
Fine line collar bone pieces look delicate in photos, but they ask more from placement than most people expect. What trends sell on social media can wear unevenly across the collarbone because the skin there is thin and moves with breath and shoulders. Pick a design that gives the lines room and tell your artist where you sleep and what jewelry you wear so the piece ages with you. The first idea shows how.
1. Minimal Script Following the Curve
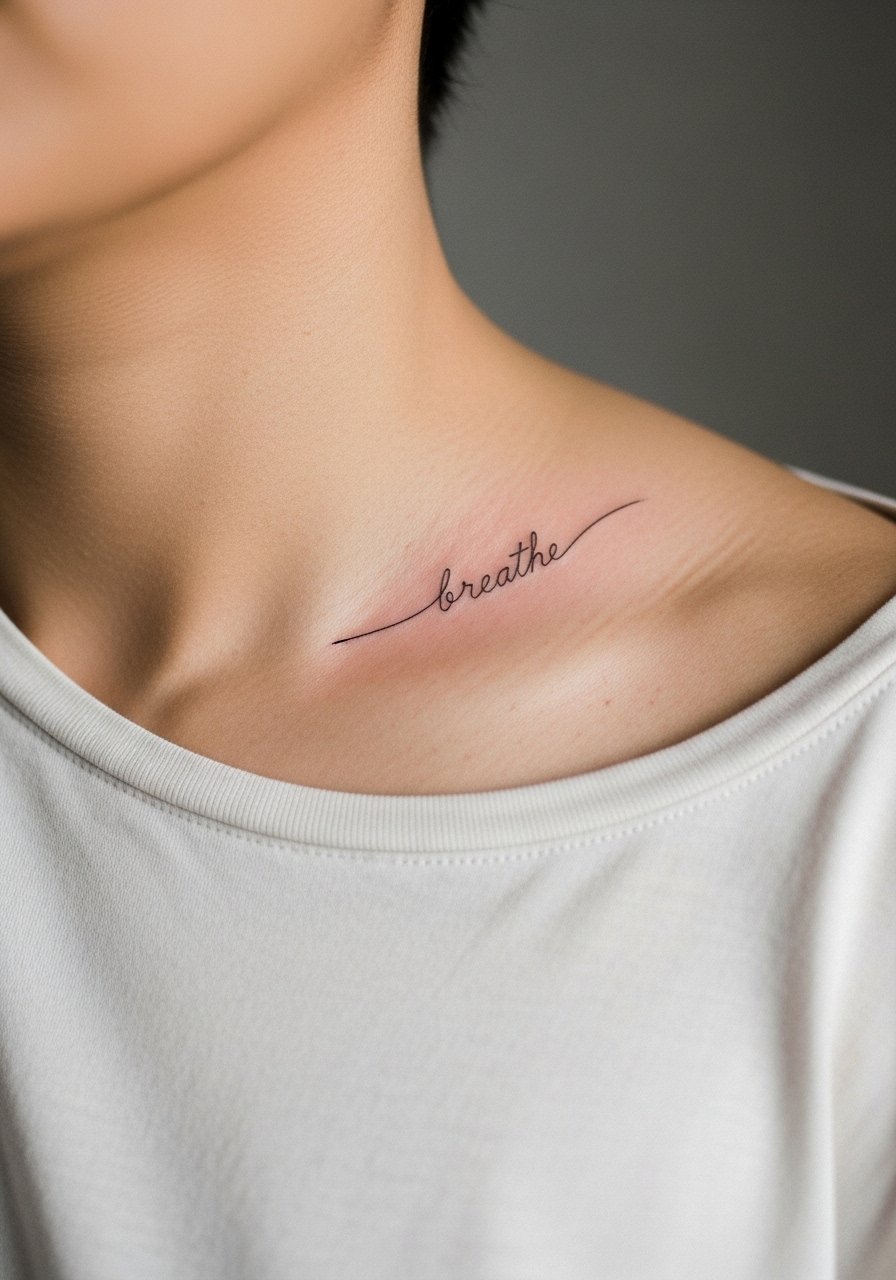
I've seen this layout on people who want a subtle personal phrase without overpowering necklaces. Ask your artist to space letters slightly and to avoid ultra-thin single-pass lines. The collarbone moves when you shrug, which can make very tight script blur faster. Expect a one-hour session and moderate sensitivity because the bone sits shallow under the skin. Common mistakes are requesting micro-lettering that reads well on-screen but merges after a year. For show-off outfits, a thin chain pendant necklace sits just above script without crowding it. Mention your preferred necklace during consultation so the artist can place the wording where it will sit nicely with jewelry.
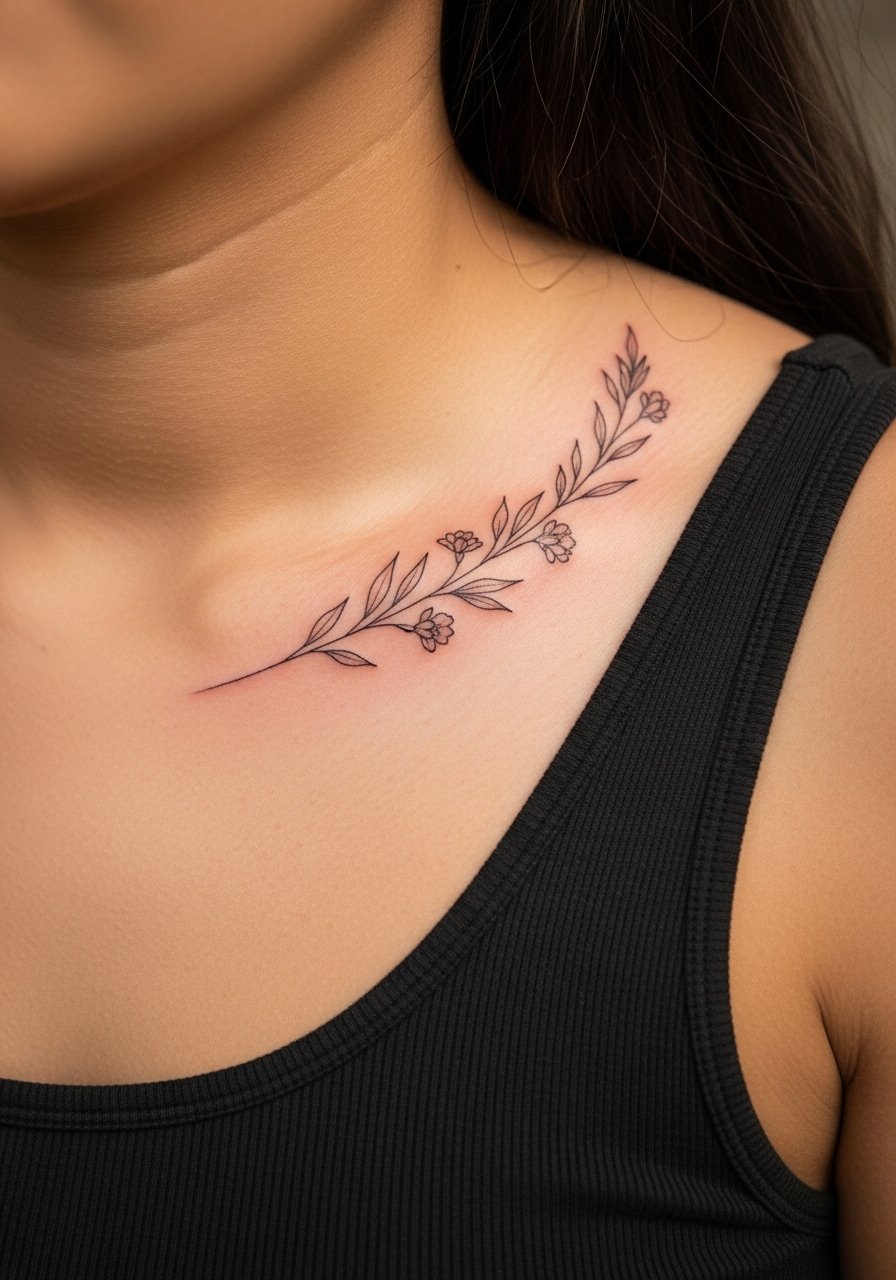
2. Tiny Botanical Sprig Along the Collar

Fair warning: collarbone pieces can feel sharper than arm work because needle passes close to bone. I recommend a short session for a single sprig, about 45 to 90 minutes. Tell the artist you want airy spacing between leaves and avoid dense shading so the piece keeps its clarity at year two. A common error is packing stipple shading too closely, which tends to clump on the collarbone over time. For showing it off, an off-shoulder blouse frames the sprig while keeping attention on the linework. Sleep position matters too, so expect tenderness for a few nights if you lie on your side.
3. Small Micro-Realism Shell Near the Sternoclavicular
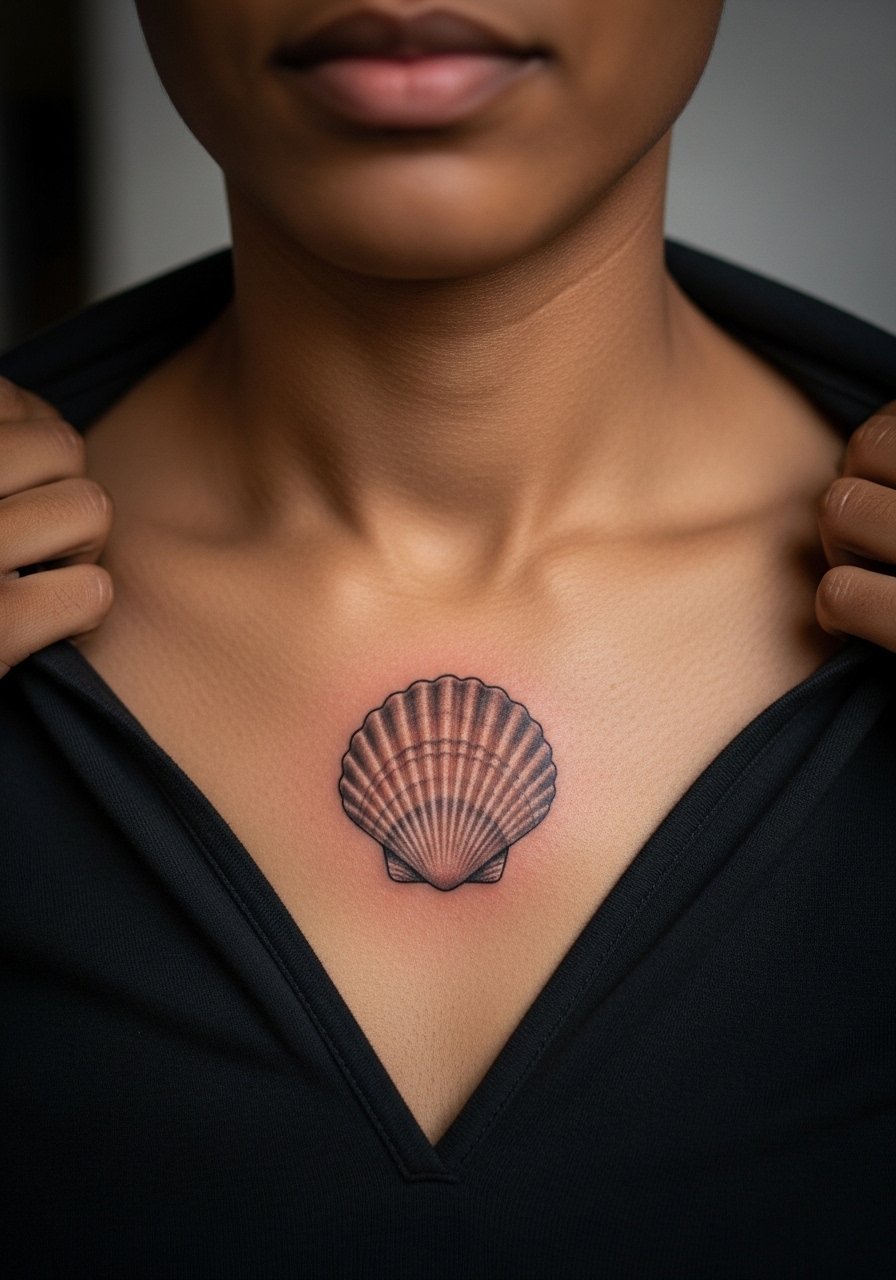
There is a visual payoff when micro-realism is sized for the collarbone. In my experience, tiny realistic details hold best when scaled to allow minute contrast instead of pushing ultra-fine texture into a tiny area. During consultation, show close-up references of healed micro-realism and ask for slightly bolder anchor lines. The collarbone area has moderate blowout risk because the skin is thin. Expect a session under two hours and a likely touch-up at year two if you want the contrast to remain crisp. For the session wear, a wide-neck shirt you can pull aside keeps the artist’s access clean without fuss.
4. Geometric Dot-Work Accent Across the Bone

There is something about dot work that reads like texture rather than line, which helps on the collarbone. The biggest mistake is packing stipple dots too close together. When dots are given space they age into a soft gradient instead of turning into an indistinct patch. Tell your artist you want visible spacing and ask for a test patch of dot density on similar skin if possible. Pain sits at moderate because the needle passes near bone. For outfits, a boat-neck top shows off the geometry without competing with necklaces. Expect possible touch-ups at year three for density refresh.
5. Single-Line Wave That Sits Over the Clavicle
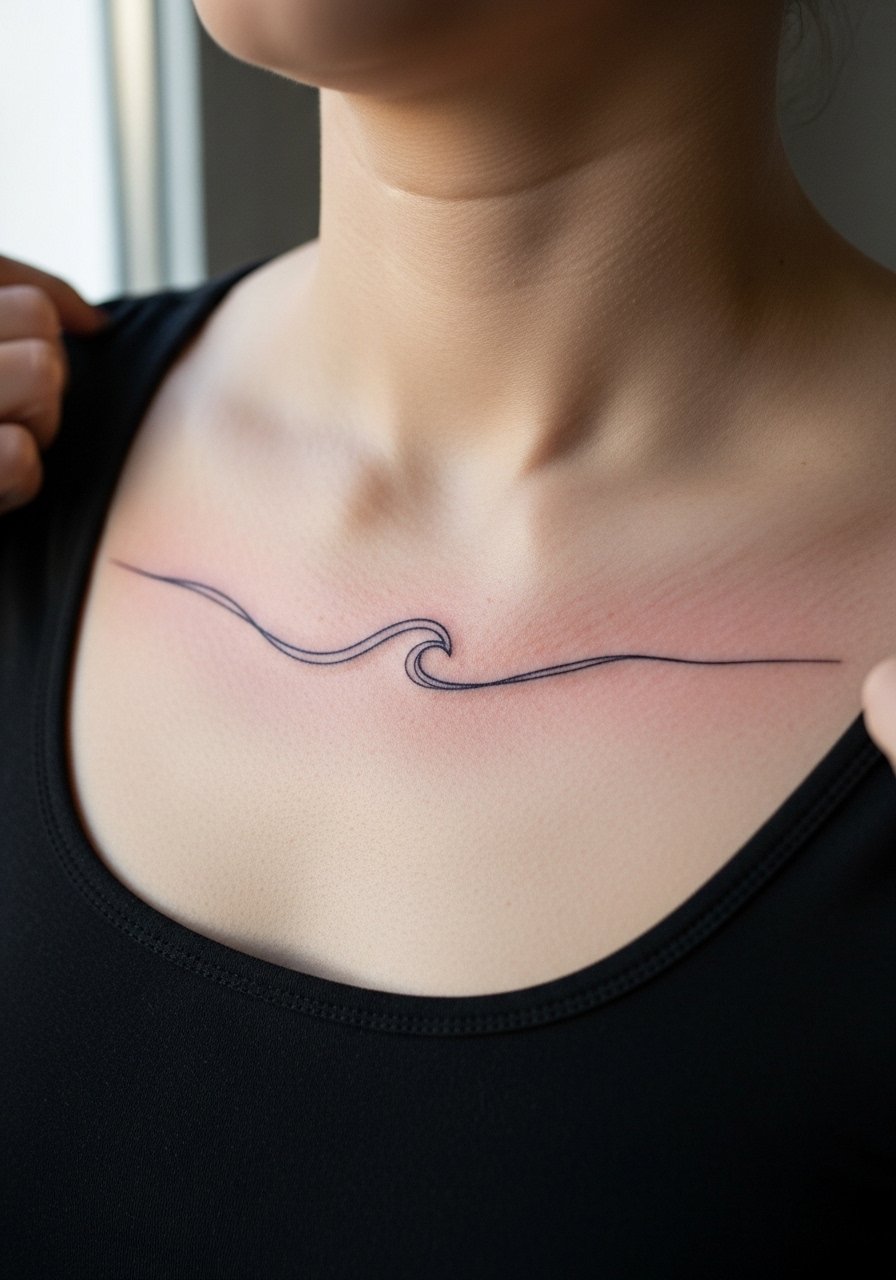
When people ask for continuous single-line pieces, I tell them the line needs room to breathe. The common problem is requesting a one-millimeter line tight to bone. That often softens into a thin blur later. Ask your artist for a slightly heavier initial line weight and for consistent depth so the stroke settles evenly. This placement is sensitive and can sting more than an arm tattoo. Session time is usually under an hour. If you plan to wear chokers, test their fit before the appointment. A racerback tank is easy session wear and keeps the shoulders free.
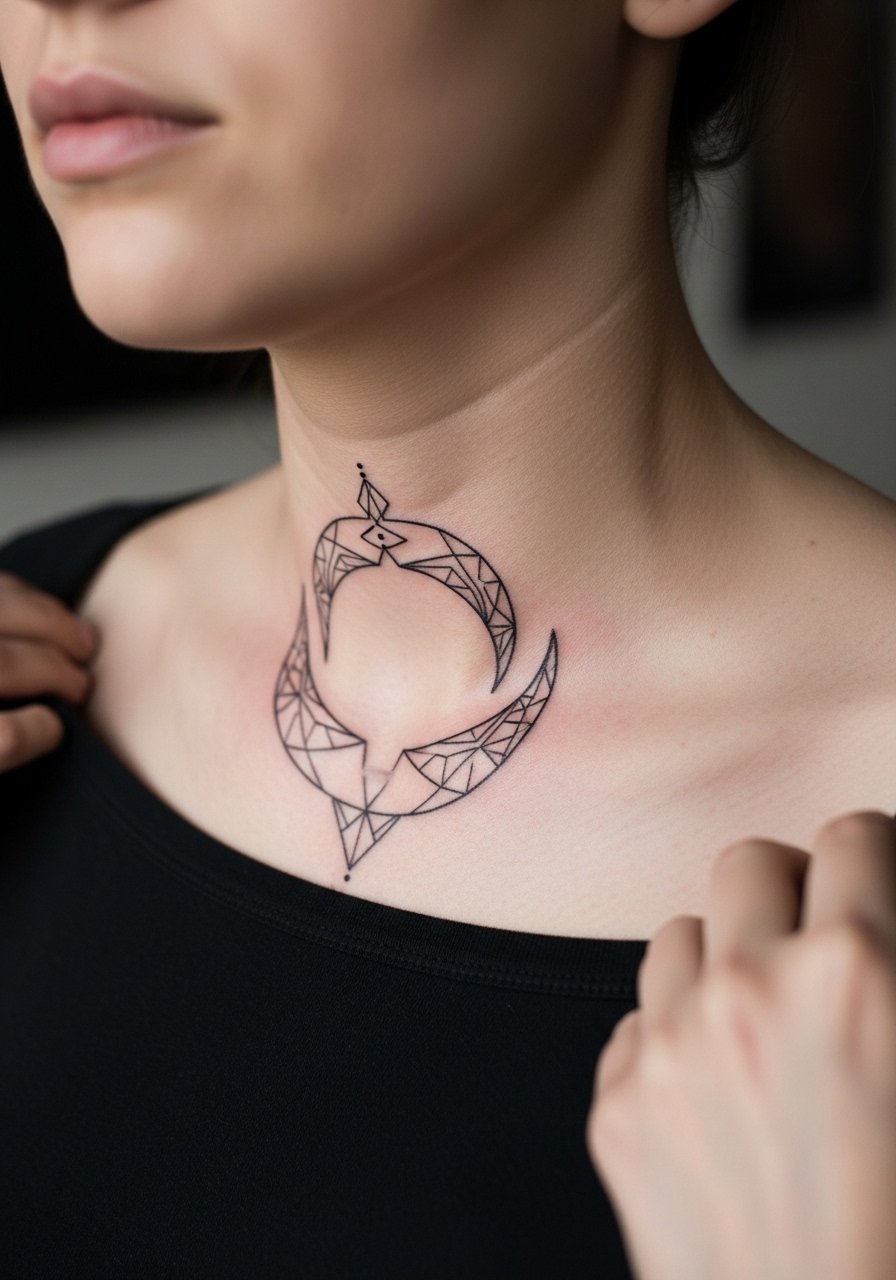
6. Small Crescent Moon Cluster at the Outer Collar
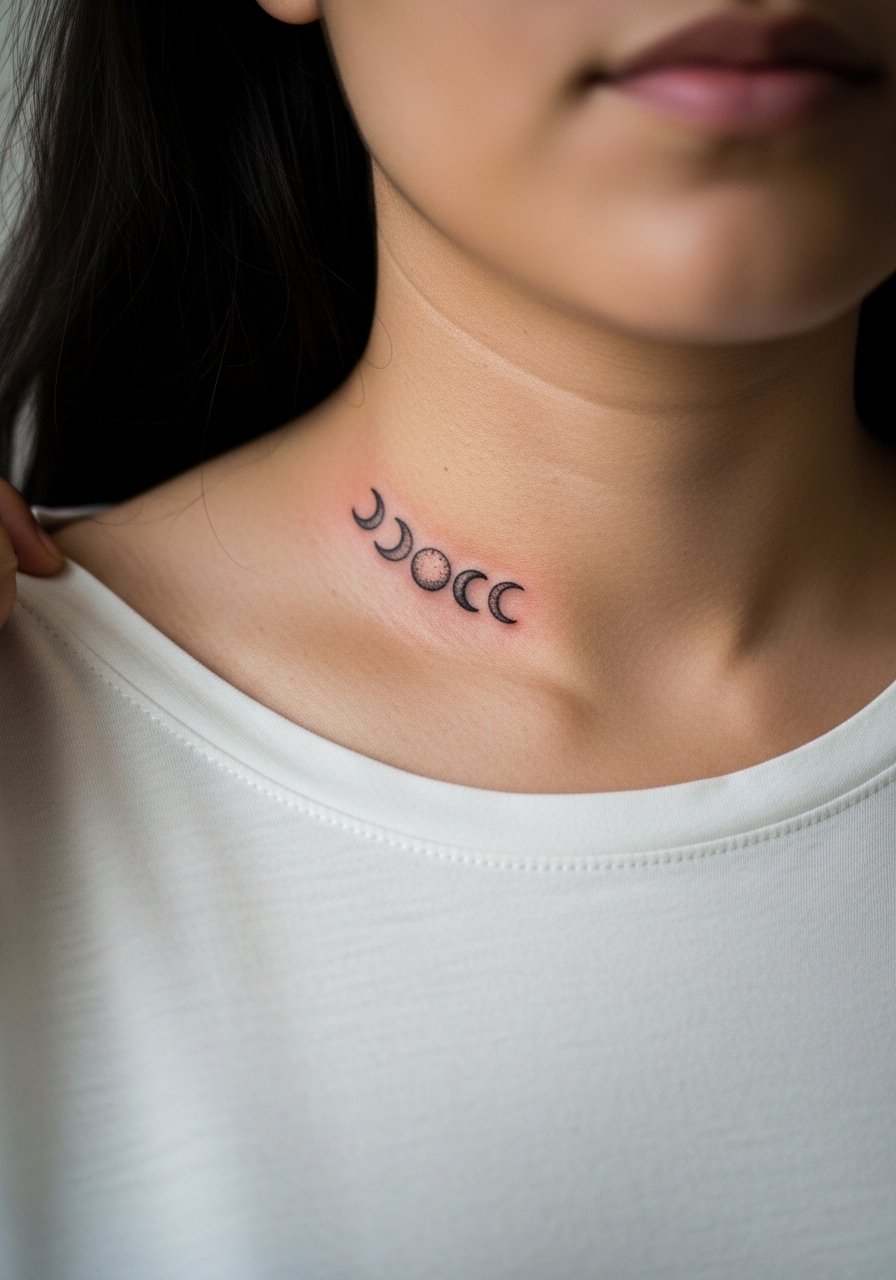
When you want a cluster of little moons, spacing matters more than symmetry. The worst version squeezes motifs tight so they read as a blob after a year. Tell the artist to stagger the motifs and to leave negative space between elements. This piece is low session time, often under an hour, and fairly tolerable on the pain scale. A thin delicate bracelet or a scoop-neck top highlights the moons without overwhelming them. Expect a touch-up at year two if you want the crescents to stay defined.
Studio Day Picks
The narrow, high-visibility pieces above need different prep than larger chest work, and a few small items smooth both the session and the first week.
-
Stencil transfer paper kit. Lets you preview placement on the curve of the collarbone so you can test how lettering or a chain will sit once you move.
-
Topical numbing cream. Applied 30 to 45 minutes before can take the edge off shallow-bone sensitivity during short collarbone sessions.
-
Thin protective film roll. Helps with friction from clothing in that first two days when tiny linework is still forming a scab.
-
Fragrance-free gentle body wash. Cleans the area without irritating delicate linework during showers.
-
Aquaphor healing ointment. A thin layer for the first couple of days locks moisture for compact, fine line pieces without clogging the skin.
7. Tiny Anchor Tucked by the Clavicle
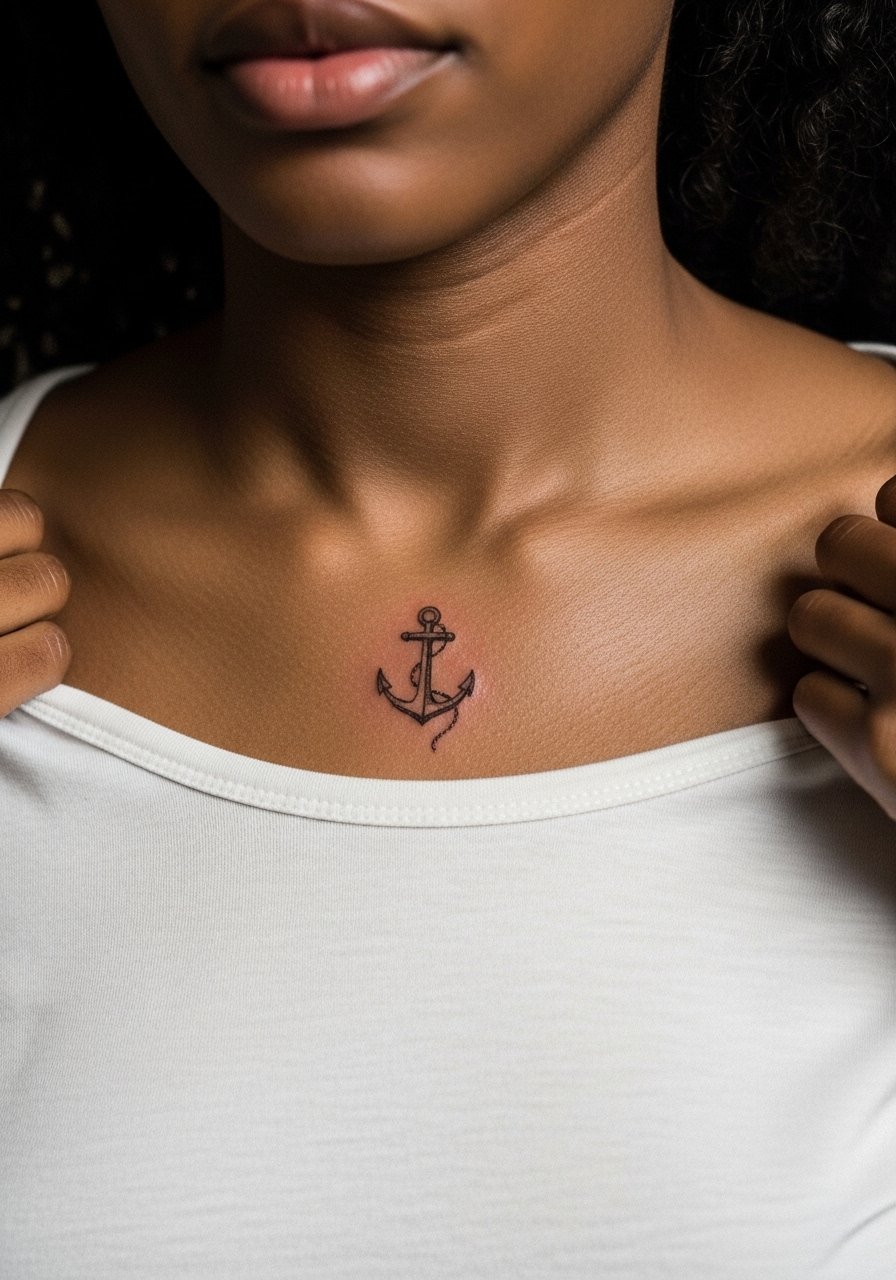
Personal observation: nautical tokens often age better on the collarbone when simplified. Ask for a clear single-pass outline and minimal shading. The common mistake is layering texture into a tiny shape, which softens into an unclear smudge. This one is modest in session length and has moderate pain because of bone proximity. For session clothing, wear a button-down shirt you can pull aside so the artist has a clean field. If you work in a job with visible jewelry rules, consider how an anchor will read with workplace dress codes.
8. Symmetric Minimal Barbell Mirror on Both Sides
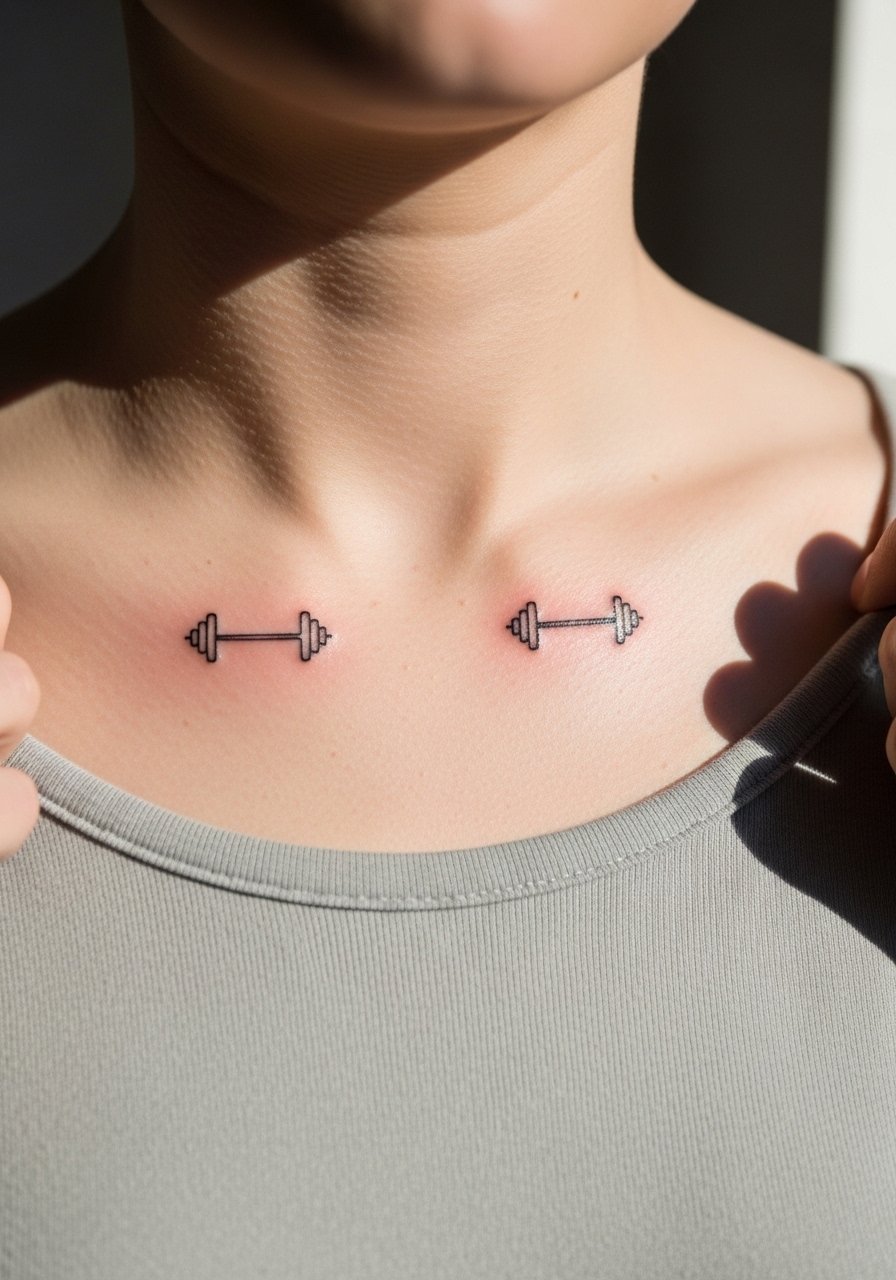
Aging/healing lead: symmetry is forgiving when both pieces are sized evenly. The mistake I see is asking for one tiny copy of a larger design, which throws off balance when placed on an uneven torso. Tell the artist you want both measured and stenciled while standing, not lying down, because posture shifts the clavicle line. Pain is short and sharp. For evening wear, an off-shoulder dress showcases the mirrored work. Expect a small touch-up if one side settles slightly differently.
9. Single Floral Sprig Curving Toward the Shoulder
Mistake lead: the biggest error with this layout is running dense blooms into the shoulder crease. That area moves and rubs with straps so dense ink can dull quickly. I suggest spacing petals and keeping stippling to a minimum near the shoulder. Session time is usually one to one and a half hours. For the appointment, a loose tank top gives access and keeps friction low after the session. If you want more coverage, the same design scales up nicely for a shoulder piece later.
10. Crescent Script with Subtle Shading Above the Bone

Consultation lead: sit with your artist and point out exactly where a sweater collar or jewelry will sit. The shading in tight crescent shapes can merge on thin skin if placed too close to clothing seams. Ask for soft whip shading rather than packed color near edges. Expect sensitivity similar to other collarbone spots and a session under two hours. For easy reveal, a crew neck sweater with a wide neckline layers cleanly and keeps the piece visible without exposing much skin.
11. Tiny Zodiac Glyph Centered Over the Clavicle
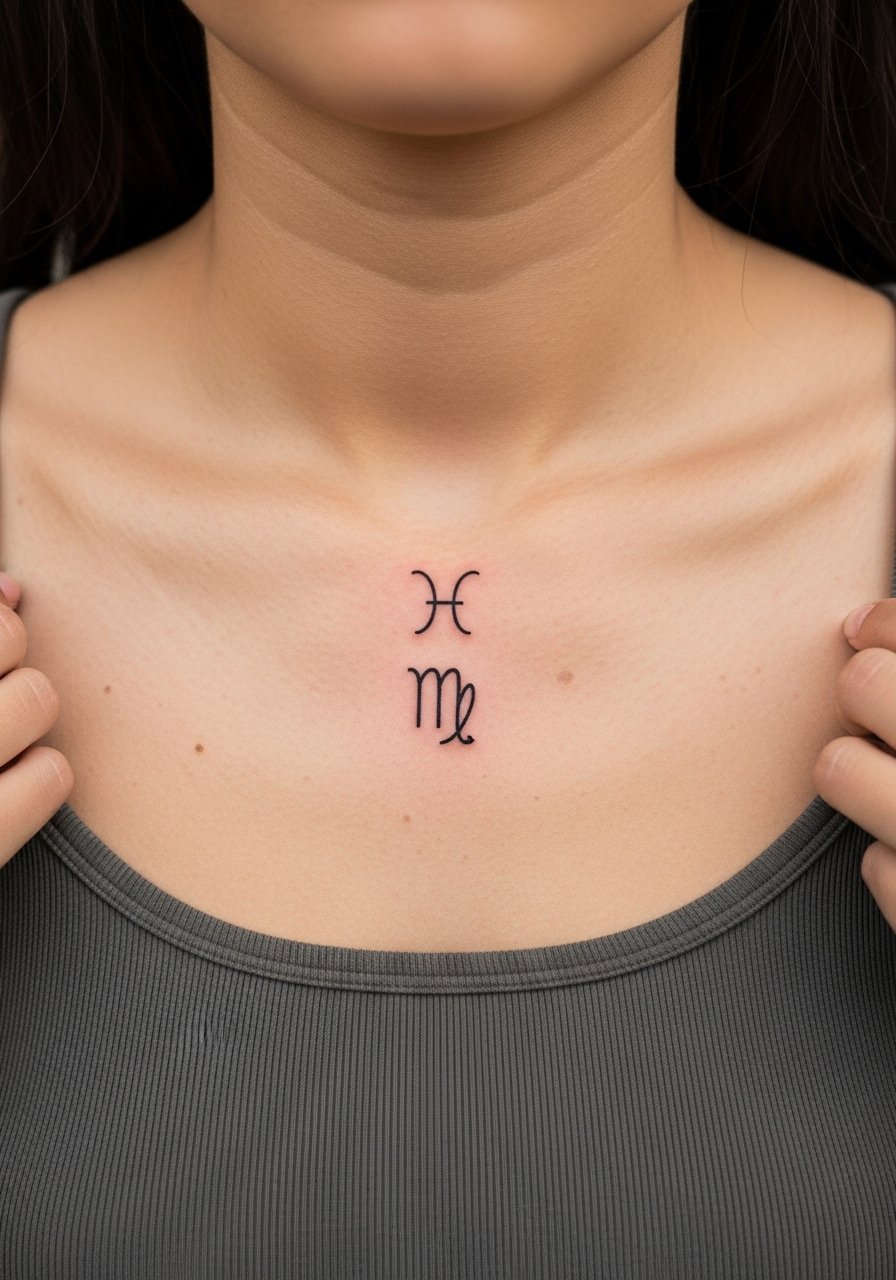
Visual impact lead: a tiny glyph reads best when centered and not competing with pendants. The usual misstep is requesting ornate flourishes around the glyph at a tiny scale. Keep it simple and bold enough to hold. Pain is brief and tolerable. Session time is quick. If you want to layer jewelry, choose necklace lengths that sit below the glyph so it does not get constantly rubbed. A thin chain pendant works well, but confirm placement before the needle hits.
12. Micro-Illustration of a Bird in Flight Along the Bone
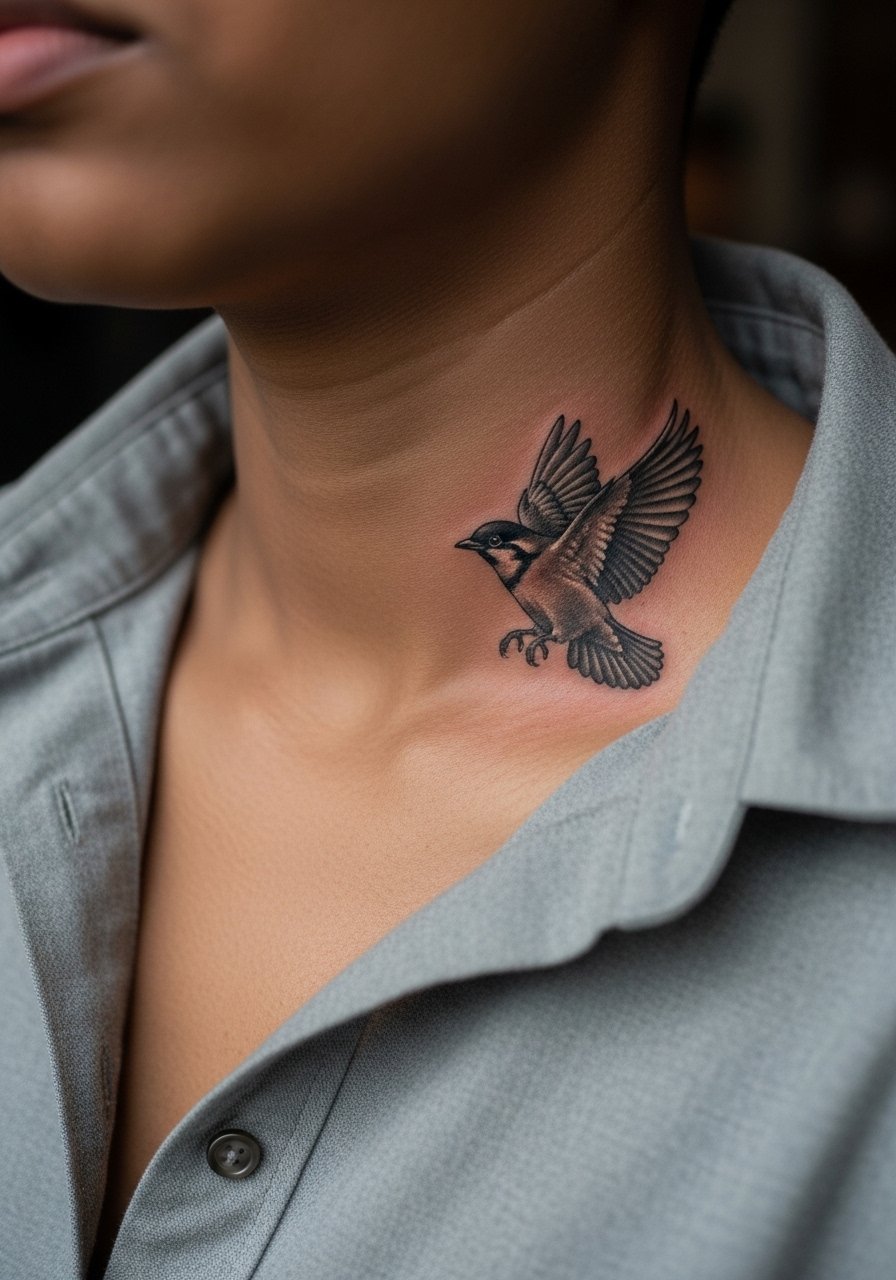
Personal observation lead: tiny bird illustrations look alive when the wings have negative space. The common mistake is compressing wing feathers into a single shaded mass. Ask the artist for open feather work and slight separation between strokes. Collarbone movement can add a sense of motion to the design. Expect a longer session if the bird has micro-detail, and plan for a touch-up around year two if you want the tiny feathers to remain crisp. For showing it off, an open-back top or wide-neck shirt keeps attention on the flying motif.
13. Thin Chain Tattoo That Mimics a Necklace
Mistake lead: people often ask for an exact replica of a heavy chain. That does not read well as a tattoo because texture and saturation differ. Request a simplified single-line chain with occasional tiny links to suggest metal rather than attempting photorealism. This piece is highly visible so think about workplace norms. It can sting more than a forearm tattoo due to shallow tissue. For sessions, leave jewelry at home and wear a wide-neck shirt you can move aside. Expect minor fading in high-rub areas after a few years.
14. Small Mandala Slice Nestled by the Collar
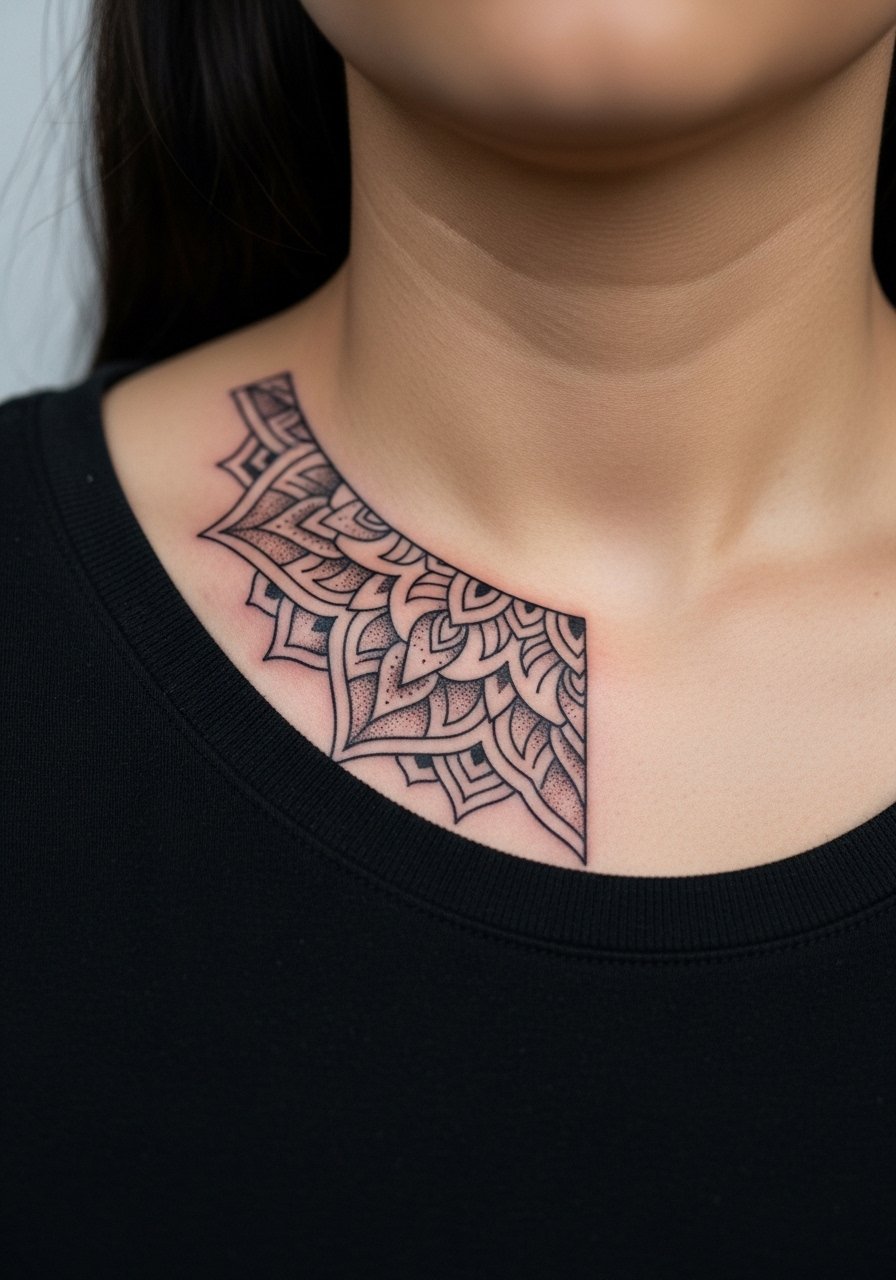
Controversy lead: artists are split on mandala detail so close to the collarbone. One camp argues dense patterning blurs because of thin skin and movement. The other camp says careful spacing and slightly bolder linework keeps the geometry intact. Name both camps during consultation and ask which approach the artist uses. This piece can take longer because of detail and has moderate pain. For evening outfits, pair with a deep V dress that frames the mandala without hiding it. Expect touch-ups for dense stippling at year two or three.
15. Single Tiny Star Cluster Following the Collarbone
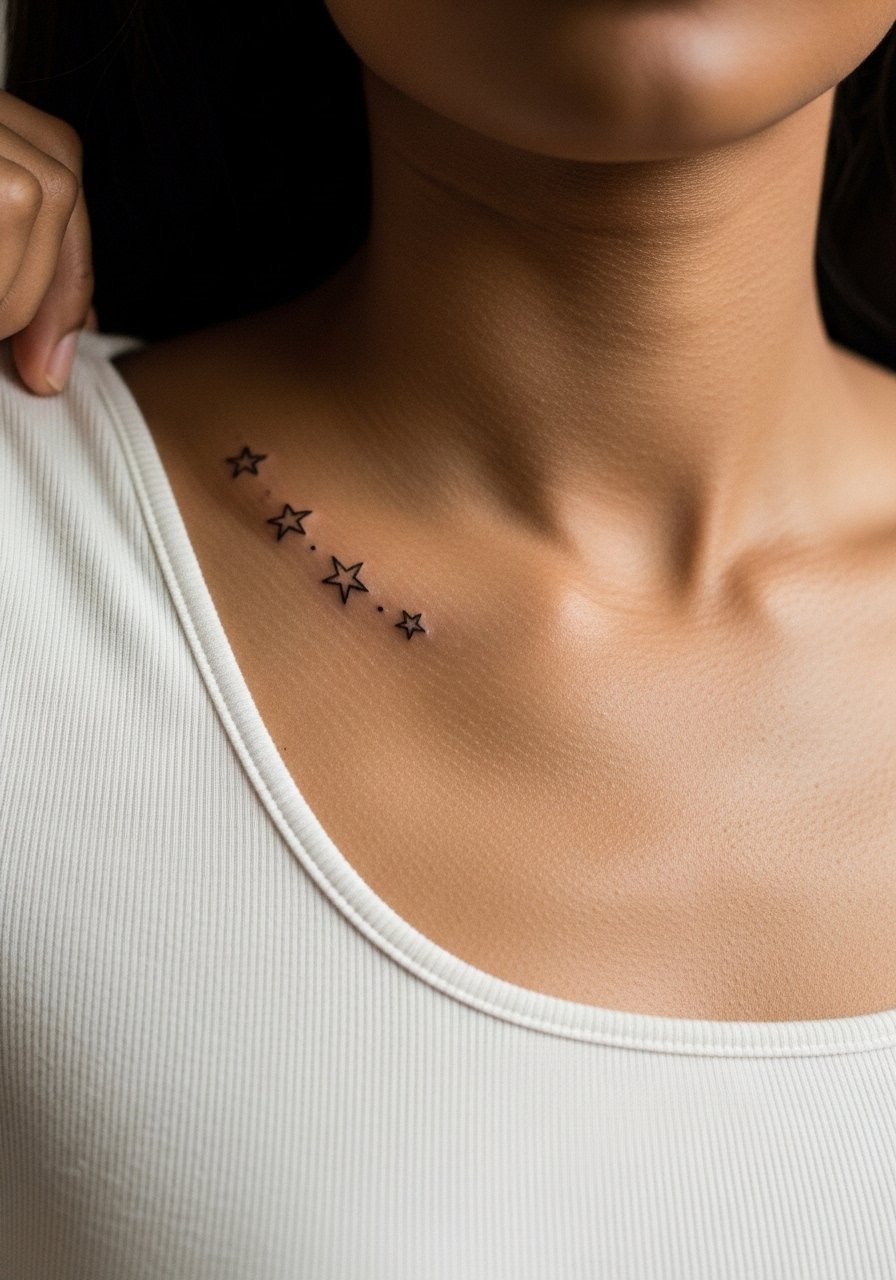
Visual impact lead: little star clusters read as a motif when they are staggered and not too tiny. A common error is clumping stars so they look like freckles rather than intentional marks. Ask for varying sizes and spacing to create depth. Session time is short. For show-off styling, a delicate layered necklace set can complement the cluster without hiding it. Plan for a quick touch-up if some points soften after a year.
16. Miniature Compass Pointed Toward the Shoulder
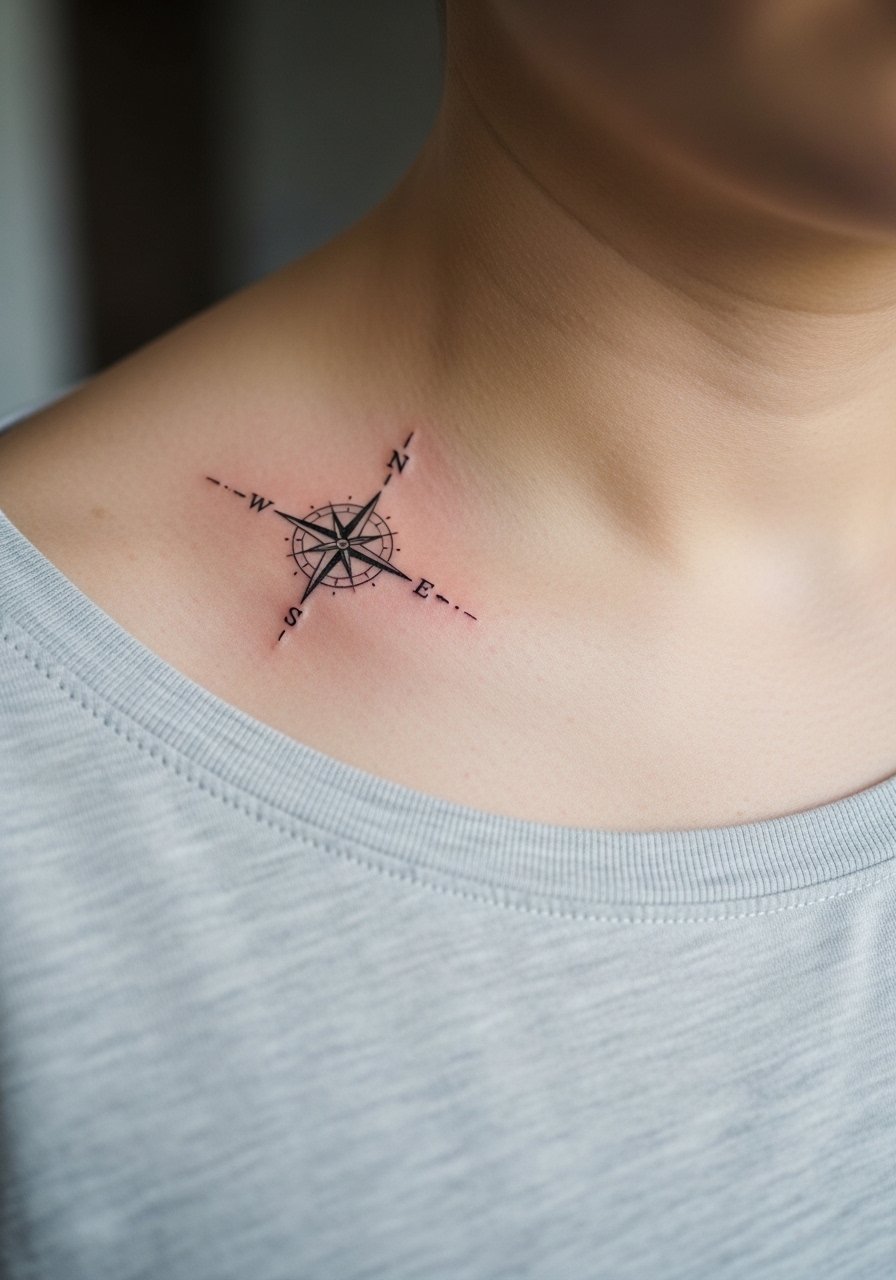
Consultation lead: a compass benefits from clear cardinal points and a bit of weight in the outline so the directional arms stay legible over time. The mistake is asking for wafer-thin arms that blur. This sits tenderly above bone but heals fast. Wear a button-down shirt you can move aside on studio day. A touch-up around year two will help crisp the points if you want a perpetually bold look.
17. Single-Line Heart Offset from the Middle
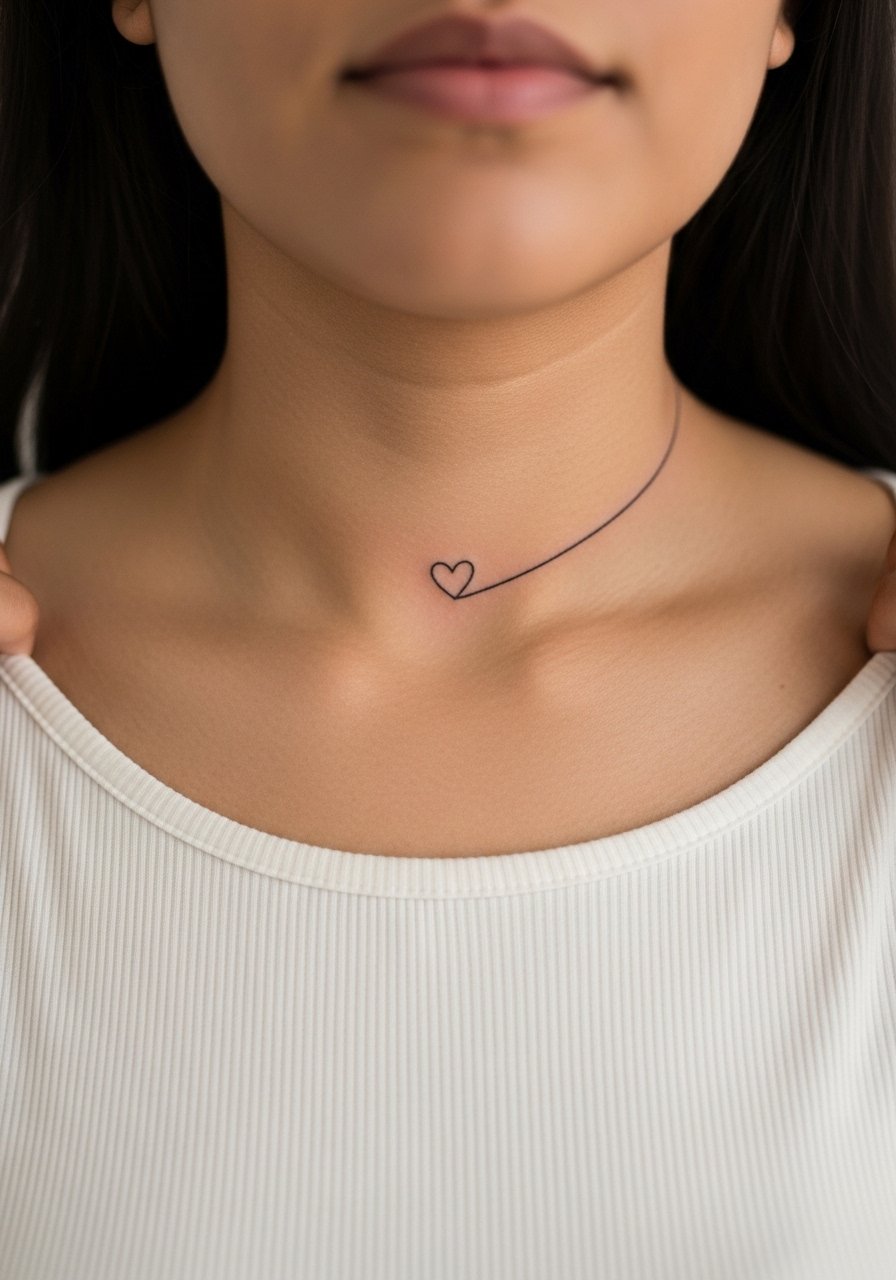
Pain warning lead: shallow single-line hearts can be more sensitive than nearby flesh tattoos. The common slip is requesting micro scale hearts without accounting for movement and necklace wear. Ask for a slightly thicker initial pass and map placement with the artist while standing. The session is quick. For showing it off, a low scoop-neck tee keeps the heart visible without forcing it under jewelry. Expect a small touch-up if the point softens with time.
18. Tiny Arrow Laid Along the Collarbone
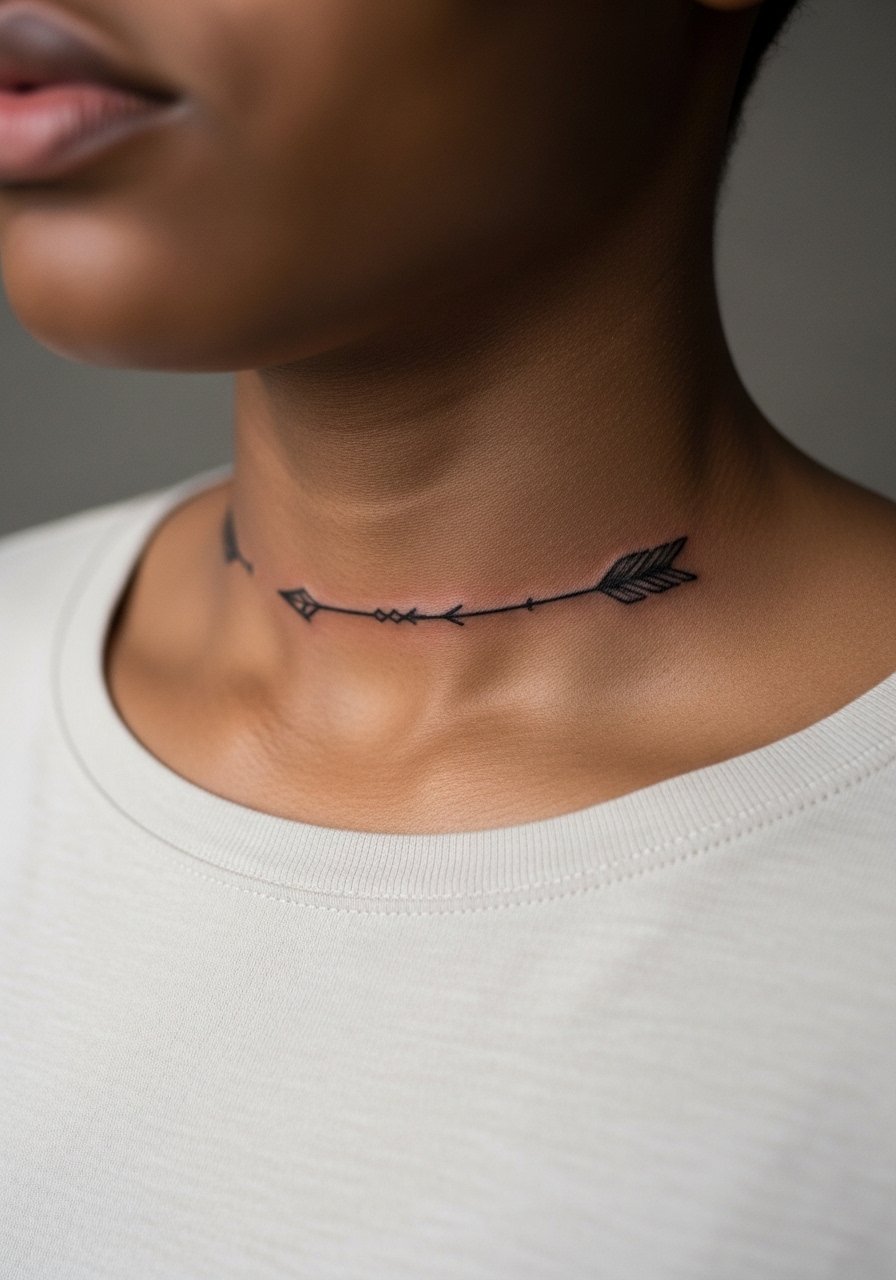
Personal observation lead: arrows work visually when the shaft has a confident single weight and the fletching is simplified. The mistake many make is over-ornamenting the tip or tail at a tiny scale. For placement, confirm direction relative to your posture; standing vs lying can shift where the arrow points visually. The pain is a brief sharpness above bone. For session wear, a loose button-down lets you pull fabric aside easily. Touch-ups at year three are common for fine arrows.
19. Minimal Script with Roman Numerals Near the Center
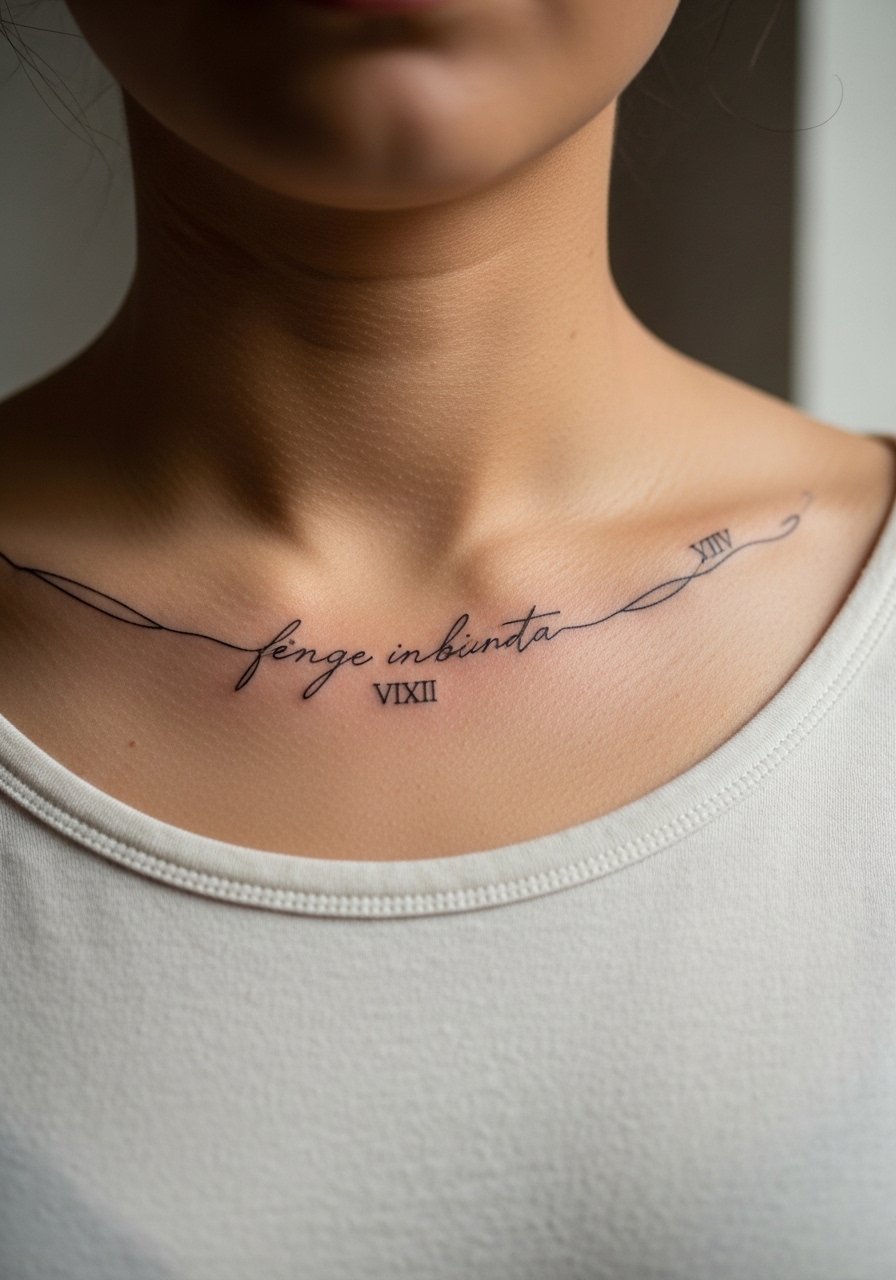
Aging/healing lead: numerals hold better when the digits are spaced and not too thin. The frequent mistake is compressing many numerals into a tiny line. Ask for larger, slightly bolder numerals and preview the stencil while standing. Session time is short. Be precise in text because image generation and tattooing both need exact characters. For wear, a thin chain necklace can sit below the numerals. Plan for a touch-up if characters soften over time.
20. Geometric Crescent with Negative Space
Mistake lead: dense black fill near the collarbone can age into a heavy patch because the skin there moves differently. The fix is using negative space within the crescent and slightly bolder lines that read through a few years. This is a slightly longer session than a dot or star, and it can feel more uncomfortable near the bone. For outfits, a crew neck tee with a wider neckline frames the crescent without squeezing it. Expect a touch-up at year two for saturation refresh.
21. Single Fine Line Infinity Knot Over the Clavicle
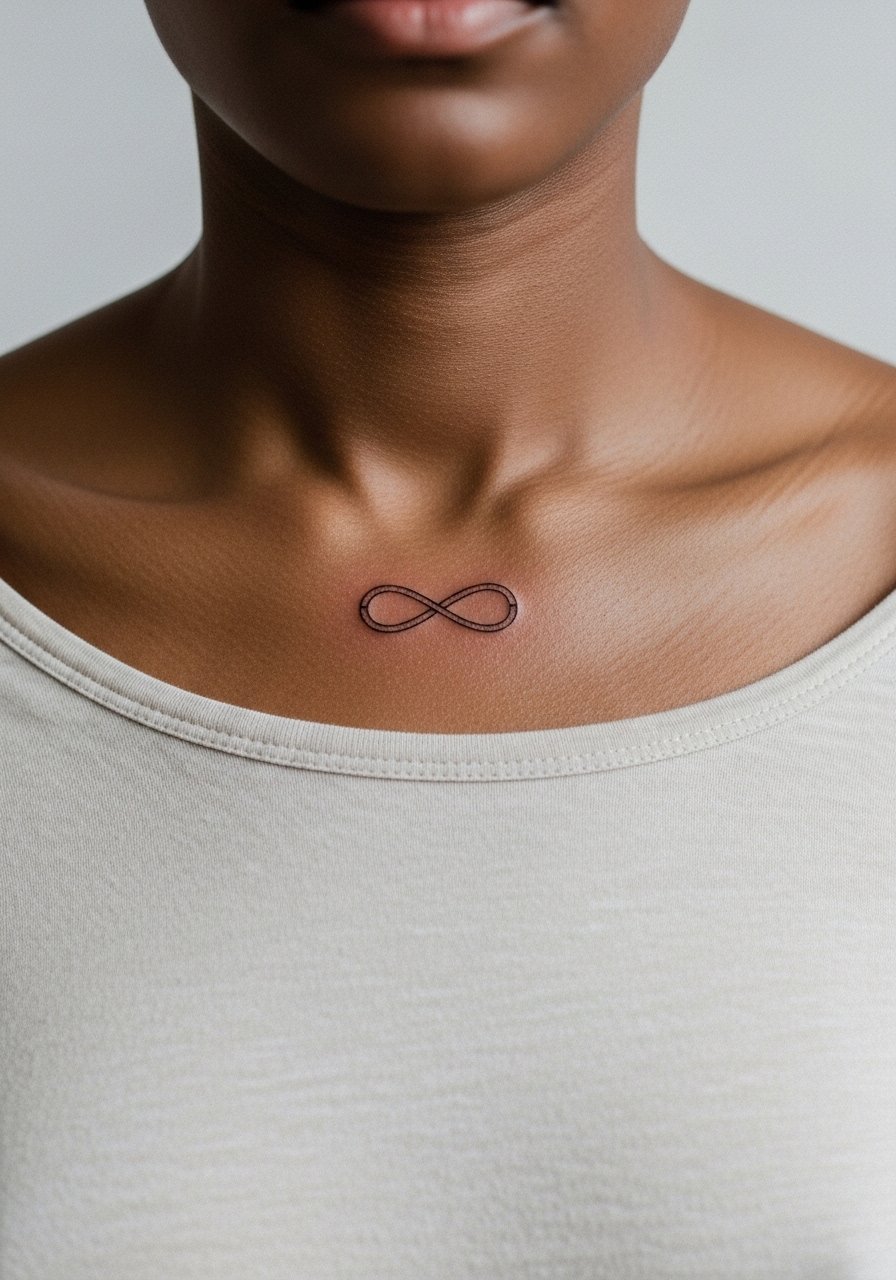
Consultation lead: the knot motif asks for even loops and consistent line weight so it remains readable with skin movement. The classic error is making the loops too tight. Tell your artist you want slightly looser curves and preview the stencil while standing. Pain is brief and manageable. For session clothing, a wide-neck shirt keeps the area accessible and comfortable. Expect a small touch-up if one loop softens compared to the other.
Frequently Asked Questions
Q: Will a fine line collar bone tattoo blur faster than a bold traditional piece?
A: It depends on placement and spacing. Fine line work sits close to the skin surface and the collarbone area moves and stretches with shoulders and breathing, so very thin strokes can soften sooner than bold traditional pieces. I recommend slightly heavier initial line weight for collarbone fine line work and plan for a touch-up at year two or three if you want to maintain crispness.
Q: How should I prepare clothing-wise for a collarbone session?
A: Wear a top you can pull aside without removing, like a wide-neck shirt or a loose button-down. That keeps the artist’s access clean and prevents you from exposing more skin than needed. Bring a lightweight layer for after the session to avoid rubbing the fresh work with tight collars.
Q: Do necklaces affect healing or placement decisions for collarbone tattoos?
A: Yes. Constant friction from pendants or chokers can irritate healing skin and may cause early fading along the contact line. Try the necklace you plan to wear and show the artist where it sits so they can place the tattoo just above or below it. A thin chain pendant often pairs best visually without constant rubbing.
Q: Are collarbone tattoos more painful than shoulder pieces?
A: Usually a bit more due to the shallow tissue over bone. Pain is brief and often described as sharp during passes that cross the clavicle. Numbing creams can help for sensitive folks, but discuss topical options with your artist first.
Q: How long should I expect a collarbone touch-up to be needed?
A: From what I have seen, many fine line collarbone pieces benefit from a touch-up around year two to three. Bold blackwork often lasts longer without intervention, while delicate scripts and micro-detail sometimes need earlier refreshing depending on sun exposure and clothing friction.
