
Fine line cherry blossom sails across feeds, and the reality is that the tattoos that still read crisp five years later are often the ones that started with bolder linework and spacing. People chase watercolor and micro detail for the fresh photo, then book touch-ups when petals blur. Read on for 21 sakura ideas that balance what looks great now with what truly holds up over time, plus specific things to tell your artist at consult.
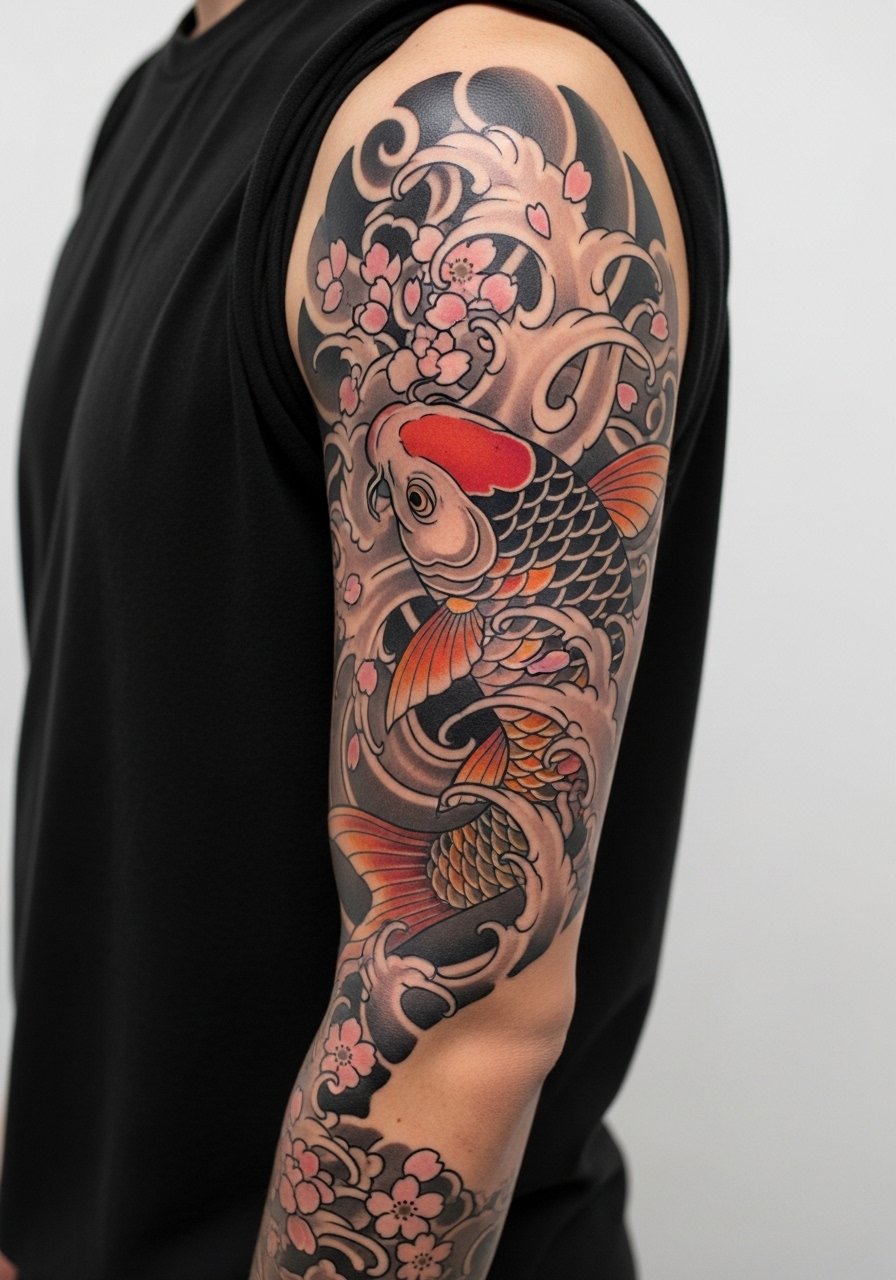
1. Traditional Japanese Sakura Branch on Outer Forearm
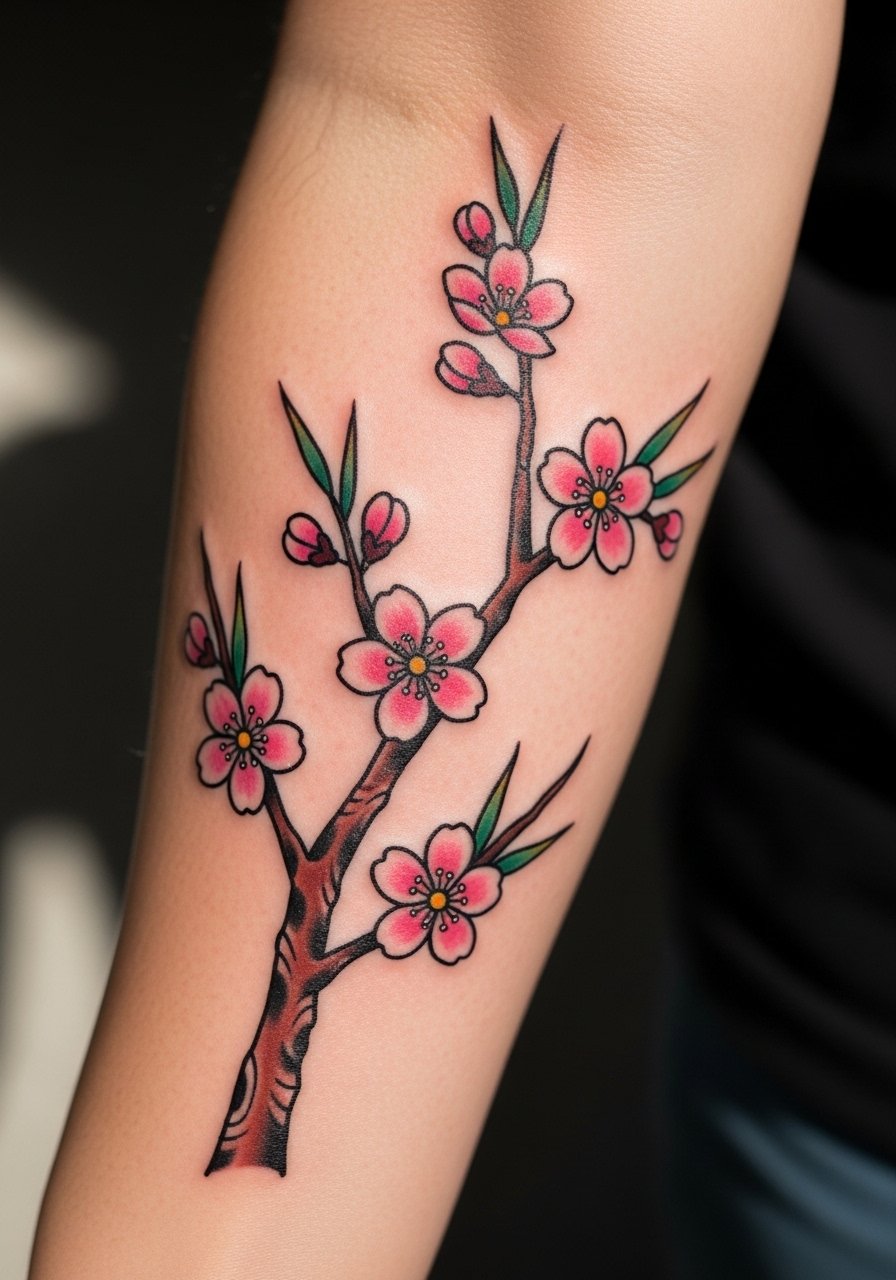
I’ve seen this exact forearm composition last a decade when artists used heavy outer linework and solid saturation. Fair warning: the forearm gets sun and abrasion, so ask for slightly thicker outlines than you might want on paper. Tell your artist you want bold linework with stipple shading behind petals so the pink reads against different skin tones. Session time is usually one short visit under two hours and pain is a manageable three out of ten. Common mistake is requesting ultra-fine outlines for a visible forearm piece. For the session, wear a loose tank or a rolled sleeve chambray shirt so the arm extends freely and the fabric does not drag the stencil.
2. Neo-Traditional Sakura Sleeve with Falling Petals

When you want motion and scale, a neo-traditional sleeve gives petals room to fall around muscles. Bring references that show how the branch winds with the arm so the flow reads when you flex. Expect multi-session work over several months and a soreness that varies with each session. A frequent aging problem is over-crowding petals too close together. Ask for spacing and a mix of whip shading and stipple shading so the negative space survives touch-ups longer. This design suits collectors who plan touch-ups at year three. If you shop for guest spots, mention you want consistent saturation across sessions and check portfolios for healed sleeves.
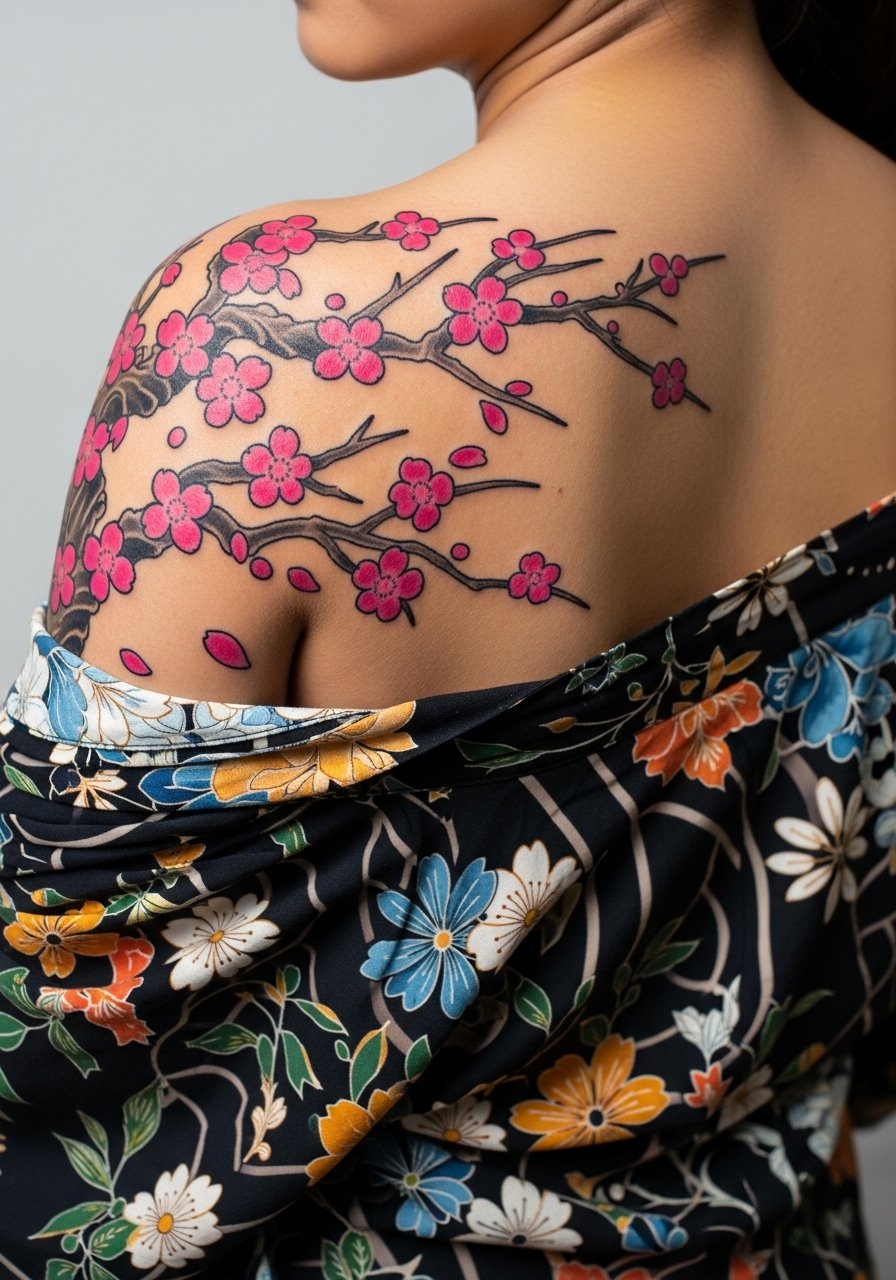
3. Watercolor Sakura Cluster on the Shoulder Blade
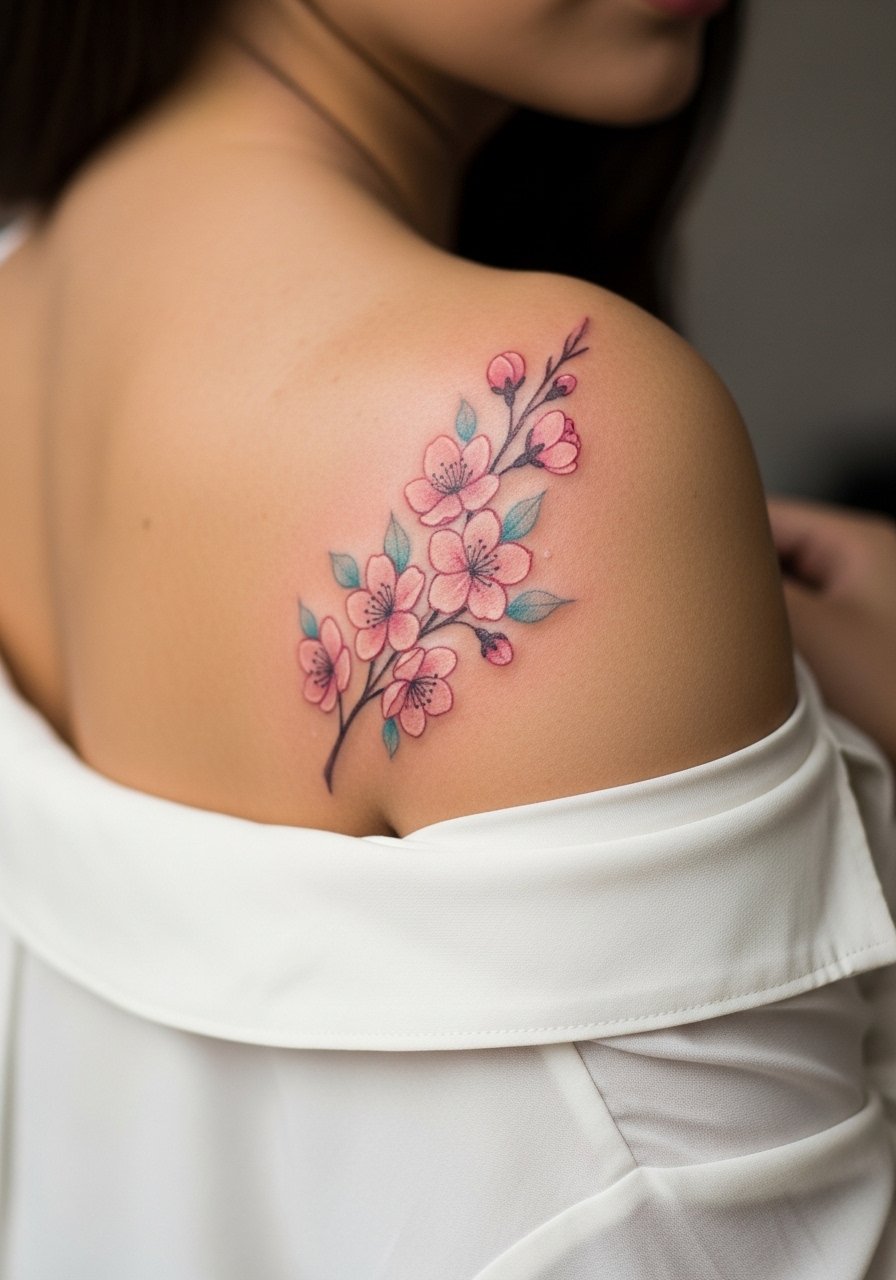
A watercolor shoulder piece reads ethereal and photographs beautifully, but the shoulder is mobile so pigment spread can look patchy if the artist packs color too shallow. In consultation, say you want painterly washes with a firm anchor line for main branches so the composition keeps its shape. Session time is usually one to two hours and pain is a two to three out of ten. The big mistake is asking for an entirely outline-free piece on a shoulder that will see friction from straps. Pair this design with an off shoulder blouse white for show-off looks, and wear a strapless or loose top to the session so the artist has clear access.
4. Black-and-Gray Realism Sakura on the Ribs
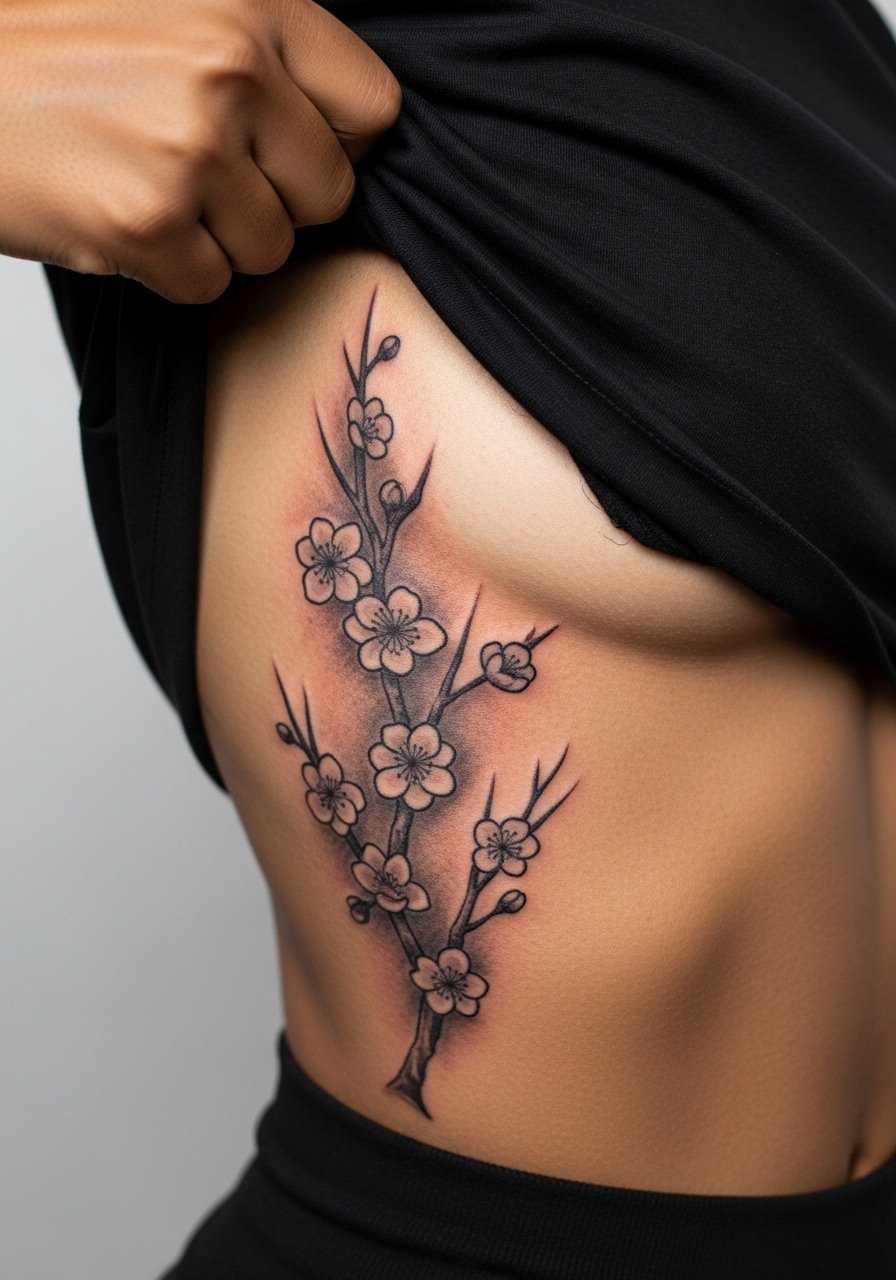
Fair warning: the ribcage rates high on pain charts. Expect a solid seven out of ten for many people, but the result reads intimate and ages well in grayscale. One controversy to name here is Saniderm versus dry healing. One camp prefers protective film for color retention and a cleaner first week. The other camp swears dry healing helps scabs breathe and reduces trapped moisture. Ask your artist how they handle ribs and whether they have a rib-specific aftercare routine. Also discuss numbing creams if you need them, because some artists avoid numbing for line consistency while others will work with topical analgesics. A common mistake is requesting delicate single-needle lines on ribs. Instead choose confident linework and deeper stipple shading so the branch holds up when the skin stretches.
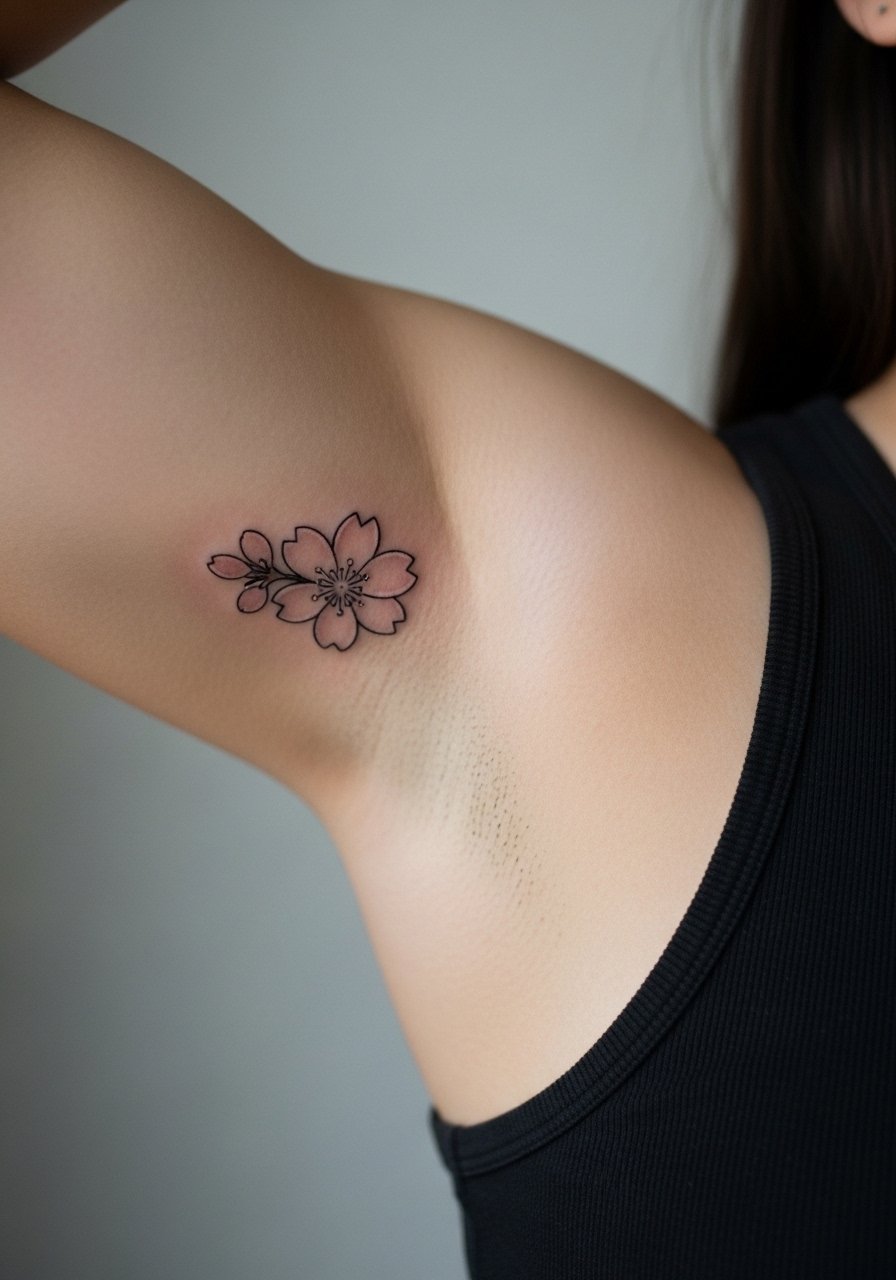
5. Fine Line Single Blossom on the Inner Wrist
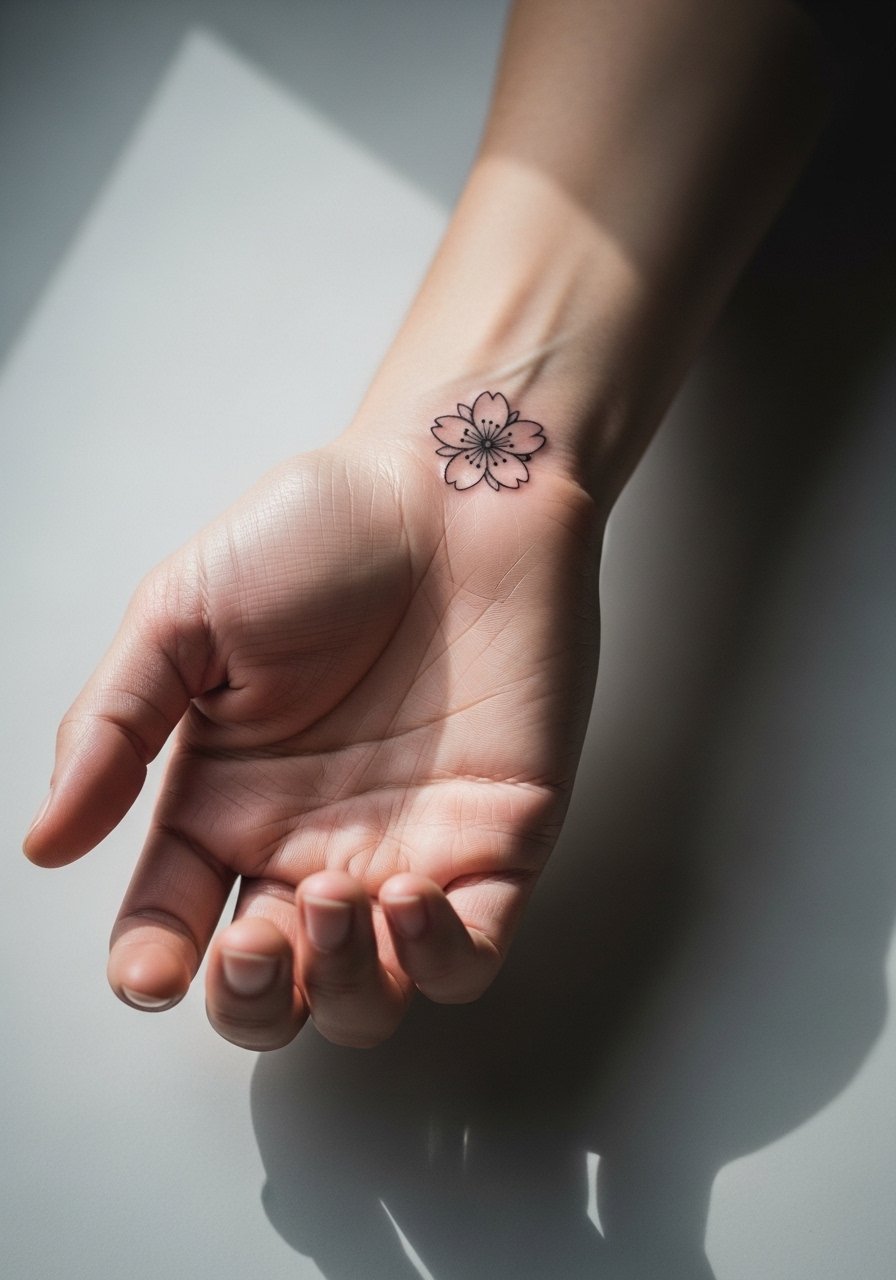
Fine line on the inner wrist reads very elegant fresh. The reality is it tends to soften faster than bold work because of constant movement and washing. Artists split into two camps on this: one group says fine line here blurs within 18 months and prefers stronger line weight. The other group argues that with perfect needle depth and spacing, fine line can last longer. Ask which camp your artist sits with. Short session, low pain, but plan touch-ups at year two or three. Avoid the mistake of getting micro-detail that sits too close together. For showing it off, add a dainty silver bangle set on the opposite wrist rather than crowding the tattoo with bracelets during the first week.
6. Traditional Full-Back Sakura Panel
Large back panels are multi-session projects that thrive on composition and negative space. When done right, the branches read from across a room. A common mistake is trying to compress sleeve-level detail into a back panel. During consult, bring full-body mockups and ask the artist to map branch flow around shoulder blades. Sessions run long and are scheduled over months, with soreness after each sitting. For show-off pieces, pair the upper-back panel with a kimono sleeve top to let the wind-swept branch peek at festivals.
Studio Day Picks
The first six ideas above include wrist, forearm, shoulder and ribs work, and a couple of prep items smooth those session differences.
-
Tegaderm film roll. Lightweight protective film that users prefer for rib pieces and other high-friction areas because it reduces chafing during the first 48 hours.
-
Aussie Butter Balm tin. A thinner healing balm recommended for lower-leg and calf work in dry winter months where heavier balms feel greasy.
-
Tattoo goo spray alternative. No-touch spray applicators help keep areas like rib and shoulder clean after showers without rubbing the fresh ink.
-
Korean mugwort aftercare gel. Cooling gel that some folks use on thigh irritation, especially after longer sessions.
-
Fragrance-free CeraVe Healing Ointment. Lighter than heavy petroleum options for humid climates and tends to feel less pore-clogging during the first few days.
7. Geometric Cherry Blossom Mandala on the Outer Thigh

Geometric mandalas layered with sakura motifs give a modern edge while leaving room for gym movement. The biggest mistake is scaling a mandala too small on the thigh so lines blur during workouts. Tell your artist you want line spacing that survives stretching and heavy workouts. Expect two to four sessions and mild soreness during sitting. For showing the piece, style with high cut denim shorts so the design sits center stage without cutting the pattern awkwardly.
8. Ignorant Style Sakura Explosion on the Calf
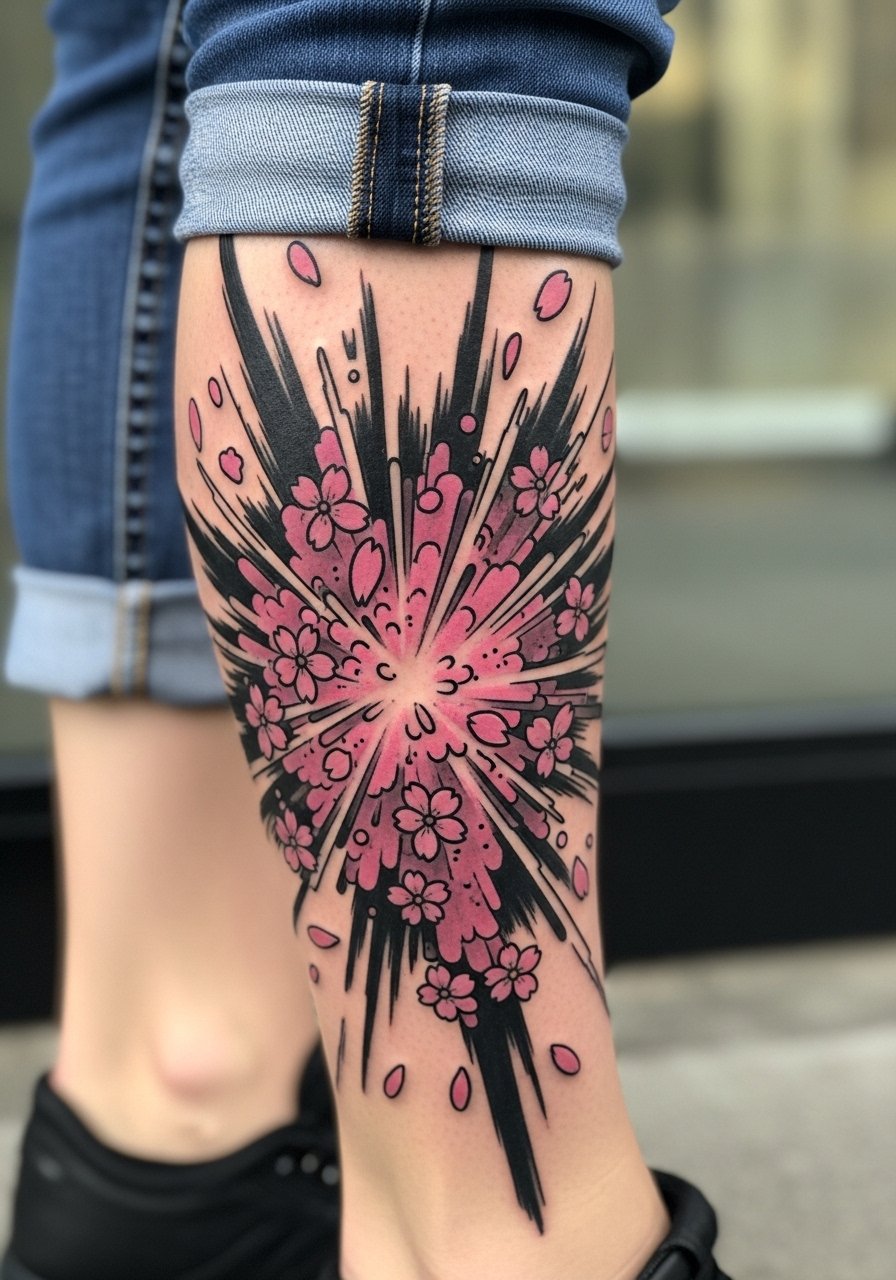
Calf work is low on the pain scale for most people and shows well with bold, exaggerated petals. This style benefits from thick linework and heavy saturation that survives gym friction and sun exposure. Common error is going too small and losing the intentional roughness that defines ignorant style. A short session often finishes this piece in one go. Pair it with rolled ankle jeans or a midi dress with a side slit when you want to flash the explosion on nights out.
9. Sakura Branch Wrapped Around a Surgical Scar
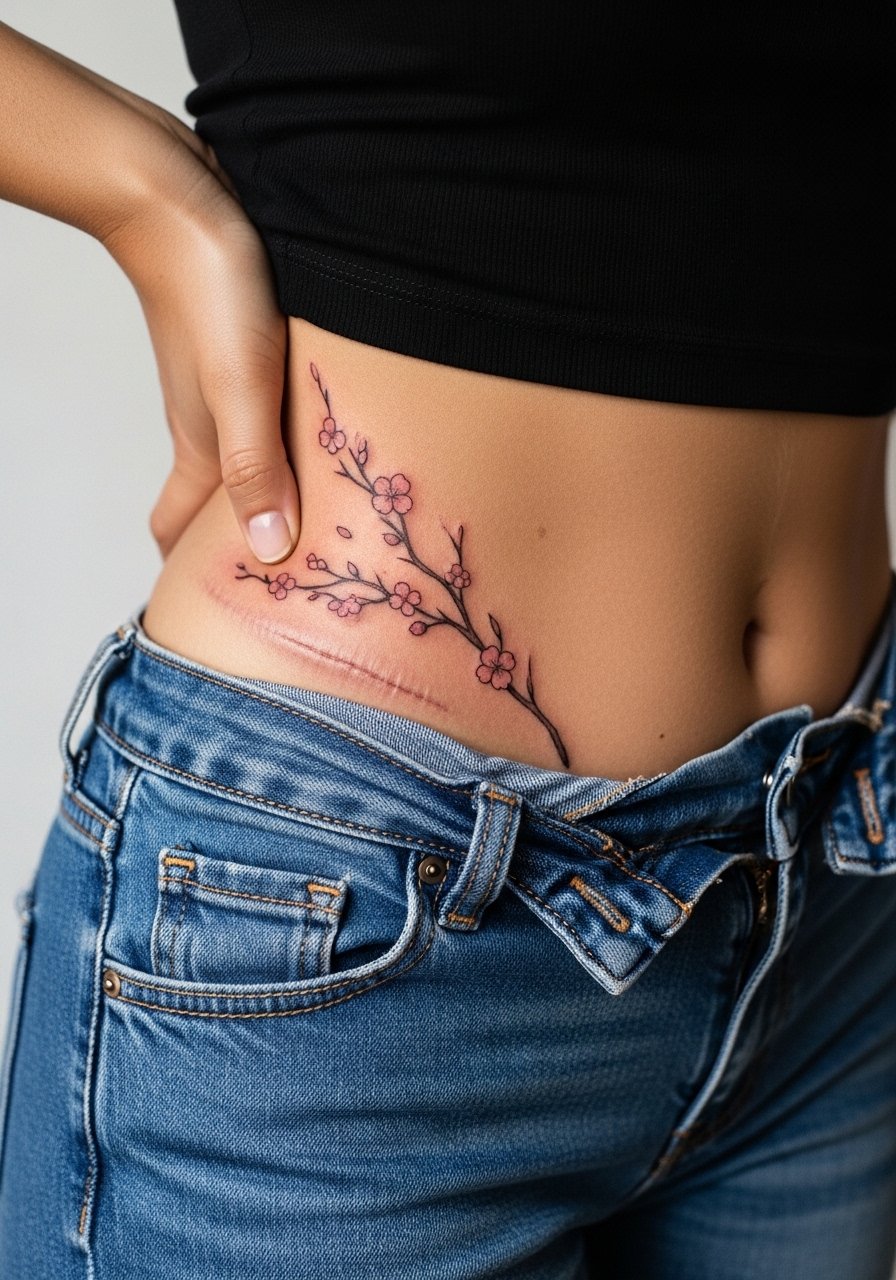
Using sakura branches to frame and soften scar lines is a sensitive option that can feel empowering. Discuss scar maturity with your artist and bring photos of the scar under different lighting. The important technical choice is to avoid dense saturation directly over new scar tissue and to focus on surrounding flow and texture. Sessions are cautious and may need a test patch. A common mistake is expecting perfect color match over raised scar tissue. Instead plan for a custom flow that visually integrates the branch with the surrounding anatomy.
10. Inverted Collarbone Sakura That Mimics Falling Upward
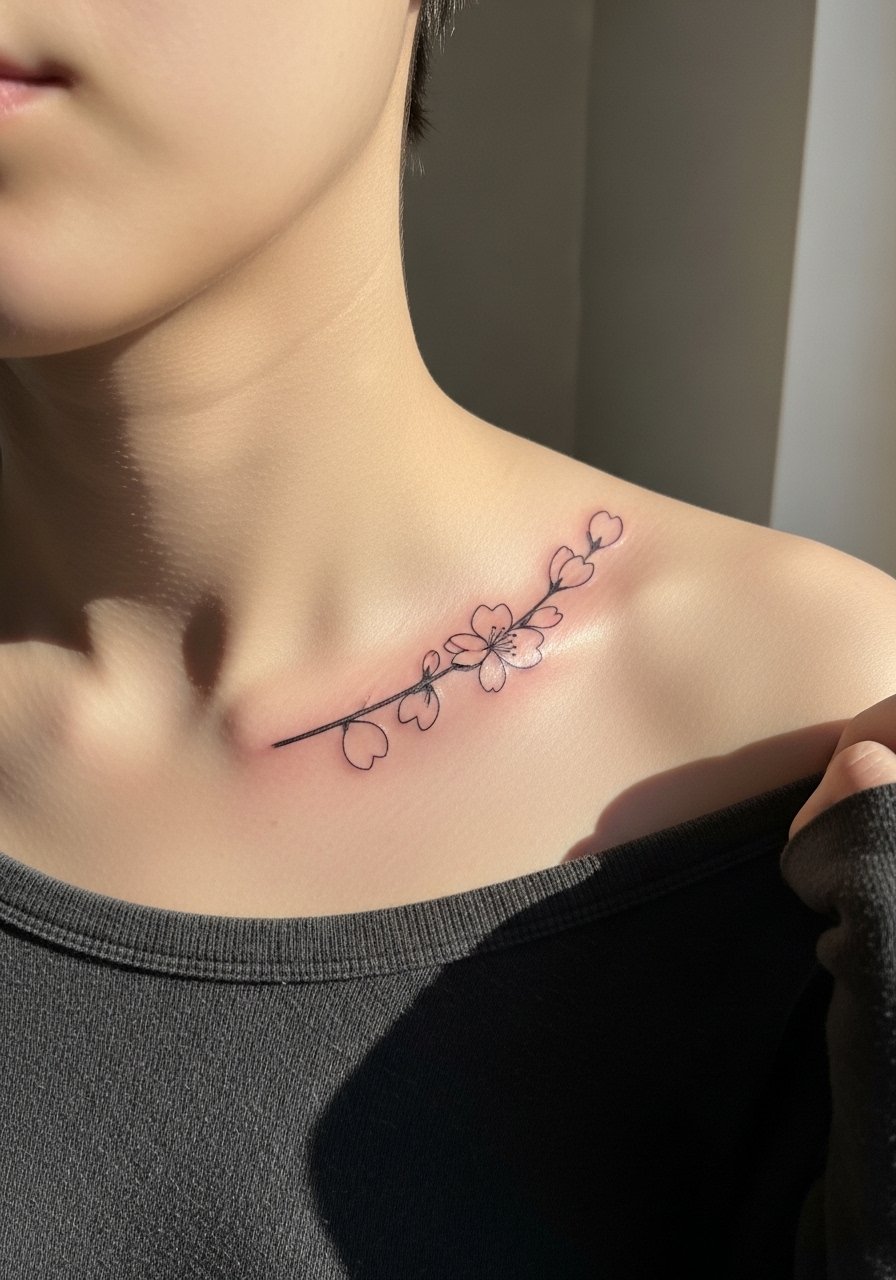
This is a playful twist that uses direction to change how petals interact with gravity. When you book consults, ask the artist to map negative space so the upward fall reads intentional. Collarbone work can be tingly because of thin tissue, so plan for sharp stings in a short session. A common mistake is centering the design too high where straps constantly rub. For show-off looks consider a thin gold chain necklace that sits above the inverted petals and frames the area.
11. Koi Pairing With Geometric Sakura for Thigh Statement
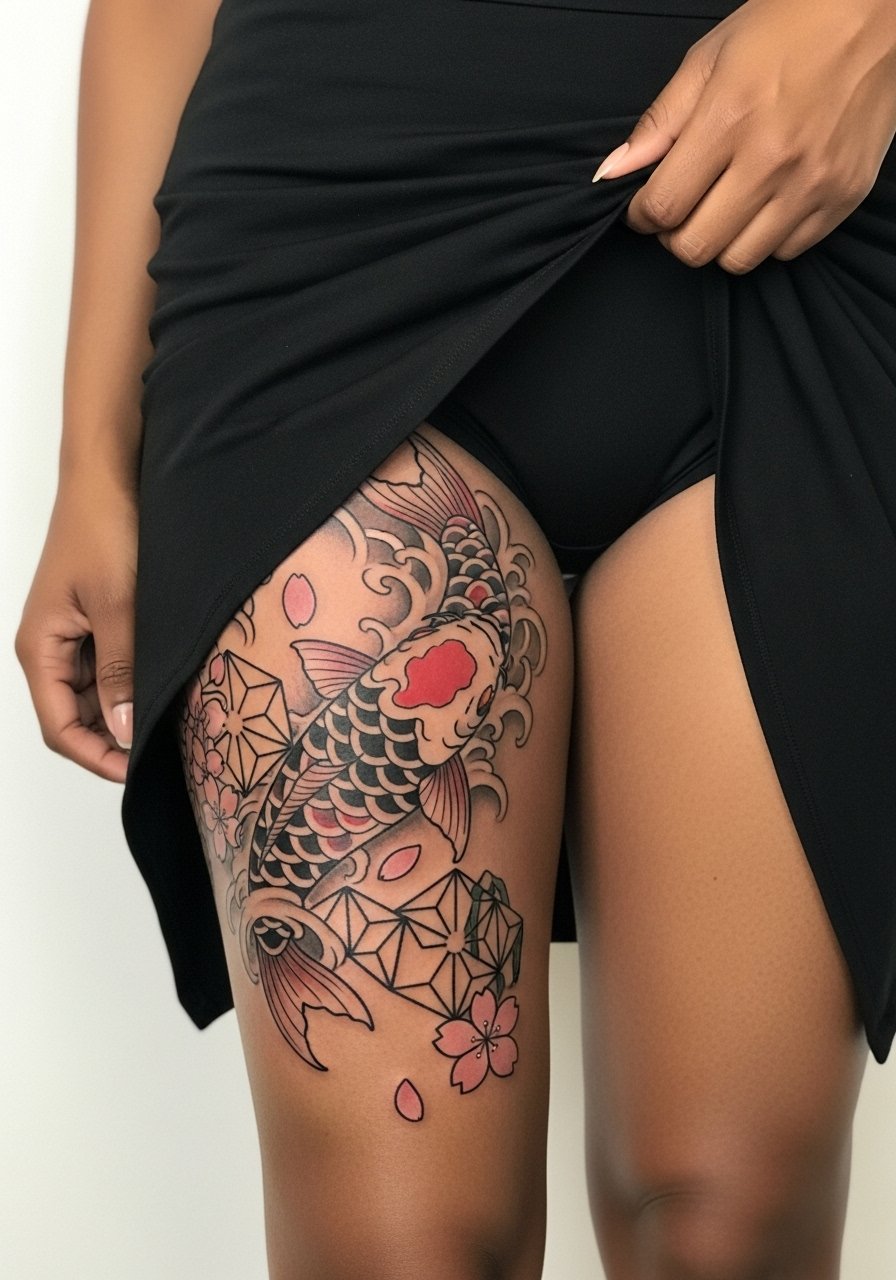
Pairing koi with sakura gives instant Japanese influence without copying historical panels directly. The trick is scale. If the koi is too small it competes with mandala geometry. During consult ask the artist to balance negative space and use color saturation strategically. Sessions are long and may require multiple visits. This combo survives gym wear better when the artist leaves breathing room between heavy black outlines. For summer festival vibes, show the design with an asymmetrical mini skirt.
12. Dark-Skin Optimized Sakura With Teal Undertones
On darker skin tones, pinks can read muddy if not balanced with contrast. I advise asking for a palette with teal or cooler undertones behind petals and stronger black linework to keep the motif legible after healing. Request healed photos from the artist that show similar skin tones. Sessions are typical for a medium piece and pain is low to moderate. The mistake is accepting a palette without a clear contrast plan. This version is all about color theory and healed reference images.
13. Micro Sakura on Fingers for a Subtle Y2K Revival
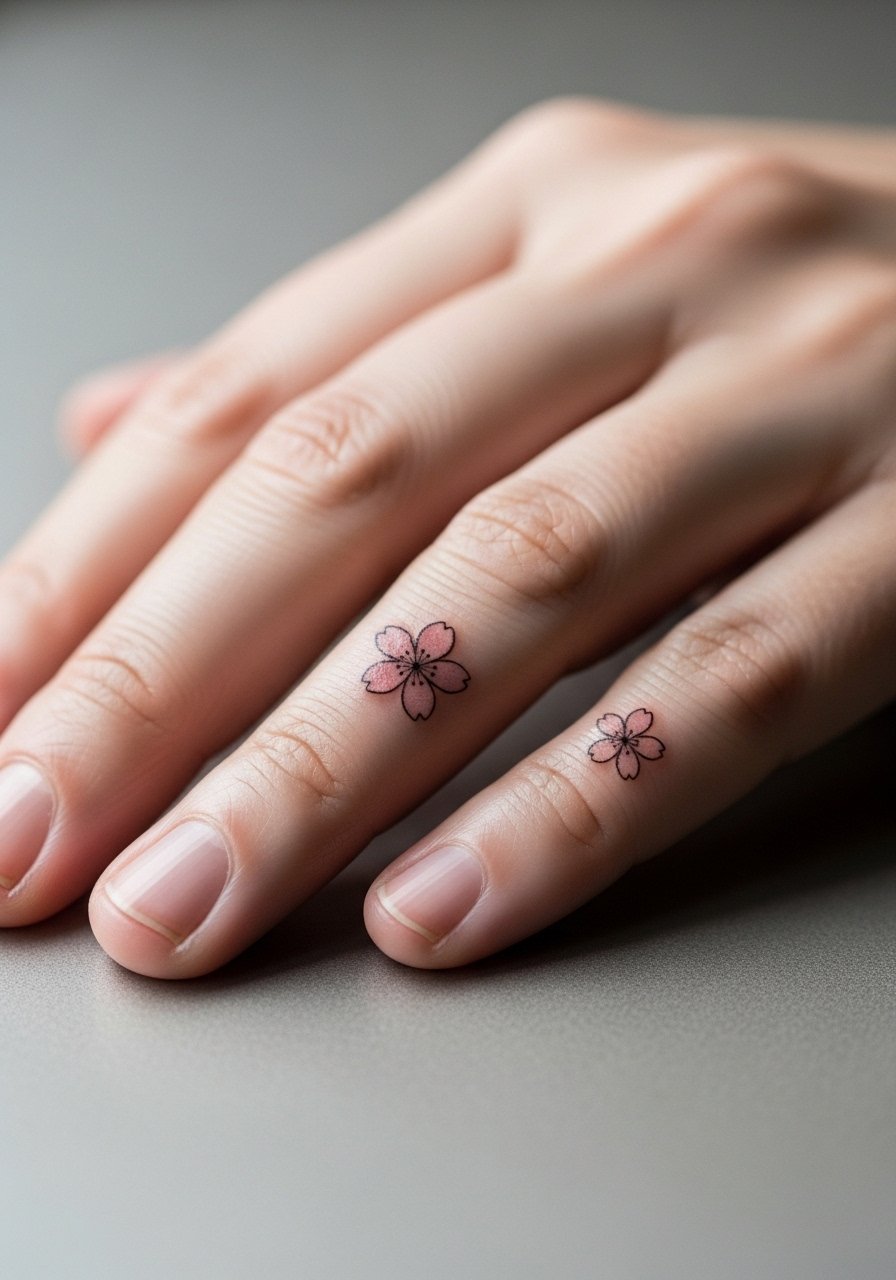
Finger micro tats read personal and trendy, but they fade faster due to constant washing and thin skin. Expect touch-ups sooner, often within a year. The most common error is asking for too much micro detail in a tiny space. If you want longevity, keep petals minimal and accept a slightly bolder dot work approach. Sessions are short and the pain can sting because fingers have little cushioning. If career visibility matters, remember finger ink is still judged differently in some workplaces.
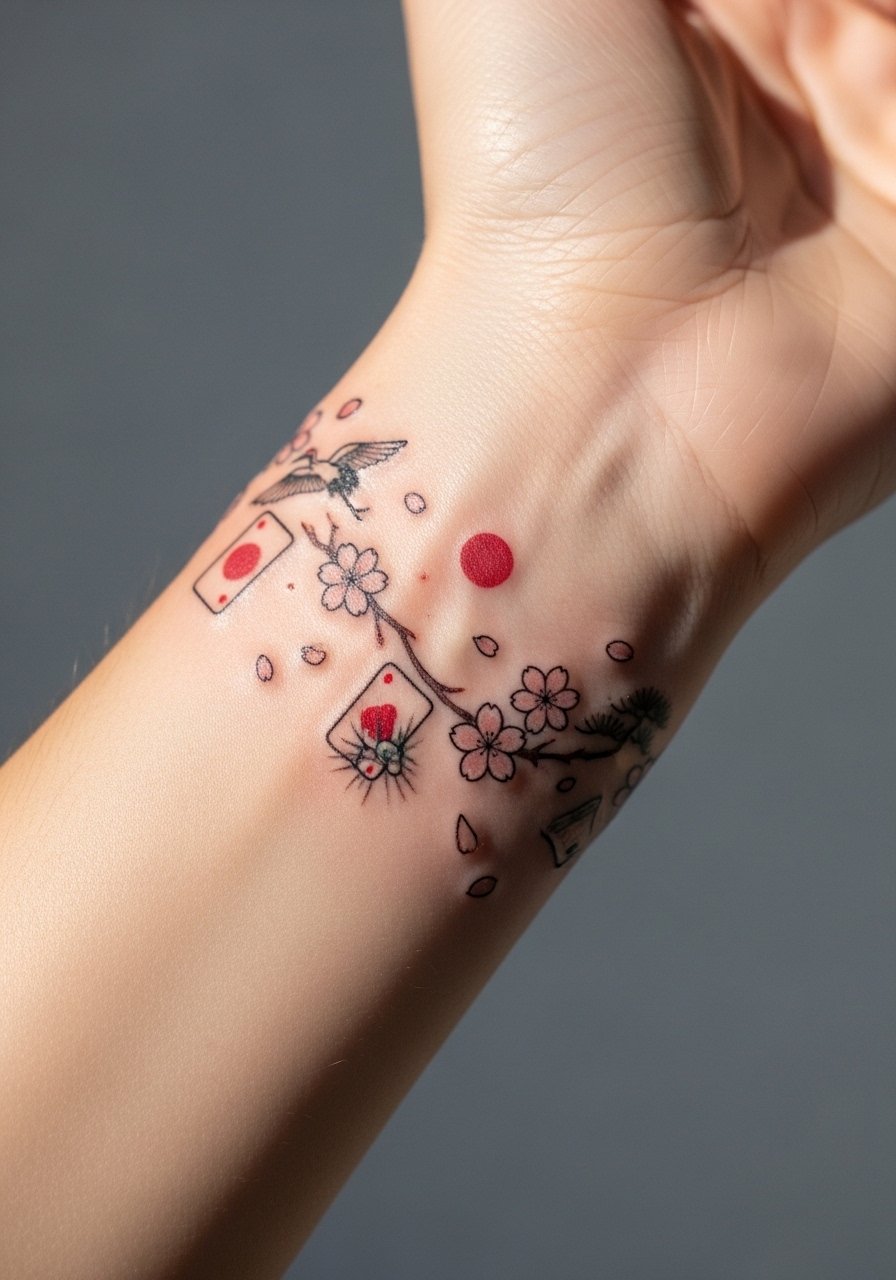
14. Hanafuda Card Accent With Sakura on the Outer Forearm
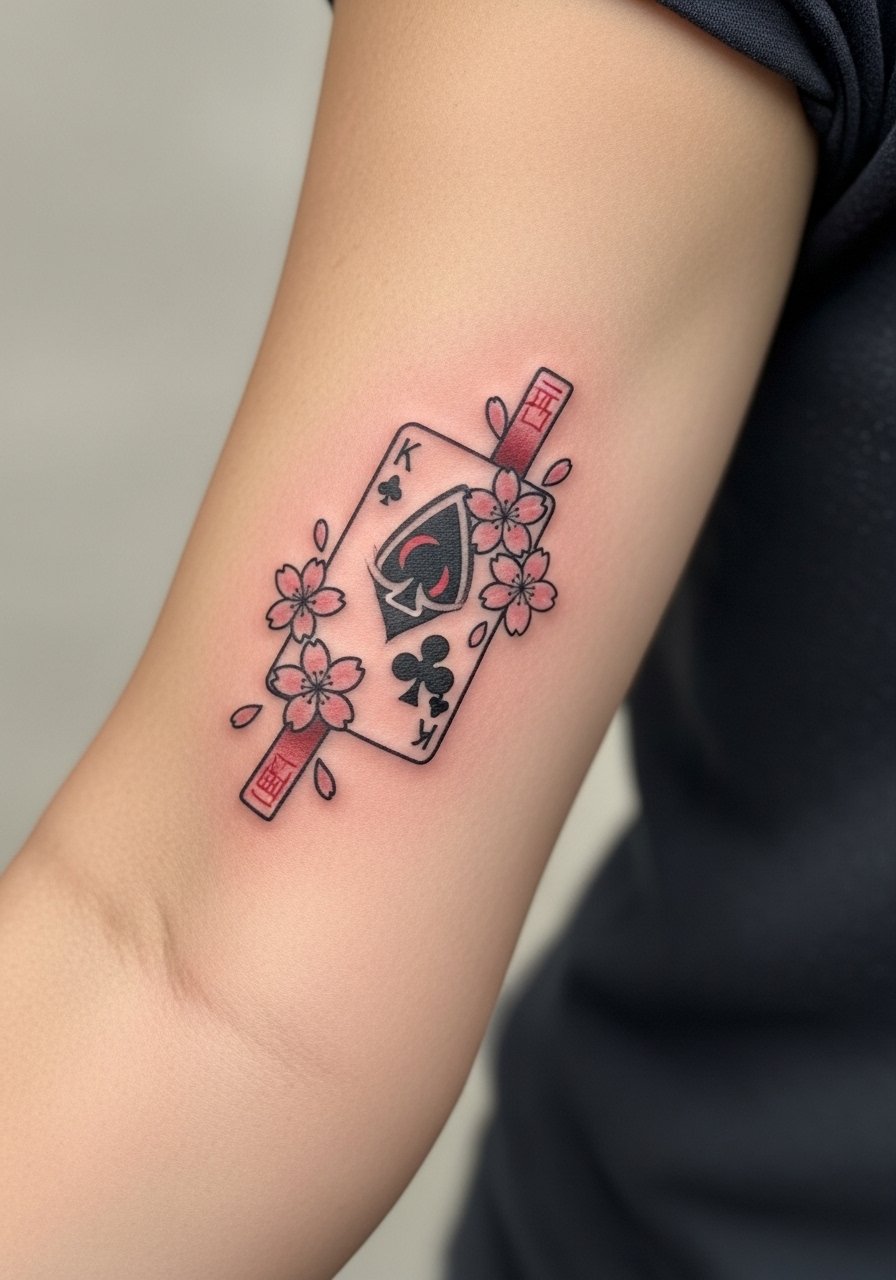
Pairing sakura with subtle hanafuda motifs is a niche move for gaming or family heritage fans. The biggest mistake here is overloading the forearm with tiny card details that read as noise. Ask for a single card element scaled to compliment the branch and for heavy outlines that keep iconography crisp. Session time is short. For outfit pairing, roll your sleeves into a chambray work shirt so the card and petals show naturally when you move.
15. Sleeve That Blends Koi, Wind, and Falling Petals
This is for collectors who want narrative across the arm. The session plan is critical here. A common mistake is leaving the branch flow to the final session, which can lead to mismatch in scale. Start consults by asking your artist to rough-in branch paths before color sessions. Expect multiple long sessions and patchy soreness between appointments. To avoid aging issues, request bold anchor lines around moving joints so the composition reads even when muscle tone shifts.
16. Single Blossom Behind the Ear, Below the Hairline
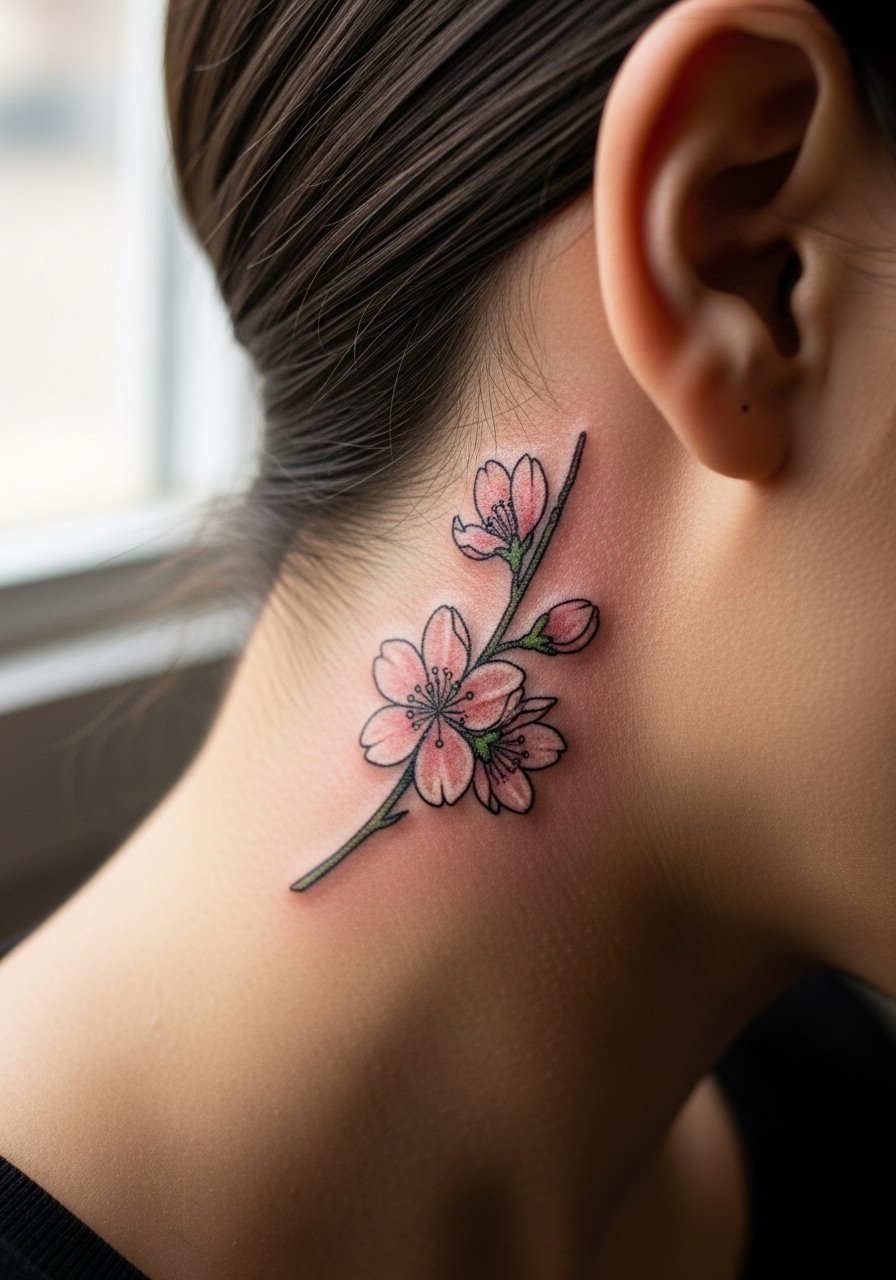
Behind-the-ear pieces read private and small. The tiny canvas means single-needle detail can blur, so ask for a slightly bolder outline than you might expect. Sessions are quick and pain is usually a four out of ten. Sensitive placement rules apply, so the artist will likely want a precise stencil. Because hair covers it often, decide if you want visibility or a tucked-in secret before booking.
17. Lower Back Sakura Panel That Frames a Dress Back
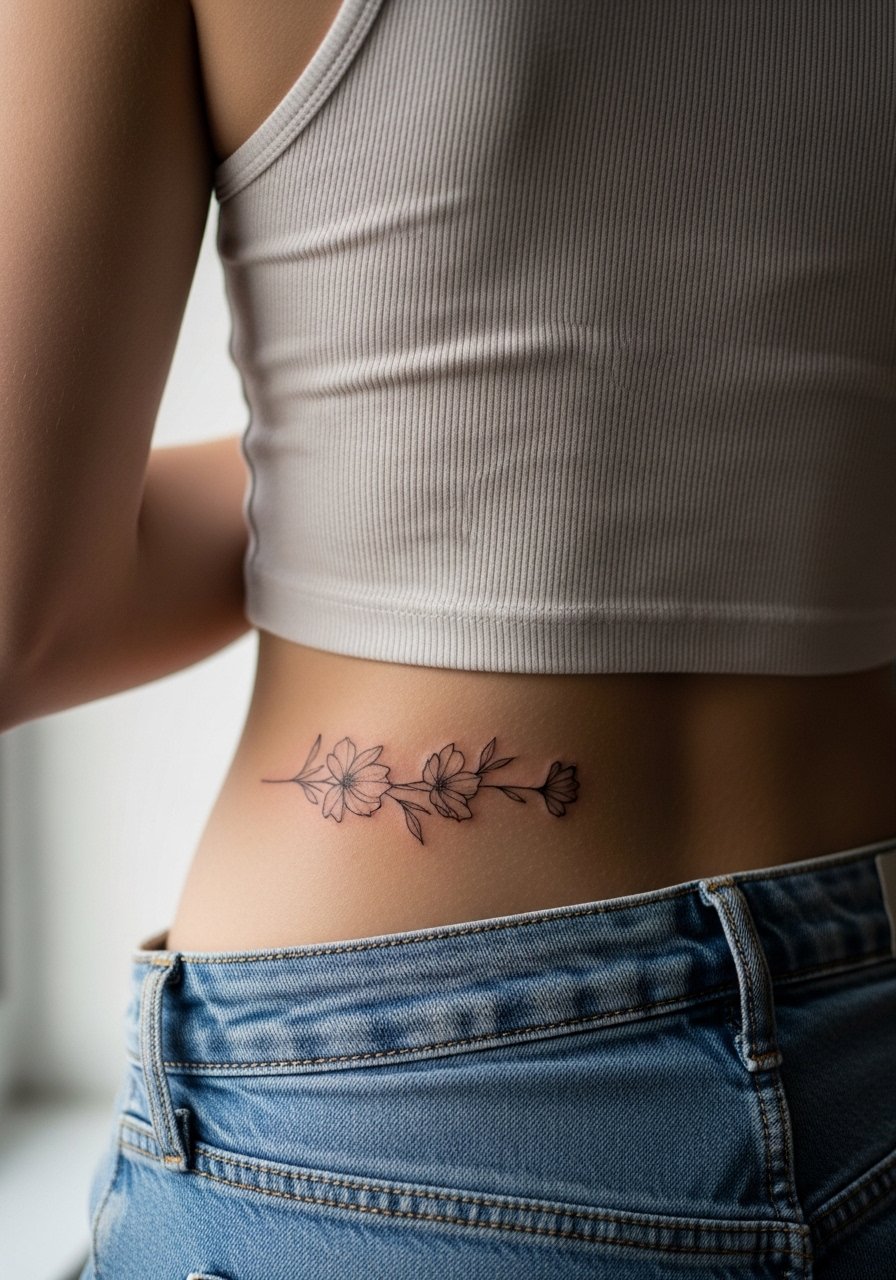
Lower back panels read elegantly under open-back dresses, but the area moves and sits against high waists. Ask for a design that sits just above the waistband so it does not ride into clothing. Sessions are straightforward and pain is low to moderate. Avoid dense, tiny fills that will get lost. For showing it off, a simple tank top and high waisted jeans combo keeps the panel visible without risking fabric friction.
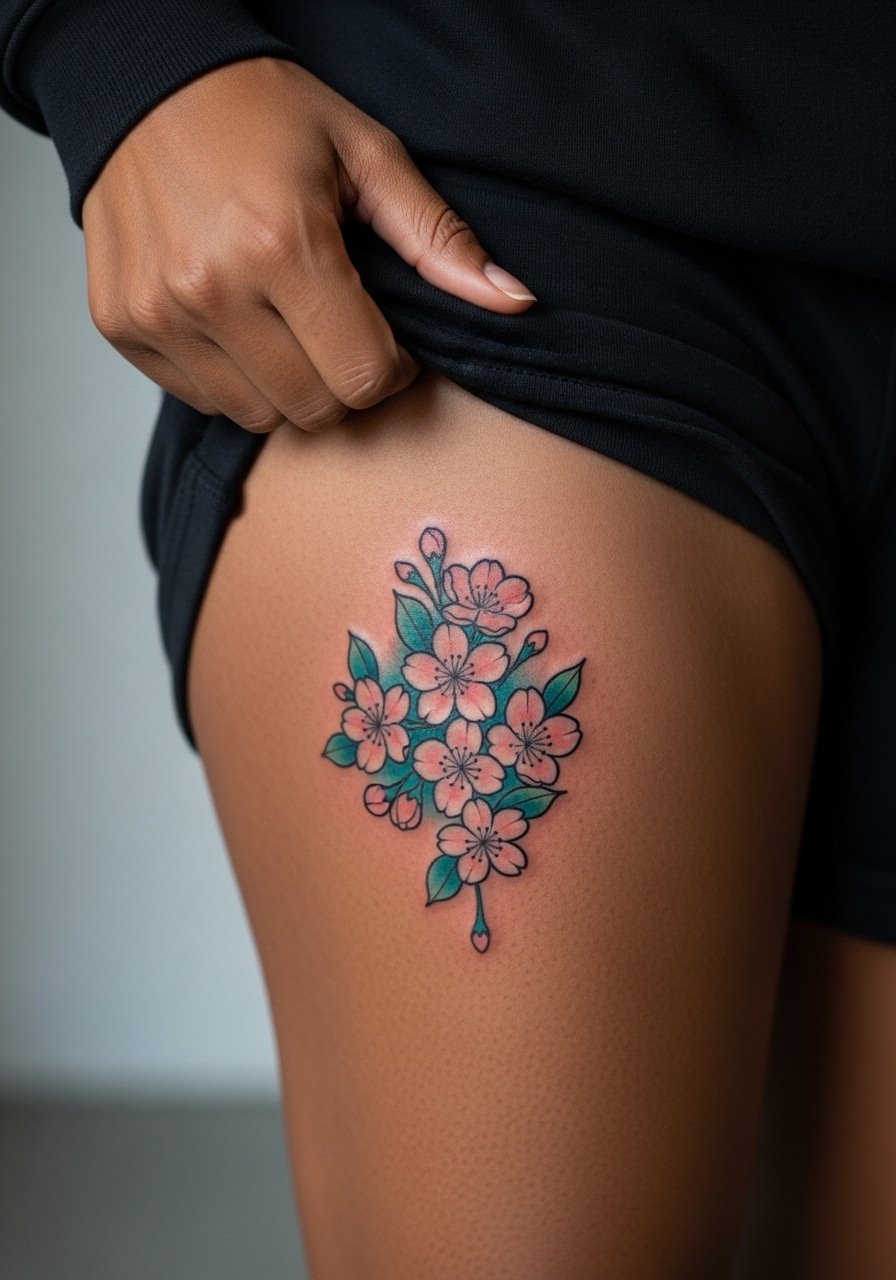
18. Thigh Wind-Swept Branch for Festival Season
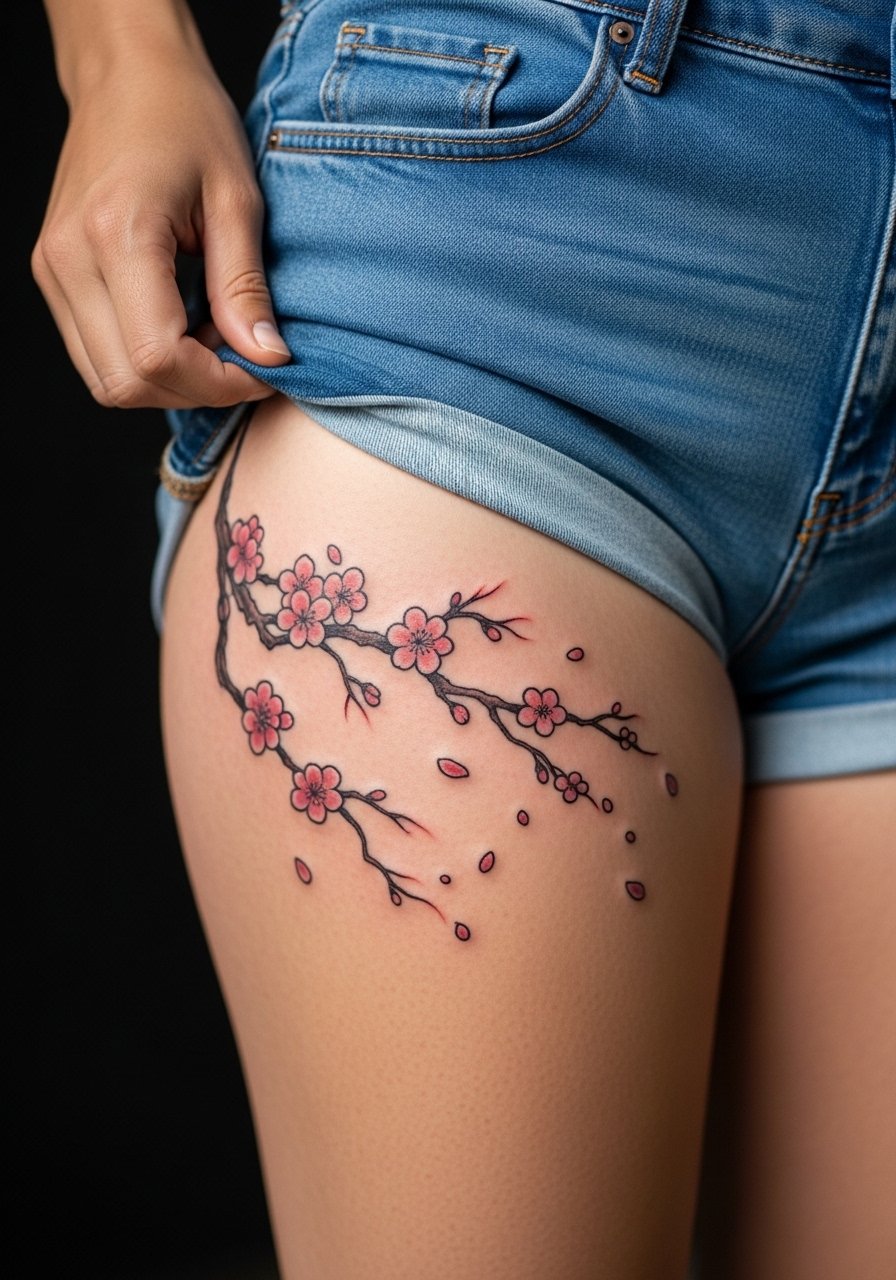
Thigh pieces are forgiving when it comes to sizing and detail. A wind-swept branch works with summer styling and holds up through workouts if the artist leaves breathing room. The common mistake is placing dense shading where clothing constantly rubs, which accelerates fading. Sessions are usually comfortable and allow for higher saturation. If you plan on frequent shorts and festivals, map the branch to sit where skirts and straps won’t rub.
19. Geometric Sakura Panel for Inner Bicep
Inner bicep work is intimate and can age differently because of skin stretch. A frequent error is packing too much geometric density into a tight inner bicep space. Tell your artist you want negative space to prevent lines from merging as the arm moves. Sessions may be slightly more painful because of sensitivity. This placement often benefits from stipple shading to create texture that softens with time rather than blurring.
20. Ankle Sakura Chain That Trails Into Foot
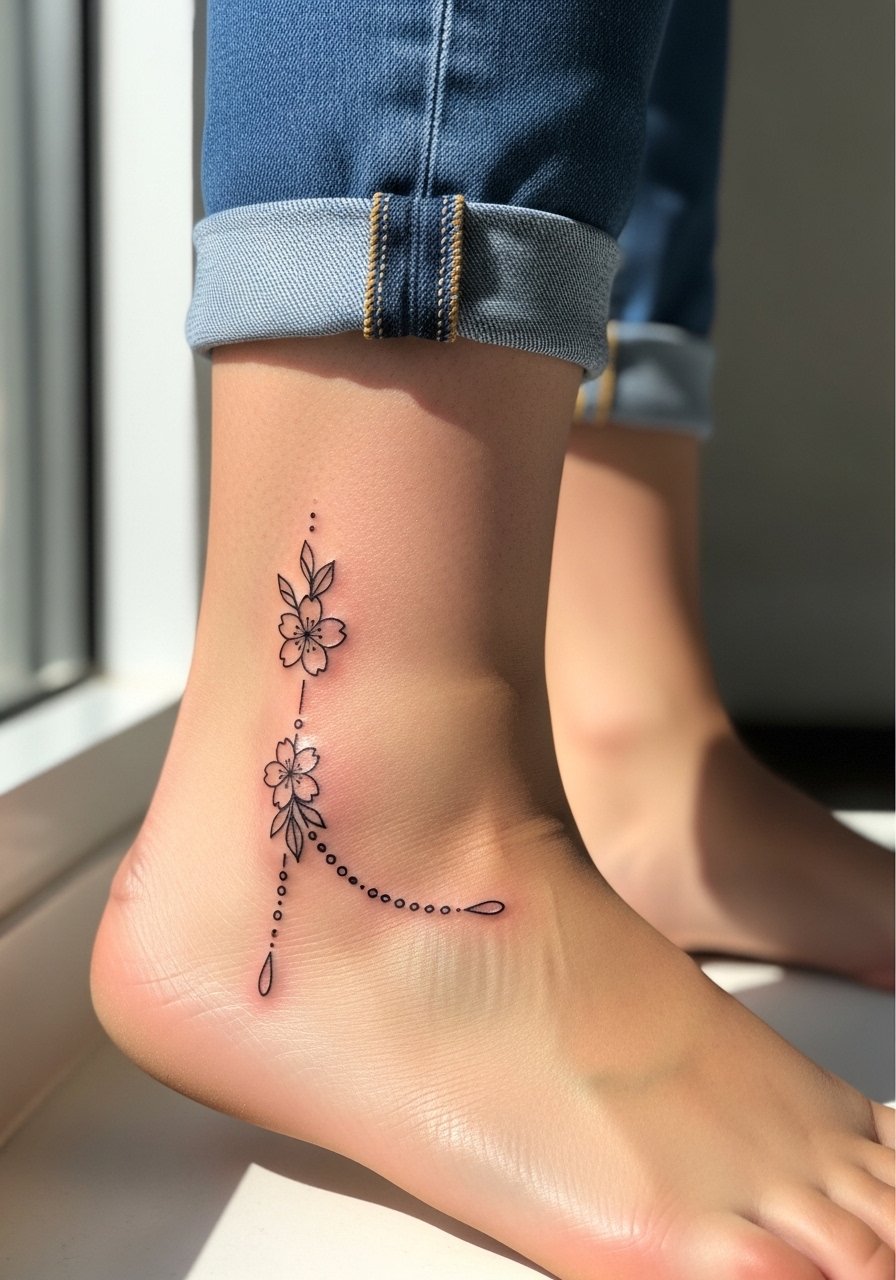
Ankle and foot tattoos face heavy rubbing from shoes and socks. For longevity pick bolder outlines and accept touch-ups in the first year. A common mistake is choosing ultra-fine filigree that disappears under footwear friction. Sessions are short and sharp. For showing the piece, styling with rolled pants or ankle strap block heel sandals highlights the chain without stressing the ink.
21. Small Sakura Wrist Wrap With Hanafuda Accent
A wrist wrap with a card accent is delicate and visible daily. The fragility comes from constant washing and bracelets. Ask for slightly thicker anchor lines and spaced petals so each element keeps definition. Expect touch-ups at year two for fine work. The main mistake is over-detail in a very small circumference. For session comfort wear a sleeveless tee and prep to remove jewelry so the artist can place the stencil cleanly. Pair this with a dainty silver bangle set once healed to frame the wrist without crowding the linework.
Frequently Asked Questions
Q: How much does a traditional sakura tattoo typically cost in a broad range?
A: Prices vary by size and shop, but expect small wrist or finger pieces to fall in a lower range and sleeves or full-back panels to require several thousand in the upper range. Get quotes from three shops, ask about session length, and check guest-spot calendars to compare costs and availability.
Q: Will fine line sakura on my wrist blur faster than a traditional bold version?
A: From what I have seen, fine line tattoos on wrists usually need touch-ups sooner because of movement and washing. If longevity matters, ask for slightly heavier anchor lines or a hybrid approach where the branch is bolder and the petals remain fine.
Q: For darker skin tones, how do I make pink blossoms pop after healing?
A: Request high-contrast palettes and ask your artist for healed examples on similar skin. Many artists add cooler undertones like teal behind petals or stronger black outlines so the pink reads clearly as the piece heals.
Q: Which healing approach should I pick, Saniderm or dry healing, for a rib or shoulder sakura?
A: Artists and clients split into two camps. One camp prefers protective film to keep the area clean and sealed, especially for ribs and shoulders. The other camp favors dry healing to let scabs breathe. Ask your artist which they recommend for that specific placement and why, then follow the shop’s protocol.
Q: How often should I budget for touch-ups on small sakura pieces like fingers or inner wrist?
A: Plan for touch-ups around year one to two for the smallest, high-friction placements. Medium pieces on thighs or forearms usually hold longer but a five-year check is common. Touch-up frequency depends on sun exposure and daily wear, so factor that into your timeline.
