
Fine line dog paw tattoos are everywhere on feeds right now, and the trend has a split personality. Some of these pieces look breathtaking fresh and then soften into an indistinct smudge. Others keep crisp contour for years. The difference comes down to placement, spacing, needle depth, and realistic scale. Read the first idea to see a wrist-friendly approach that stays readable after two years.
1. Fine Line Mini Paw on Inner Wrist
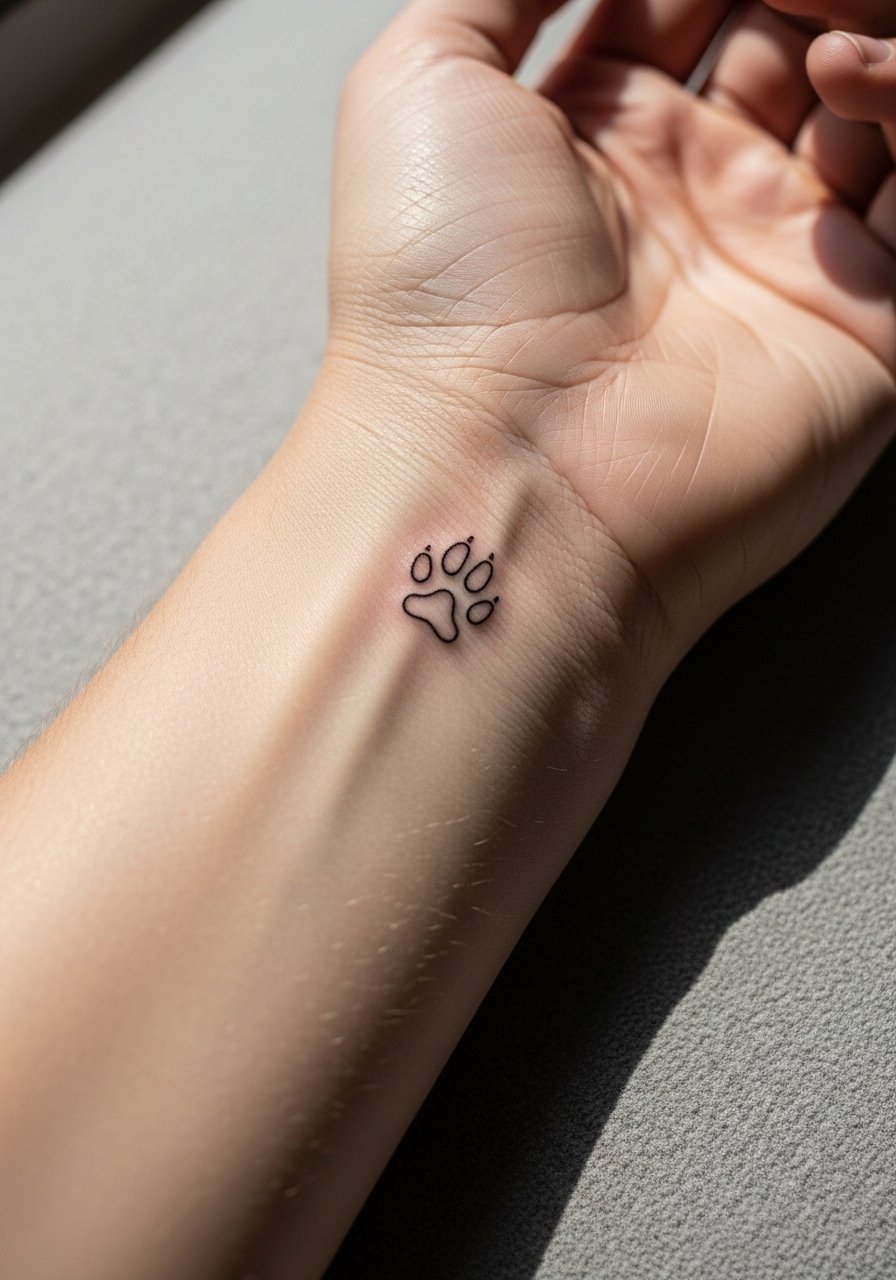
I've seen tiny wrist paws hold well when artists leave breathing room around toes. Fair warning, the inner wrist is sensitive but not brutal on most people, so expect a short session of about 30 to 45 minutes. Tell your artist to use slightly bolder contour than a hairline sketch so the pads do not merge after a year. A common mistake is asking for dots inside the pads, which can blur into a gray patch. For showing it off, rolled-up sleeves work best, and a minimalist watch or thin bracelet complements the tiny scale.
2. Micro-Realism Paw with Fur Texture on Forearm
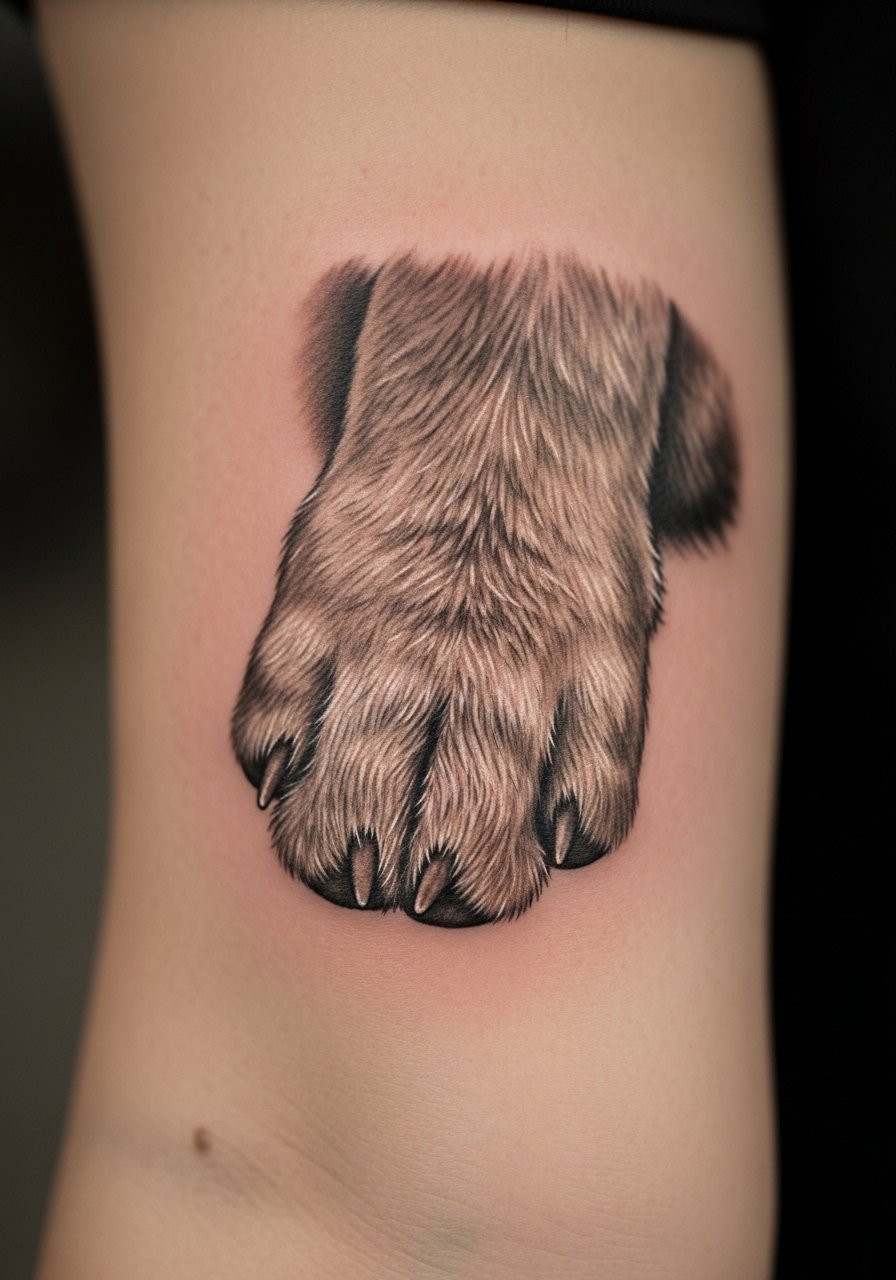
When you want the fur detail visible from a short distance, the forearm is ideal and easy to photograph. In consultation, bring close-up photos of your dog’s paw so the fur direction and pad creases are clear. Sessions run about one to two hours depending on size and shading. Most micro-realism fades into soft gray if artists go too shallow. Ask for slightly stronger saturation up front and plan for a touch-up at year two. For session day, wear a short-sleeve linen shirt so the artist has easy access without you feeling exposed.
3. Stipple-Shaded Paw on Ribcage
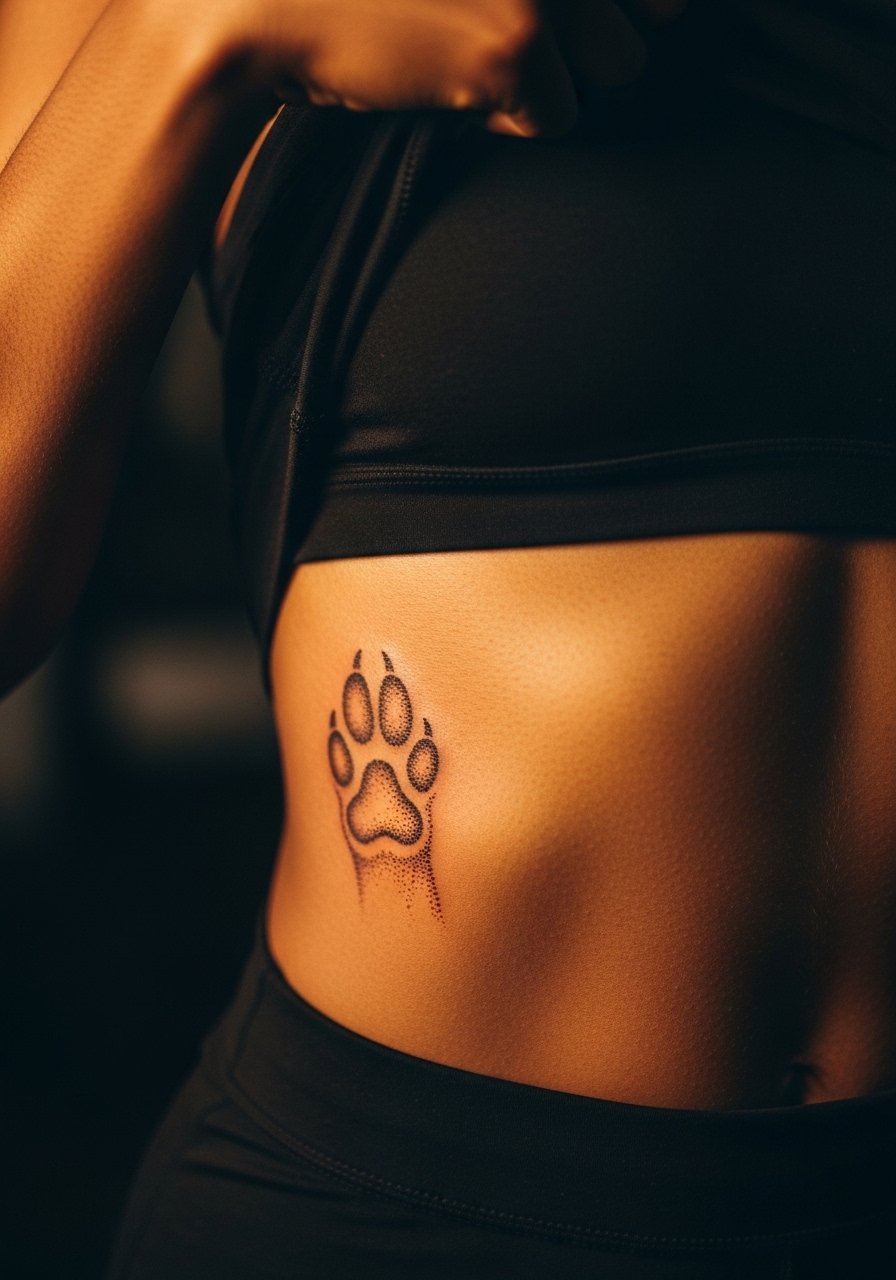
Artists are split on fine detail on the ribs. One camp says the skin stretches and lines blur quickly. The other camp argues that with correct needle depth and spacing, stipple shading settles well. Name both views in your consultation and ask the artist which approach they prefer. Expect a moderate pain level and a session that can take one to three hours. The biggest mistake is requesting tiny stipple that looks delicate on paper but clumps after healing. For the session, bring a loose top you can lift, and plan for a patch test on nearby skin if you worry about sensitivity.
4. Negative Space Paw with Script Along Collarbone
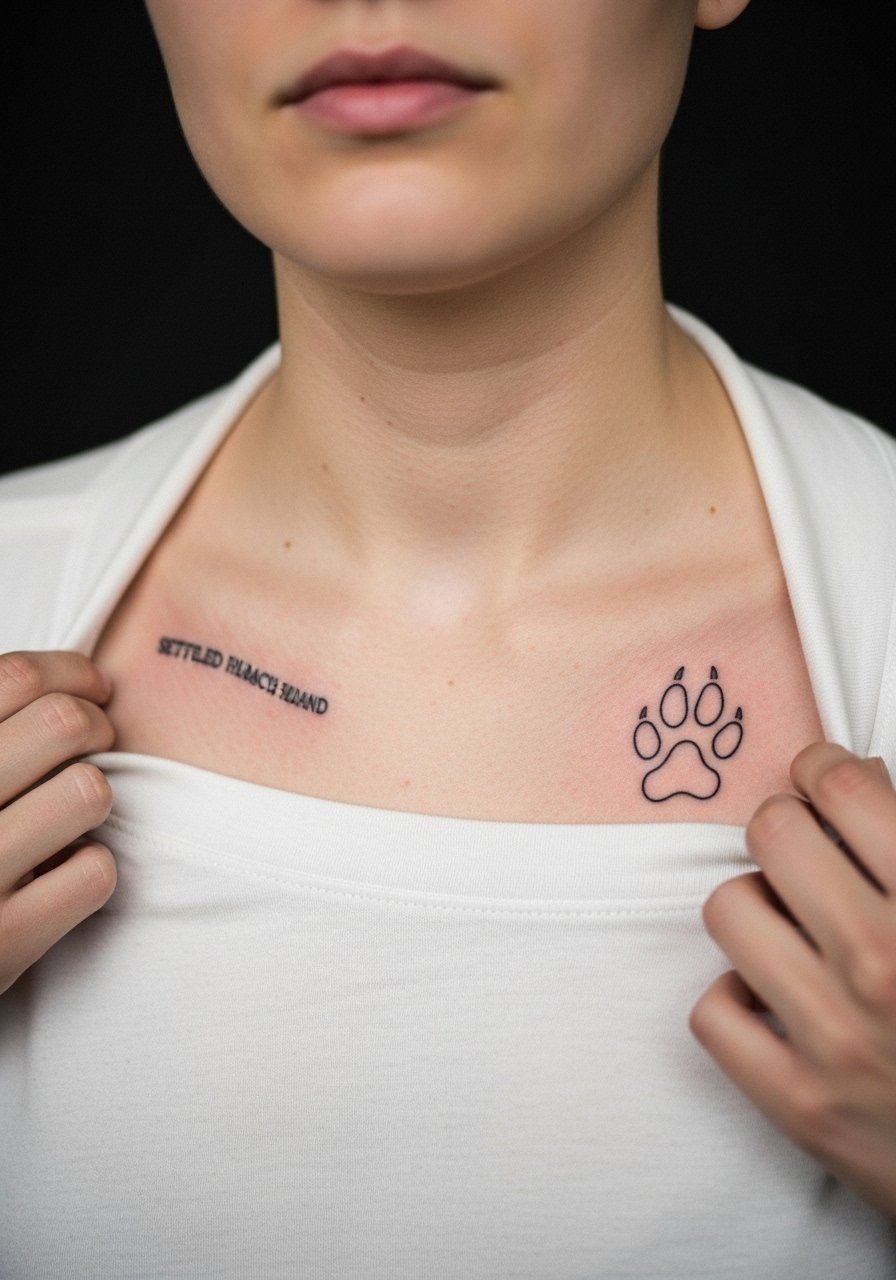
There is something about a paw carved out of skin tone framed by tiny script that reads intimate without shouting. The collarbone has thin skin, so the session is quick and can feel sharp for a few minutes. Tell your artist the exact script weight and show where you want the negative space to sit inside the paw so the pads remain legible. One mistake is crowding the lettering too close to the paw margin. For evenings out, a thin chain pendant pairs neatly just above the design.
5. Watercolor Paw Splash on Shoulder Blade

Watercolor approaches give a lively, painterly feel but age differently than saturated blackwork. Most watercolor-style tattoos lose intensity faster on high-movement areas, and the shoulder blade moves with the shoulder blade muscles. In practice, that can mean softer edges at year two. Ask your artist to anchor the paw with a thin outline or stipple accents so it retains shape. Sessions are often layered, so expect multiple shorter sittings for color saturation. A loose tank top makes getting inked easier and avoids rubbing the new piece in the first days.
6. Tiny Paw on Ankle with Shadow Base

Ankle pieces have a high friction risk from socks and shoes, so the shadow base helps the paw read longer as surface wear appears. Personal observation: tiny ankle work often needs a touch-up at year two if you are on your feet a lot. Ask your artist for slightly denser saturation in the pad shadows and avoid ultra-fine outer lines. Session time is short, but the first week requires careful footwear choices. Pair the tattoo with sandals or low-profile sneakers after the initial healing window to reduce rubbing.
Studio Day Picks
The forearm, ankle, and collarbone designs above each present different prep needs. A few targeted items smooth the session and the first week.
- Stencil transfer paper kit. Helps you preview exact placement on the skin for small wrist and collarbone pieces so scale appears correct.
- Topical numbing cream. Applied about 45 minutes before the session eases wrist and rib sensitivity without altering linework when used sparingly.
- Thin protective film roll. Ideal for ankle and finger tattoos to limit friction during showers and daily activity.
- Fragrance-free gentle body wash. Cleanses healing skin without irritating the delicate areas that tiny paw lines rely on.
- Aquaphor healing ointment. Thin application during the first few days maintains moisture in fine line channels without clogging them.
7. Paw Outline with Geometric Frame on Outer Bicep
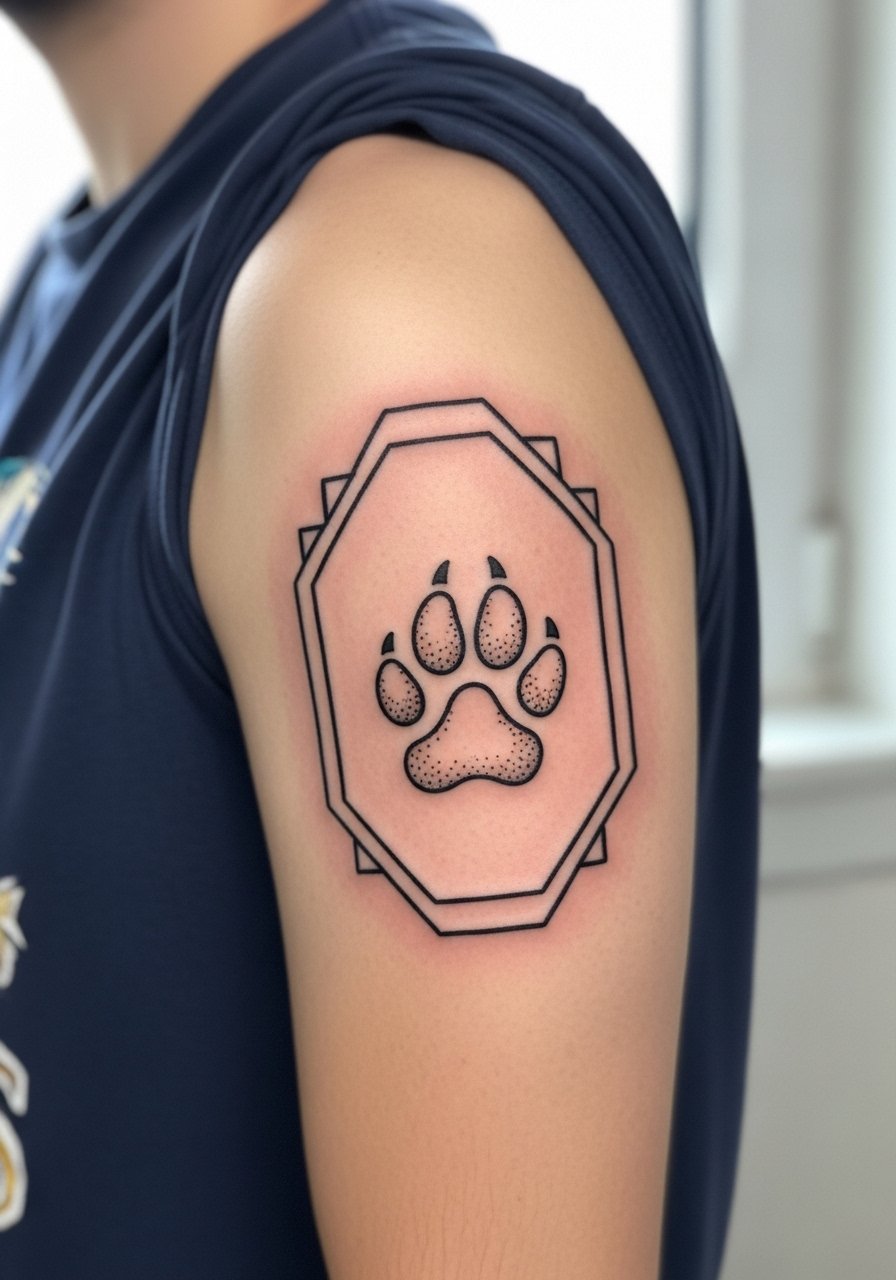
I've noticed that the outer bicep gives enough flat surface for clean geometric frames around organic paw shapes. Visual impact leads this design, and the session feels straightforward. Ask for moderate line weight in the frame and slightly lighter linework inside the pads. A common mistake is making the frame too tight, which crowds the paw and speeds up visual blending after a few years. Touch-up at year three is common for thin inner lines. For the session, wear a short-sleeve shirt you can roll so the artist can access the bicep cleanly.
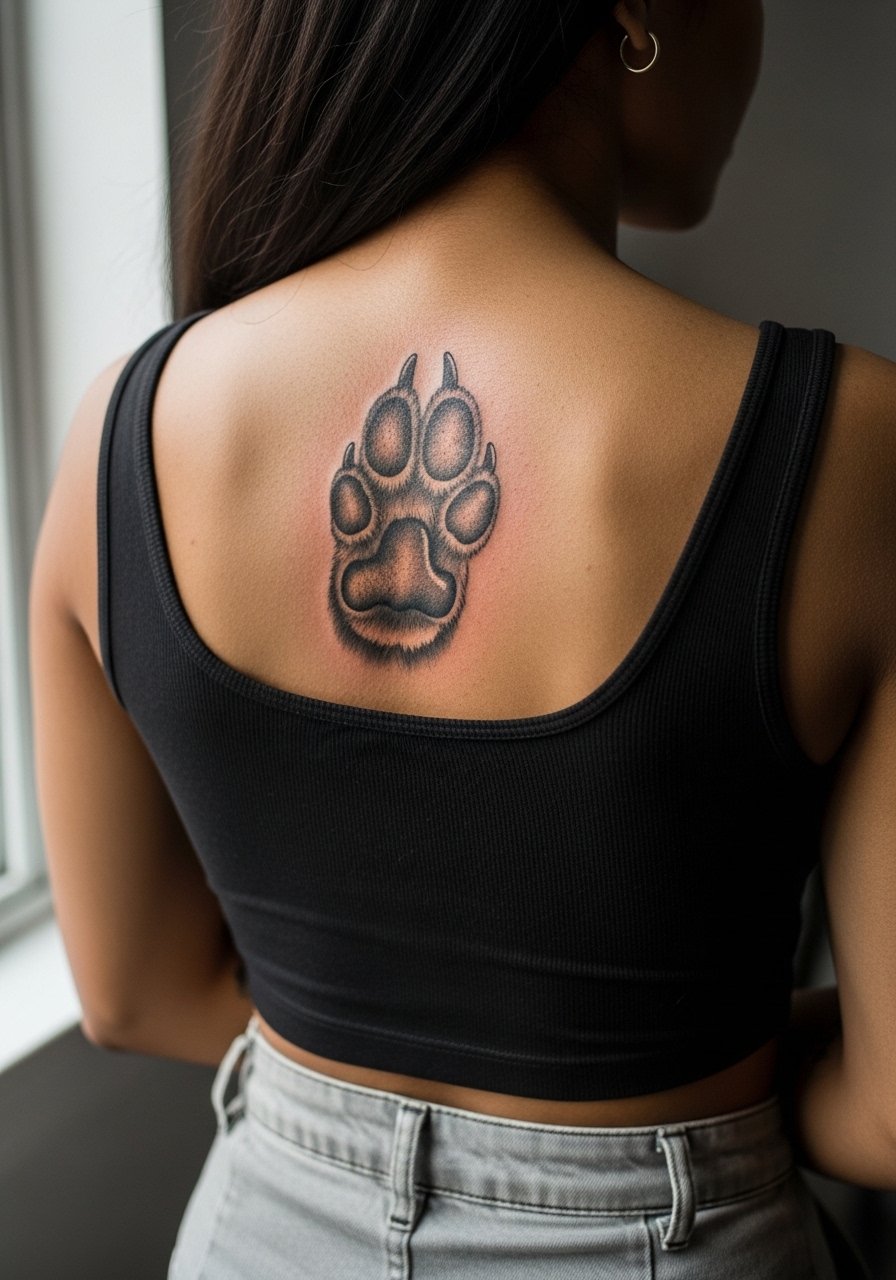
8. Realistic Paw with Shadow on Calf
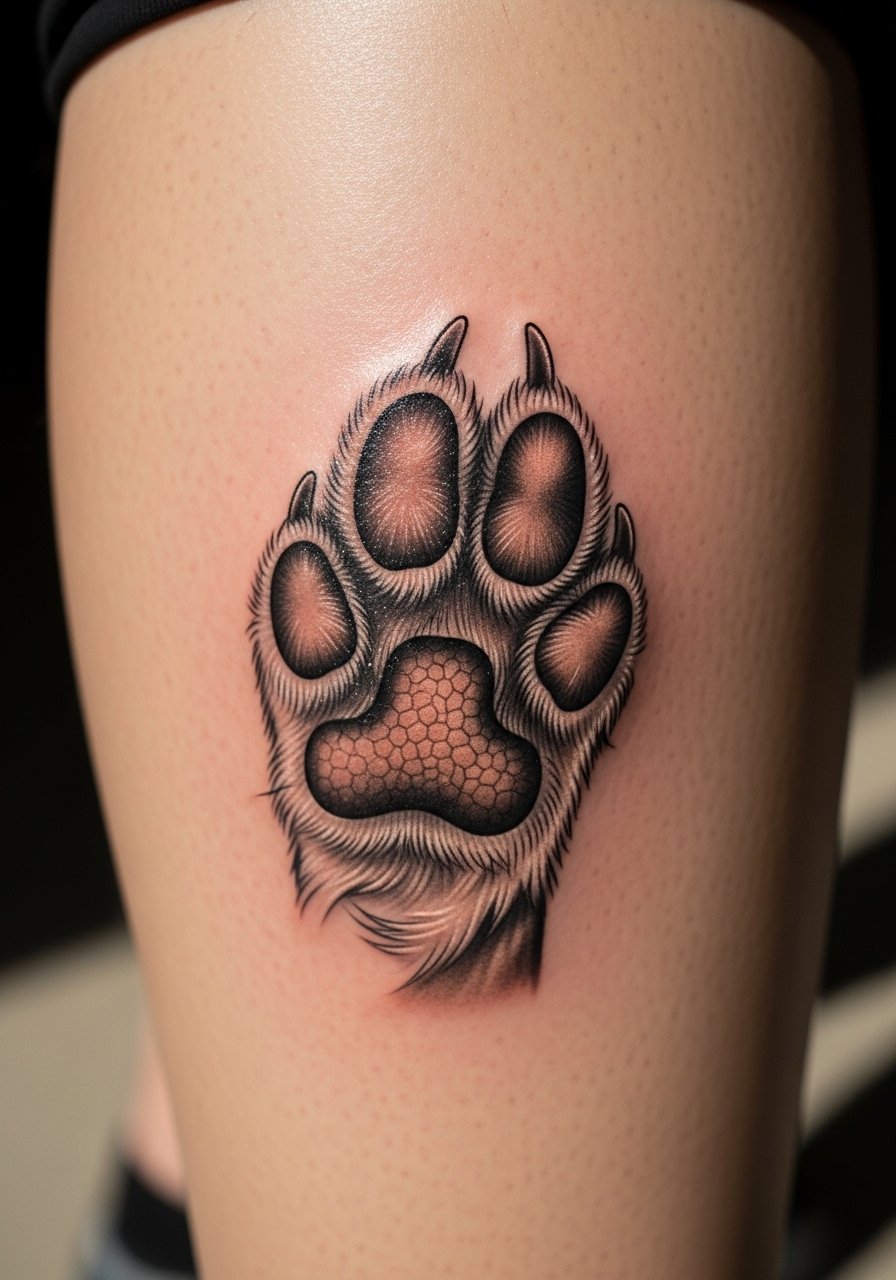
The calf is forgiving for depth work and holds shading well because the skin is thicker. Most people sit for an hour to two for realistic shading at this placement. The biggest mistake is requesting an overly small paw with heavy shading, which can turn into a gray blob after healing. Tell your artist you want clear pad separation and directional fur cues. For showing it off, mid-calf pairs nicely with cropped trousers or a midi skirt and a pair of classic sneakers.
9. Paw Print Trail Along Side Rib
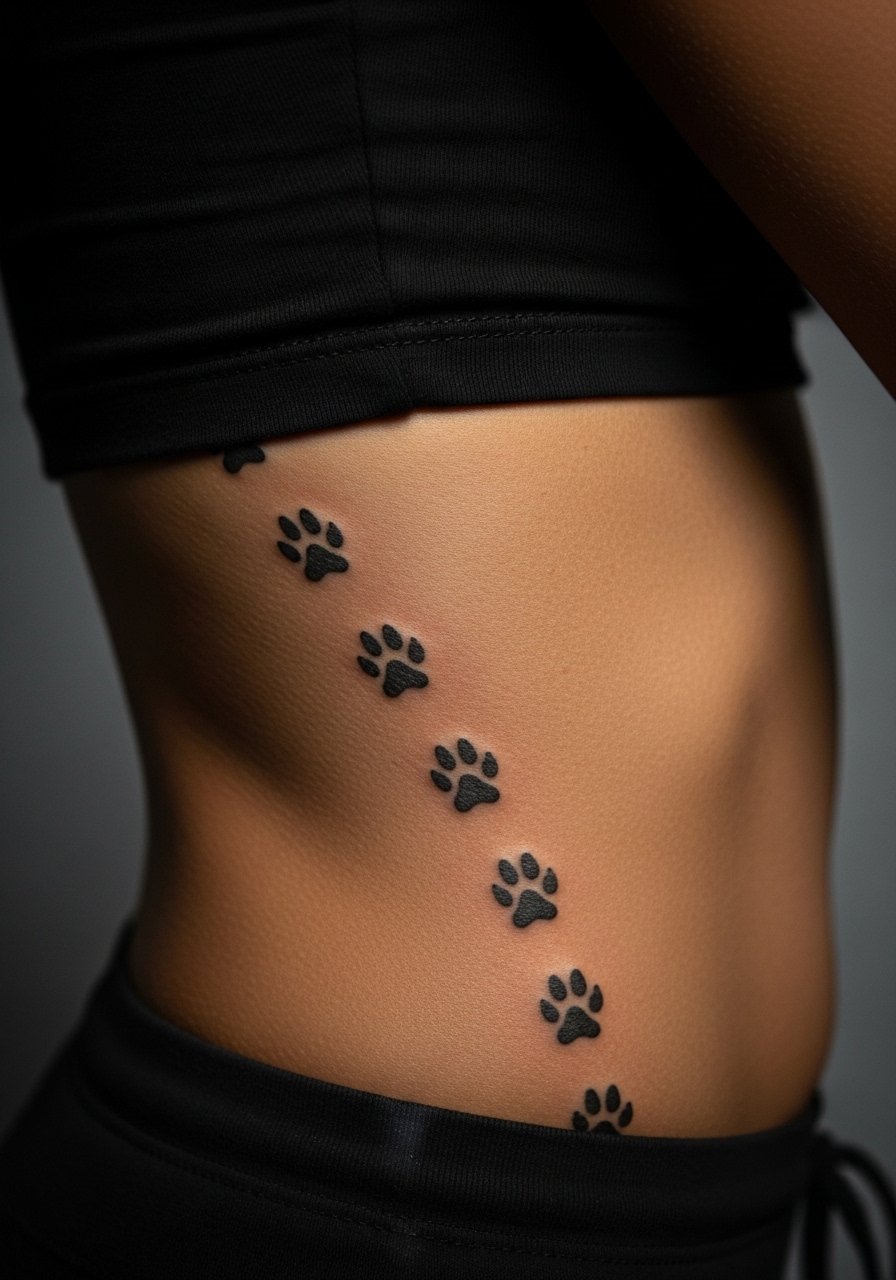
Decision-pressure lead works here. Placing a trail along the rib is a commitment because the spacing and curve must match your torso. Expect a higher pain rating and sessions split across shorter sittings. Artists debate the fine line approach on ribs. One camp warns of rapid blurring from skin movement. The other says careful depth and minimal density keeps prints distinct. Avoid packing too many tiny prints close together. For a session, wear a cropped athletic top so only the area needed is exposed.
10. Tiny Paw Between Fingers
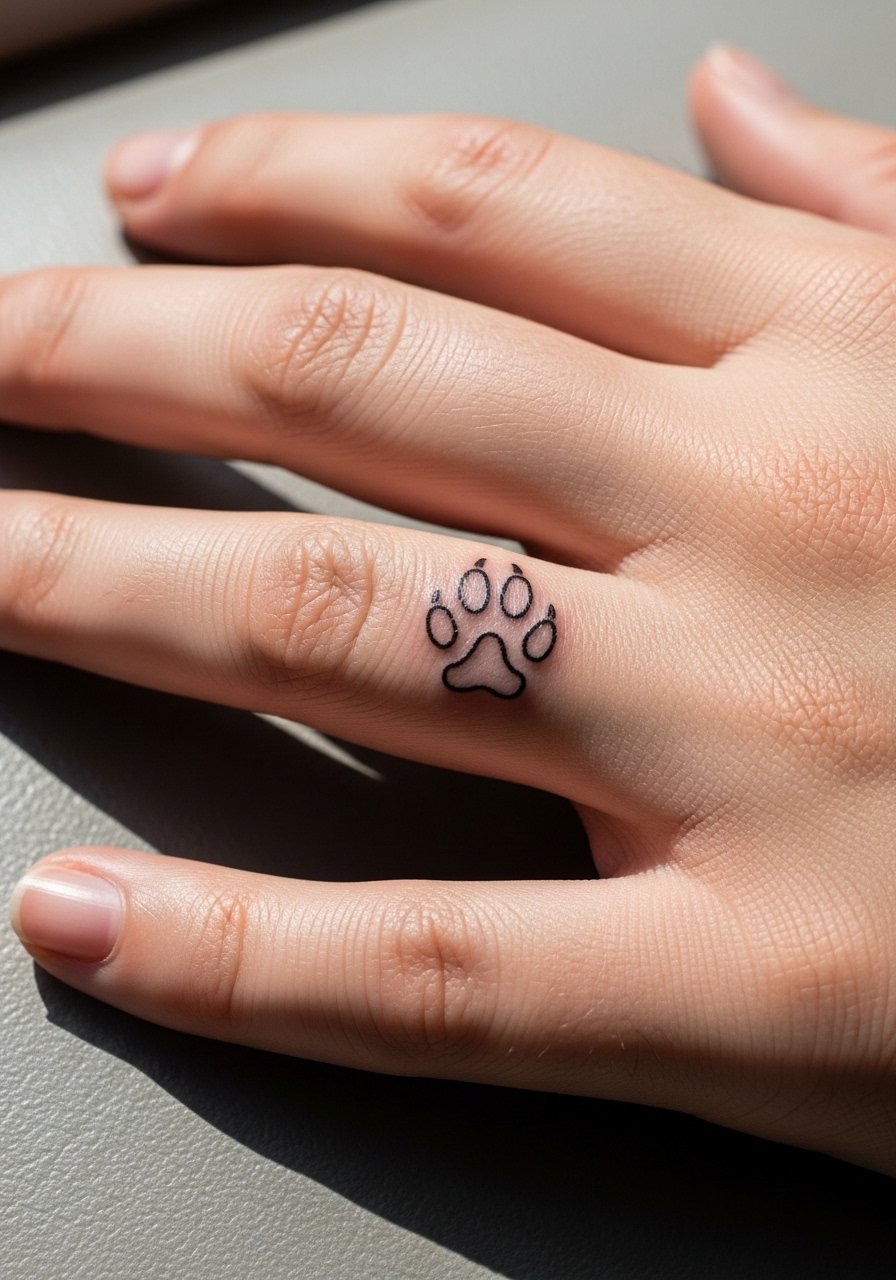
Hand and finger placement has a high fade and blowout risk because skin there regenerates and is exposed to constant washing. If you want visibility, a pocket-sized paw between fingers reads cute for a while but expect touch-ups sooner than for arm work. The common mistake is asking for too much detail in that tiny area. Tell your artist you prioritize bold pad shapes over micro texture so the silhouette survives. Session time is short. For showing it off after healing, thin stacking rings avoid covering too much of the tattoo.
11. Paw Silhouette on Lower Back
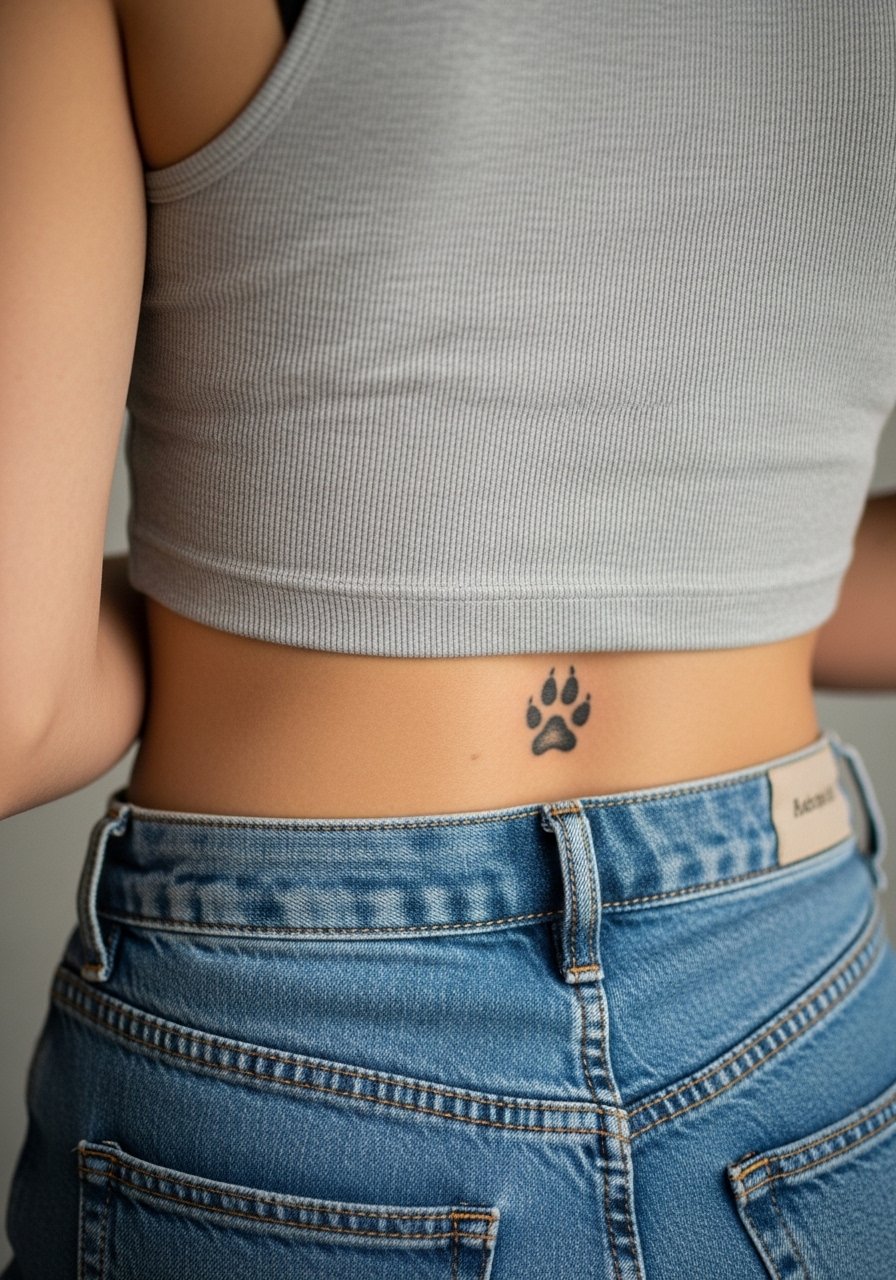
Visual impact lead suits this placement. Lower back provides a broad canvas, which is why silhouette designs stay crisp there longer than on wrists. Tell the artist if you wear high-waisted clothes often so the placement sits above common waistlines. A misstep is centering the paw too low, where waistband friction accelerates fading. Sessions typically last under two hours. For summer looks, low-rise or cropped tops pair well, and a cropped denim jacket frames the artwork nicely.
12. Scripted Date with Tiny Paw on Sternum
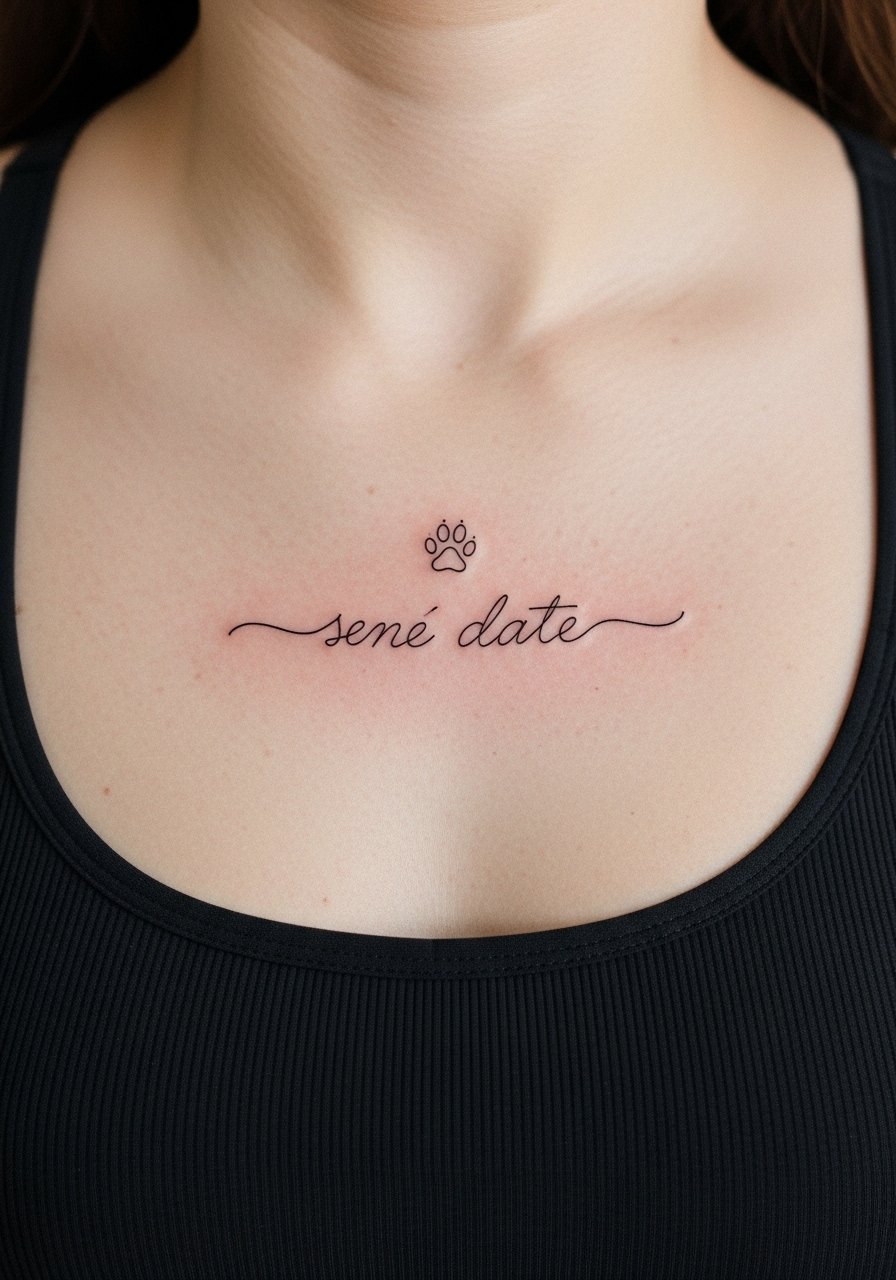
The sternum is a sensitive area and can be more visible in certain clothing. This placement needs an artist practiced in chest work because thin skin and breathing motion affect healing. In consultation, be explicit about the exact script weight, and show the artist where you want the paw relative to the fabric line. One mistake is choosing lettering that is too small next to the paw. Sessions are uncomfortable for most but short. Consider an open-front top to reveal the tattoo without overexposure.
13. Paw with Floral Wreath on Thigh
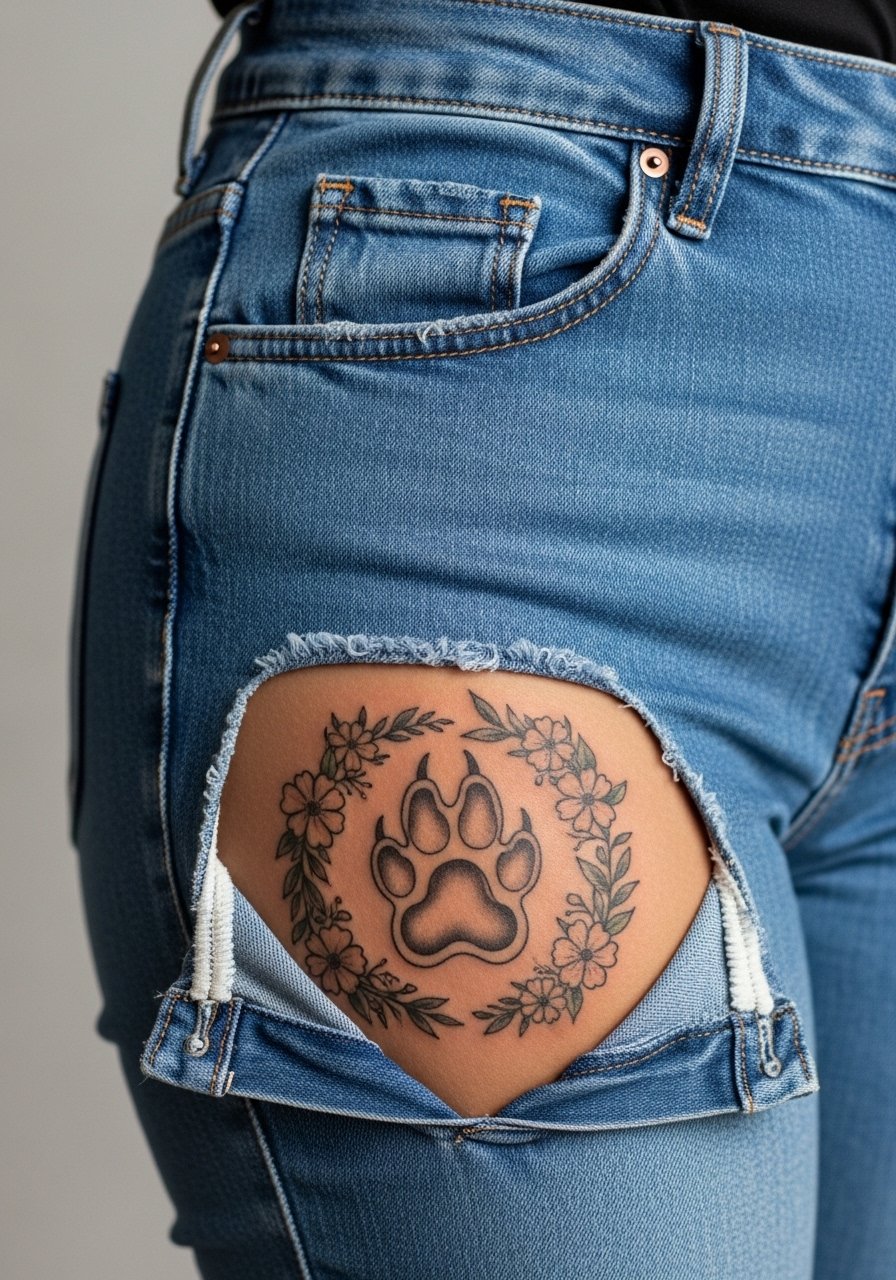
Aging and healing lead works here. Thigh placement holds color and detail well because of lower sun exposure and thicker skin. This design suits anyone wanting a larger, sentimental piece. Tell your artist you want the wreath to frame the paw without touching it so details do not fuse over time. Sessions can be longer but tolerable. For the appointment, wear high-waisted shorts that you can pull down slightly to expose the upper thigh without full undress. Consider this if you value longevity.
14. Paw with Constellation Dot Work on Shoulder Cap
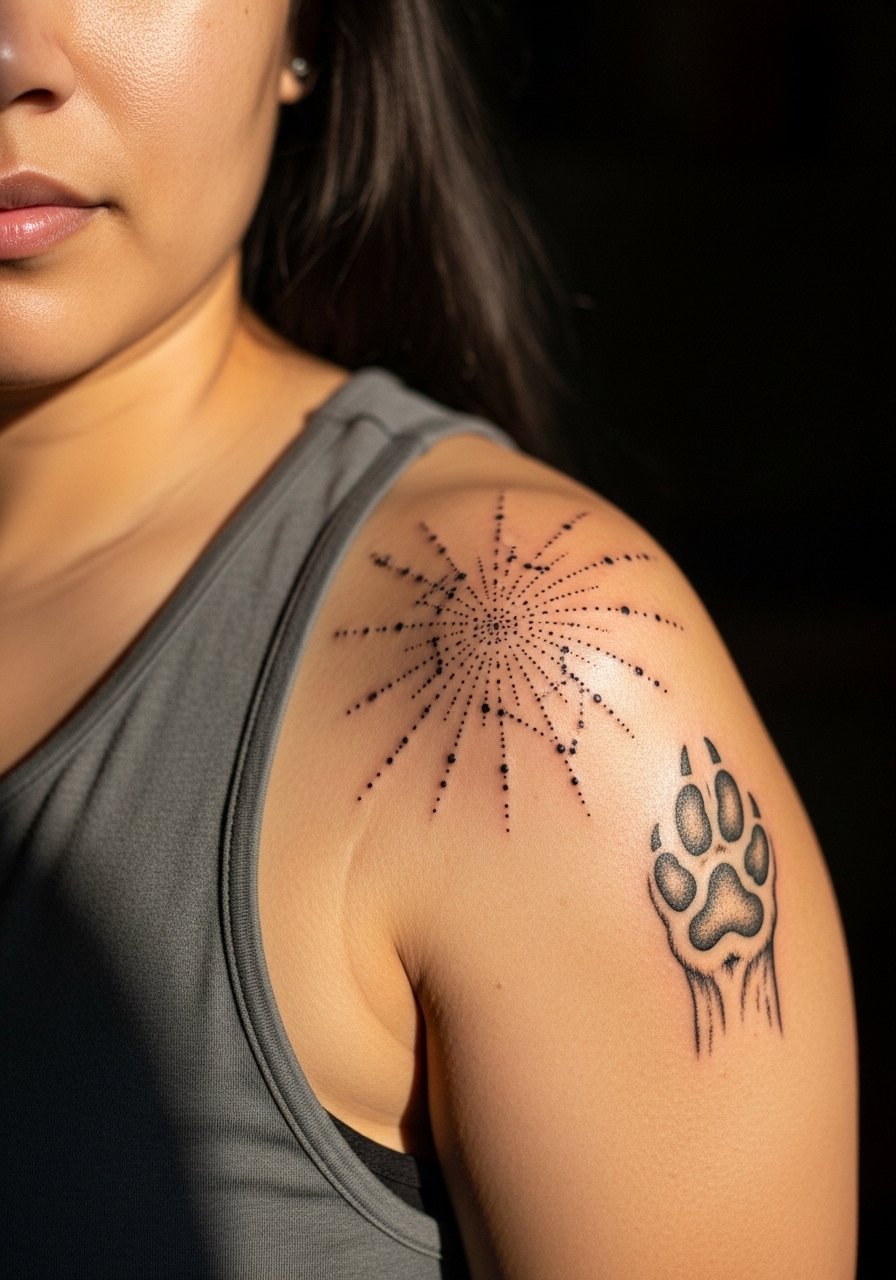
Mistake lead applies here. The shoulder cap tolerates dot work well, but overloading dots causes early blurring in dense clusters. Ask for spaced constellations that reference your pet without saturating the skin. Sessions are short to moderate. For clothing, a loose tank top gives access and frames the finished design for casual wear.
15. Realistic Paw Pad Close-Up on Back of Hand
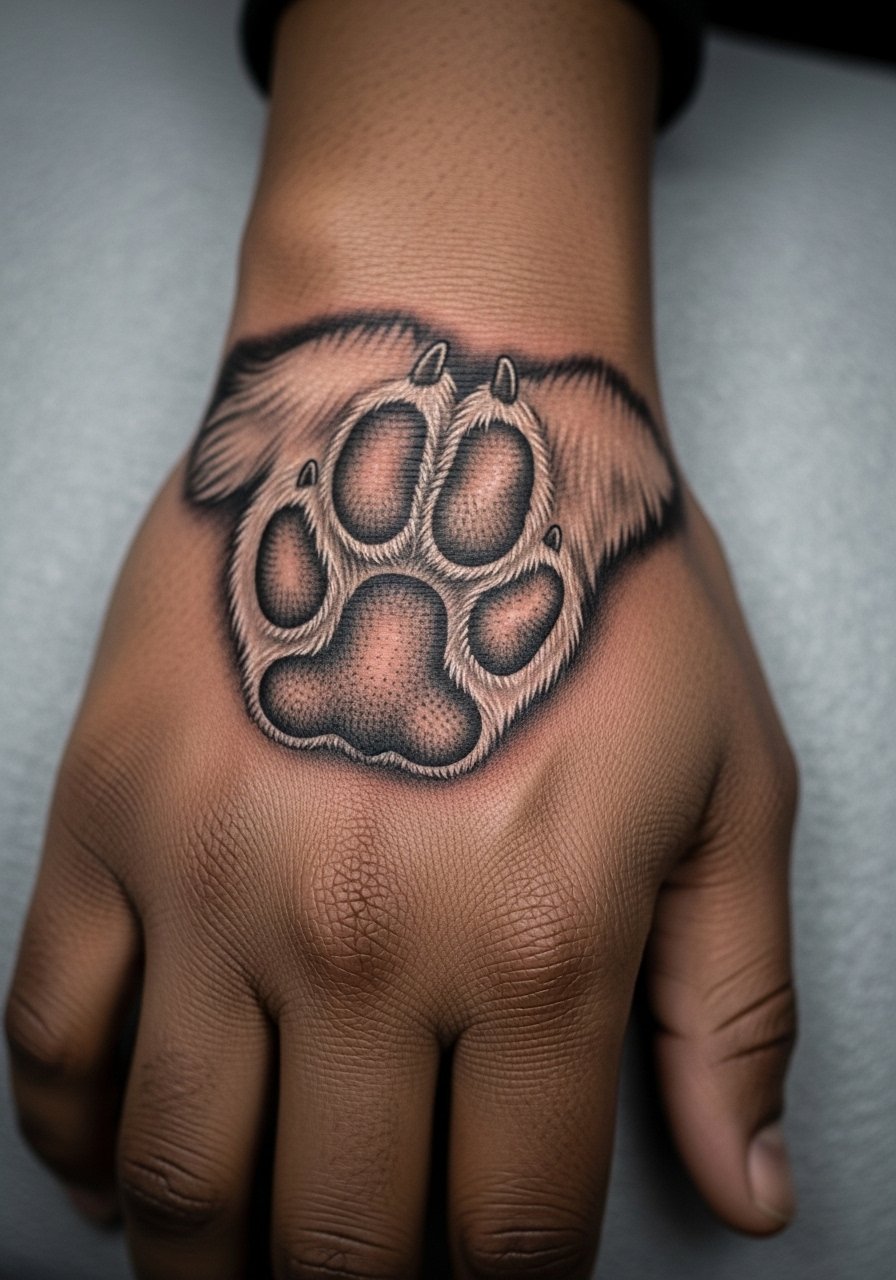
Controversy lead fits this risky spot. Back of the hand gets the most sun and abrasion and often fades faster than other placements. One camp suggests avoiding realism there because daily use erases fine shading. The other camp says bold, simplified realism with stronger contrast lasts longer. If you choose this, request higher contrast and accept touch-ups will be more frequent. Sessions are short but expect the need for revision work at year one to two.
16. Matching Paw Anklet Around Ankle
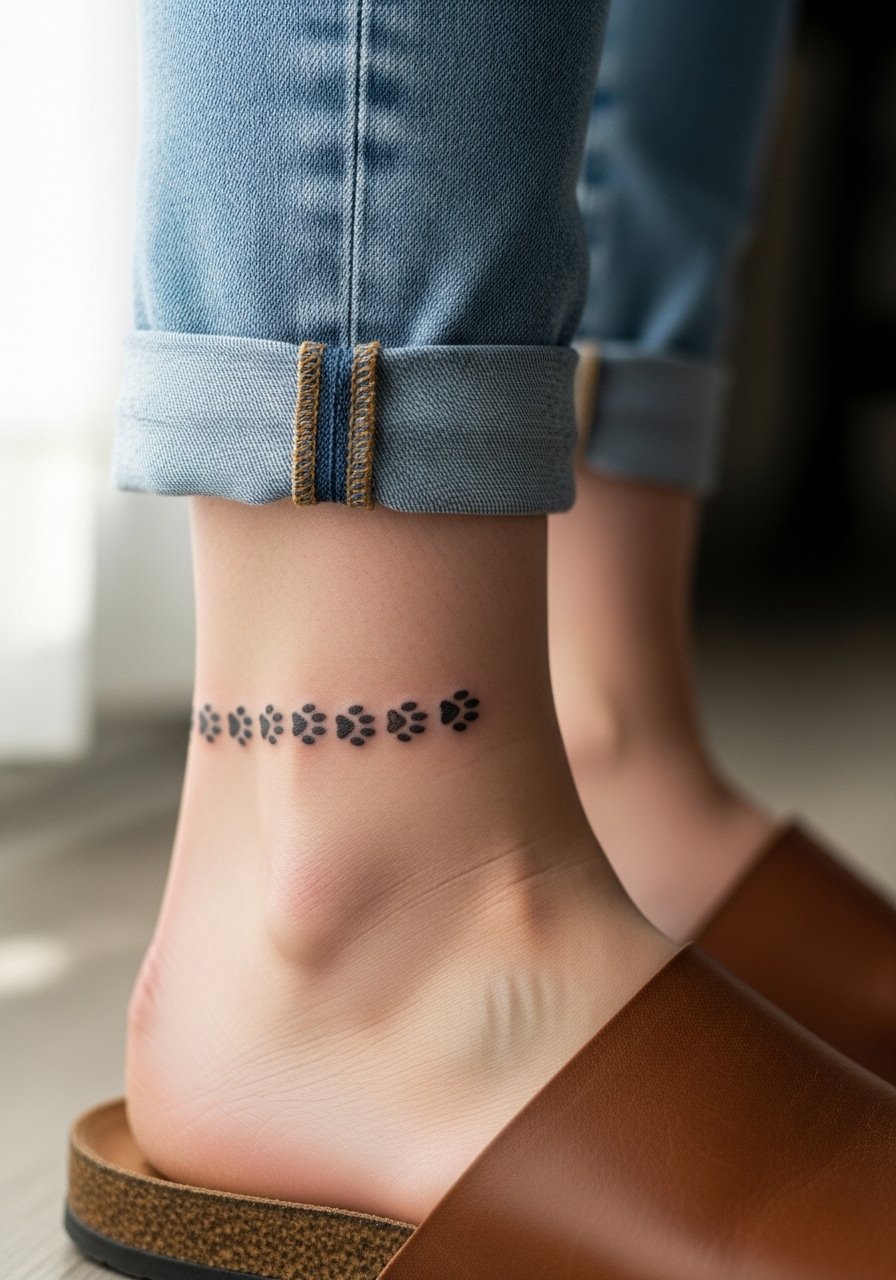
Personal observation: anklet-style placements read like jewelry and pair well with footwear that reveals the design. This area sees friction, so a thin linked pattern with tiny paws works best when the line weight is slightly bolder than micro. A common mistake is asking for an intricate chain detail that vanishes with movement. Tell your artist you want a durable outline and expect touch-up at year two. For display, simple sandals showcase the piece without covering it.
17. Paw with Negative Space Heart on Chest
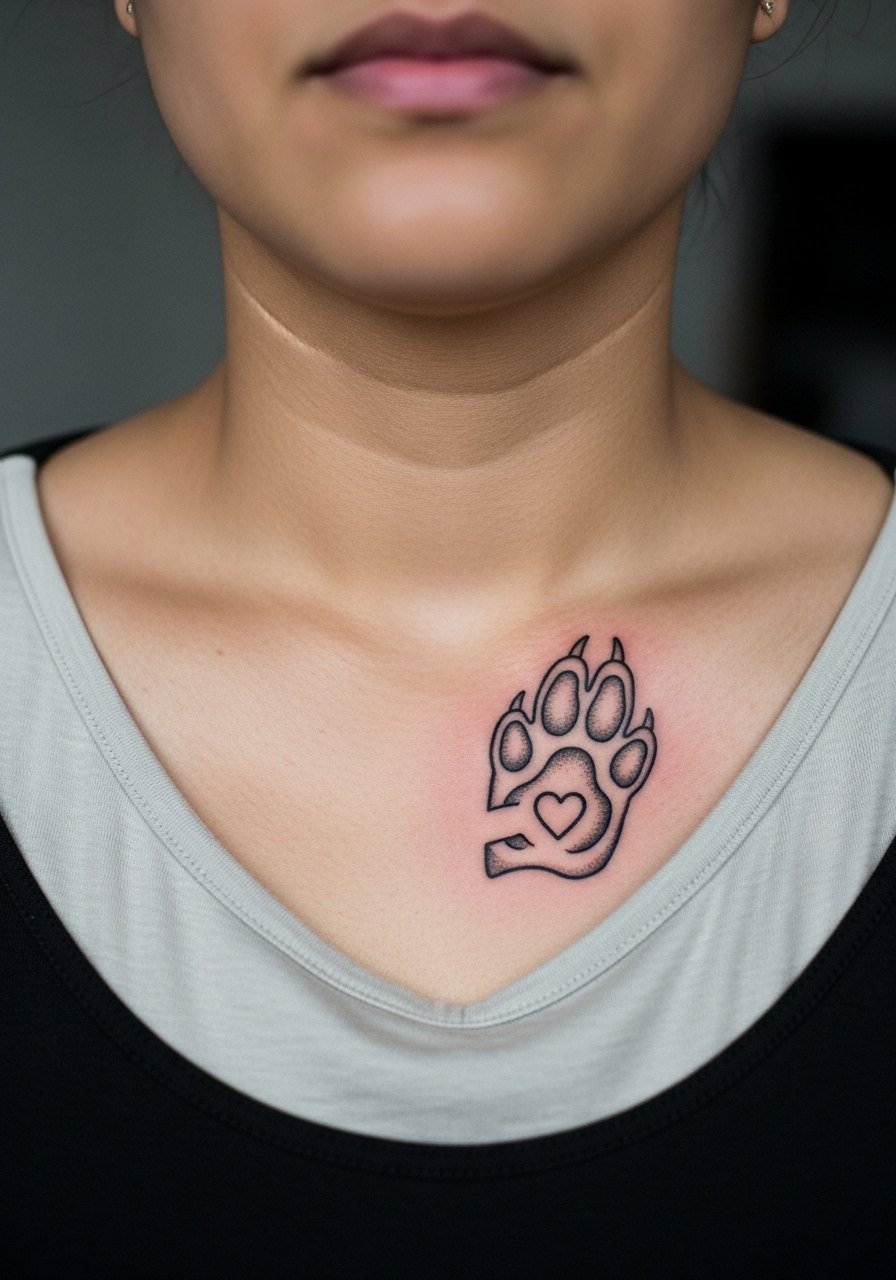
Aging reality lead applies. Upper chest sees sun and movement from shirts, which can flatten subtle negatives. Ask for slightly stronger outlines around the negative heart so it reads as a shape even as edges soften. Sessions are moderate and quick to heal with proper care. One professional consideration is workplace visibility in some industries, so think about placement relative to collars. A wide-neck blouse can either reveal or hide this piece easily.
18. Paw with Watercolor Halo on Calf Side

Visual impact lead works here. Calf side keeps watercolor washes vibrant if the artist layers color properly. The mistake is accepting a pale first session and expecting it to stay intense. Plan for two sittings for brighter saturation. Ask for a muted palette that complements your skin tone rather than a single bright shade that can look patchy as it fades. For casual looks, cropped trousers and a midi skirt show the design with minimal fuss.
19. Paw with Geometric Negative Space on Thigh Side
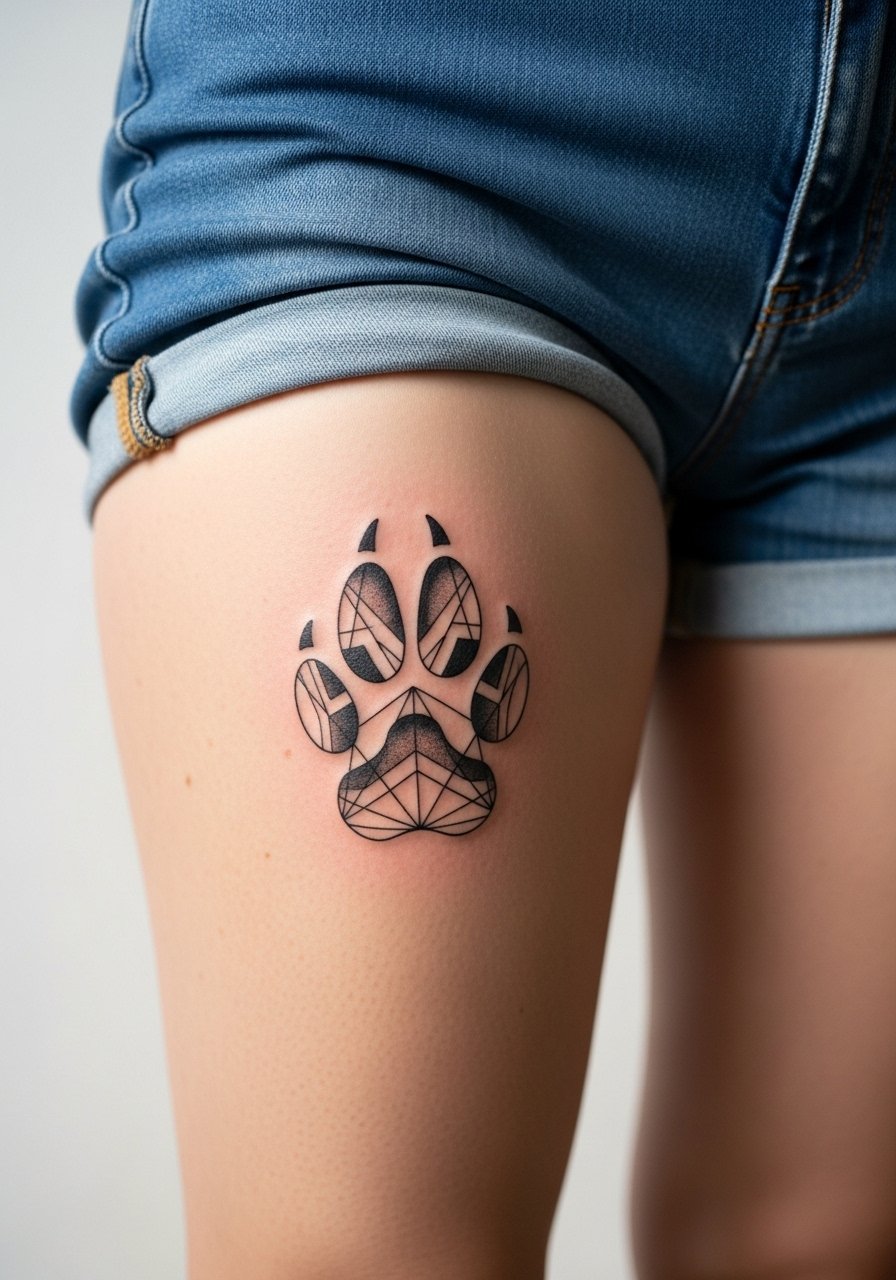
Consultation lead matters most for geometric pieces. The thigh is forgiving, but misaligned symmetry will stand out. Bring reference photos with measurements so the artist can draft a stencil that follows your natural contours. Avoid asking for too many tiny triangles that will blur into each other. Sessions can be longer, and a second visit for fine tuning is common. Wear high-cut shorts for the appointment so the artist can access the area without full undress.
20. Mini Paw on Behind the Ear Skin
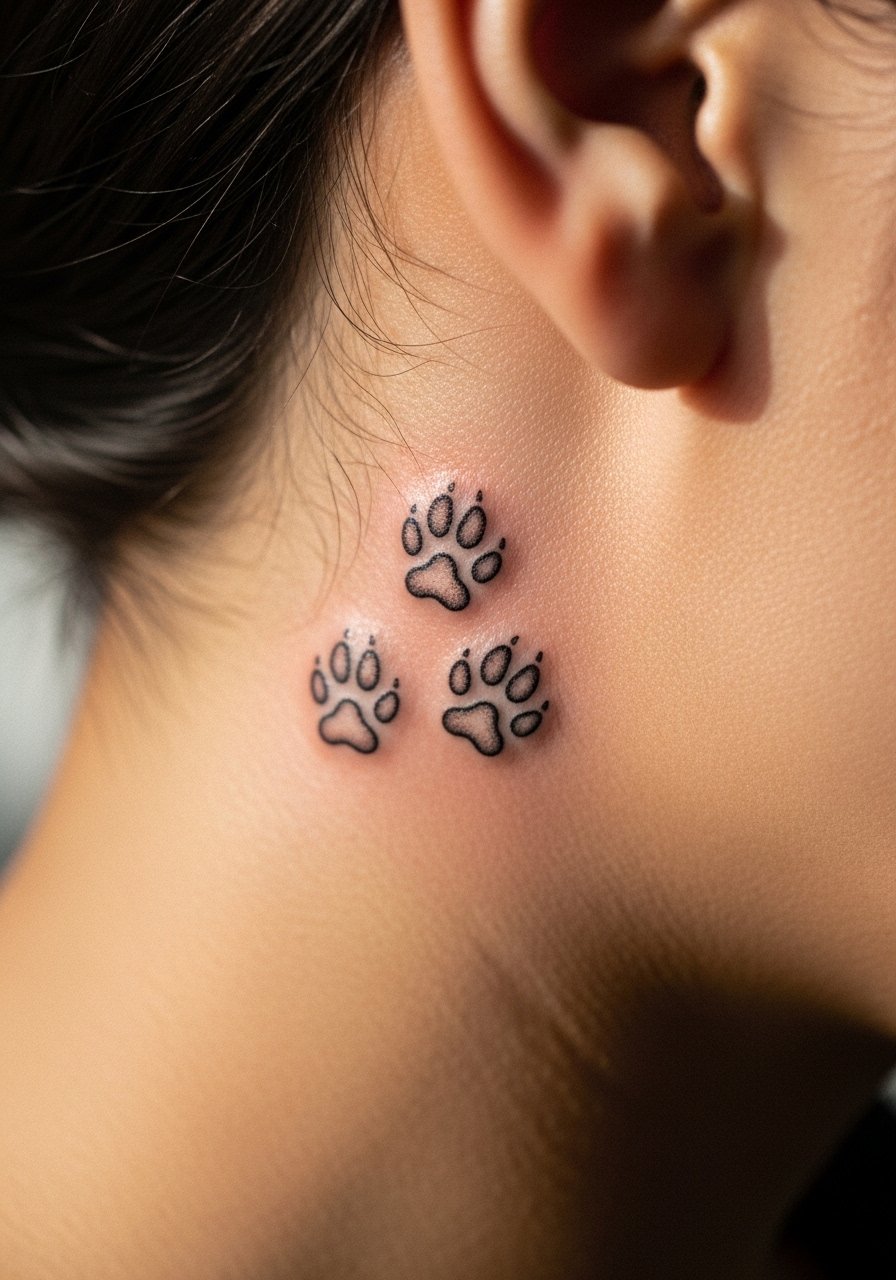
Pain warning lead applies. Behind the ear is thin and very sensitive, but small pieces there are quick. The image prompt follows safety rules and keeps exposure minimal. The main mistake is underestimating how visible it will be when hair is up. If your career requires discretion, consider location carefully. Sessions are brief. Discovery pathways like local shop directories and convention portfolios help find artists experienced with neck-area work.
21. Photo-Reference Paw Portrait on Upper Back
Personal observation lead closes the series. The upper back is one of the best spots for a photo-reference paw portrait because it allows scale without constant sun exposure. Bring multiple high-resolution photos of your pet’s paw taken from the same angle and tell the artist which elements are must-haves. Sessions can be long and may be split into two sittings. Common errors include asking for too much tiny fur detail in a small piece. Use discovery pathways like portfolio sites, local conventions, and hashtag searches to find someone who photographs healed work well.
Frequently Asked Questions
Q: Will a fine line realistic dog paw blur faster on the ribs compared to the forearm?
A: Yes, ribs tend to blur faster because the skin moves with breathing and stretches more often. I've seen ribs need touch-ups sooner than forearms. If you love the ribs, ask for slightly more spacing and a stronger contour so the paw reads longer.
Q: How visible will a tiny paw between the fingers stay over time, and is it worth it?
A: Finger placement fades faster due to constant washing and thin skin. It can look great for a year and then soften noticeably. If you want visibility, plan for maintenance visits and choose simpler pad shapes rather than micro texture.
Q: What should I wear to a session for a shoulder blade watercolor paw?
A: Wear a loose tank top that clips or lifts easily so the artist can reach the shoulder without you needing to remove much clothing. A loose tank top is a practical choice and keeps you comfortable during longer sessions.
Q: Are chest and sternum paw designs more likely to need touch-ups than thigh pieces?
A: In my experience, chest and sternum work often needs more adjustments because of thinner skin and sun exposure. Thigh pieces usually retain saturation longer. If you choose chest, plan for at least one touch-up within a few years depending on sun exposure.
Q: How do I find an artist who can do a photorealistic paw portrait without naming an individual?
A: Use discovery pathways like local convention lineups, portfolio searches on gallery sites, and specific hashtags for photorealism. Look for healed-photo examples that match your skin tone and the scale you want, and ask about healed photos during consultation.
