
Fine line fillers are everywhere on feeds, but what holds up and what fades fast are two different stories. Trends push micro detail and pastel wash, yet longevity really comes down to placement, skin tone, and needle spacing. I put together practical filler ideas that solve common gaps, show how they age, and offer wardrobe tips so your new ink looks intentional from day one into year three.
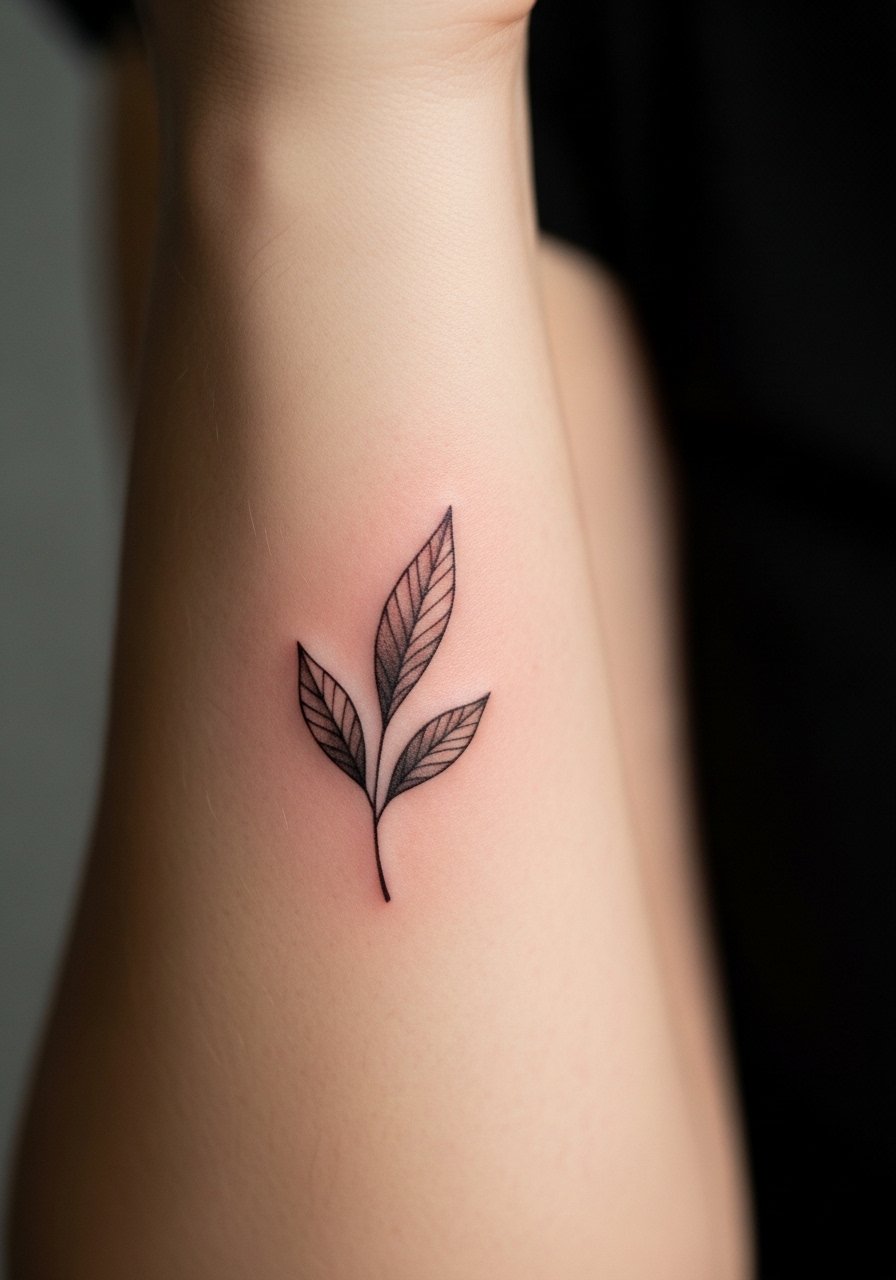
1. Fine Line Vines Linking Sleeve Gaps
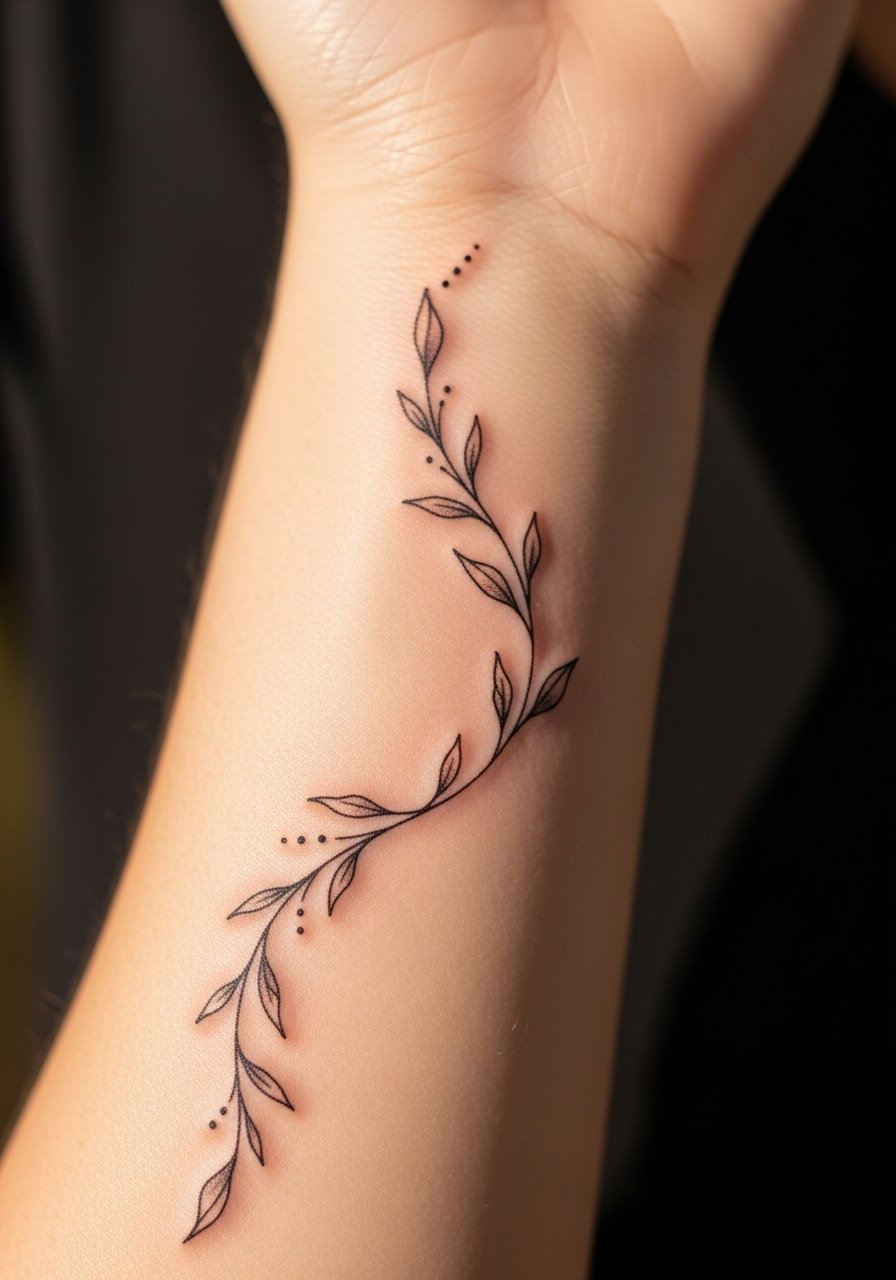
I see vine fillers used to thread older pieces together because they add motion without taking visual priority. Ask your artist for slightly varied leaf spacing and a single-needle weight that resists merging over time. The common mistake is packing too many tiny leaves in a small area, which blurs after a couple of years. Forearm pain is low and sessions are short. For showing it off, roll sleeves up and pair with a thin chain pendant necklace so the neckline frames the arm when you move.
2. Neo-Traditional Rose Clusters for Upper Arm Gaps
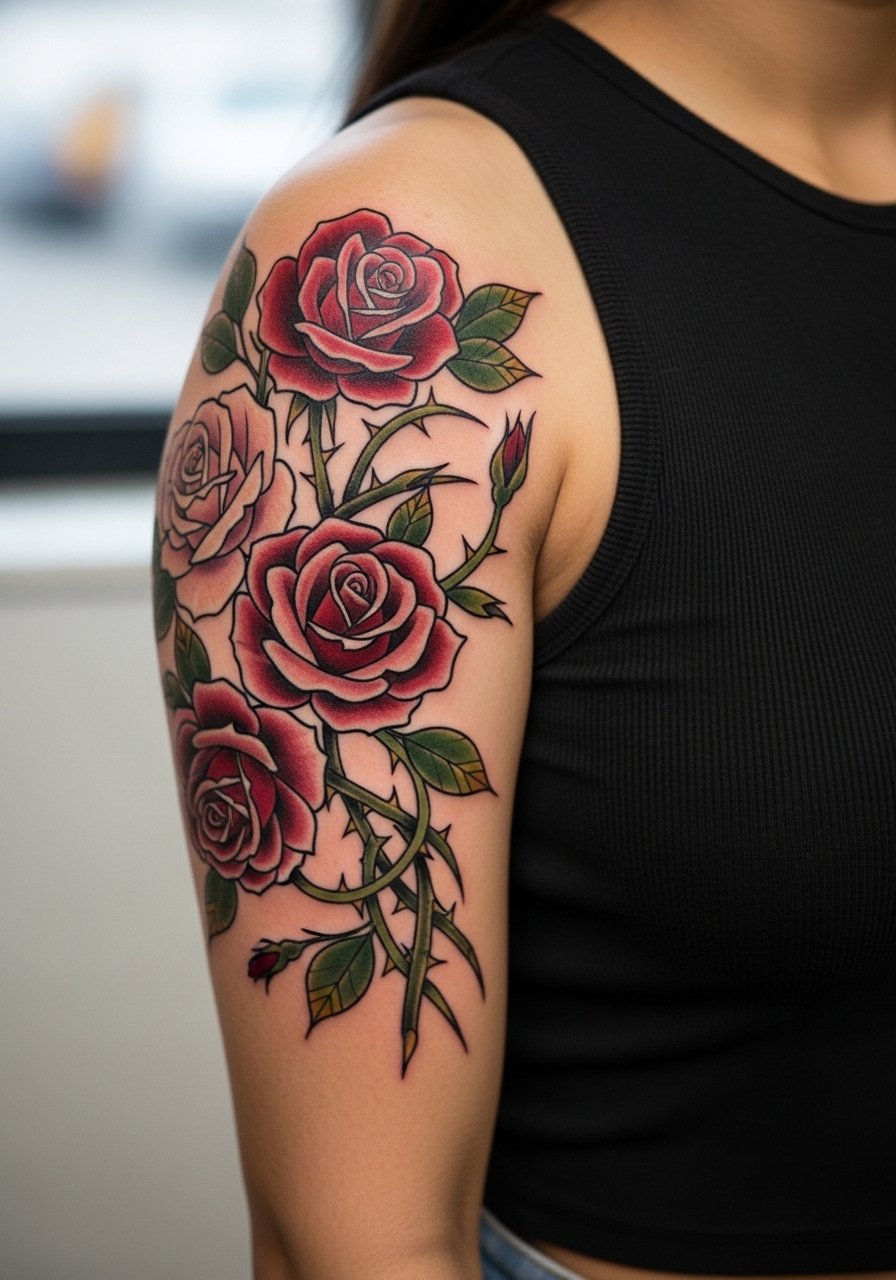
Bold roses work well where you want color continuity between black and gray pieces and a pop that ages into dense saturation. Tell your artist you want a slightly thicker outline and confident color packing to avoid early washout. The usual regret is tiny roses with watercolor fills that bleed into each other. Upper arm sessions are moderate with decent visibility for touch-ups. Pair this with a loose button-down shirt you can pull aside on session day and later cuff sleeves to show off the blooms.
3. Minimalist Geometric Stars to Fill Wrist-to-Elbow Gaps
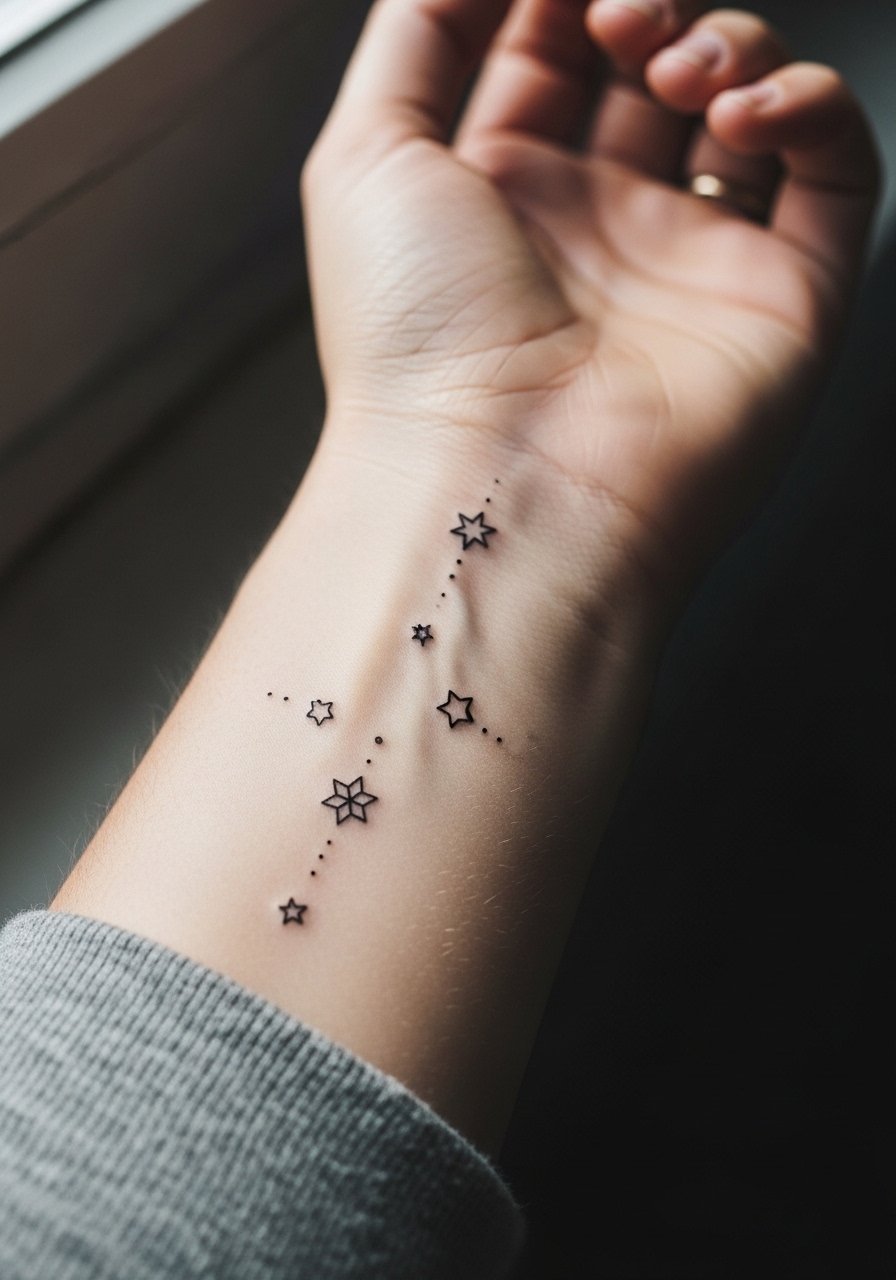
Micro geometric stars are great when you want negative space to breathe between bigger motifs. The biggest mistake is scaling them too small for dense areas. In the first six months the points read crisp, and at two years they may need touch-ups on active skin like the wrist. Expect a quick, low-pain session. For nights out, stacked dainty bracelets or a minimalist watch keep attention on the wrist without overwhelming the tiny stars.
4. Blackwork Mandala Fragments for Shoulder-to-Chest Transitions
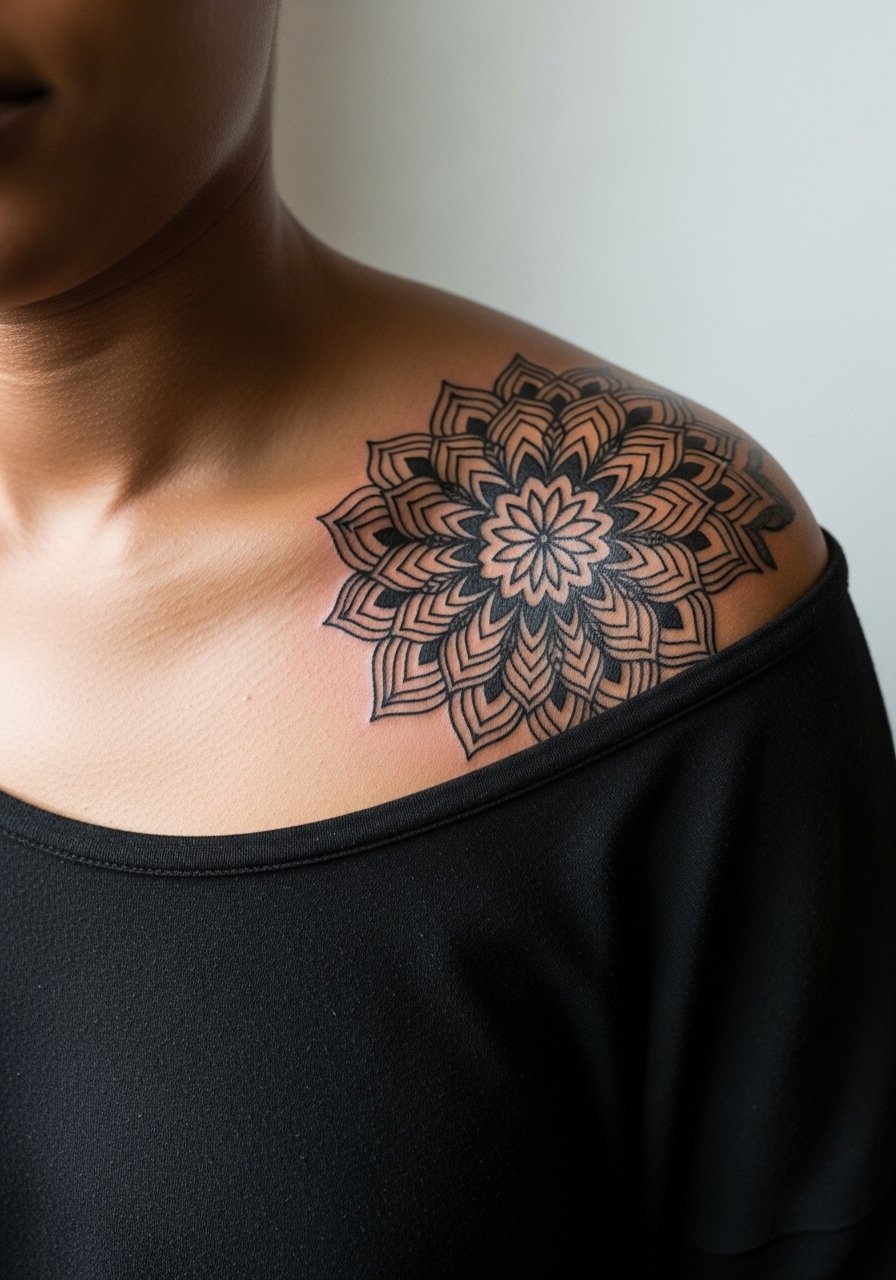
Mandala fragments solve awkward curves where a full round mandala would clash with anatomy. Artists split on line density here. One camp says tight stippling holds up, the other says heavy saturation is safer. Ask for spacing that respects the shoulder curve. These pieces take longer and may need two sessions for solid saturation. For session comfort, wear a loose button-down shirt you can slide off one shoulder so the artist has clear access.
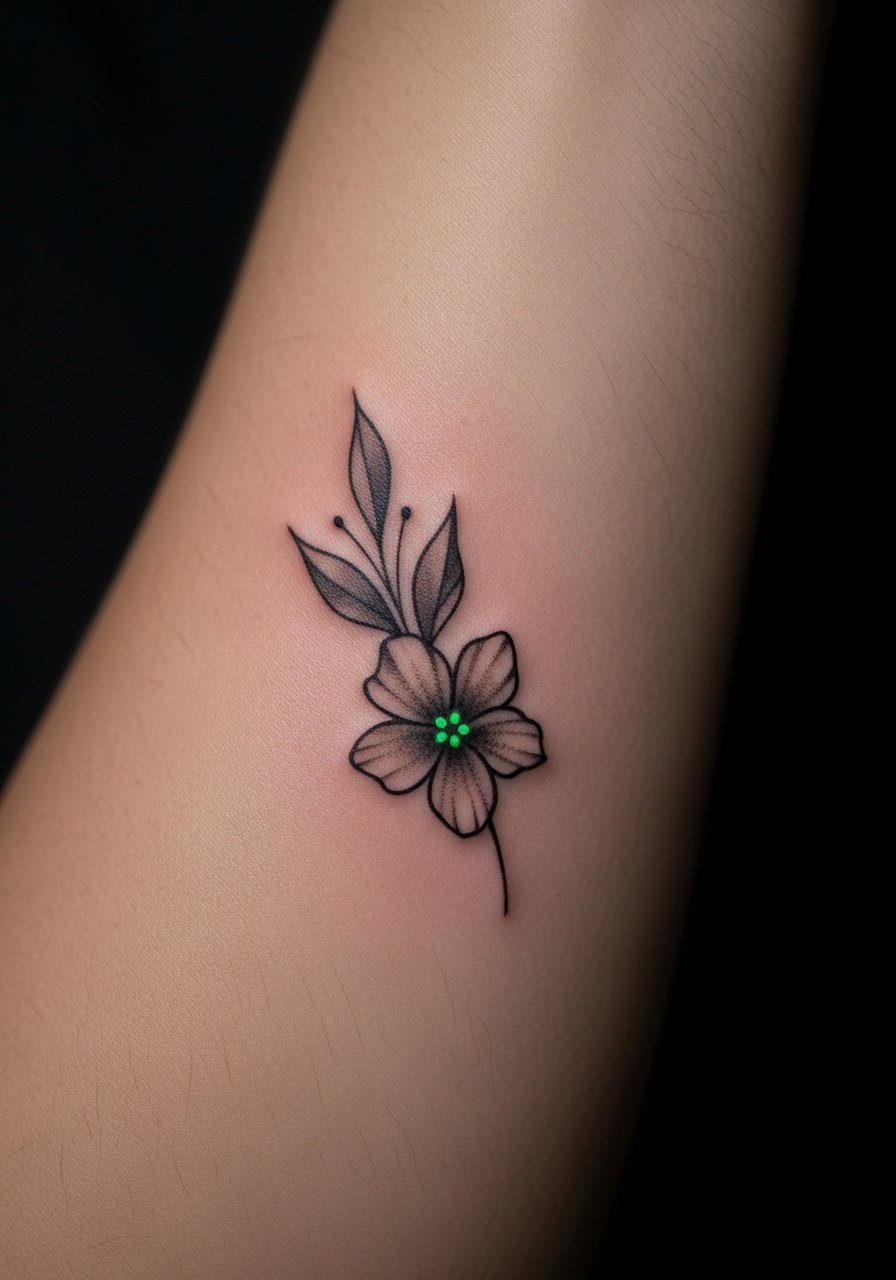
5. Watercolor Cherry Blossoms on the Inner Bicep
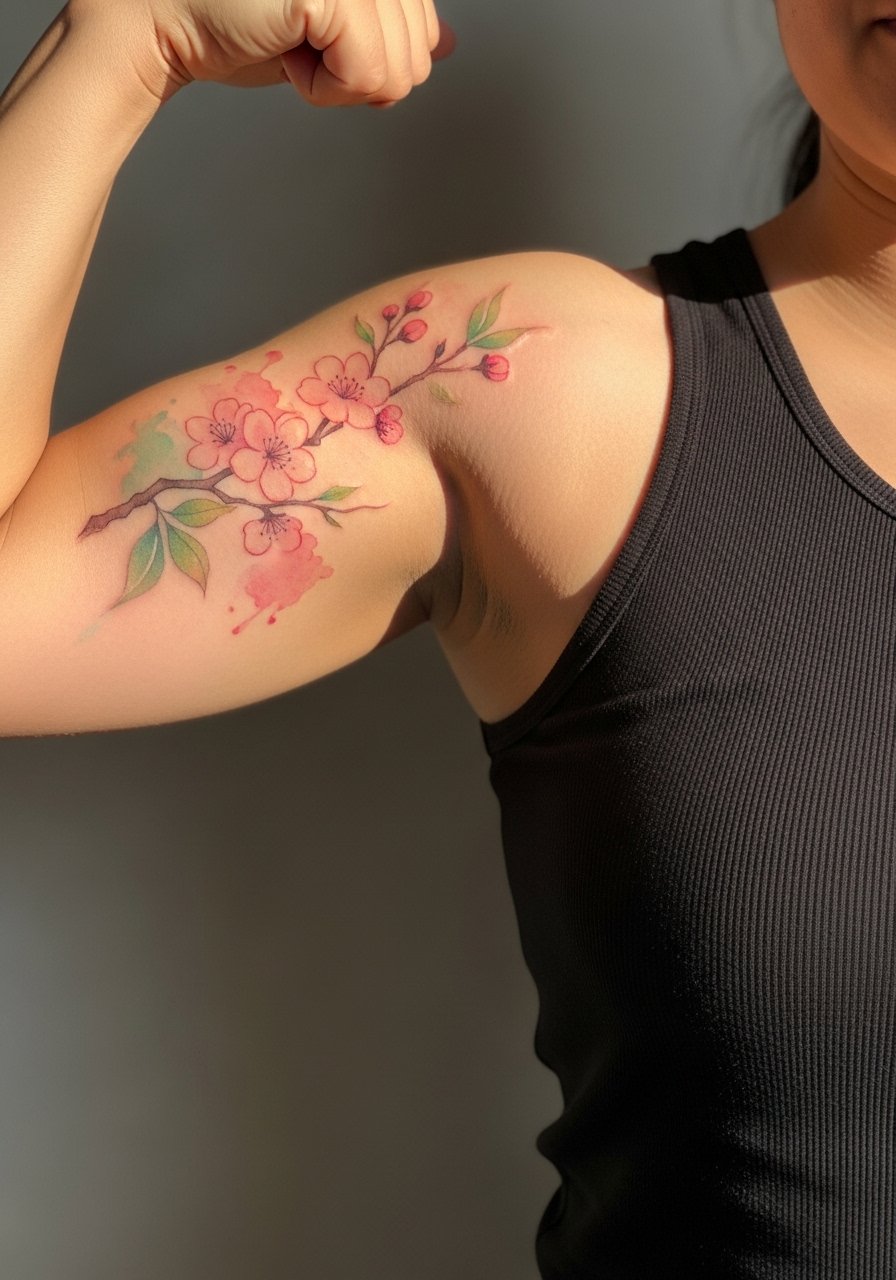
Watercolor fills create soft transitions between bold motifs, but they are the most sensitive to bleed and sweat. The common failure is using watercolor where skin texture or sweat will muddy the pigments. Inner bicep is moderately painful and heals poorly if exposed to gym sweat. Ask for slightly stronger outlines to contain the wash and plan a touch-up. For the session, wear a racerback tank so the artist can access the area without you being uncomfortable.
6. Micro-Realism Insects, Like Bees, for Outer Forearm Gaps
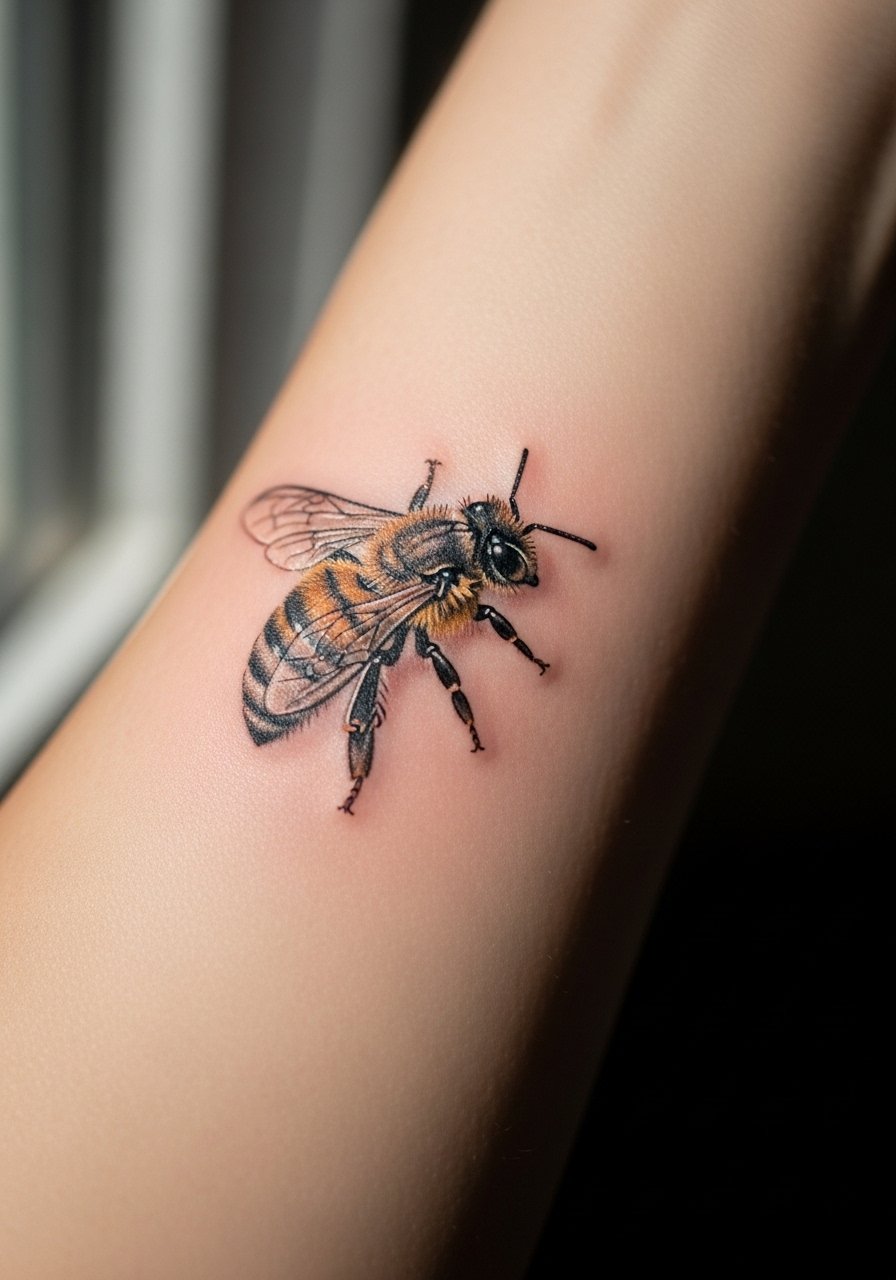
Micro-realism bees add life and focus to sleeve gaps without overpowering surrounding work. The session feels precise and calm, because artists work slowly to render tiny textures. A mistake is asking for ultra-tiny detail that the skin cannot hold, so agree on minimum size in consult. Plan a one-session visit and expect a touch-up in a year if you want it crisp. Pair this with rolled-up sleeves and a thin chain bracelet for casual framing when you want the bee visible.
Studio Day Picks
Those first six ideas include both visible forearm work and inner arm pieces, so a few session-day items make the appointment easier and protect fragile linework during the first week.
-
Stencil transfer paper kit. Lets you preview exact line placement on skin before the needle touches down, helpful for the fine vine and star layouts above.
-
Topical numbing cream. Applied as directed before appointments eases wrist and inner bicep sensitivity without altering the artist's linework when used properly.
-
Thin protective film roll. Keeps small wrist and finger pieces clean during the first week of hand washing and friction.
-
Fragrance-free body wash. Gentle cleansing protects watercolor and fine line pieces on the inner arm as they heal.
-
Aquaphor healing ointment. A thin layer for the initial days helps protect needle channels on delicate micro work without excessive clogging.
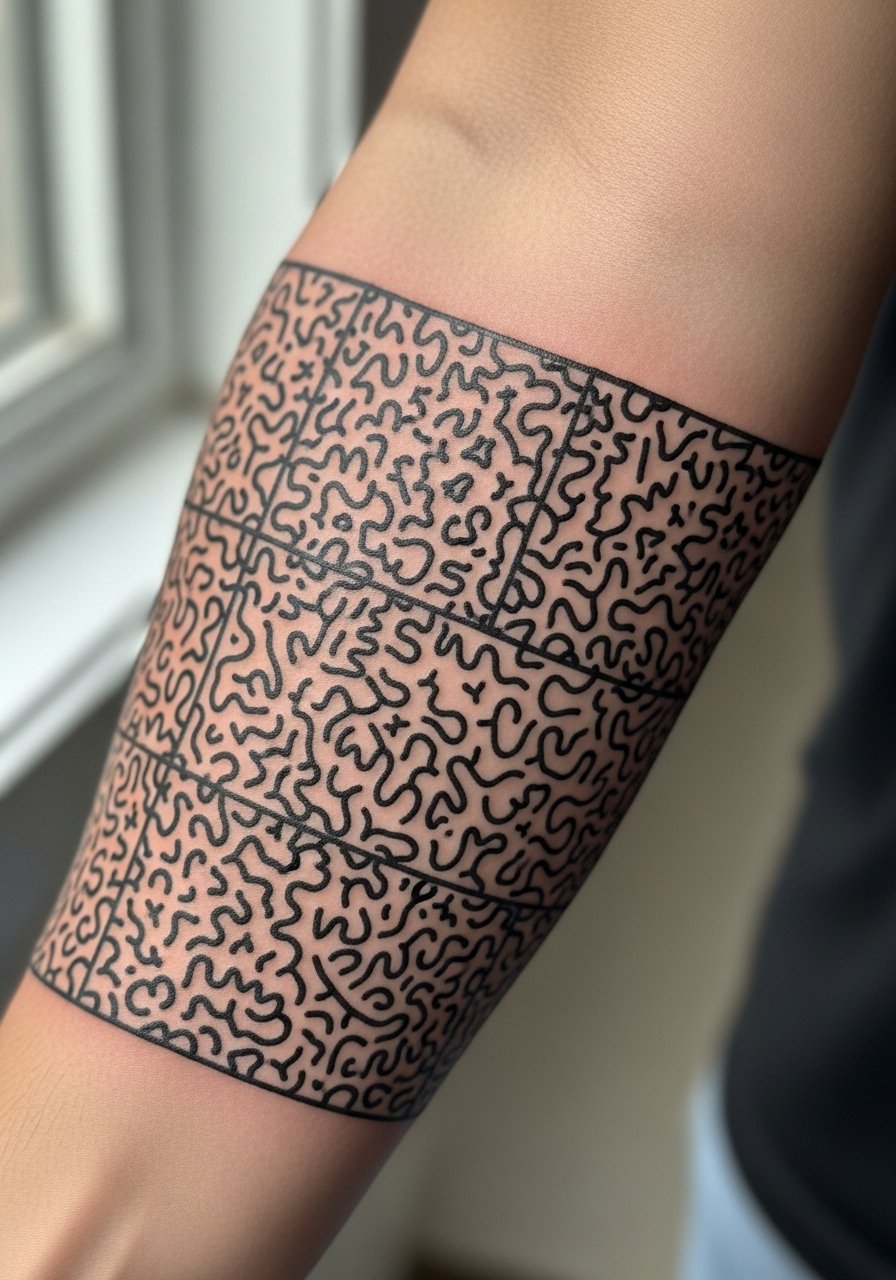
7. Ignorant Style Squiggles for Elbow Ditch Fillers

Ignorant squiggles are playful and low-commitment. They work especially well in the elbow ditch where odd shapes look intentional. Expect a short, bold-line session and minimal pain because the artist moves quickly. The usual error is trying to make a squiggle too detailed. Keep it graphic and unapologetic. For post-session wear, choose loose sleeves or roll a casual linen shirt so the elbow heals without tight fabric rubbing.
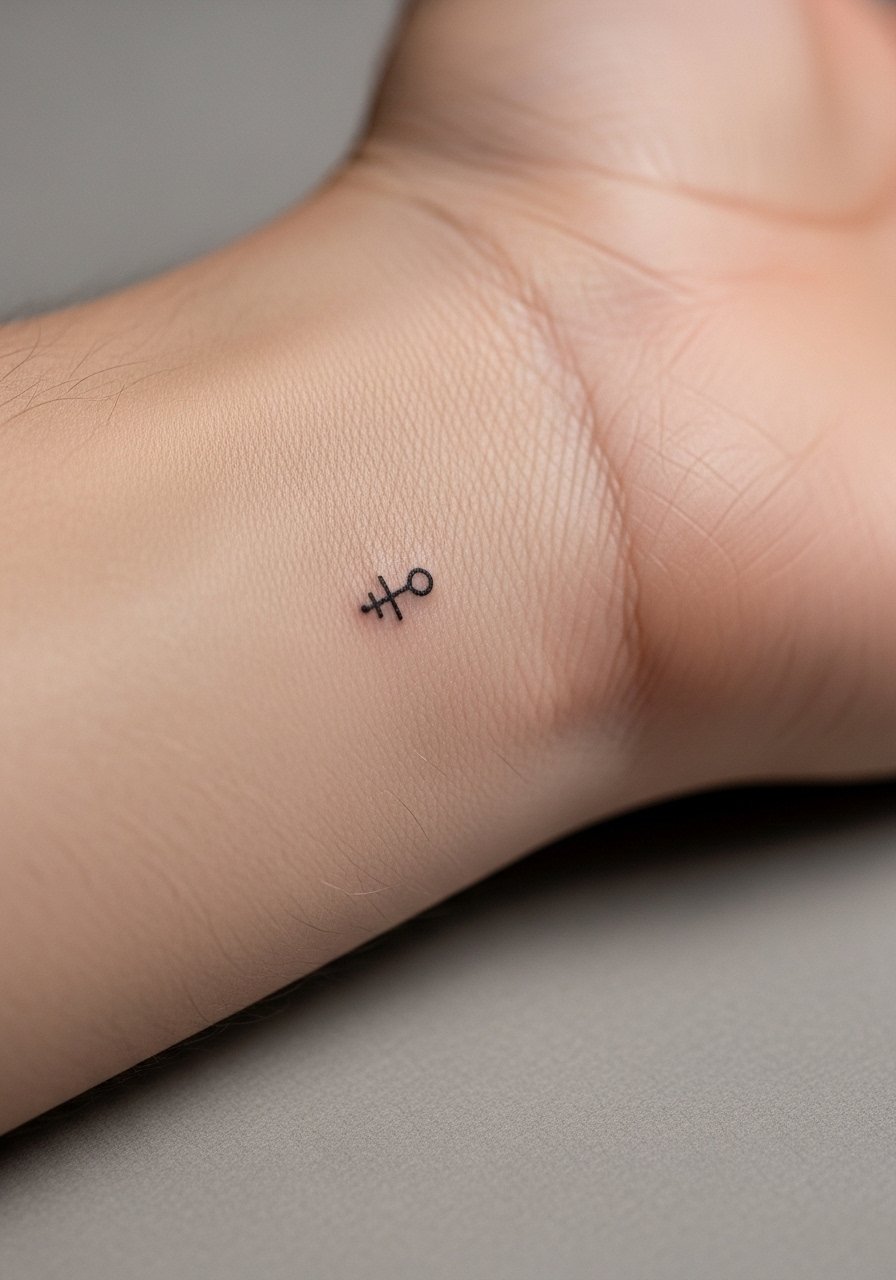
8. Ornamental Dots and Chain Links Around the Wrist
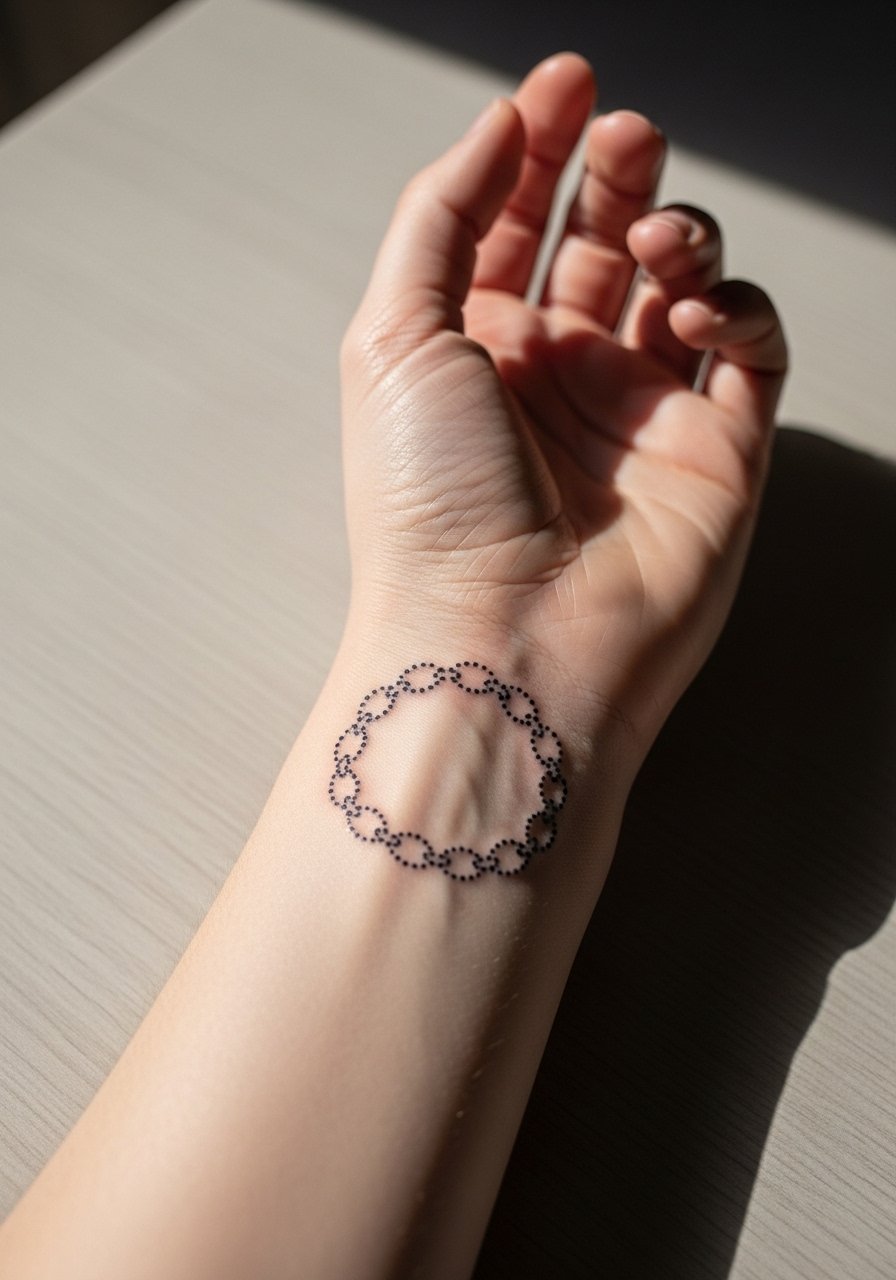
Dots and chain links solve visibility issues on the wrist while creating a rhythm across joint lines. Dot work ages well when the artist spaces points with blowout risk in mind. The typical mistake is clustering dots too tightly. These pieces are quick and have low pain. Stack with thin bracelets and a minimalist watch to keep the wrist curated without hiding the dots.
9. Traditional Anchor with Rope on Lower Arm
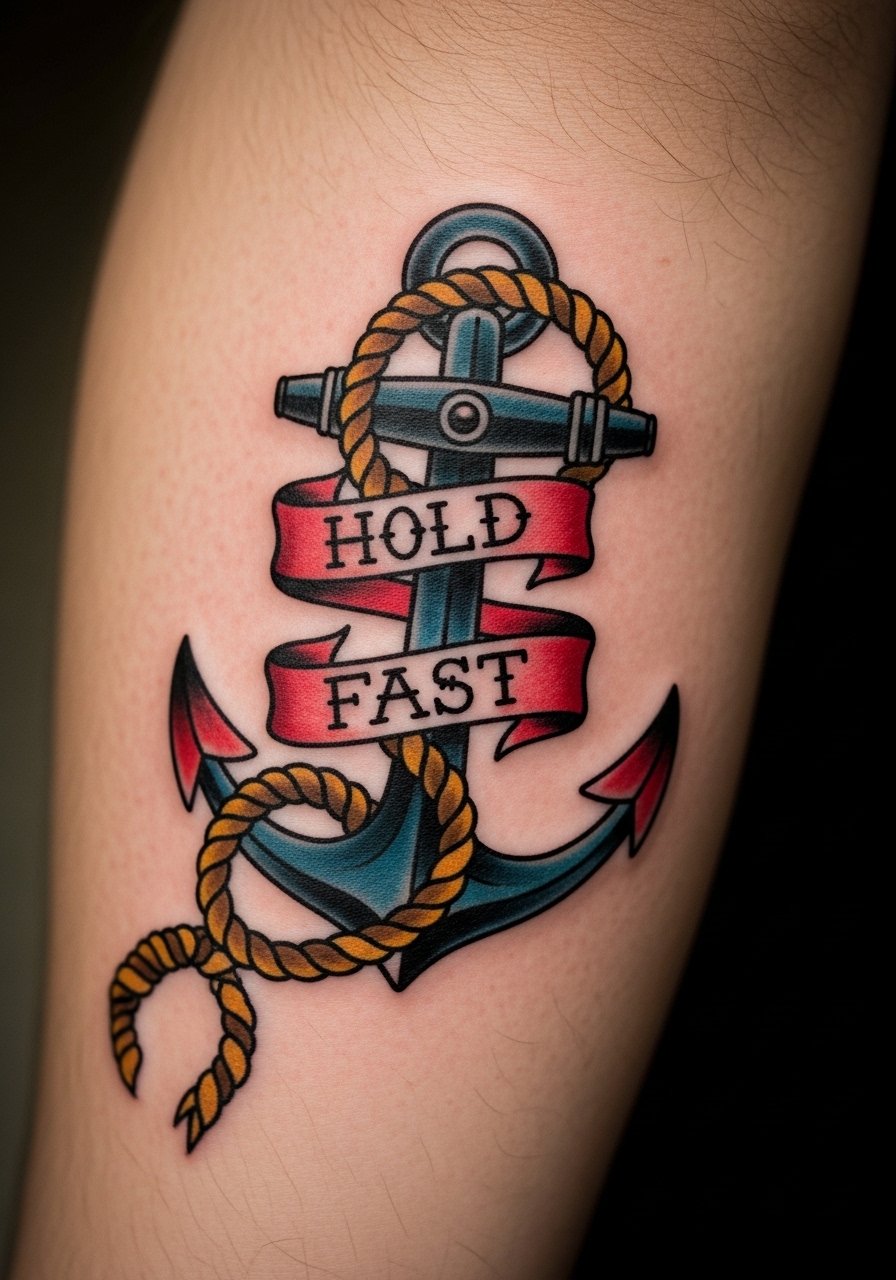
Traditional anchors bring a classic anchor point to nautical sleeves and bridge heavier blackwork areas. Ask for confident outlines and saturated fills to avoid early washout that some watercolor-heavy anchors suffer from. Lower arm sessions are moderate and photograph well. A common annoyance is artists scaling the anchor too small to make room for other motifs. Wear a short-sleeve tee on session day so the artist can access the lower arm with ease.
10. Fine Line Cascading Waves for Collarbone Transitions
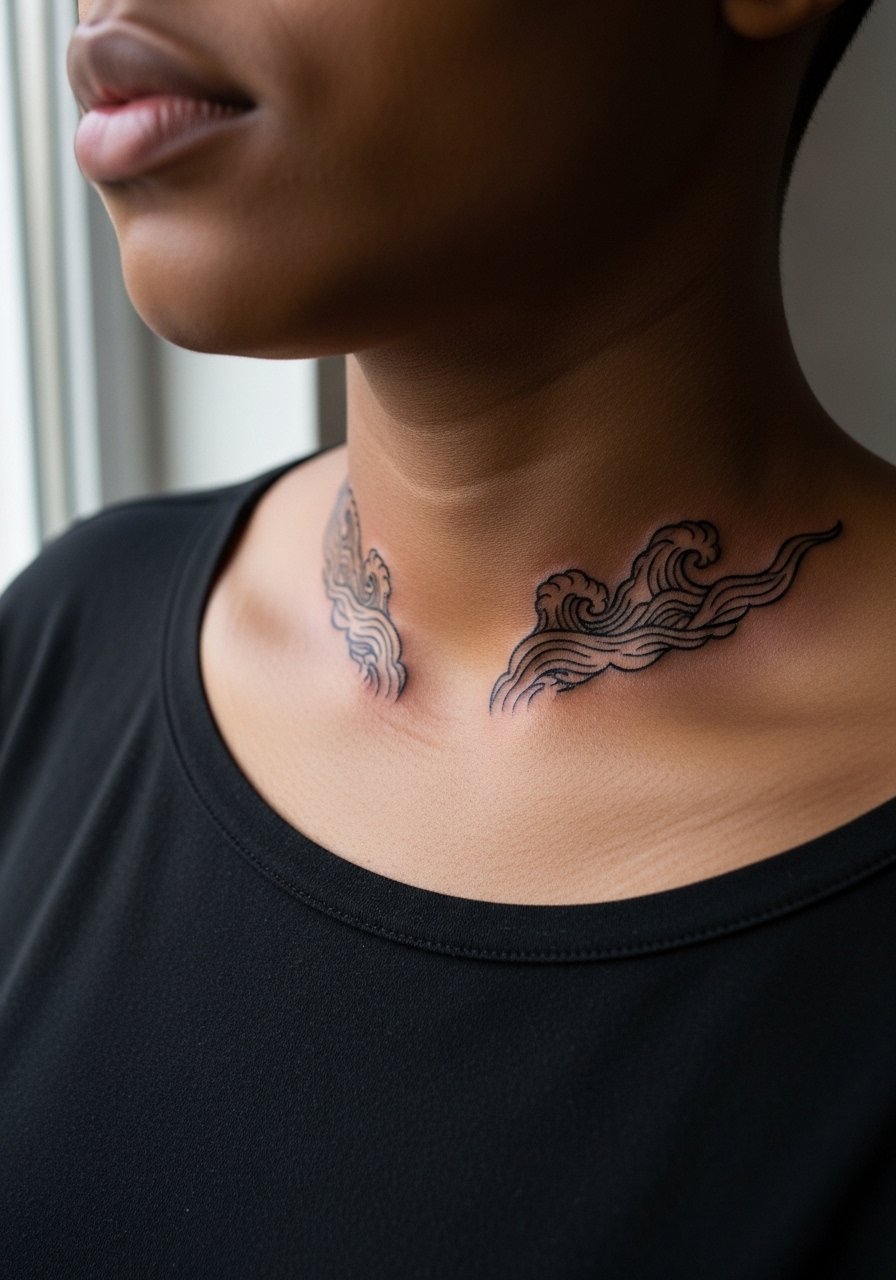
Waves mimic motion and ease transitions between chest and arm pieces. Collarbone skin moves differently and can distort dense linework. To avoid that, ask for slightly wider spacing in the wave curves. Pain on the collarbone is higher than the forearm but tolerable in short bursts. Pair this with open-neck tops or an open-back midi dress to let the wave read without interference from necklaces.
11. Black and Gray Feathers for Thigh Gaps
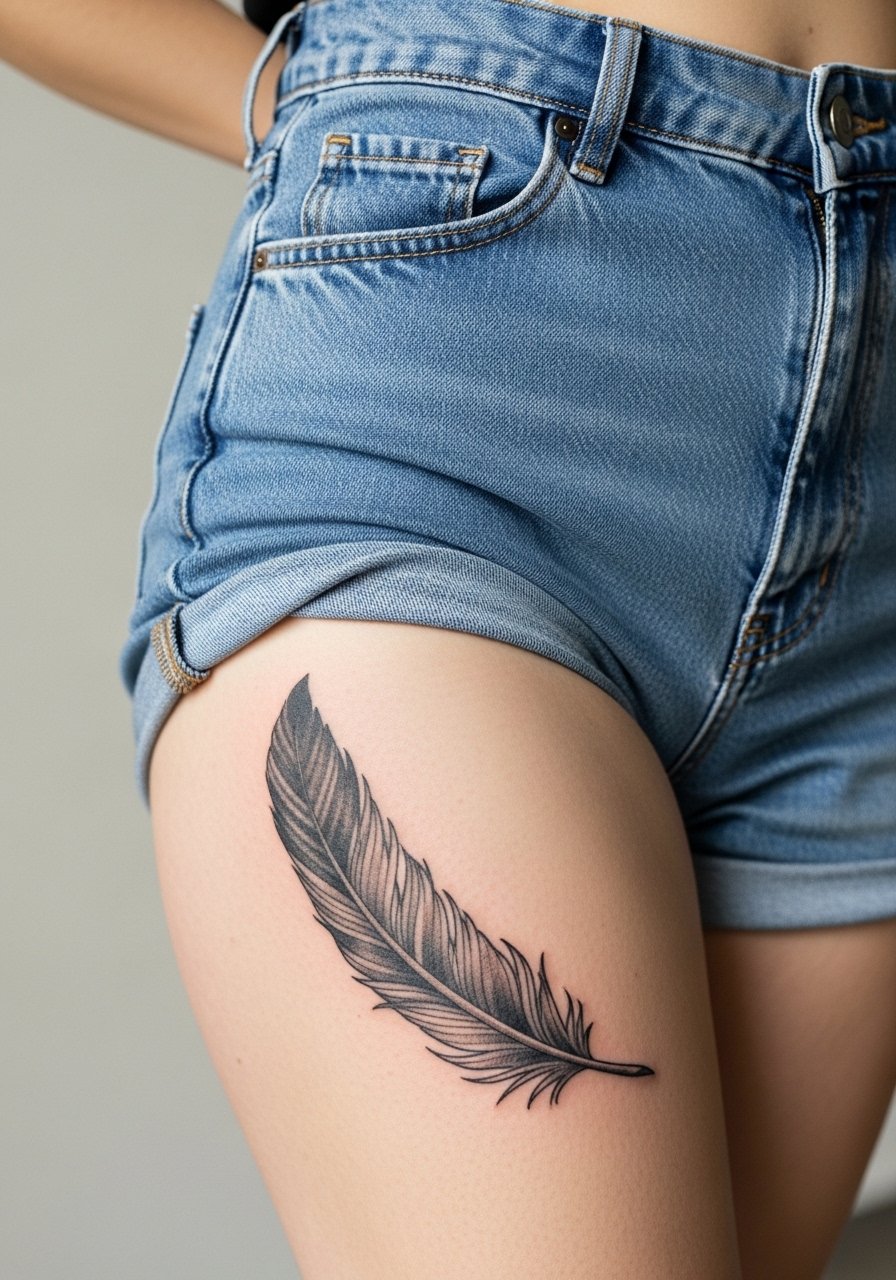
Feathers fill thigh gaps elegantly and age gracefully when shaded densely. The outer thigh is forgiving for gradient shading, but gym sweat and friction from tight pants can muddy detail during healing. Ask for slightly bolder barbs near the base to hold through movement. Sessions are moderate and often done in two passes for ideal saturation. For session comfort, wear loose shorts or a loose drawstring linen pant so the artist can roll the leg up without pressure.
12. Minimalist Hourglass on the Side Torso
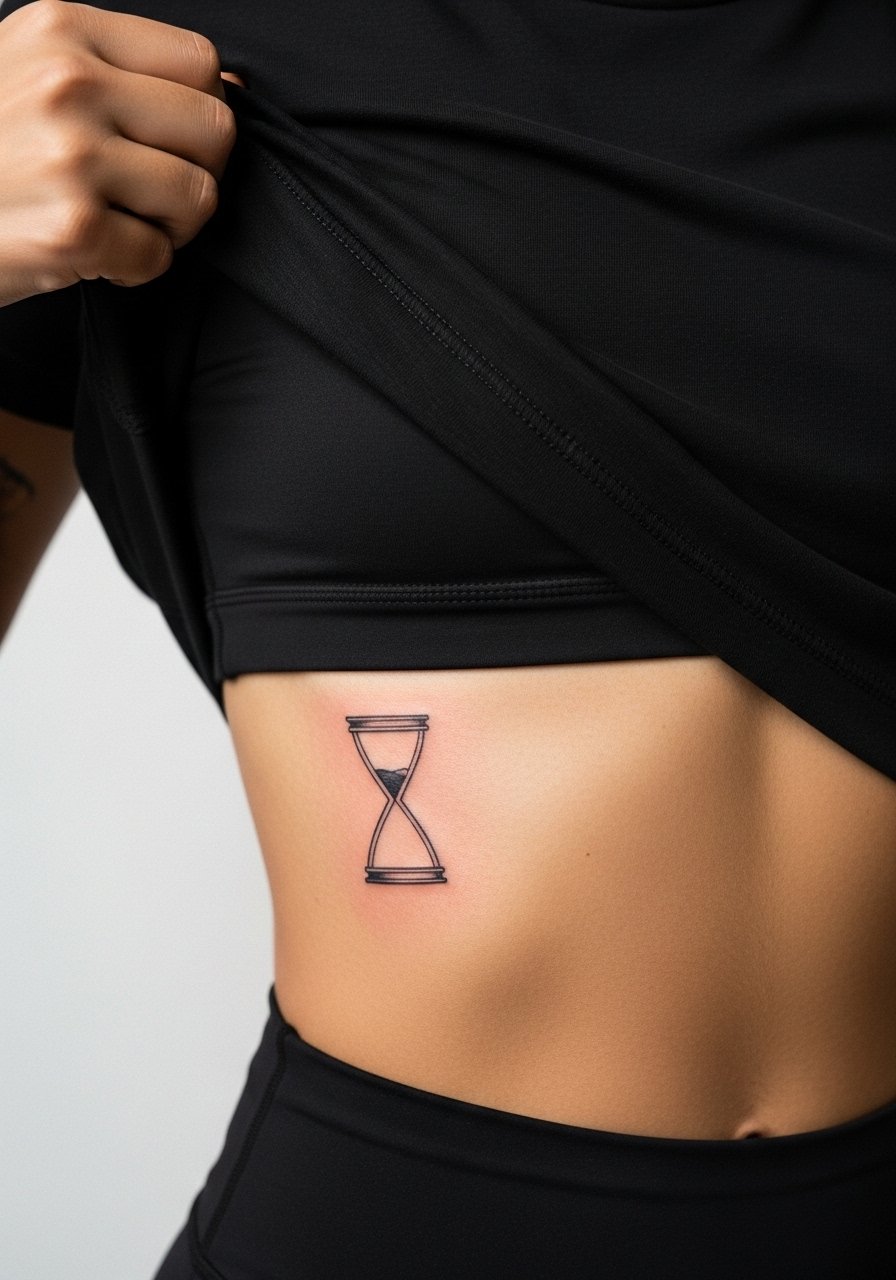
Ribcage fillers like an hourglass are compact and symbolic, but the ribs are a high-pain zone prone to line blur if too fine. Artists disagree on fine line on ribs. One camp says the stretch blurs lines within two years. The other camp says a slightly deeper needle depth and spacing holds. Ask for a slightly bolder outline and budget a touch-up. Wear a fitted sports bra on session day so the artist can access the sternum and ribs safely.
13. Neo-Traditional Swallows in Flight on the Back Shoulder
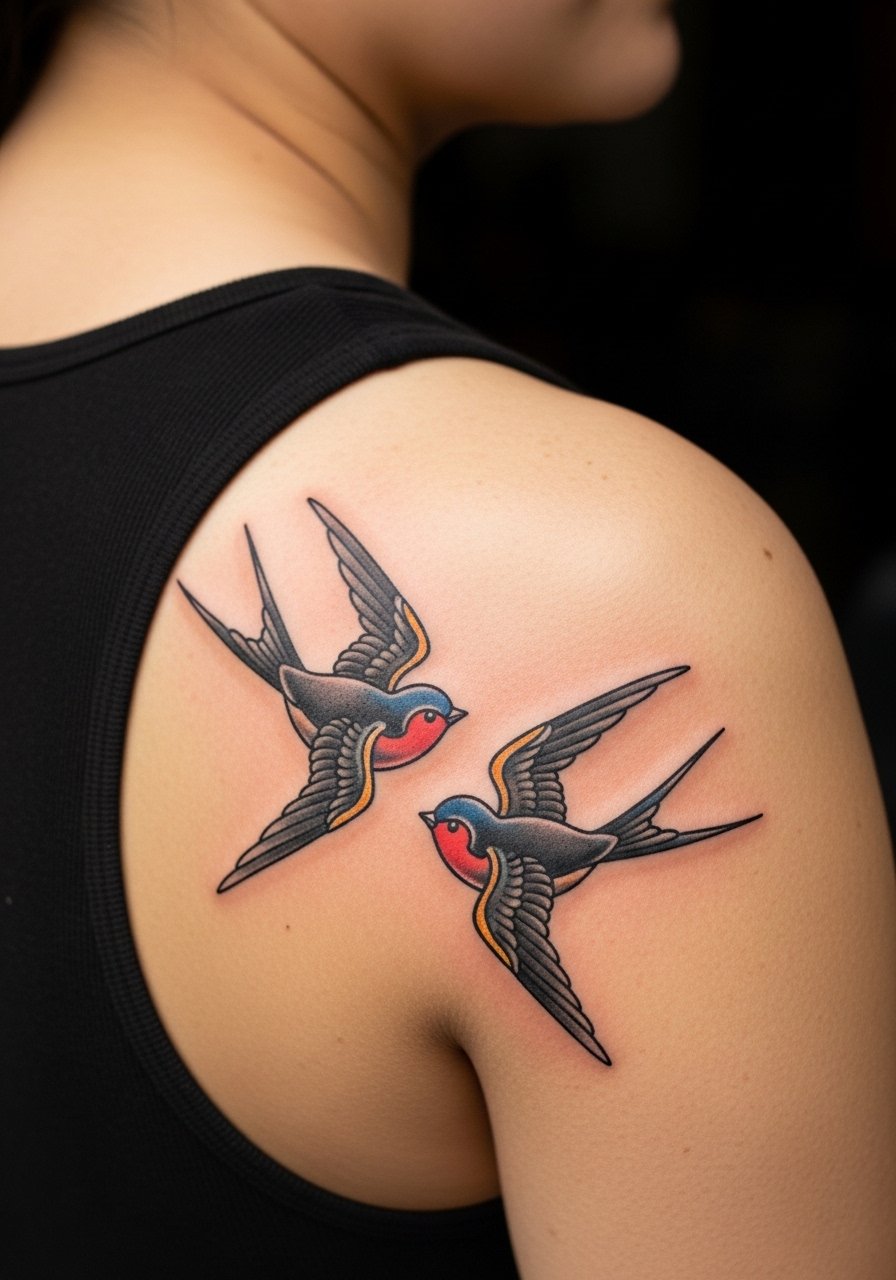
Swallows add migration energy to vintage sleeves and bridge negative space on the shoulder blade. Small flights photograph well and hold if the wings get crisp outlines and color packing. Back shoulder sessions are moderate and sometimes require a second pass for saturation. Consider an open-back top for showing the birds and a thin chain pendant necklace to keep the upper back framing simple.
14. UV-Reactive Ink Accents for Blacklight Sleeves
UV-reactive accents are a niche filler that glows under blacklight while remaining subtle in daylight. They are not for everyone and require an artist comfortable with specialty pigments. The drawback is long-term color stability and limited touch-up options. Use UV as accents rather than large fills. Sessions are fast and usually painless for small spots. For nights when you want the glow shown, wear a short-sleeve tee that exposes the glow zone.
15. Weightlifter-Optimized Stretch-Resistant Forearm Dots

If you lift regularly, forearm skin stretches and shifts, which can warp tiny fillers. Ask for slightly larger dot sizes and a looser arrangement so the pattern keeps its shape through gains and losses. Many clients miss this step and end up with wavy lines after weight changes. The session is short and the pain low. For gym time after healing, choose looser sleeves or a breathable athletic sleeve to reduce rubbing.
16. Memorial Micro Fillers for Subtle Personalization
Micro memorials are quiet and personal, ideal for filling small gaps with emotional weight. A common error is making script too small to read as it heals. Instead choose a tiny symbol or slightly larger type. Wrist placements itch during week two for many people so expect some mild discomfort. When showing it off, pair with a thin chain bracelet that complements rather than covers the micro piece.
17. Ornamental Lace Fragments Around the Ankle

Lace fragments hug the ankle and create feminine negative space without needing large coverage. The ankle can be tender and prone to motion during healing. Ask for slightly bolder thread lines so the pattern does not fade into skin texture. Sessions are short but may sting more than the forearm. For footwear that shows the design, try sandals paired with a thin anklet so the lace reads as jewelry.
18. Geometric Blackwork for Chest-to-Shoulder Bridges
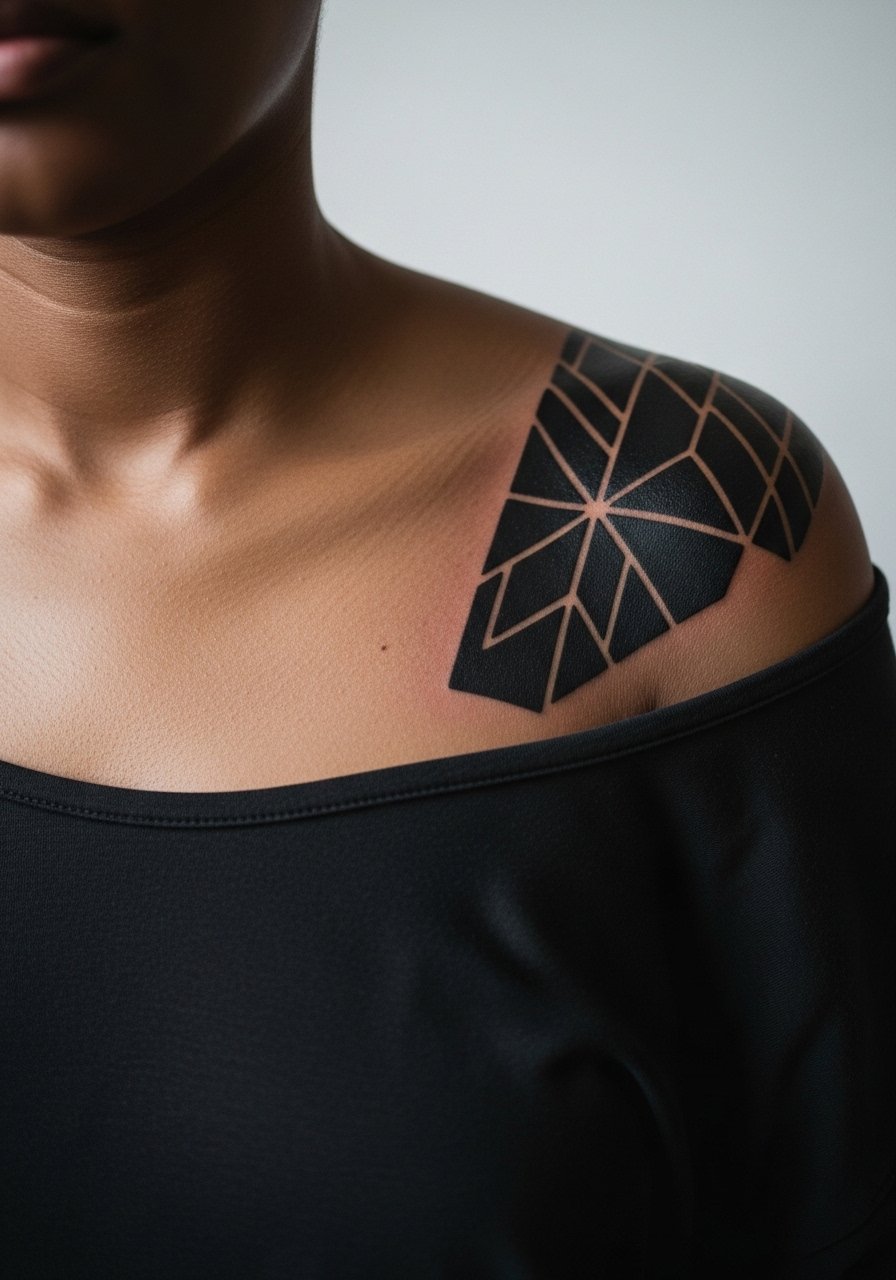
Geometric fills turn angular gaps into intentional blocks that age predictably when packed correctly. The chest skin is different in texture, and dense blackwork will age into a bold matte look. Artists debate spacing and saturation for chest pieces, with one side favoring heavy saturation and the other preferring strategic negative space. If you like the matte block, ask for dense packing and expect longer sessions. Pair with open-neck tops and a thin chain pendant necklace to keep the chest visually balanced.
19. Botanical Hip Sprig for Upper Thigh or Hip Gaps
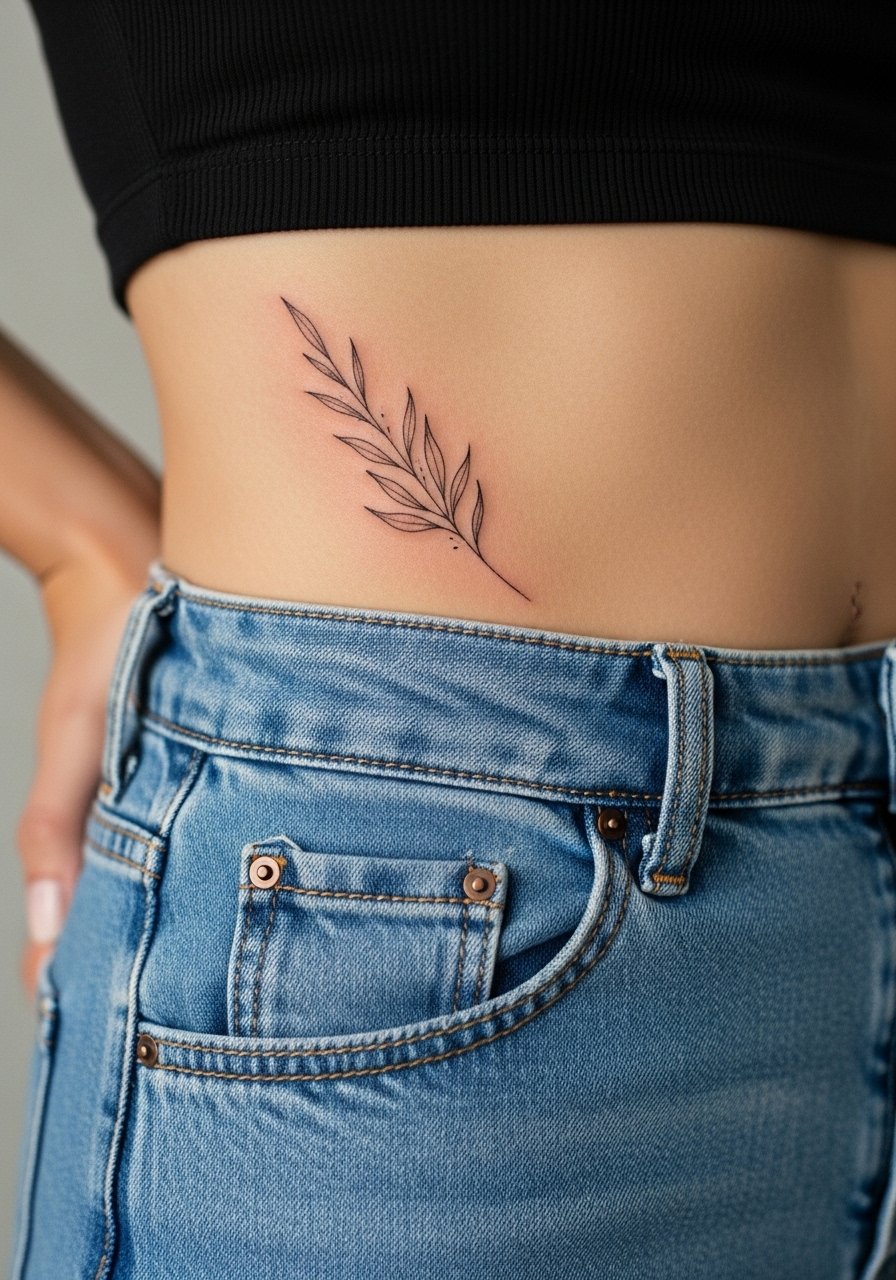
A hip sprig fills the curve between thigh and torso and photographs well in swimwear. The hip can be sensitive and prone to friction during healing. The most common mistake is placing overly dense detail on the hip, which can blur with movement. Keep lines slightly bolder than typical fine line. For showing it off, high-waisted bottoms and a bandeau top frame the sprig without covering the area.
20. Scripted Coordinates as Micro Placement Fillers
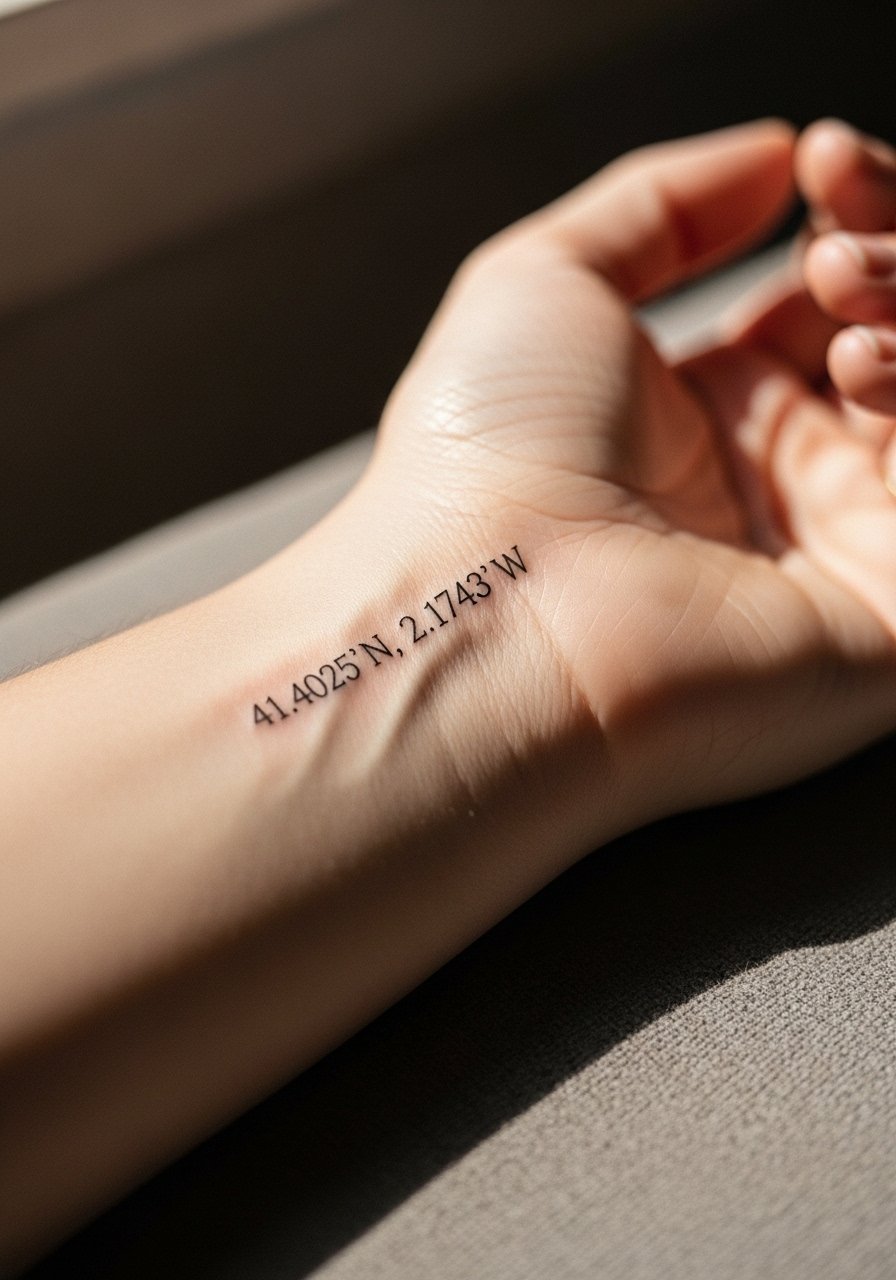
Coordinates are a discreet way to memorialize a place and fit small gaps elegantly. The mistake is asking for ultra-thin lettering that becomes illegible after healing. Use a slightly heavier typeface or choose Roman numerals for better longevity. Wrist placement is visible and can require periodic touch-ups. For a simple reveal, match the script with a thin chain bracelet so the text reads like a subtle accessory.
21. Stipple-Shaded Crescent Moon for Inner Arm Transitions
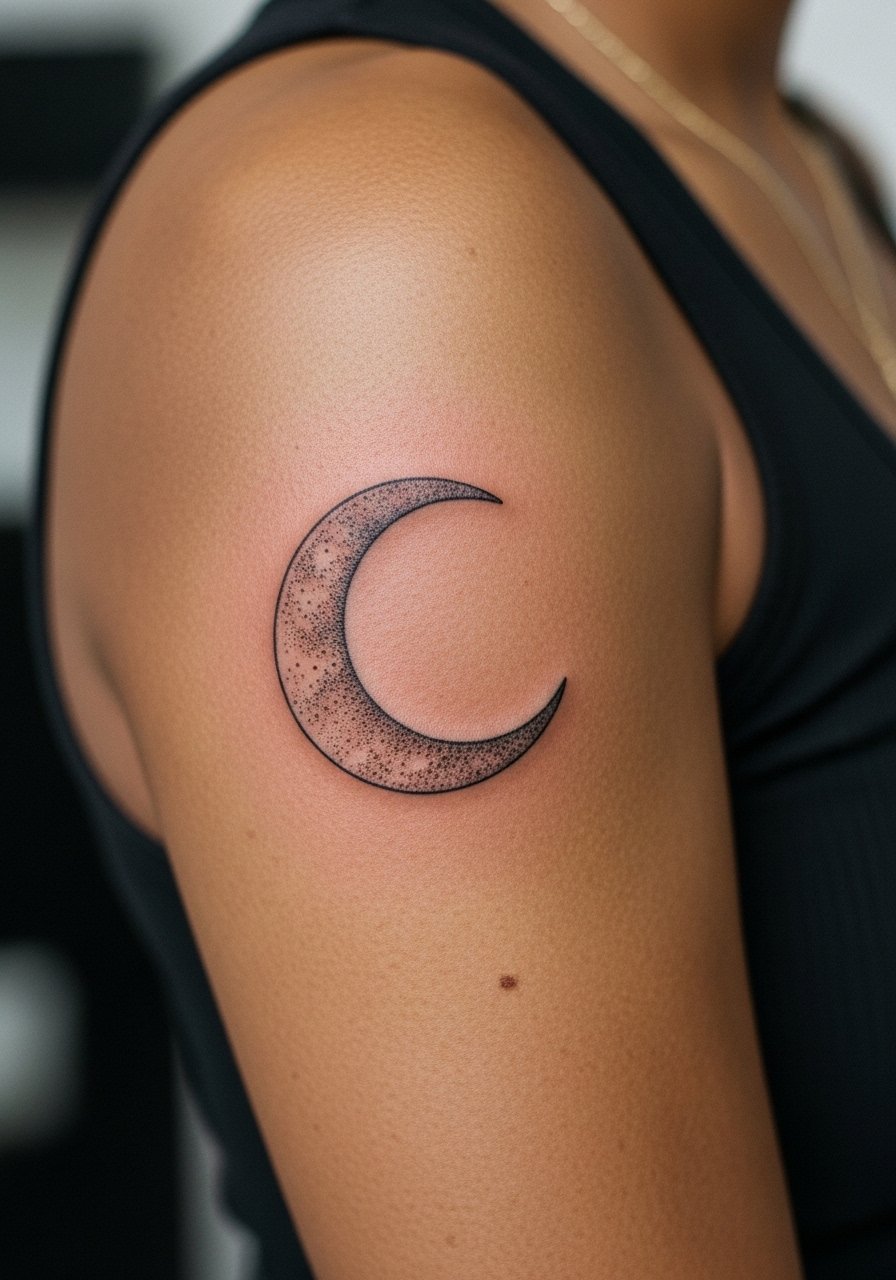
Stipple shading holds texture beautifully on softer zones like the inner arm, creating gradation without solid blocks that can bruise. Inner bicep healing is sensitive and susceptible to sweat. A frequent error is requesting solid black fills where stipple would be more flattering. Sessions are slower to allow dot placement. Wear a racerback tank on session day so the artist can access the area without discomfort.
22. Minimalist Mountain Range for Collarbone or Forearm

Mountain ranges are low fuss and solid for negative space between larger motifs. The error is compressing too many peaks into a tiny band. Spread peaks and use mid-weight lines so the silhouette reads over time. Pain is minimal on the outer forearm and sessions are quick. Pair with rolled-up sleeves and a minimalist watch to show the landscape when you want it visible.
23. Blackwork Ornamental Necklet for Upper Chest
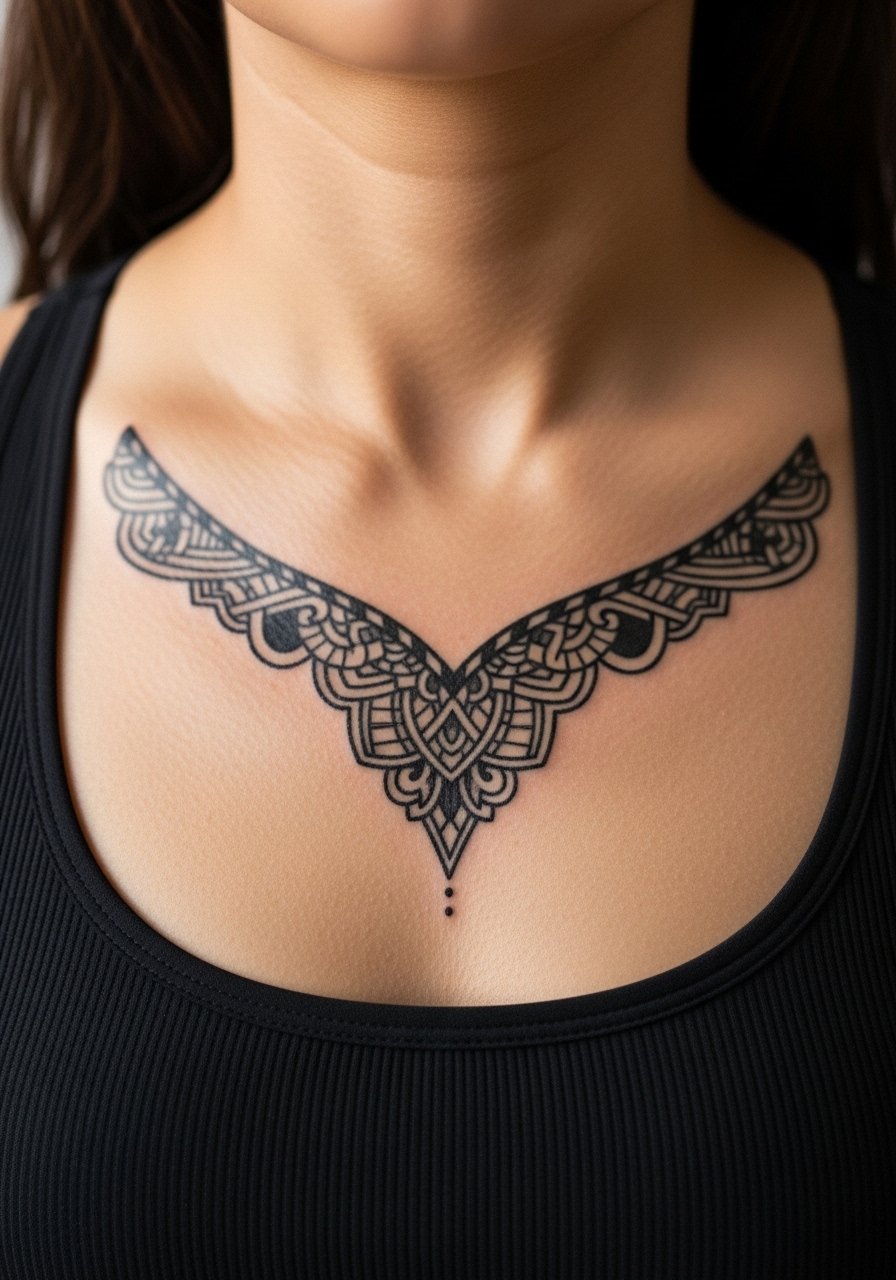
Necklets fill the upper chest neatly and can provide a framing device for other pieces. Sternum and upper chest heal differently and may need longer sessions to pack black evenly. The common decision error is trying to make a very intricate necklet in one quick session. Schedule the time and expect some soreness. For outfits, an open neckline or a strapless top keeps the piece visible without competing jewelry.
24. Tiny Botanical Under-Bust Fillers
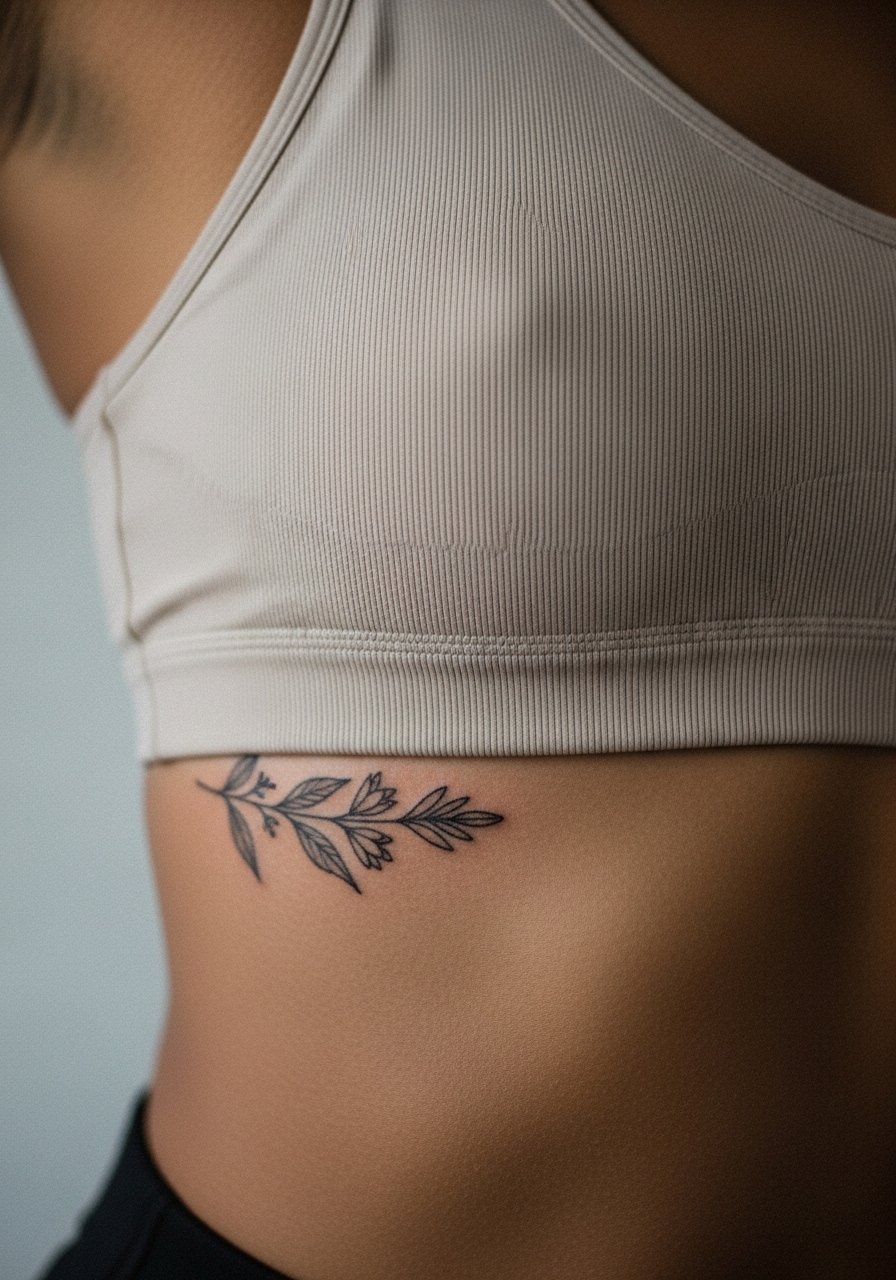
Under-bust fillers work well for intimate gaps and add a framed line without overpowering. This is a sensitive area with higher pain and movement, so avoid ultra-fine lines that can blur. Artists sometimes disagree on depth here, so ask where they stand on rib and under-bust work. Sessions can be short but intense. For showing the art, a bandeau top or open-front shirt provides clean framing.
25. Eco-Friendly Plant-Based Ink Accent Pieces
Plant-based inks are an under-covered option for sensitive skin or people who prefer sustainable choices. Not all artists stock these pigments, and availability varies. The upside is gentler chemistry and often less immediate irritation, but color longevity can differ from mainstream inks. Discuss pigment origin and expected touch-ups during consult. For casual display, roll sleeves and wear a loose linen shirt that complements the earthy tone.
26. Filler Symmetry Tools for DIY Mockups and Consults

Symmetry tools and printable stencils let you test how a filler balances with existing work before booking. The common mistake is assuming digital mockups translate perfectly to curved skin. Bring a printed stencil and test it on your skin in different positions. This simple step avoids placement regrets. For the consult, wear a loose button-down shirt so the artist can apply the stencil easily and show how it moves with your body.
27. Patchwork Squiggles for Patchwork Sleeve Fillers
Patchwork squiggles let collectors fill mismatched sleeve gaps with humor and flow. The risk is creating visual clutter if each piece competes for attention. Ask your artist to use a connecting theme, such as repeated dot sizes or a single palette, so it reads cohesive. Sessions are modular and often booked in short blocks. For a casual reveal, roll sleeves and use a thin chain bracelet to keep the look curated rather than chaotic.
Frequently Asked Questions
Q: Will fine line fillers fade faster on darker skin tones and look like smudges?
A: From what I have seen, fine line work can blur quicker on more melanated skin when the lines are too tight or shallow. Ask for slightly heavier line weight and an artist experienced in single-needle work on darker skin. Plan a touch-up at the one-year mark to keep micro details crisp.
Q: What should I do if an artist cancels my filler session or reschedules multiple times?
A: Try to get a clear deposit policy upfront and book with artists who use an appointment system that shows guest spots. If cancellations happen repeatedly, ask for a recommended colleague or check local studio listings and community threads for reliable walk-in options.
Q: Are session-day numbing creams legit or seen as cheating by artists?
A: Artists are split. Some recommend topical numbing for long or sensitive sessions because it helps the client stay calm. Others worry it masks feedback that affects line placement. Ask your artist whether they prefer you use a topical and how it should be applied before the session.
Q: How do I avoid paying inflated prices for tiny filler pieces?
A: Get quotes from three studios and compare hourly rates versus flat fees. Tiny pieces can be priced on minimum session time in some shops, so ask if they will prorate. Being flexible on appointment timing can also land lower-cost spots.
Q: Does dry healing or Saniderm make more sense for fillers like those on wrists and fingers?
A: The community divides into two camps. One group likes Saniderm for active lifestyles because it keeps the area clean. The other camp prefers dry healing, citing irritation and trapped moisture. Decide based on your daily routine and skin sensitivity, and follow the artist's specific guidance for the placement you chose.
Q: How do I make Pinterest fillers photograph better on brown skin?
A: Bring reference images and ask the artist to adjust contrast and outline thickness for your skin tone. Also ask for richer saturation and slightly bolder strokes so the design reads in photos. If possible, review healed photos from artists with similar skin tones during consults.
Q: Can I use symmetry tools or stencils to preview how a filler will sit with my existing sleeve?
A: Yes. Printable stencils and simple overlays are very helpful in consults because they show how the design moves with muscle and skin. Bring them in so you and the artist can tweak placement before any needle touches your skin.
