
Fine line collarbone pieces keep trending, but the patchwork take is where things get interesting. The look layers small motifs, negative space, and varied line weights so the whole collarbone reads like a curated strip of flash. It makes a bold statement without covering a lot of real estate, and the right spacing and consultation notes below will help you get a patchwork that still looks intentional five years from now.
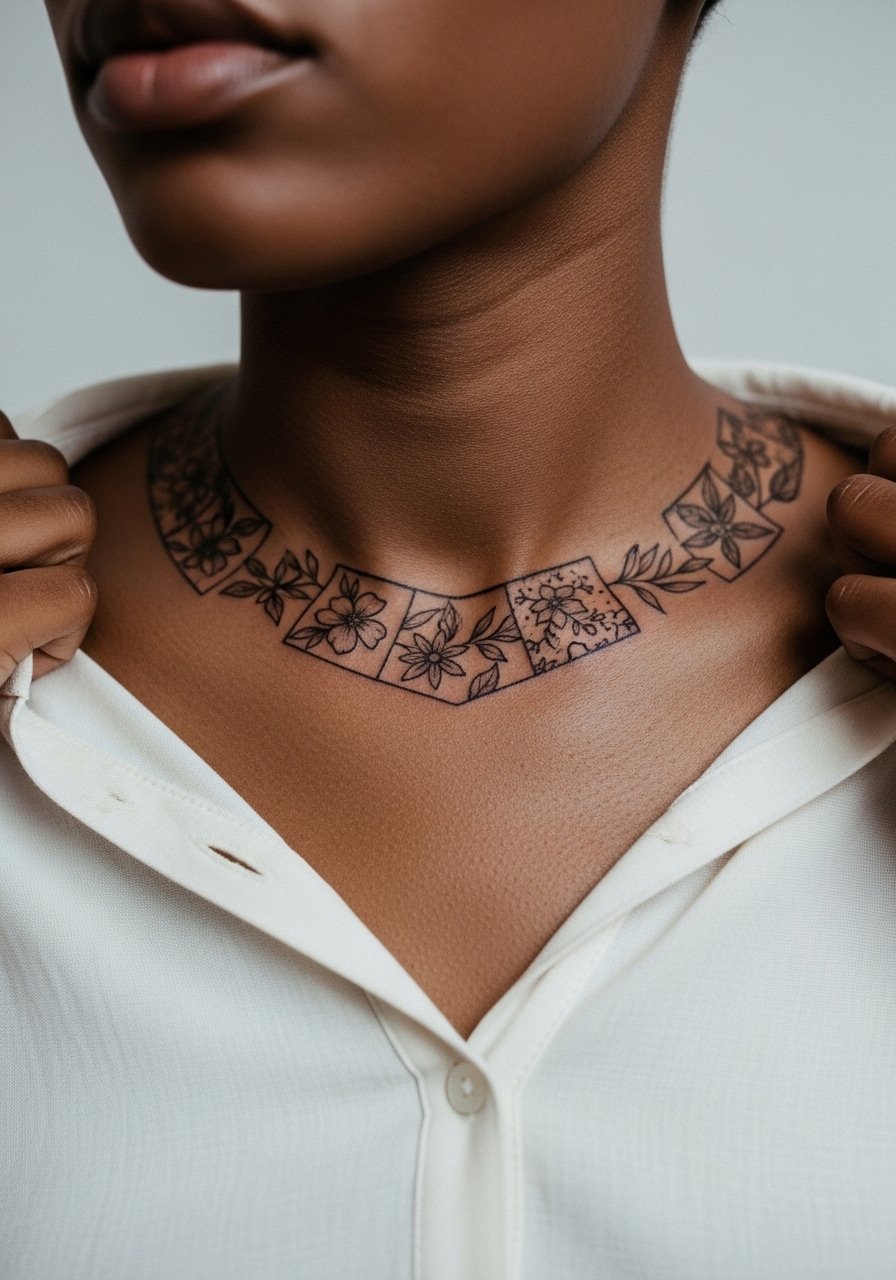
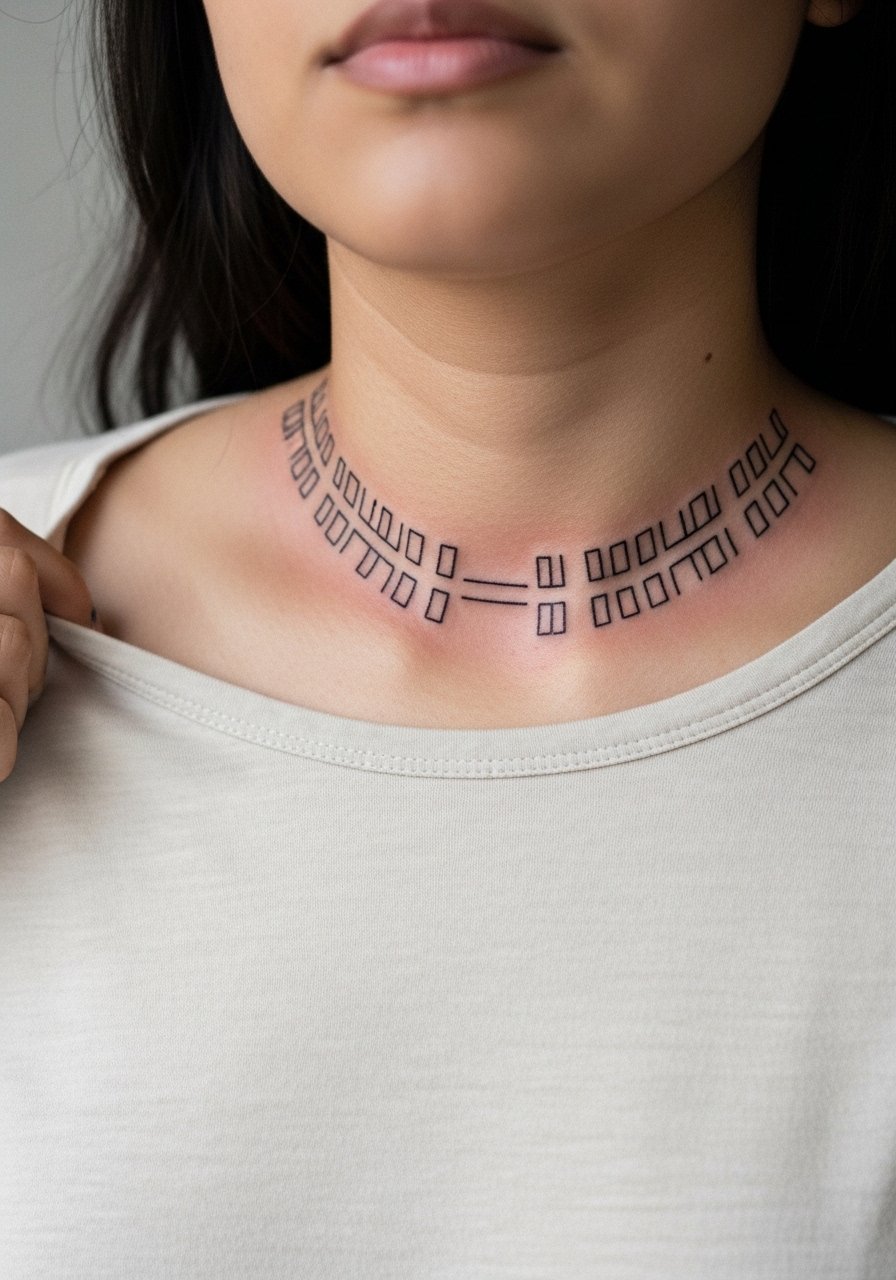
1. Minimalist Patchwork Line Strip on the Right Collarbone

Start with a single-direction strip of small motifs spaced like tiles rather than crowded icons. In a consultation, ask for slightly varied line weights between motifs so each element reads on its own when healed. Fair warning, tiny single-needle work placed too close together tends to blur into one shape after a few years. For pain, collarbone sits around a 5 out of 10 for most people because the area has thin skin over bone. Plan for a single short session under 90 minutes for a neat strip. For showing it off, pair with a wide-neck shirt pulled aside so the negative space reads clean.
2. Black Ink Patchwork with Bold Anchors
This approach mixes heavy black anchors with lighter, detailed fillers. Tell your artist you want two or three saturated anchor pieces for long-term readability and then filler motifs at about half the scale. One common mistake is asking for everything the same density, which makes the whole patch fade into a blob over time. The anchors handle UV exposure and friction from collars better than faint lines. Session time varies, expect a block around two hours if multiple saturated spots are involved. Pair this with a low collar or open-button shirt to show the contrast.
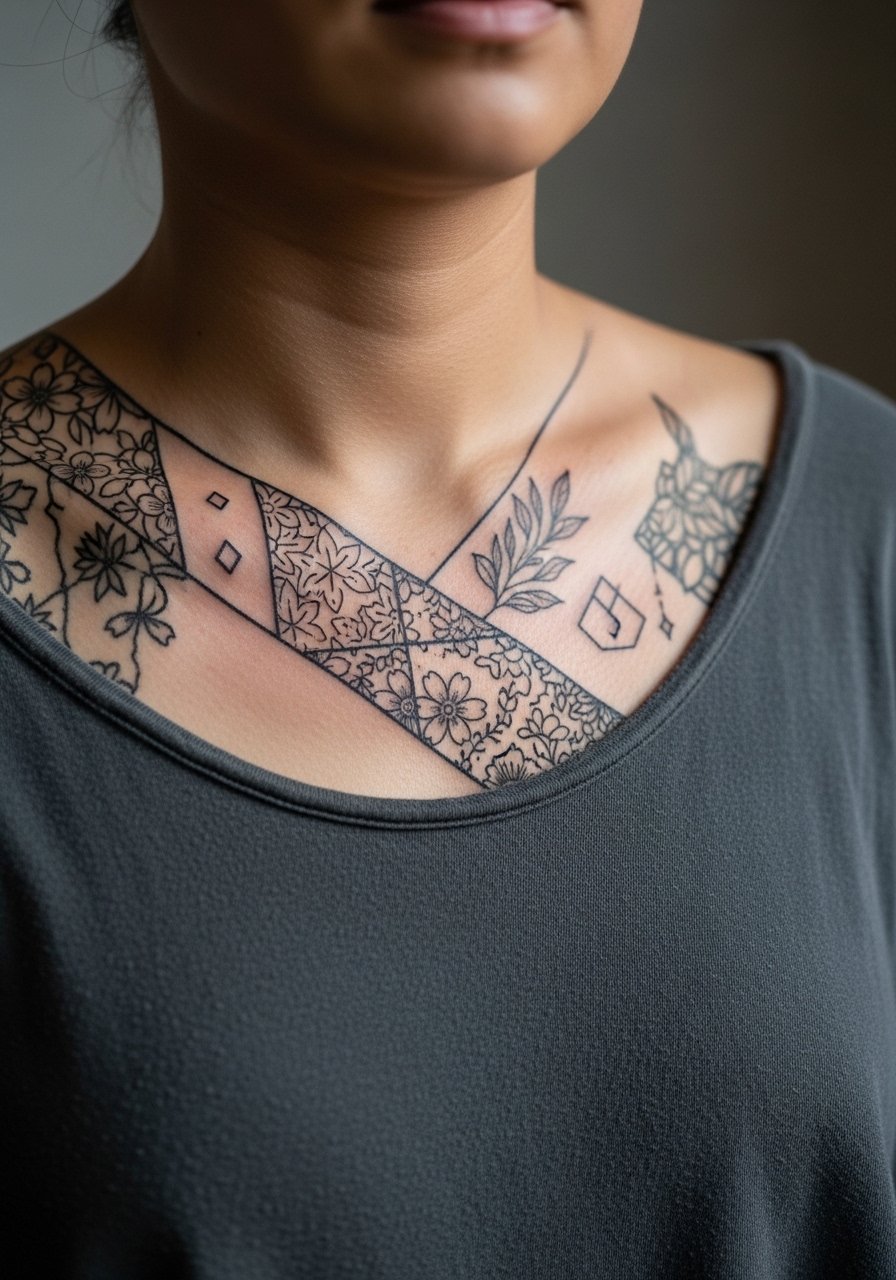
3. Geometric Patchwork That Follows the Clavicle Curve

There is something about geometry that reads architectural across the collarbone. Ask for slightly more space between dense patterns so the pieces keep definition as they age. The biggest mistake is shrinking a mandala-style piece to fit the curve; those need room. Expect moderate discomfort where the needle crosses the bone. If you want to wear it casually, a slim chain necklace sits above or below the geometry without competing. Over time, lines close up a little, so plan a touch-up around year three for crisp edges.
4. Script and Icon Patchwork Along the Collarbone

Pair short script phrases with tiny icons for a personal patchwork bar. During the consult, specify exact lettering size because small script often becomes unreadable. A common aging issue is scripts spacing too tight to remain legible. For session prep, wear a loose top so the artist can access the left collarbone without tugging at fabric. When showing it off, the bar reads clean under a crew neck tee with a deeper collar. Touch-ups are likely needed for the smallest letters by year two or three.
5. Stipple-Shaded Patchwork with Dot Work Fillers

Stipple shading gives a textured, vintage flash feel when combined with crisp outlines. Tell your artist you want dot density to vary across elements so the eye moves instead of locking on one area. A frequent mistake is packing dot work too tightly, which reads muddy after healing. This style works well with slightly longer sessions because stipple takes time. For styling, a lightweight linen shirt with the collar open frames the dots without competing. Stipple holds better than ultra-fine hairlines on the collarbone but expect a gentle softening at year five.
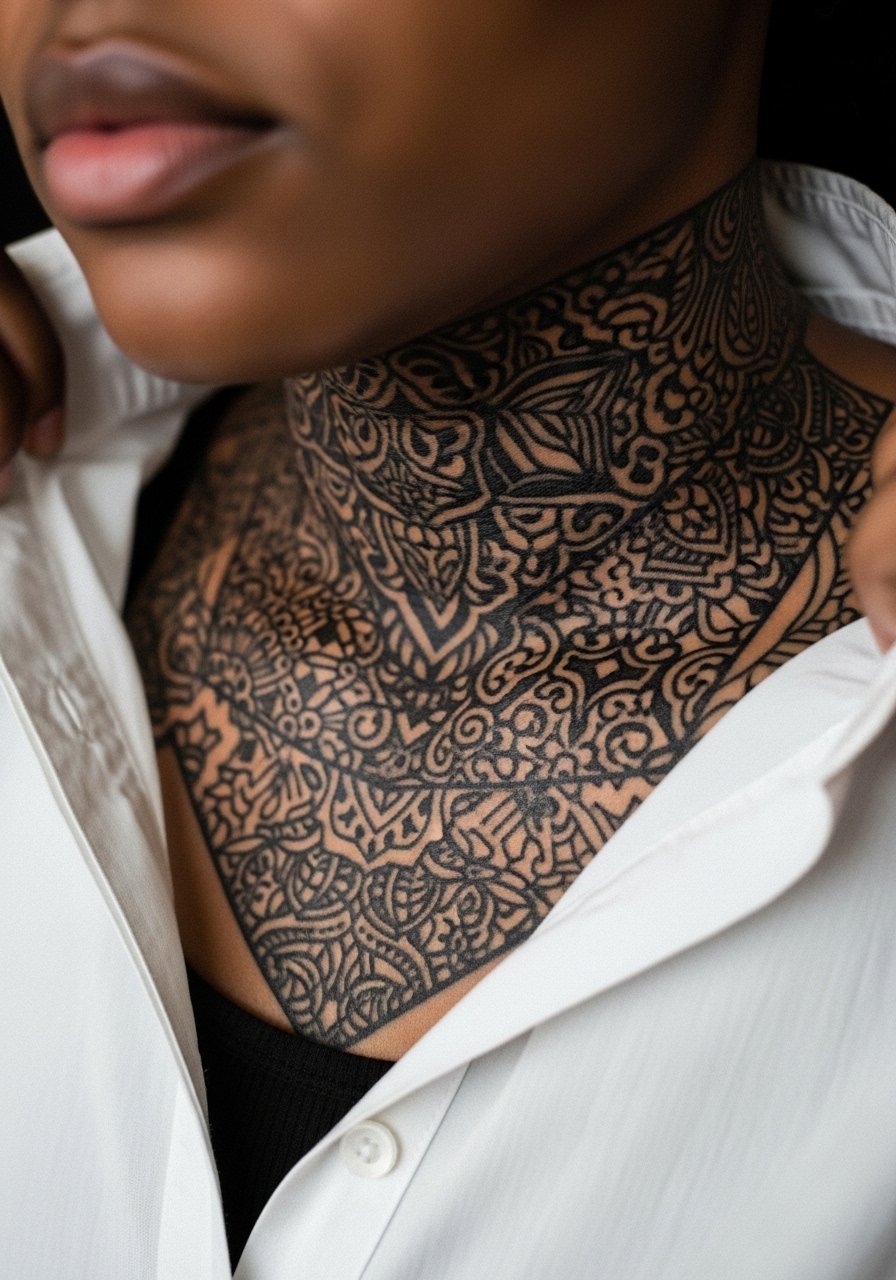
6. Collage Patchwork: Tiny Portraits and Symbols
A collage effect mixes micro-realism portraits with simple symbols for a personalized strip. In the consultation, bring clear reference photos for each portrait so sizing is accurate. The controversy around micro-realism on small areas appears here. One camp argues micro portraits at this scale blur quickly. The other camp says with careful spacing and slightly bolder linework they remain recognizable. Ask your artist how they balance contrast before booking. Session time tends to run longer because portraits require steady hand speed. For the appointment, wear a button-down shirt you can pull aside so the area is accessible.
Studio Day Picks
The collarbone pieces above blend fine line, blackwork, and dot work, and a few practical items make the appointment and the first week easier.
-
Portable stencil transfer paper kit. Lets you preview exact placement and spacing on the collarbone before the needle touches skin.
-
Low-odor topical numbing cream. Helps with the brief sharpness over the bone during clustered sessions without overwhelming artist control.
-
Thin protective film roll for small tattoos. Useful for keeping collarbone patches clean when shirt collars brush the area the first two days.
-
Fragrance-free gentle body wash. Cleans the healing strip without stripping pigments that fine line work relies on.
-
Aquaphor healing ointment. A thin layer during the initial days helps lock in moisture for the tight needle channels common in collarbone patchwork.
7. Asymmetrical Patchwork Crossing the Collarbone
An asymmetrical layout reads dynamic and modern. Ask for an intentional focal piece on one side so the eye has a starting point. A common mistake is mirroring everything, which kills the asymmetry. The session feels quick for the smaller filler pieces and sharper over the bone where the needle meets less cushion. Blowout risk is moderate when lines cross the clavicle at shallow depth. When dressing to show it off, an open-collar shirt or a deep V tee highlights the staggered layout without pulling attention away from the artwork.
8. Negative-Space Patchwork with Breaks and Gaps
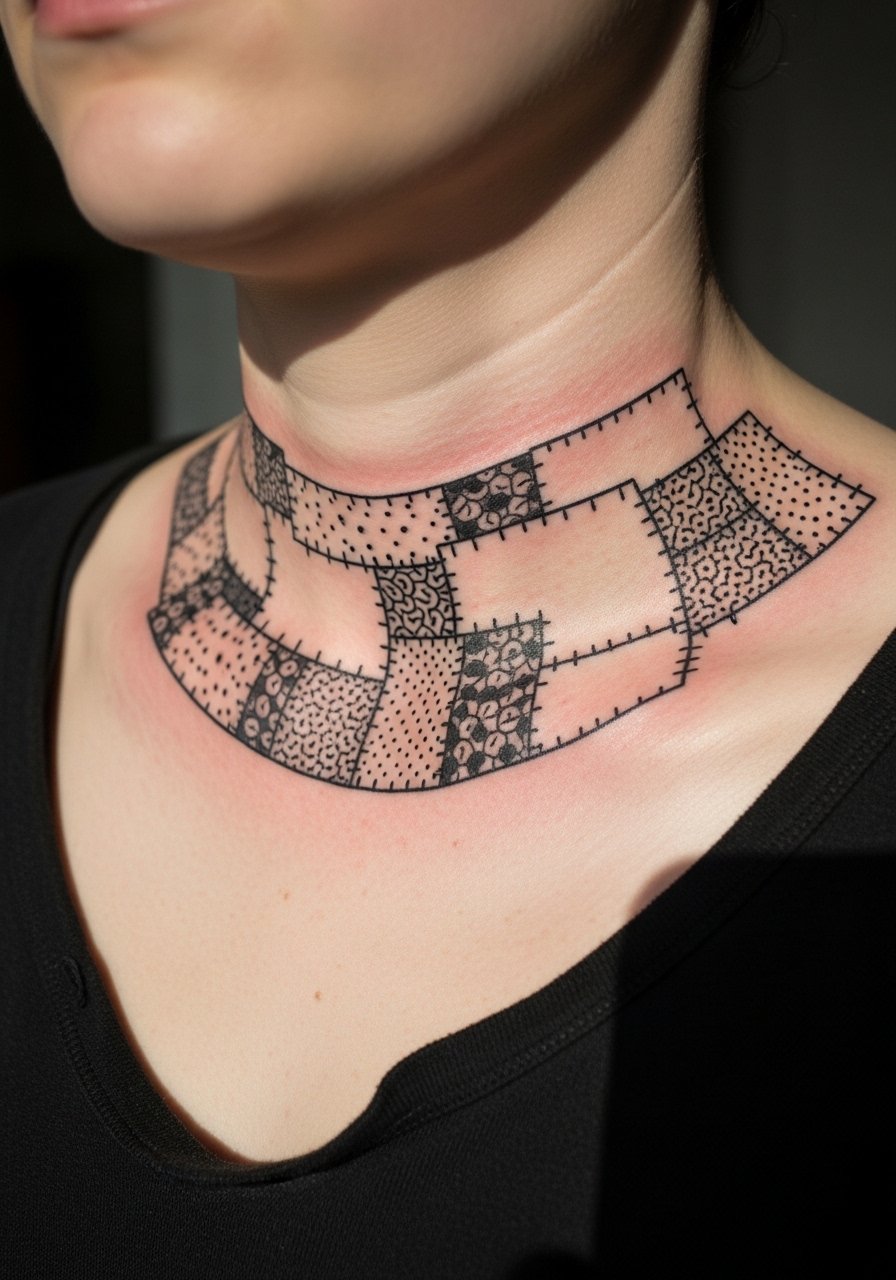
Deliberate negative space is what separates curated patchwork from clutter. During the consult, ask the artist to sketch spaces that breathe rather than trying to fill every inch. Many people request dense fills and later regret the crowded look as lines smudge. Expect mild tenderness along the bone and minimal session time for a balanced layout. For showing it off, a plain white tee with a relaxed neckline makes the gaps read like intentional design choices. Negative space helps this style age better because there is less pigment to migrate.
9. Floral Patchwork That Sits Along the Collarbone
Botanical pieces soften the collarbone and move well with the body. Tell your artist which flower should be the focal point and which should be fillers. There is a debate among artists about tiny florals in this spot. One camp prefers thicker outlines for durability. The other camp pushes for delicate veins and lighter fills for realism. The right choice depends on how visible you want the piece to be in five years. For the session, wear a shirt that slides easily off one shoulder. When styling, a henley shirt with the top buttons open frames the flowers without hiding them.
10. Script-Only Patchwork with Small Separators

A string of single words or short phrases separated by tiny dots makes a personal bar. In the consult, provide exact text and preferred font size because legibility drops faster than people expect. The usual error is cramming too many words; fewer words spaced slightly wider keep meaning intact. Session time is short when all elements are linear. For showing it off, a thin chain pendant necklace works well positioned above or below the script. Plan a touch-up window at year two for letters that soften.
11. Nautical Patchwork Along the Collarbone
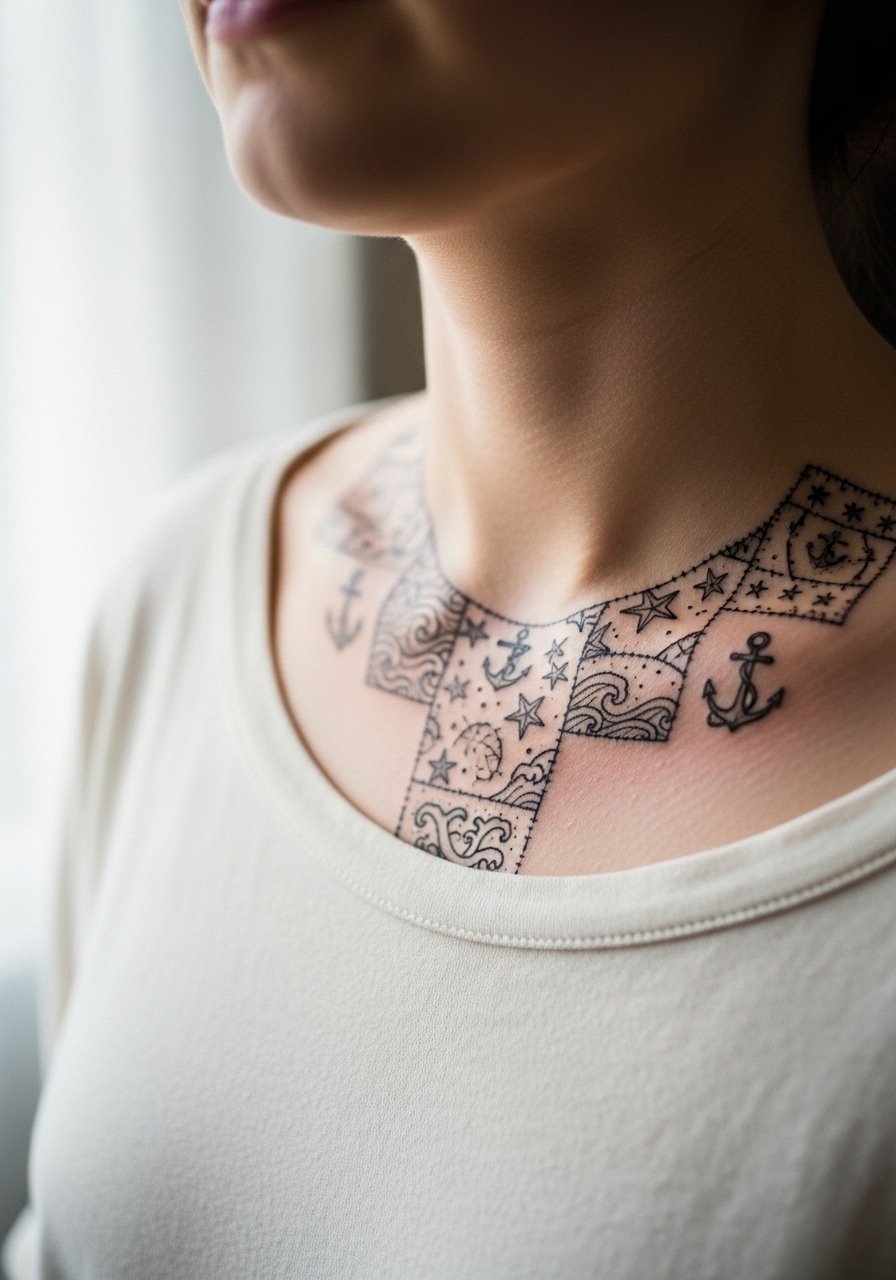
Nautical icons read classic and pair well as a strip. Ask for stronger outlines on anchors and lighter stars so the heavier pieces anchor the composition. A familiar mistake is mixing disparate scales; keep the anchors noticeably larger. Pain is spotty where the needle crosses the bone. This style looks intentional with a striped tee and an open collar. Over time, the black anchors hold better than faint stars, so balance density accordingly.
12. Collage of Tiny Geometric Symbols and Coordinates
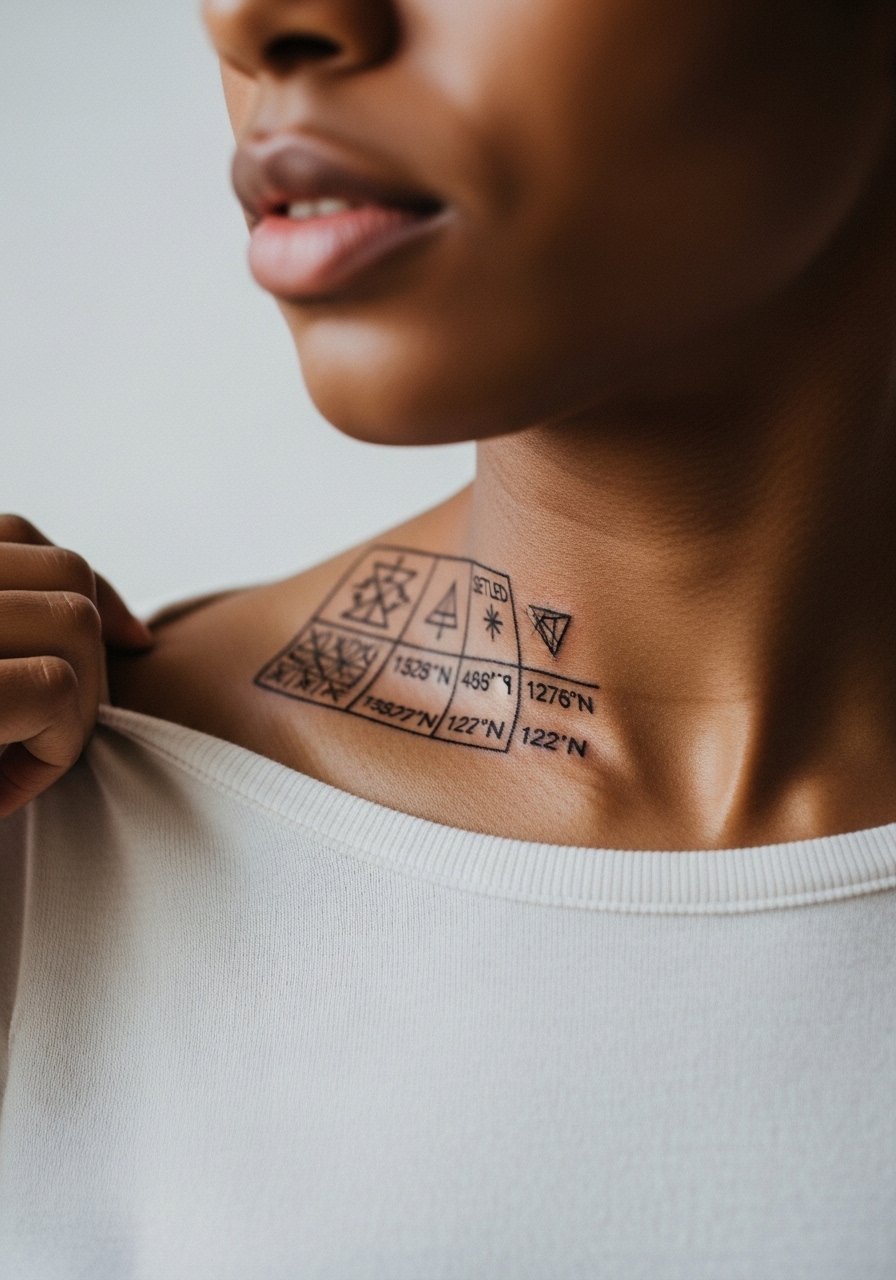
Mixing coordinates with glyphs gives a travel-oriented patchwork. Always give the exact coordinates as text during booking so the artist can stencil them correctly. A common error is choosing too small a font for numbers, which can blur and become unreadable. The collarbone tolerates small numbers but expect a touch-up if you want crisp numerals long term. For daytime styling, a racerback tank or wide-neck tee keeps the strip visible without overexposing the area.
13. Traditional Flash Patchwork with Old School Motifs
Old school motifs translated into a patchwork bar give dramatic contrast through bold outlines and solid fills. Tell your artist you want classic saturation and leave space between colored pieces so the pigments do not muddy as they age. The common mistake is compressing colored elements, which increases the risk of color blending. Expect a bit more session time if color fills are involved. For show-off outfits, a navy button-up with the top buttons open highlights the saturated shapes without competing.
14. Negative-Line Patchwork with Thin Bars and Breaks
This minimalist take uses hollow bars and thin outlines to create rhythm across the collarbone. Ask your artist for slightly bolder outer contours so the hollow inner sections keep definition. Tiny hollow sections that are too close often collapse into faint shading after healing. The session feels quick because there are fewer needle passes. To show this version, a fitted tee with a relaxed neckline keeps the lines prominent without overexposure. Expect a gentle softening, with a possible touch-up at year three.
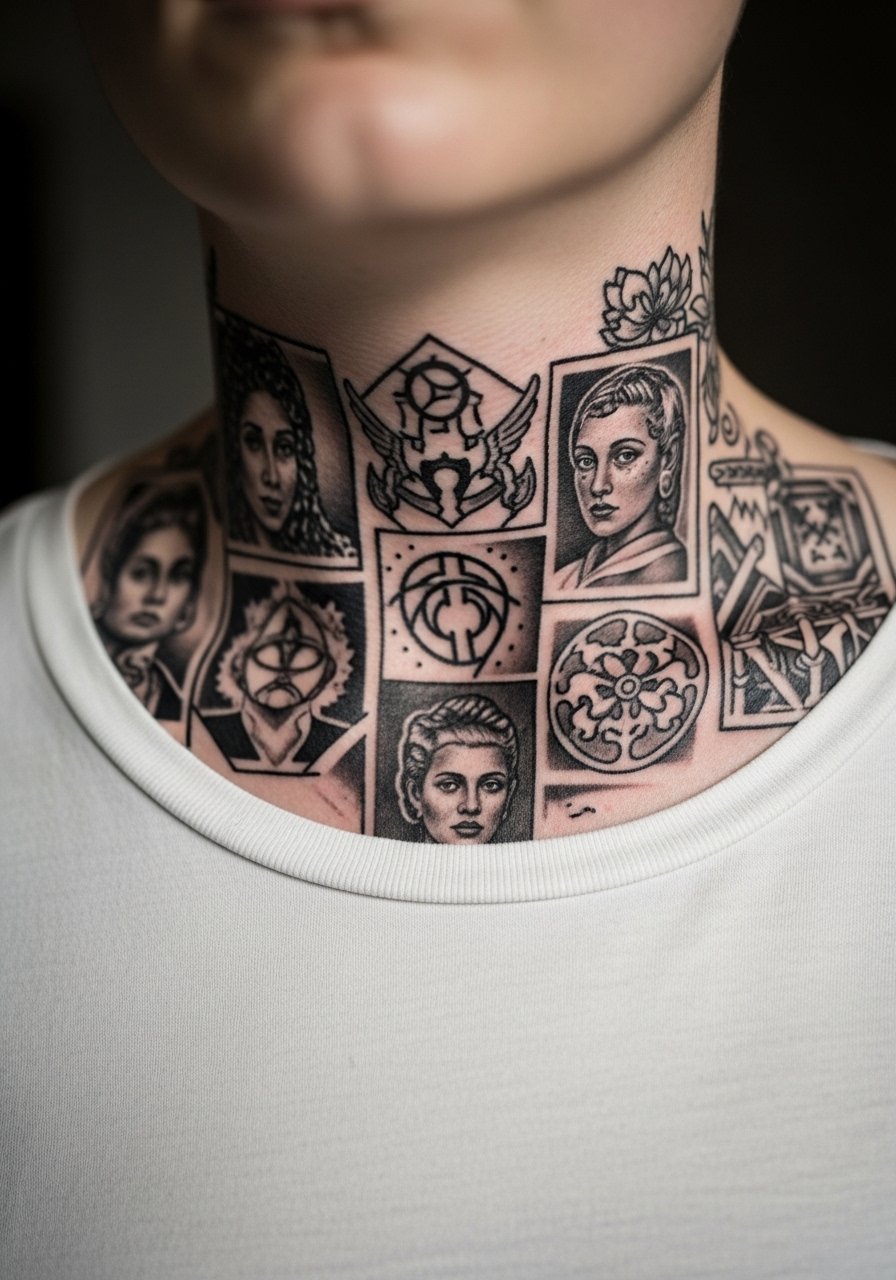
15. Small Animals and Emblems in a Patchwork Row
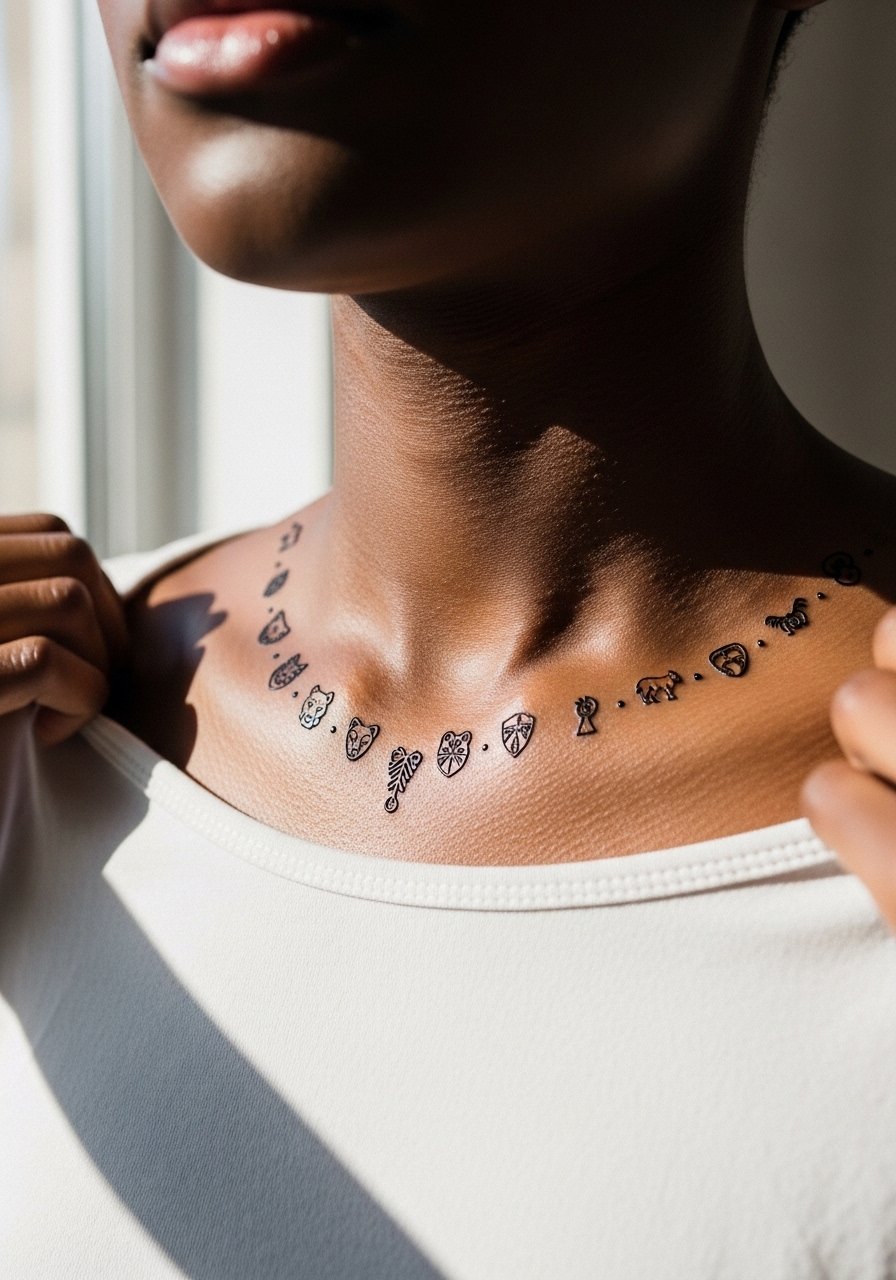
A row of tiny animals and emblems reads personal and curated. Give your artist clear size references for each animal so detail is preserved and not reduced to blobs. A common mistake is over-detailing the smallest animals in the belief that tiny realism will hold, which it does not. The collarbone is sensitive but tolerable for short bursts over bone. For a casual reveal, a crew neck shirt with a slightly wider opening frames the icons nicely.
16. Mixed Media Patchwork with Watercolor Wash Accents
Adding soft watercolor washes behind solid line motifs can lift a patchwork visually. During the consult, specify that washes remain background elements rather than overpowering the linework. The controversy here is color longevity. One camp says watercolor fades poorly on high-motion spots. The other camp argues that when washes are shallow and used sparingly they add dimension without demanding frequent touch-ups. If you include washes, expect a slightly longer session and a possible color refresh in a few years. For styling, a lightweight tank or open-neck shirt keeps the washes visible.
17. Bold Single Motif with Tiny Supporting Patchwork

Centering a bold motif and surrounding it with tiny fillers gives a clear visual anchor. Tell your artist which motif should dominate and ask for larger spacing around it so the supporting pieces do not overwhelm. People sometimes pick a large focal image and then try to cram too many supporting elements in the same zone. Expect stronger sensation over the main motif where the needle deposits denser ink. For show-off outfits, a V-neck tee centers attention on the dominant piece and gives the supporting patchwork room to breathe.
Frequently Asked Questions
Q: How well do patchwork collarbone tattoos hold up over time compared with a single large piece?
A: From what I have seen, patchwork pieces can age well if you plan spacing and contrast from the start. Small, ultra-fine motifs need more breathing room than bold anchors. Expect some softening of the tiniest lines by year two to three and plan touch-ups for those elements rather than the whole bar.
Q: Should I avoid watercolor accents on the collarbone because of fading?
A: It depends on how saturated you want the wash to be and how visible you need it to stay. Subtle shallow washes behind strong linework fade more gracefully than saturated blobs. If longevity is a priority, keep washes minimal and place them behind bolder outlines.
Q: Can I get a collarbone patchwork if my job has a conservative dress code?
A: Yes, but plan placement and wardrobe together. A patchwork that sits closer to the inner collarbone can be covered by standard collared shirts. If visibility is a concern, choose pieces that sit lower or wear higher collars on workdays. Consider discovery pathways like local directories to find artists experienced with discreet placements.
Q: How soon can I wear necklaces after getting collarbone ink?
A: Wait until the initial scabbing phase passes and the skin is less raw, usually about a week. A thin chain worn above or below the bar is fine once tenderness fades. If a necklace rubs the tattoo during the first week, skip it until the skin feels settled.
Q: Will mixing styles in a single collarbone patchwork look messy?
A: Artists and collectors split into two camps on this. One camp warns that mixing too many styles creates visual noise. The other camp favors curated contrast if there is a clear anchor and consistent spacing. The key is to plan the hierarchy during your consultation so the mix reads intentional.
Q: What should I wear to the appointment for a collarbone patchwork?
A: Choose clothes that give the artist clear access like a button-down shirt you can pull aside or a wide-neck top. Loose, easy-removal layers make the session smoother and protect the finished piece on the ride home.
