
Fine line trends are everywhere, but the patchwork pieces that still read clean at year five are often the ones planned with spacing, consistent linework, and a clear build strategy. I have seen guys swap guest spots and still get a sleeve to hang together when they started with a mockup and stuck to a palette. Below are 27 modern patchwork tattoo ideas that favor longevity and cohesion.
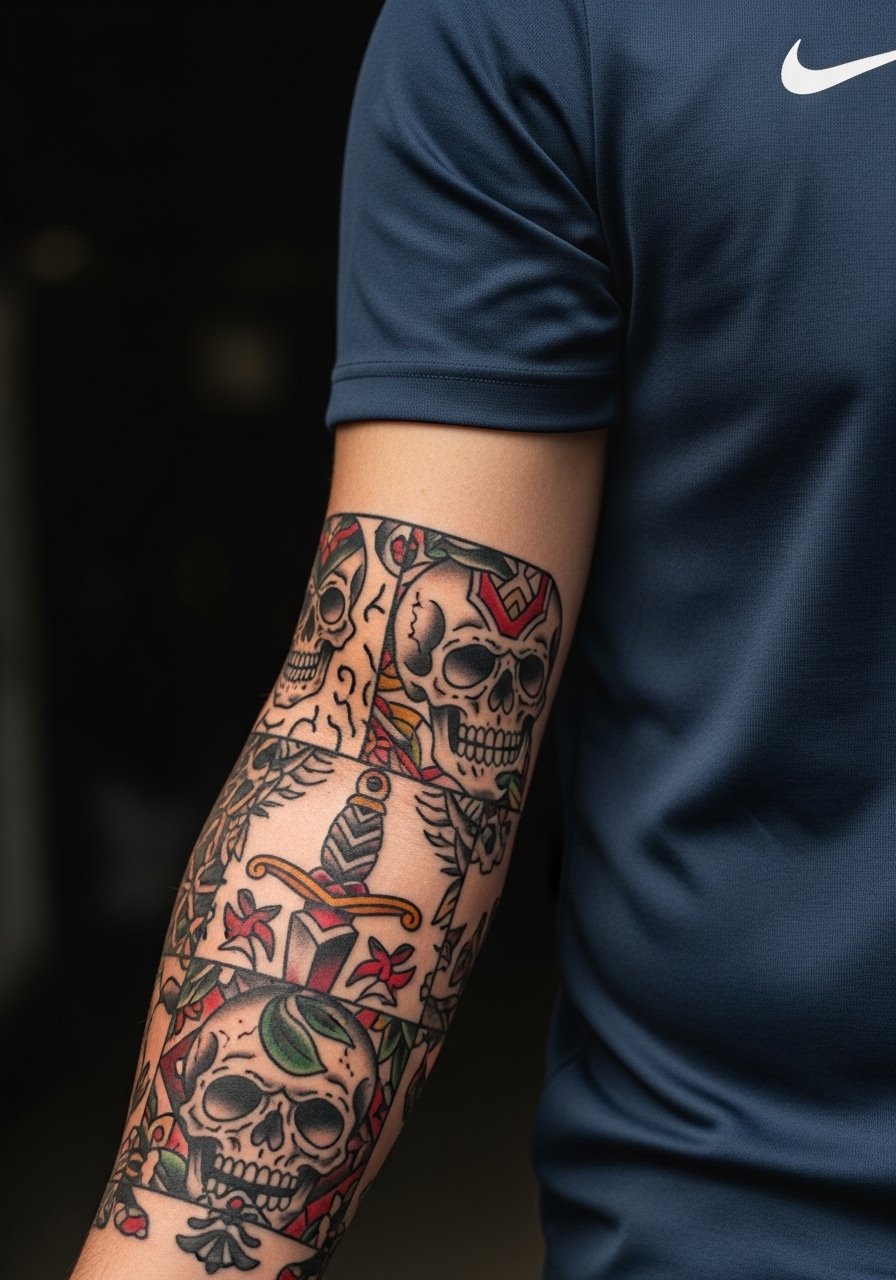
1. Bold Traditional Skull and Dagger Forearm Sleeve
I've seen this forearm build survive gym life because the pieces use thick outlines and limited color saturation. Tell your artist you want 4–6 inch modules and matching outline weights across segments so the sleeve reads cohesive when new and healed. The outer forearm is moderate pain and most sessions run 2–4 hours. Common mistake is mixing thin fine-line portraits into the same band. For the session wear a short sleeve athletic shirt so the artist has full access, and show-off with a black henley rolled at the cuff to let the forearm breathe. Expect a touch-up around year three if sun exposure is high.
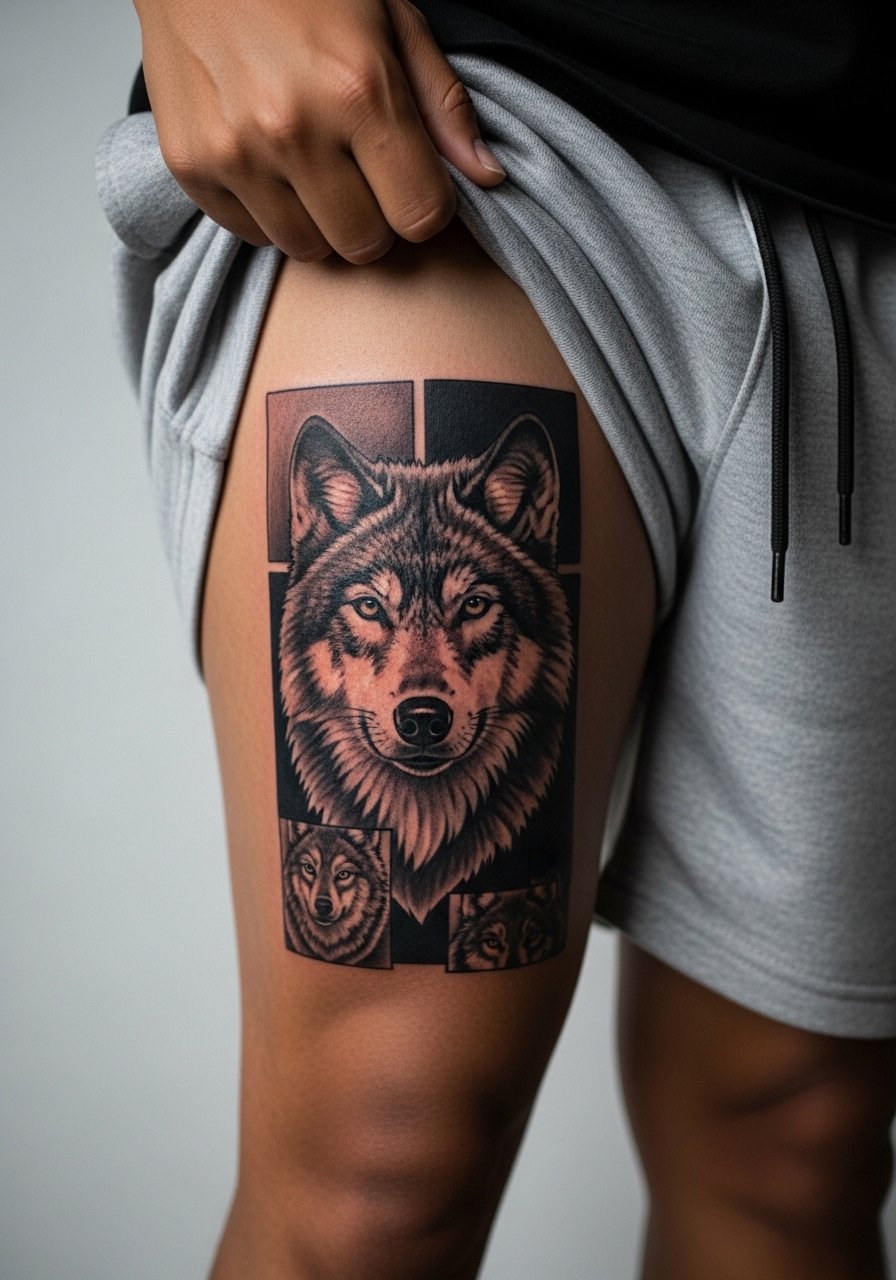
2. Dark Realism Animal Portrait on Outer Thigh
Fair warning, the outer thigh takes longer sessions but heals well through size changes. This style needs heavy black shading and multiple depth passes to maintain contrast on motion-prone skin. Tell the artist you want 6–10 inch portraits with a unified shadow language so neighboring pieces do not clash. Session time runs 3–6 hours per portrait and pain is lower than ribs but higher than the calf. For appointment day wear loose gym shorts that slide up easily and bring a pair you do not mind staining from ointment, for example tailored athletic shorts. Expect the deepest areas to mellow by six months and require a minor touch-up at year two to recapture mid-tone depth.
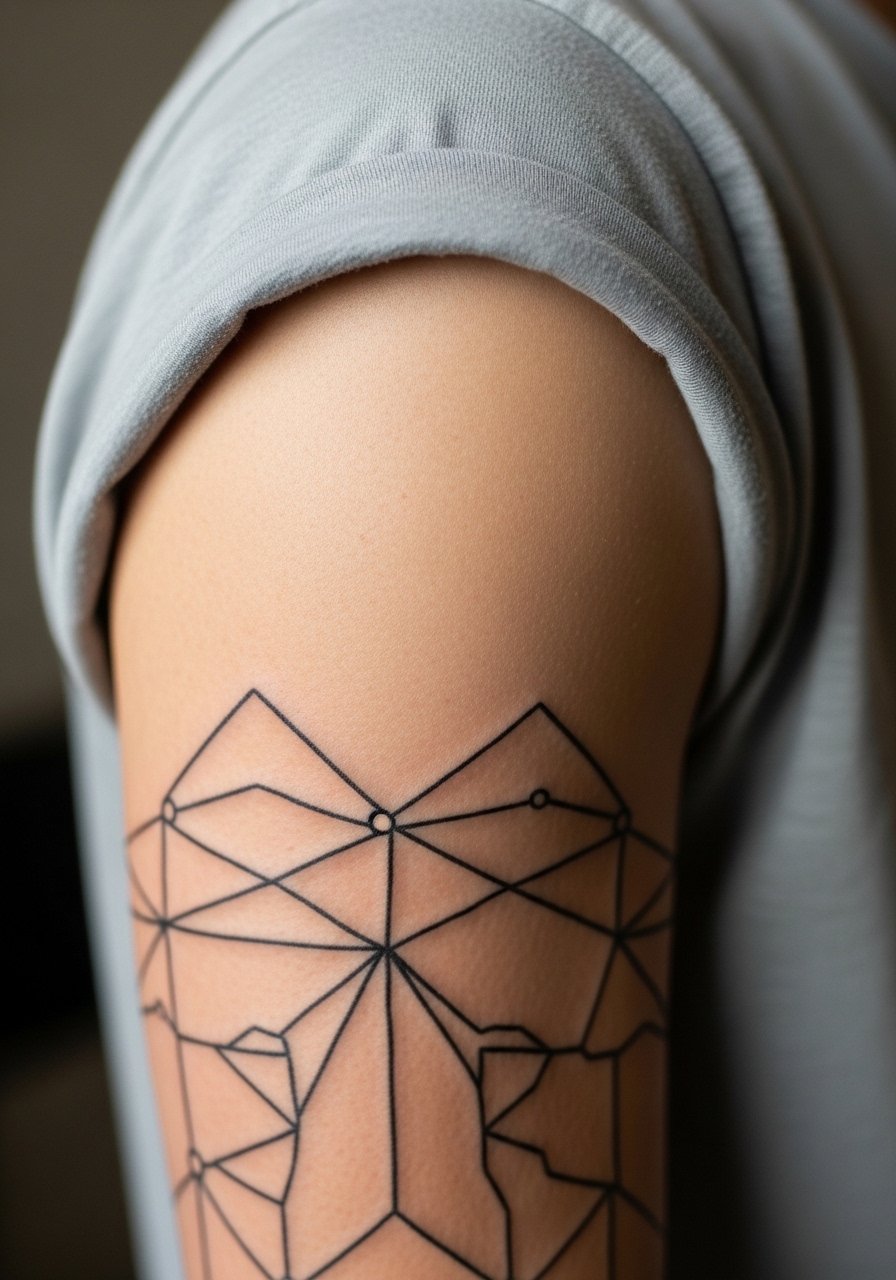
3. Geometric Mandala Shoulder Cap in Blackwork
Most clients choose this for a professional-friendly look that still reads bold from a distance. The shoulder cap needs 3–6 inch modules and clean negative space to prevent over-saturation. In consultation, ask for spacing diagrams so dense dot work does not sit too close to thick black blocks. Session times are 2–3 hours per module and pain is sleeve-low. For showing it off, wear a fitted tank top in charcoal or white that frames the geometry. If you want to avoid blowout, keep the tight stipple areas a little larger than you think they need to be.

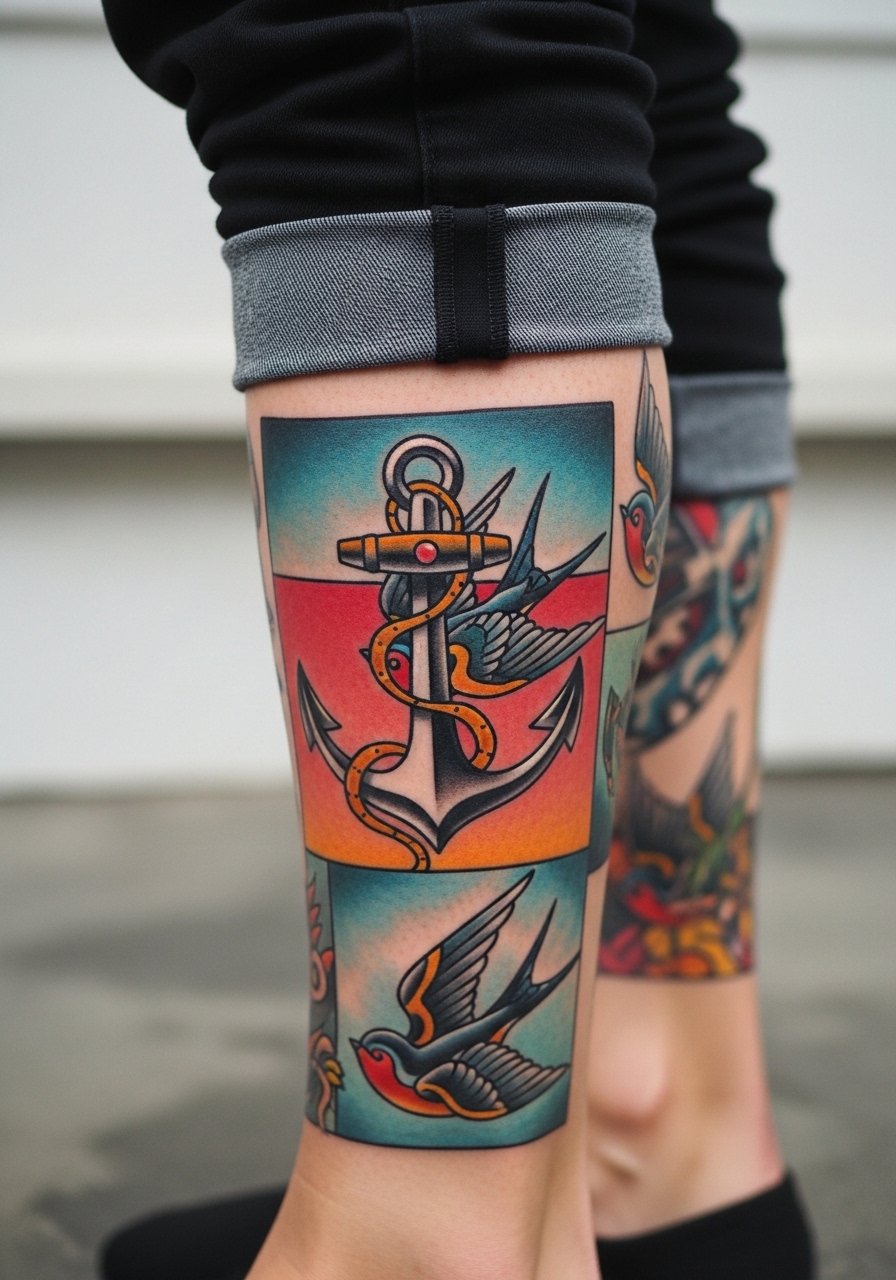
4. Neo-Traditional Anchor and Swallow Calf Wrap
The calf is great for seasonal visibility and it tolerates color saturation well. Ask for 5-inch patch modules with thick outlines and saturated fills so the motifs stay crisp when you roll pants up. Session wear should be loose track pants you can roll, and for showing the work off try slim joggers rolled to mid-calf alongside vintage sneakers. Here is a pair to consider: slim joggers men. Pain is moderate and touch-ups are uncommon if outlines are bold. One mistake is tiny fills that look busy in shorts.
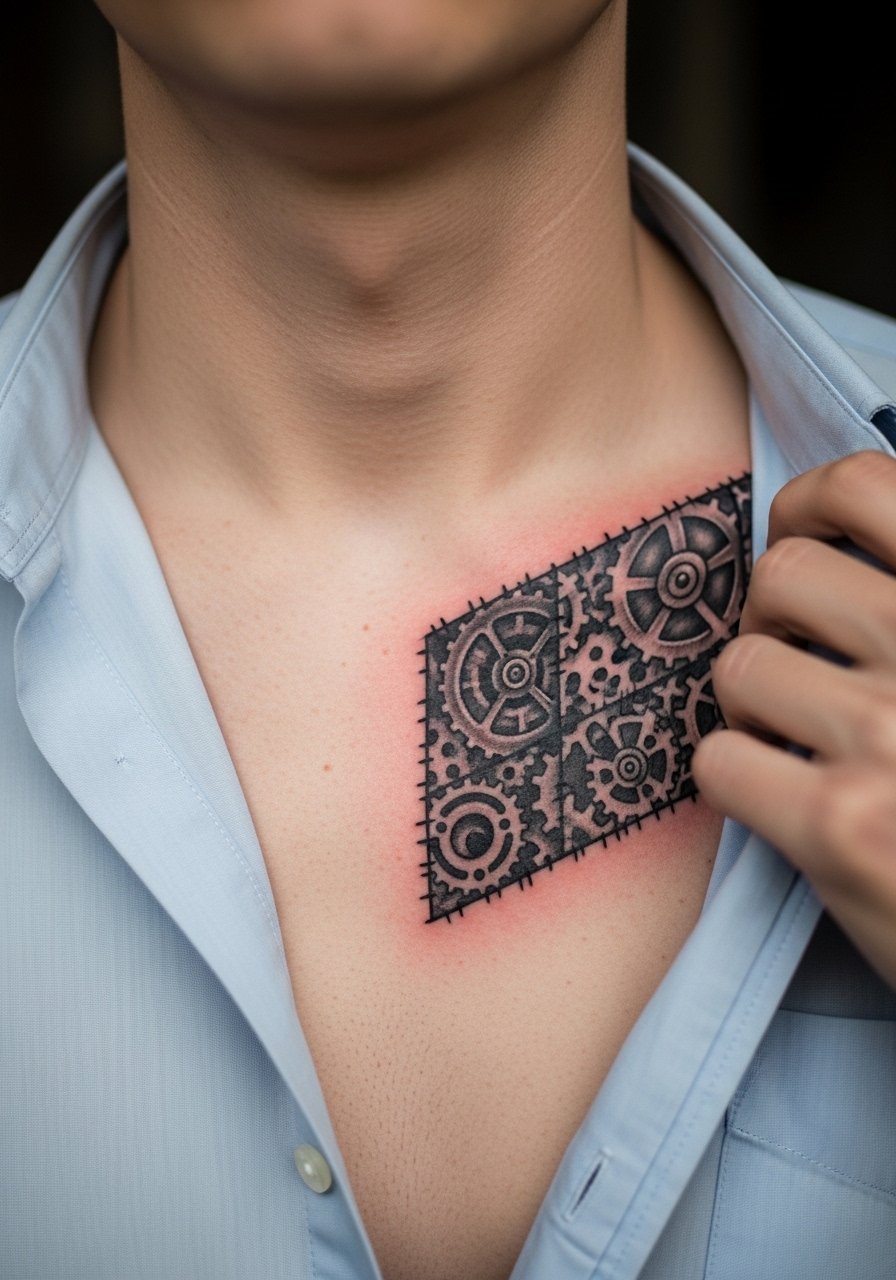
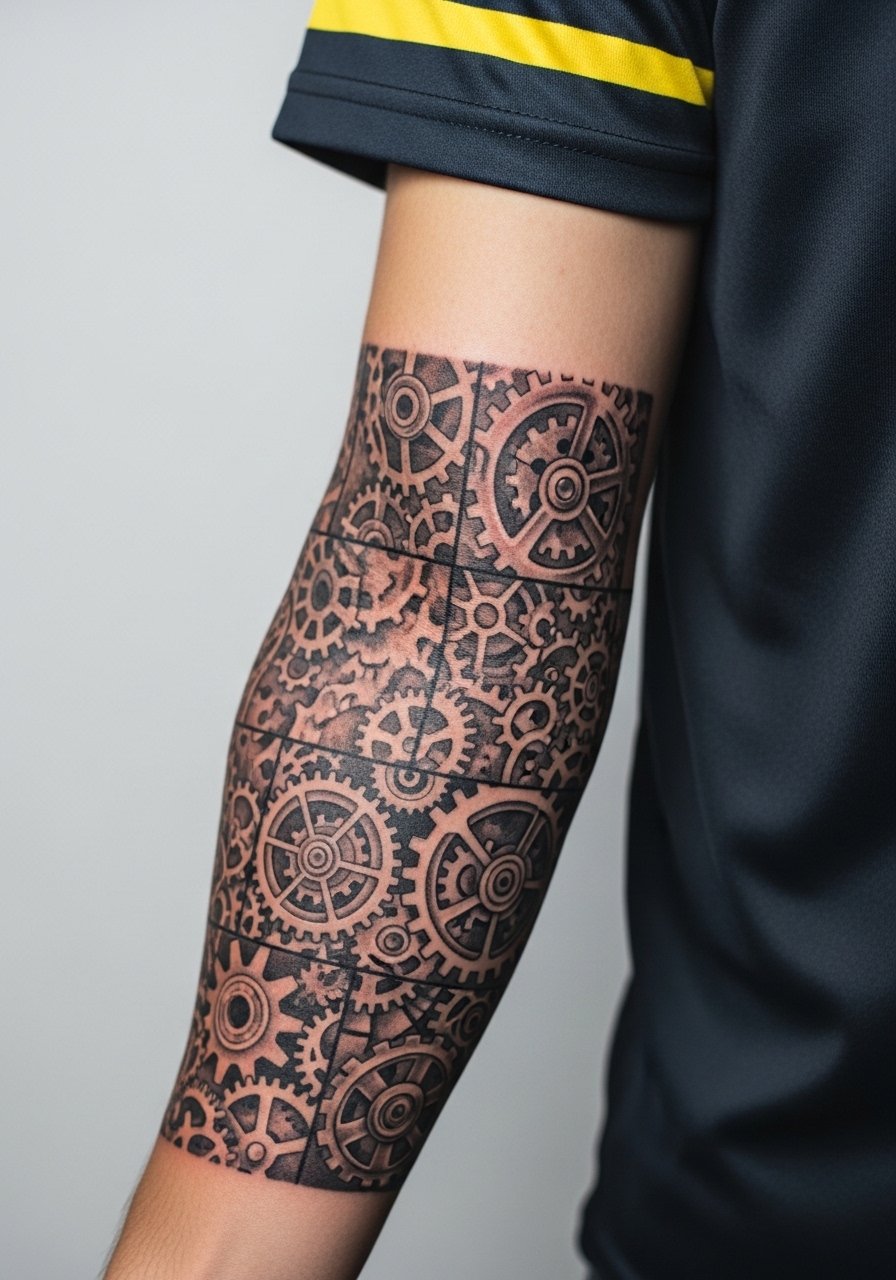
5. Blackwork Mechanical Gear Patchwork Across Upper Chest
Chest patchwork demands clear planning because curved surfaces distort gears. Consultation lead is essential here. Ask for templates that show how each panel moves with pectoral motion and request bold black gradients to maintain contrast. Sessions run longer and pain is higher near the sternum. For a night out wear a deep V-neck tee to display the upper chest without exposing sensitive areas. Sensitive placement note: wear an open button-up or wide-neck shirt to keep the rest of the chest covered during healing.
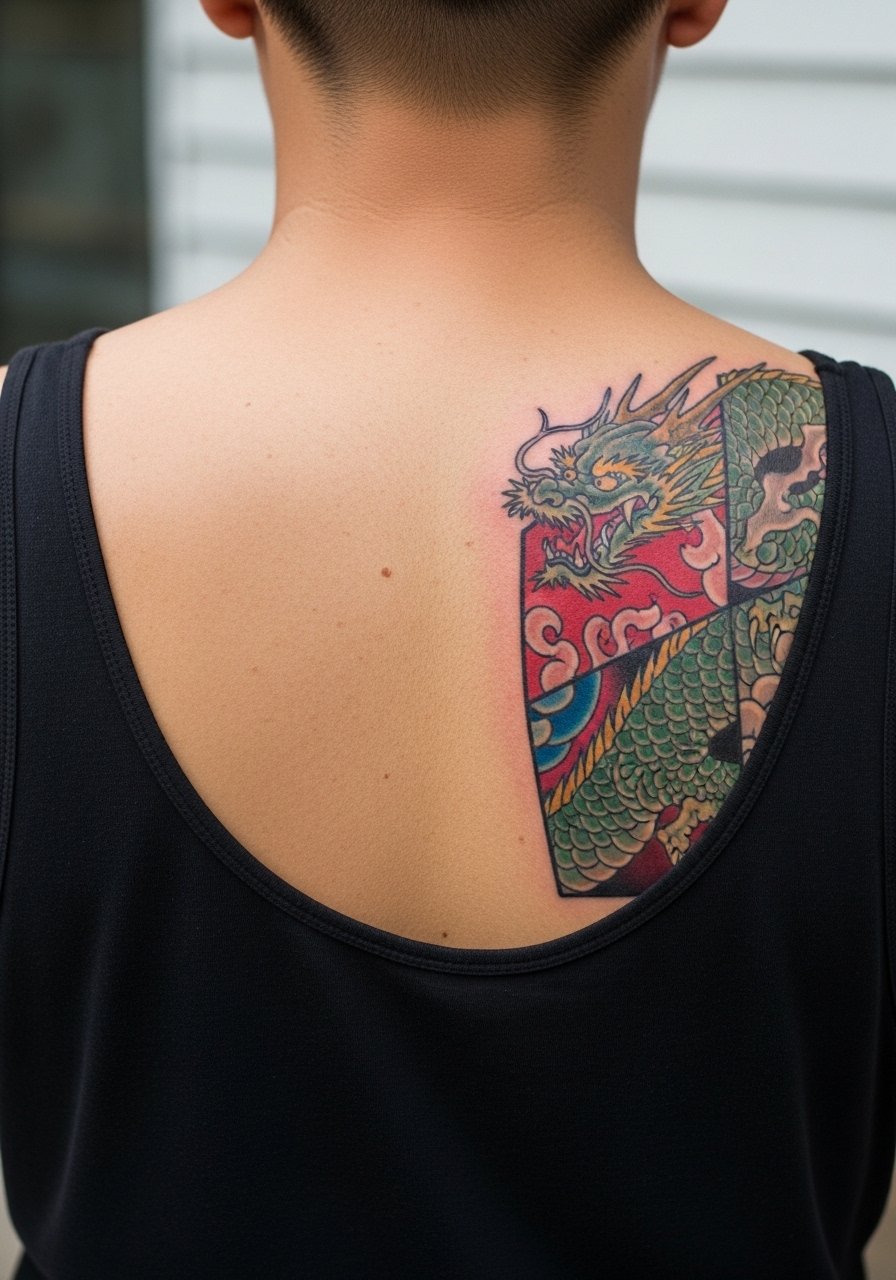
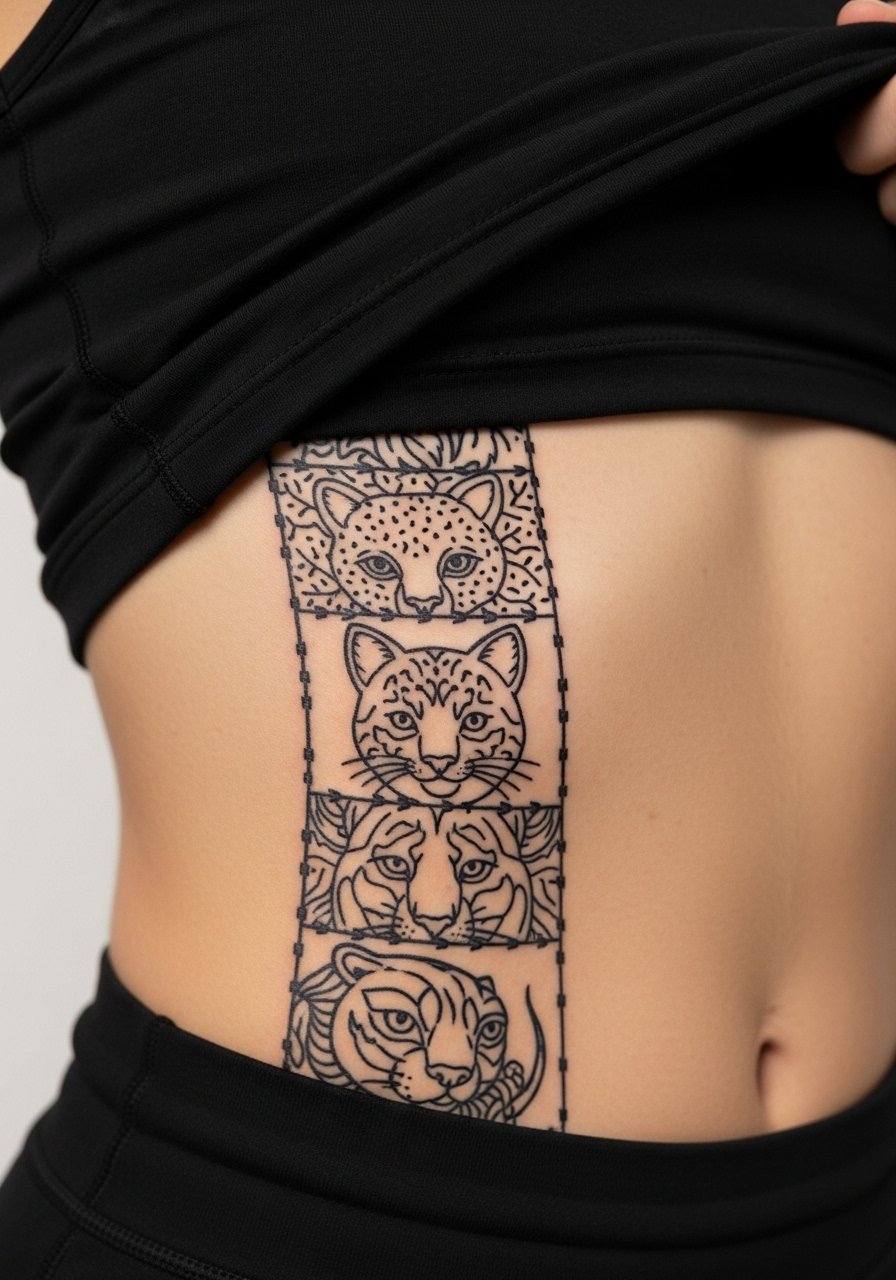
6. Traditional Japanese Dragon Segmented Back Panels
Aging lead fits this design because segmented back panels make future additions easier to align. The trick is matching outline weight and color saturation across trips to different artists. Tell your artist you want 8-inch panels with bold outlines and planned connectors for future links. Sessions are long and you will need prone positioning. For beach showing, use a backless tank that reveals panels without full exposure. Cultural note: this imagery ties to irezumi tradition, so consider respectful adaptations rather than direct replicas.
Studio Day Picks
The forearm, chest, and thigh pieces above all demand slightly different prep, so a curated set of session items keeps the day on track.
-
Tea tree indie balm. Thinner than heavy ointments, it breathes in humid conditions which helps sleeve sections on the forearm during summer.
-
Cetraben cream. A non-greasy option that suits geometric blackwork on the shoulder cap during dry winter healing.
-
Australian tattoo goo. Lightweight and good for multi-session dark realism thighs where heavy products can trap sweat.
-
Japanese washi aftercare wrap. Gentle film ideal for sensitive ribcage patches and areas that crease when you move.
-
Aquaphor healing ointment. Useful for the first 48 hours on bold line patches, helps preserve saturation in newly inked black outlines.
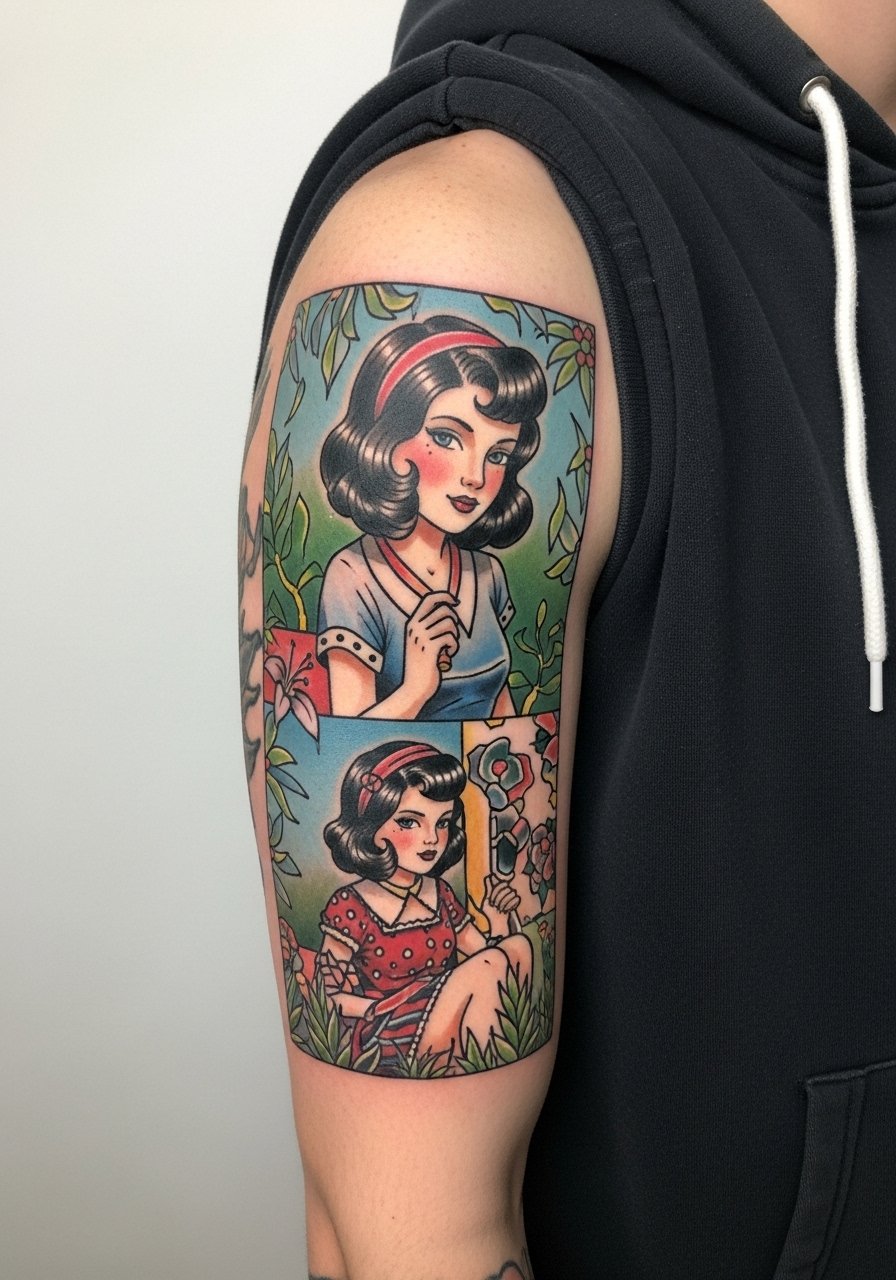
7. Illustrative Pin-Up Girl on Outer Bicep
Personal observation: pin-up patchwork reads best when the bicep hosts medium detail instead of tiny micro shading. Ask for 3–5 inch panels with clear shading planes and a consistent color palette so nearby neo-traditional pieces match. Sessions run 2–3 hours and pain is sleeve-low. A common mistake is layering fine dot work into the same band as heavy neo-traditional fills which can age unevenly. For the session wear a sleeveless hoodie so the arm is free and you stay warm between passes. Expect a softening of mid-tones at six months and plan a color refresh if needed.
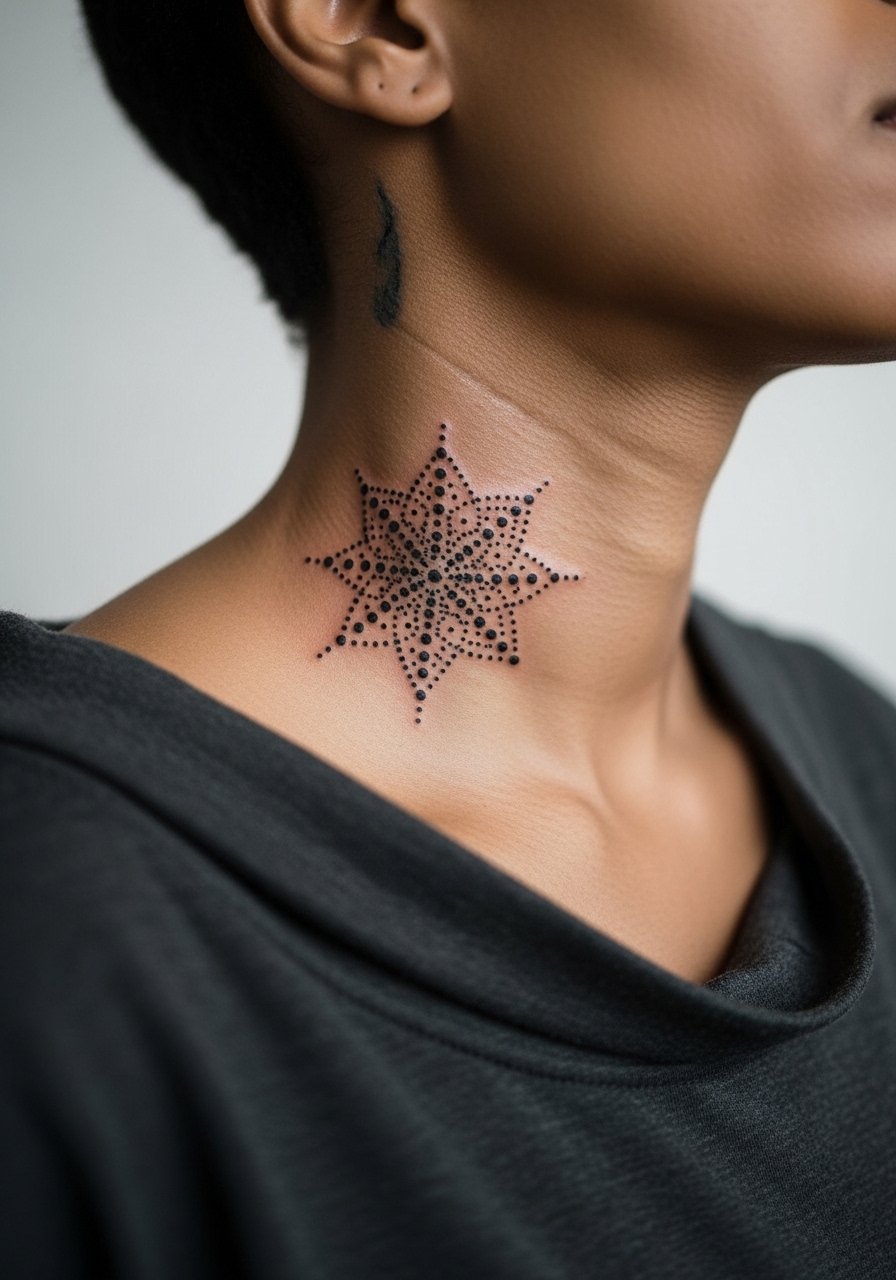
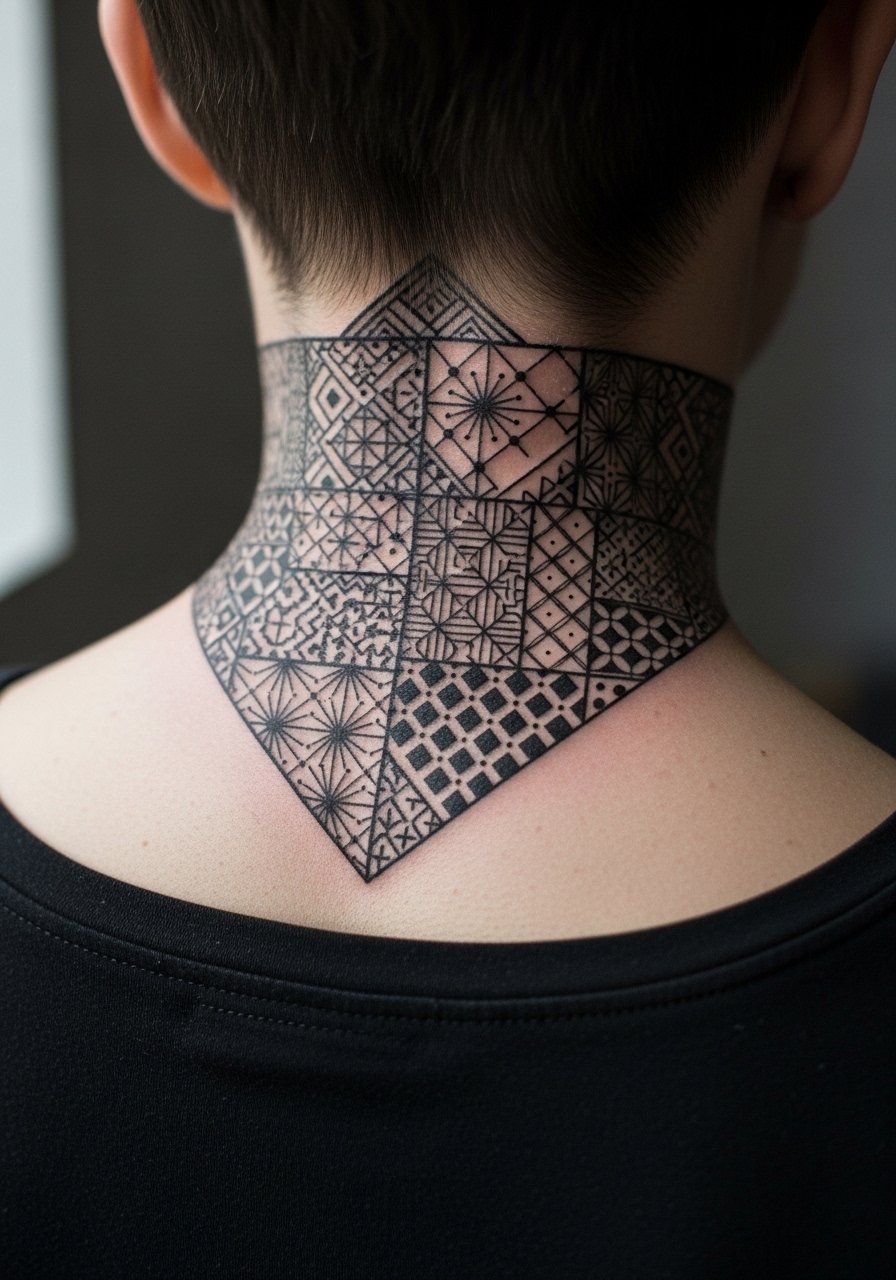
8. Sacred Geometry Dotwork on Side Neck
Consultation lead here. Dotwork on the side neck is visible and needs slightly larger dots to avoid early merging. The side neck is sensitive so sessions are short and often split. For showing off, a wide-neck shirt with the collar pulled to one side frames the pattern. Sensitive placement note: neck tattoos stay visible during job searches in some fields, so weigh the career impact. One mistake is asking for too-fine stippling on thin skin, which blurs faster than expected.
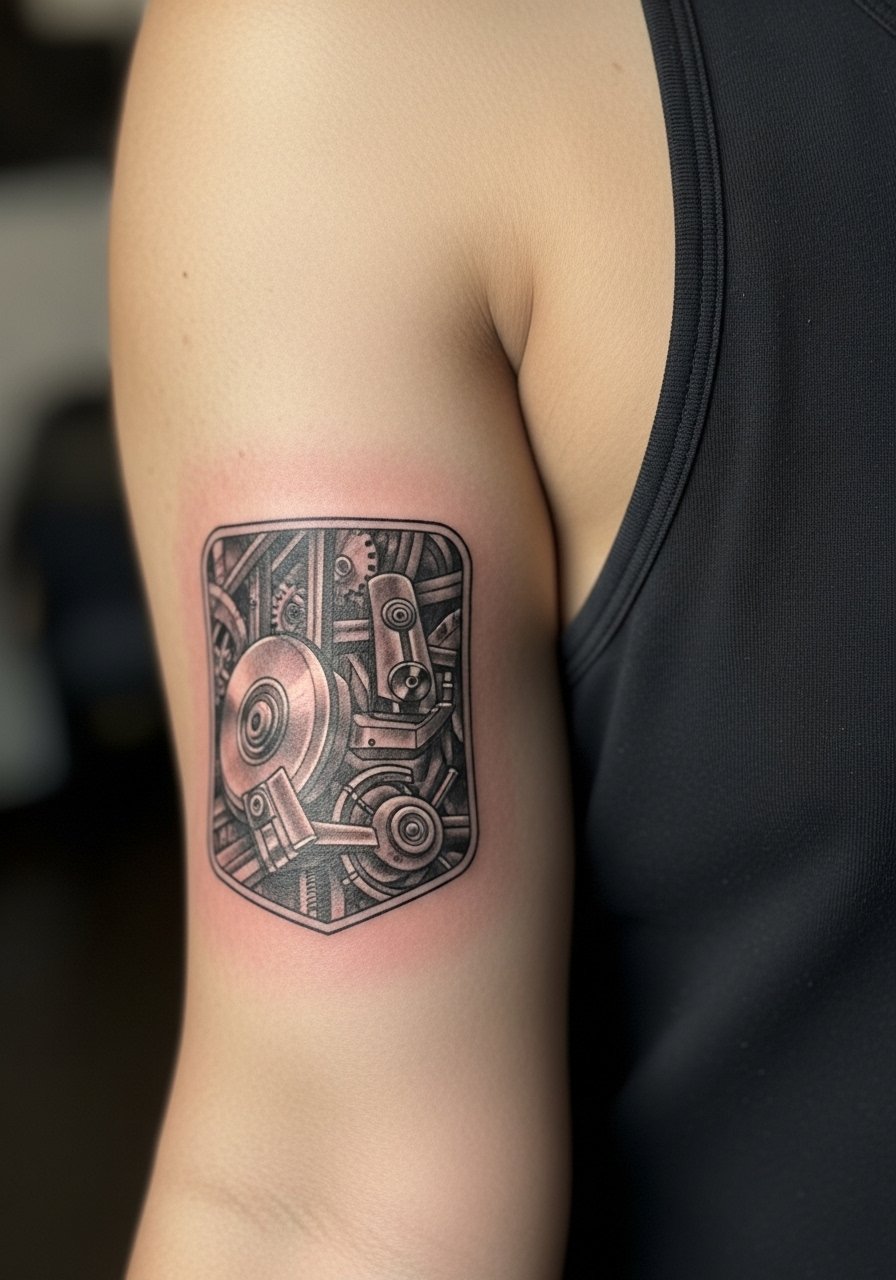
9. Photorealistic Machinery on Inner Forearm
Pain warning: the inner forearm is sensitive but photoreal submissions here reward with strong narrative cohesion. Tell the artist you want black and gray micro-realism with heavy mid-tone contrast to survive smartphone photography edits. Session times tend toward 3–4 hours and matching the linework depth to adjacent flash pieces prevents a patchy appearance. For the session wear a short sleeve athletic shirt that allows the inner arm to lie flat. A common issue is mixing different realism techniques without a unifying saturation plan.
10. Bold Outline Animal Stack on Ribcage
Pain warning: ribs score high on most pain charts, but vertical animal stacks with bold outlines age predictably. The key is to ask for vertical spacing and thicker outlines so curvature does not swallow detail. Sessions are long and require careful breathing control. Sensitive placement note: show the tattoo through a cropped athletic top that lifts to reveal only the rib zone during the session. Artists split over numbing cream use for ribs; one camp says it helps long sessions, the other says it interferes with sensation. Ask your artist which they prefer.
11. Ornamental Mandala Knuckle Modules
Mistake lead: tiny knuckle pieces often fail because the skin there moves and gets washed constantly. Keep modules micro but bold in contrast and expect touch-ups. Two short sessions usually cover both hands and pain is higher than the forearm. For work-safe wear minimal jewelry, and for showing off a compact mandala pair with a simple thin chain pendant that does not compete for attention. Hands also age differently so plan for refreshes at year two to keep edges crisp.

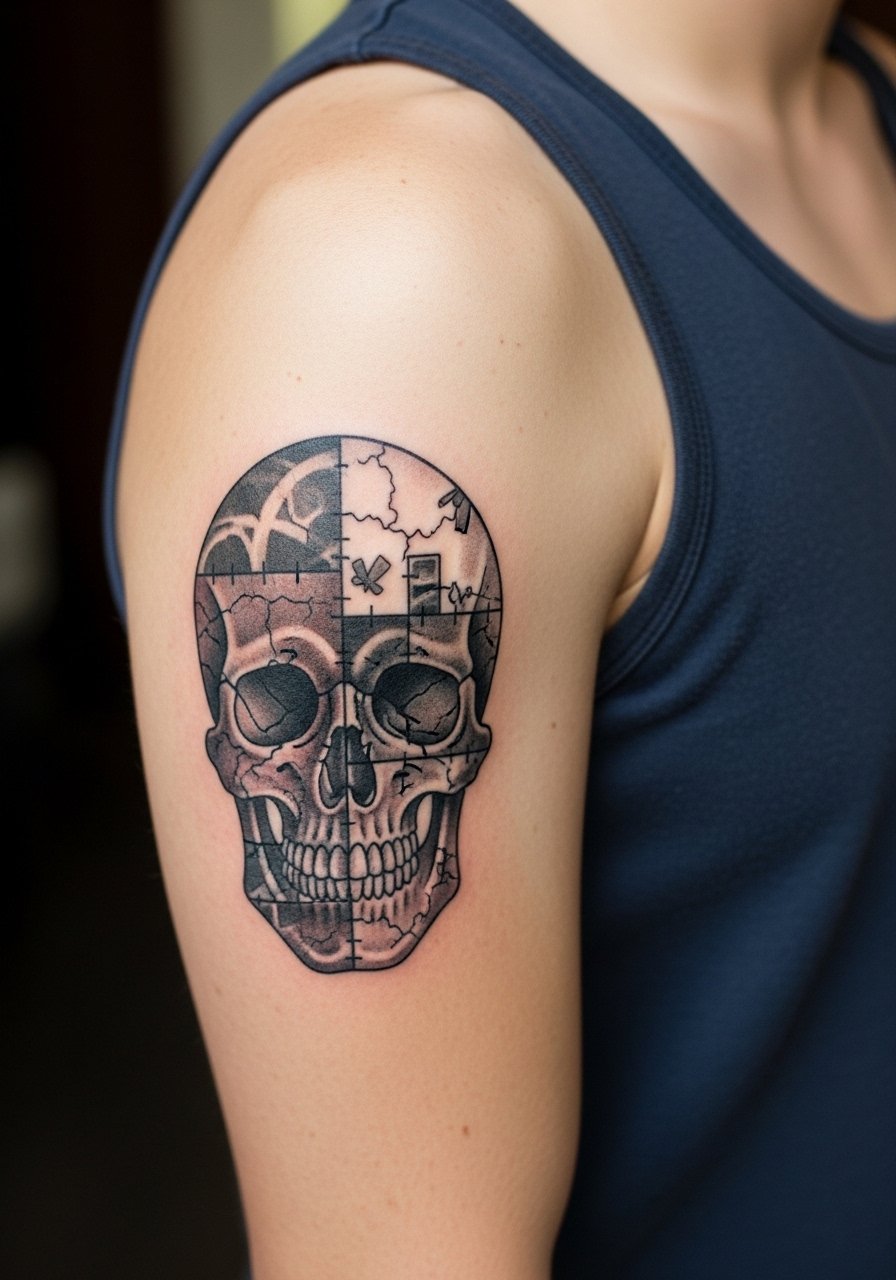
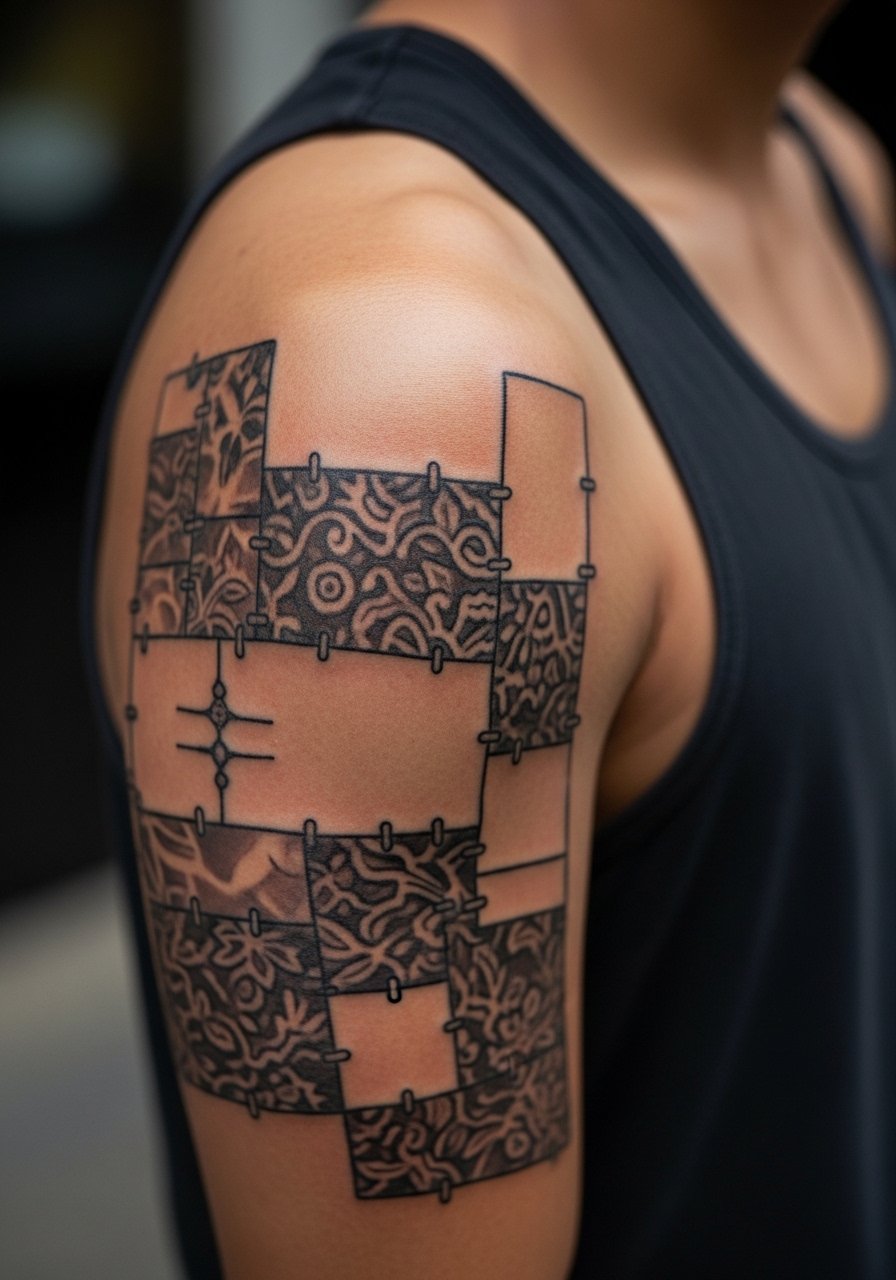
12. Mixed Media Skull Upper Arm Connector Pieces
Visual impact lead: mixed media skulls work when the upper arm pieces serve as anchors for future sleeve links. Request 5–7 inch skull modules with consistent lineweight across each visit. Session time is moderate and pain tolerable on the outer arm. A common error is adding washed out watercolor next to saturated traditional fills. For the session wear a tank top so the artist can angle the arm as needed. Expect edges to soften slightly at six months but retain structure if outlines are bold.
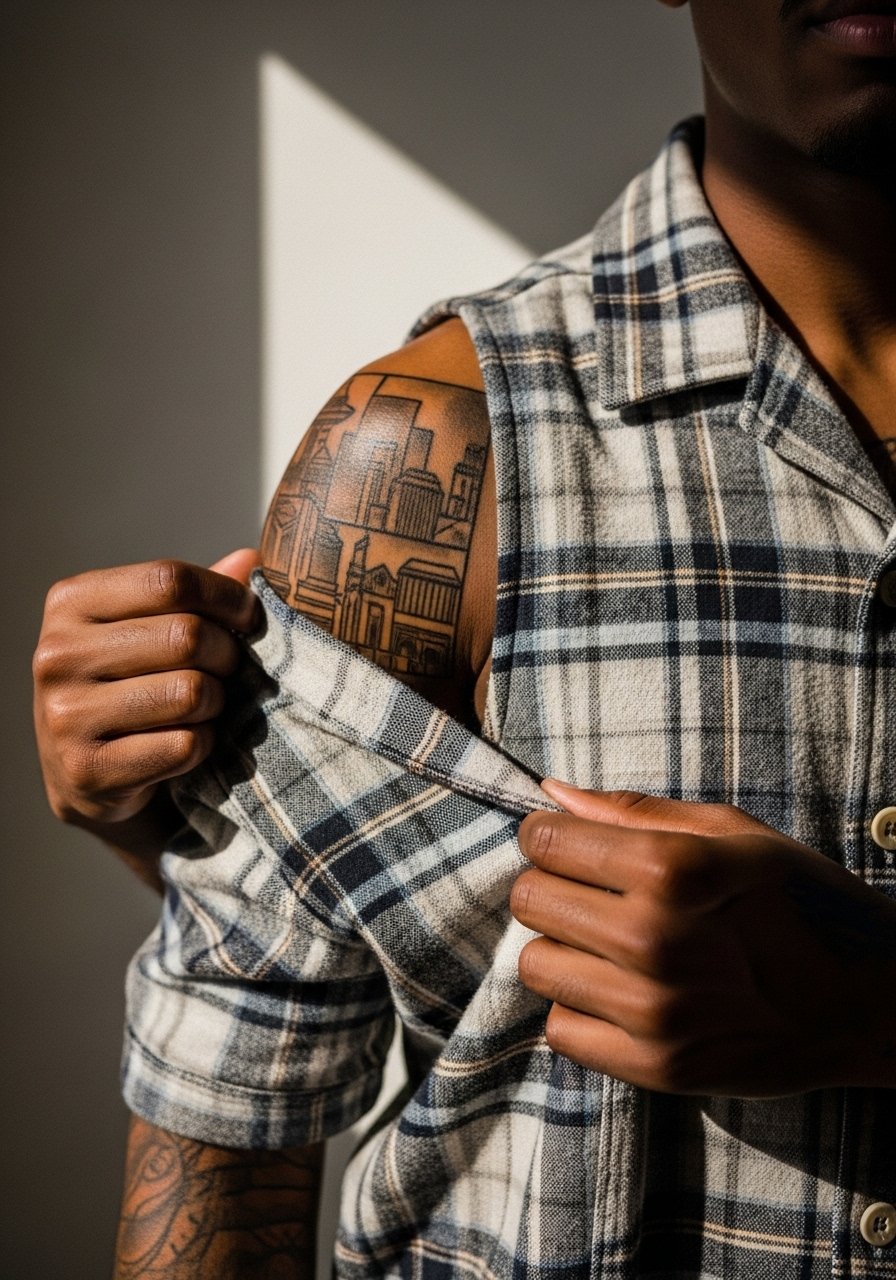
13. Architectural Cityscape Shoulder and Upper Arm
Unique idea: architectural elements create a city-themed patchwork that blends geometric and realism. In consultation ask for skyline panels sized to match shoulder curvature and request negative space to emphasize facades. Session wear should be a button-down camp shirt that you can pull aside without stretching fabric. For showing off, pair the piece with a button camp shirt worn loose. Expect tighter linework to need touch-ups if done too small.
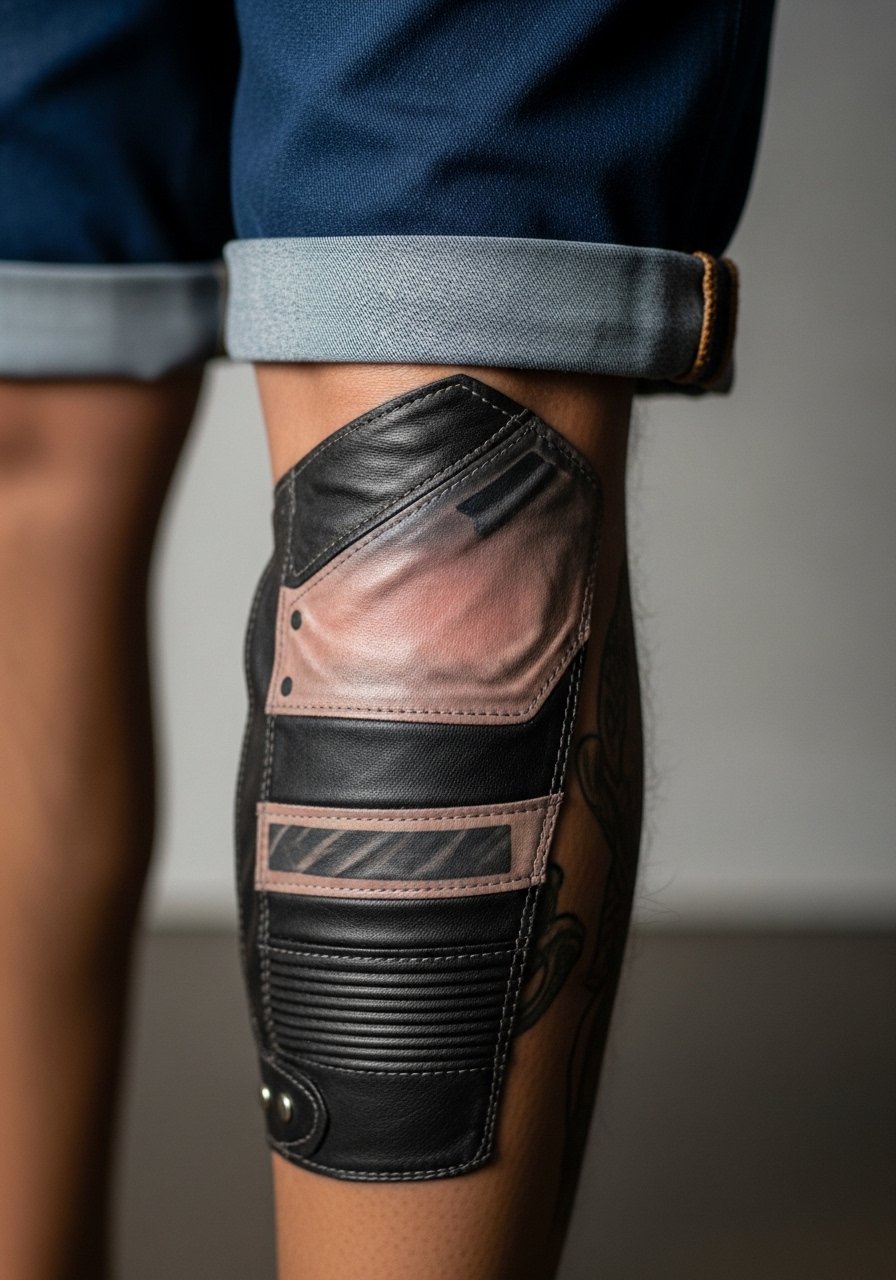
14. Motorcycle Gear Calf Panels
Styling lead: calves take summer rolls well and the mechanical theme pairs with fitted shorts. Ask for gear modules sized around 5 inches and consistent color fills so panels match over time. Session pain is moderate and touch-ups are rare. For showing off, roll slim joggers or wear olive cargo shorts. A common misstep is crowding too many small logos into one leg band which reads noisy at a distance.
15. Negative Space Geometric Neck Accent
Aging/healing lead: negative space in dense geometry helps maintain legibility as skin changes. For side or back neck placements request slightly larger modules and leave breathing room between dense lines. Sensitive placement note: use a wide-neck shirt pulled slightly aside for appointments. This area is visible in many workplaces so consider placement carefully. The neck will need gentle touch-ups sooner than the forearm if the work is dense.
16. Micro-Realism Inner Bicep Detail Panels
Pain warning: inner bicep is sensitive and sessions must be short. Micro-realism here benefits from high-contrast shading with open halos to avoid blur. Tell your artist to build small modules and plan touch-ups into the schedule. For the session wear a tank top with the arm raised slightly to expose the inner bicep. A common issue is trying to cram too much tiny detail into a small oval. Expect the softest shadows to diminish first and schedule a color or tone refresh at year two.
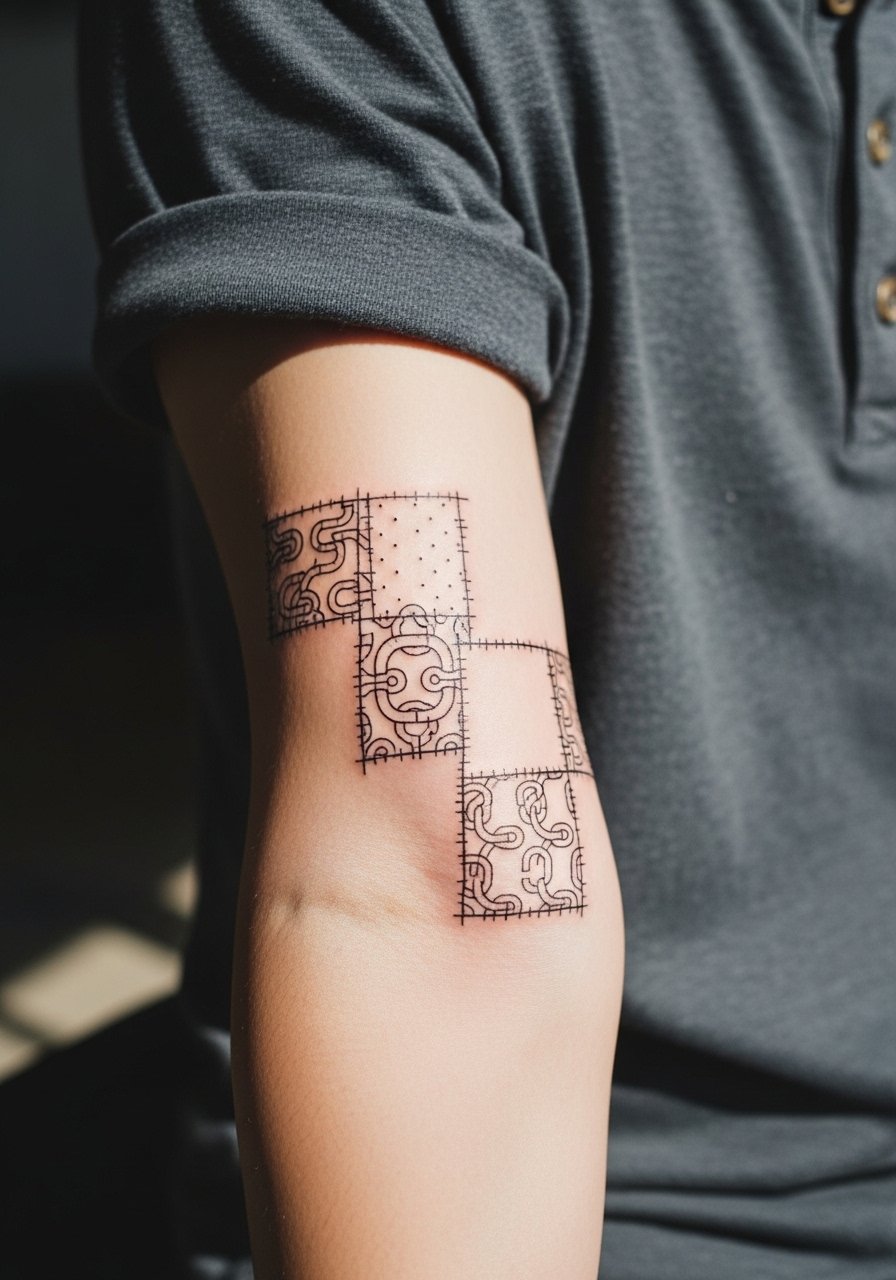
17. Minimalist Chain-Link Forearm Modules
Mistake lead: making chain links too small makes them merge into a band after year two. Ask for slightly thicker linework and clear spacing. Outer forearm placement keeps blowout risk lower than the inner arm and session time is short. For showing off, roll the sleeves of a henley shirt and add a leather cuff on the opposite arm for balance. This design ages cleanly if outlines remain bold and spacing is generous.
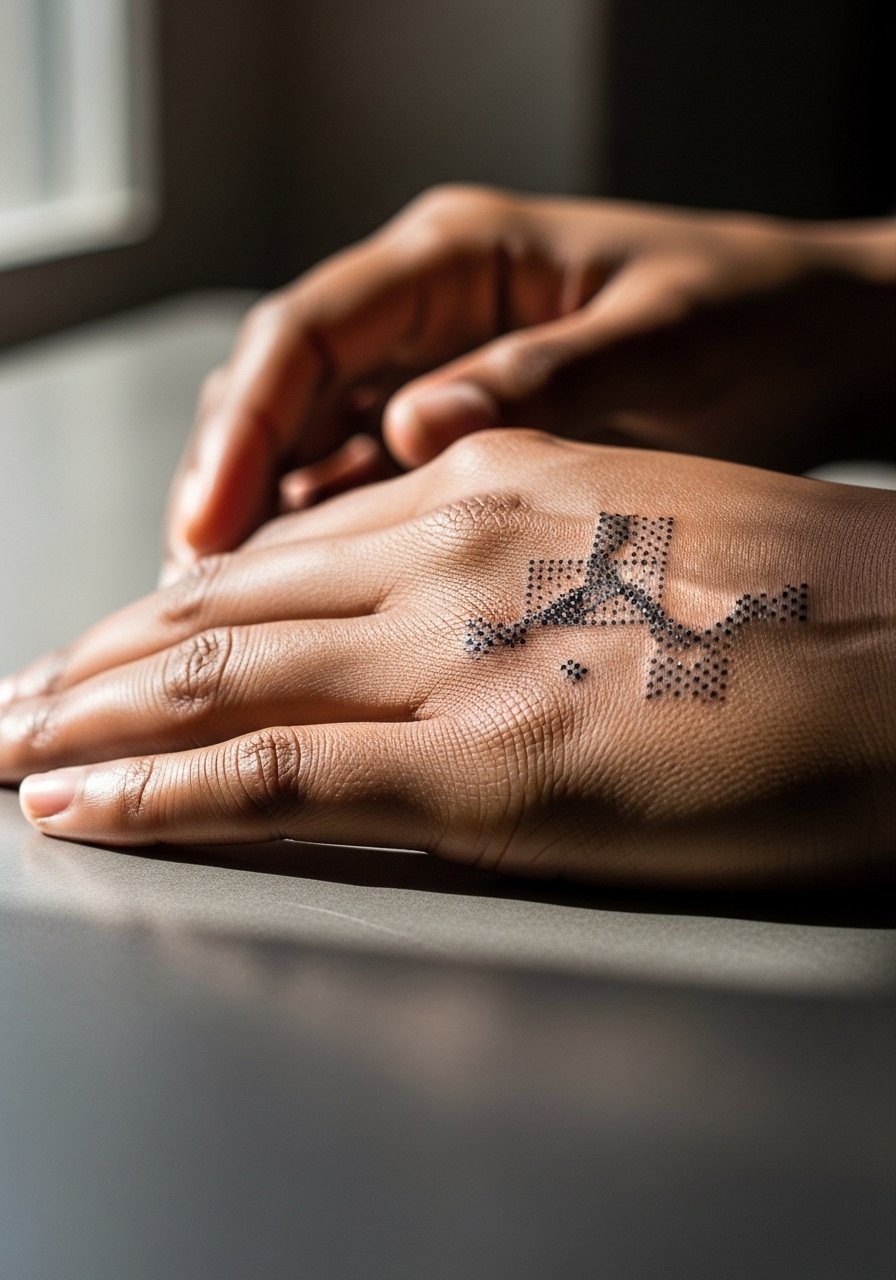
18. Constellation and Micro Stars on Hand Edge
Personal observation: small constellation patches on the hand edge work when you accept touch-ups as part of the plan. The hand is high friction and washes constantly. Ask for very bold tiny dots and expect yearly refreshes. For showing, minimal jewelry keeps the area readable and a small thin chain pendant can sit above without distracting. Sensitive placement note: hands are scrutinized in many jobs so consider visibility before committing.
19. Geometric Half-Sleeve Connector Panels
Consultation lead: half-sleeves built as connector panels let different artists contribute without mismatch. Ask your artist for mockups that map where each future piece will link and standardize outline thickness. Session lengths vary and pain is moderate. For the session wear a loose short sleeve tee and for showing off try a rolled sleeve tee. A common mistake is starting with too many small connectors that complicate later large pieces.
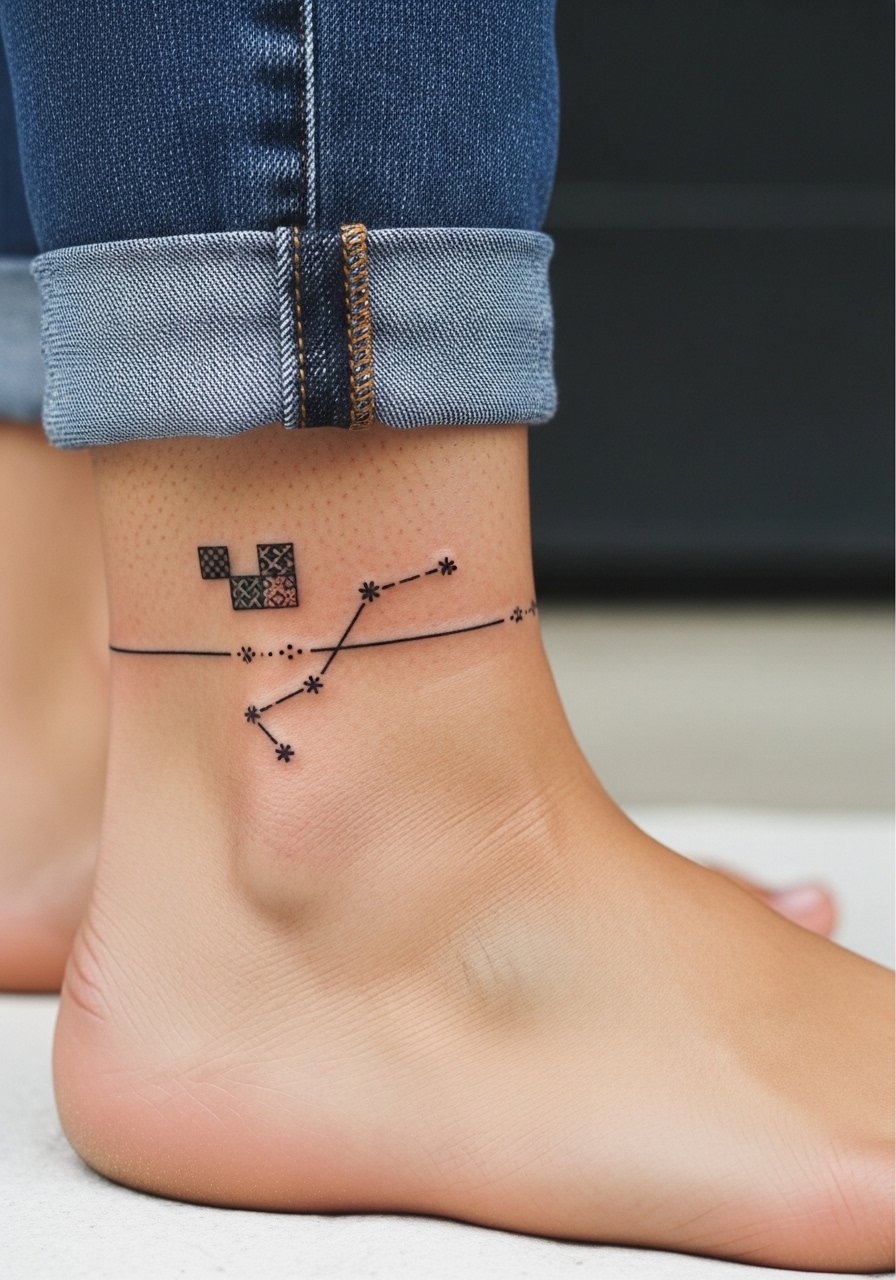
20. Ankle Patchwork Constellation Strip
Visual impact lead: ankle patches are small but visible with sandals. Keep modules simple and bold because the area endures friction from shoes. Session time is short and pain is moderate. For showing off, wear sandals or roll jeans and try a [minimalist sandal look] (https://www.amazon.com/s?k=vintage+sneakers&tag=inkedqueen-20). One common error is letting the design sit too low on the foot where creasing blurs the ink.
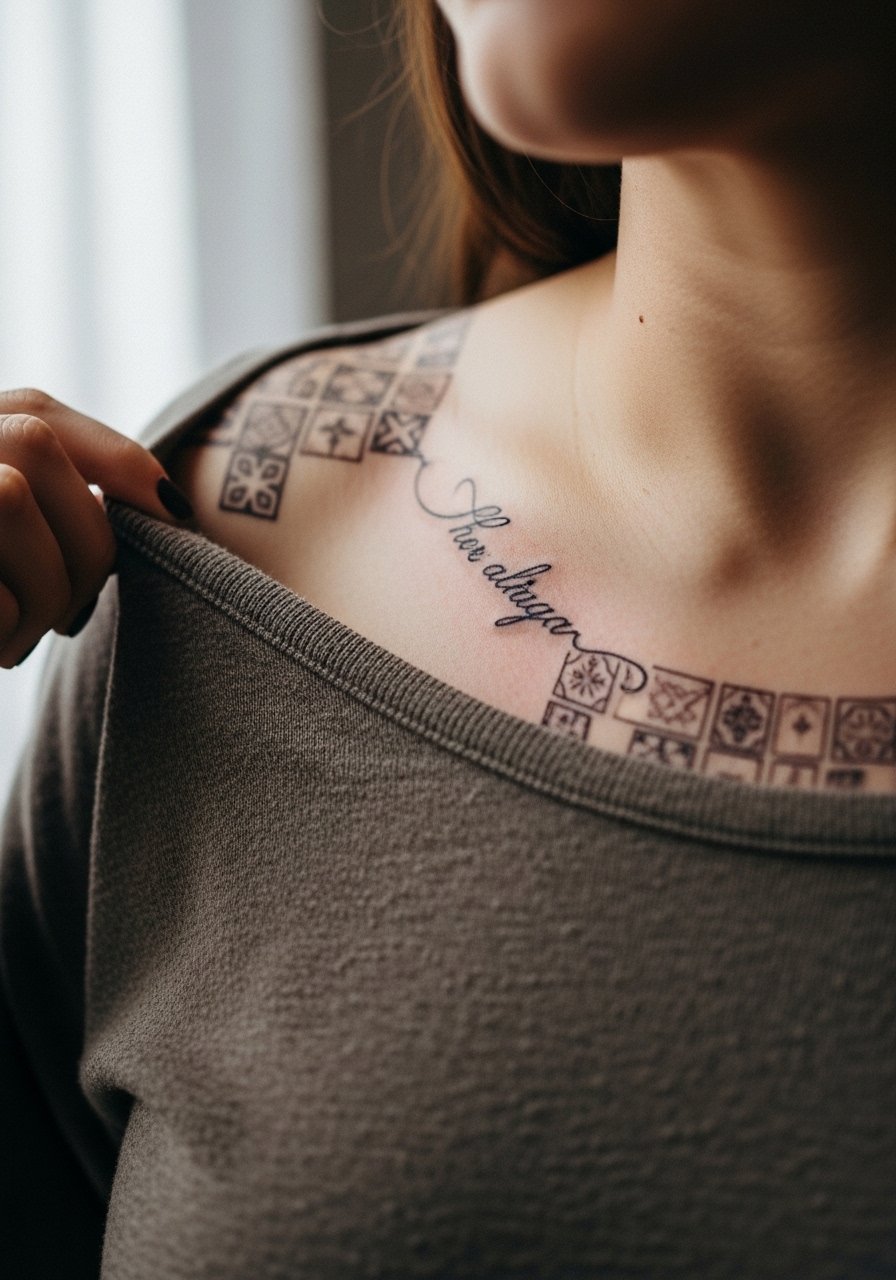
21. Collarbones and Script Micro-Panels
Aging/healing lead: collarbone pieces need open spacing so scripts and micro panels do not blur with motion. Keep script weight medium and request mockups that show the healed scale. Sensitive placement note: wear a wide-neck shirt or bandeau so the artist only exposes the collarbone area. For showing off, a deep V-neck tee works well. Expect letters to need a touch-up sooner than bold symbols if they are very fine.
22. Back Panel Phoenix in Mixed Patchwork
Personal observation: phoenix panels centered on the upper back become graceful anchors for future patches. Plan each segment with consistent color saturation and request connectors that read when you move. Sessions are long and require prone positioning. For beach reveal use an open-back rash guard or a backless tank. Cultural origin note: mythic phoenix imagery appears across cultures so explain which reference you prefer to the artist. Expect wings and feather detail to soften and plan a touch-up at year three.

23. Calf Flash Sheet Patchwork for Walk-Ins
Mistake lead: using multiple small flash pieces without plan makes the calf look crowded. If you want a flash-based patchwork, ask for a consistent palette and outline weight across the sheet. Sessions are short and ideal for guest spots. For showing off, roll slim joggers or wear vintage sneakers. For session day, wear loose track pants so the artist can access the area easily. Flash sheets age predictably if outlines are bold and fills saturated.
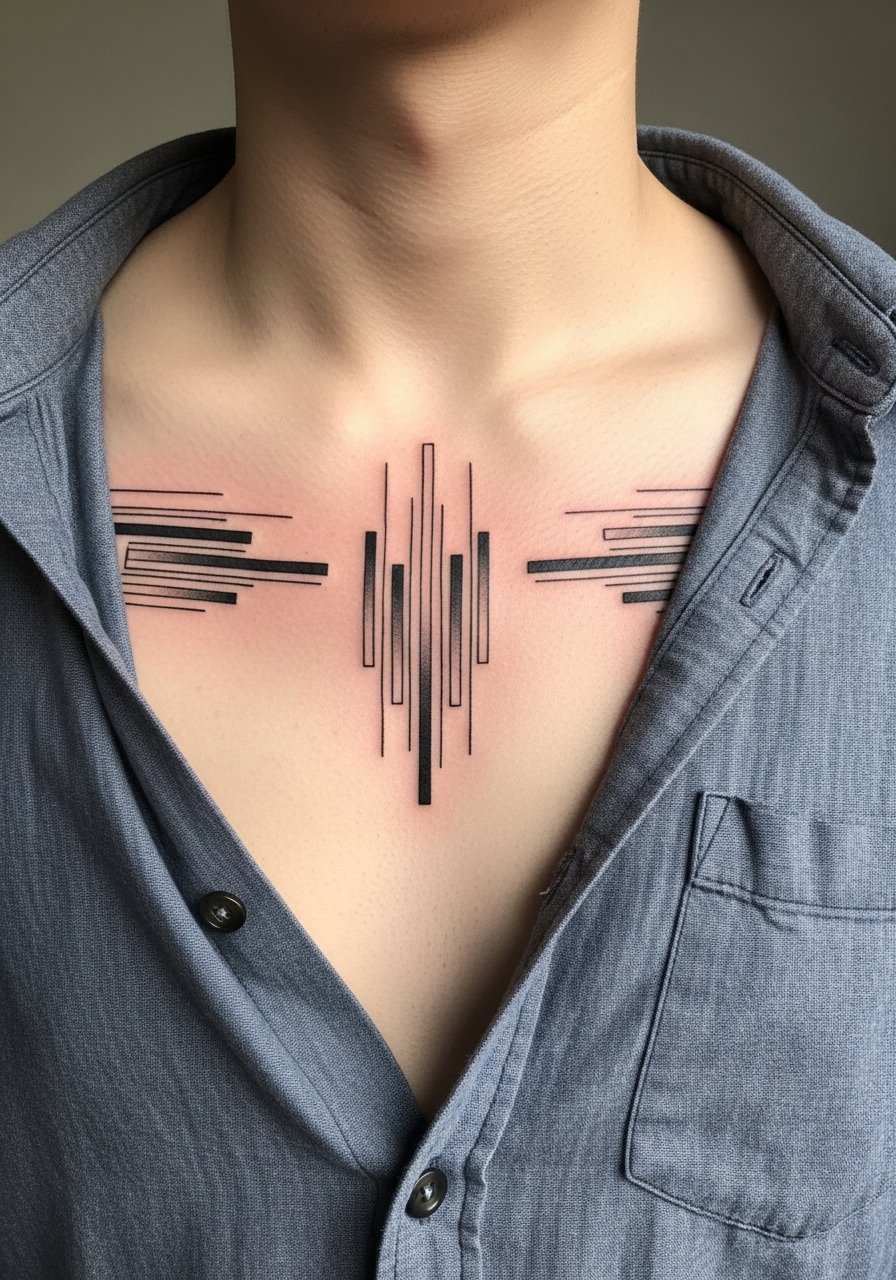
24. Minimal Chest Patchwork Bars
Aging/healing lead: minimal chest bars read best when spaced across the upper chest rather than bunched near the sternum. The chest moves with breathing so keep modules wider than you think. Sensitive placement note: wear an open button-up or wide-neck shirt pulled aside during the session. For showing off, a deep V-neck tee frames the bars cleanly. Expect fine lines to need refreshing earlier than thicker bars.
25. Patchwork Cover-Up Strategy for Old Pieces
Consultation lead: successful cover-ups require mapping old ink size and color then designing panels that take those tones into account. Artists often recommend near-black fills or layered neo-traditional pieces to hide older work. Sessions vary and often need multiple visits. For the session wear clothing that exposes the old tattoo cleanly. One real mistake is starting a cover without a color study that simulates healed results. Plan for a touch-up schedule that may stretch over a year.
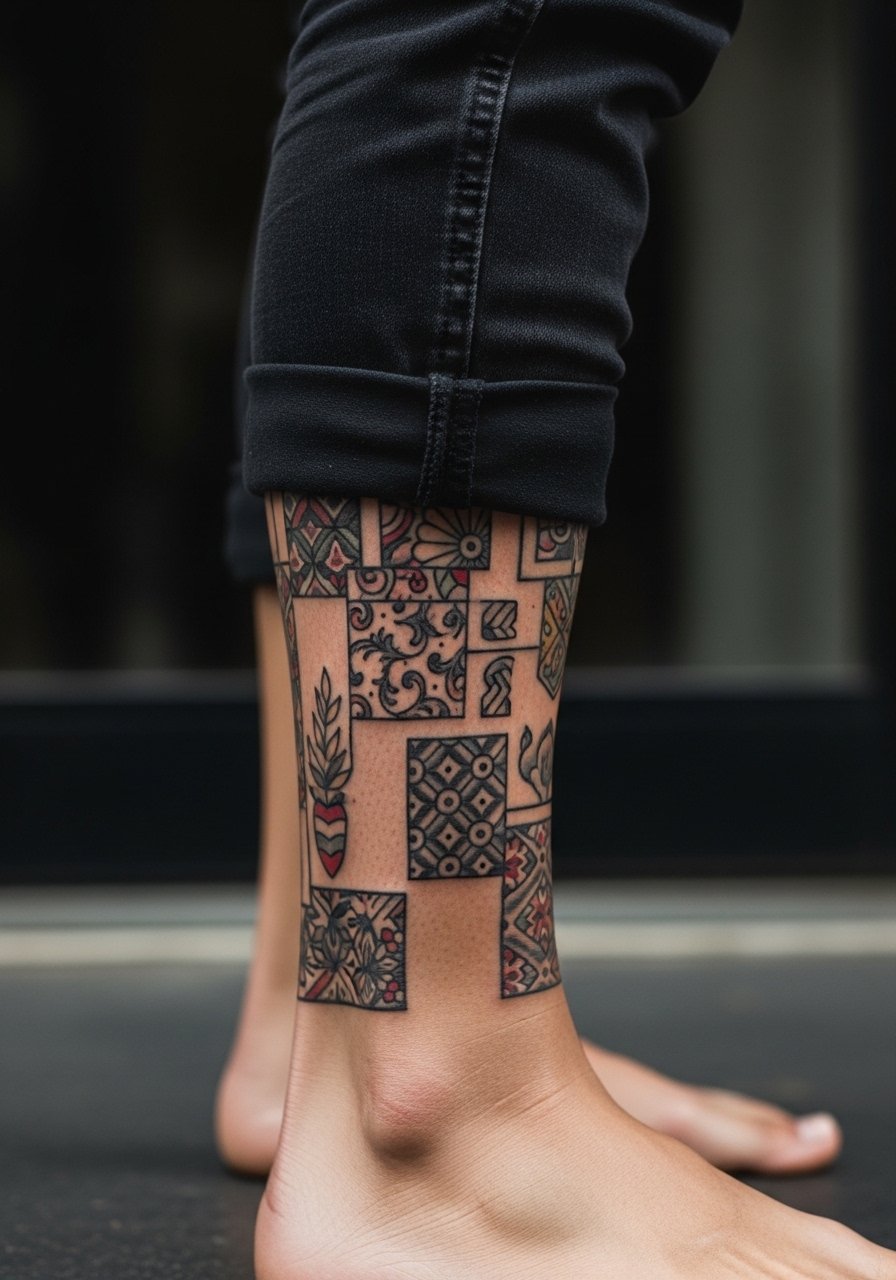
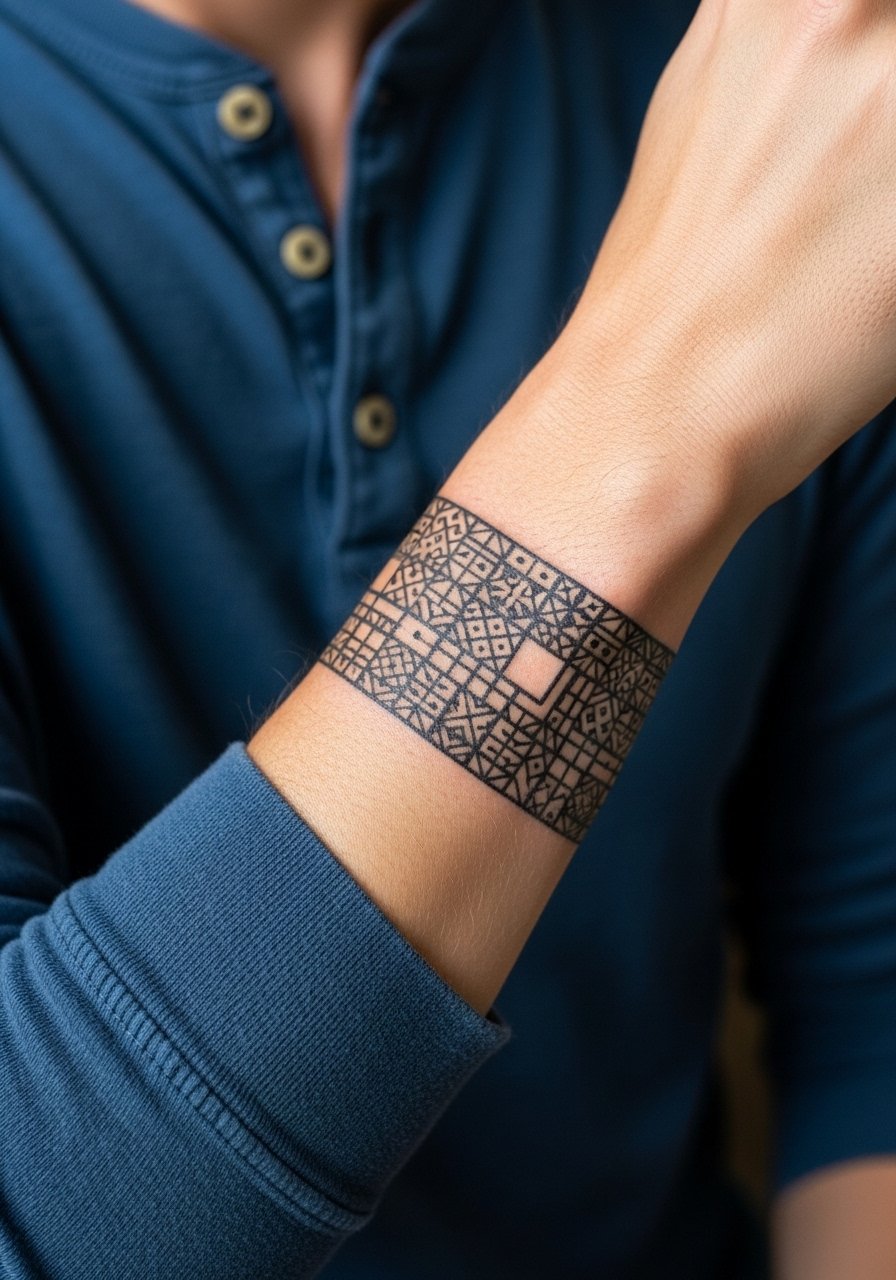
26. Mosaic Micro-Patches Across the Wrist and Lower Forearm
Visual impact lead: mosaic micro-patches across the wrist look deliberate when you keep negative space consistent. Ask for modules each 2–3 inches and a standard outline weight. The wrist sees a lot of use so expect yearly softening. For the session wear a loose button-down shirt that you can pull the sleeve aside, and for showing off try a rolled sleeve henley. Common mistake is matching dotwork with solid blocks without transition panels, which creates a patchy healed look.
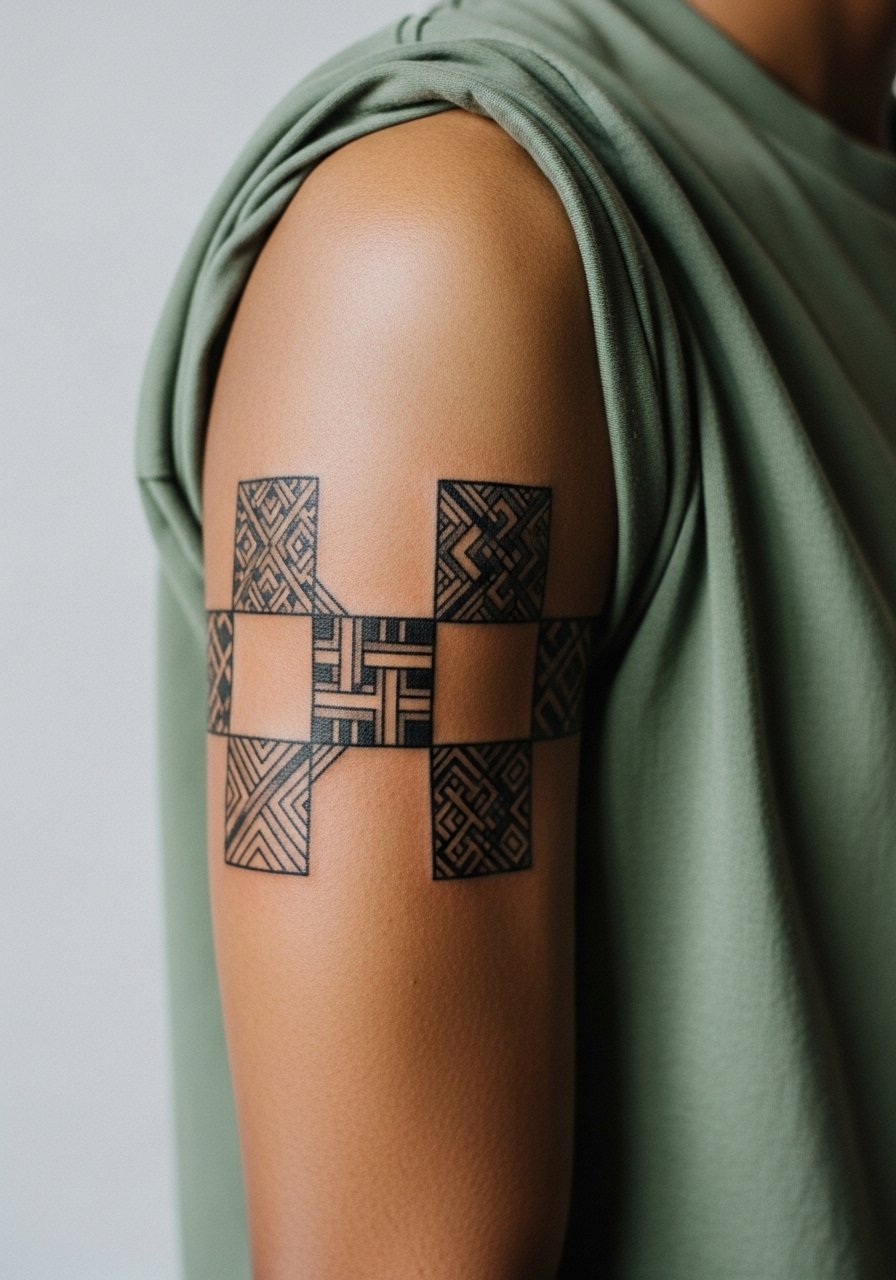
27. Spacer Panels to Match Multi-Artist Sleeves
Consultation lead: spacer panels are the unsung tool for multi-artist patchwork. They harmonize line weights and create breathing room between disparate styles. Ask for connector mockups and request the same outline thickness that appears in your existing work. Sessions are short and useful when filling gaps. For the session wear a shirt that gives the artist full access to the zone. Expect spacers to need less maintenance if they use blackwork blocks and simple negative space.
Frequently Asked Questions
Q: Will fine line patchwork blur faster than bold traditional sections in a sleeve?
A: It depends on placement and spacing. Fine line pieces on high-motion or thin-skin areas tend to soften sooner than bold traditional sections. If you want both, ask for larger negative space around fine lines and matching outline depth so the pieces age alongside one another.
Q: How do I coordinate guest spot artists so my patchwork sleeve does not look patchy?
A: Bring mockups that show exact outline weight and palette, and ask each guest to match those specs. Use discovery pathways like style hashtags and studio location tags to find guest spots, and book three to six months ahead to keep continuity.
Q: Are thigh dark-realism patchwork pieces a bad idea if I plan to change weight?
A: Thigh pieces tolerate moderate weight fluctuation better than the forearm. If you expect major changes, choose larger modules and bold outlines so forms remain readable when skin stretches. Expect some distortion with large weight shifts, but touch-ups can restore shape.
Q: What's the realistic touch-up timeline for knuckle, hand, and finger patchwork?
A: Hands and fingers age fastest because of friction and washing. Plan for yearly touch-ups for micro modules and expect minor color loss within six to twelve months. Bold contrast and larger dots help stretch the interval.
Q: Should I worry about cultural sensitivity with Japanese or mandala patchwork panels?
A: Yes, be mindful. These styles have specific cultural histories. Talk to your artist about which elements you want to adapt, and consider variations that honor the source rather than copying sacred iconography directly.
