
Fine line back tattoos look incredible fresh, but the real test is how they age. Trends push ultra-slim script and single-needle motifs, and I have seen the ones that keep their shape two years later are the designs that started with intentional spacing and the right placement. Below are 17 minimal tattoo ideas for the back that read clean now and still read clean after seasons of sun, workouts, and wardrobe changes.
1. Fine-Line Spine Quote
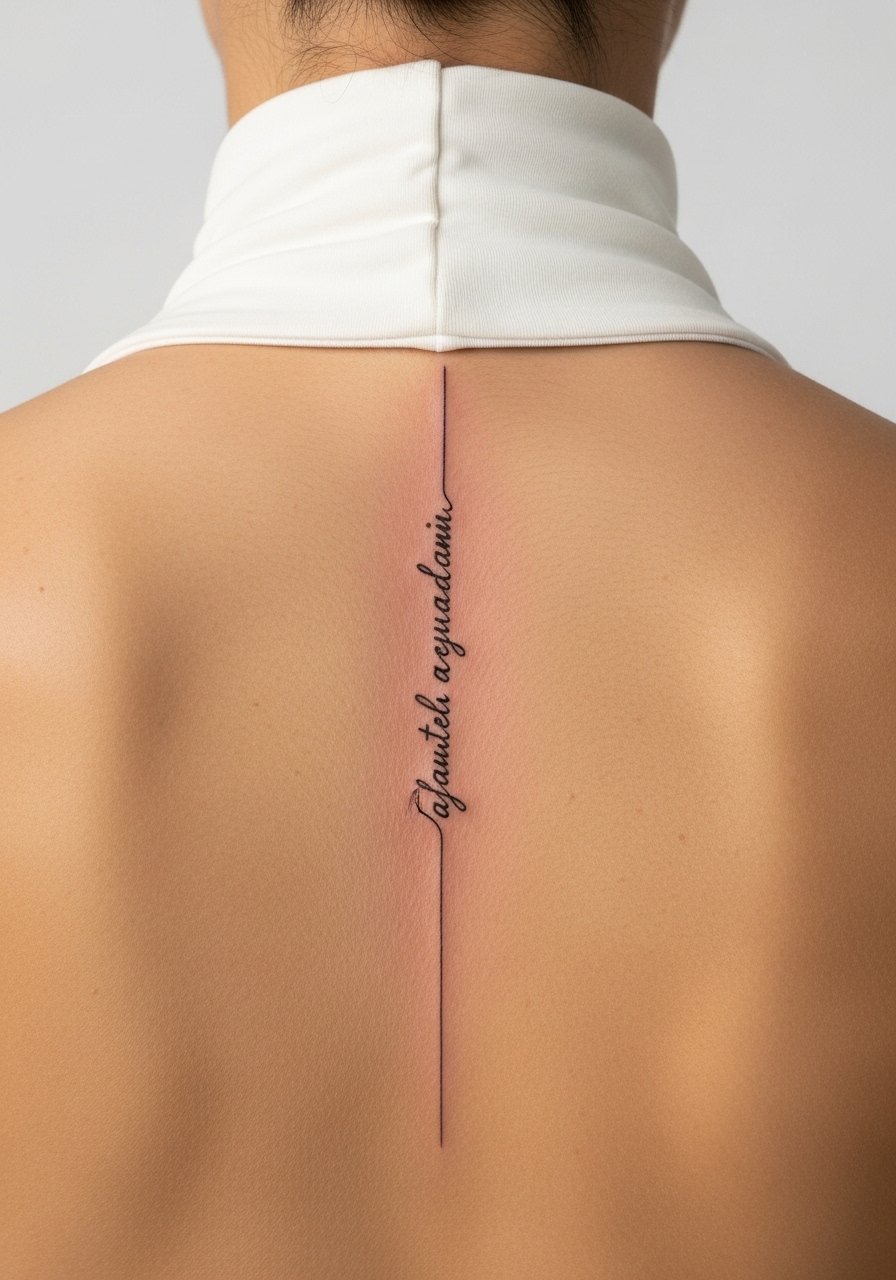
A vertical quote along the spine reads like a private mantra, and it is one of the best small options if you want something hidden on weekdays. When you talk to the artist, ask for slightly heavier lineweight than the thinnest single-needle script so the letters do not wash into one another as they age. Common mistake is requesting ultra-tiny letters that look delicate fresh and become illegible by year three. Expect a moderate pain level for the spine placement, and plan a single short session. For showing it off, pair the piece with a low-back crop top or a high-neck halter that reveals the upper spine when you want to display it.
2. Dainty Palm Silhouette on Shoulder Blade

This tiny palm sketch gives wanderlust energy without committing to a full tropic sleeve. I recommend a clean single-line outline with a little breathing room around each frond so the thin lines do not merge over time. The typical error is compressing detail into a 1-inch height which ends up smudging after a couple of years. Shoulder blade skin tends to hold fine line well and the session feels like a steady, low-to-moderate buzz. For session day, wear a front-open button-down so the artist can work prone without you wriggling.
3. Minimal Wave Across Lower Back
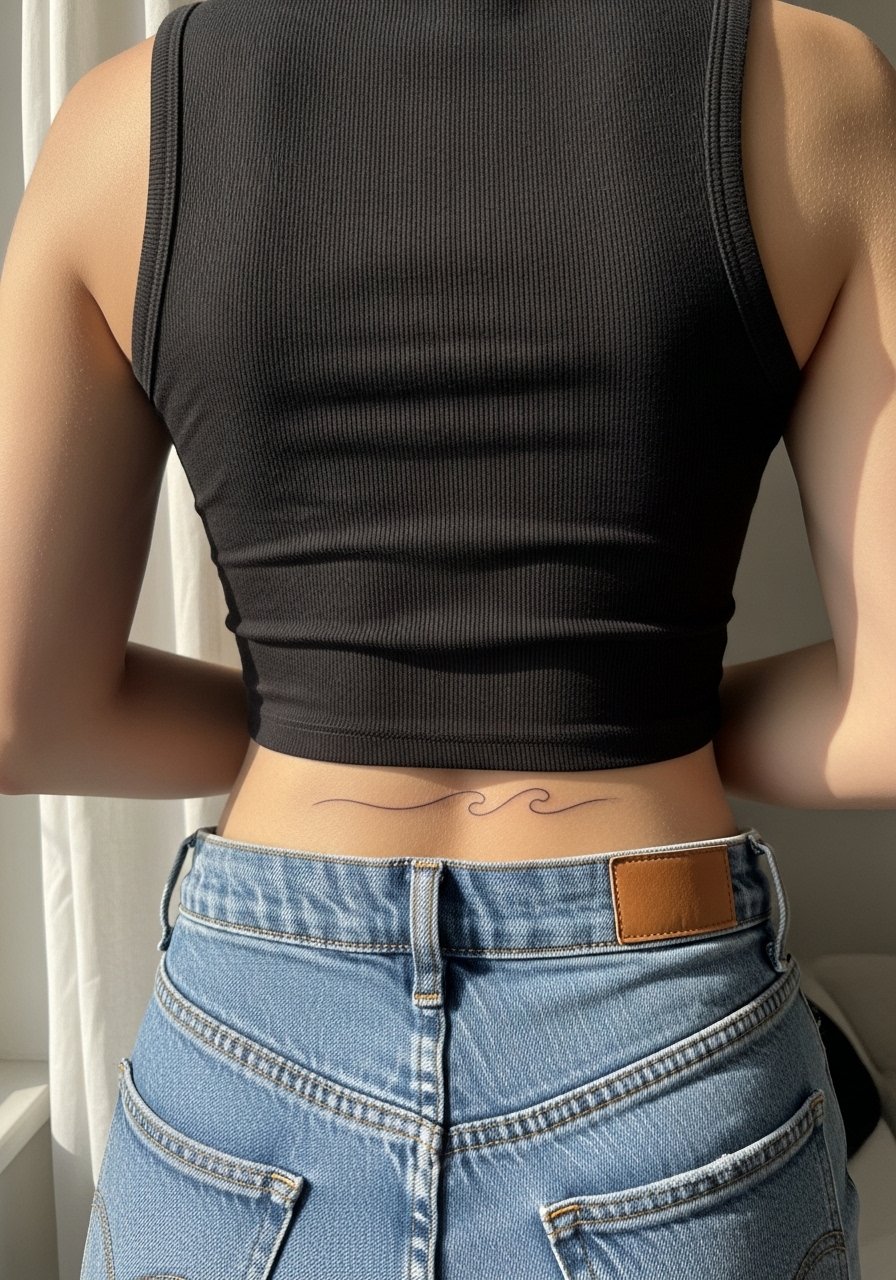
A horizontal wave is subtle and translates across a range of styles. If you want longevity, ask your artist to keep the line slightly bolder than a hairline so it survives sun exposure and friction from waistbands. The main aging issue is stretch in the lower back from weight change, so pick higher lumbar placement if you expect body shifts. The session time is short and pain is usually mild, though the lower back can be tender over the spine. Pair this with high waist crop skirts to reveal the curve without exposing the whole back.
4. Single-Line Mountain Outline on Mid-Back
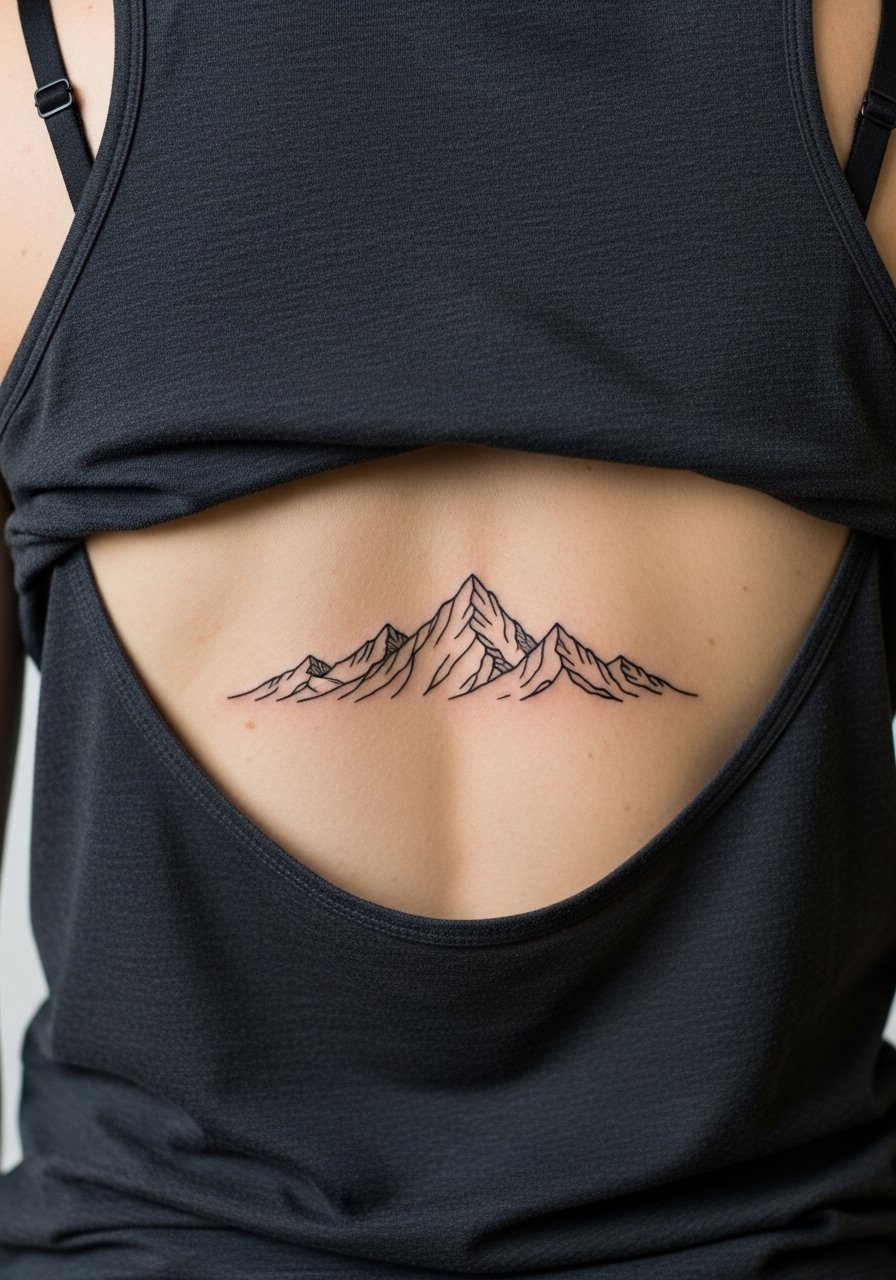
A minimalist mountain is a great starter for future scaling into a larger landscape because the clean peaks act as anchors. Tell your artist you want negative space between peaks for breathing room and avoid tight hatch shading that blurs with time. A frequent mistake is compressing too many peaks into a tiny rectangle which ages into a blotchy band. Mid-back placement gives a flatter canvas so linework settles predictably. Pain is moderate and the session runs quickly. For evenings out, a racerback tank shows the symmetry without competing with the silhouette.
5. Geometric Arrow Cluster Near Spine
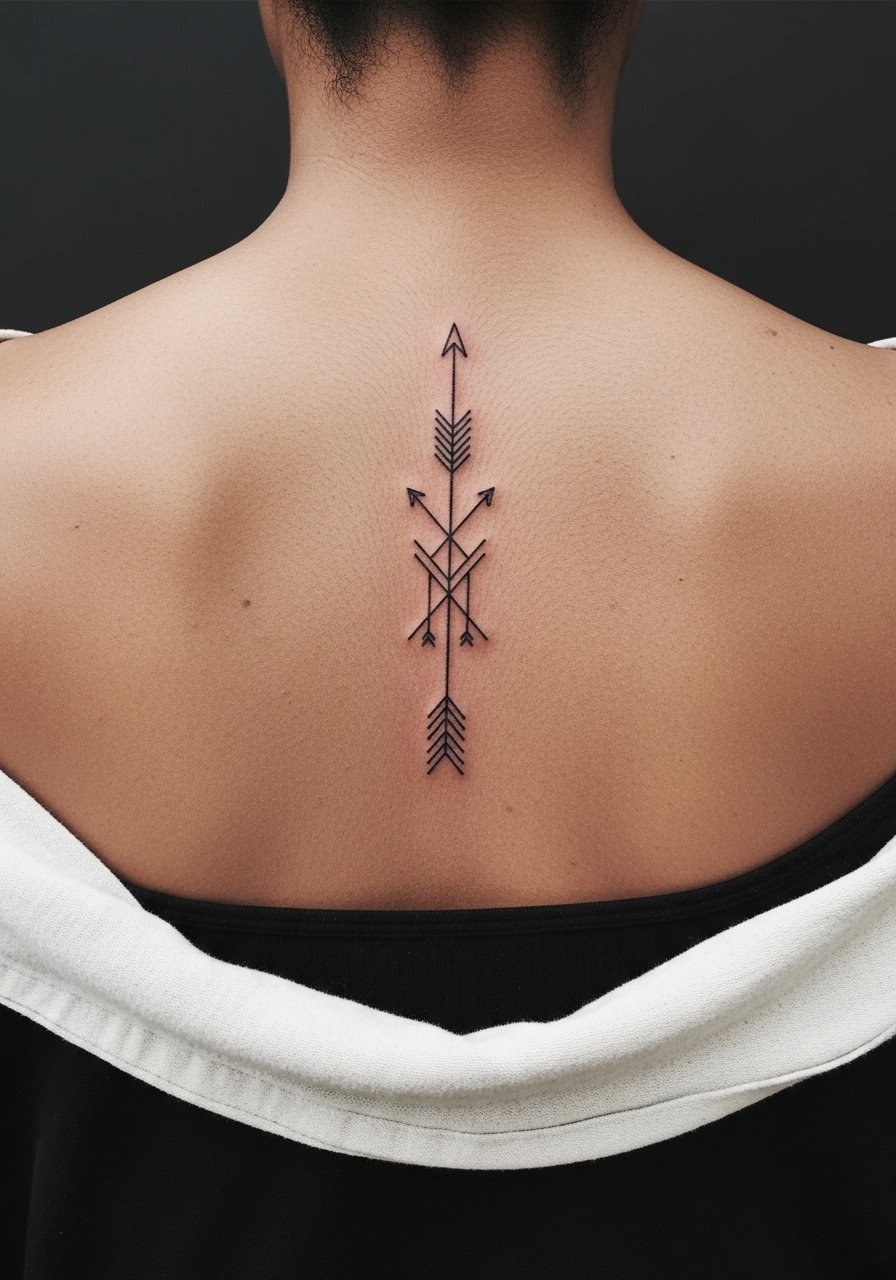
Arrows grouped along the spine read directional and personal without being literal. Ask for varied spacing and line weights so some arrows age into soft marks while others hold crisp. The mistake is making every arrow identical and tight; that causes visual merging over time. Spine-adjacent skin can be more prone to blowout if the artist pushes too deep, so discuss needle depth during consultation. Expect moderate pain and a one-session job. For showing it off, try an open-back midi dress that frames the cluster.
6. Tiny Constellation Map on Upper Back
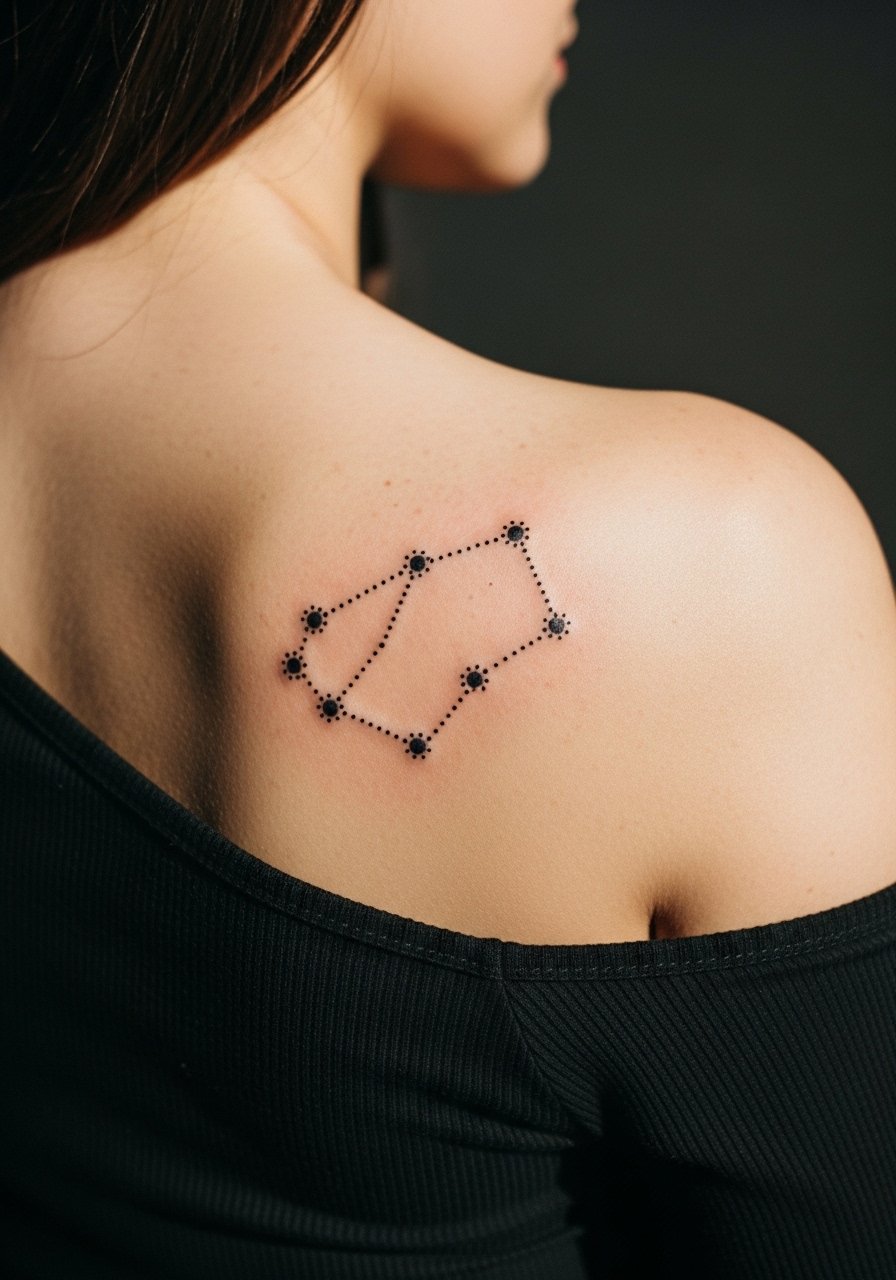
Dotwork constellations scale well to small sizes because they rely on spacing not heavy lines. When you bring references, show the exact star placements you want so text or coordinates, if used, are accurate. A frequent operator error is asking for dots too close together which later blend into a gray patch. Dotwork holds best with steady stipple shading and occasional touch-ups around year three for contrast. The session feels quick and mild. For wardrobe, a one shoulder top linen highlights the asymmetric placement.
Studio Day Picks
The spine and shoulder blade pieces above need different session prep than lower back work, so these items help smooth the appointment and the first 48 hours.
-
Stencil transfer paper kit. Lets you preview exactly where a spine quote or constellation will sit on your back before the needle touches skin.
-
Topical numbing cream. Applied under a thin layer before a mid-back session eases the sting for sensitive spine zones without altering linework.
-
Thin protective film roll. Useful for lower back and shoulder blade areas that rub against clothing during the first week.
-
Fragrance-free body wash. Gentle cleansing helps dotwork and fine lines keep contrast as scabs shed.
-
Aquaphor healing ointment. A thin layer in the early days locks moisture for delicate script and fine line pieces without clogging.
7. Fine-Line Feather on Lower Back
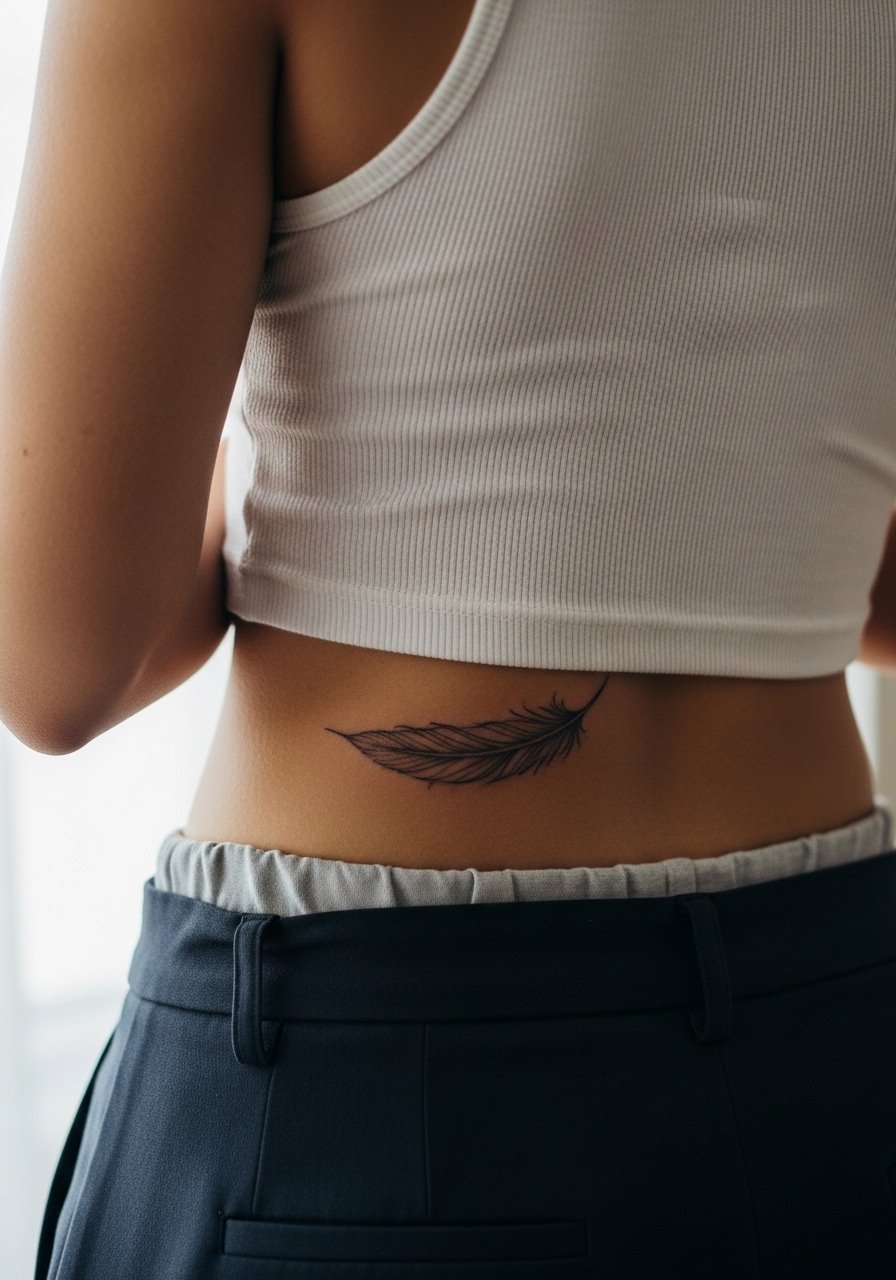
Feather motifs on the lower back move with the body and look airy without heavy shading. Ask the artist to orient the feather along a curve that follows your spine so the design reads natural when you bend. Common mistake is over-detailing the vane on a 2-3 inch piece which leads to loss of definition. The lower back sees friction from belts and waistbands, so expect touch-ups sooner if you wear tight clothing there often. Pain is mild to moderate. For the session, a drawstring linen pant makes removal and repositioning easier.
8. Minimal Lotus Between Shoulder Blades
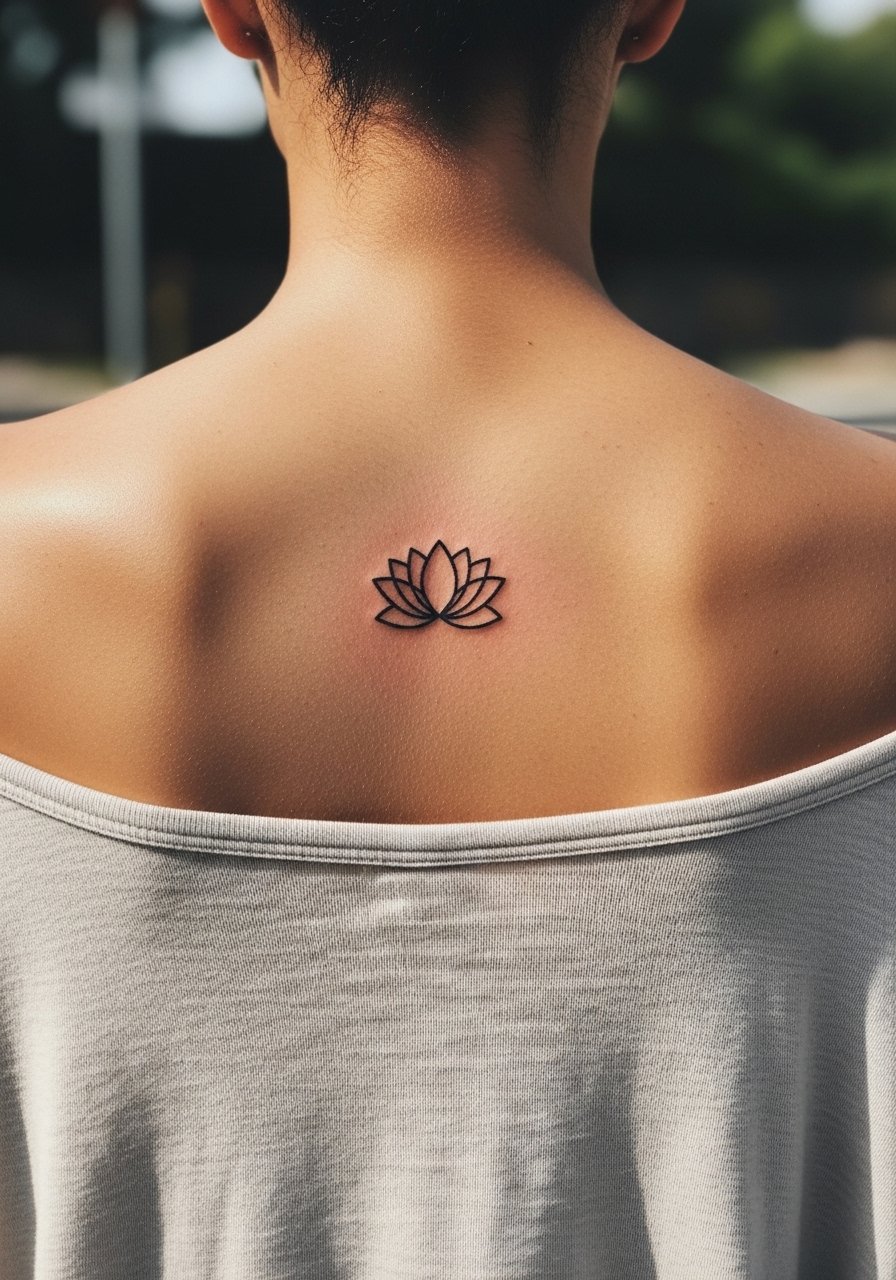
Centered lotus designs read symmetrical and meditative on the back. During consultation specify that you want clean negative space between petals so stipple shading can be added later without overcrowding. The frequent mistake is requesting dense petal detail in a small space which ages into muddled tone. Shoulder blade skin usually supports fine lines well and the piece typically needs only one session with a touch-up after a year if you want sharper contrast. For show-off looks, a v neck linen tee keeps attention on the back symmetry.
9. Single-Line Bird in Flight on Mid-Spine
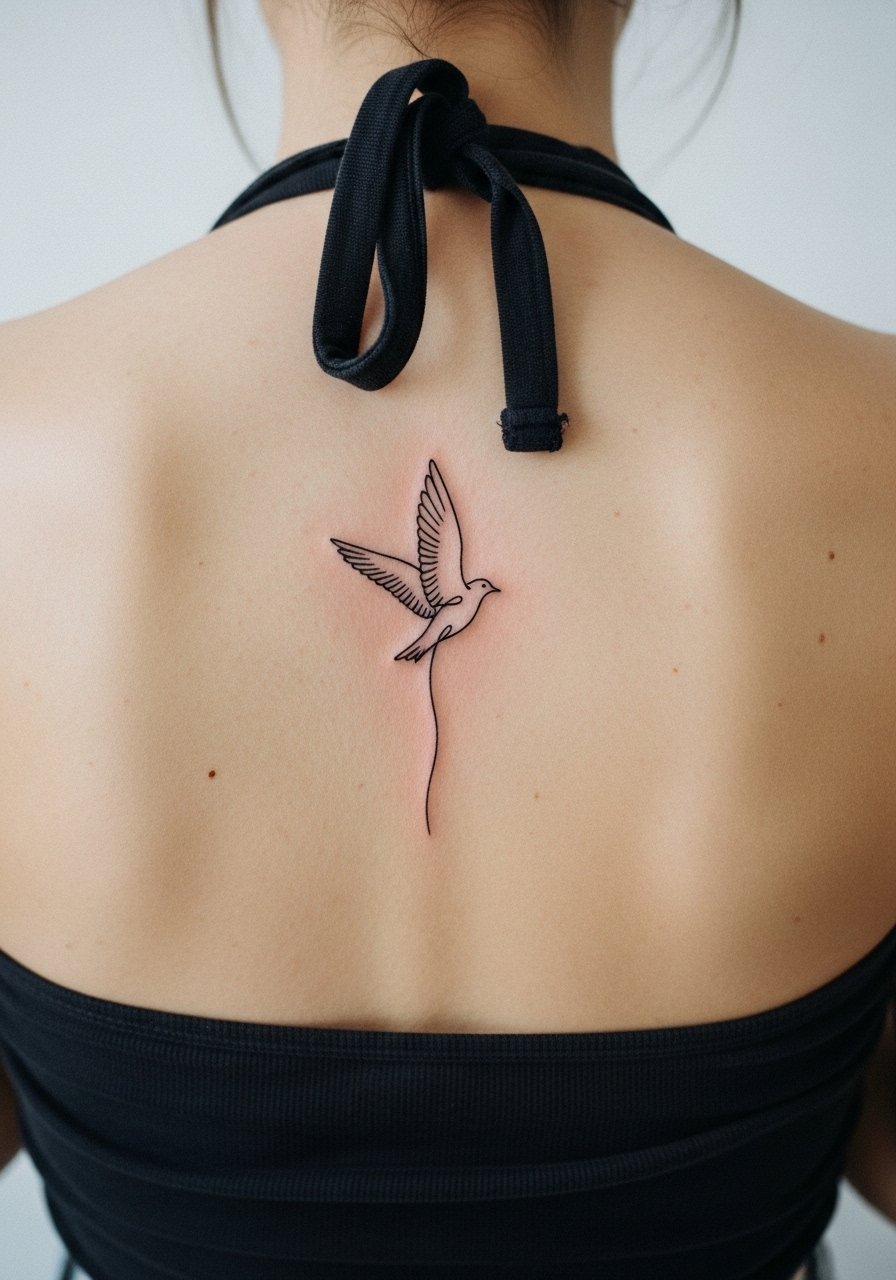
A single-line flying bird reads as motion and freedom without heavy ink. Tell your artist you want a continuous contour with deliberate line breaks to prevent entire wings from blurring together later. The common error is cramming wing detail into a 1.5-inch vertical space. Mid-spine placement has moderate pain and a quick session. Expect touch-ups at year three for very thin lines. Pair this with a halter tank to let the silhouette peek through.
10. Abstract Crescent Moon Near Upper Back
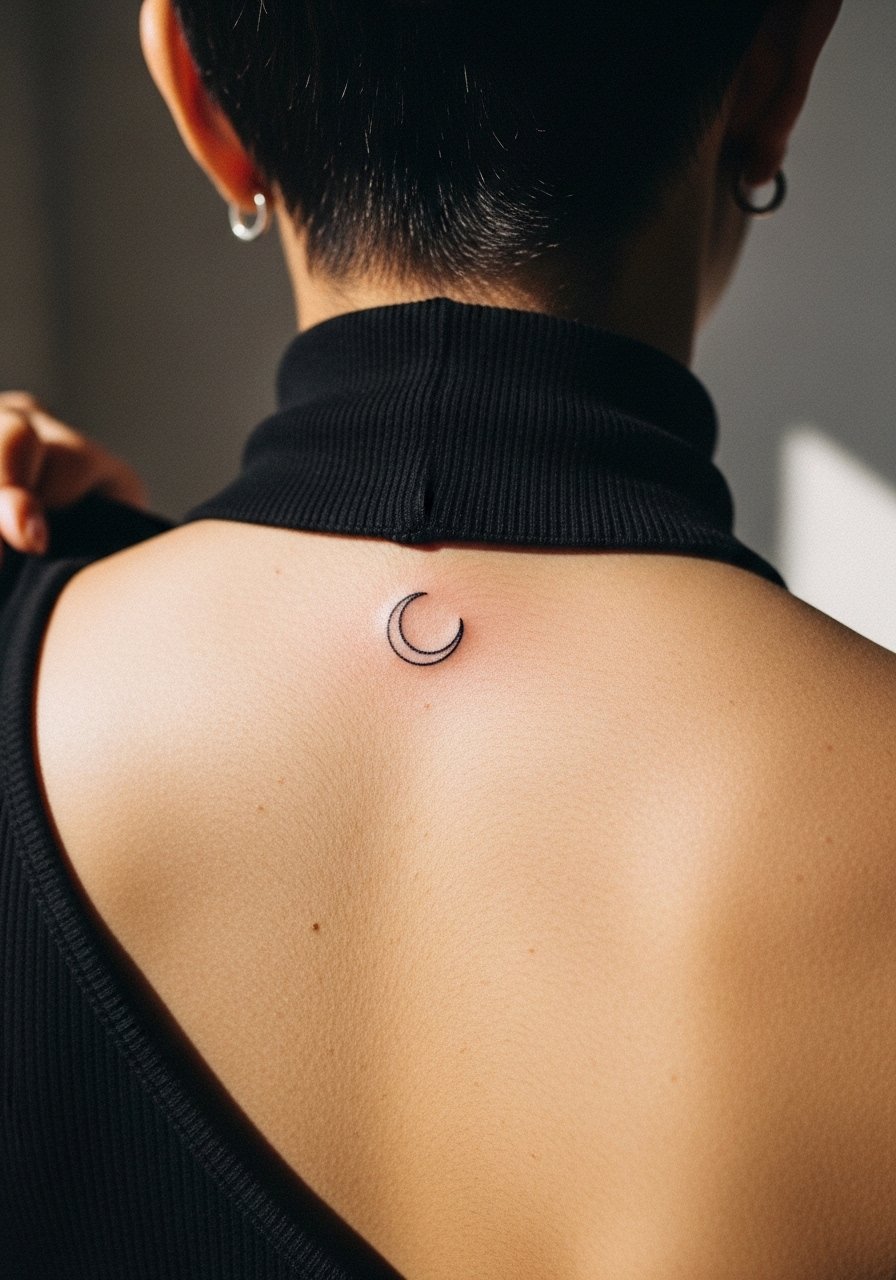
A tiny moon near the top of the back is discreet and expandable later. When you describe it, specify the negative space you want inside the crescent so shading options remain open. People often overspecify fill styles on day one and then wish for emptier designs later. This spot sees less friction than the lumbar zone and fine line survives well with mild sun protection. Session time is short and pain is low. For styling, a high neck halter top reveals the neckline placement elegantly.
11. Minimal Heart Line with Initials on Lower Spine
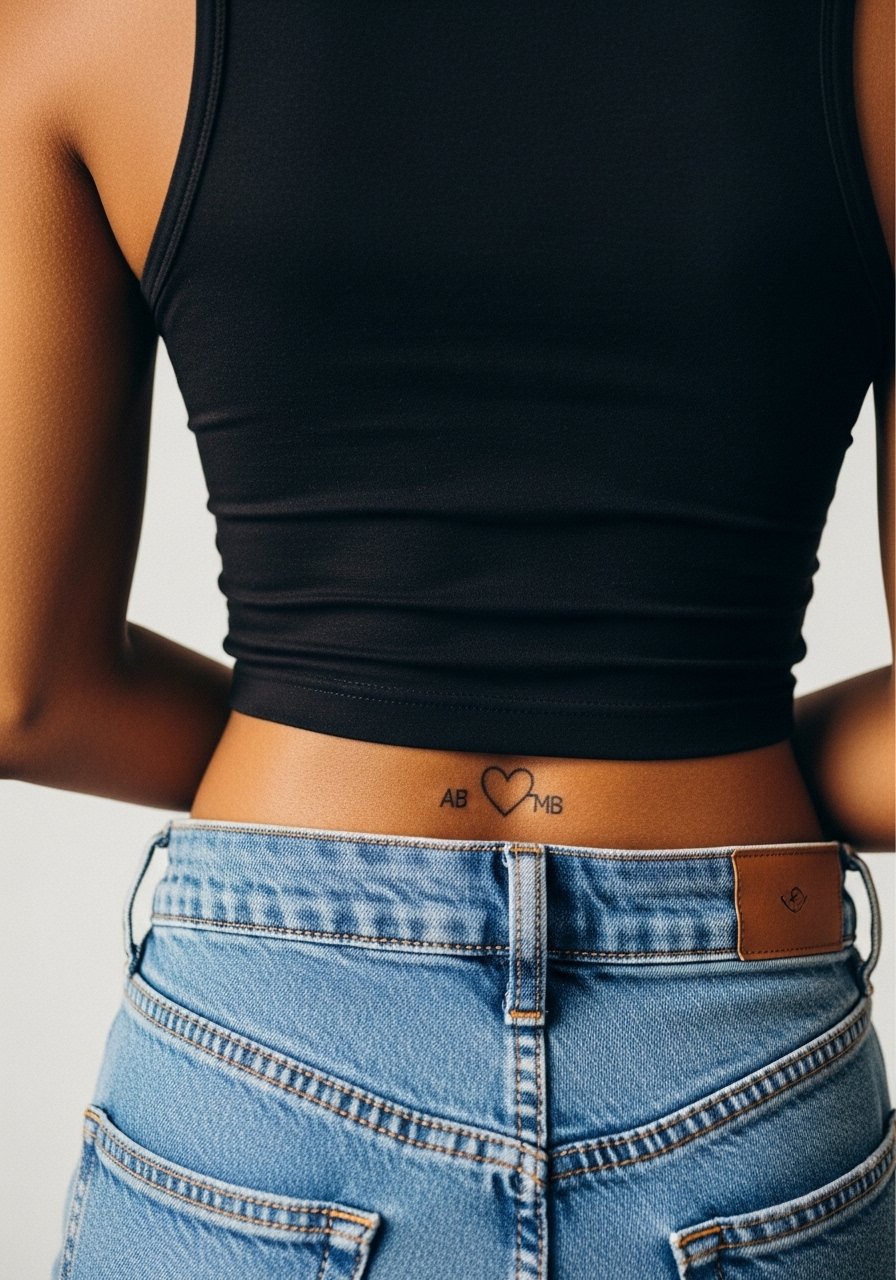
A lower spine heart with initials is personal and highly concealable. When you bring initials, provide exact lettering and spacing so the artist lays out the stencil precisely; text in small sizes must be exact. The frequent mistake is choosing ornate script for tiny initials which loses legibility with healing. Lower spine skin shifts with weight and sitting posture, so place it slightly above the dimple area for more stability. Expect mild-to-moderate pain. For nights out, high-waisted pieces hide or reveal it on purpose.
12. Minimal Sunburst Rays From Spine Center

A compact sunburst plays with symmetry and suits the central back. Request spacing between rays rather than too many tight lines, because dense rays will gray together as they heal. The mistake is overpacking the design for a small diameter. Mid-back symmetry helps lines age predictably and touch-ups are straightforward. Session is short and pain moderate. Pair this piece with a racerback tank to frame the radial composition.
13. Stacked Geometric Dots Along the Spine
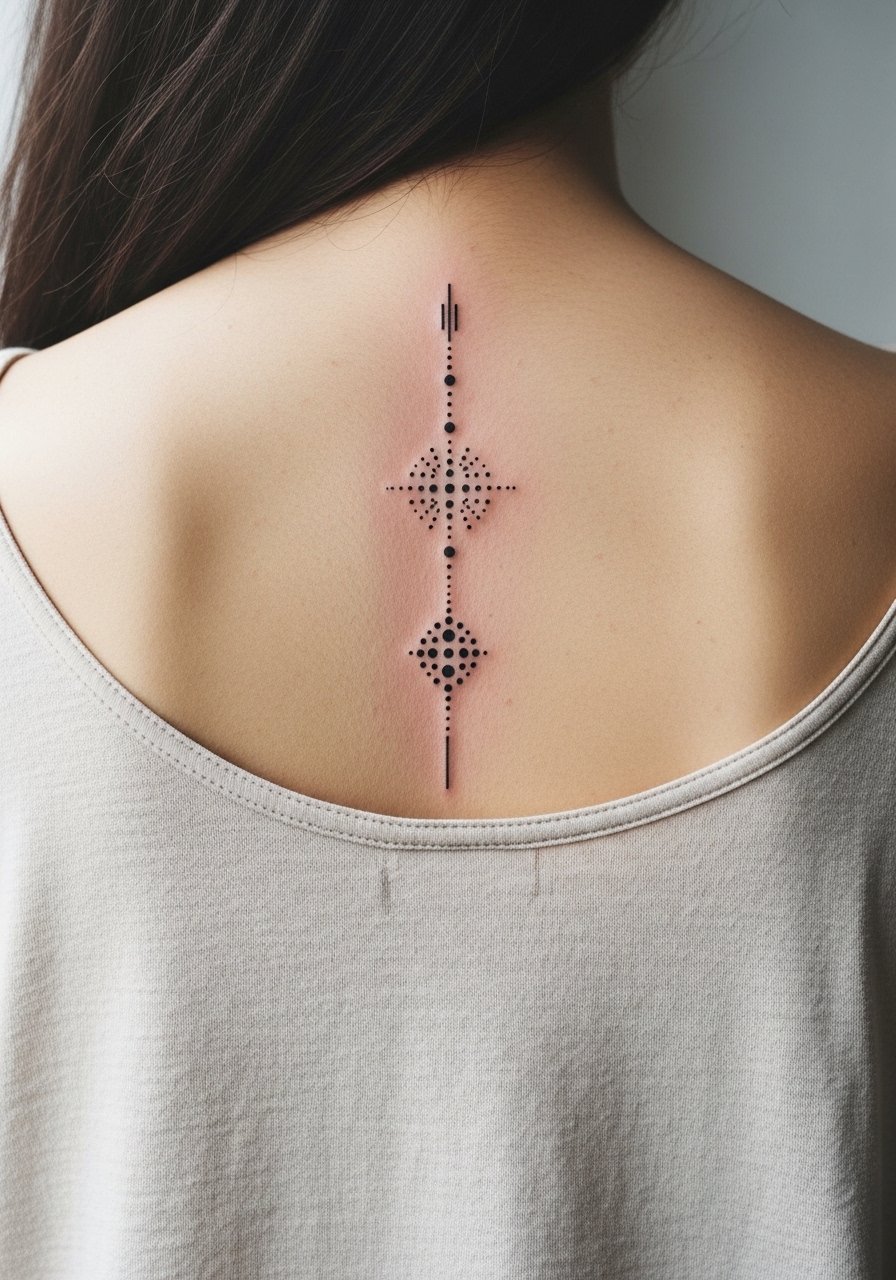
A vertical stack of dots and bars is minimal and versatile as an anchor for future work. Be explicit about dot sizes and spacing in consultation so artists know you want long-term readability rather than a visual texture that will blur. The common error is asking for micro-dots under 1.5 millimeters which often spread. Spine placement requires careful depth control to avoid blowout. Expect a brief session and a touch-up window at year two to restore contrast if needed. For casual wear, an open-back midi dress puts the geometry on display.
14. Tiny Compass Point on Upper Back
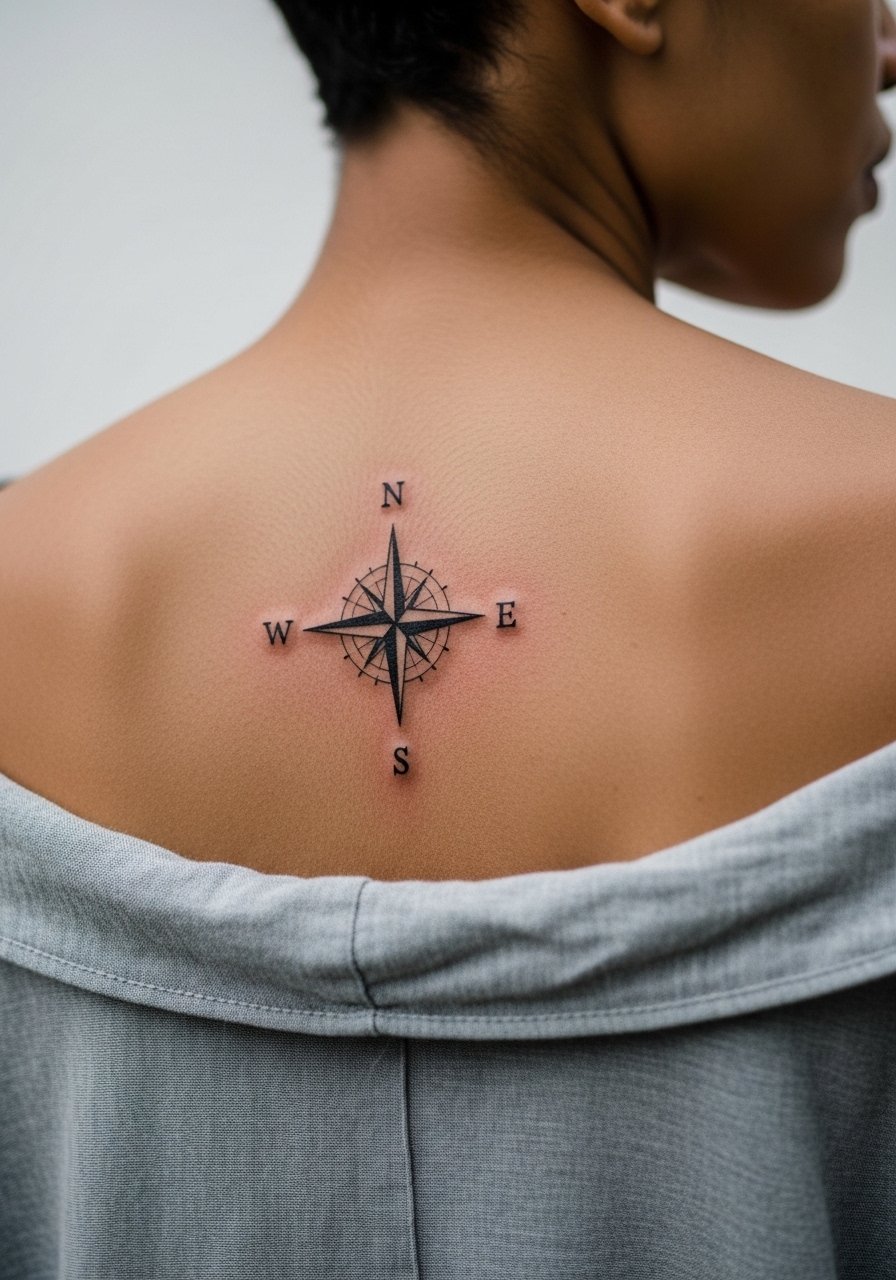
A single compass needle or point is symbolic without heavy ornament. Ask for a clean, bold point rather than fine filigree if you want it to remain legible long term. People sometimes pick ornate motifs for very small marks and then lose clarity. Upper back flesh holds crisp lines well and sessions are quick. Consider a light touch-up after two to three years if you want the mark to stay graphic. A v neck linen tee keeps the focus on the central upper back.
15. Horizontal Minimal Horizon Line on Lower Back
A tiny horizon reads calm and balances with low-rise garments. For longevity, set the sun dot slightly above the line and keep the horizon a touch thicker than a hairline so it does not fade into a gray smudge. The usual mistake is a hairline horizon that fades under sun and friction. Lower back placement can shift with weight gain, so discuss future expansion plans with your artist. Pain is mild to moderate and the session brief. Pair it with backless mini dresses when you want to highlight the sweep.
16. Tiny Lotus Petal Row Along the Upper Spine
A linear petal row creates rhythm and reads like a delicate spine accent. Ask for equal negative space between petals and avoid tiny inner details that vanish. A mistake is stacking petals too close which turns the row into a gray band over time. Upper spine skin holds fine line well but is exposed to sun near the neckline, so plan for sunscreen. Session time is short and pain moderate. For the session wear a front zip sports bra to give the artist straight access without fuss.
17. Micro Dotwork Wave Cluster on Shoulder Blade
Micro dotwork waves are subtle and textural, and they age based on contrast more than line crispness. During consultation, state that you prefer higher contrast dots spaced carefully so the pattern keeps definition as it heals. The common mistake is packing too many dots into a tiny area which fades into a gray patch. Shoulder blade placement is forgiving and sessions feel low in intensity. For show-off moments, an off shoulder sweater frames the art without distraction.
Frequently Asked Questions
Q: Do fine line spine quotes fade faster on the lower back than the upper spine?
A: They can, because lower back skin is more prone to stretch from weight shifts and waistband friction. The upper spine is closer to the shoulder blades where the skin holds linework more steadily. If you want a quote to last, request slightly bolder strokes and discuss touch-up expectations with the artist.
Q: Artists argue about wraps versus dry healing for back tattoos. What are the two camps and which should I pick?
A: One camp prefers short-term protective film or bandaging to keep sweat and clothing off fresh work, especially on large or lower-back pieces. The other camp favors air healing for better scab formation and less trapped moisture. Your choice depends on the placement, how much you sweat, and the artist's preferred protocol. Ask them to explain their process so you know how to care for that specific back zone.
Q: How much does a minimal back tattoo hurt compared with arm placements?
A: Pain varies by exact spot. Upper shoulder blade and outer mid-back are usually milder than direct spine or lower back over the tailbone. Most minimal back pieces are a short, manageable sting followed by soreness. Bring a small snack, hydrate well, and schedule a short session so you can take breaks if needed.
Q: If I plan weight changes, which back placements should I avoid?
A: Avoid placing tiny, detail-dependent designs directly over the lumbar curve or very low on the tailbone if you expect significant weight fluctuation. Upper back, between the shoulder blades, and the central mid-back handle shape changes more predictably. Discuss future body plans in consultation so the artist can suggest a safer placement.
Q: How can I check my back tattoo while it heals since I cannot see it easily?
A: Use two mirrors to inspect the area or ask a trusted friend to take progress photos under natural light. Many people also ask their artist for a check-in photo during the first week. If you want to photograph the piece for social reference, a simple tripod and mirror setup gives consistent comparison shots across healing stages.
