
Fine line trends look effortless on saved boards, but the reality is more technical. Line weight, placement, and how the skin moves matter far more than the image on your phone. Expect honest trade offs between fresh look and long-term clarity, and plan for touch-ups or bolder choices when it fits your skin and lifestyle. Start with a design that respects spacing and the body surface it will live on.
1. Fine Line Mountain Silhouette on Inner Forearm
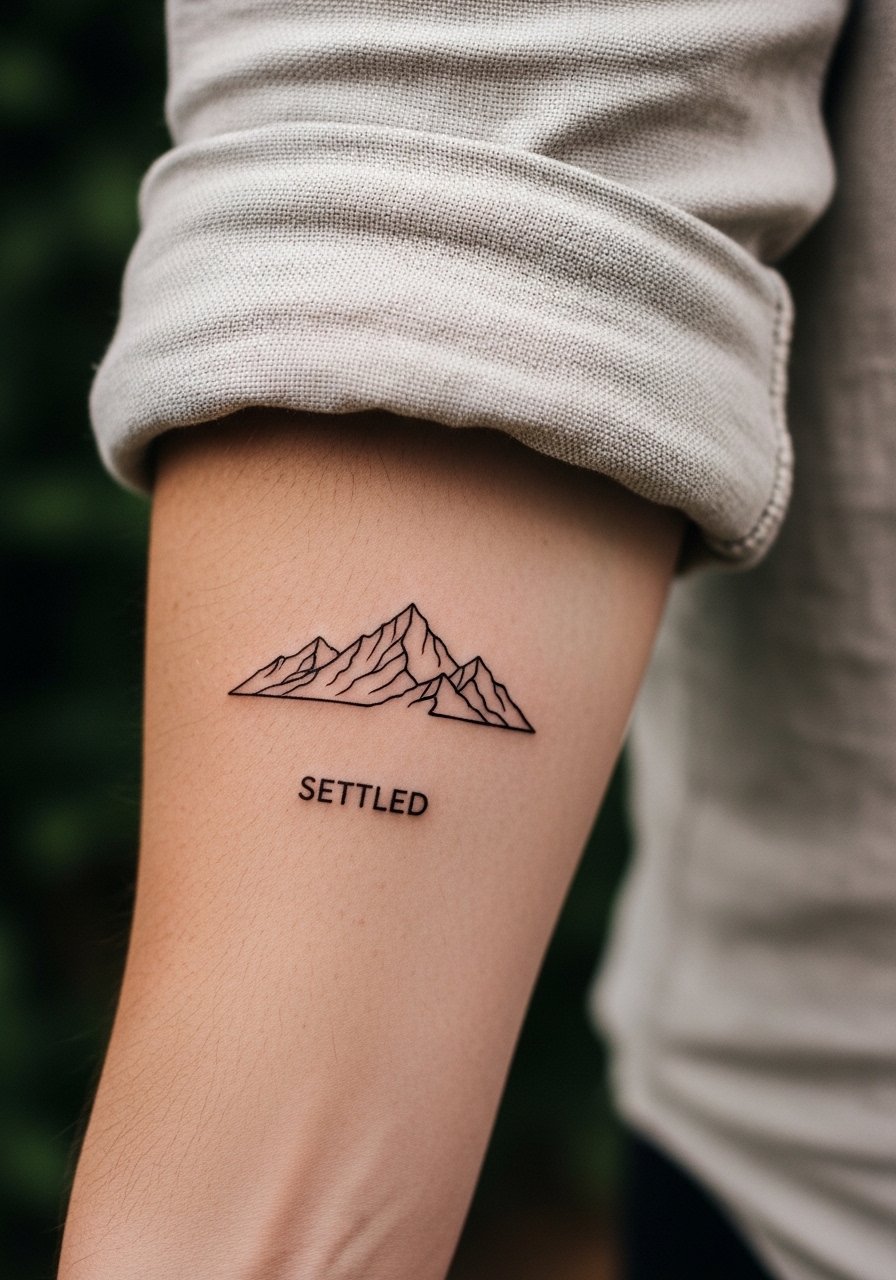
I've seen this piece age well when the artist uses single needle precision but draws room between peaks. Say in consultation you want 1.5 inches of negative space between ridges so the peaks do not merge over time. Common mistakes include going too small or adding thin texture that erases into a blur at year two. Pain is low on the inner forearm, session time is about 30 to 45 minutes, and touch-up at 6 to 18 months is normal for fine line work. Pair it with a rolled cuff linen shirt for showing it off, the neutral fabric keeps attention on the linework.
2. Geometric Single Circle on Inner Wrist

Fair warning, the wrist is high-motion territory and the circle needs absolute precision. Ask your artist to scale the design to at least 0.75 inch so the curve retains shape instead of bleeding into a soft edge. Expect 20 to 40 minutes in the chair and mild tenderness for 48 hours. For darker skin tones, request slightly bolder linework to keep contrast. Wear a thin chain bracelet on the opposite wrist when you show it off, the balance draws the eye without crowding the circle.
3. Fine Line Botanical Stem on Collarbone
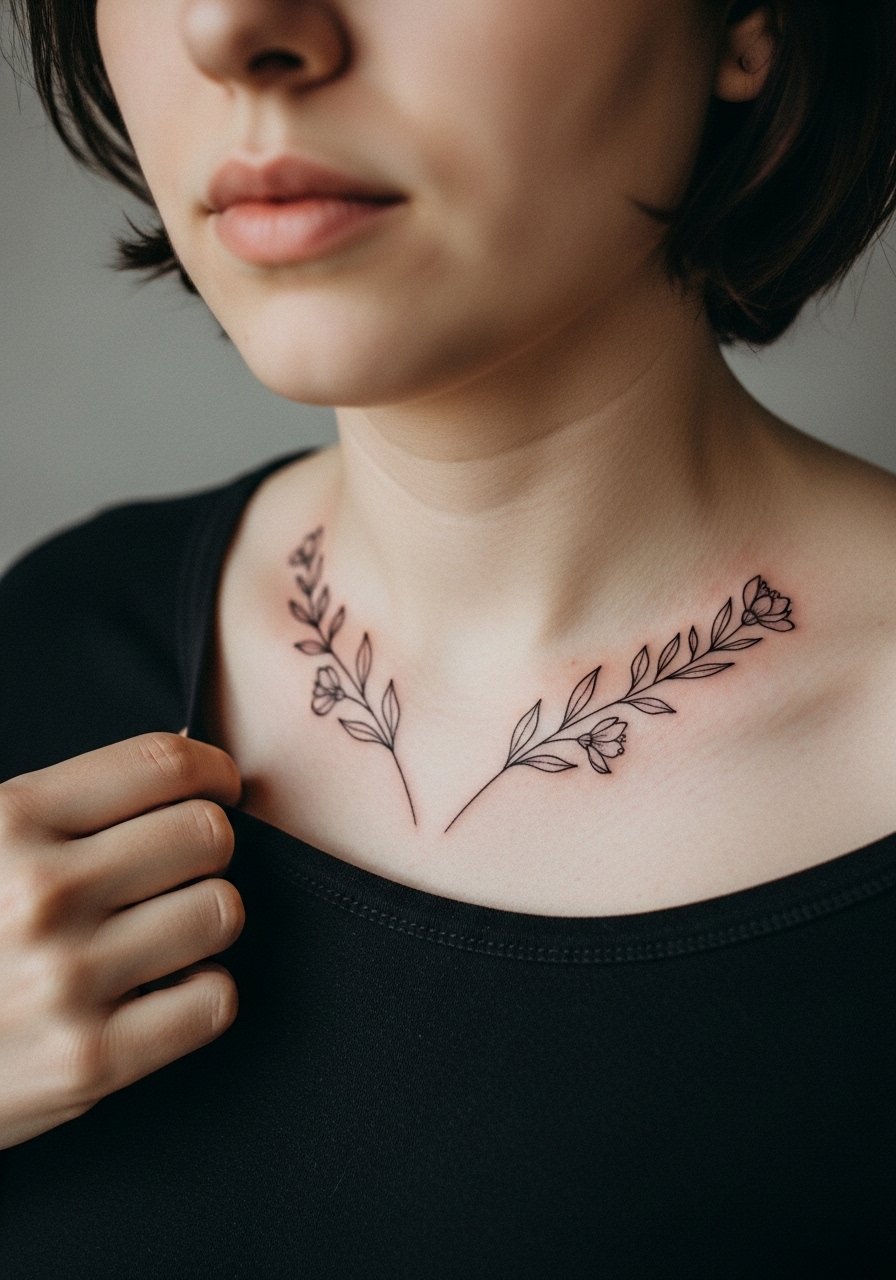
Collarbone placement reads intimate and moves with breathing, so plan for a 2 to 3 inch stem that follows the bone. The biggest mistake is compressing too much detail into a narrow strip. Tell your artist you want the stem to flow along the collarbone contour and to keep node spacing open. Pain is variable, often a 5 to 7 out of 10. Expect a single session under an hour and a likely touch-up at year one for any hairline fade. Pair it with an off shoulder blouse when you want the tattoo to peek just above the fabric.
4. Continuous Line Wave on Calf
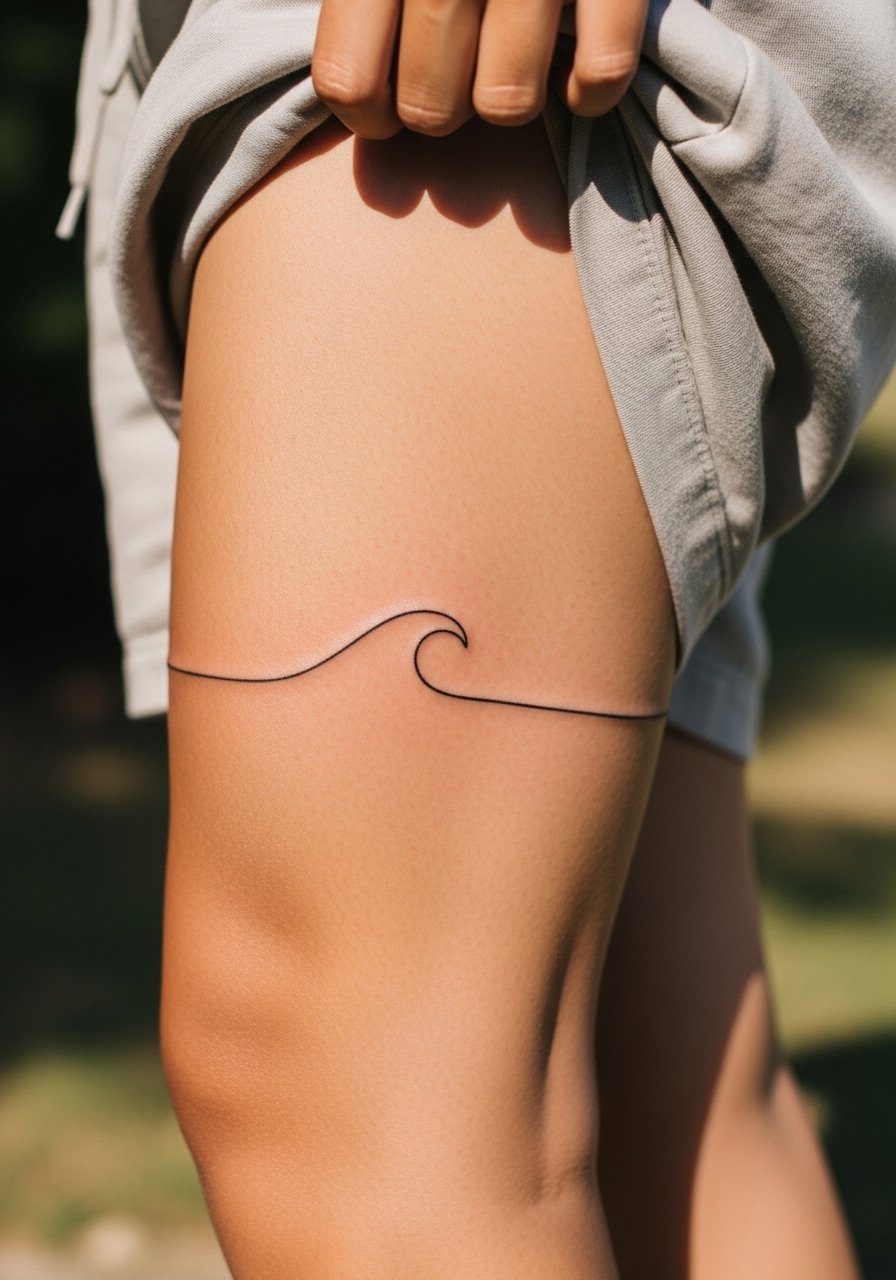
This flowing, single-line wave relies on confident execution more than fine detail. Ask your artist to keep the stroke weight consistent and to place the wave along the calf muscle so its motion reads when you walk. The calf is forgiving on blowout risk, but very tight curves can feather with time. Session time runs 30 to 60 minutes depending on size. For showing it off, high-waisted shorts or a flowy thigh skirt highlights the curvature during summer outings.
5. Negative Space Geometric Animal on Upper Arm
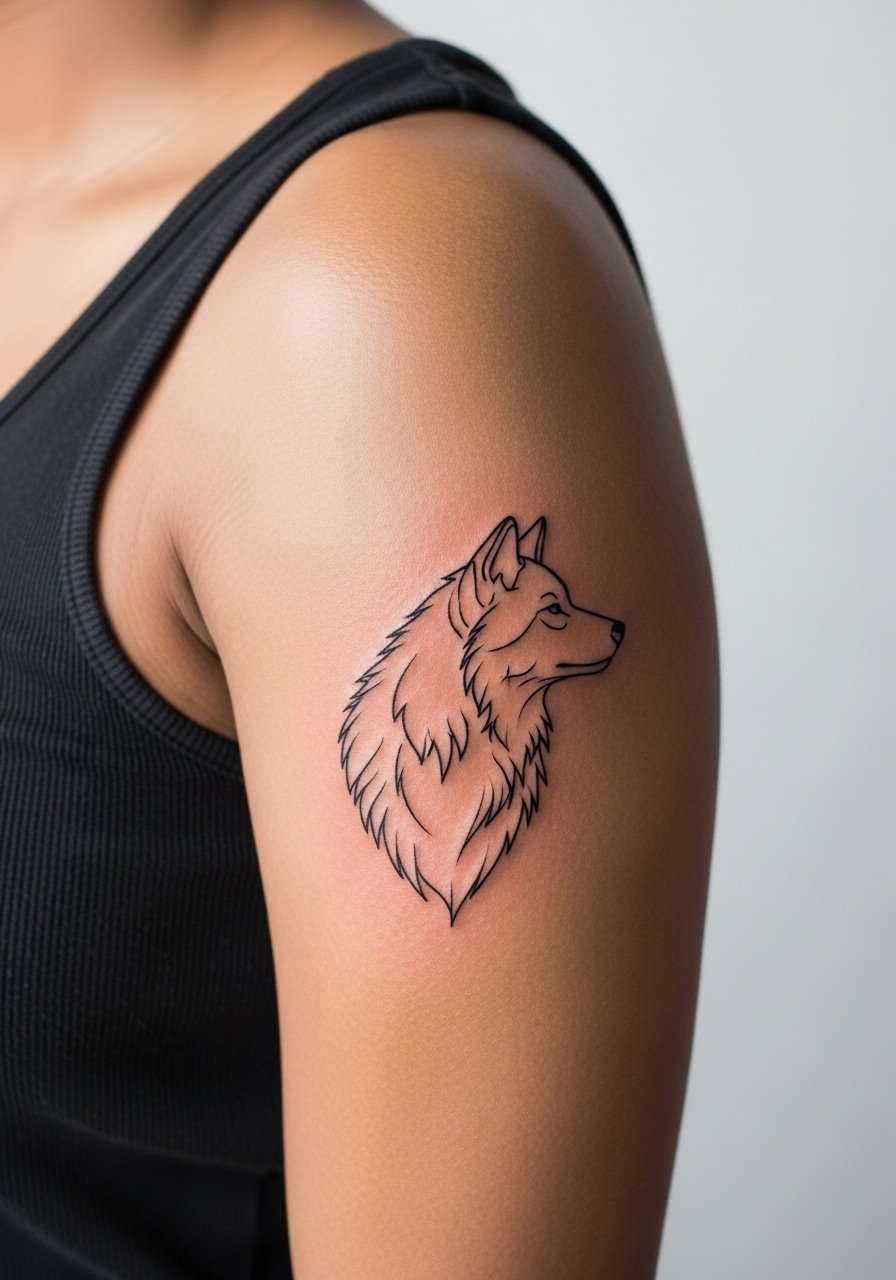
Artists often reduce animals to their essential geometric forms to let skin act as shading. The trap is overcomplicating the silhouette. Request a design that uses broad negative space planes rather than many tiny cutouts, that approach keeps the figure readable at two and five years healed. Shoulder placement handles larger proportions and is lower on blowout risk. Expect a single session of 45 to 90 minutes. Pair with a sleeveless tank top to show the negative space against solid fabric.
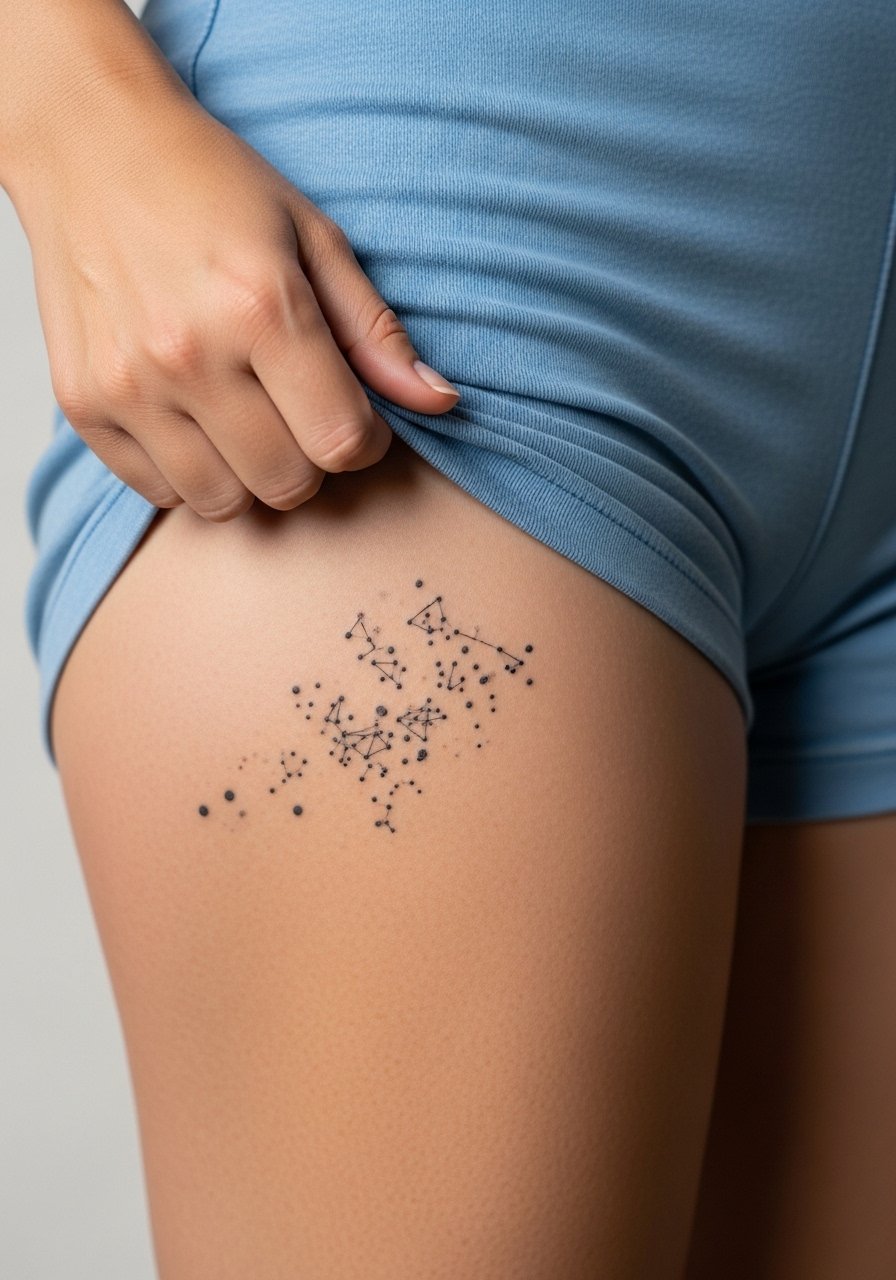
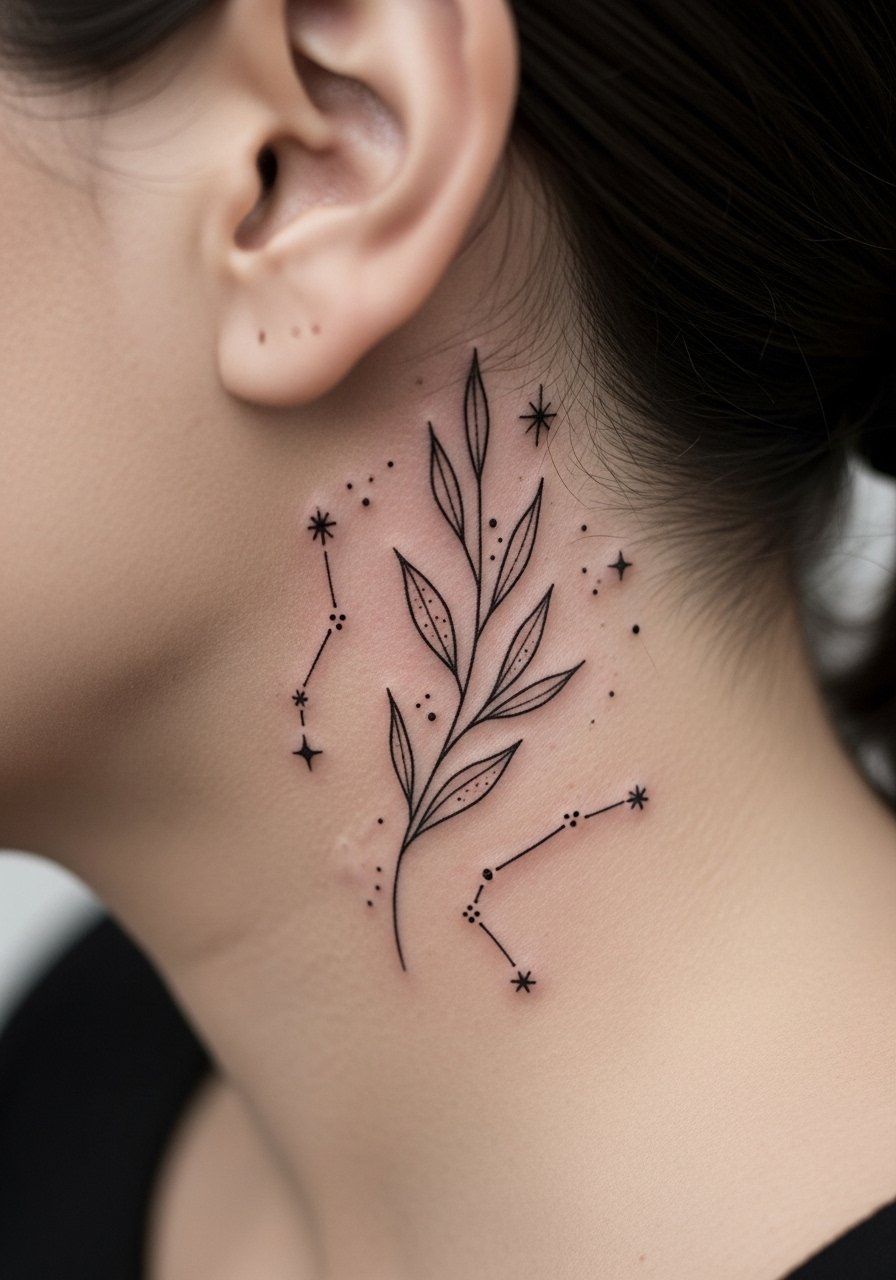
6. Single Dot Constellation on Inner Arm
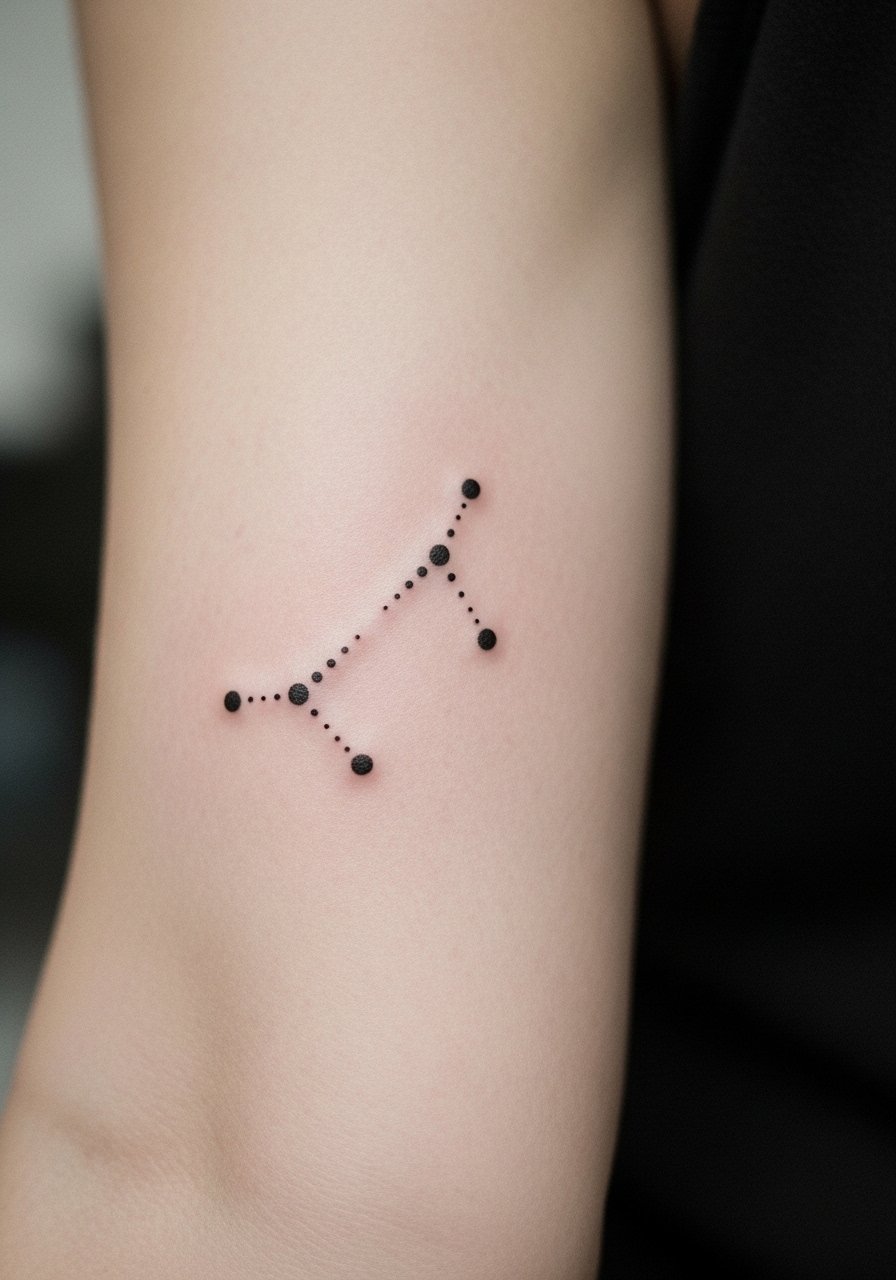
A constellation reads best when scaled to body curves. Ask for a 1.5 to 2 inch layout and exact star spacing so the pattern does not compress with healing. Common mistakes include tiny dots that blur into a smudge at the one to three year mark. The inner arm is moderate on pain and session time is under an hour. This piece pairs with stacked thin rings for minimal distraction. Wear a thin gold ring set on the opposite hand to balance the celestial motif when you photograph it.
Studio Day Picks
The small wrist and inner arm pieces above heal differently from larger shoulder and calf work, so a few targeted items smooth the session and the first week.
-
Stencil transfer paper kit. Lets you preview the linework on skin before committing, which is useful for the mountain silhouette and geometric animal above.
-
Topical numbing cream. Applied 30 to 45 minutes before the session eases wrist and rib sensitivity so you can sit longer without flinching.
-
Thin protective film roll. Keeps delicate wrist and finger pieces clean during the first days when friction and washing threaten fine needle channels.
-
Fragrance-free gentle body wash. Cleanses healing zones without irritating linework, helpful for collarbone and inner arm care.
-
Aquaphor healing ointment. A thin layer during the first 48 to 72 hours helps fine line pieces retain moisture without heavy clogging.
7. Fine Line Leaf Contour on Ankle
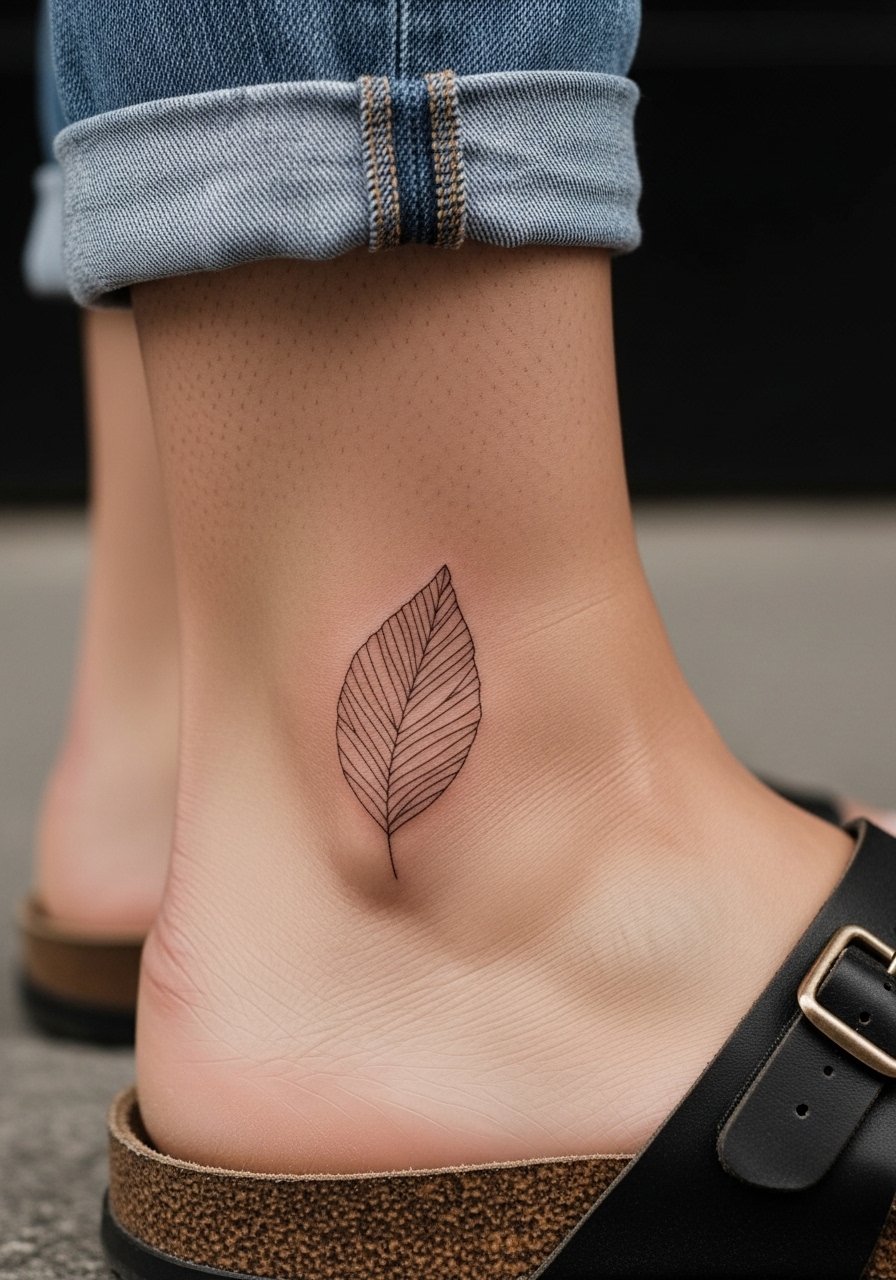
Ankle tattoos face constant rubbing from socks and shoes, so scale matters. I recommend 1.5 to 2 inches of vertical space and slightly thicker single-needle weight to resist early fading. The ankle is a moderate pain spot and sessions are short, about 30 minutes. A common mistake is placing the stem too close to the bone where healing compresses the lines. Show it off with strappy sandals and a minimal ankle bracelet in warm weather, both draw attention without obscuring the contour.
8. Minimal Compass Rose on Outer Wrist
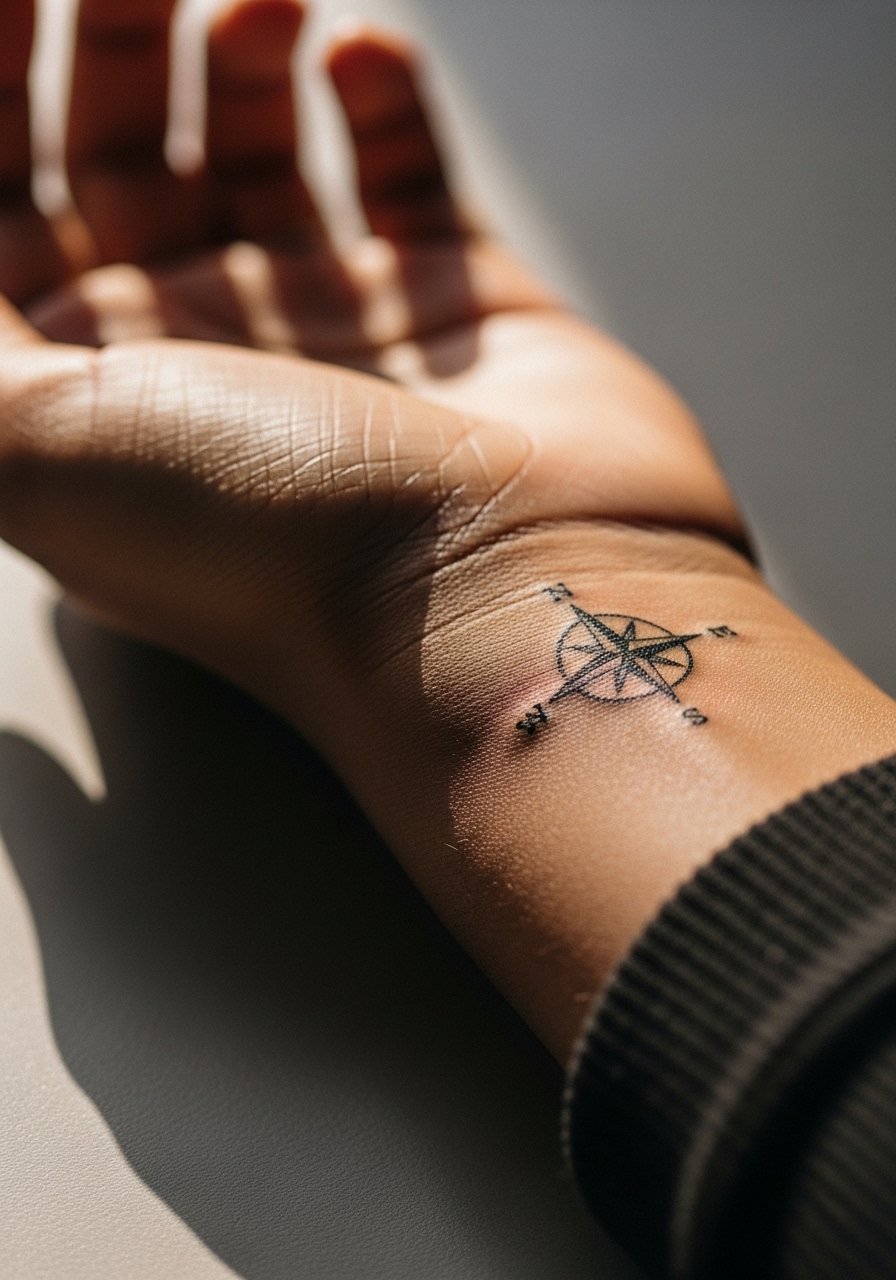
The compass reads as direction orientation, so keep cardinal points open rather than filling small sections. Tell your artist you want strong anchor points at north and south so the motif keeps orientation as the skin shifts. The wrist is sensitive and short sessions of 20 to 40 minutes are typical. On darker skin, ask for higher contrast line weight to maintain visibility over time. Pair with a minimalist watch on the opposite wrist to frame the compass while avoiding overcrowding the tattoo area.
9. Abstract Single-Line Face Profile on Collarbone
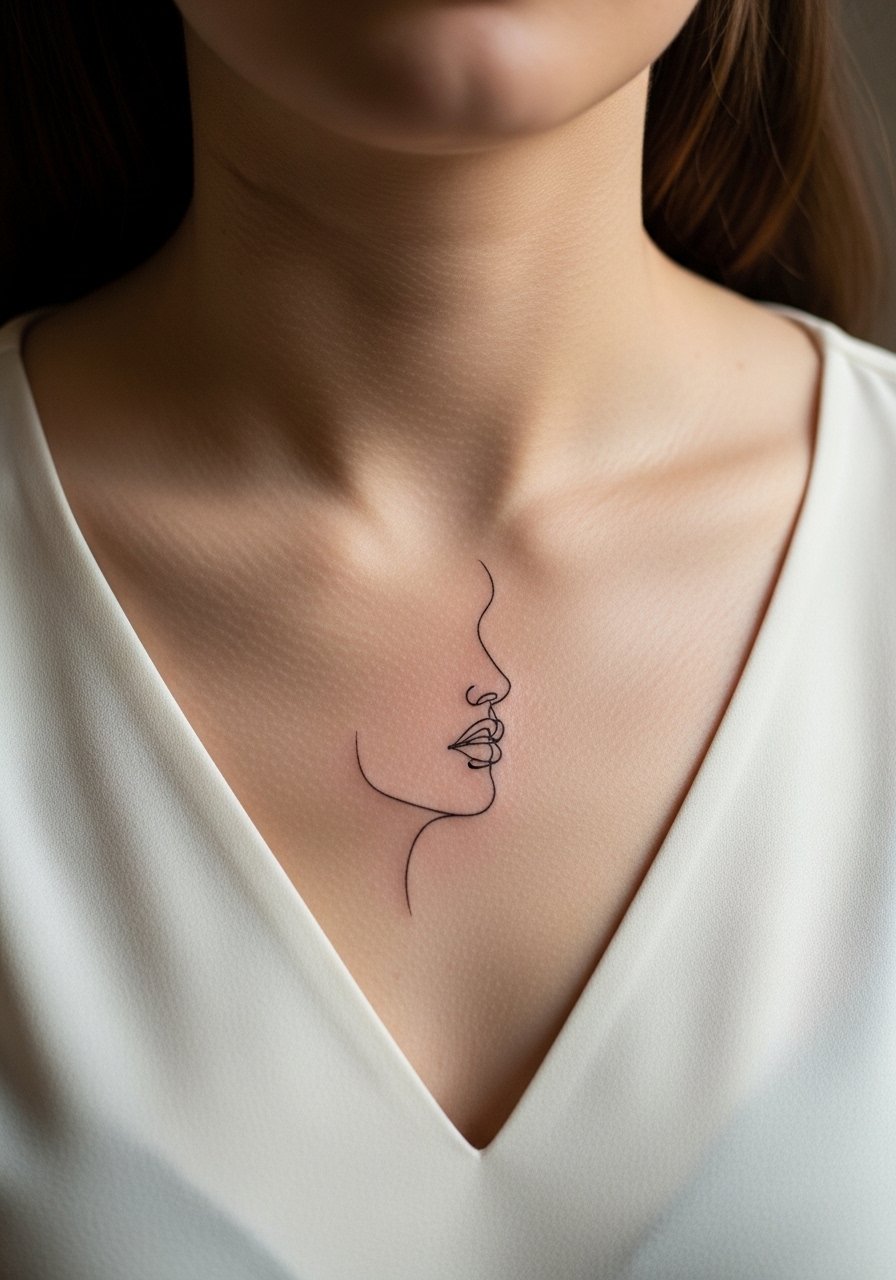
Single-line faces depend on economy of form, so reduce every feature to an essential curve. The collarbone gives a sculptural surface, but narrow designs risk distortion with shoulder movement. Ask the artist to test the stencil while you move your neck to ensure the expression stays coherent. Pain sits around a 6 out of 10. Expect a 45 minute session and plan for a touch-up at one year if micro shifts occur. Style it with a v neck silk top so the line aligns with the neckline.
10. Tiny Initial Lettering on Ribcage
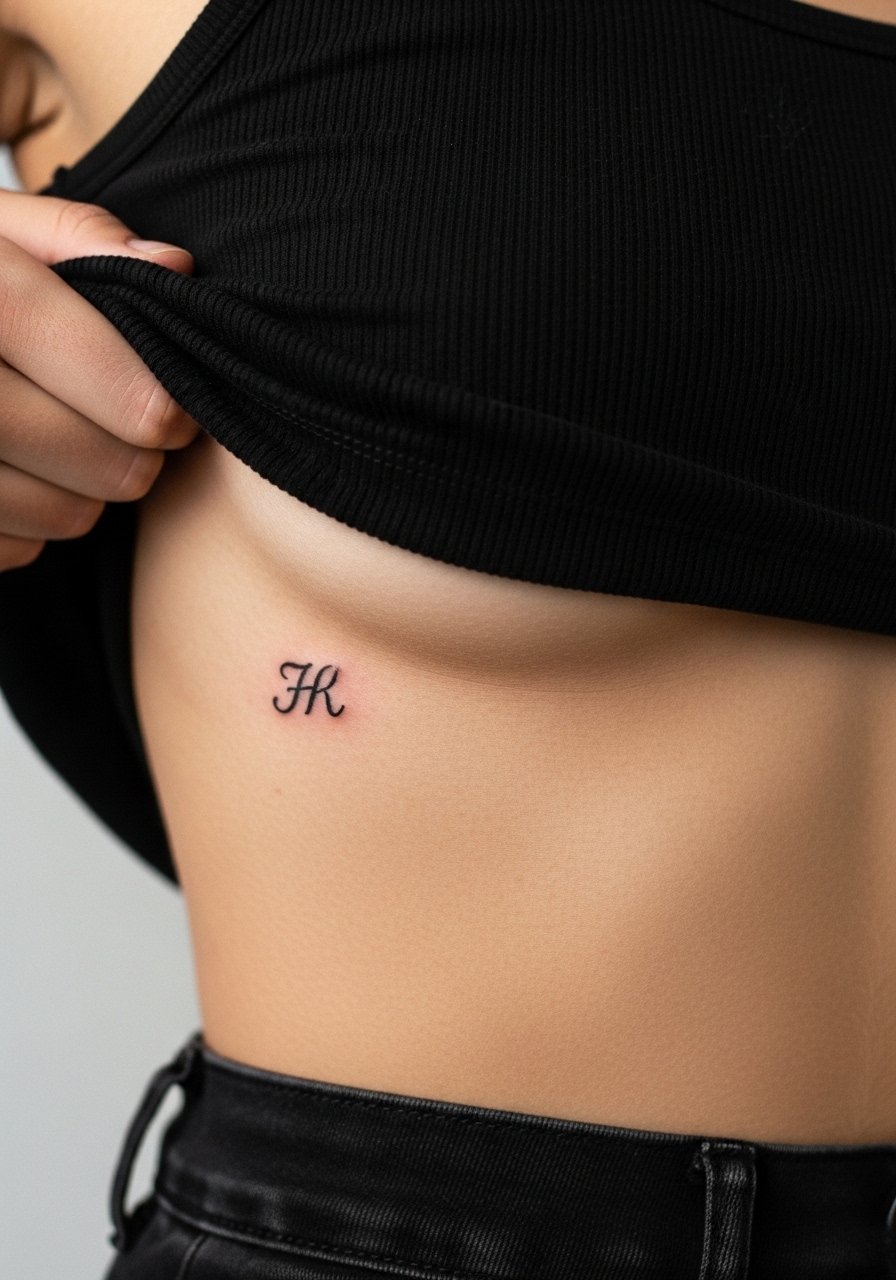
Fair warning, ribs are one of the higher pain zones and the skin stretches with breath and weight changes, so plan wisely. One camp of artists advises against ultra fine scripts there because lines can blur within two years. The other camp maintains that with correct needle depth and spacing the script settles fine. Ask your artist where they stand and request a slightly bolder stroke if you expect body changes. Session time is usually under an hour for a single initial. For appointments, wear a cropped tank top so the artist can access the area easily.
11. Sacred Geometry Triangle with Dot Accents on Inner Forearm
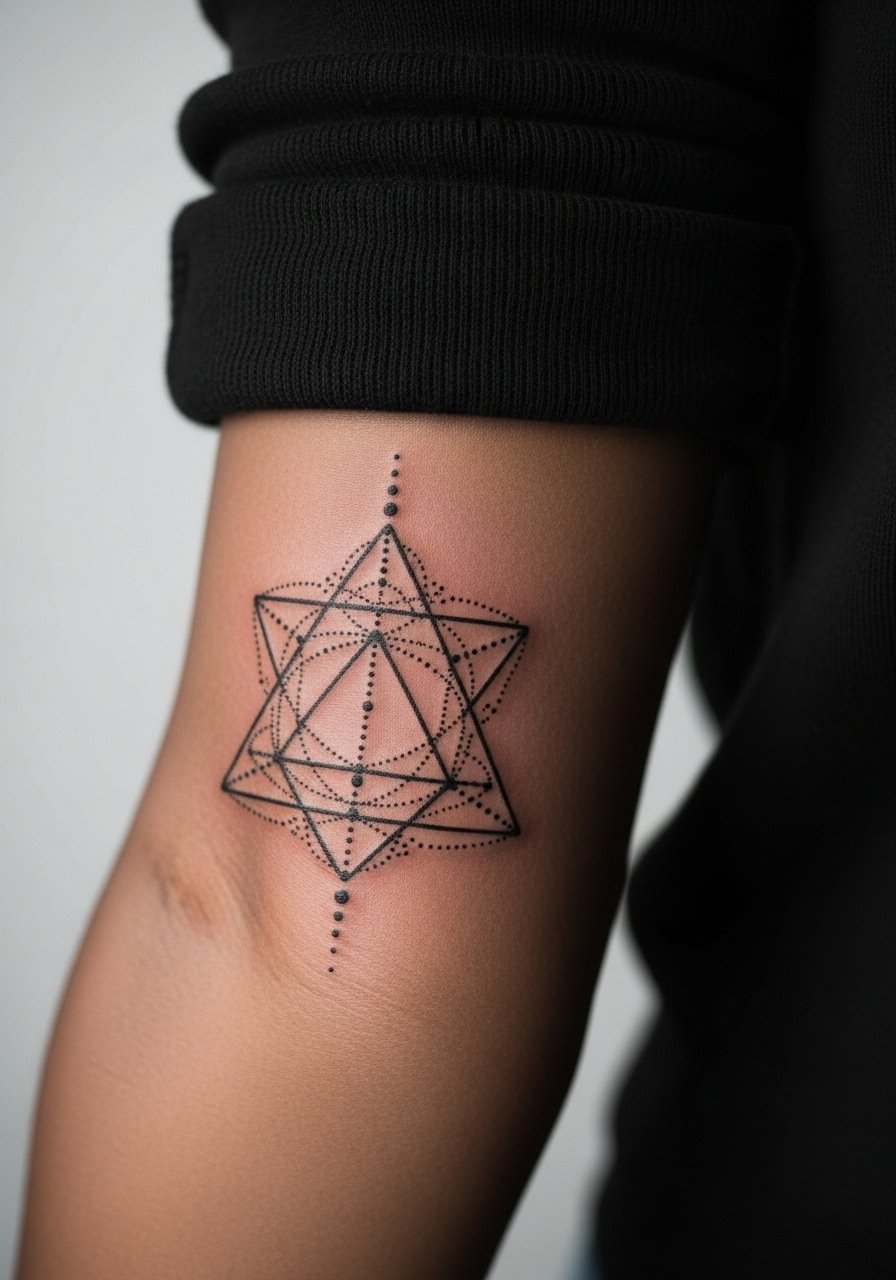
Sacred geometry relies on precise spacing, and the inner forearm is forgiving for that. Tell the artist you want measured negative space between the triangle and dot clusters so the pattern breathes over time. The dot accents should be scaled so they remain distinct after two years. Expect a 45 to 75 minute session. For a refined look, roll up a linen button down shirt to frame the forearm and keep attention on the geometry.
12. Fine Line Eagle Silhouette on Shoulder Blade

Shoulder blade work ages well because the skin there is stable, but very thin strokes can wash out if they sit too close to each other. Ask for a silhouette with solid outer linework and minimal internal detail so the form reads from across a room as it ages. Sessions take about 45 to 90 minutes depending on size. This placement pairs with halter tops or a loose button shirt you can slide aside on session day.
13. Disconnected Shape Cluster on Thigh
Thigh skin offers room for abstract clusters that use negative space for depth. The common error is overpacking elements into a small area. Plan for 2 to 3 inches of spread so each shape keeps its edge. The thigh is lower on pain and sits well for longer sessions up to 90 minutes. For summer shots, high-waisted shorts or a side slit skirt lets the cluster peek through without full exposure.
14. Tiny Geometric Triangle on Ankle Bone

Ankle bones are unforgiving when you go under 0.5 inch. The triangle needs crisp corners and a bit of line weight to hold. Expect 20 to 30 minutes in the chair and mild soreness while wearing shoes. A common mistake is placing it right over the bony prominence where scabbing adheres more. Wear cropped pants and strappy sandals so the placement reads clearly and does not rub against footwear, and consider a cropped ankle pants for seasonal photos.
15. Continuous Line Animal on Outer Forearm
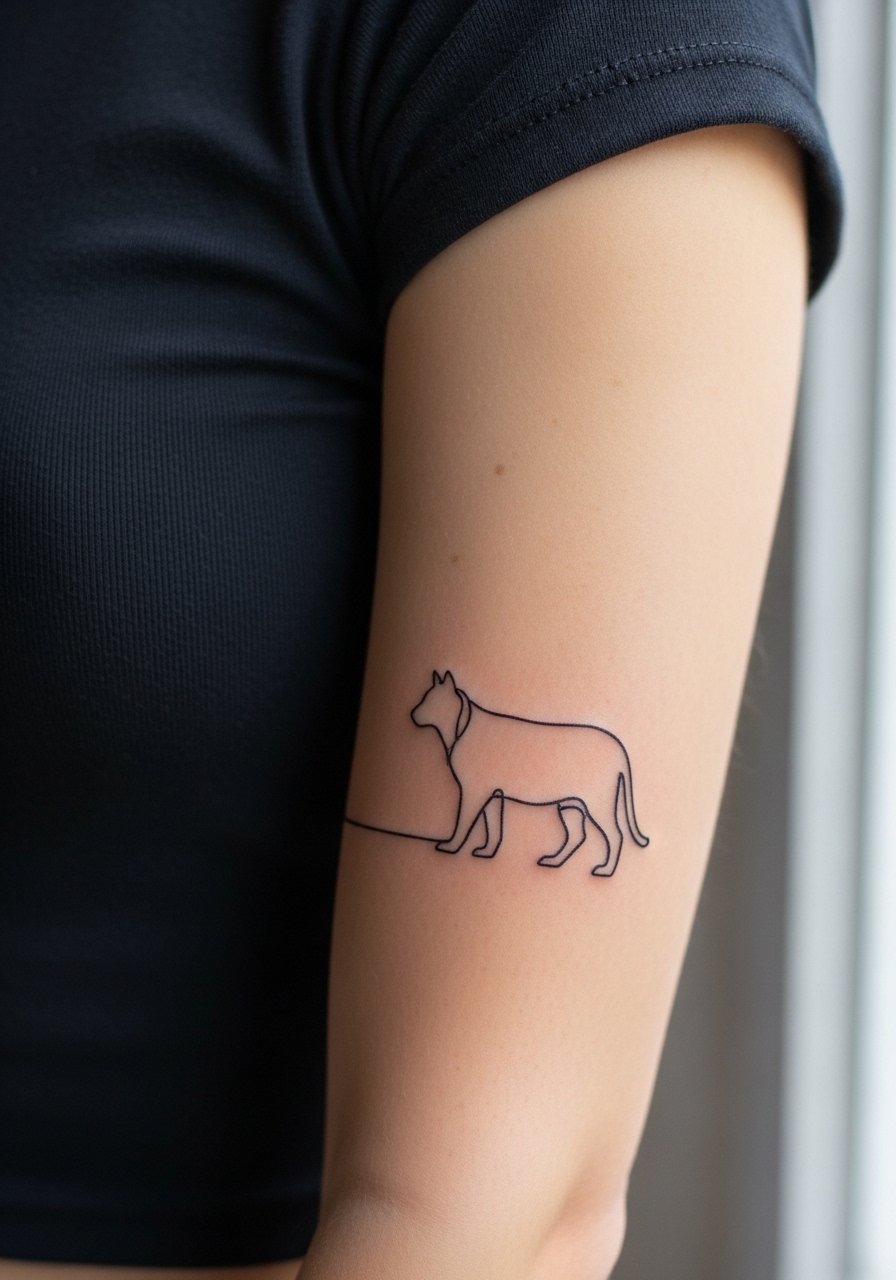
A continuous animal line turns a complex subject into a single gesture, and execution is everything. Ask the artist to trace the limb motion during consultation so the line complements muscle flow. The outer forearm is forgiving on blowout, but small tight twists in the line will soften with time. Session time is typically under an hour. Pair the design with a rolled sleeve tshirt for an editorial vibe that frames the silhouette.
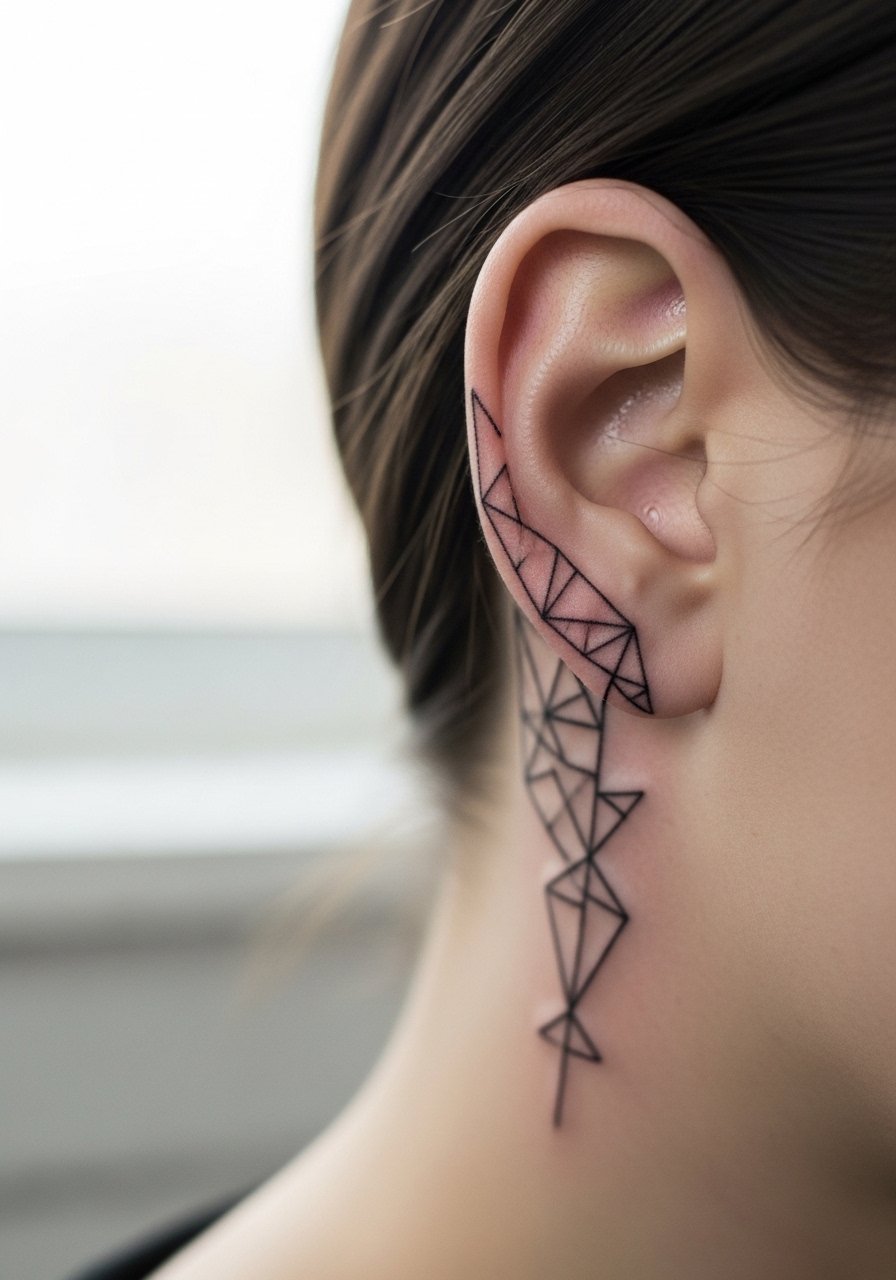
16. Micro-Constellation Behind the Ear
Behind the ear tattoos require tiny scale and precise placement under hairline coverage. The trick is to design placement so the constellation only reads when hair is tucked or up. Pain is low to moderate and sessions are brief. This spot needs an artist experienced with small-scale dot work to avoid blurring. Keep in mind that hair products can affect healing. For appointments, pull your hair into a bun so the area is clear for stencil and needle work.
17. Single Needle Leaf on Upper Thigh

Upper thigh skin gives room for slender botanical work that ages gracefully if spaced along the muscle. Tell the artist to map the stem along the muscle line and to avoid squeezing too many veins of detail into the leaf. Sessions are comfortable for most and last 30 to 60 minutes. The thigh tolerates fine lines, but weight fluctuation can stretch the area, so discuss future body plans. Pair with high waist shorts when you want the tattoo to show.
18. Minimalist Arrow on Side Wrist
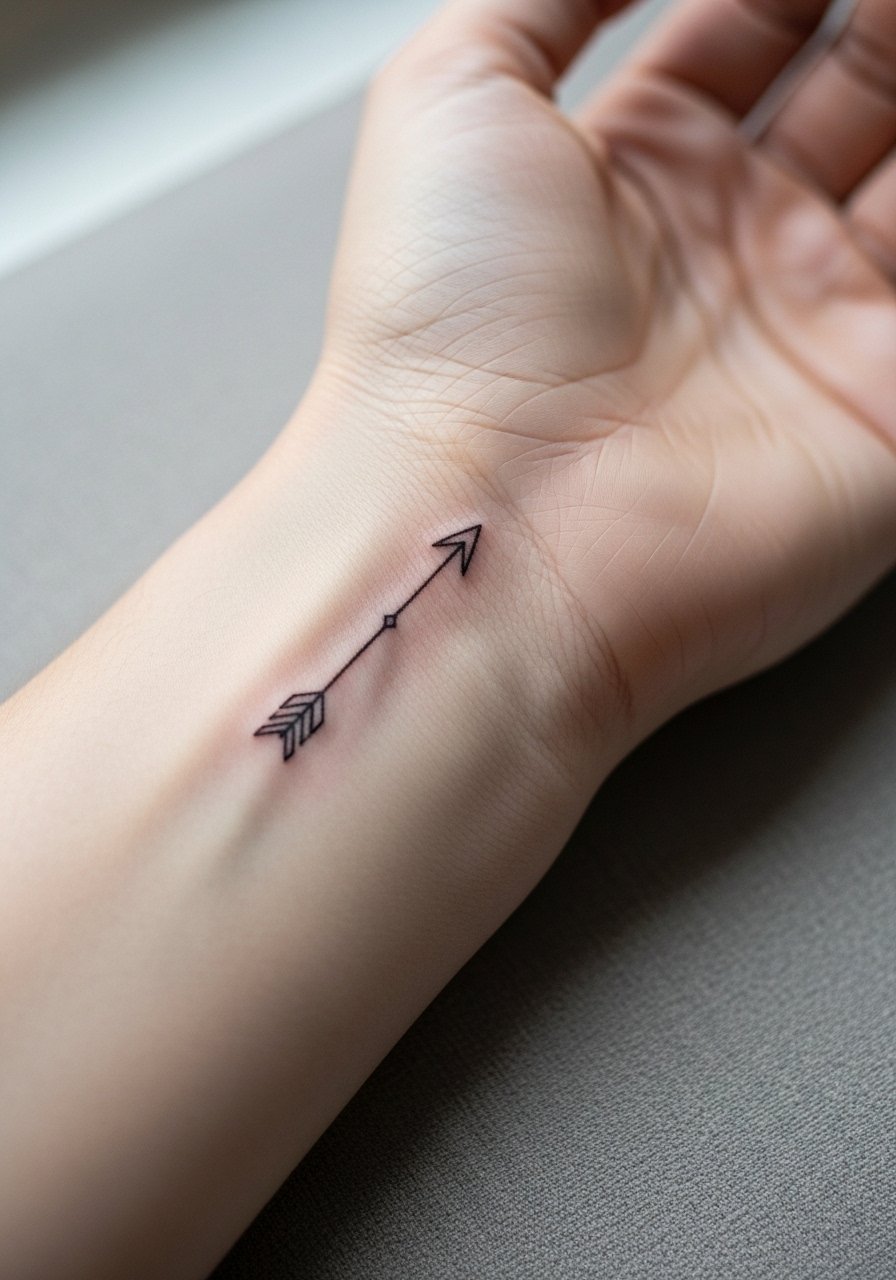
Side wrist placements need clean anchors to prevent rotational blur. Request that the artist align the arrow with the bone axis and use slightly denser linework at the shaft so direction stays crisp. Expect short sessions and quick healing, though repeated washing and friction from bracelets affect the first month. For showing it off, a dainty bracelet stack on the opposite wrist complements without rubbing the tattoo.
19. Tiny Coordinates on Inner Forearm
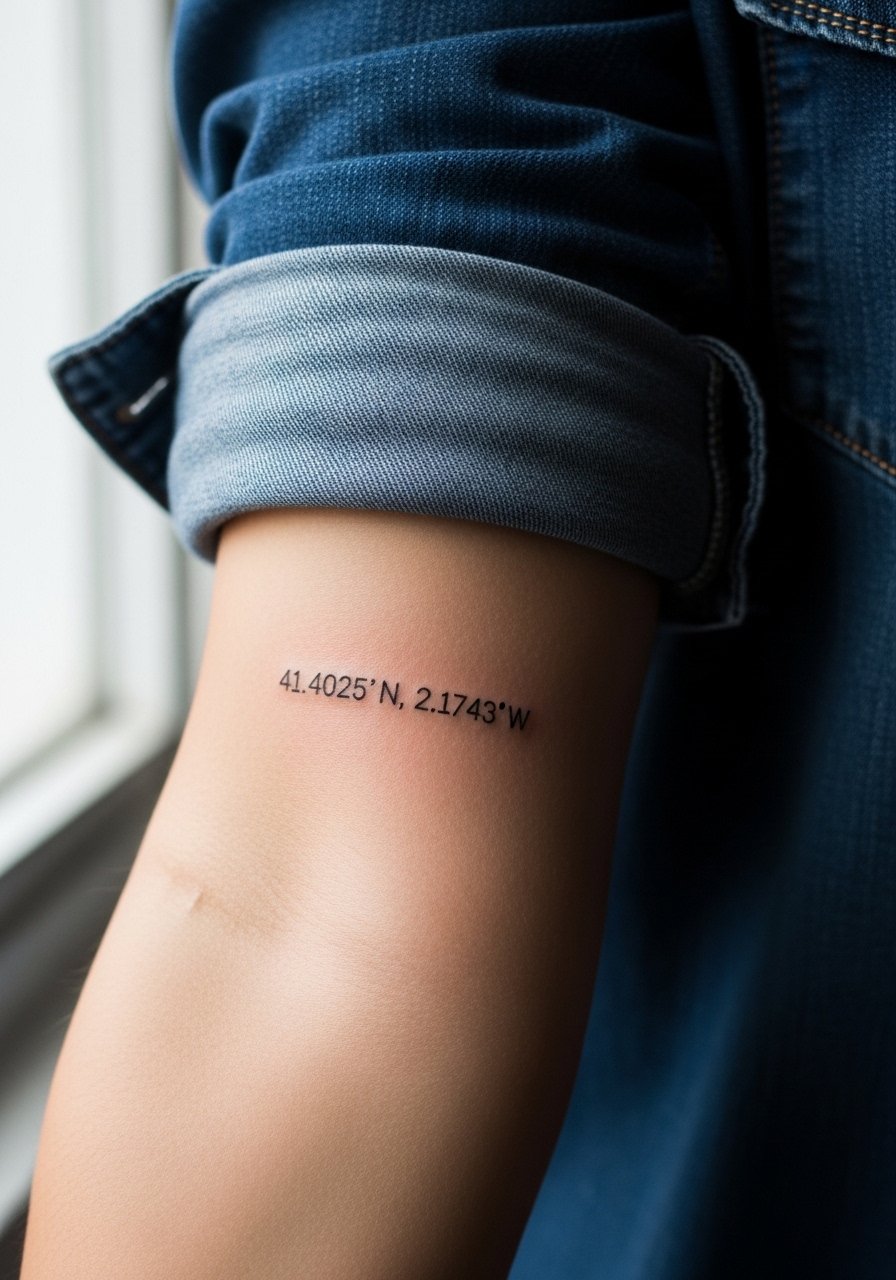
When text is part of the design, accuracy matters. Specify the exact coordinates you want inked and ask the artist to stencil the numerals at life size so the decimals remain legible. Inner forearm is a stable canvas and the piece typically needs a 20 to 40 minute session. Avoid ultra-thin numerals or tight kerning that will blend with healing. A simple thin chain pendant necklace sits above the line without crowding if you layer jewelry.
20. Micro Script Behind the Ear Lobe

Tiny script behind the ear needs legible lettering and steady handwork. Ask for a compact font like lowercase sans that keeps letterforms open. The area is sensitive but not extreme, and sessions are brief. Hair products and friction from collars can challenge healing, so plan accordingly. If you wear long hair, a simple clip-up the day of the appointment keeps the area clean and visible for the artist.
21. Minimalist Moon Phase on Ankle
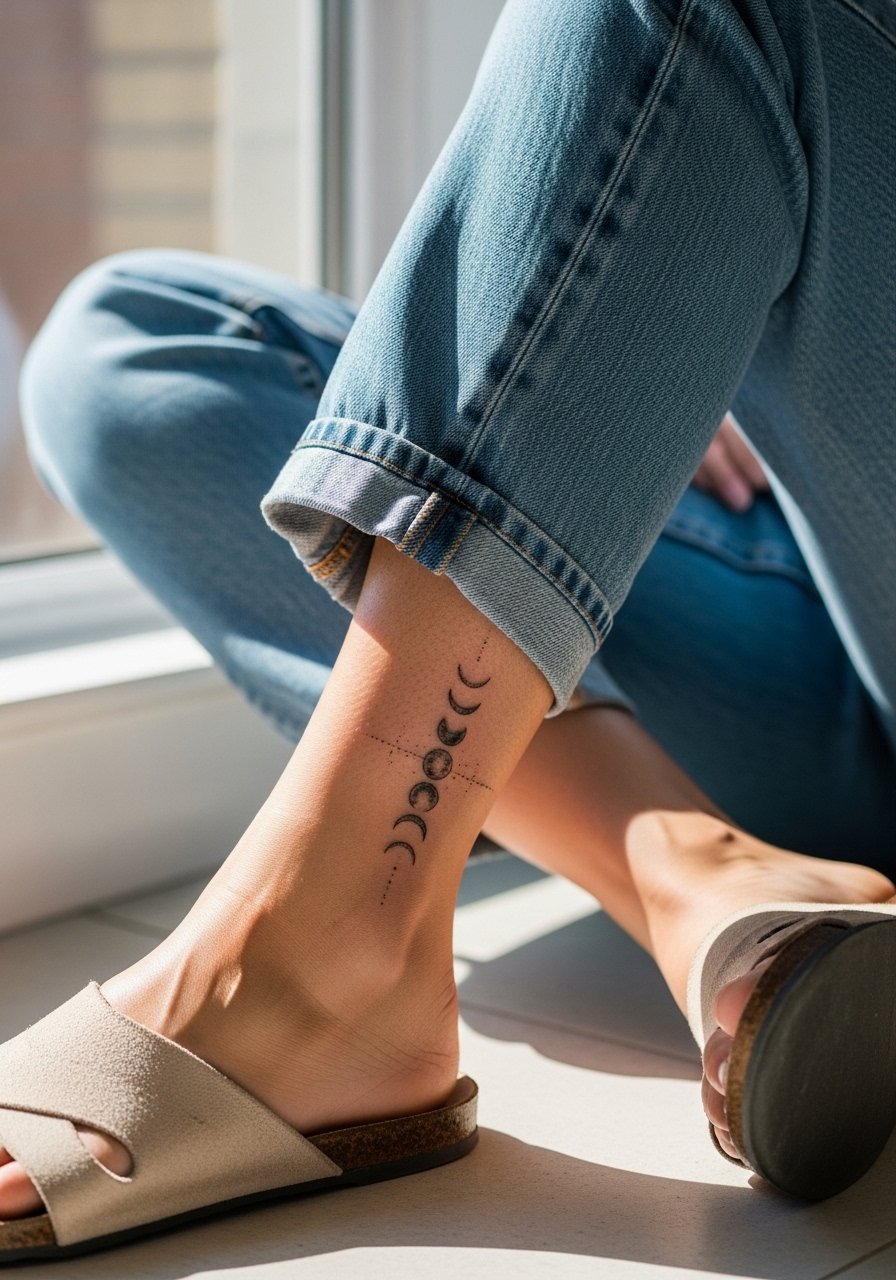
Moon phase series need consistent spacing between crescents so the sequence remains readable. The ankle is a high-friction spot so scale each crescent at least 0.4 inch. Sessions are short, but expect some scabbed edges from shoe contact. For showing it, cropped pants or a strappy heeled sandal will highlight the arc without rubbing.
22. Single Line Heart on Ribcage
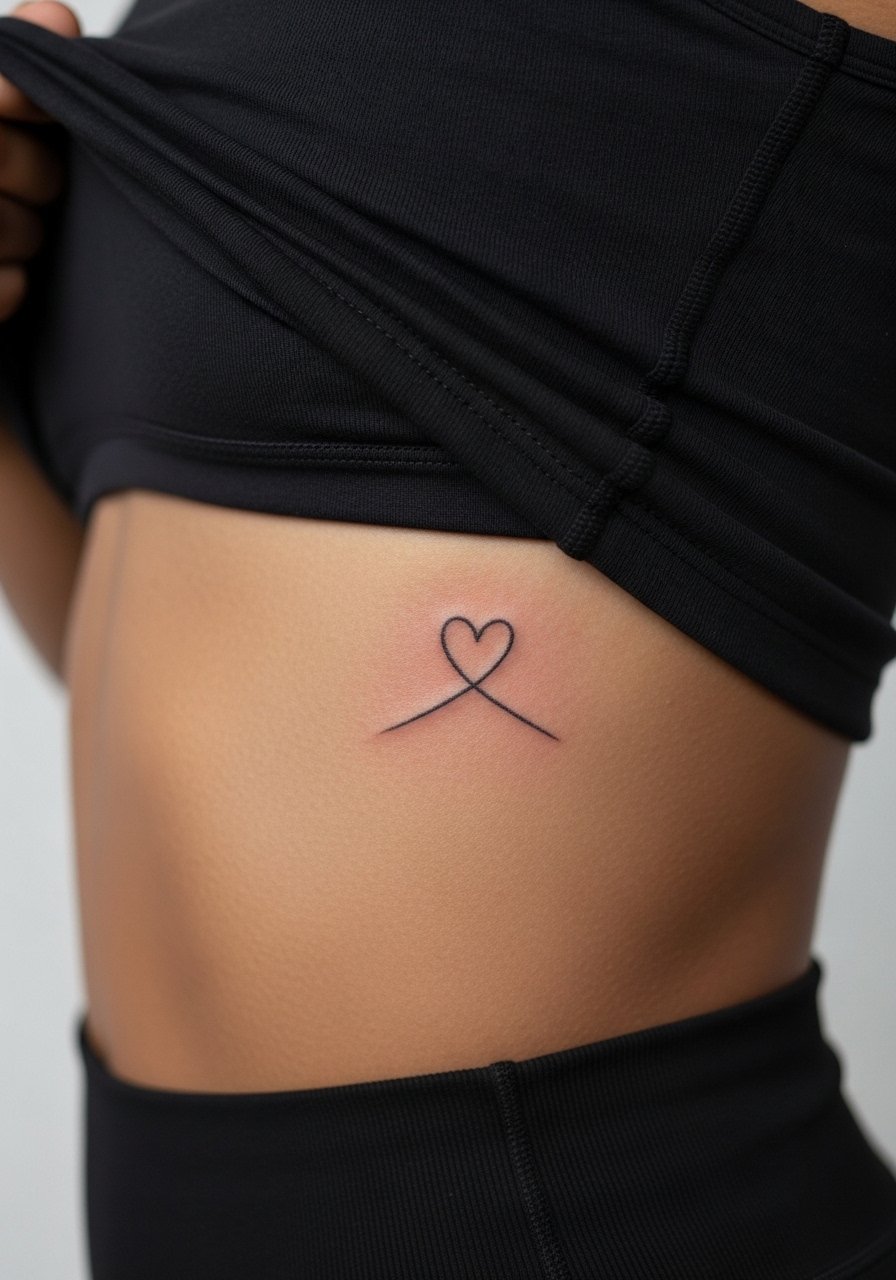
Ribcage work is high on the pain scale, but it rewards with privacy and intimacy. Artists debate fine line on ribs, one camp warns of blurring from skin stretch while the other camp vouches for careful depth and spacing. Ask the artist where they stand and choose line weight accordingly. Session time is often 30 to 60 minutes and expect a touch-up at one year.
23. Minimal Anchor on Outer Wrist
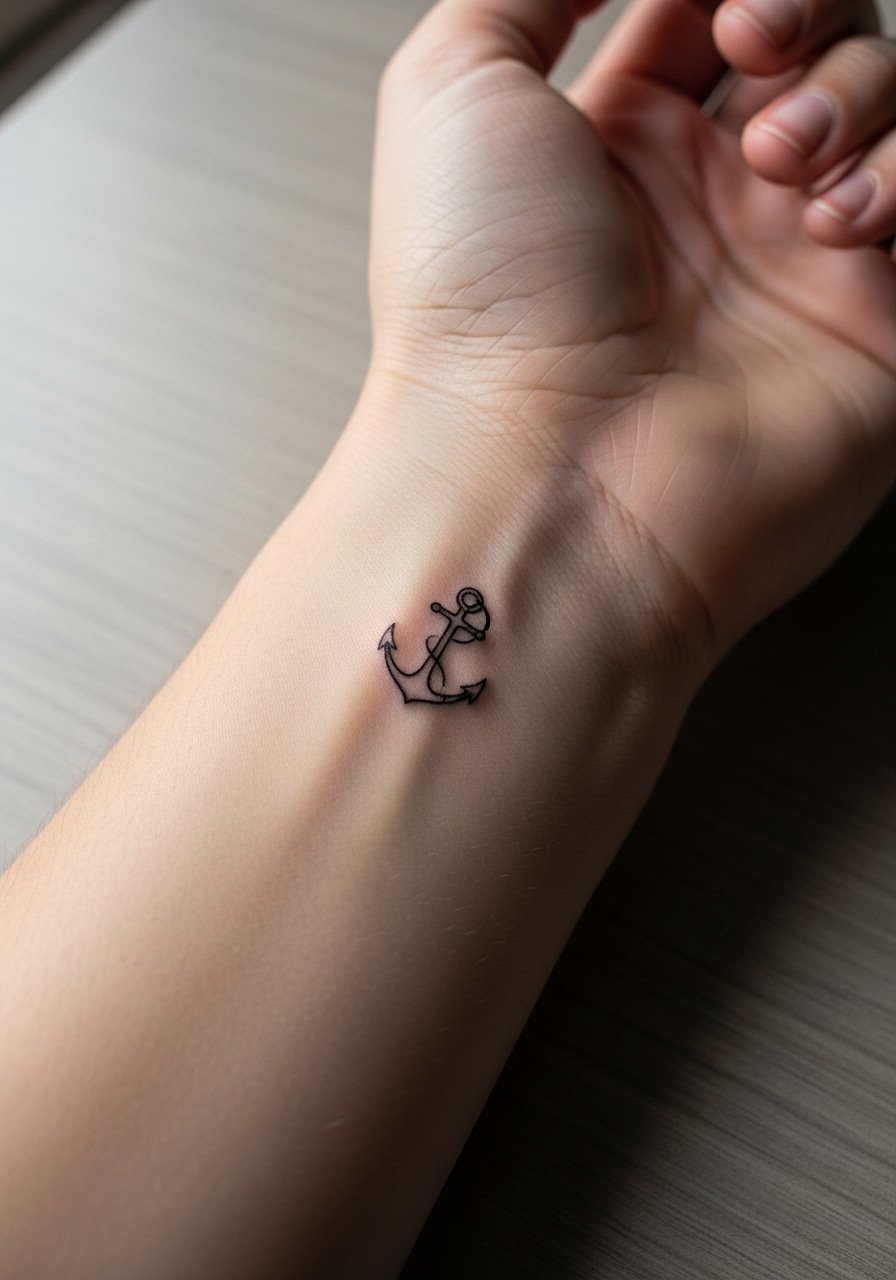
Small nautical anchors read best with bold perimeter lines and minimal internal detail. The wrist moves a lot, so avoid filigree that will fill in. This piece is quick in the chair and usually heals well with minimal touch-up if placed off the crease. Complement it with a minimalist watch on the opposite wrist to evoke a coastal aesthetic while balancing wristwear.
24. Dotwork Sunburst on Shoulder Cap

Dotwork radiates better when spacing is measured and stipple density tapers slowly. The shoulder cap tolerates stipple shading well, and the skin there resists blowout. Ask the artist to leave subtle breathing room between dots so the burst maintains contrast at two to five years. Sessions can be 60 minutes depending on scale. Pair with a halter neck blouse when you want the burst to show.
25. Geometric Band Around Forearm
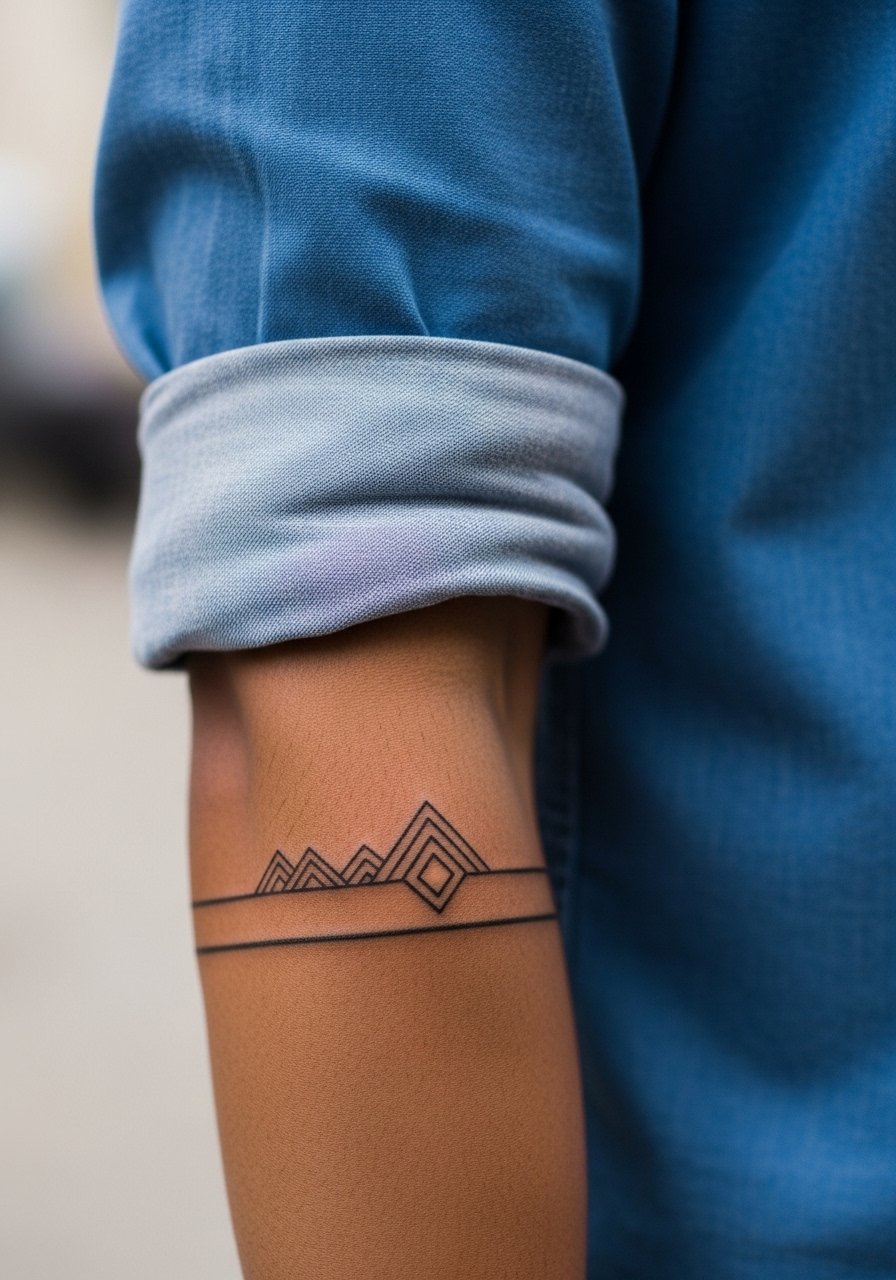
Circumferential bands need symmetry and even pressure so linework meets cleanly around the arm. The common error is misaligned joins that read at odd angles once healed. Discuss stencil alignment and ask the artist to wrap the design while you flex to check fit. Expect a session of 45 to 75 minutes. Show it off with a loose button-down shirt cuffed at the elbow.
26. Minimalist Wave on Side Rib
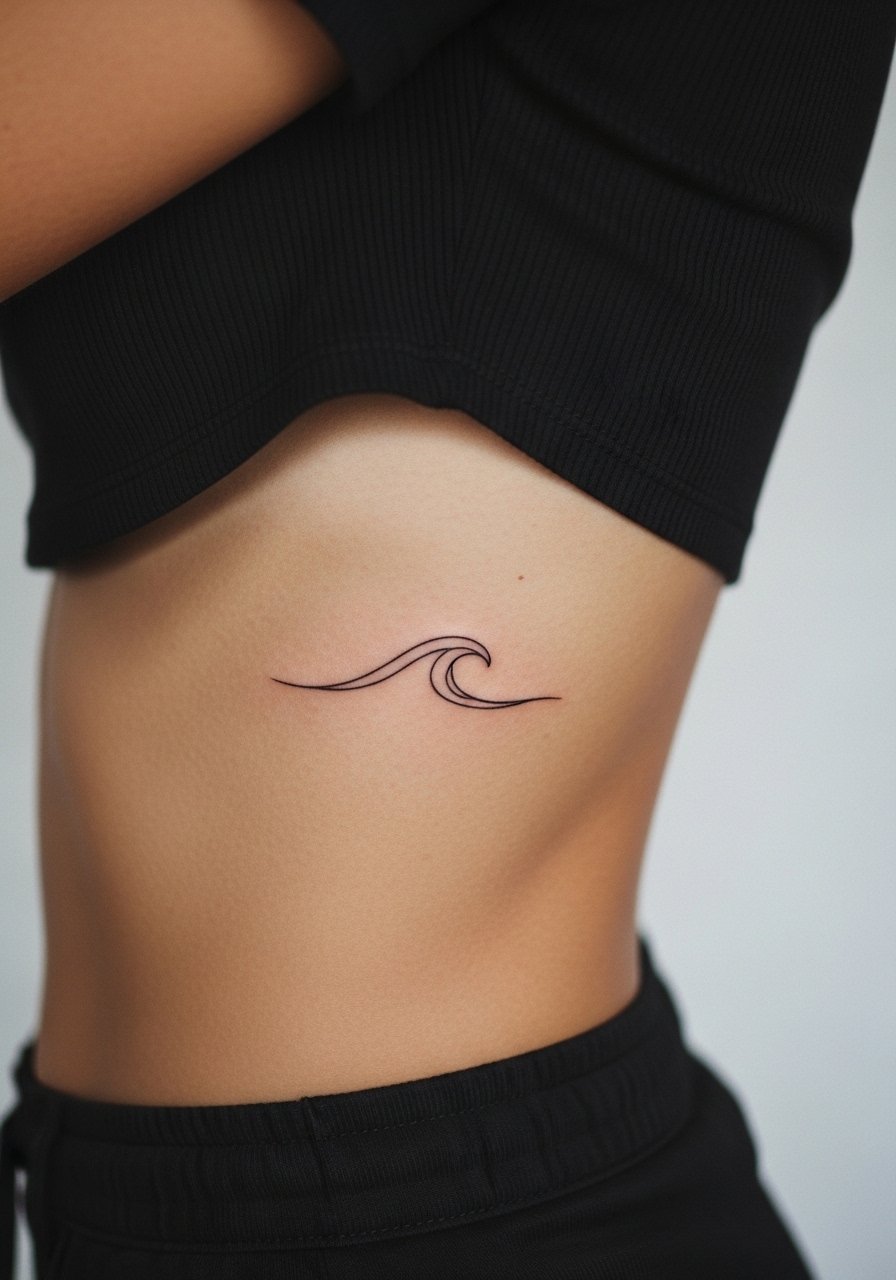
Side rib waves look elegant when scaled to body length and not compressed into a small patch. The rib is sensitive, so plan for a 30 to 60 minute session and brace for discomfort. Artists disagree on fine line in this area, with one group warning about early blur and the other citing technique as decisive. Ask about expected touch-up timelines and whether they prefer a slightly thicker gauge for longevity.
27. Discrete Geometric Ear Cuff Line
This placement mimics jewelry and benefits from design economy and exact spacing. Behind the ear requires the stencil to sit below the hairline on the neck so the piece can be hidden or shown as you like. Sessions are fast and healing is usually smooth, though you must avoid hair oils and sleeping directly on that side for a few nights. For the appointment, pull your hair up so the artist can position the stencil cleanly.
Frequently Asked Questions
Q: Will fine line tattoos like the mountain silhouette fade faster than bolder work?
A: Fine line tends to soften sooner than heavily saturated blackwork. One camp of artists champions fine line for its elegant aging if you plan touch-ups. The other camp prefers bolder lines for longevity. In practice, spacing, placement, and slight increases in line weight are the keys to a result that reads well at year three and five.
Q: How do I choose between Saniderm style healing and traditional dry care for small wrist pieces?
A: People split into two camps. Saniderm fans like the sealed approach for less scabbing and cleaner showers. Traditionalists prefer air drying to let the skin breathe. I suggest asking the artist their preferred method and following it for consistency. Your shop will often have experience with your chosen placement and can recommend the best option.
Q: My skin is darker. Do minimalist designs still show up?
A: Yes, though some fine needle work can disappear on darker tones. Ask for slightly bolder line weight or blackwork alternatives, and request healed photos from the artist showing similar skin tones. That visual evidence beats general advice.
Q: How often should I expect touch-ups for fine line chest or ribcage pieces?
A: Expect at least one touch-up in the first one to two years for fine line chest or ribcage work. The exact timing depends on your skin, sun exposure, and whether the artist built spacing into the design. Discuss a follow-up plan in the consultation.
Q: What should I wear to my appointment for a collarbone, shoulder, or rib session?
A: For collarbone and shoulder pieces wear a loose tank or wide-neck shirt that you can pull aside without full undressing. For ribs pick a cropped tank or a shirt you can lift slightly so the artist has clean access. Comfortable, easily removable clothing makes the session smoother.
