
Fine line tattoos are all about choices that sound simple until you see them healed. Small spacing, needle depth, placement, and even what you wear to the session decide whether a delicate line stays crisp or blurs into a smudge. These ideas favor minimal linework that reads like a quiet sentence on skin. Read the first one and you will see the specific consultation notes to bring to your artist.
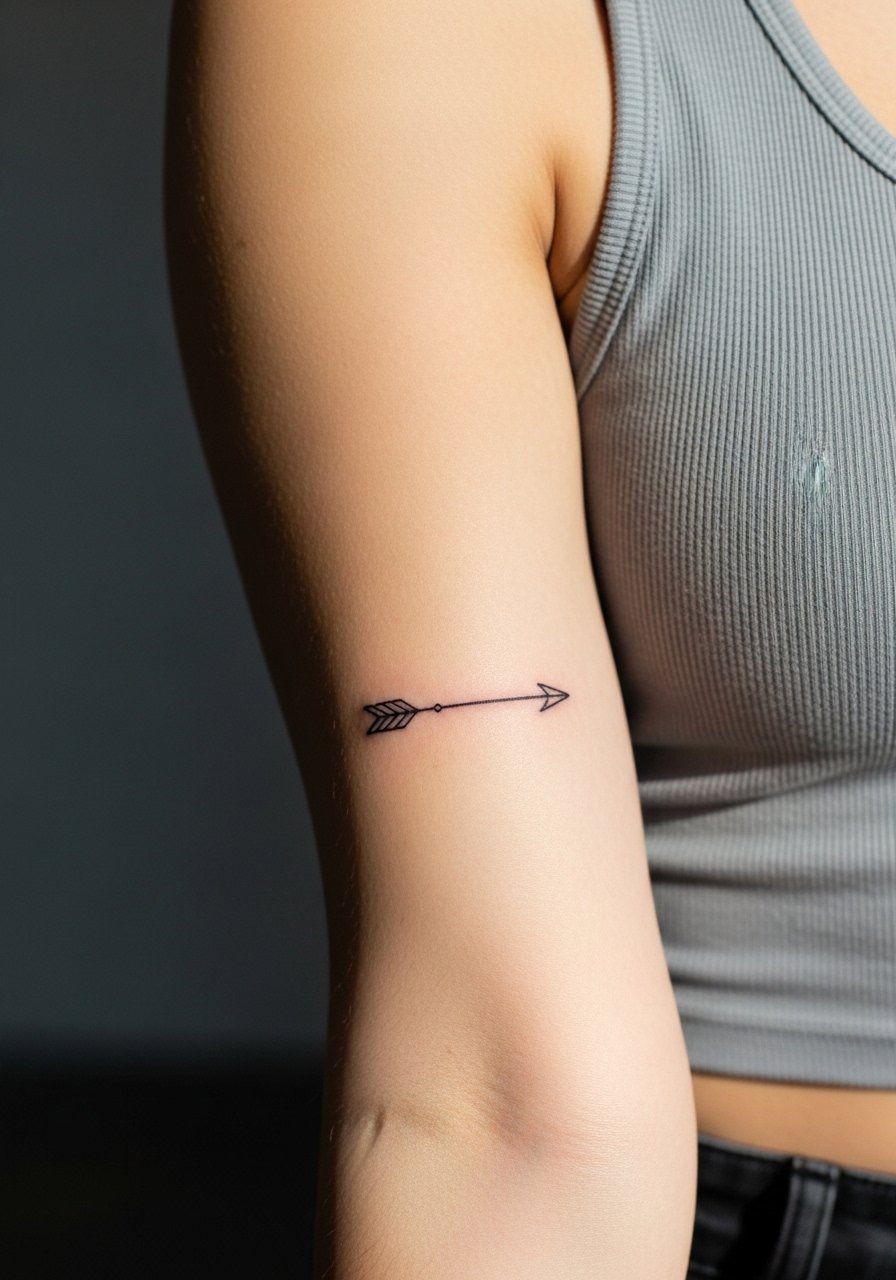
1. Single-Stroke Arrow on Inner Forearm
I have seen single-stroke arrows age well when they are given breathing room. Ask your artist to keep the arrow at least 6 mm long per visible segment and to avoid ultra-thin lines that sit too shallow. Pain here is low and sessions are short, often a single 20 to 40 minute pass. The common mistake is shrinking the design to fit a narrow spot, which compresses linework and invites merging in two to three years. For the session wear a racerback tank you can pull aside so the forearm lies flat. Expect a light touch feeling, and plan a touch-up if you find early feathering at year two.
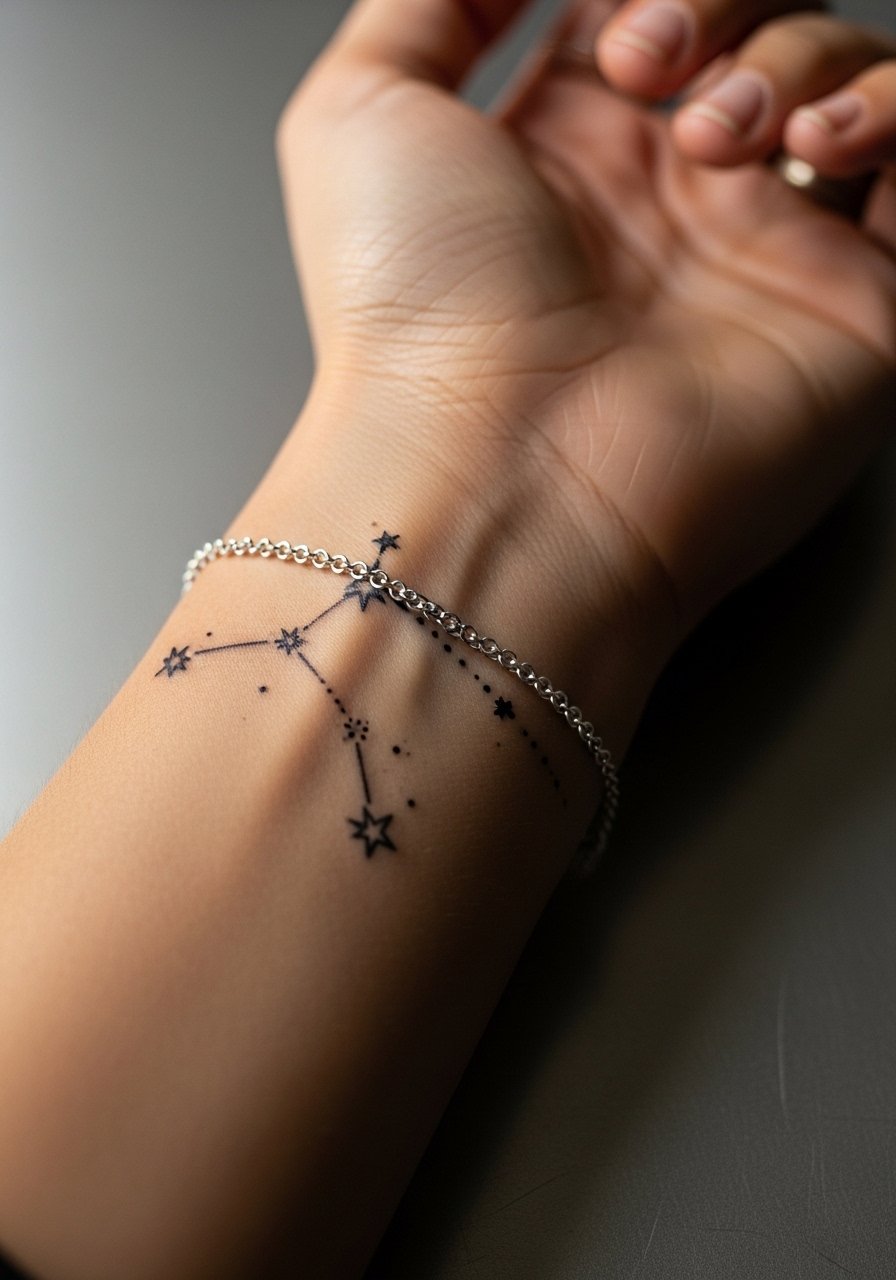
2. Tiny Constellation Cluster on the Wrist
Most people get constellations on the wrist because they want something discreet and meaningful. Fair warning, wrist linework faces friction from watches and bracelets, and that daily wear speeds fading. Tell your artist to space the dots and tiny connecting lines slightly wider than they look right away. The session is quick but sensitive. For showing it off, pair the piece with a thin chain bracelet or a minimalist watch so the tattoo reads between accessories. Expect sharper contrast at six months and a softer look by year two that may need a small touch-up if you want original crispness.
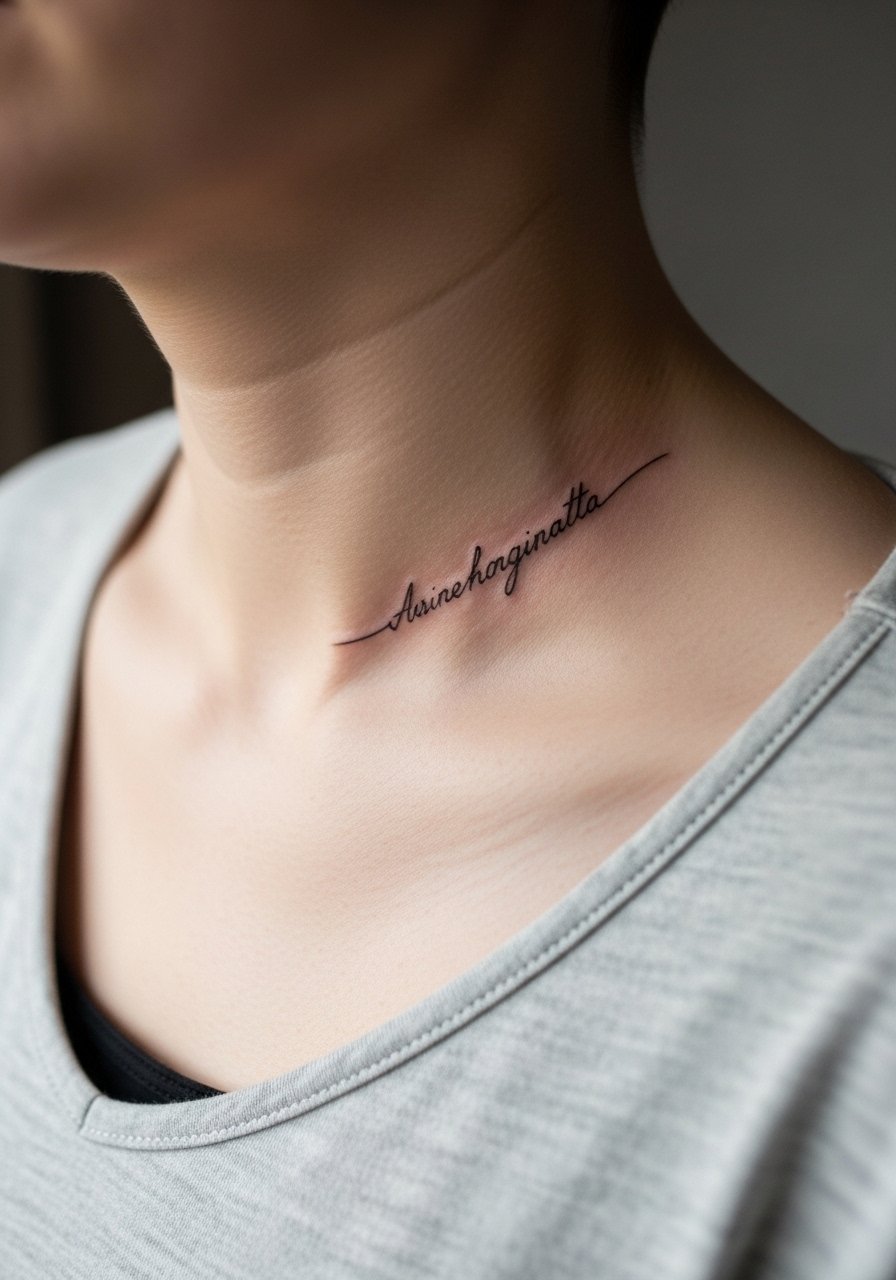
3. Narrow Script Along the Collarbone
I've noticed collarbone script looks best when letter spacing is generous and the text follows the bone contour. The collarbone moves with breath and clothing, so the biggest mistake is using condensed fonts. Sessions take 30 to 60 minutes depending on length and sensitivity is moderate. For the appointment wear a wide-neck shirt you can pull aside so the artist has clean access without you scrunching. When healed the linework reads elegant against the collarbone and keeps readable longer than tightly packed type. If the phrase contains visible text, show exact wording in your reference to avoid misletters.
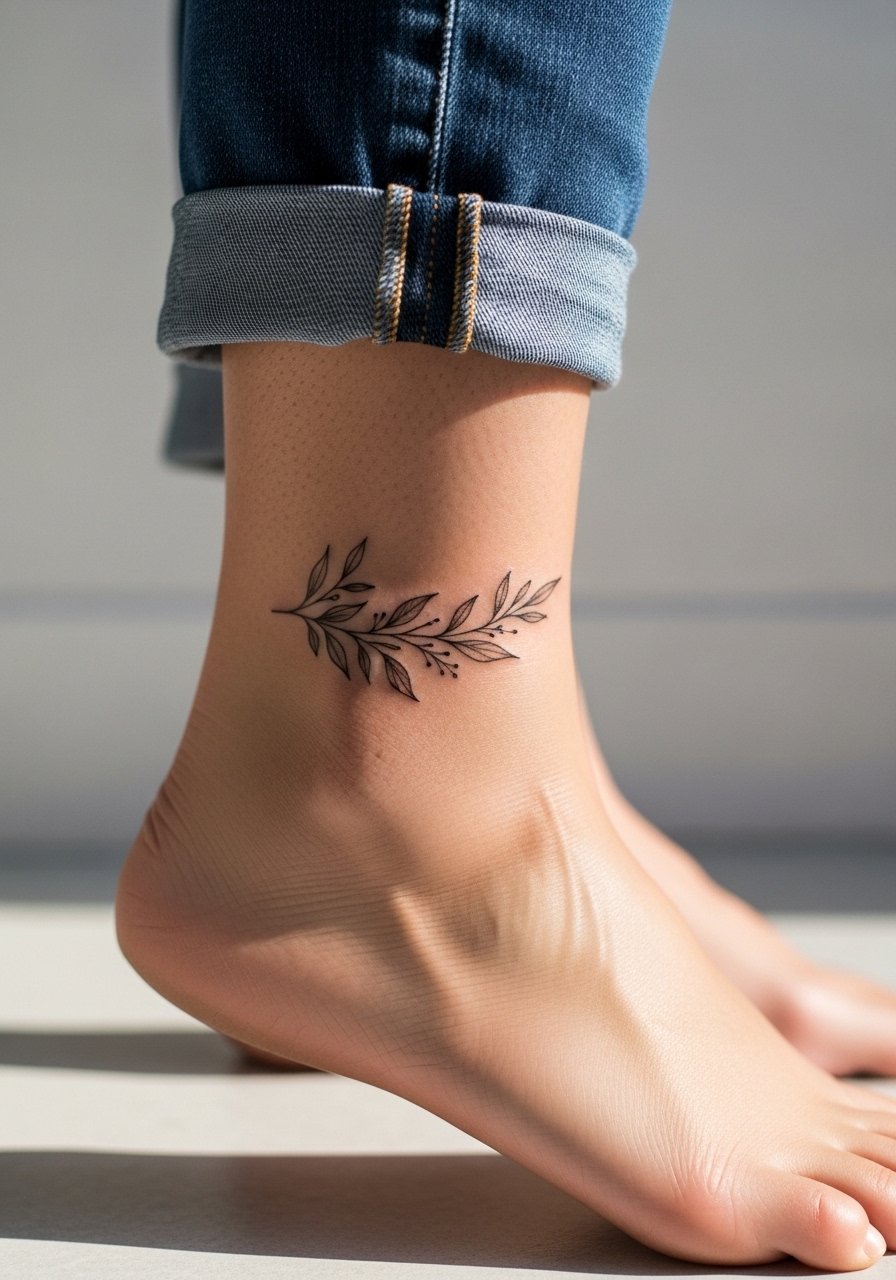
4. Micro Botanical Ankle Wrap
There is a visual lightness to micro botanical wraps around the ankle that photos capture well. The ankle is a high-friction zone from socks and shoe collars, and the common version done too close to bone loses crispness first. Ask for slightly thicker outer contour lines and avoid ultra-fine shading in tight clusters. For the session put on rolled jeans or a pair of jeans you can cuff so the artist can access the ankle without pulling at fabric. Expect initial sharpness at six months and softening by year three, with touch-ups often timed around seasons when your shoes rub more frequently.
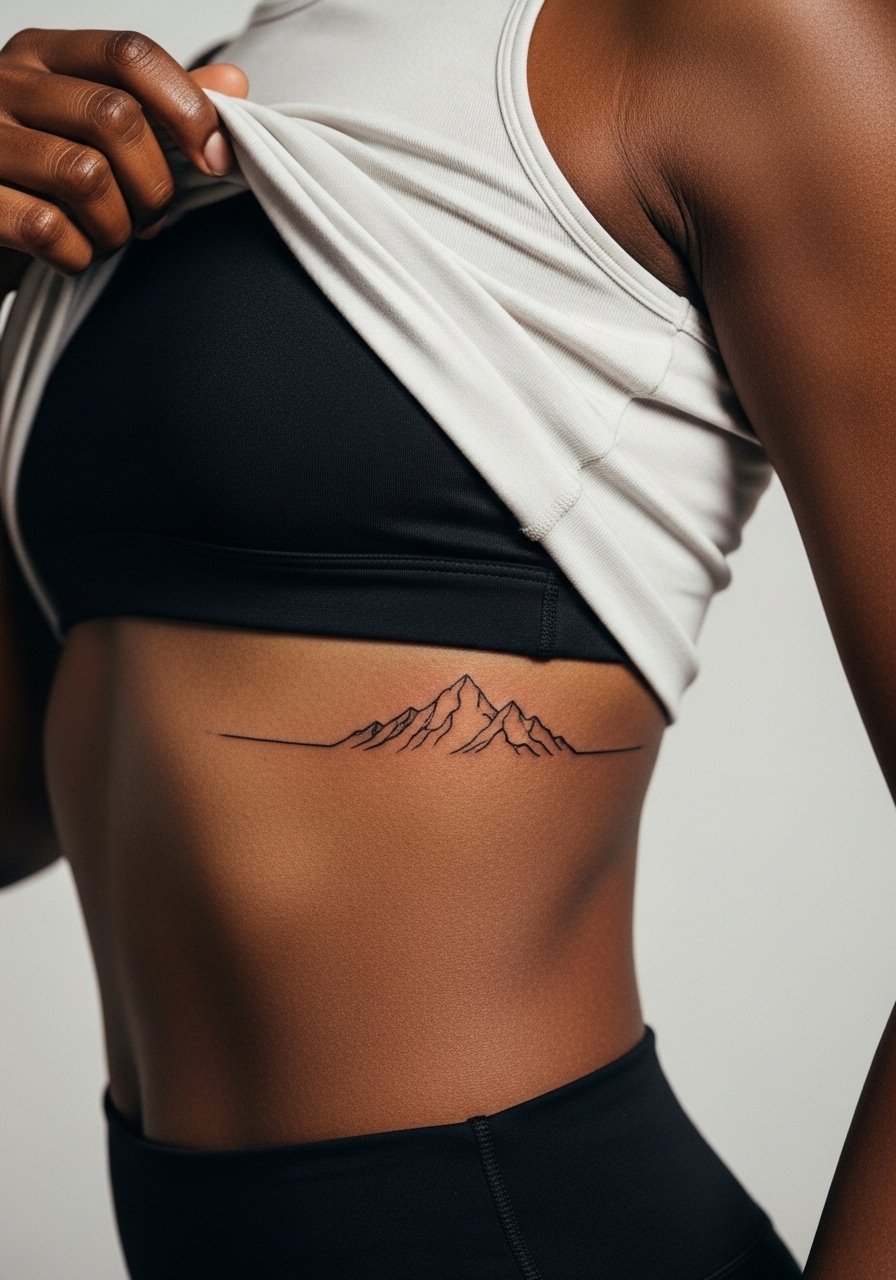
5. Single-Line Mountain Range on the Ribcage
Ribcage pieces read beautifully when scale is respected, but artists are divided about fine line on ribs. One camp says the skin stretch and breathing blur thin lines within two years. The other camp argues that with proper needle depth and spacing, fine line settles well on ribs. When you consult, ask where the artist lands on that debate and what spacing they recommend. Pain is high and sessions may split into two shorter sittings. Wear a cropped top you can lift slightly, like an athletic crop, so only the area is exposed. Expect crisp detail at six months and possible softening by year three that could require a targeted touch-up.
6. Dotwork Crescent Behind the Ear
This placement reads intimate and subtle when the crescent is placed just behind the hairline on the neck. The final look depends on hair, ear shape, and whether you want it visible with certain hairstyles. The area heals quickly but needs precise stencil placement. For the session have hair tied back and wear a shirt with a collar you can pull slightly aside. If you plan to show it often, pair it with small stud earrings or a thin chain pendant necklace that frames the area without covering it. Expect the motif to stay readable for years if spacing is generous and the artist places ink at consistent depth.
Before You Book
The wrist, ankle, collarbone, ribs, and behind-the-ear pieces above ask for different prep than larger back or sleeve work. A few small items make the session and first week more manageable.
-
Stencil transfer sheets. Lets you preview how lineweight and placement will sit on curved areas like the collarbone and wrist.
-
Topical numbing cream option. Useful for high-sensitivity rib sessions when you need to break longer work into shorter passes.
-
Breathable protective film roll. Helps ankle and wrist pieces manage friction from shoes and bracelets during the first few days.
-
Fragrance-free gentle body wash. Cleans healing fine line work without stripping moisture that tight linework needs.
-
Aquaphor healing ointment. Thin application in the first days preserves delicate channels in fine line pieces without heavy occlusion.
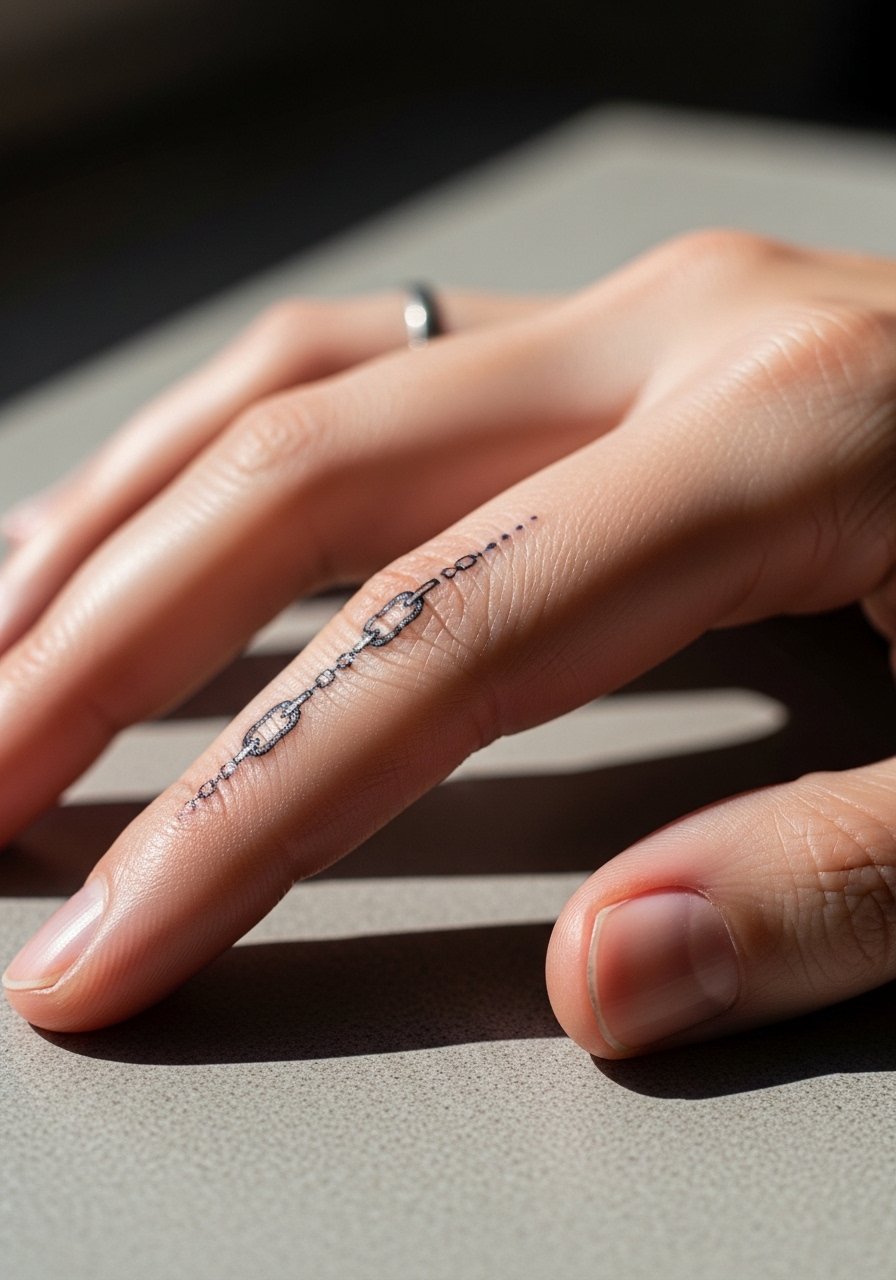
7. Minimalist Chain Link on the Finger
Finger linework wears differently because of constant hand use and exposure. The biggest mistake is requesting the same fine weight used on an inner arm and expecting it to last. Ask for a slightly heavier contour and accept that touch-ups are common within two years. Sessions are quick and painful, with frequent movement making aftercare fussy. For showing off, thin stacking rings or a simple band will frame the chain without crowding it. Expect crispness at six months and visible softening by year two, and plan for a scheduled touch-up rather than assuming permanence.
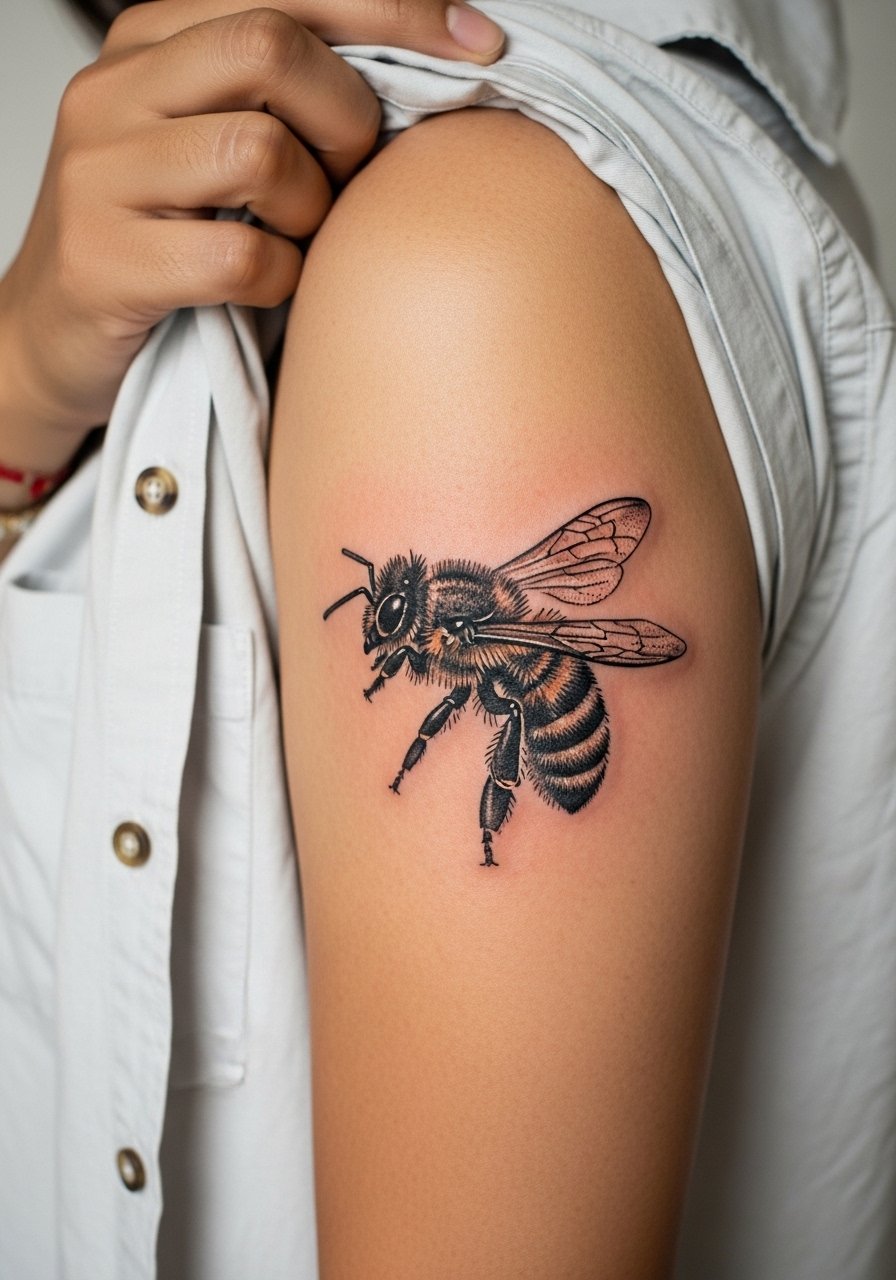
8. Micro-Realism Bee on the Upper Arm
Visual impact lead works here because a tiny micro-realism bee reads as a jewel on the upper arm. This placement tolerates finer detail better than high-friction zones. Tell your artist you want subtle stipple shading and defined wing veins rather than heavy gray wash. Sessions are short and pain is low to moderate. For the session wear a loose button-down shirt you can pull aside so the artist has clear access. Over years stipple holds faster than dense shading, and most of the aging comes from sun exposure so keep the area covered or use sun protection when outdoors.
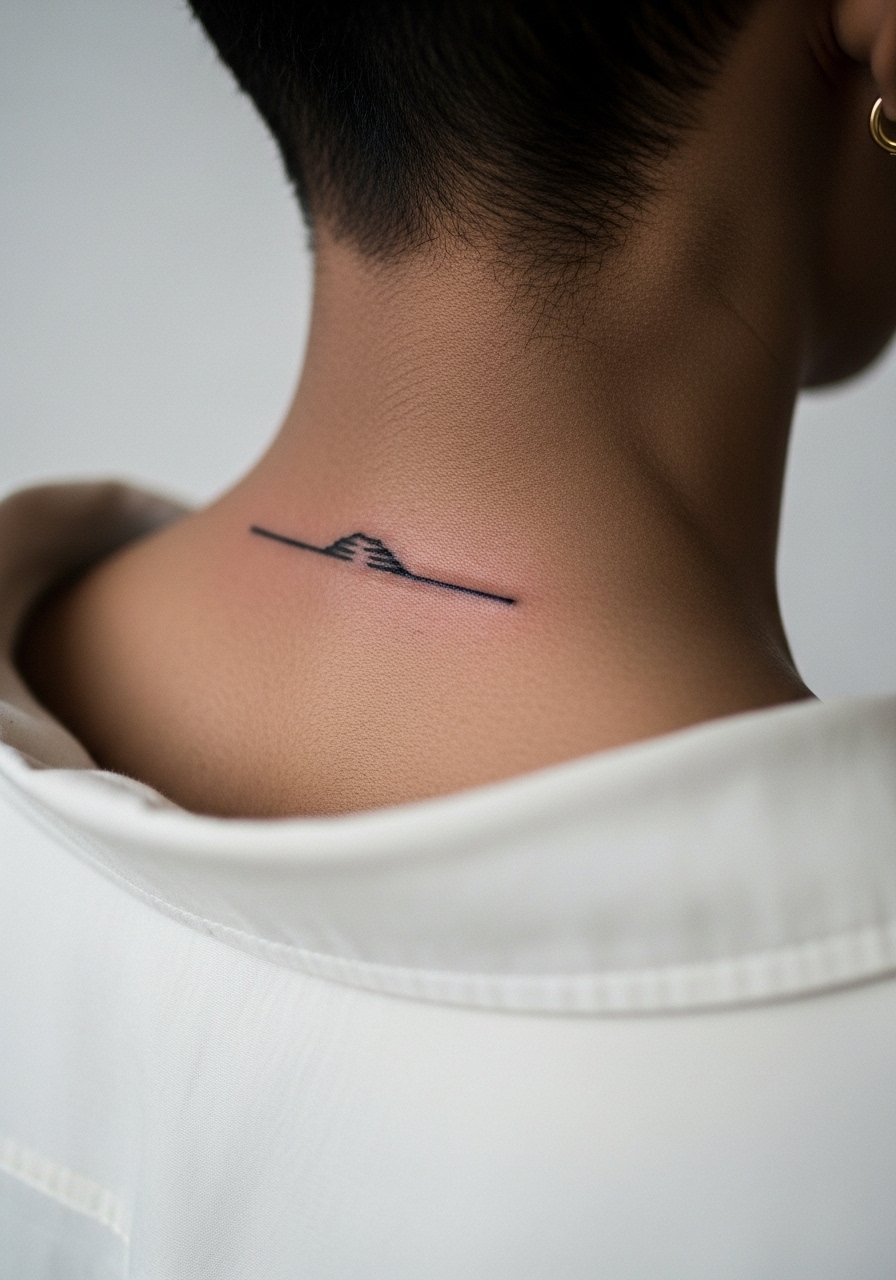
9. Single-Line Horizon on the Back of the Neck
There is a decision pressure moment with neck placements. The back of the neck is often discrete or visible depending on hair length, so think about how you style your hair. The area heals well but needs precise horizontal placement to sit evenly with hairlines. Ask for a thin but confident single stroke that reads against hair texture. Sessions are brief and sensitivity is moderate. For showing off, pair it with a collared shirt you can adjust during the session. If you work in a conservative environment consider how visibility will affect professional norms before booking.
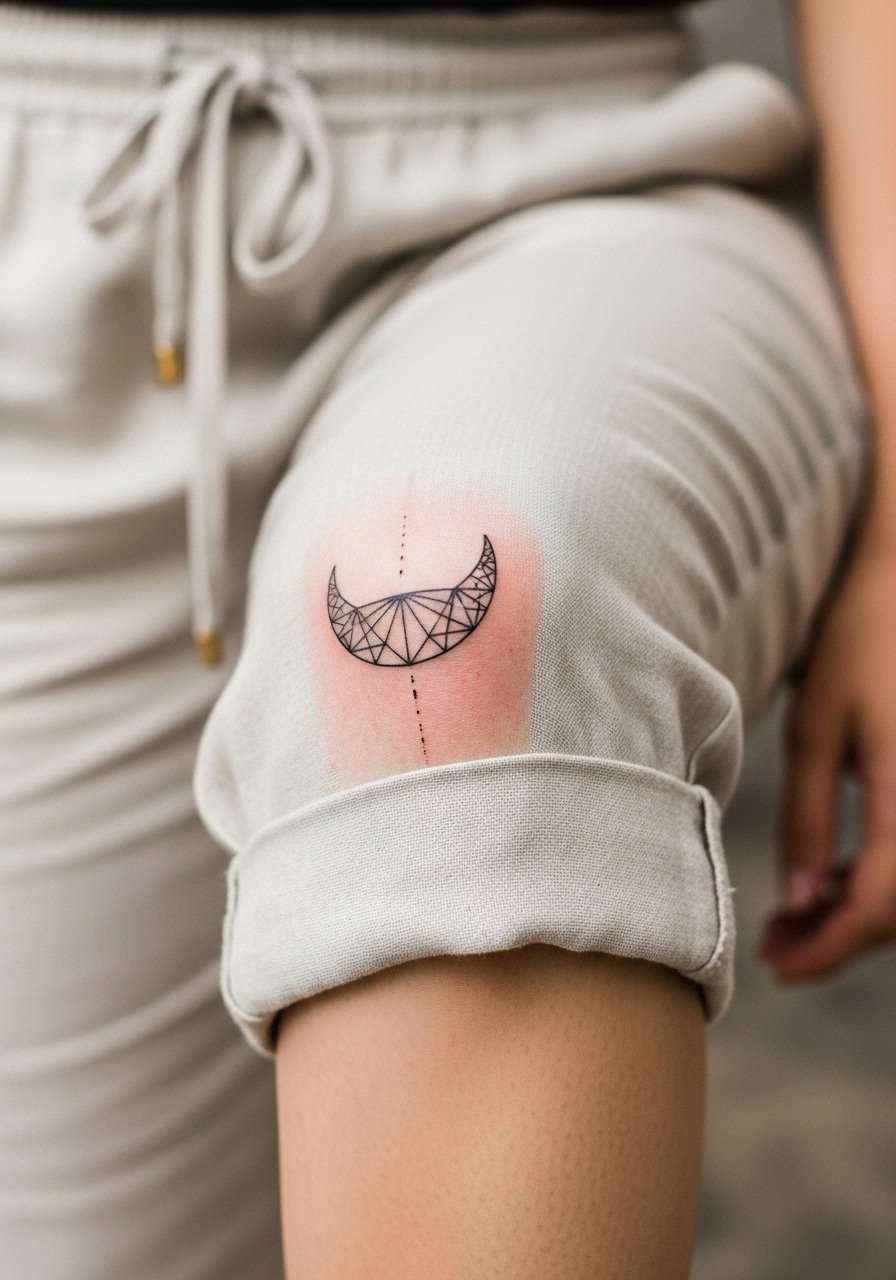
10. Geometric Half-Moon on the Calf
Most calf placements benefit from slightly bolder linework because the skin here can tolerate density without blowout. The mistake is going too minute and then seeing edges soften after two years. In consultation ask for deliberate spacing in the half-moon arcs and request the artist map the arcs to your calf muscle bulge so the piece reads straight when you stand. For the session wear loose drawstring linen pants that you can roll up easily. Sessions are moderate in length depending on repetition and pain is low to moderate. Longevity is strong if UV exposure is minimized.
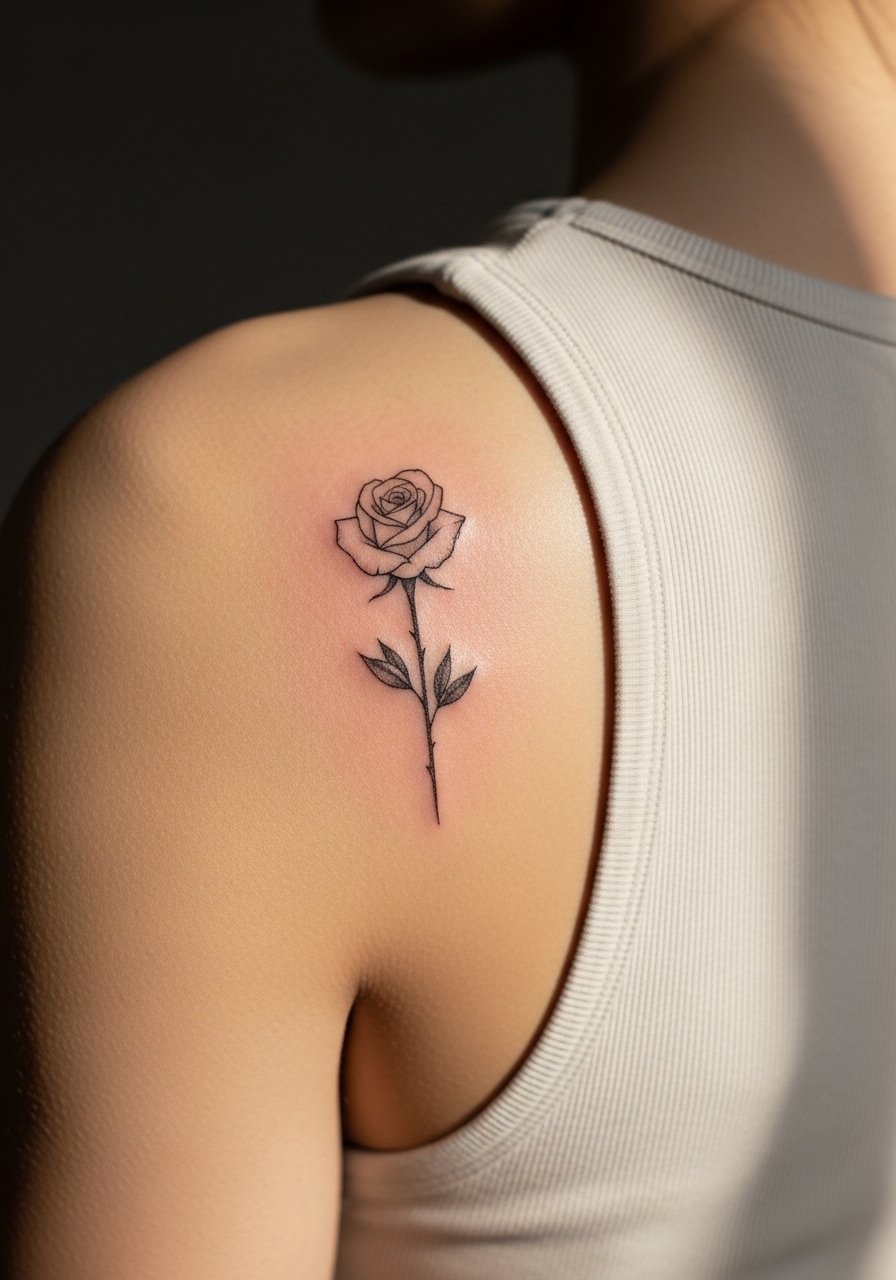
11. Single-Petal Rose on the Shoulder Blade
I've seen shoulder blade spots carry small, neat pieces that look intentional under loose clothing. Placement moves with shoulder motion so the common aging issue is contour distortion when the design hugs a curve too tightly. Tell your artist you want the petal edges to breathe and to avoid dense stippling near the spine. Session time is short and pain is low, and the area is easy to dress for aftercare. Pair the healed piece with open-back tops or a tank top for days you want the tattoo visible. Expect minimal blowout risk if the artist respects tissue curvature.
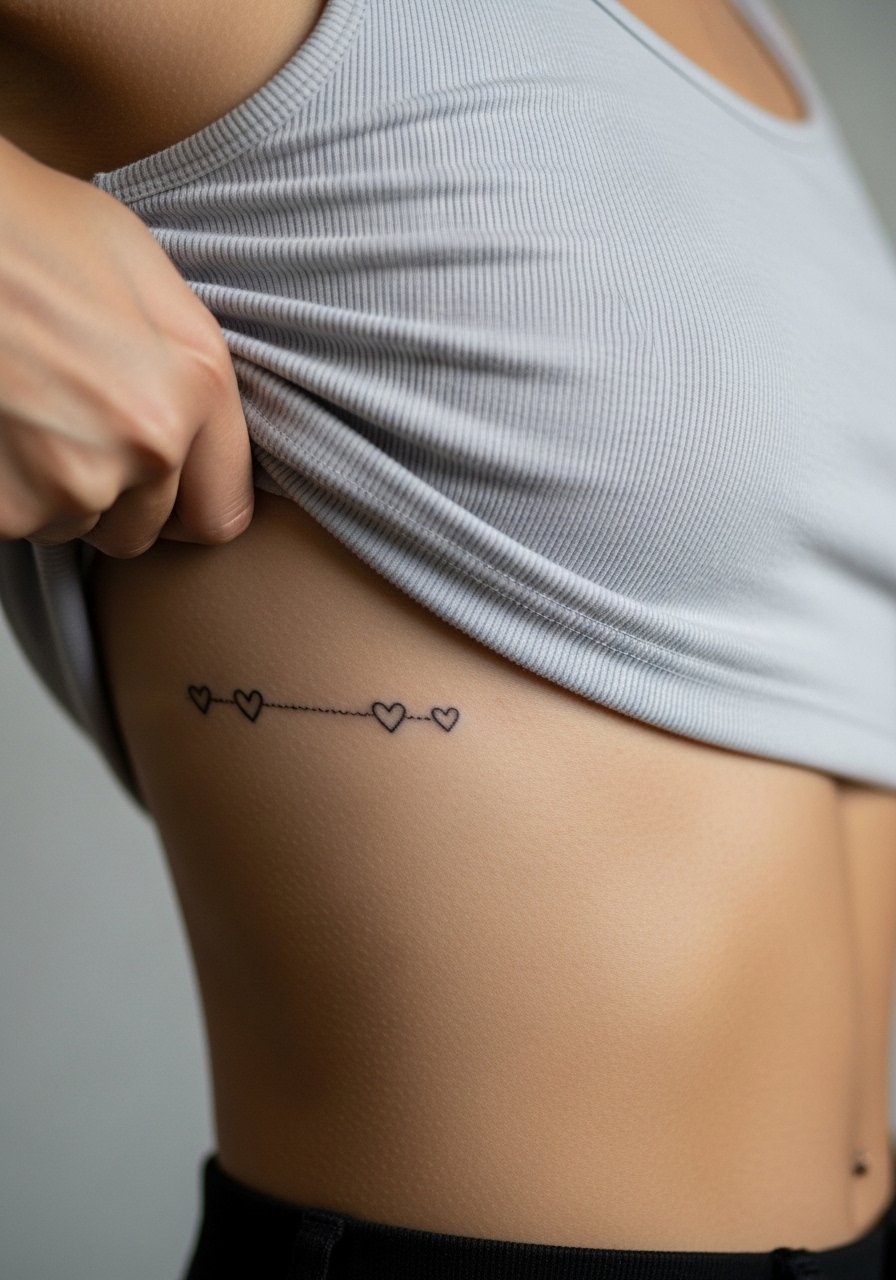
12. Chain of Tiny Hearts Along the Side Rib
Aging/healing lead fits ribs again because breathing and stretch determine outcome. This vertical chain can be gorgeous if each heart is spaced for expansion during inhalation. The common error is stacking hearts too tight and relying on extremely thin lines. Plan for higher pain and possibly split sessions when you book. For the appointment wear a cropped tank so the artist can expose only the side rib area. After healing you will see the linework soften more than on an arm, and touch-ups are realistic in the third year if you want to retain crisp hearts.
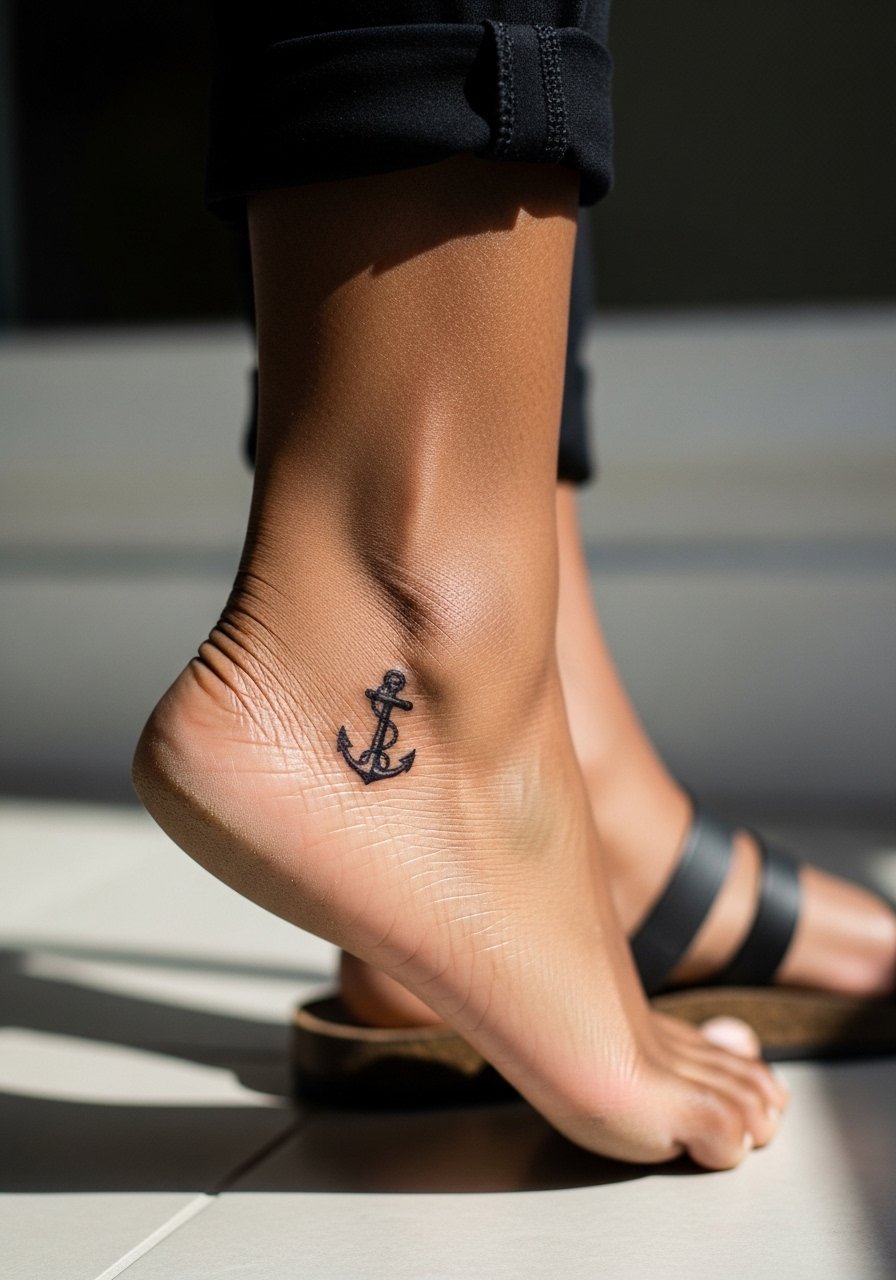
13. Fine Line Anchor on the Heel Edge
Visual impact lead is useful here because a heel-edge anchor reads unexpected and personal. The skin near the heel is thick and sees friction from shoes that accelerate abrasion. The mistake is expecting the same permanence as a forearm piece. Ask for a compact but slightly bolder outline and plan to avoid tight shoes for the first few weeks. For the session take sandals or shoes you can loosen so the area breathes. Expect fading faster than on low-friction zones and factor a potential touch-up if the outline softens within two years.
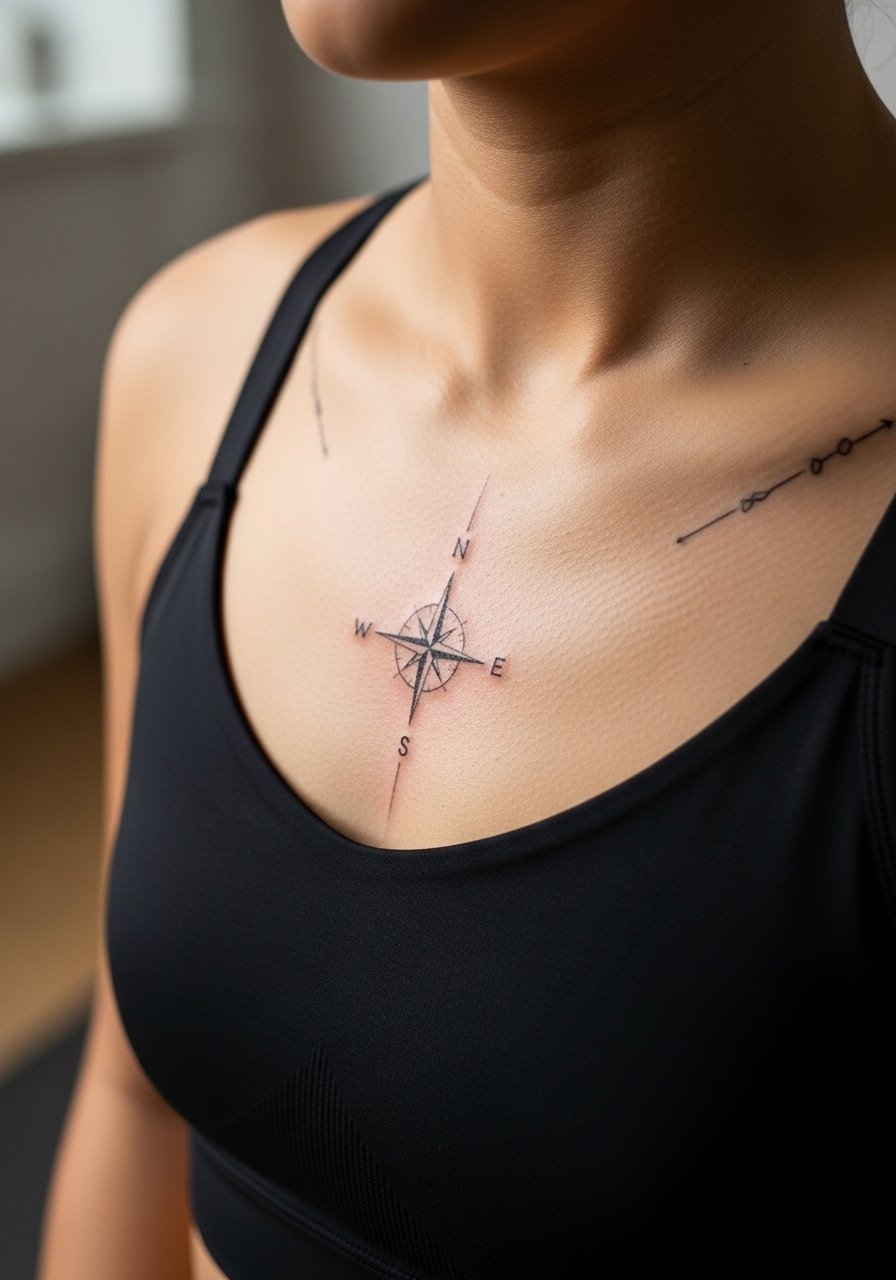
14. Minimalist Compass on the Upper Chest
When a chest piece sits near the collarbone, styling and placement determine how it reads under clothing. The sternum and upper chest are sensitive, so book time with an artist who has experience on torso lines. The common poor outcome is a compass with cramped details that merge as the skin moves. Wear a fitted sports bra or wide-neck top to the session so only the area is exposed. For evenings out a slightly open blouse frames the piece and lets the compass sit as a focal point. Expect solid longevity with regular sun protection and occasional touch-ups to maintain needle crispness.
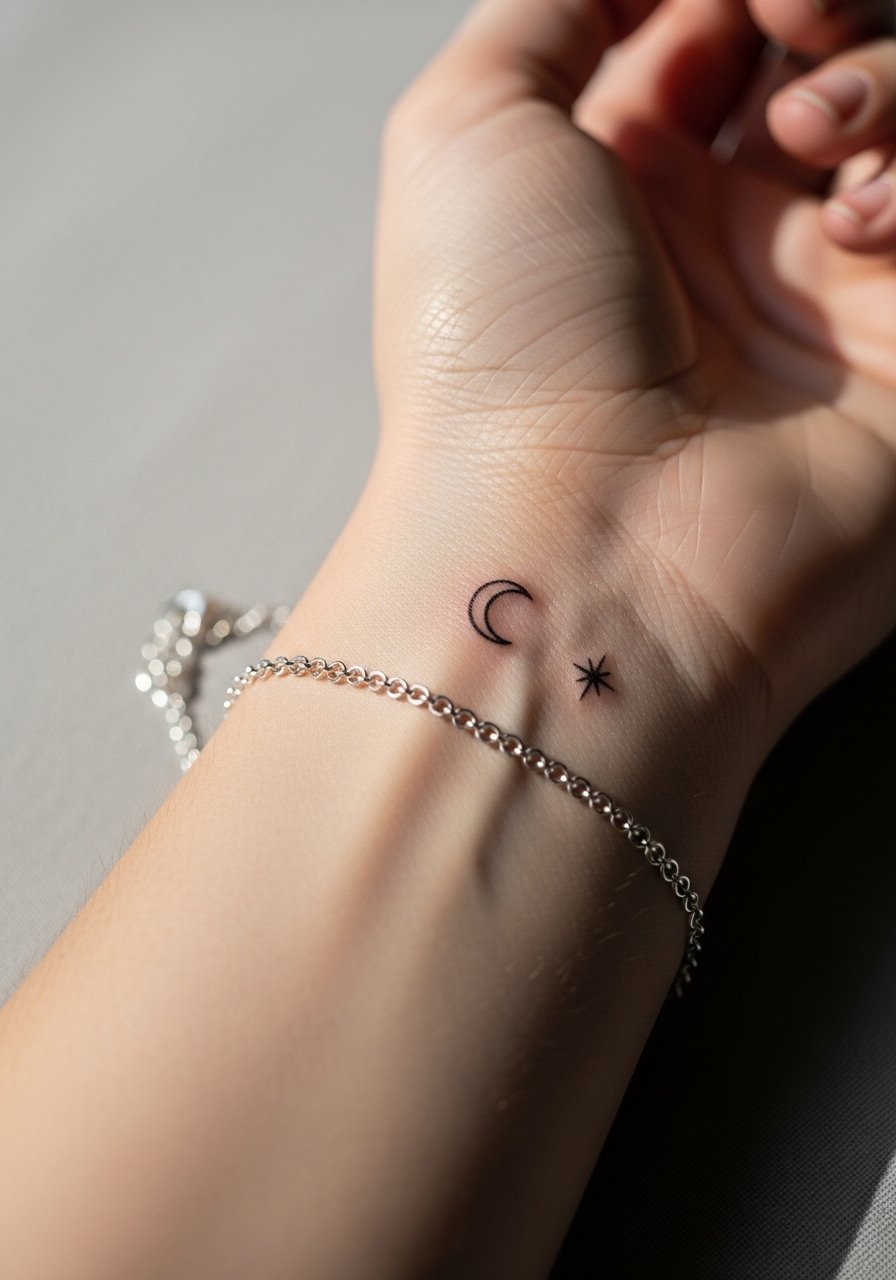
15. Micro Crescent and Star Above the Wrist
Mistake lead applies because many ask for the crescent too small and end up with merged star points. The skin above the wrist moves a lot and sees frequent washing. Ask for slightly open star points and a crescent with modest line weight. Sessions are short and sensitivity is moderate. For showing it off a slim bracelet or a thin chain bracelet keeps focus on the piece without hiding it. Healed, the symbols remain readable for years when protected from constant abrasion and sun exposure.
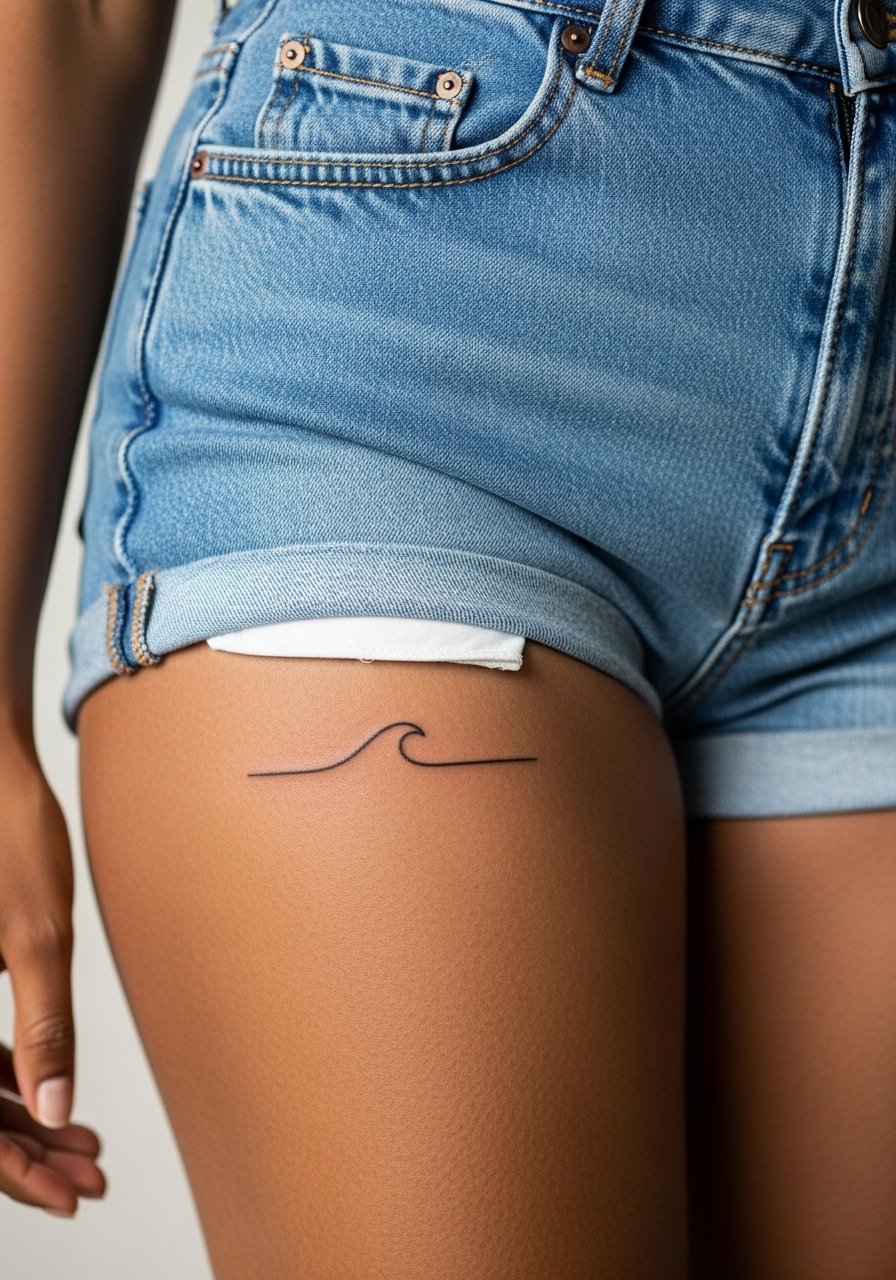
16. Single-Line Wave Along the Outer Thigh
Styling lead is useful here because thigh placement pairs with specific clothes. The outer thigh tolerates longer lines and finer detail than inner thigh, and it ages predictably if you avoid extreme compression from tight clothing. For the session wear high-waisted shorts or a skirt you can shift, like a high-waisted denim short, so the artist can access the outer thigh without concern. Sessions are moderate in duration and pain is lower than on ribs. Over years the line reads steady if you avoid frequent friction and heavy sun, and touch-ups are straightforward when needed.
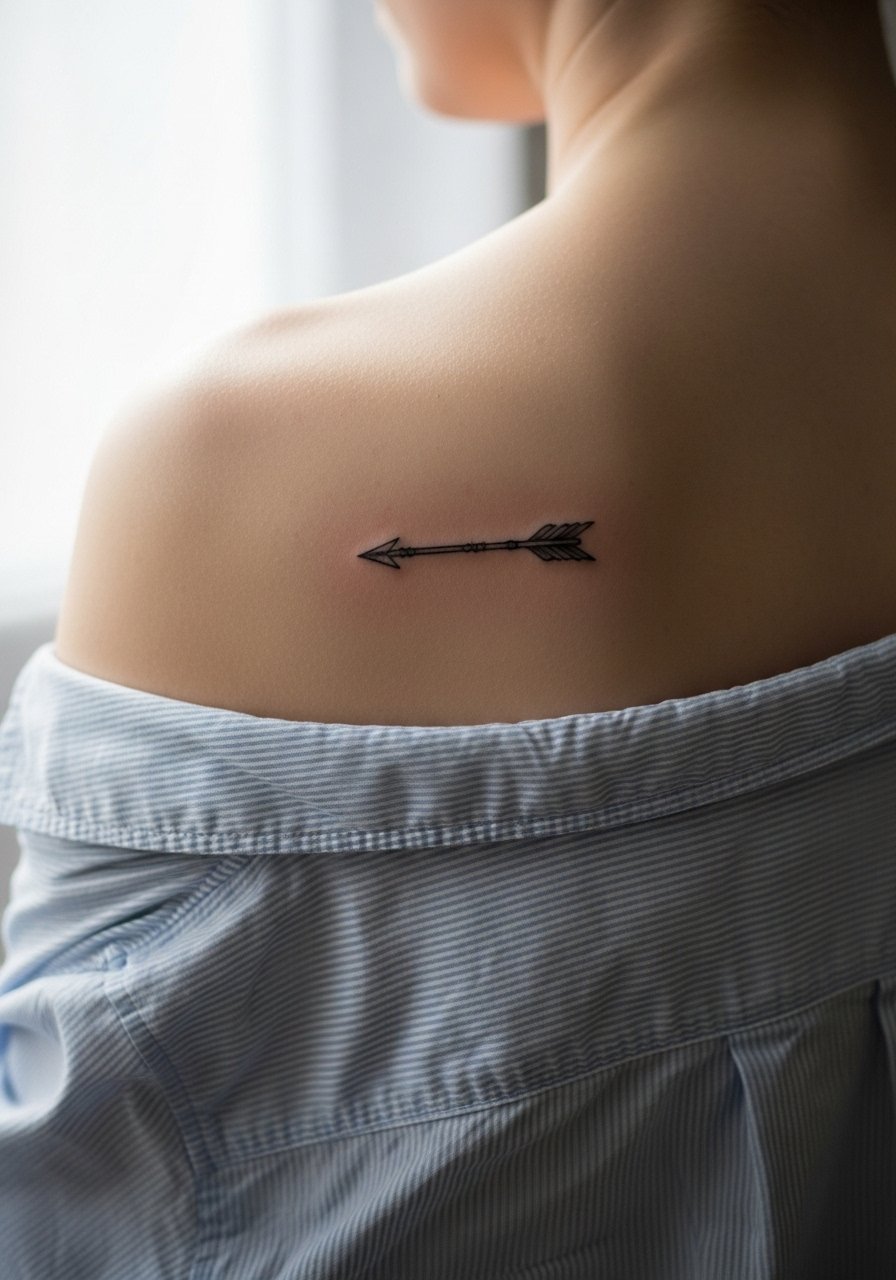
17. Tiny Arrow Between the Scapulae
Consultation lead fits because a between-scapulae arrow shifts with posture. Tell your artist you want the arrow aligned to the spine and sized so it remains visible whether you stand or slouch. The area tolerates detail but accessing it may require you to sit or lie in a way that feels awkward. Wear a button-down shirt you can pull aside or a loose tank to reveal only the upper back. Pain is moderate and aftercare is straightforward since clothing can be adjusted to avoid rubbing. Expect long-term legibility if the arrow is scaled for the space and not squeezed into an inch.
Frequently Asked Questions
Q: Will a minimal fine line tattoo on the ribs blur faster than the same design on the forearm?
A: It depends on spacing and needle depth. Ribs move with breathing and the skin stretches, which can make very thin lines merge sooner than on forearms. If your artist recommends slightly wider spacing and confident depth you will likely see better longevity, but plan for a touch-up window earlier than you would for arm work.
Q: How often do finger and hand minimal tattoos need touch-ups compared with other placements?
A: Frequently. Fingers and hands have thin skin and constant wash and friction, so touch-ups are common within one to three years. Choosing slightly bolder contour lines and accepting a maintenance plan upfront sets realistic expectations.
Q: Can I request ultra-thin script along the collarbone and expect it to stay crisp?
A: Only if letter spacing and ink depth are adjusted for movement. Ultra-condensed script often blurs because the collarbone shifts. Ask your artist to space letters openly and to show you stencil placement so you can see how it follows the bone.
Q: Does a micro-realism bee on the upper arm need different aftercare than a single-line wrist piece?
A: The basic steps are similar but the risks vary. Upper arm pieces tolerate slight rubbing and sun better, while wrist pieces face constant friction. Protect wrist designs from bracelets and avoid repetitive wetting during the first two weeks for best results.
Q: How should I choose clothing for a session when I have several placements to consider?
A: Dress to expose only the area being worked while staying comfortable. For shoulder and upper arm pieces a loose button-down is ideal. For rib or chest work pick a fitted sports bra or cropped tank. Bring a zip-up hoodie or loose layers to stay warm between passes.
