
Fine line shoulder pieces are everywhere online, but what holds up on skin and what looks great in photos are not always the same. Trends push delicate, tiny marks, yet shoulders tend to reward bold placement and thoughtful spacing. These matching shoulder ideas balance what reads well now with what will still look intentional after years of sun and movement, starting with a simple, wearable take you can book this week.
1. Minimal Crescent Moon on Outer Shoulder
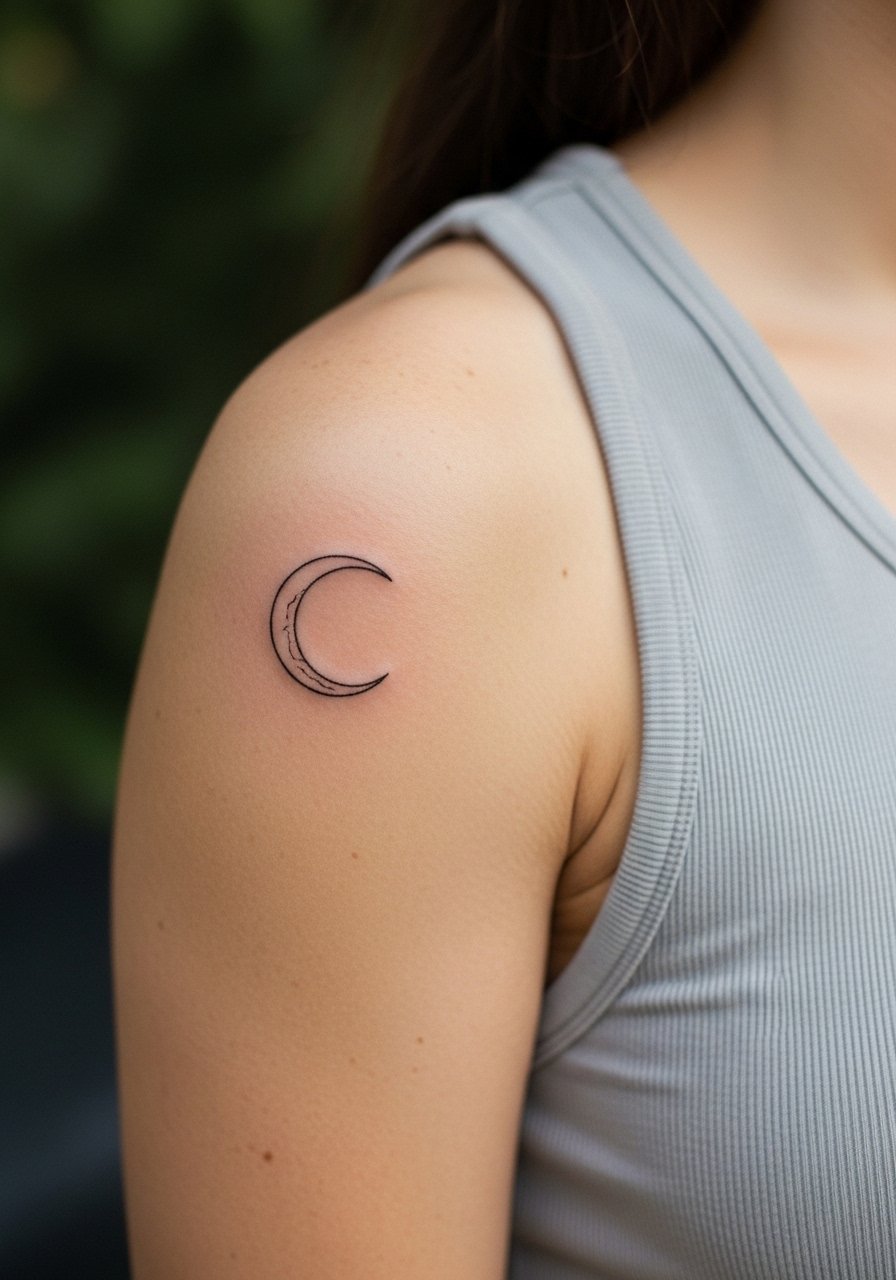
I open with this because it is one of the easiest matching starters that still reads personal. Fair warning, fine line moons done too small can blur quickly if the lines sit too shallow or the spacing is tight. Ask your artist for slightly heavier linework than you think you need and for the stencil to be scaled to your shoulder cap rather than the reference photo. Session feel is usually mild to moderate, around thirty to forty minutes per shoulder. For showing it off, wear a sleeveless tank that keeps the silhouette visible without competing with neckline jewelry.
2. Mirrored Floral Cap Piece
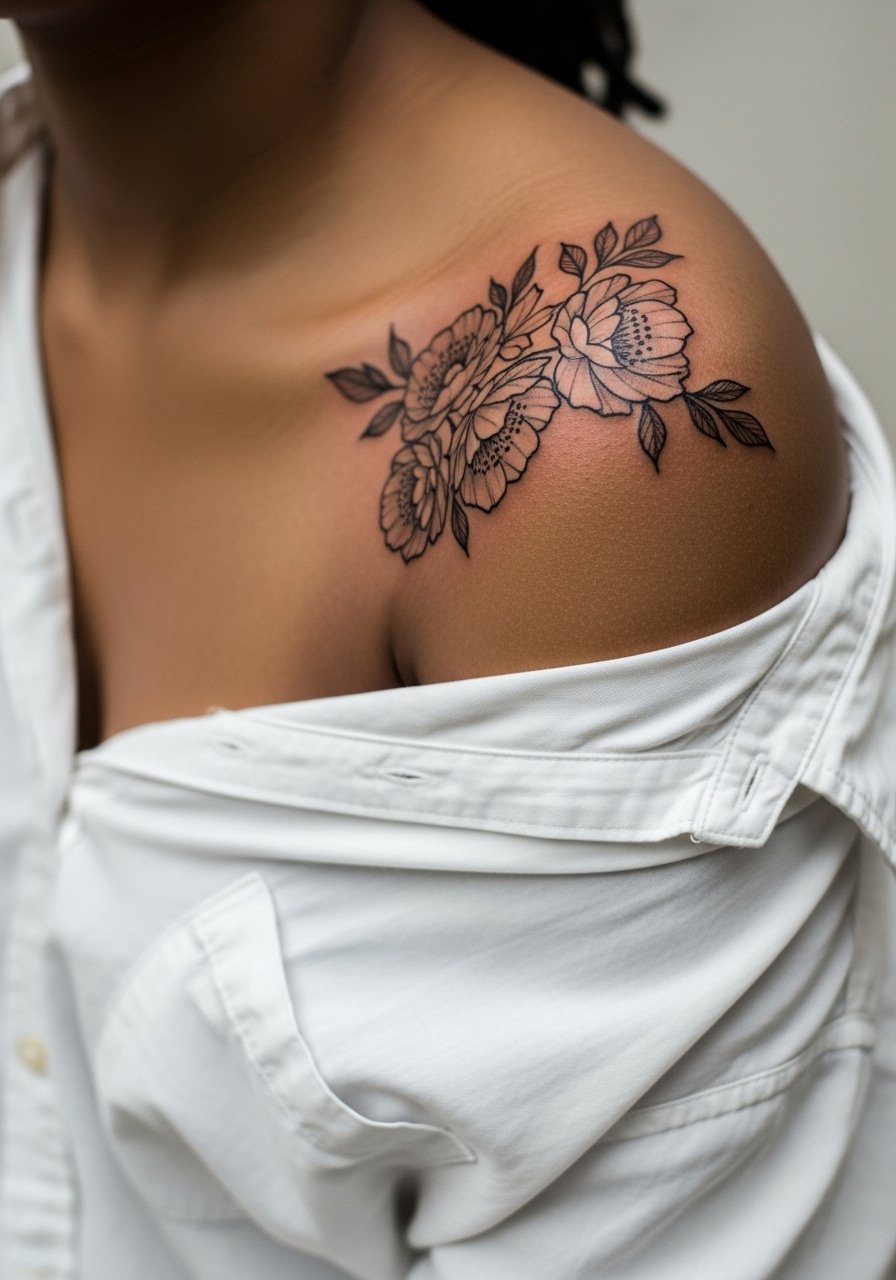
When two people match on the shoulder cap, mirrored florals read cohesive without being identical. The common mistake is packing too many tiny petals close together. That version looks cluttered after a few years. Tell the artist you want negative space between flower centers and sparse stipple shading for texture. Expect a one to two hour session depending on size. Pain is generally a 3 to 5 on the shoulder, manageable for most. Pair the pieces with a loose button-down shirt you can pull aside during the session and wear afterward to show the matching curve.
3. Single Line Wave Across the Deltoid
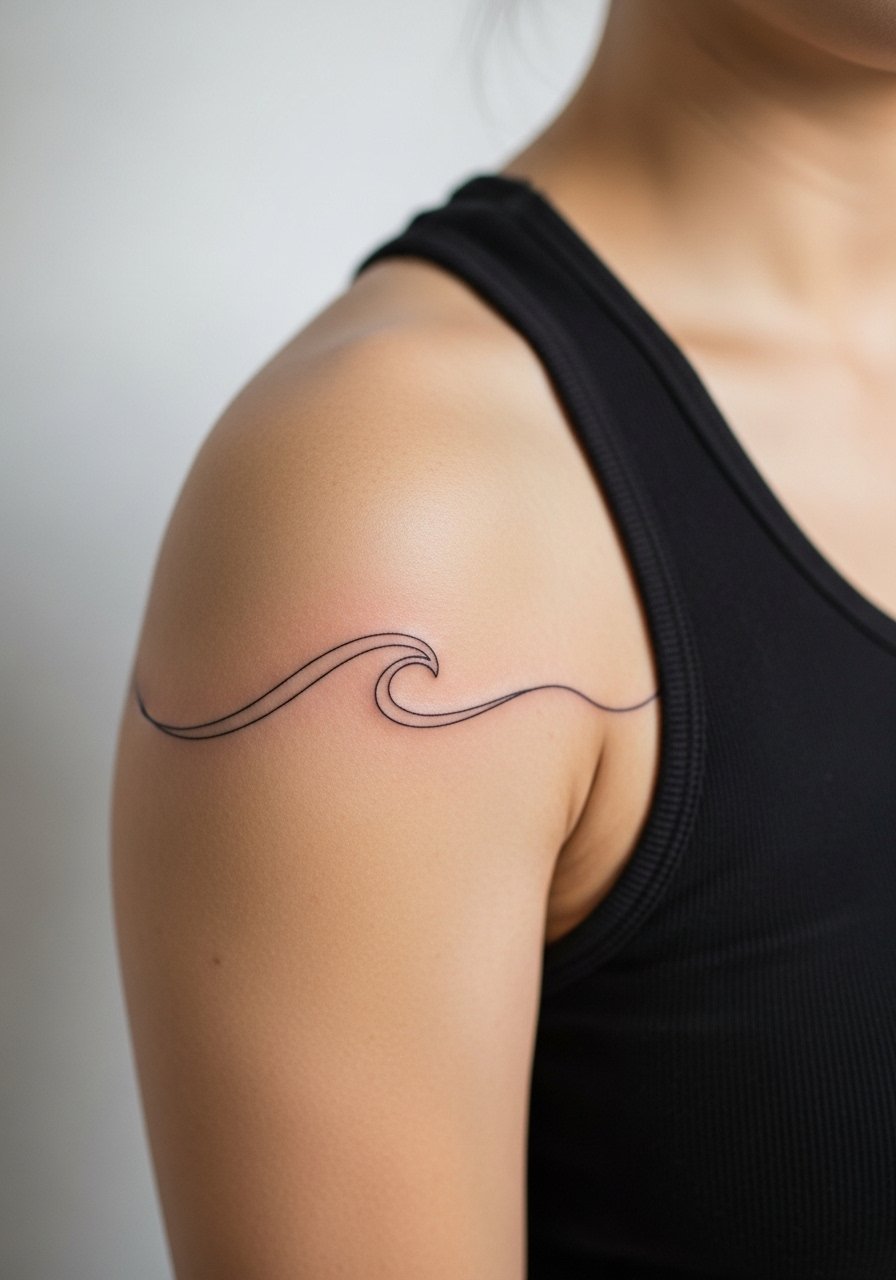
I’ve seen this style age well when artists keep the line slightly bolder than a hairline. The trap is asking for an ultra-thin line that inks too superficially. In consultation, request one-pass linework with consistent depth so the curve keeps its motion as it heals. Touch-ups are common at year two for super-fine lines. Session time is short, often under thirty minutes. For showing off, a racerback tank frames the line while keeping it casual.
4. Tiny Constellation Cluster on the Shoulder Blade
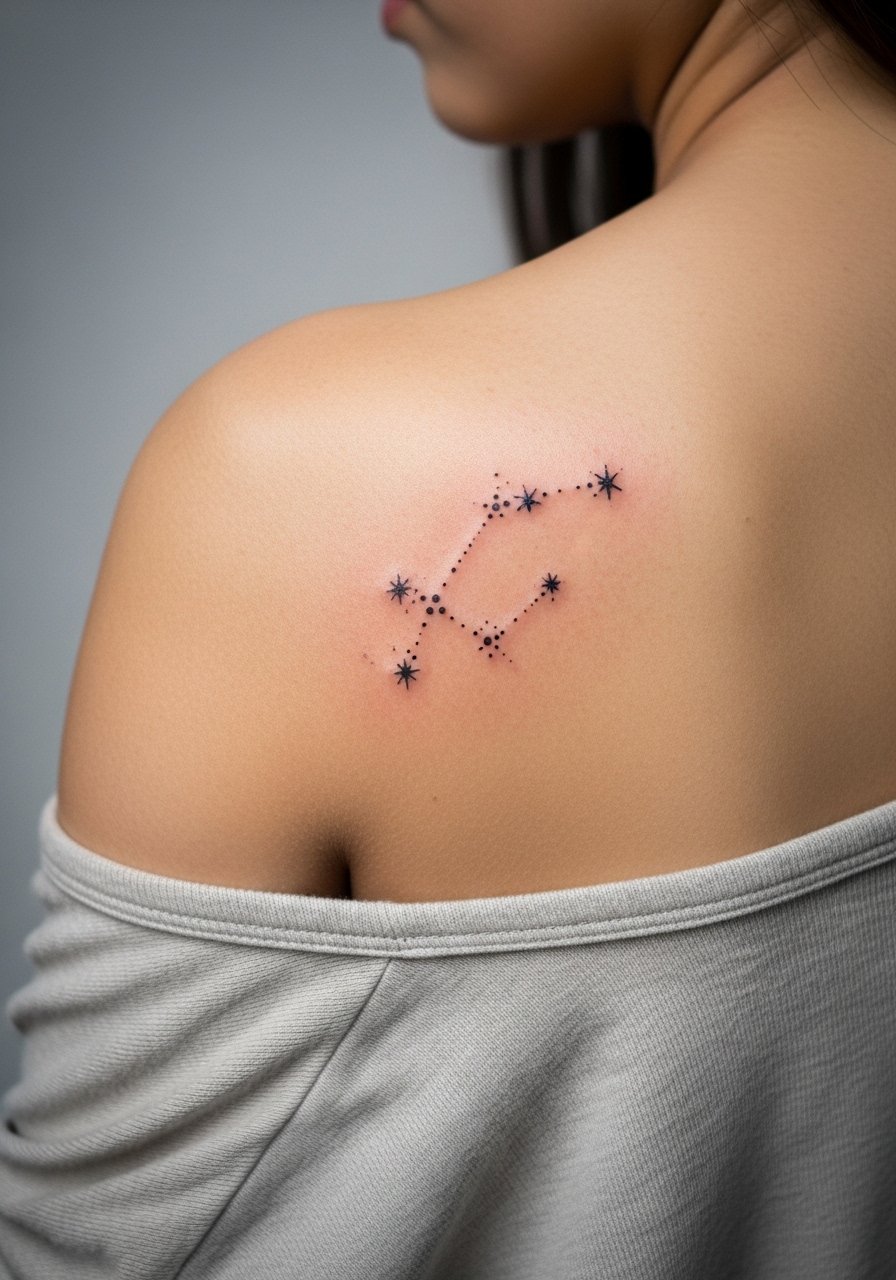
Most constellation clusters look best when spread out a little instead of tightly bunched. The aging issue is dot work merging if placed on high-friction areas or too close to the edge of the shoulder blade. Tell the artist you want spacing equal to at least twice the largest dot size. Expect a light sting and a 30 to 45 minute session per side. For nights out, pair the pieces with an open-back midi dress or a wide-neck tee for a casual reveal.
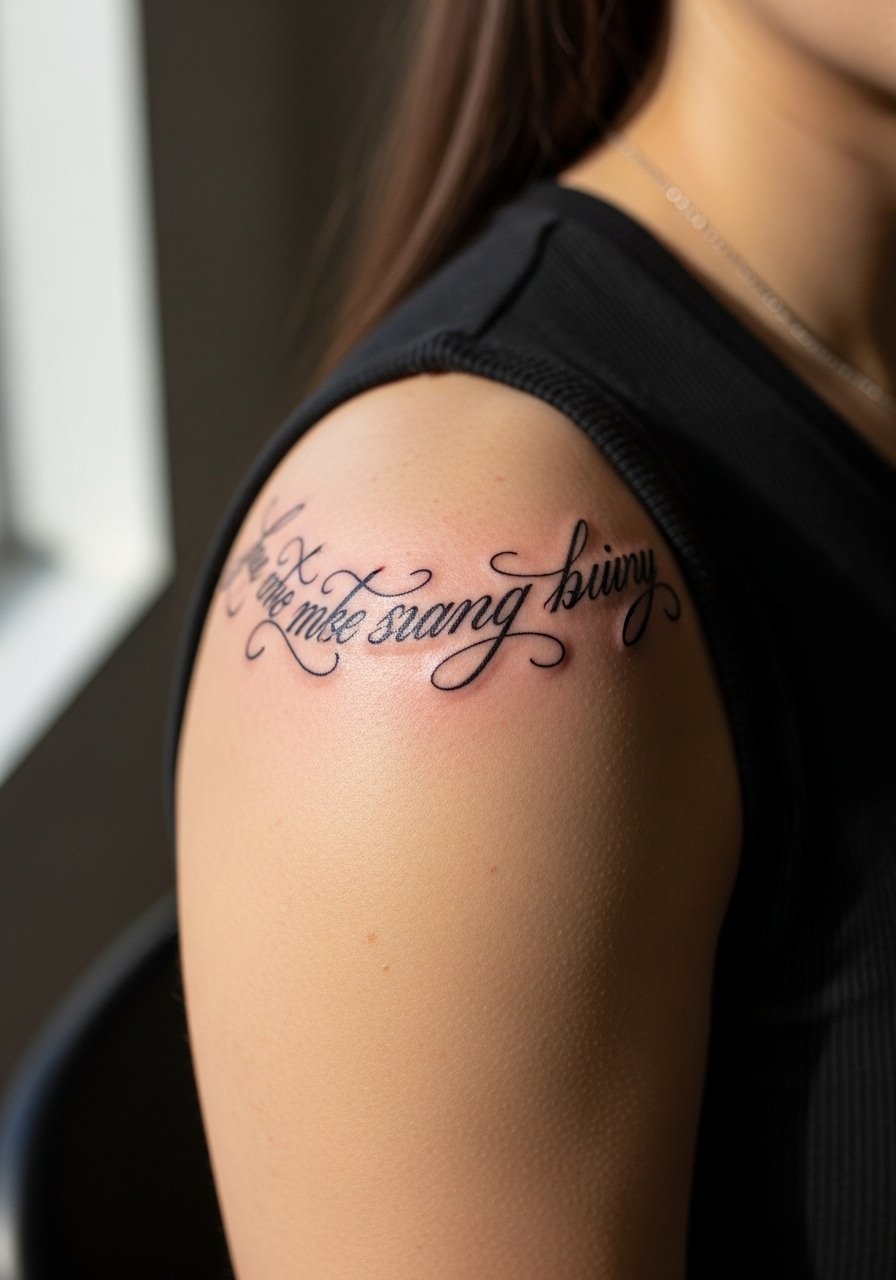
5. Matchbook-Style Minimal Script Along the Shoulder Curve
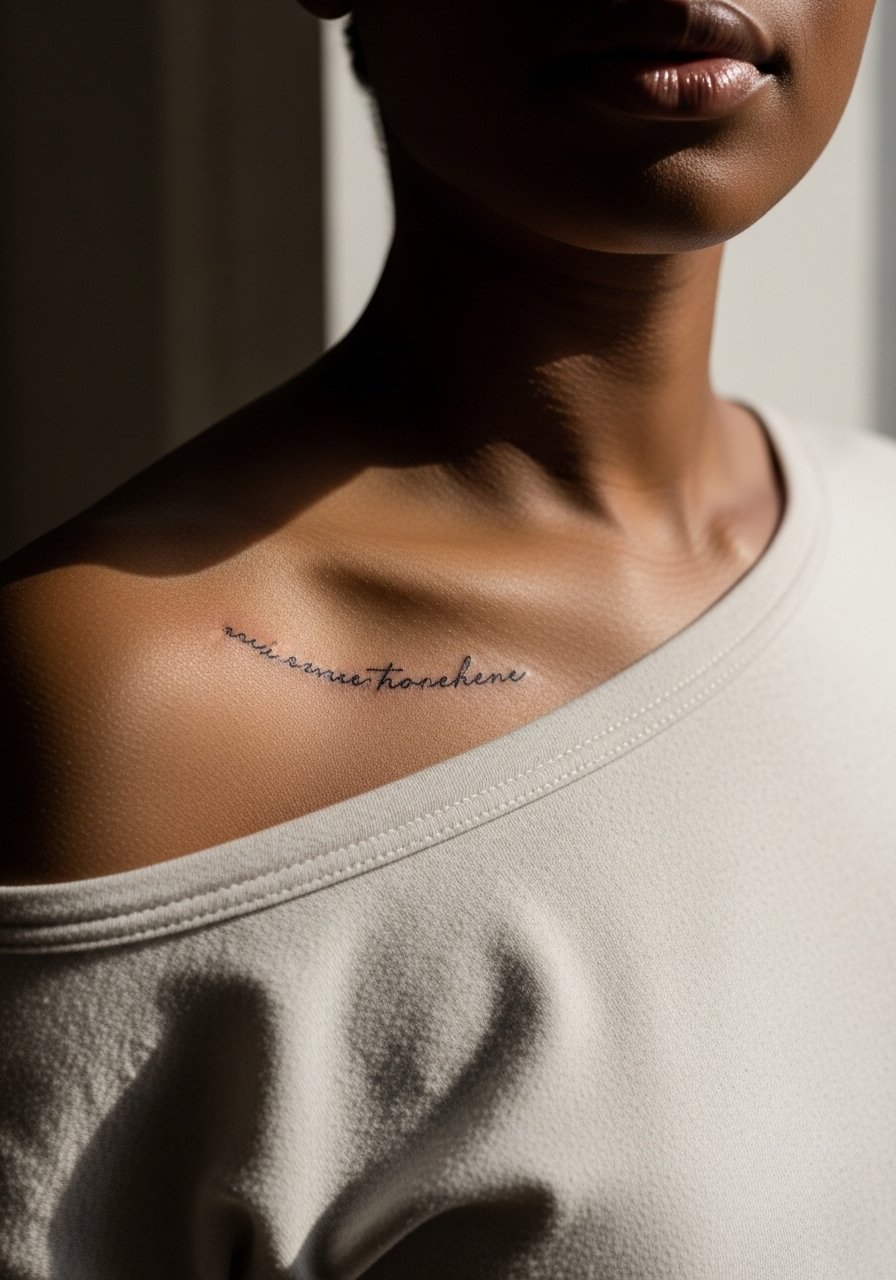
Script on the shoulder looks elegant if letter spacing is generous. A common version that fades poorly is tiny lettering pressed too close together, which becomes hard to read after a couple of years. During consultation, spell out the exact font size you want and ask for a test stencil to check spacing on movement. This piece often takes 20 to 40 minutes. If matching names or coordinates, specify the exact text when the stencil is applied so no surprises. Pair with a thin chain pendant necklace if the script runs close to the clavicle.
6. Bold Blackwork Shoulder Patch
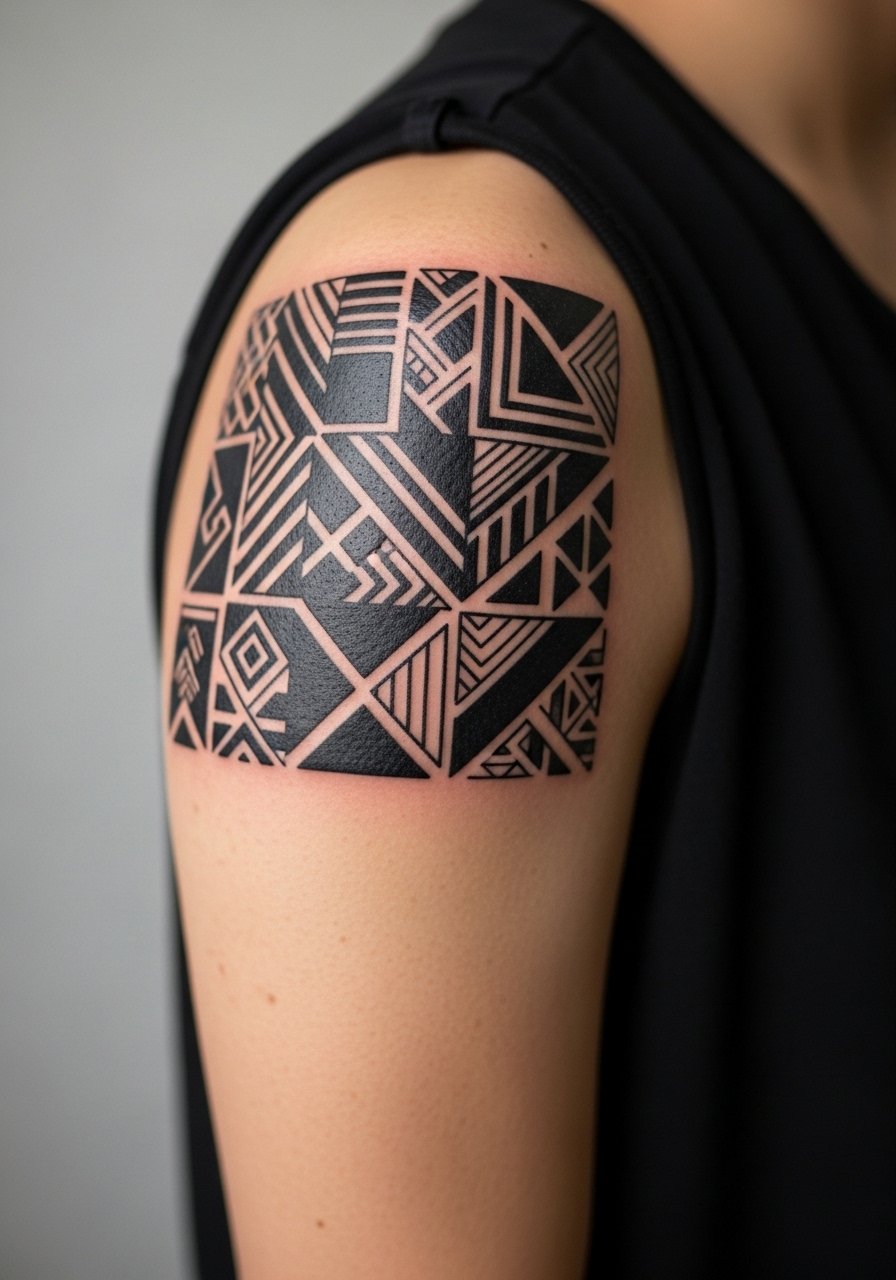
Visual impact is immediate with saturated black patches, and they tend to age well because saturation resists sun fade. The mistake is leaving sharp corners with too-small negative space, which can trap ink and look patchy later. Tell your artist you want gradual edges and consistent saturation across the fill. Sessions can run longer, from one to three hours depending on coverage. Pain is moderate. For styling, an off-shoulder blouse highlights the negative space around the patch.
Studio Day Picks
The shoulder pieces above include fine line, script, and solid black patches, so a few practical items make the session and first week smoother.
-
Stencil transfer paper kit. Lets you preview the scale and curve on the shoulder before the needle starts, which is especially helpful for script and wave designs.
-
Topical numbing cream. Applied 45 minutes before lightens the sensation for sensitive shoulder areas without affecting stencil adhesion.
-
Thin protective film roll. Helps protect outer shoulder pieces from friction with straps or backpacks during the first days of healing.
-
Fragrance free gentle body wash. Cleanses the skin without irritation, important for fine line and dot work to avoid scabbing.
-
Aquaphor healing ointment. A thin layer for the initial window locks in moisture for delicate lines while allowing the skin to breathe.
7. Matching Sun and Moon Shoulder Caps
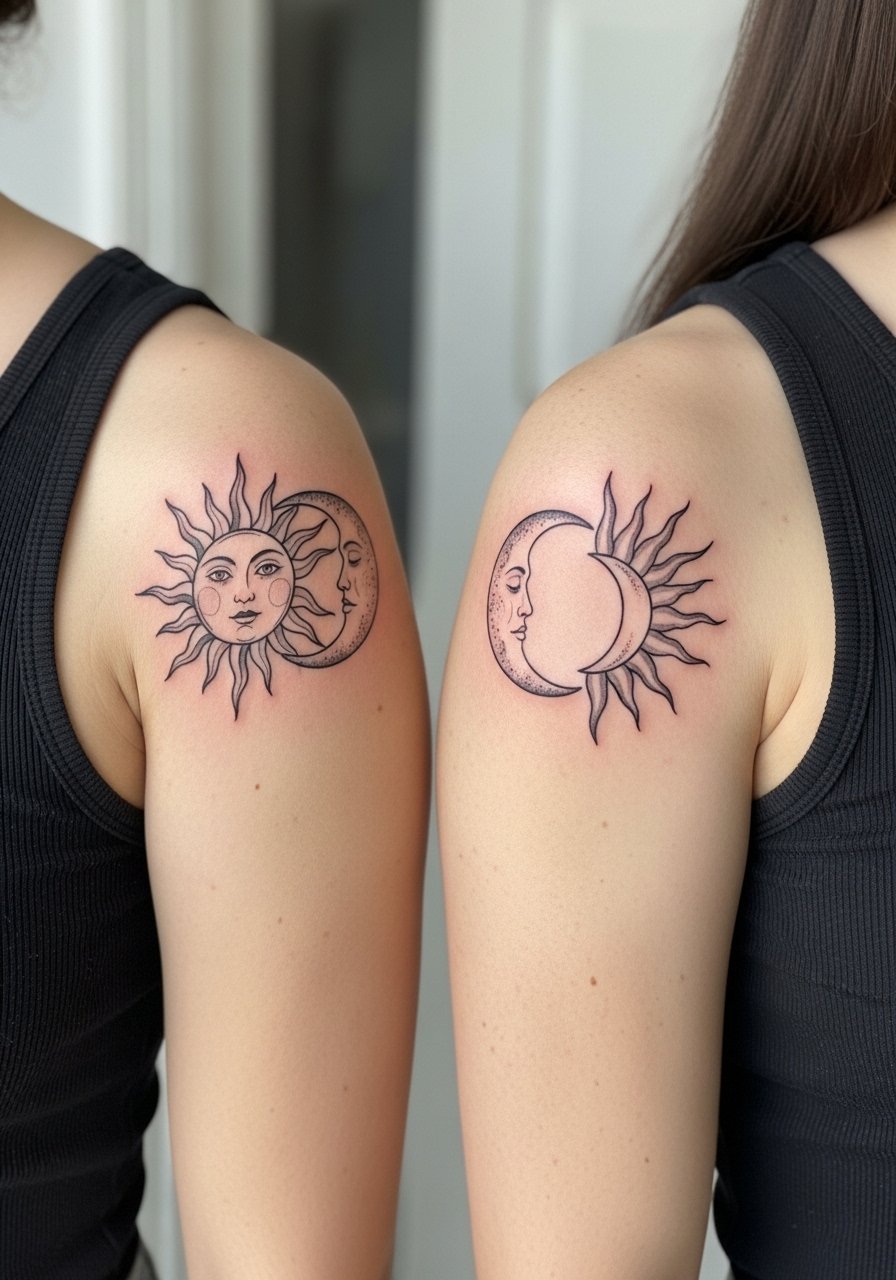
When two people split a sun and moon across matching shoulders, the contrast reads symbolic without being literal. The visual trick is keeping both pieces at similar scale so they balance when standing side by side. A common error is making the moon tiny and the sun large, which unbalances photos. Ask for mirrored size and similar line weight during the consult. Each shoulder usually takes under an hour. For date nights, an open-back top frames both designs in a simple way.
8. Geometric Half-Shoulder with Dot Work Accent
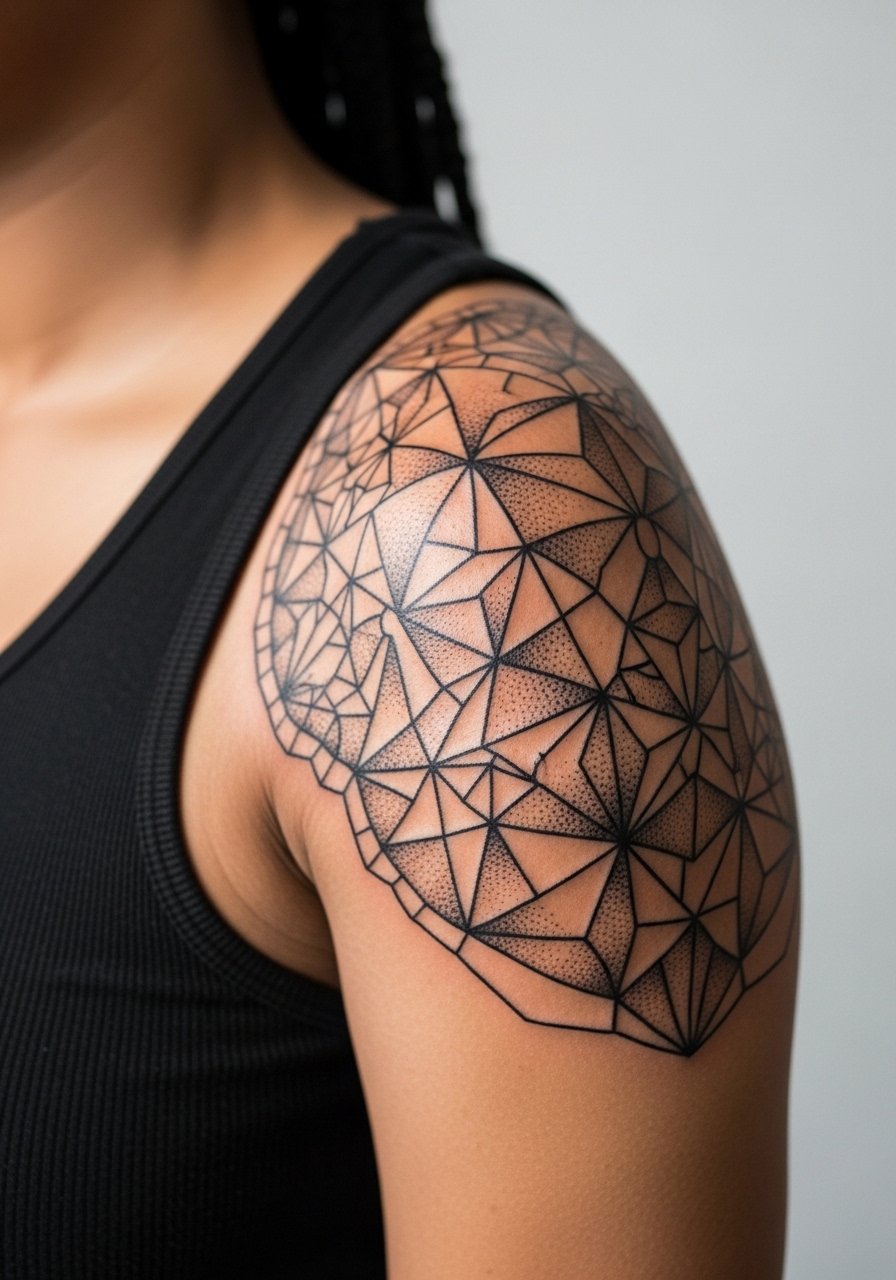
There is a debate among artists on whether small geometric elements should be dense on the shoulder. One camp says dense geometry can hold if spacing is increased. The other camp warns that too much density turns into a mottled patch as skin moves. Name both views and ask how the artist plans to space the shapes before booking. Expect a two to three hour session if the piece wraps toward the chest. Pair it with a one-shoulder top that shows the geometry cleanly.
9. Tiny Anchor at the Shoulder Joint
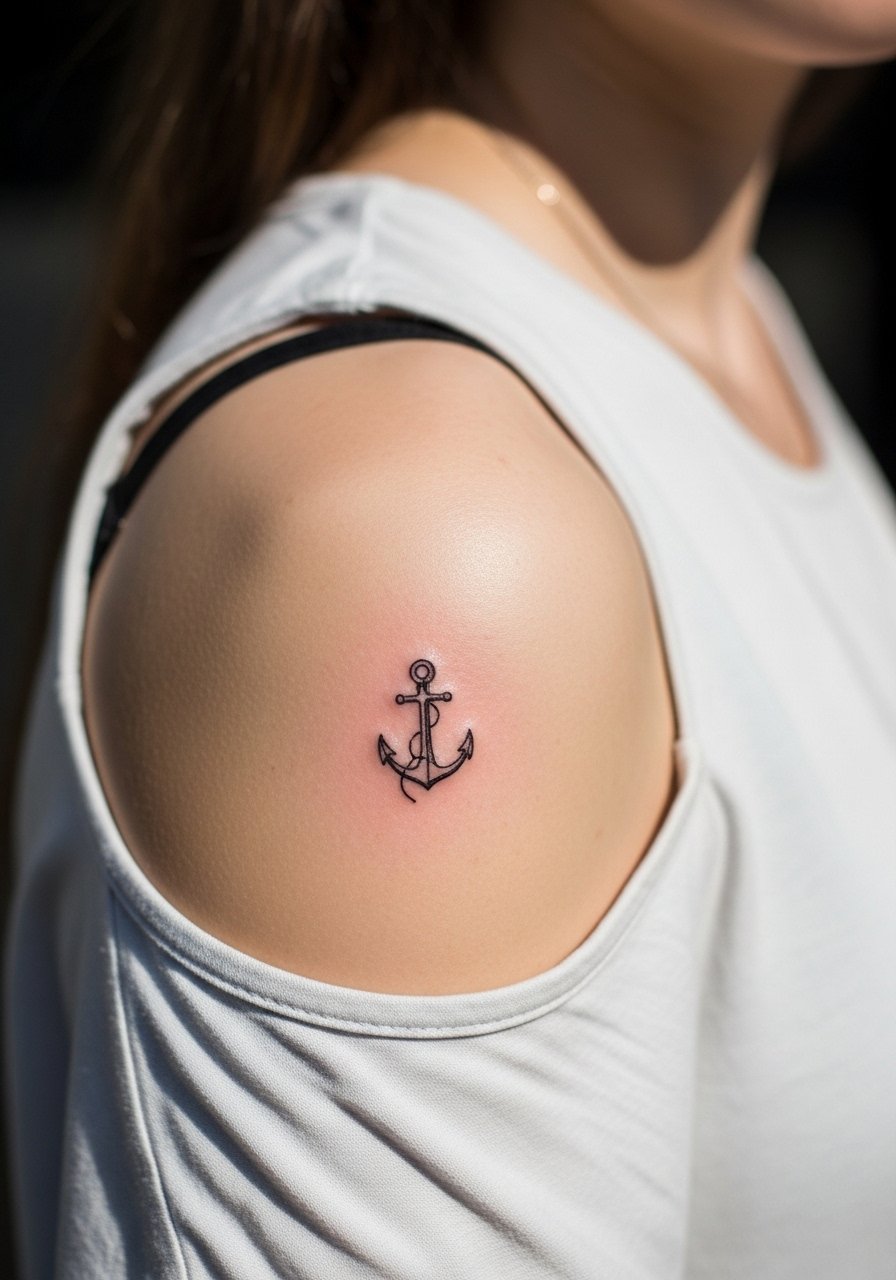
This placement is forgiving and quick, often under twenty minutes per person. The main mistake is over-detailing the anchor with tiny crosshatching. Keep it simplified so the silhouette remains clear after healing. The shoulder joint sees mild movement, so expect touch-up possibilities at year two for the tiniest details. If you want to hide the matching aspect sometimes, collared shirts or rolled-sleeve linen shirts cover the mark easily.
10. Small Botanical Spray Near the Collarbone and Shoulder
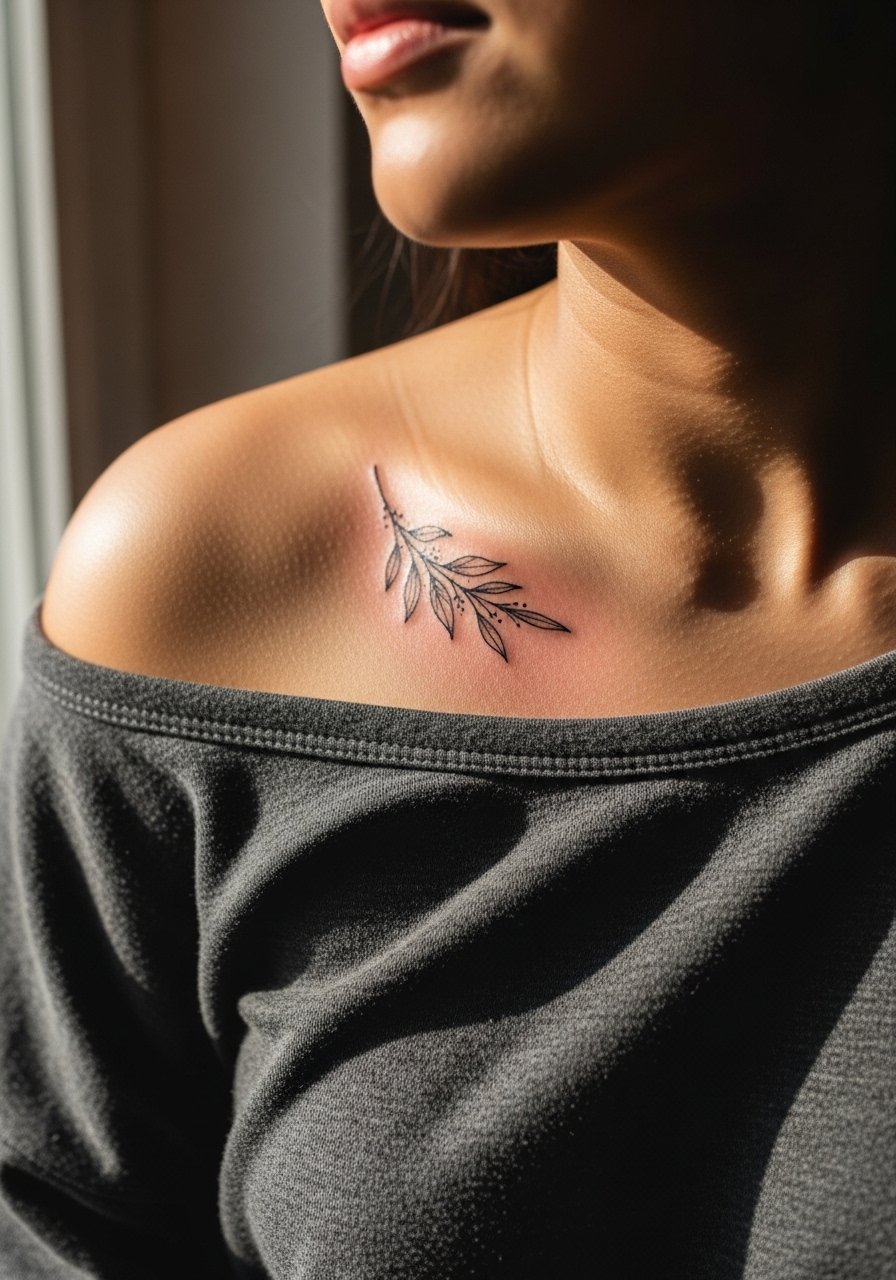
This style reads delicate and can bridge the shoulder and collarbone for a soft mirrored look. The common mistake is placing too many overlapping leaves which can bleed together with movement. Ask for individual leaf spacing and light stipple rather than full shading. Sessions are usually forty-five to sixty minutes. For showing it off, an open-neck blouse or wide-neck tee highlights the connection between the collarbone and shoulder.
11. Matching Nautical Compass on the Upper Shoulder
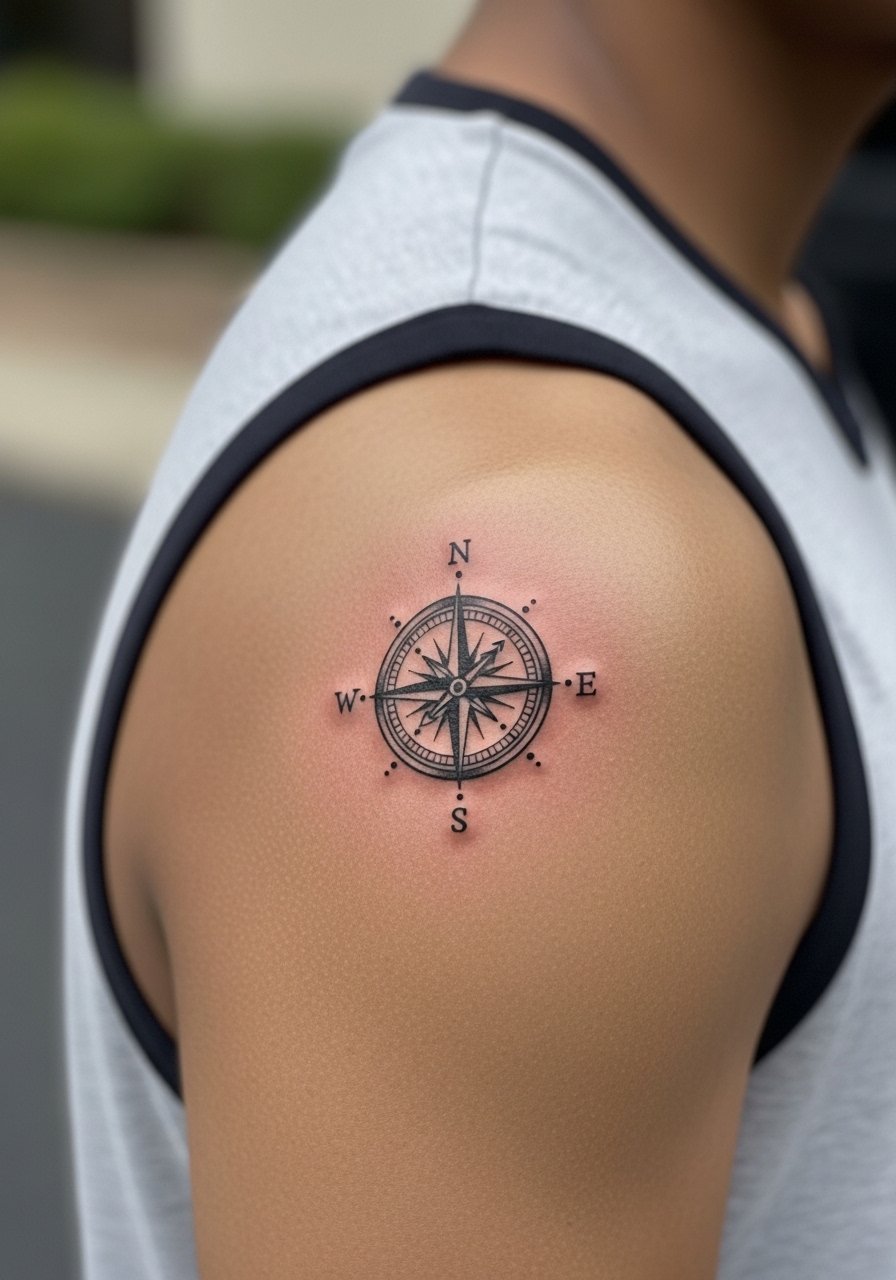
When matching compasses, symmetry matters. A frequent error is slight rotation in the stencil between partners, which looks off in side-by-side photos. Ask for stencils placed while both of you stand similarly so orientation lines up. Expect about forty-five minutes per shoulder. If you travel with backpacks, be mindful that straps can rub the outer edge during early healing, so plan clothing accordingly.
12. Celestial Line of Tiny Stars Running Over the Shoulder
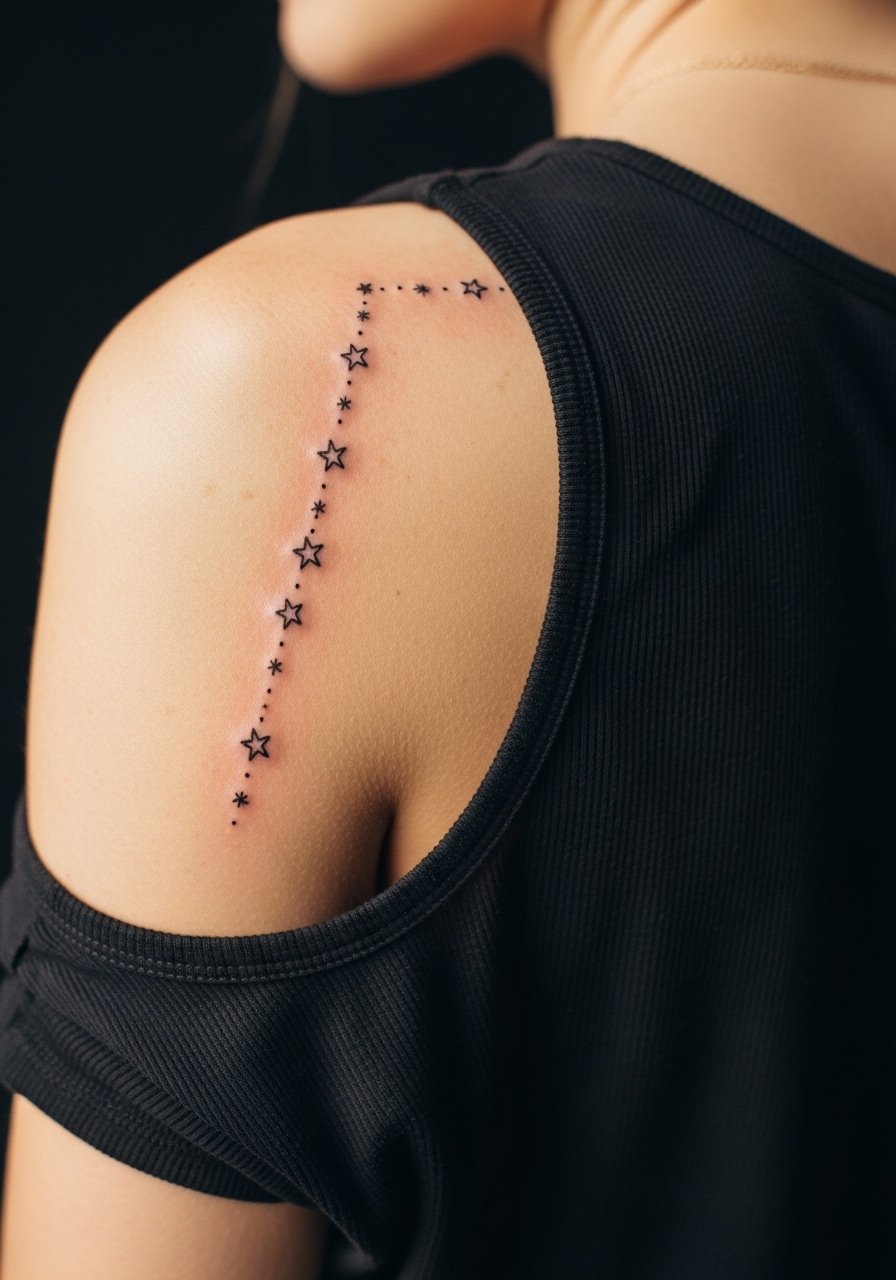
This piece looks delicate in photos and in person when the spacing is generous. Too many stars packed in a line can blur into a bar of tone after years. Tell your artist you want each star separated by a measurable gap, about twice the star diameter. Sessions are quick, often thirty minutes. For easy showing, a halter top keeps the shoulder and upper back exposure minimal and intentional.
13. Abstract Watercolor Splash at the Shoulder Cap
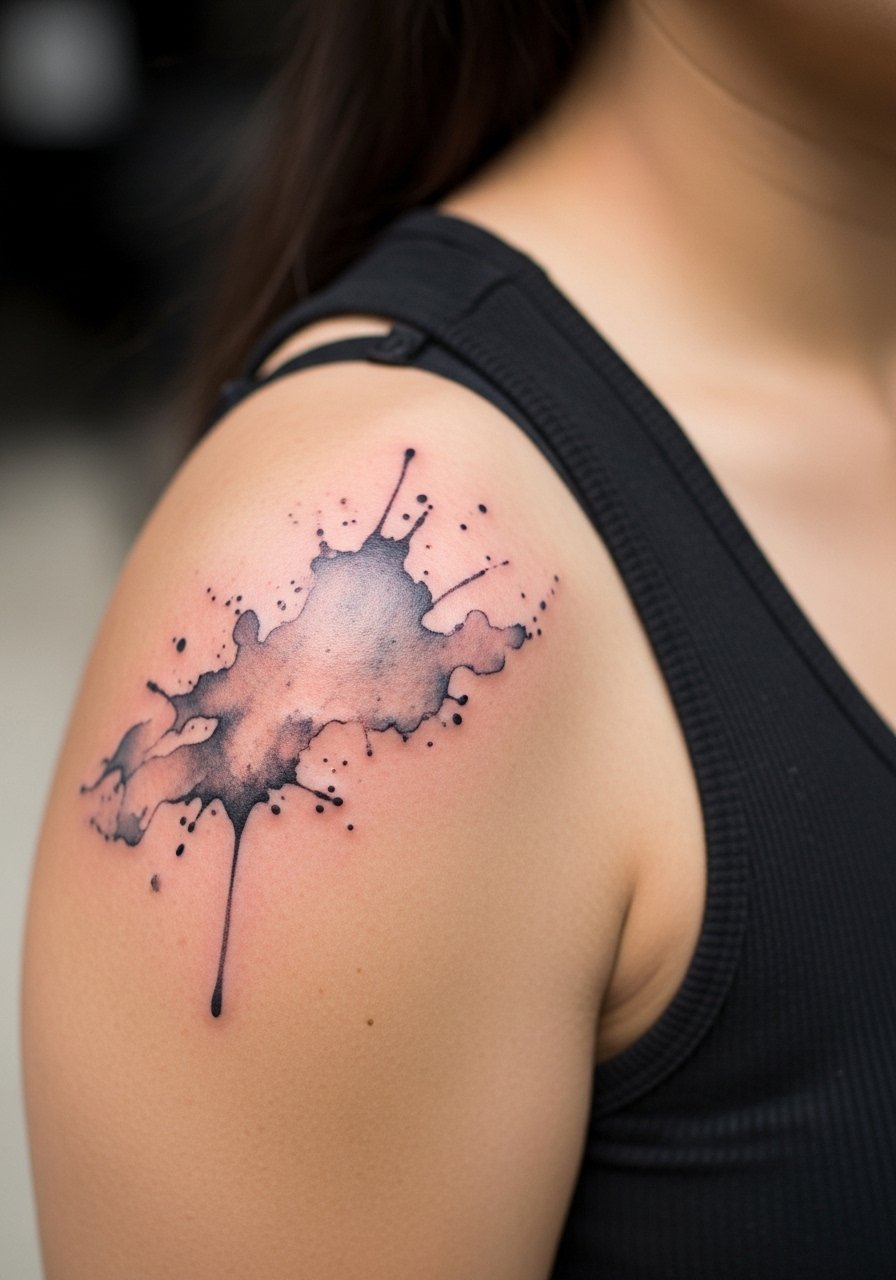
Watercolor on shoulders is controversial. One side says watercolor is best for large canvases where fading becomes part of the aesthetic. The other side argues that watercolor on the shoulder can lose definition quickly. If you pick this direction, request patches of concentrated pigment for anchors and softer washes around them. Sessions vary widely, from one to three hours, and touch-ups for color re-deposit are expected over time. For evenings out, an open-back dress shows off the wash without compressing it.
14. Tiny Geometric Sunburst Over the Shoulder

The sunburst reads bold when the rays have clear spacing. A mistake is asking for too many thin rays that blur into a single tone. Ask for fewer rays with slightly thicker line ends to keep the radial pattern. Expect a short session under forty-five minutes. For daytime wear, a sports bra with wide straps or wide-neck tee keeps the area visible without exposing more than intended.
15. Matching Script Wrap That Curves Over the Shoulder
Curved script looks intentional when the flow follows muscle lines. The common error is laying a straight reference across a curve, which distorts the reading once on skin. During the consult, have the artist ink a curved stencil to test movement. Sessions vary from thirty to sixty minutes. Pair it with a thin chain pendant if the curve approaches the clavicle.
16. Tiny Matching Paw Print on the Rear Shoulder
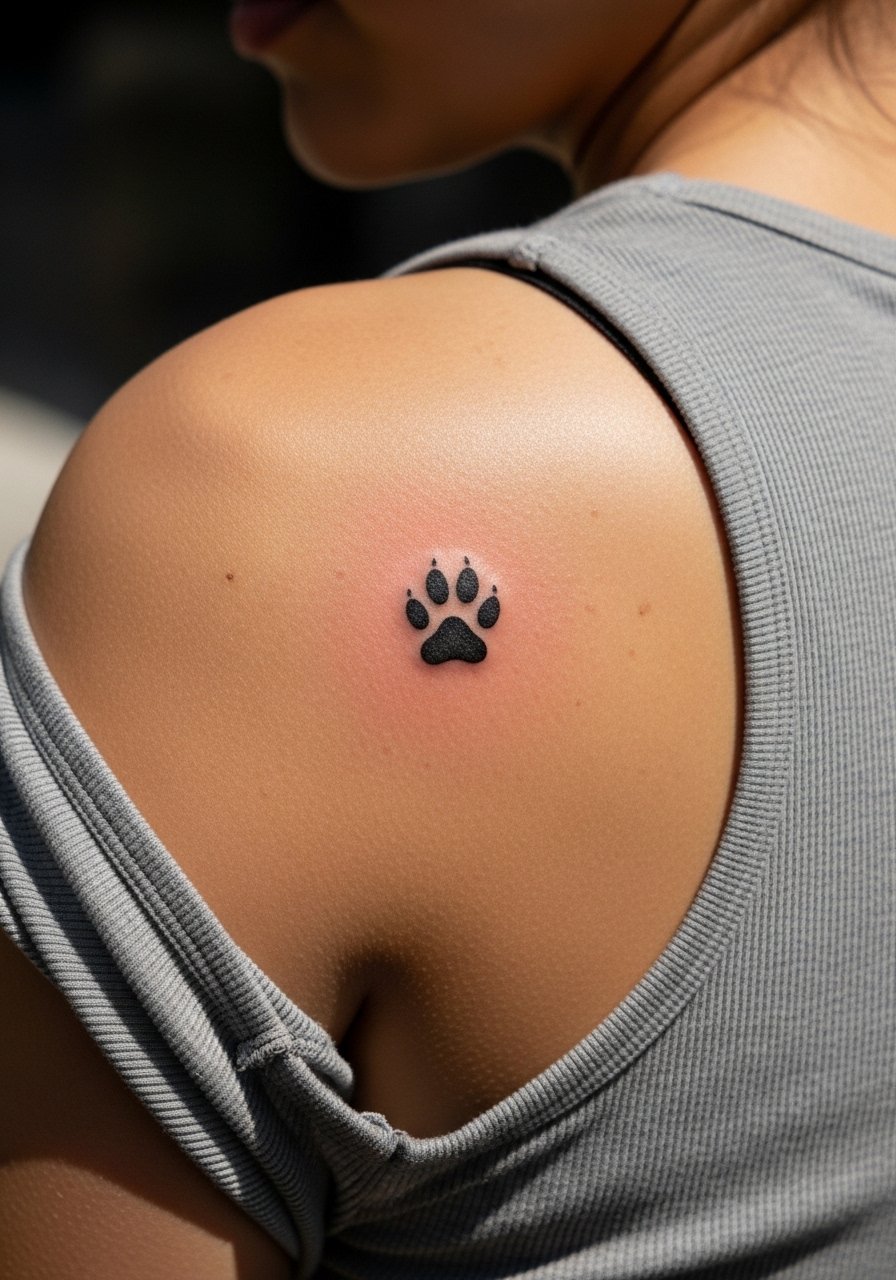
This is a sentimental option that’s quick and low-key. The mistake people make is asking for tiny interior texture in the pads; keep the pads solid for longevity. Sessions are usually under twenty minutes. If you want to coordinate with outerwear, a crew-neck sweatshirt covers the mark when you prefer it hidden.
17. Tiny Arrow Following the Shoulder Seam
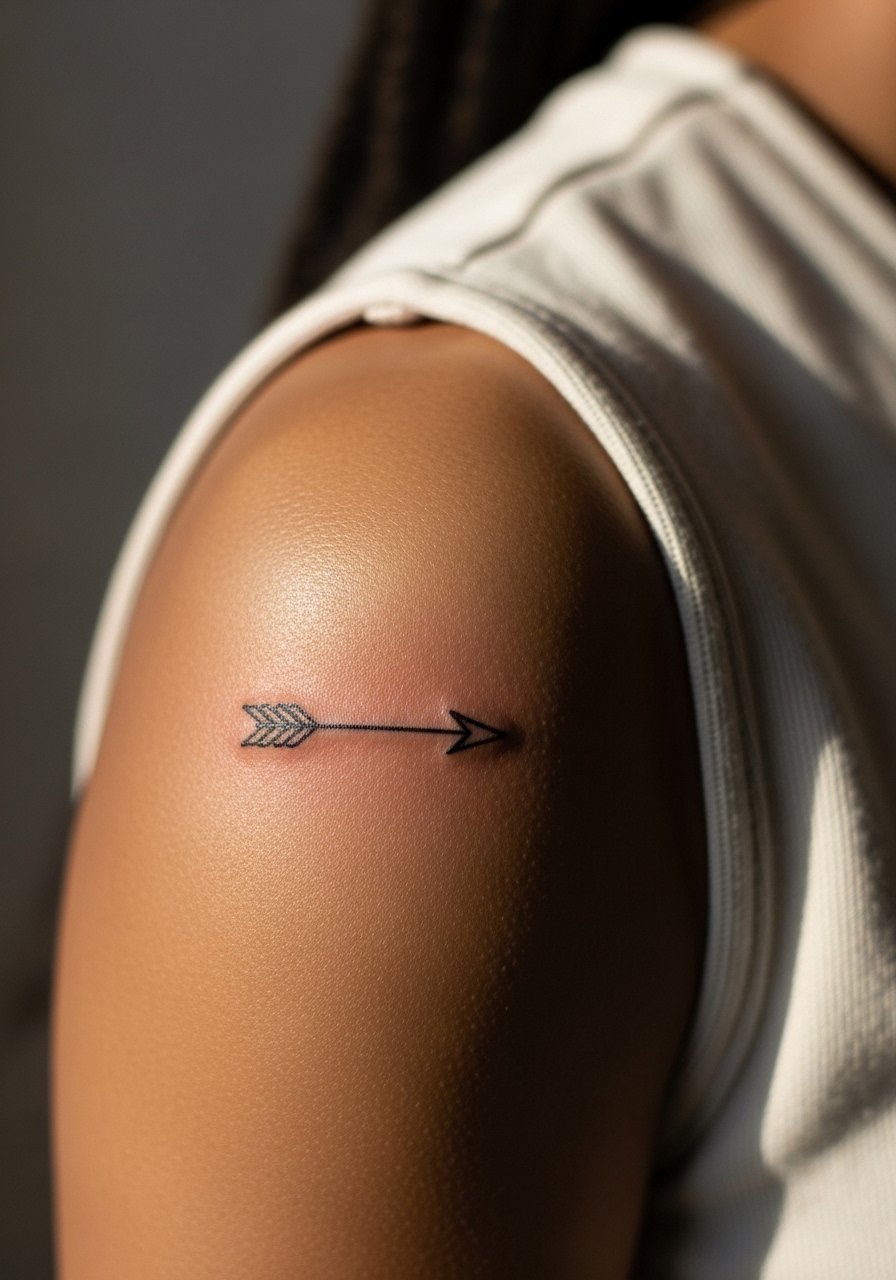
When arrows are inked along the seam, they read dynamic in motion. The usual error is placing the arrow too close to clothing seams where friction can affect healing. Ask the artist to plan placement a finger-width from typical shirt edges. Sessions take about twenty to thirty minutes. For session comfort, wear a loose button-down you can slide off one arm without pulling across the ink.
18. Matching Tiny Mountain Silhouettes on Both Shoulders
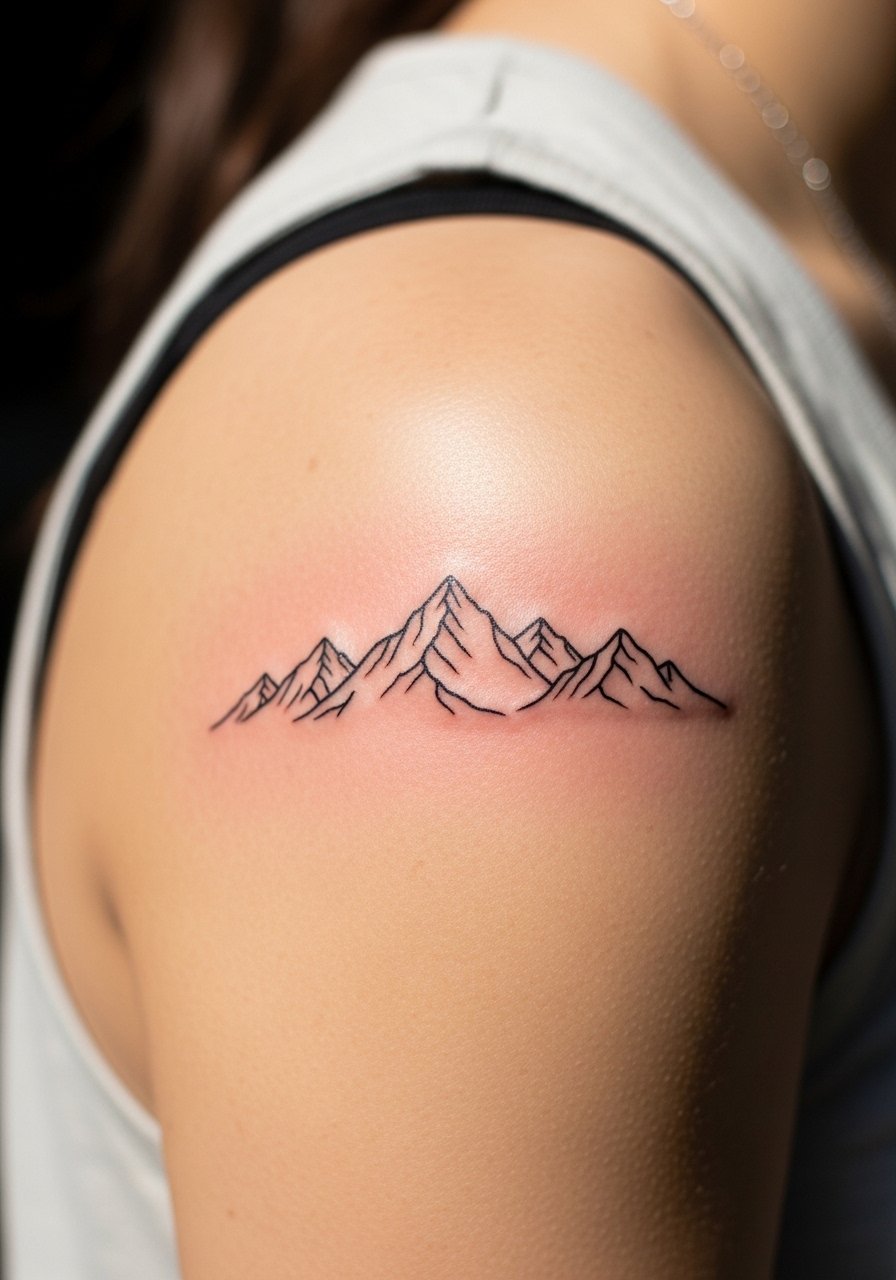
Most mountain silhouettes last when kept bold enough to hold shape as skin stretches. A common ageing issue is too many tiny peaks and interior line detail. Tell the artist you want simplified peaks with a single outline and minimal internal detail. This piece is comfortable for short sessions under thirty minutes. For outdoor seasons, an open-shoulder sweater shows the silhouette while offering coverage.
19. Minimalist Knot or Infinity Loop on the Shoulder Cap
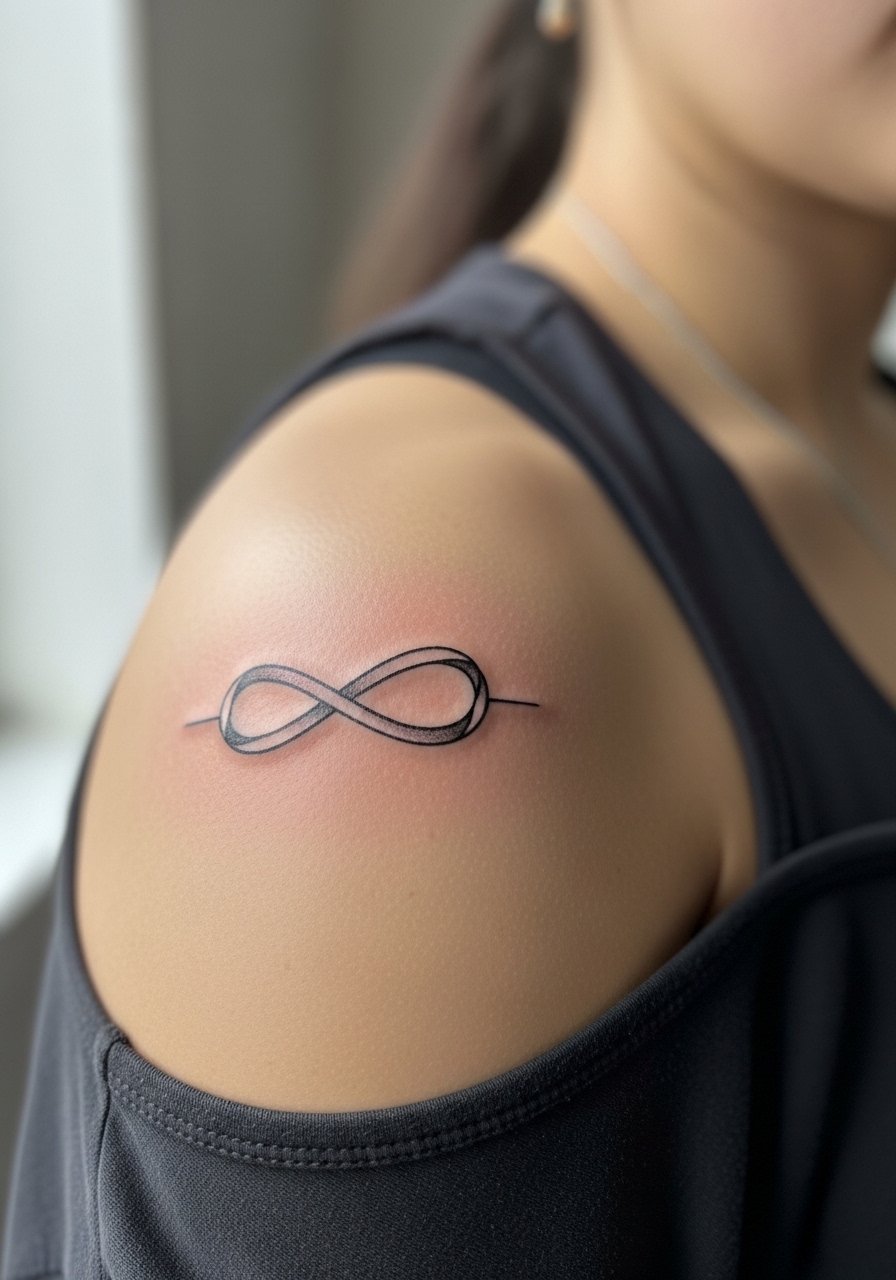
Knots and loops feel symbolic and sit nicely on the shoulder curve when the line weight is consistent. The typical error is making the loop too tight, which risks lines merging. Ask for slightly thicker line weight and a touch of negative space at each crossing. Expect twenty to forty minutes per shoulder. A one-shoulder dress showcases the knot without crowding the neckline.
20. Micro-Realism Tiny Feather Drifting Over the Shoulder
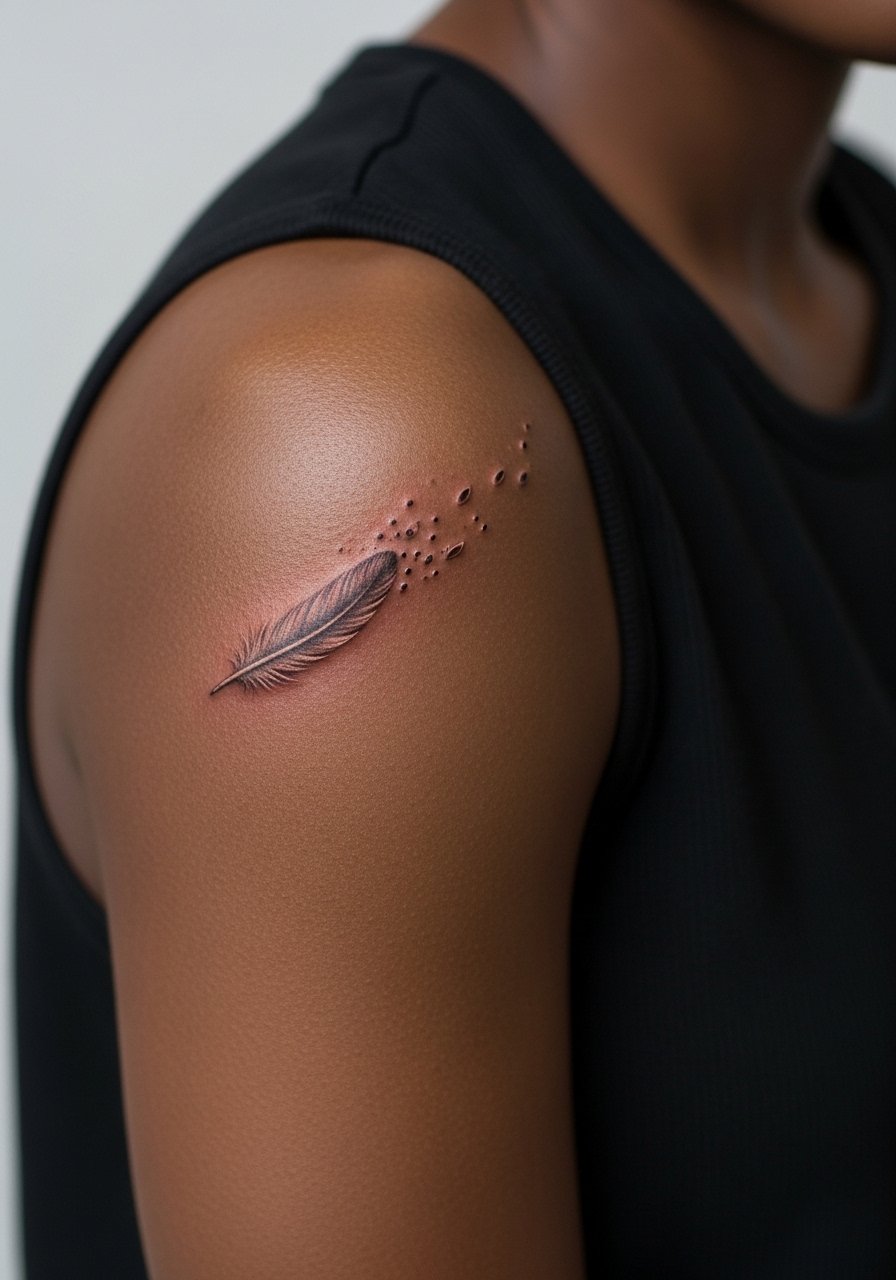
Micro-realism on shoulders splits artists into two camps. One group says tiny realistic details hold if the feather contains small anchor strokes. The other group thinks tiny realism blurs as feather barbs merge. Ask where the artist stands and request an anchor stroke approach if you want longevity. Sessions can take forty-five minutes to an hour. Pair with light jewelry and a delicate bracelet on the same side so the arm styling balances the shoulder detail.
21. Matching Minimal Anchor Point with Subtle Compass Rose
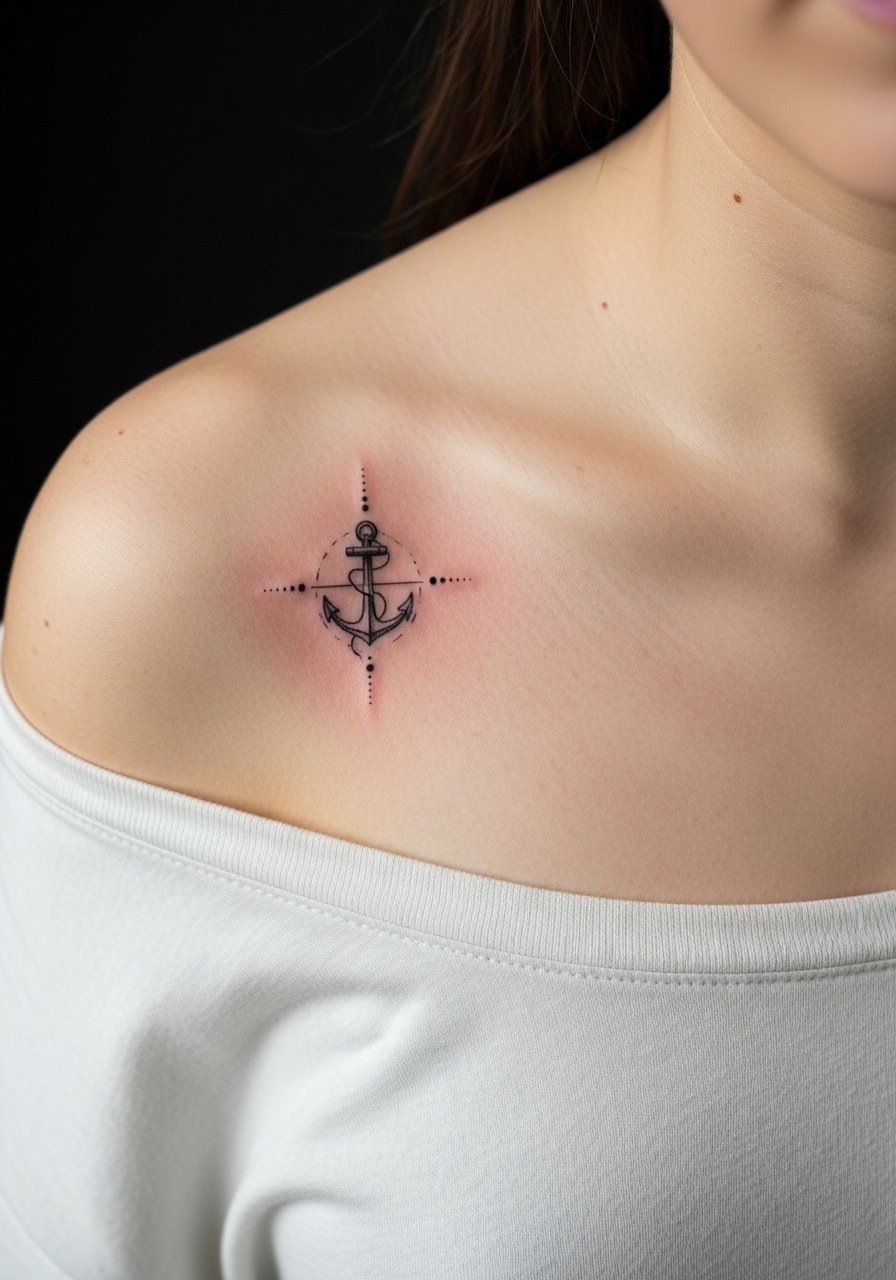
For a combined symbol like an anchor plus compass, clarity comes from limiting competing detail. The common mistake is packing a full compass into a postage-stamp area. Ask for a simplified rose with a clear central point and single-line anchor beneath. Sessions often run forty-five to sixty minutes. For formal events, an off-shoulder blouse reveals just enough to make the match intentional without being overt.
Frequently Asked Questions
Q: Will fine line shoulder tattoos blur faster than bolder blackwork on this placement?
A: From what I’ve seen, ultra-fine lines can soften sooner, especially if the piece sits where clothing or straps rub. Bolder blackwork tends to resist that early softening. If you want a delicate look with staying power, ask for slightly heavier line weight and deliberate spacing so the lines have room to settle.
Q: How should two people prepare for a matching shoulder session so the pieces align visually?
A: Stand the same way when the artist places stencils so orientation matches. Bring the exact reference scale you want and ask the artist to preview both stencils side by side. Wear similar session clothing, like sleeveless tanks, so access and angle are consistent.
Q: Are touch-ups more common on the outer shoulder than on the shoulder blade?
A: It depends on friction and sun exposure. Outer shoulders that meet bag straps or summer tees can need touch-ups sooner than shoulder blades that stay mostly covered. Expect possible touch-ups around year two to four for fine line work, and less frequent rework for saturated black patches.
Q: Can matching shoulder tattoos cause issues with workplace dress codes?
A: Most shoulder tattoos are easy to cover with standard office attire. If you work in a conservative environment with strict sleeve rules, consider placement slightly lower or choose a design small enough to be hidden under shirts when needed.
Q: Do matching shoulder designs look good on different body shapes and sizes?
A: Yes, but scaling matters. Larger shoulders can take more visual weight, while smaller shoulders benefit from simpler, smaller marks. Discuss scale in the consult so both pieces read balanced on you and your match.
