
Fine line henna and soft ornamental pairs are everywhere this season, but matching hands come with their own quirks: stains that fade faster on darker skin, two friends ending up with uneven mirrors, and surprise irritation from cheap cones. These 27 matching hand designs focus on symmetry, wearability, and session-ready tips that help you plan the look, the wardrobe for photos, and the little tricks that deliver darker, more even stains.
1. Matching Floral Mandala Back-of-Hand
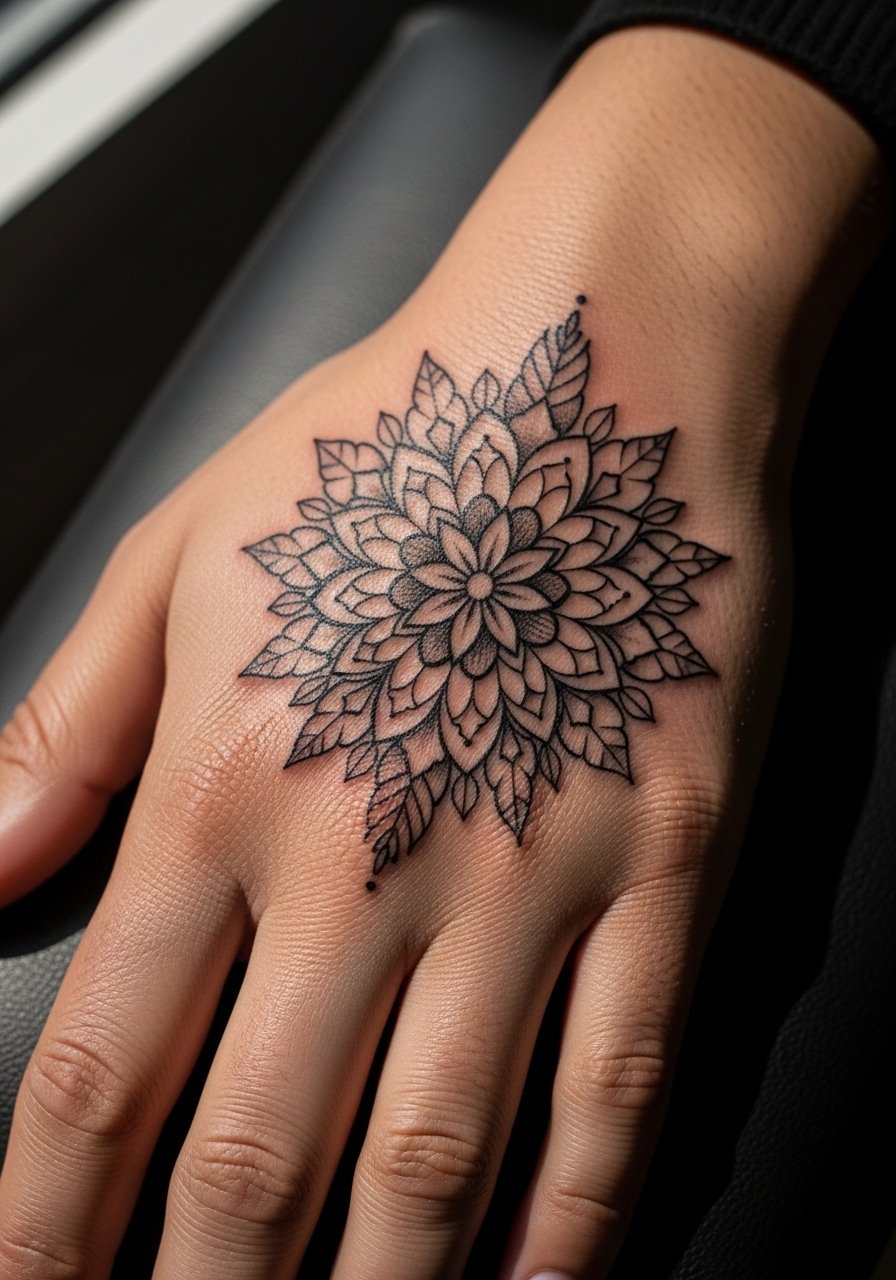
A full back-of-hand mandala reads ornate without being heavy, and it works best when both people agree on scale. I recommend bringing a single reference image that shows the overall negative space you want, not ten variations that confuse the artist. The common mistake is cramming too many tiny petals into a small area which blurs at week six. Tell your artist you want open spacing around the center and moderate saturation so the pattern breathes as it heals. For event photos, pair this with fingerless lace gloves in ivory so the reddish stain pops against neutral fabric during indoor shoots.
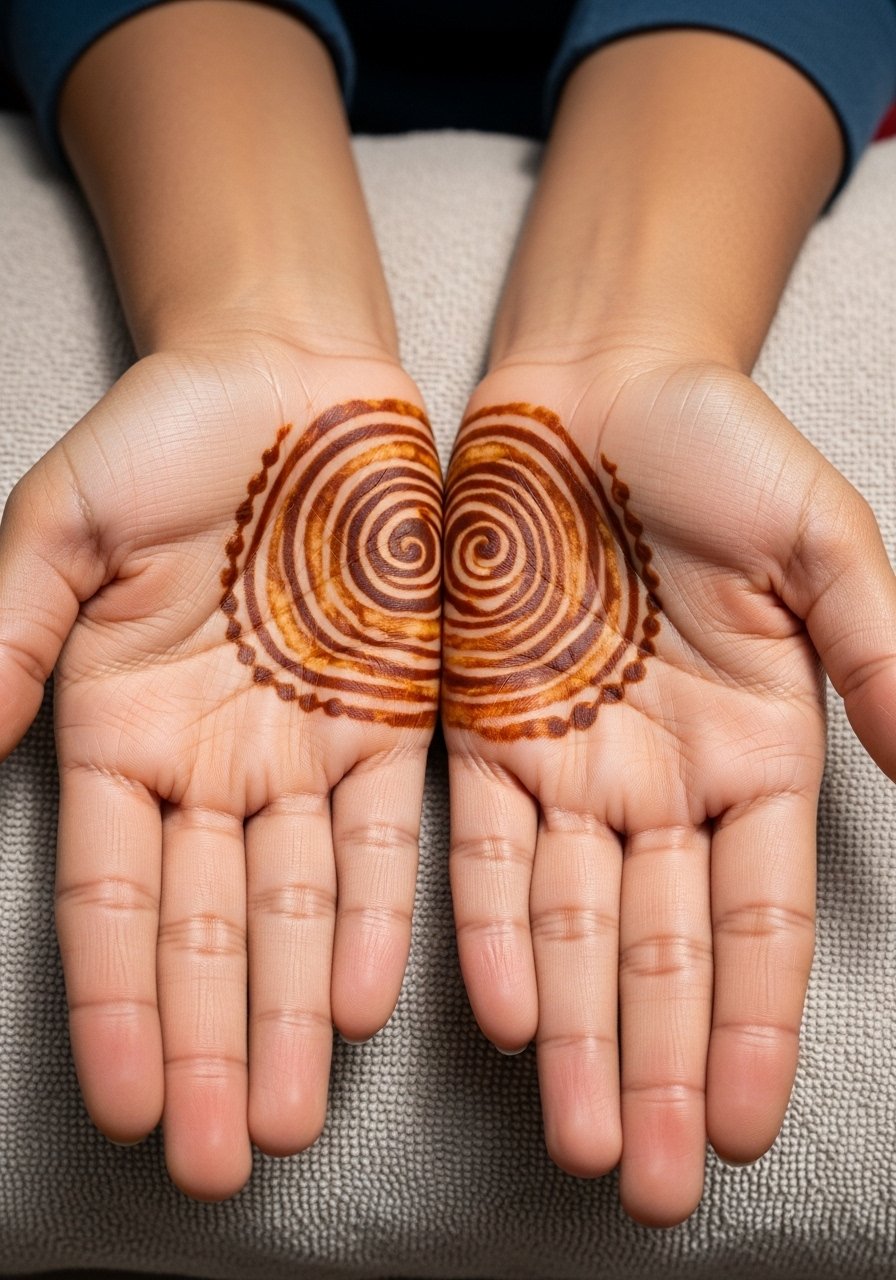
2. Symmetric Leaf Vine Pair on Palms
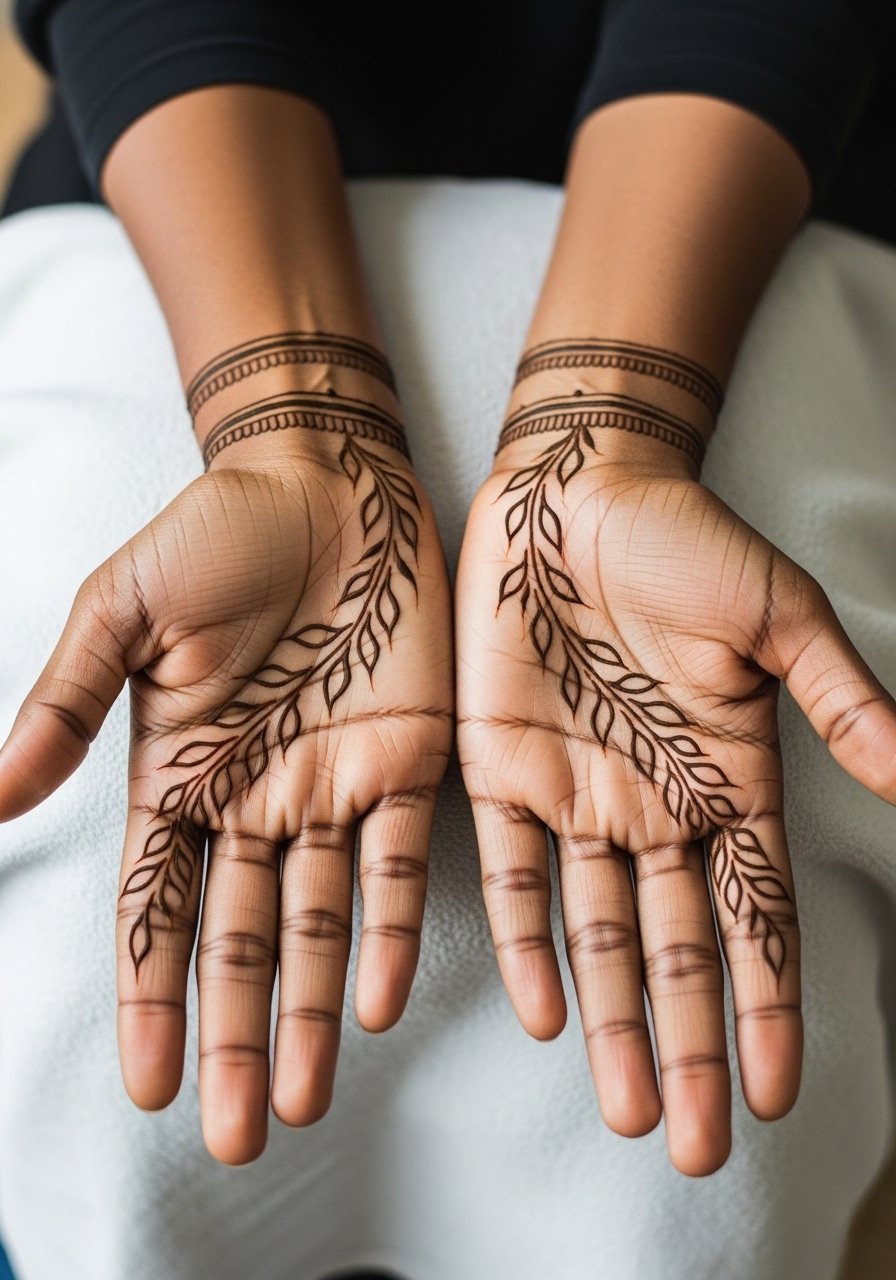
Palms are a great place for matching designs if you want something private that reveals when you gesture. Because palms shed skin faster, expect a quicker fade and plan the paste application 2-3 days before a big event for peak darkness. Ask the artist to use denser paste on high-contact junctions and to avoid ultra-fine gaps that disappear under friction. If one friend tends to squirm during sessions, request a stencil transfer so you can both approve exact mirroring before paste hits skin. For show-off photos, wear stacked bangles and an olive linen blouse in the background to keep the botanical mood cohesive.
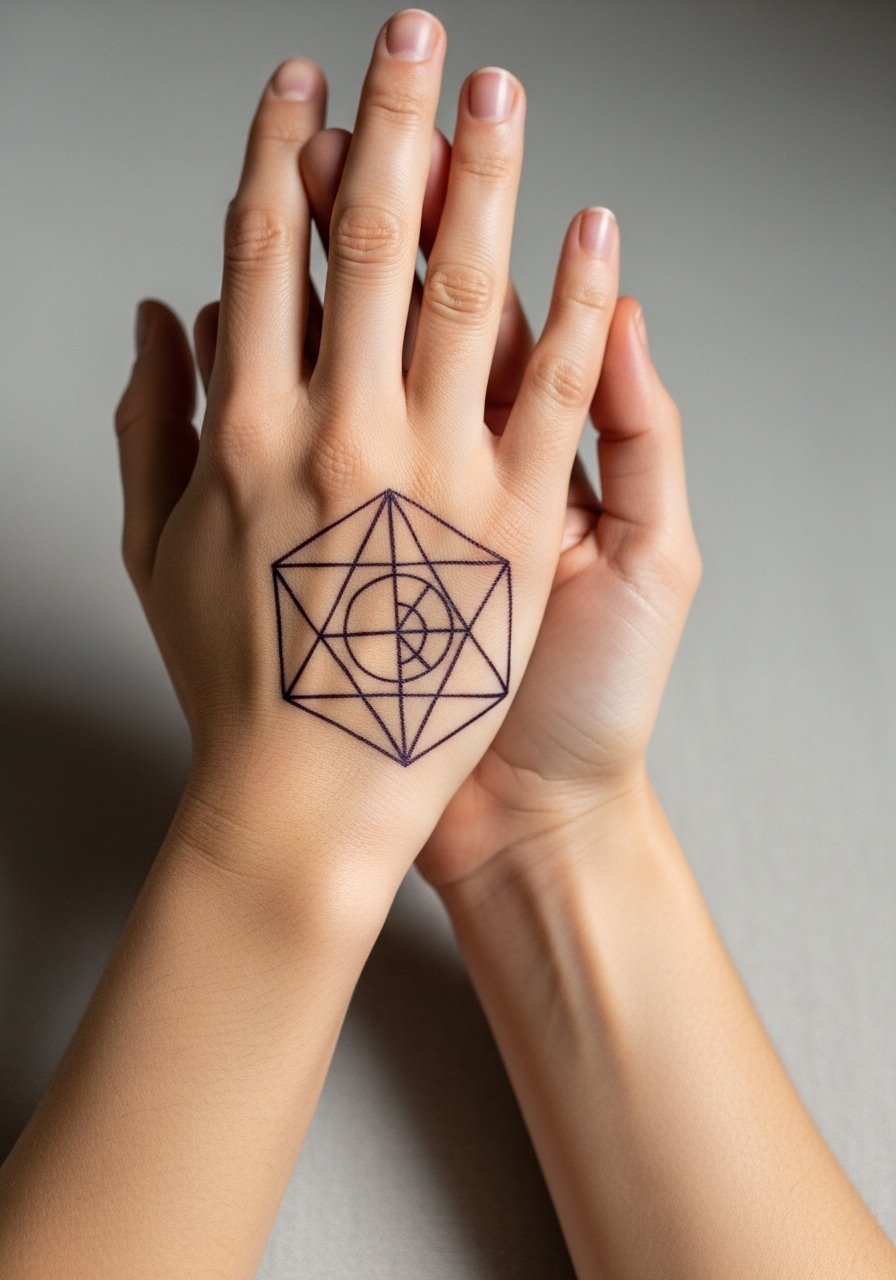
3. Geometric Interlocking Rings on Wrists

Wrist cuffs that interlock when you place your hands side by side make for a subtle matching symbol that does not scream bestie. The wrist is a high-motion area, so tell your artist you want slightly bolder linework than the thinnest flash reference. The biggest error is going micro with dense geometry; the lines need a little breathing room to avoid merging by year one. Session time is short, often under 30 minutes, but sensitivity can surprise you. Pair this with a minimalist leather watch when showing it off, and wear rolled sleeves on session day so the artist has clear access.
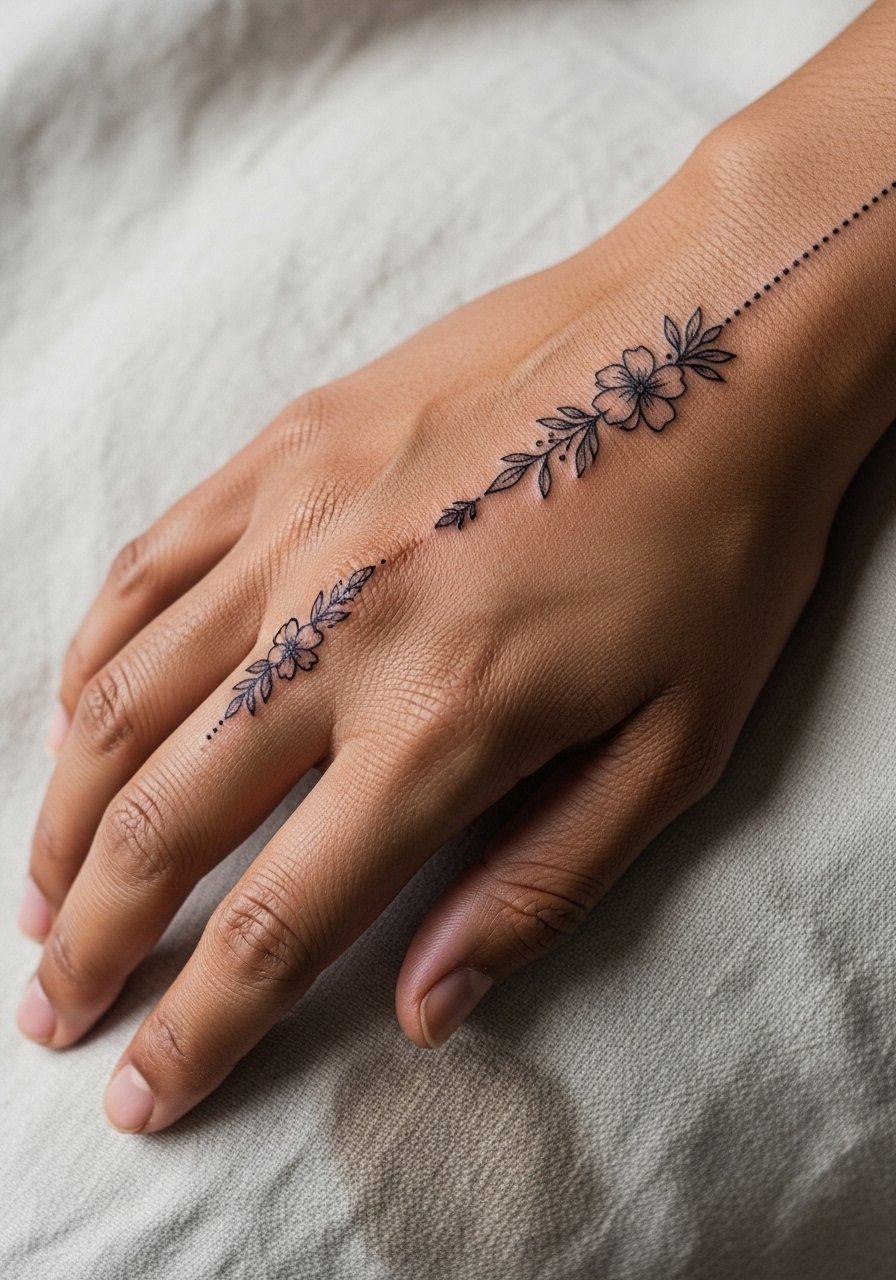
4. Dot-and-Drop Paisley Across Knuckles
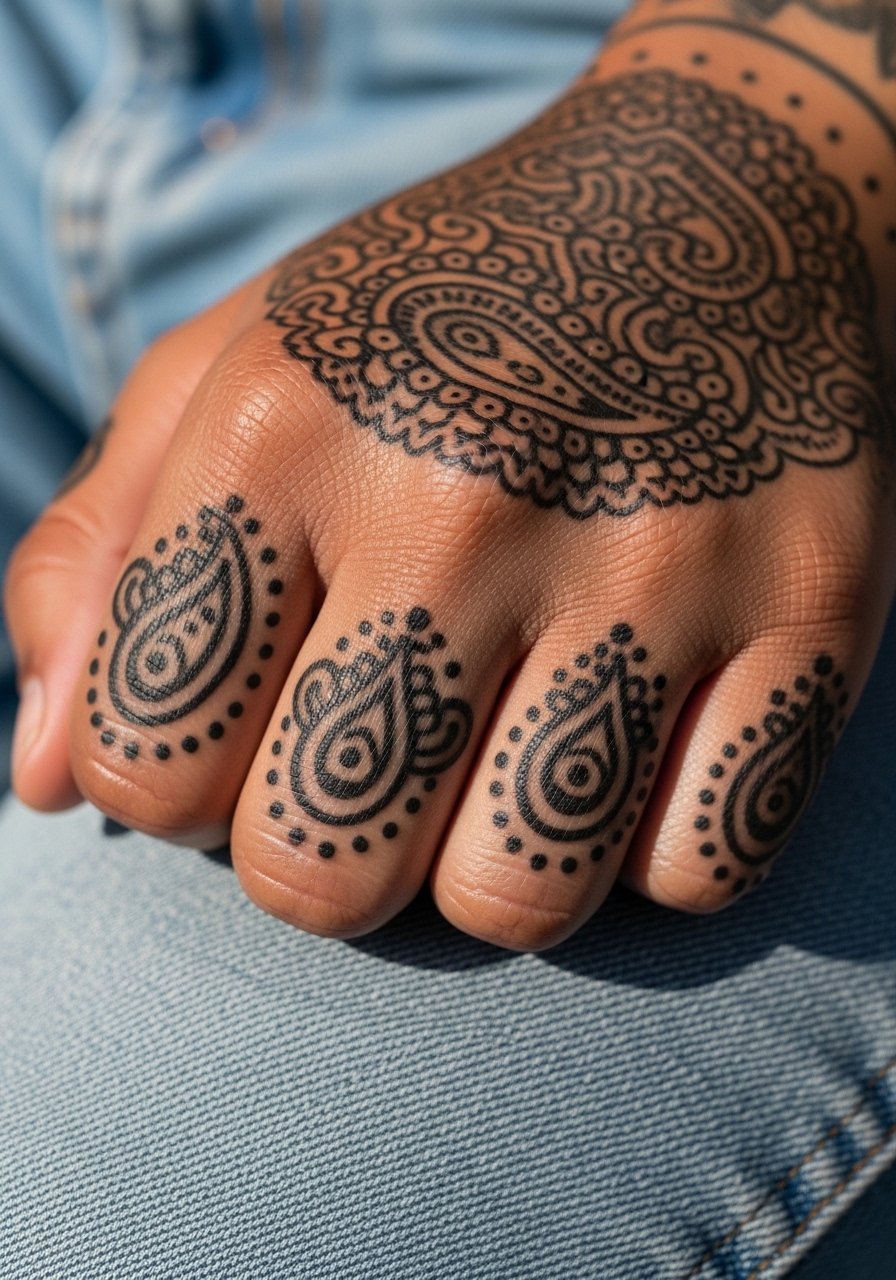
Paisley builds visual interest through repetition, which is why matching paisley across both hands photographs so well. Tell the artist you want staggered dot work and to avoid packing too many stipples into the knuckle folds. The common mistake is over-detailing on knuckles, which creases and fades quickly. Expect a comfortable 30 to 60 minute session per hand and plan for a touch-up around month two if you want long-term contrast. For session wear, skip rings and bring a dainty thin ring set to slide on after the paste has dried during photos.
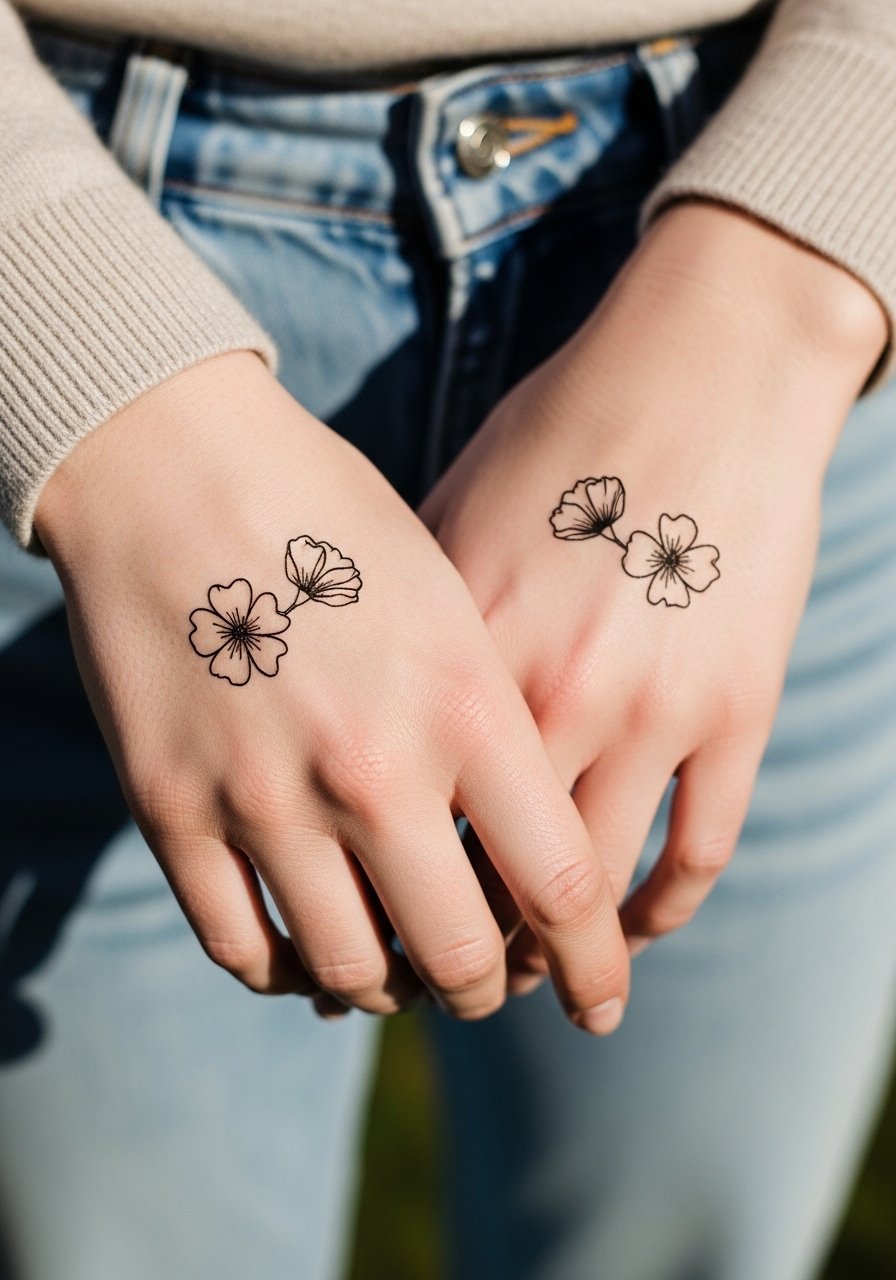
5. Symbolic Infinity with Flowers on Fingers
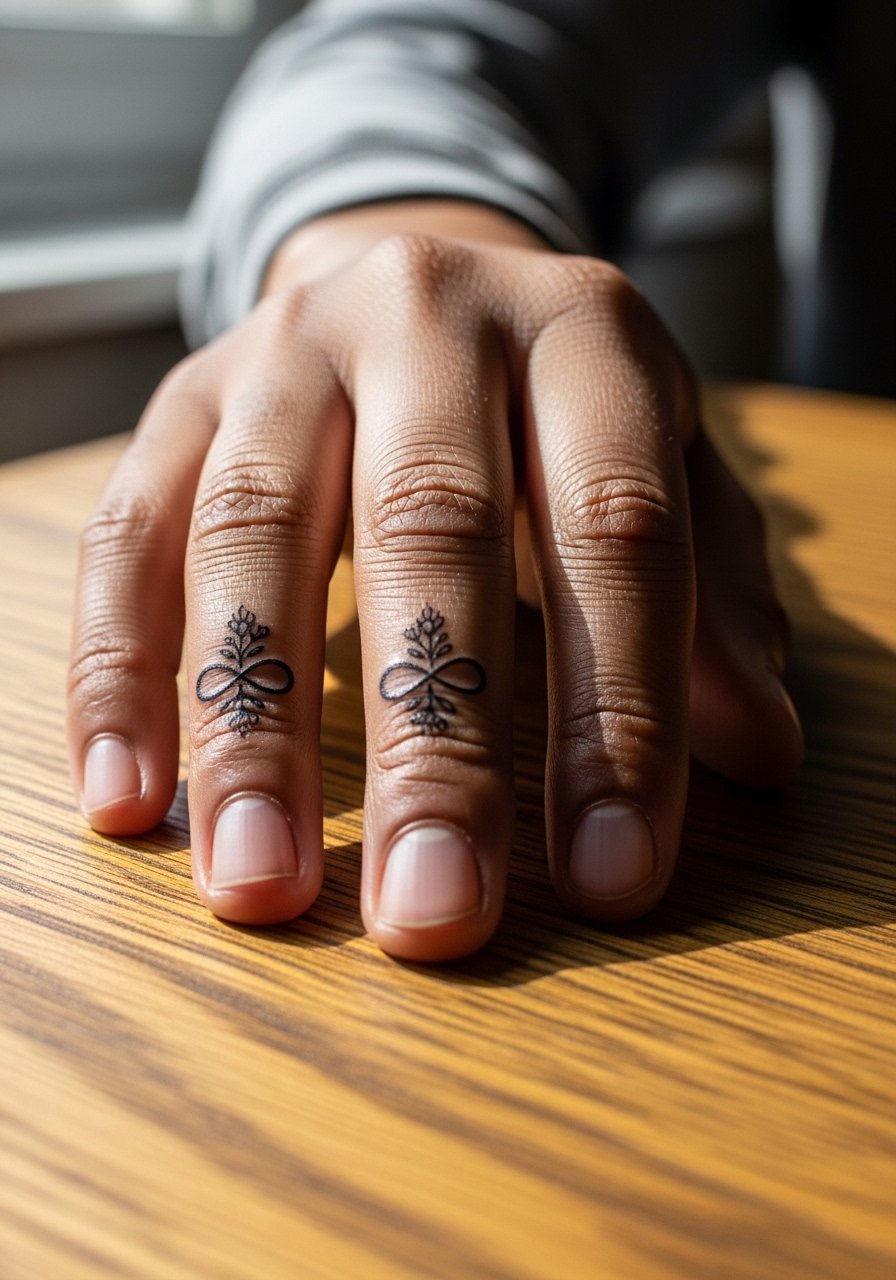
Finger pieces are bite-sized and discreet, perfect for matching symbols like infinity loops threaded with micro flowers. Because fingers see constant washing and movement, ask for slightly thicker linework and be realistic about a faster fade. A typical session for this is under 20 minutes per finger, but communicate exact knuckle placement in the consultation so both hands mirror precisely. A frequent mistake is asking for overly intricate fill inside a tiny loop. For photos and daily wear, leave one hand bare and style the other with a stackable knuckle ring that complements the micro florals.
6. Mirror Image Peacock Feather Spread

Peacock feathers feel elaborate without being culturally flat when handled with respect. If you choose this, mention to the artist you want elements inspired by traditional ornament rather than direct religious iconography. The main mistake is overworking the feather eye with heavy saturation that turns blotchy as it ages. These take about 90 minutes per hand if you want layered tones. For photo-ready styling at weddings or events, a pair of sheer mesh hand gloves in cream keeps attention on the symmetry while framing the wrist.
Pre-Session Essentials
The wrist and finger pieces above heal differently from larger back-of-hand work, so a few small items smooth out the appointment and the first week.
-
Stencil transfer paper kit. Lets you preview exact placement and symmetry for matching hand motifs before paste is applied.
-
Topical numbing cream. Applied 30 to 45 minutes before the session can reduce wrist sensitivity enough to hold steady for precise mirroring.
-
Thin protective film roll. Useful for covering finger or wrist pieces during the first day of heavy washing and typing.
-
Fragrance-free gentle body wash. Keeps newly stained hands clean without stripping dye or irritating tender skin.
-
Aquaphor healing ointment. Thin layers during the first 48 hours help lock in moisture around fine line work without suffocating the paste channels.
7. Dip-Dye Ombre Waves on Palms
Dip-dye ombre is one of those under-covered looks that photographs like permanent watercolor while staying temporary. Technique matters here, and artists are split on whether wet-surface layering speeds the fade or deeper dry paste gives a truer gradient. Name both camps during booking and ask how the artist achieves a lasting ombre. Because palms cycle skin rapidly, plan the application 48 hours before a major event for peak depth. The session is usually short but requires steady hand movement. For showing off, pair palms with a thin gold bangle stack that keeps attention on the central fade.
8. Heart-Linked Vine Cuffs on Wrists
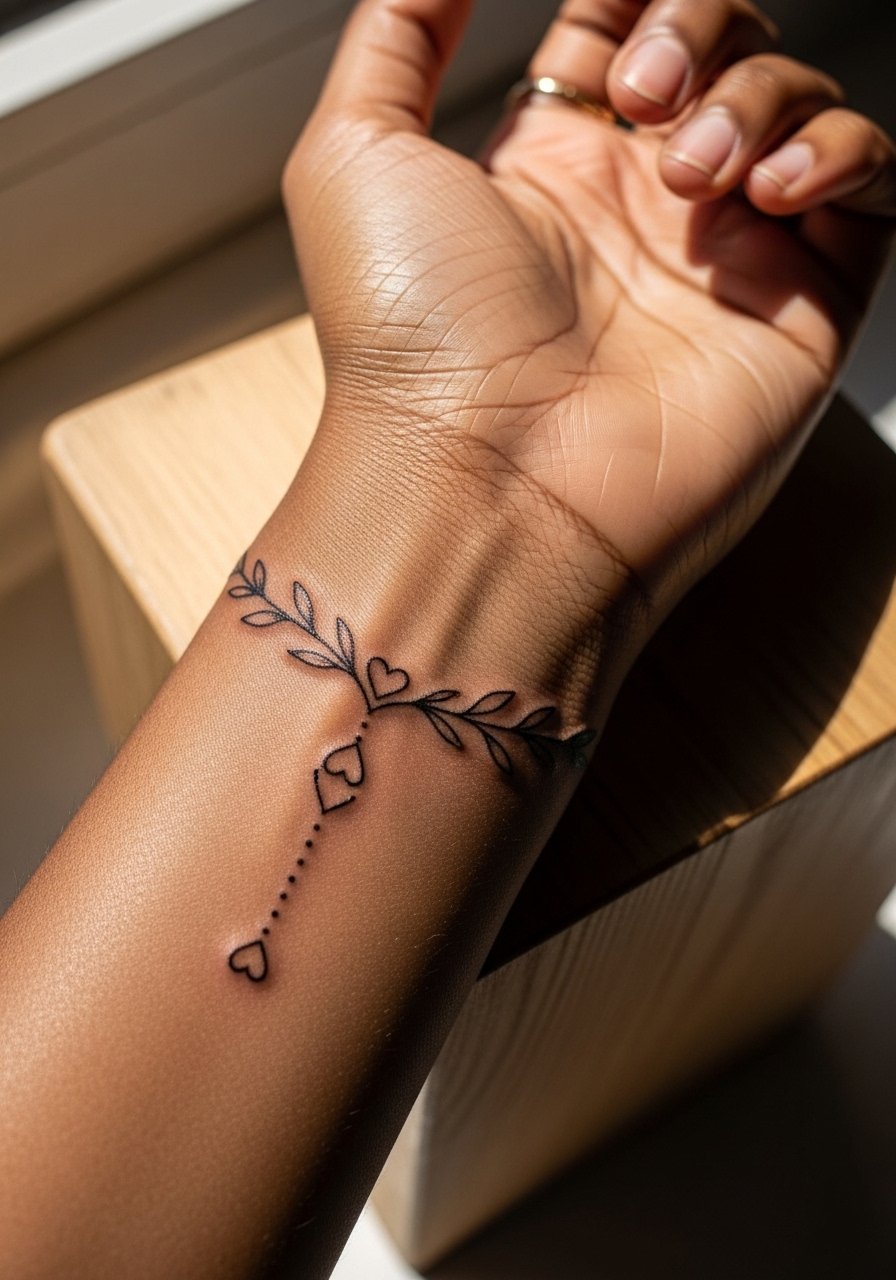
Wrist cuffs with linked hearts read romantic without being cliché when executed as delicate vines. Tell your artist you want airy vine spacing and small negative-space hearts so the pattern stays legible after two weeks of wear. The main error is making the hearts too dense which causes the shapes to merge as the stain softens. Expect a 30 to 45 minute session and modest sensitivity. For showing it off, a cuff bracelet gold on the opposite wrist frames the henna without competing with the vine lines.
9. Lace-Like Filigree Dorsal Hands
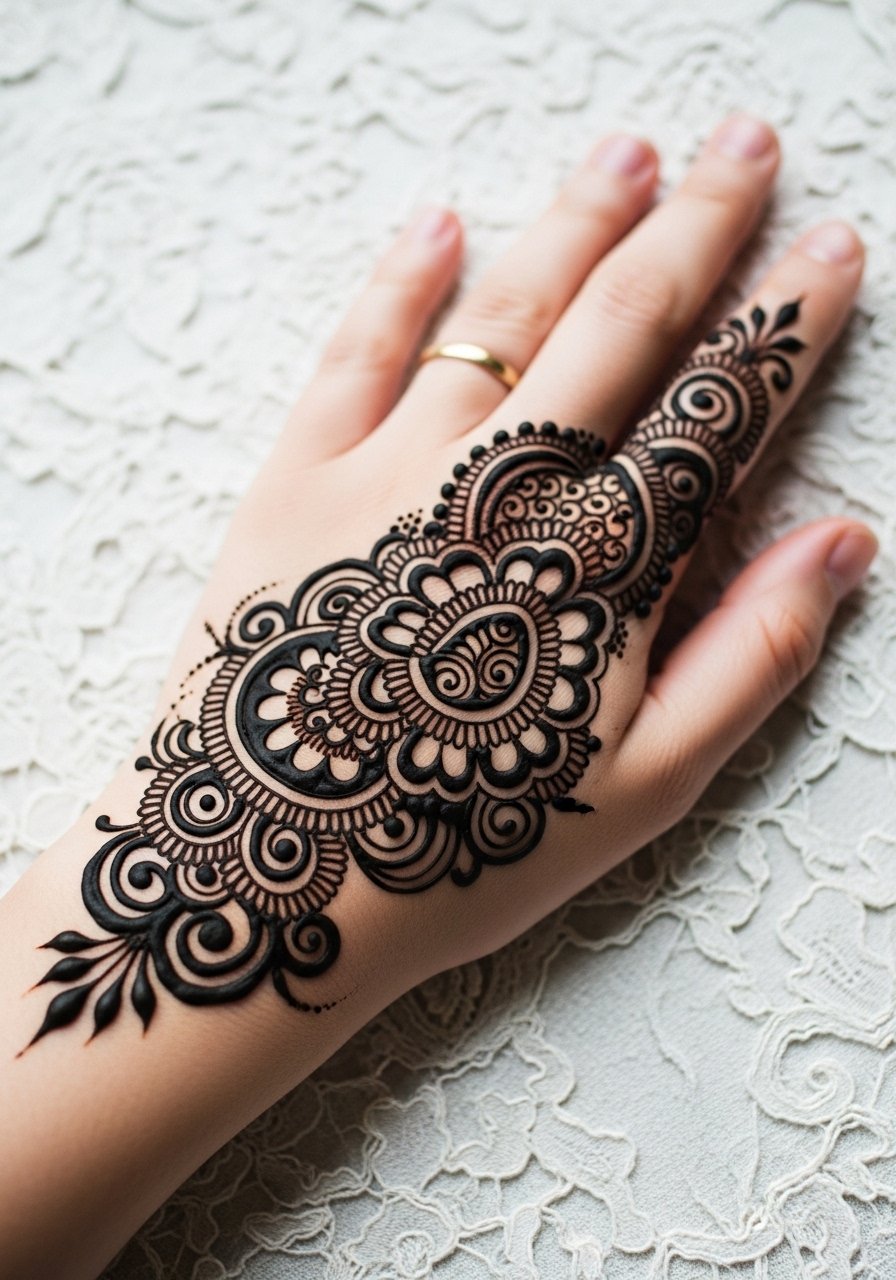
Lace filigree is a bridal favorite because it reads elegant and ornate. If you plan this for an event, schedule paste application the day before the ceremony and request deeper saturation in the main panels. A frequent mistake is filling every negative space which robs the pattern of contrast once it softens. This style can take an hour or more per hand depending on density so plan session time and avoid rings during application. For show-off wear, slide on ivory lace mitts during portraits to frame the dye while keeping the design visible.
10. Minimalist Arrow Pairs on Inner Palms
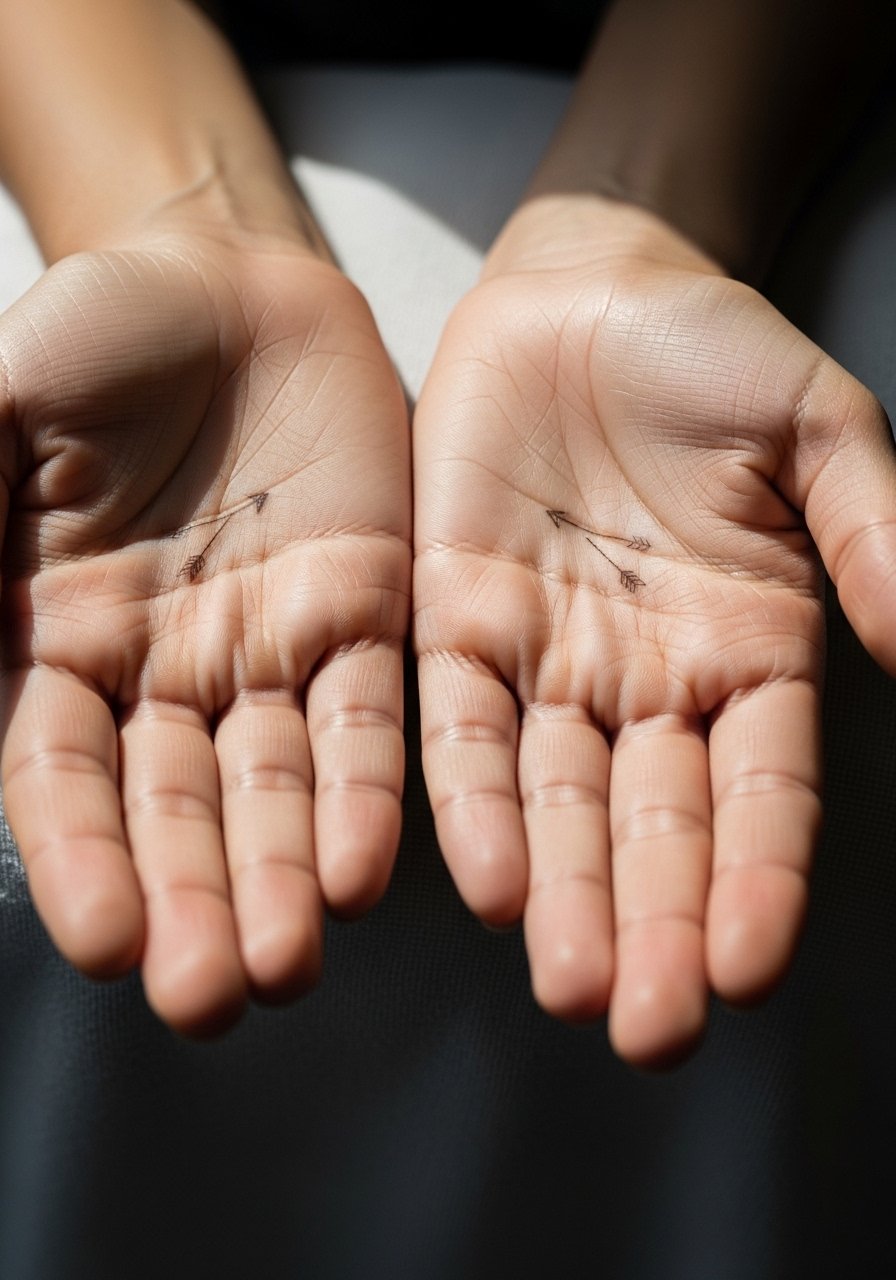
Minimalist palm arrows win as first-henna ideas because they are forgiving and quick. The inner palm placement makes them private unless you show them, which helps avoid overexposure at work. Ask the artist for slightly bolder shafts than ultra-micro references to offset rapid palm exfoliation. Avoid asking for elaborate shading inside a tiny arrow because it will muddy under pressure. Session time is usually under 20 minutes and pain is minimal. For photos or subtle reveals, neutral polish works best so try a neutral nude nail polish tone when you plan to show the palms.
11. Matching Henna Rings Around Knuckles
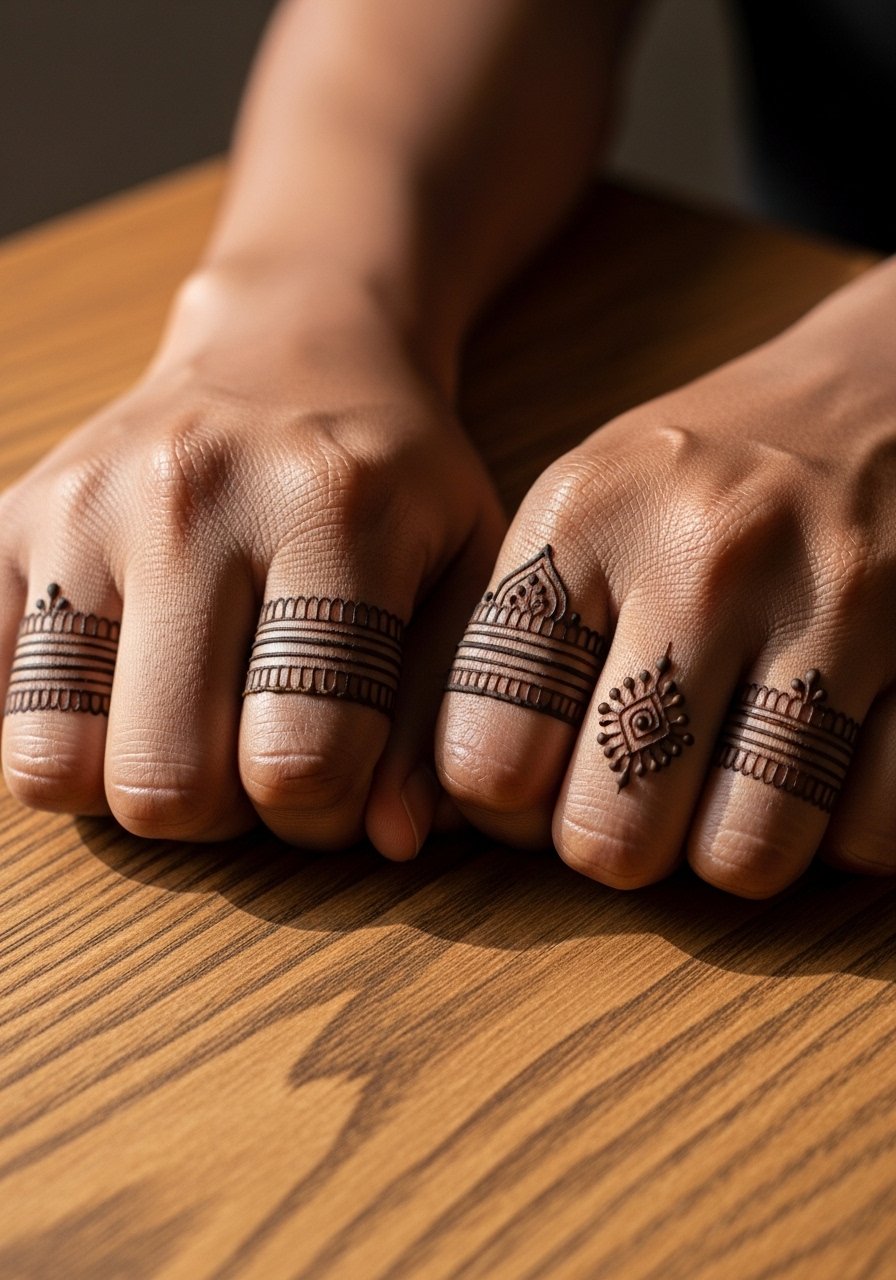
Henna ring bands are an elegant alternative to metal rings and they sit well when you want a coordinated everyday look. Because knuckles flex constantly, ask for slightly thicker bands and avoid extremely thin strand work that disappears after a week. A common mistake is placing rings too close to creases, which causes early wear. Sessions are fast, usually under 20 minutes per hand, and touch-ups may be needed after heavy use. For a delicate aesthetic, wear a single thin metal ring on an adjacent finger to create contrast without crowding the henna.
12. Palm-Exclusive Hidden Symbols
Designs that only reveal when palms meet are great for friends who want a private marker. Think coordinates, a tiny glyph split between hands, or a pair of halves that form a whole. Tell the artist you want exact hinge alignment so the halves merge when pressed together. The usual mistake is mismatched scaling so the halves never line up. Because palms have high friction, consider leaving paste on longer and plan the session timing around events. For session wear, keep sleeves short and the area clean so the artist can place each half precisely.
13. Mirror Crescent Moons on Both Thumbs
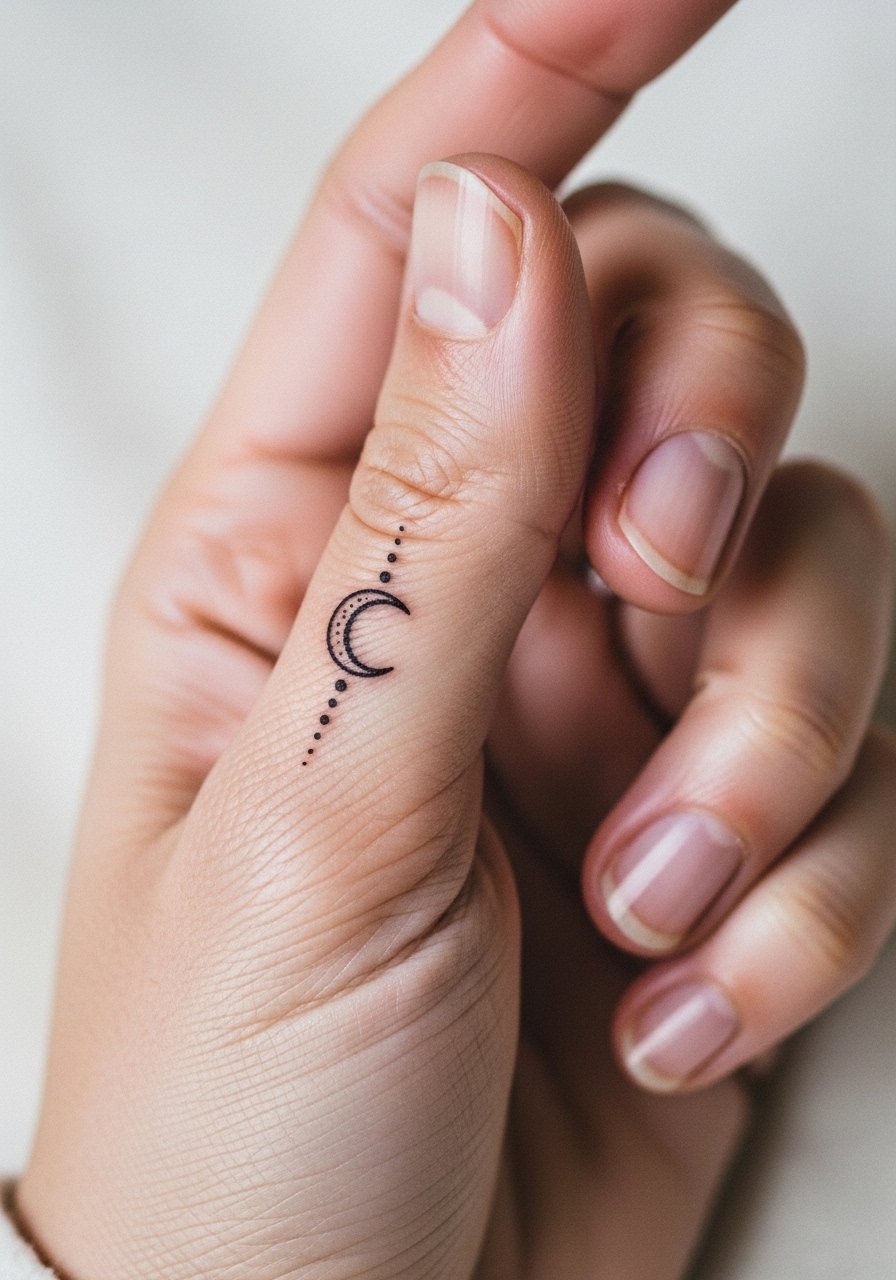
Thumb motifs are small statements that hold up surprisingly well because they sit away from constant palm abrasion. Ask for a slightly bolder outline so the crescent retains form as it fades. A common error is giving moons too many inner details which blur quickly. Sessions take minutes and sensitivity is low. For pictures that highlight the thumb work, skip bulky rings and consider a neutral manicure so the crescent reads cleanly in close-ups.
14. Linked Infinity Chains Across Fingers

A chain of micro infinites along adjoining fingers is a clever way to get matching movement into a tiny design. The technical ask is to keep the links uniform so they align when fingers close. The main mistake people make is requesting too-small loops that blur within a week. For longevity, opt for modest line weight and plan a quick touch-up after the first week. For styling, wear a minimal finger ring on a non-tattooed finger to add contrast in photos.
15. Mirror Image Peacock Eye on Each Hand
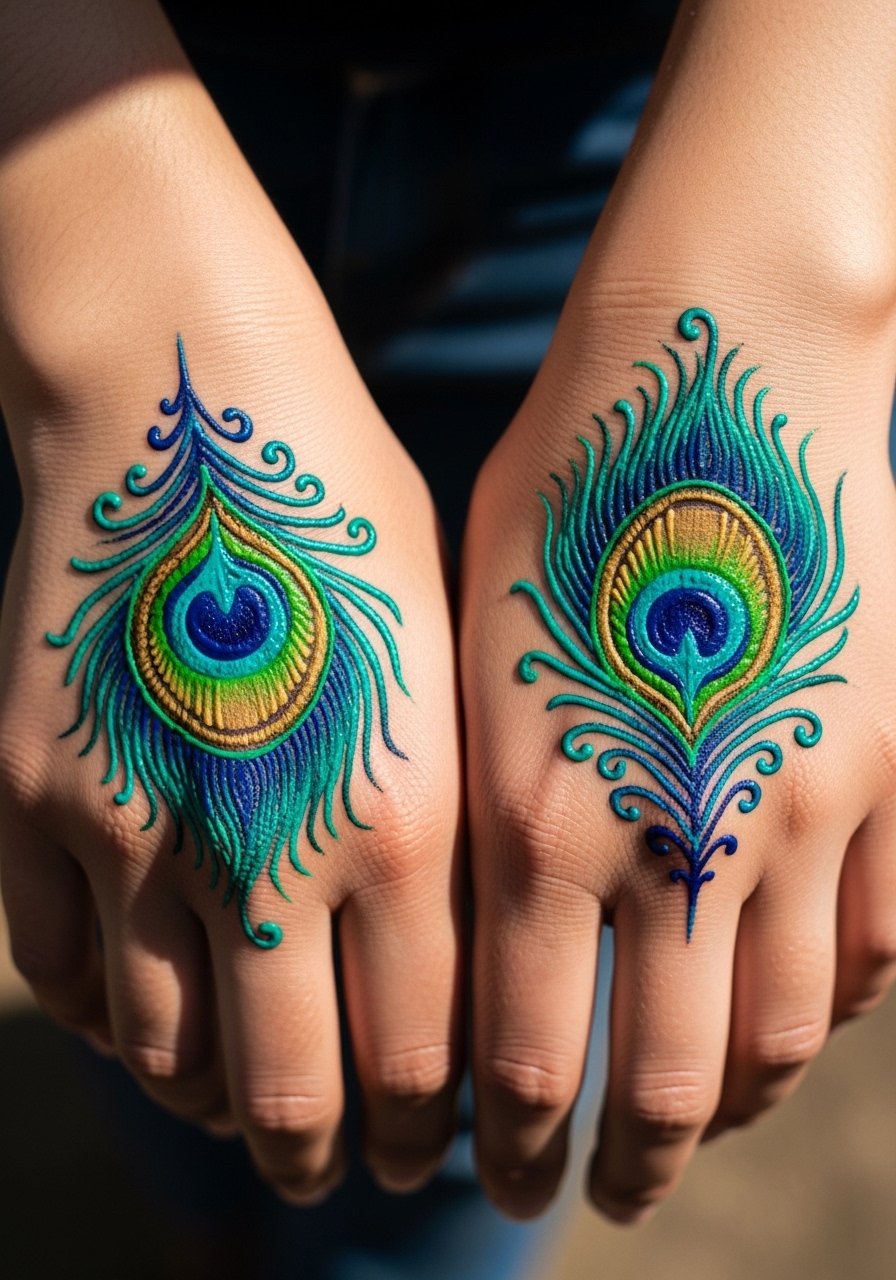
A compact peacock eye per hand gives the cultural nod of a full feather without overreaching into ornate territory. Mention origin respect in your consultation and ask for stylized interpretation rather than exact religious symbols. Over-saturation in the eye detail is the usual error because it loses clarity as it softens. These are medium session pieces and may require up to 90 minutes total. For event wear, keep jewelry minimal so the motif reads clearly in photos.
16. Palm-Centered Mandala Halves

Split mandalas that complete when palms meet are great for ritual moments or shared vows. Precision matters here. Ask the artist for a single guiding transfer so both halves match radius and spacing. A common error is mismatched center points which ruins the effect. Palms can be stubborn for stain longevity, so plan application timing to maximize darkness at the moment you want the full mandala revealed. For photos, coordinate sleeve color to avoid distraction during the reveal.
17. Negative-Space Floral Chains
Negative-space work reads modern because the skin becomes part of the pattern. Request the artist map out where the skin windows will sit so tone differences do not create unintended shapes. The mistake is relying on too-skinny bridges of paste that break during drying. This style usually takes moderate session time and settles into a softer look after two weeks. For showing it off, try a fingerless lace glove or bare fingers with a subtle polish so the negative space stays visible.
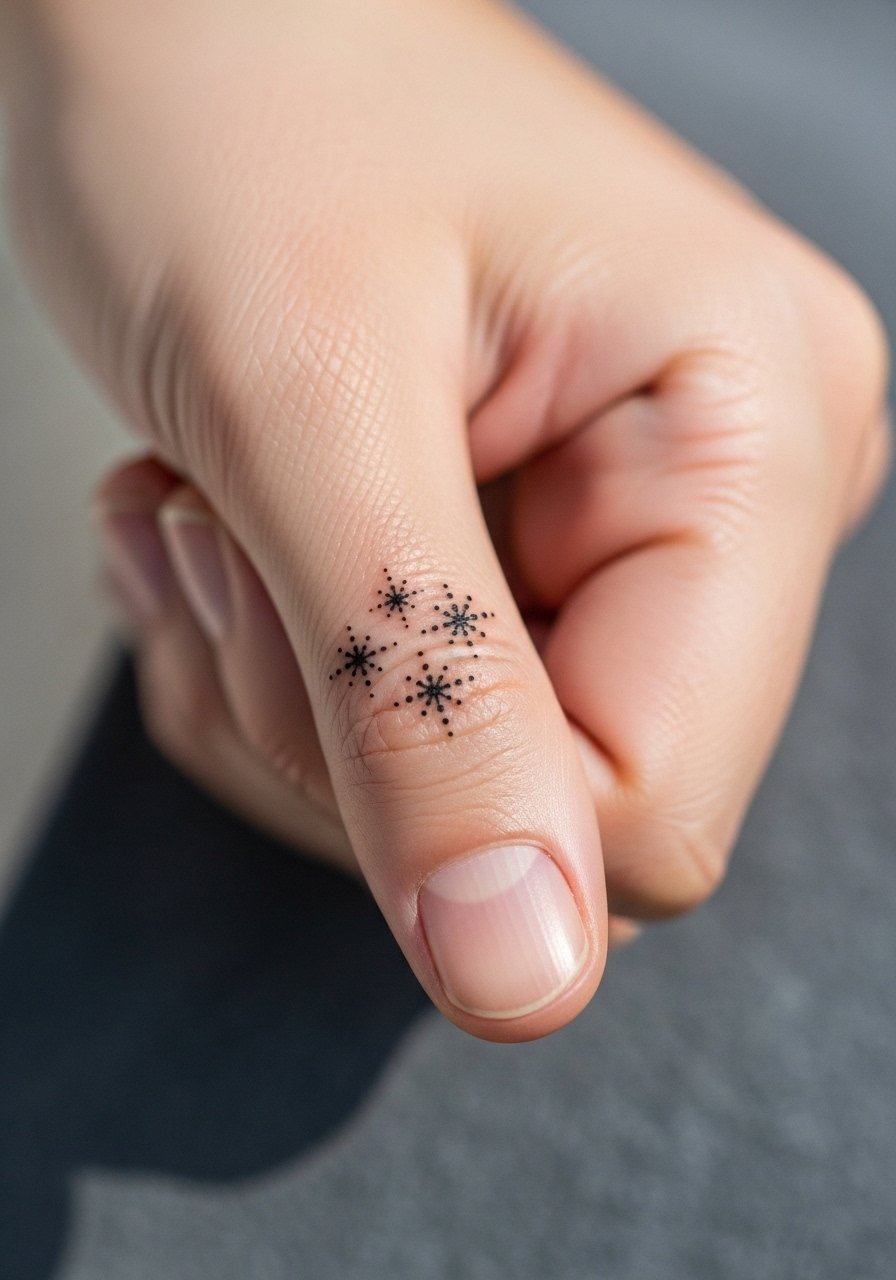
18. Tiny Constellation Matches Across Fingers
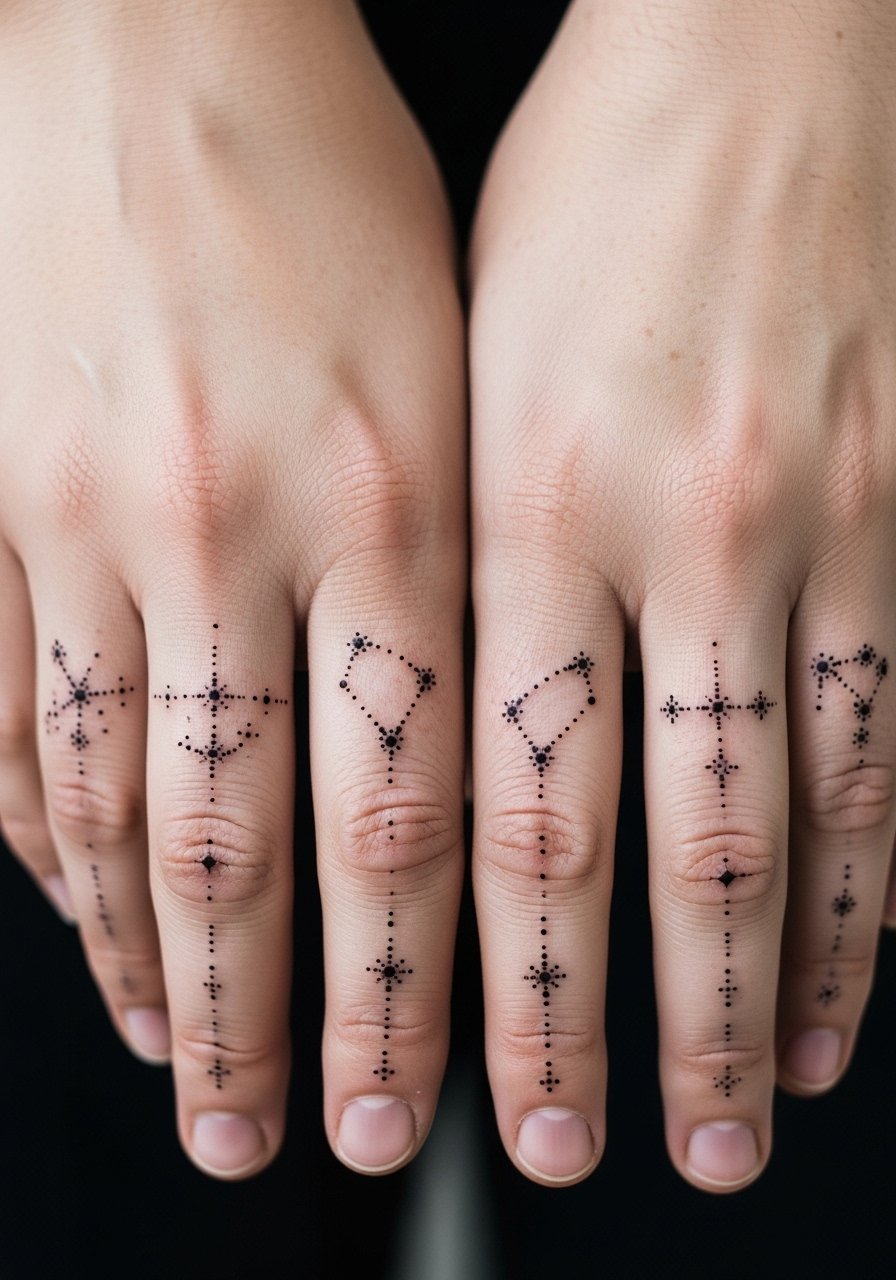
Constellation clusters are forgiving and photograph well when spaced thoughtfully. Tell the artist you want consistent dot sizes and a balance between tight clusters and breathing room. A frequent error is attempting dense clusters on small fingers which loses the star pattern. Sessions are quick and pain is minimal. For photos, a neutral manicure helps keep the dots legible and modern.
19. Paired Mandala Cuffs That Touch
Mandala cuffs that meet across two wrists make a full composition when you place hands side-by-side. Ask the artist to leave a narrow breathing gap so the pattern retains shape after slight swelling or movement. The common mistake is over-detailing edges which causes blurring after the first week. These sit in the medium session time range and may need a touch-up later if you want sharper long-term contrast. For showing off, layer a thin chain cuff on the opposite wrist to frame the mandala.
20. Mirror Image Feathered Wristlines
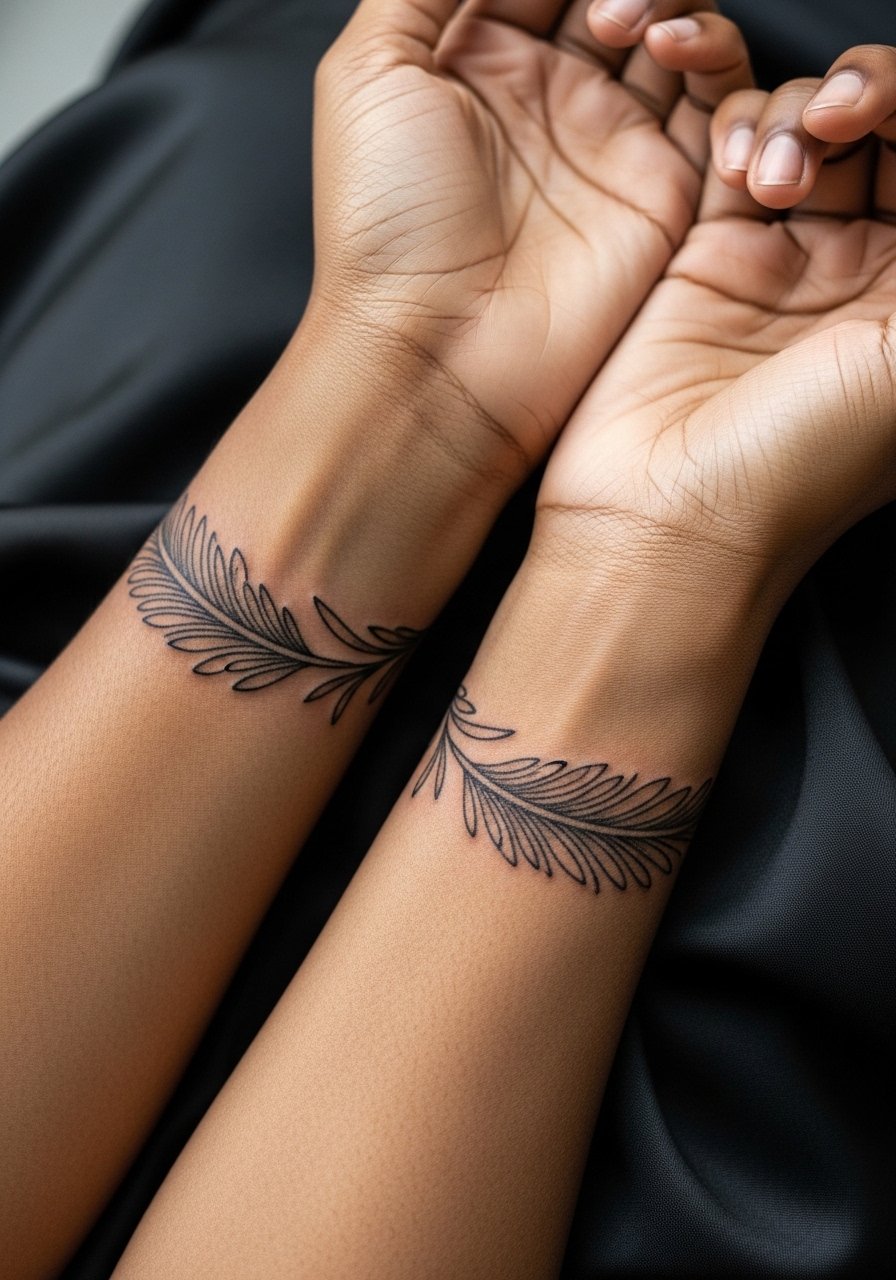
Feathered wristlines give a soft motion that suits people who prefer understated matches. Tell the artist you want graded line density so the outer feather tips are lighter than the base. A mistake is applying uniform weight which looks flat as it softens. Session sensitivity is moderate around the bone, so a topical numbing cream can help if you both prefer comfort. For evenings out, a cuff bracelet gold on the non-tattooed wrist complements the feather without crowding it.
21. Floral Birth-Flower Pairing
Matching birth flowers are personal without being on-the-nose. Bring reference images for your specific flower so the artist can simplify petals into henna-friendly shapes. A common error is asking for highly detailed botanicals at micro scale which fade into an indecipherable spot. Sessions vary depending on size but are generally short. For session comfort, remove rings and wear sleeveless or rolled sleeves so the artist can access the dorsal hand area.
22. Connecting Chain Across Thumbs
A chain that visually links when thumbs meet reads like jewelry that never leaves. State clearly that you want the links to line up at a single meeting point, and ask for slightly heavier outlines to preserve clarity as the stain softens. The usual mistake is asking for micro thin links that disappear with daily handwashing. Sessions are swift and low-pain. For reveal photos, keep hands bare and consider a simple manicure to maintain focus on the chain.
23. Dual Half-Compass That Completes
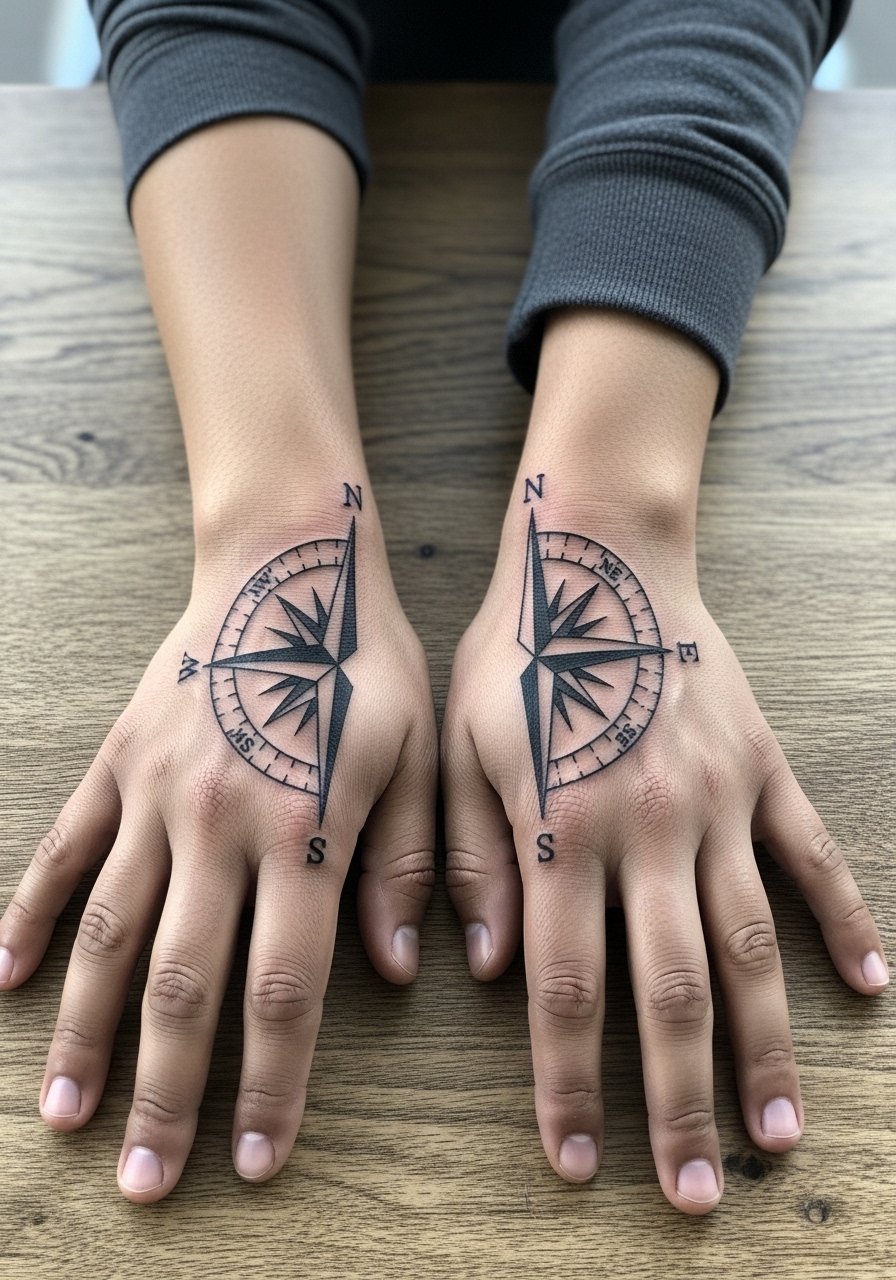
A split compass reads like direction and partnership when the halves meet. Tell the artist you need exact alignment marks so the two halves form a circle without offset. Over-detailing the cardinal points is a common mistake at this scale because they blur with movement. Expect a moderate session length and plan touch-ups if you want the center to stay crisp. For photos, neutral sleeves help the shape stand out without pattern competition.
24. Subtle Script Halves on Fingers
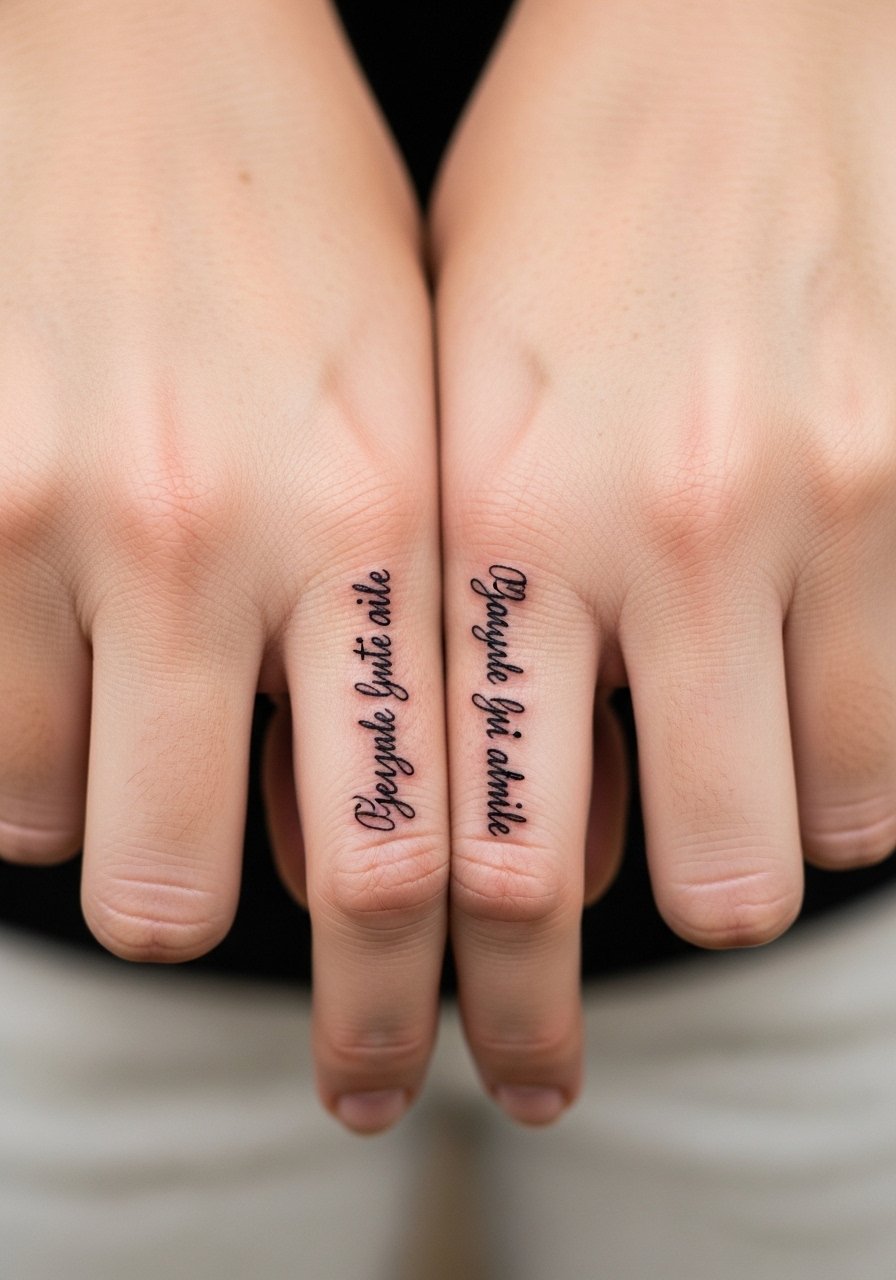
Split words or dates that complete across fingers feel intimate and intentional. Provide exact text to the artist and confirm letter spacing on the stencil. A typical error is picking ornate scripts that become illegible at micro sizes. Sessions are brief but precise. For session comfort, leave fingers bare so the artist can consistently place each character.
25. Mirrored Geometric Halves That Form a Whole
Geometric halves that tessellate when combined look modern and intentional. Tell the artist you want uniform grid spacing so the pattern reads as continuous when hands join. The main mistake is allowing slight rotation between hands which ruins the tessellation. Moderate session time and careful stencil alignment mitigate this. For wardrobe, rolled-up sleeves and a minimal watch or bracelet keep focus on the hand composition.
26. Tiny Star Clusters Along the Thumb Web
The thumb web is an under-used area that holds tiny clusters well. Ask for consistent dot spacing and to avoid dense packing near creases which can break paste during drying. The usual mistake is squeezing too many stars in a small patch so the pattern looks muddy once faded. Sessions are fast and pain is low. For photos, skip heavy rings and consider a simple neutral polish to let the cluster read clearly.
27. Hidden Palm Message That Only Shows With a Wave
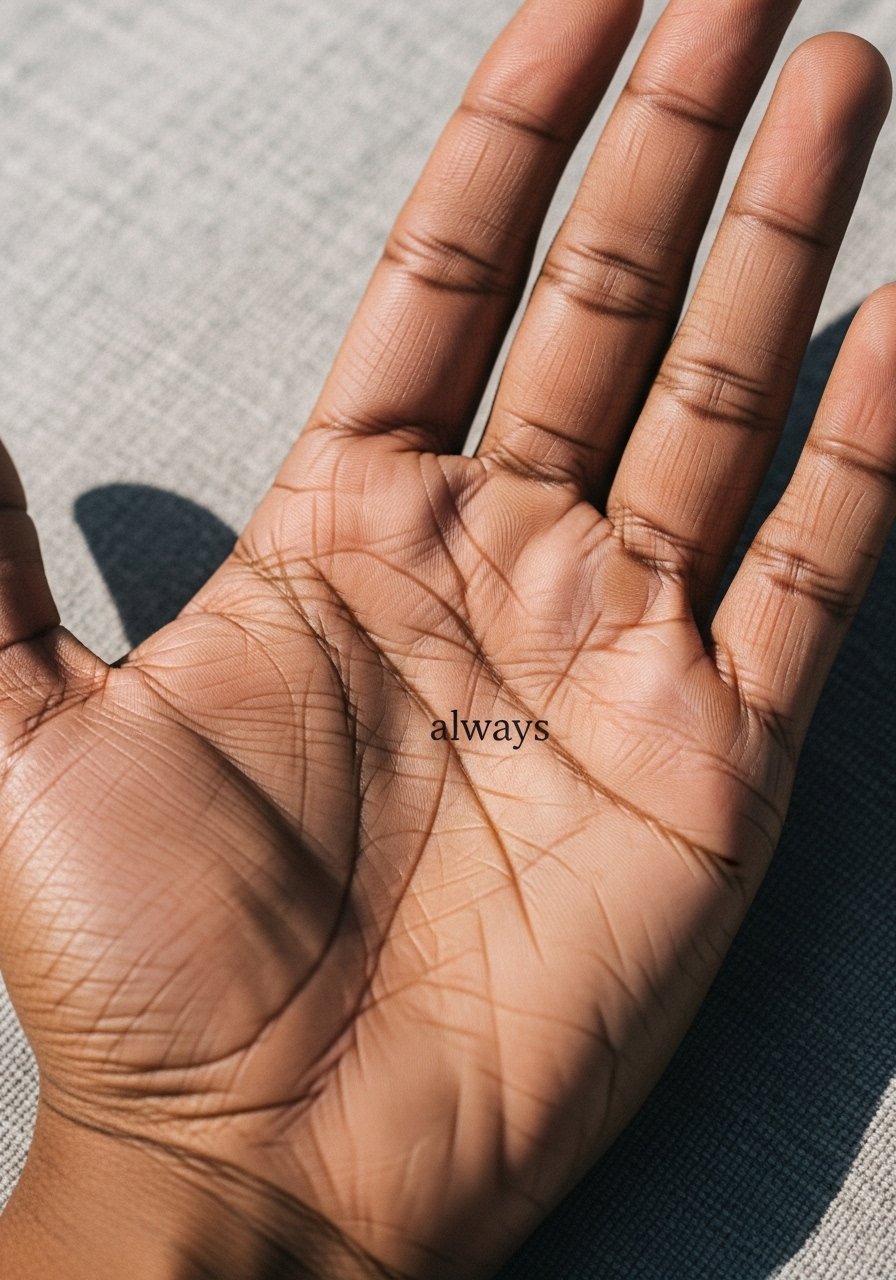
A tiny palm message that only appears in motion gives a playful reveal when you wave. Provide exact short text to the artist so the letters render properly in the small space. Expect the message to fade faster than dorsal work because the palm regenerates quickly. The most common error is choosing long phrases that become unreadable in a short space. For session wear, keep sleeves short and hands clean so the artist can position text centrally.
Frequently Asked Questions
Q: Why do henna stains sometimes look lighter on darker skin, and what can I do before my session?
A: Darker skin tones reflect pigment differently, which can make initial contrast seem lower. In my experience exfoliating the area gently the day before and leaving paste on for eight hours or more improves dye uptake. Also confirm the paste is pure henna without additives and plan to avoid water contact for the first 24 hours after paste removal for best results.
Q: How can two people get truly matching designs without one hand coming out crooked?
A: Use a single stencil transfer applied to both hands and approve it before paste. If one of you tends to move, request the artist work on that hand first or use a light numbing cream so the sitter can relax. Choosing slightly bolder line weights helps hide tiny placement shifts and makes mirrored symmetry hold better through the first week.
Q: Is "black henna" safe, and how do I avoid allergic reactions from cones?
A: Avoid any product labeled black henna because it often contains PPD which can cause severe reactions. Do a patch test with pure henna paste 48 hours ahead on the inner arm to check for irritation. If you have a history of skin sensitivity, mention it during booking and ask the studio about their paste ingredients.
Q: Artists disagree on paste application techniques and lemon juice post-care. What should I expect?
A: There are two camps: some artists favor paste-on-wet-skin methods for speed while others prefer dry paste for deeper color. Lemon juice fans say it brightens stain while skeptics worry about irritation. Ask your artist which approach they use and why, and make a decision based on your skin sensitivity and the artist's track record with hand placements.
Q: How long will matching hand pieces typically last, and when might I need a touch-up?
A: Hands take more wear than other placements so expect crispness for one to three weeks depending on placement and care. Fingers and palms fade quickest and may need a touch-up within one to two weeks for event-level darkness. Back-of-hand designs usually keep visible patterning for two to three weeks, with a minor touch-up extending the contrast.
