
Fine line sting ray pieces are everywhere on feeds right now, and the ones that still look crisp years later are rarely the tiniest, most intricate versions. Placement and how the artist spaces the wings make the biggest difference. Pick a design that reads at arm distance, know the touch-up timeline, and bring the right wardrobe to the session. Below are 21 illustrative sting ray ideas that balance impact with longevity.
1. Fine Line Sting Ray on Inner Forearm
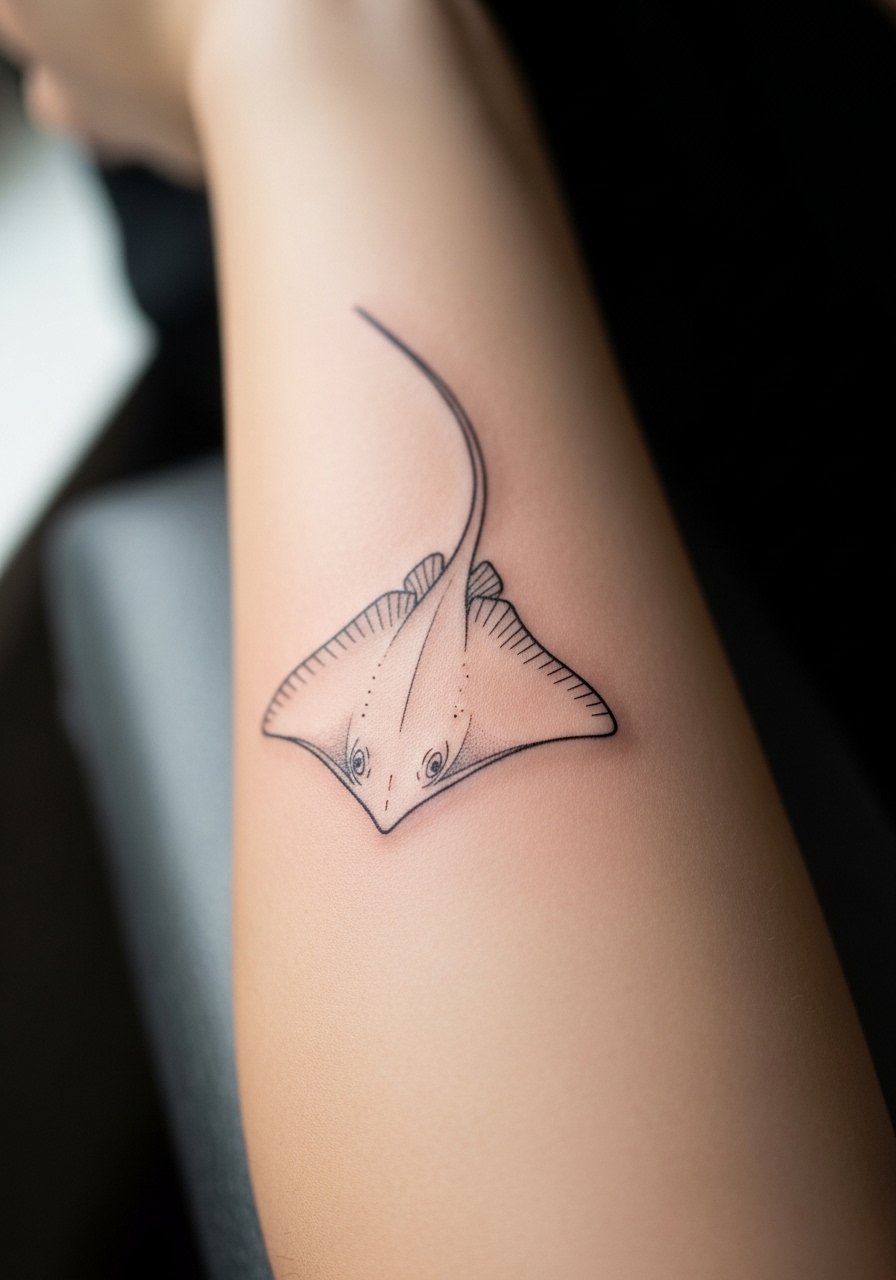
I recommend this for someone who wants clean contours without heavy saturation. Fair warning, the inner forearm takes light exposure, so expect the thinnest lines to soften at year two to three. Tell your artist you want slightly increased line weight in the root and wing joints so the silhouette stays readable as it heals. A common mistake is requesting micro hairlines across the entire wing. Those disappear first. Session time is usually under two hours and pain sits around a three of ten. For showing it off, pair the forearm with a rolled cuff linen shirt that frames the tattoo without covering it.
2. Small Sting Ray Behind the Ear, Subtle Placement
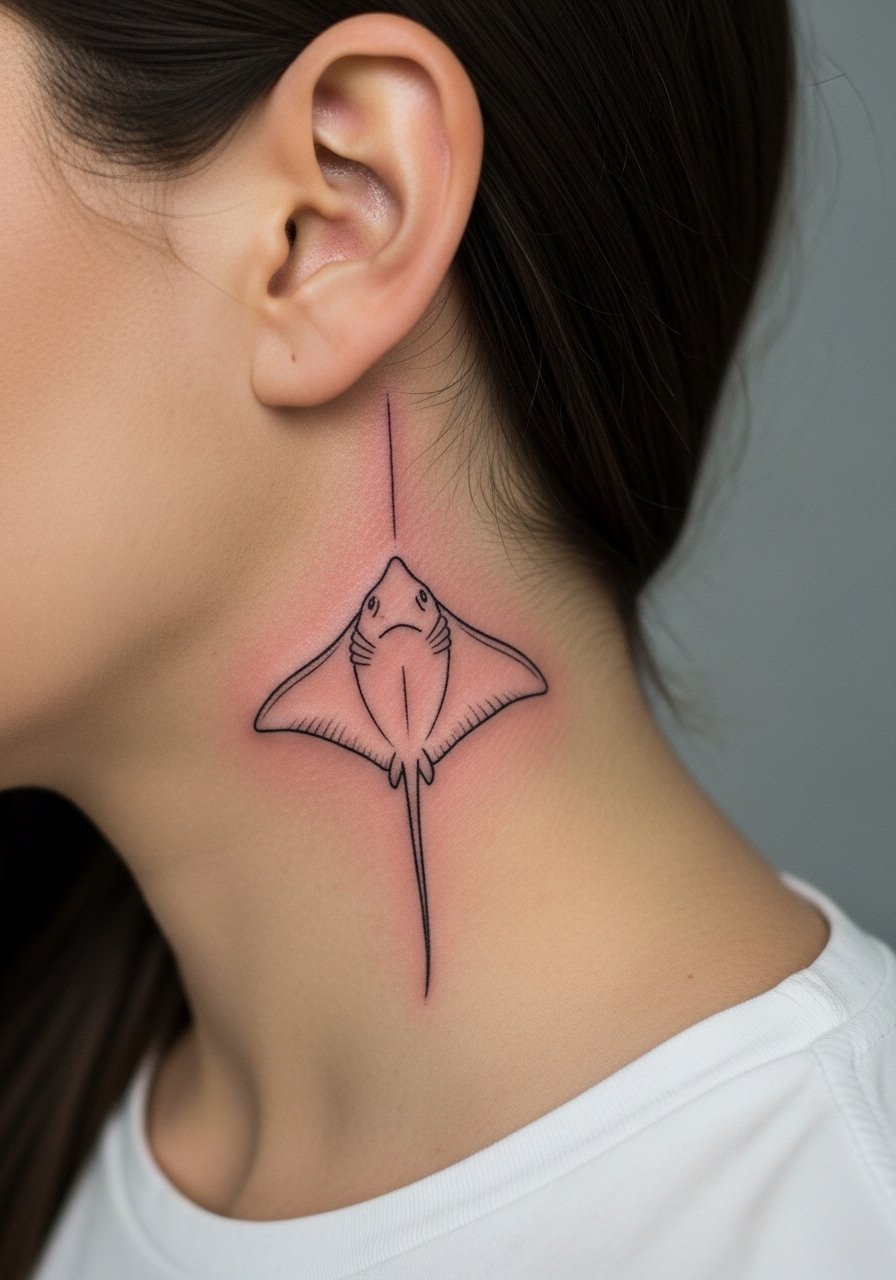
This tiny placement reads like a jewelry piece. Pain is low but placement requires an artist used to tight curves. The main mistake I see is asking for dense detail in a spot that needs breathing room. Ask for simplified wings and a single shaded belly area to keep contrast. Session is brief, often under 45 minutes, and touch-ups may be needed sooner because the skin around the hairline can shed pigment. For the appointment, wear a button-down or shirt that lets hair be pinned back easily so the artist has clean access.
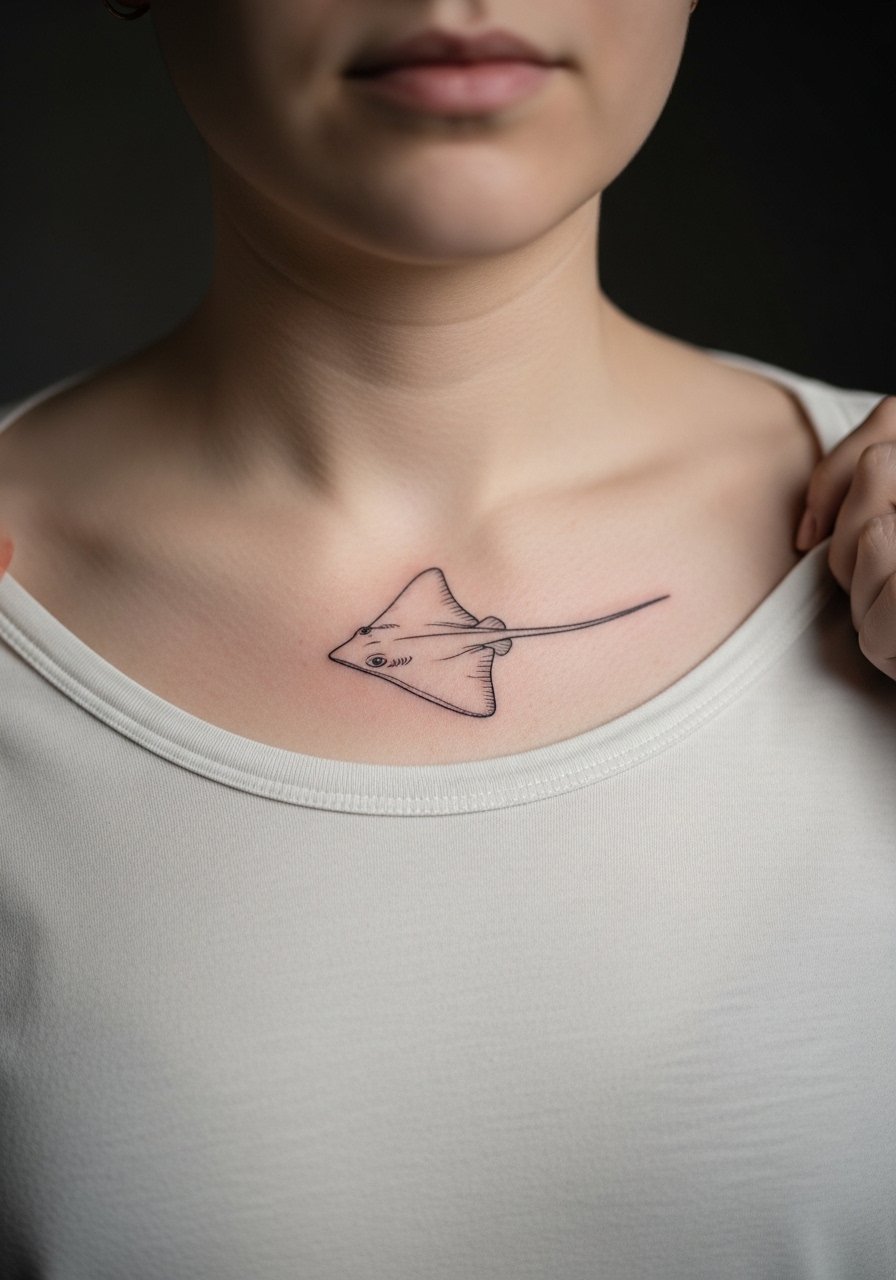
3. Illustrative Sting Ray Across the Sternum
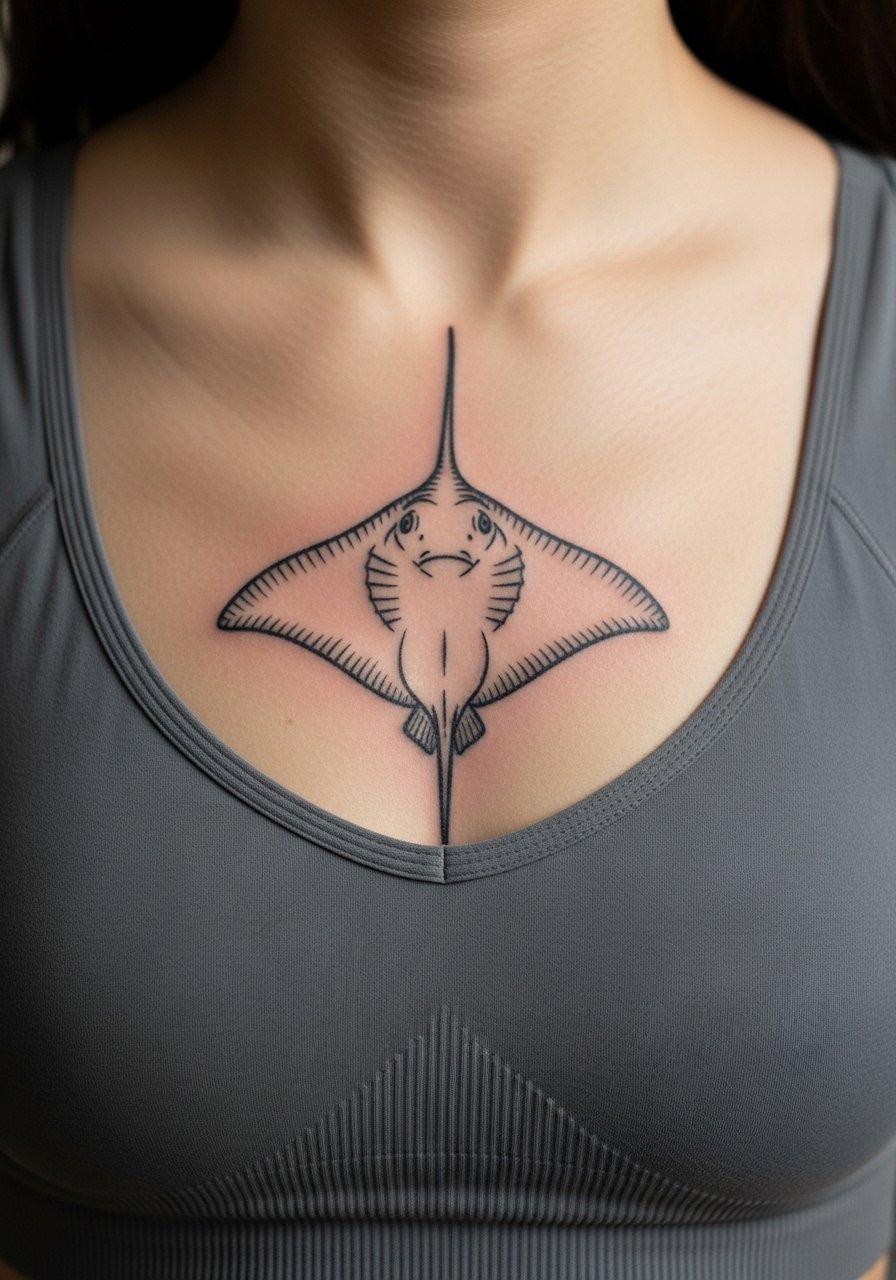
Sternum placements split artists into two camps. One group argues the chest moves and shifts too much, which blurs fine line inside two years. The other group says with proper depth and spacing fine line can settle and hold. The truth depends on your skin elasticity and how much the artist spaces the wings. Expect pain around a seven out of ten. Sessions can run longer if the design curves under the clavicle. During consultation, emphasize that the belly area of the ray stays open. For the session wear, a strapless or wide-strap top makes access easier and keeps the area comfortable.
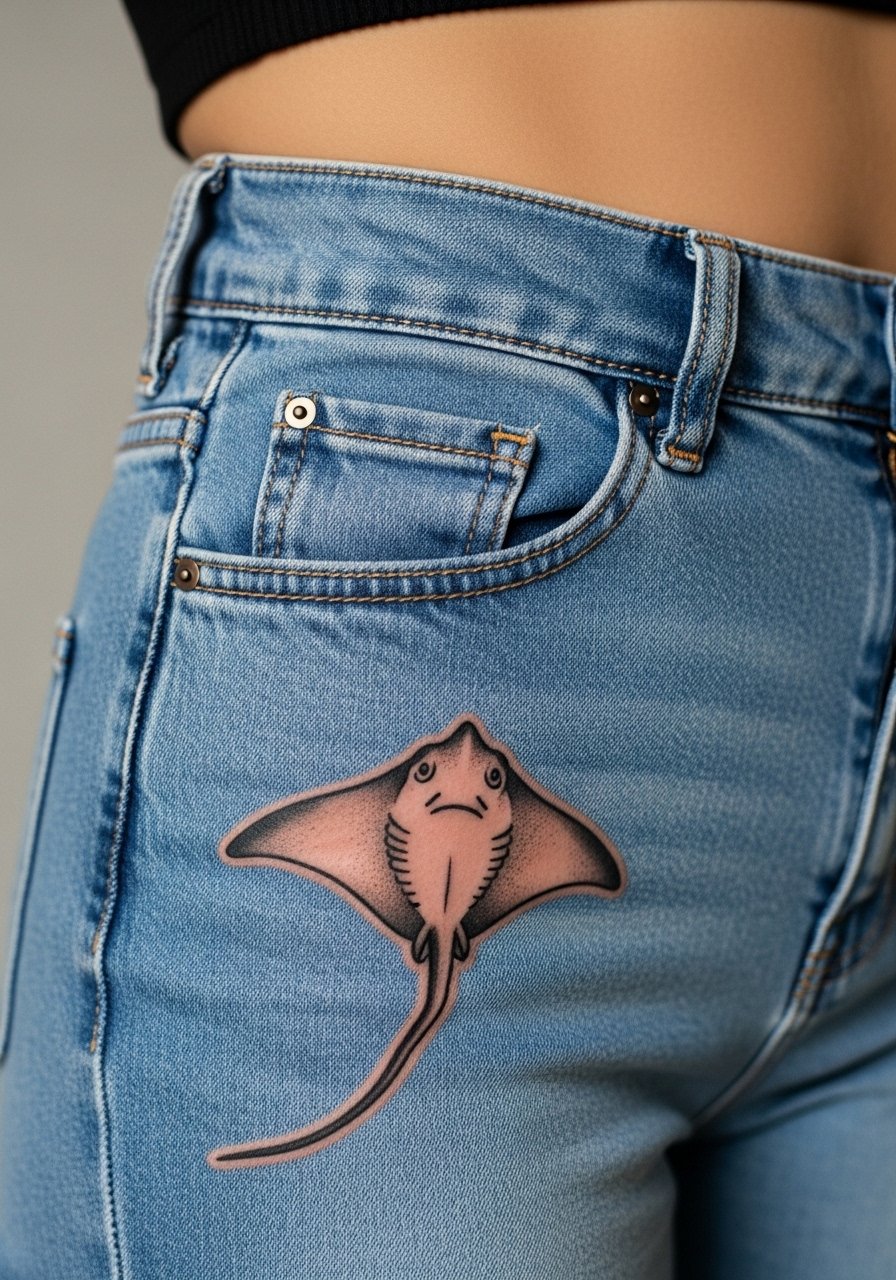
4. Watercolor Sting Ray with Soft Color Wash on Thigh
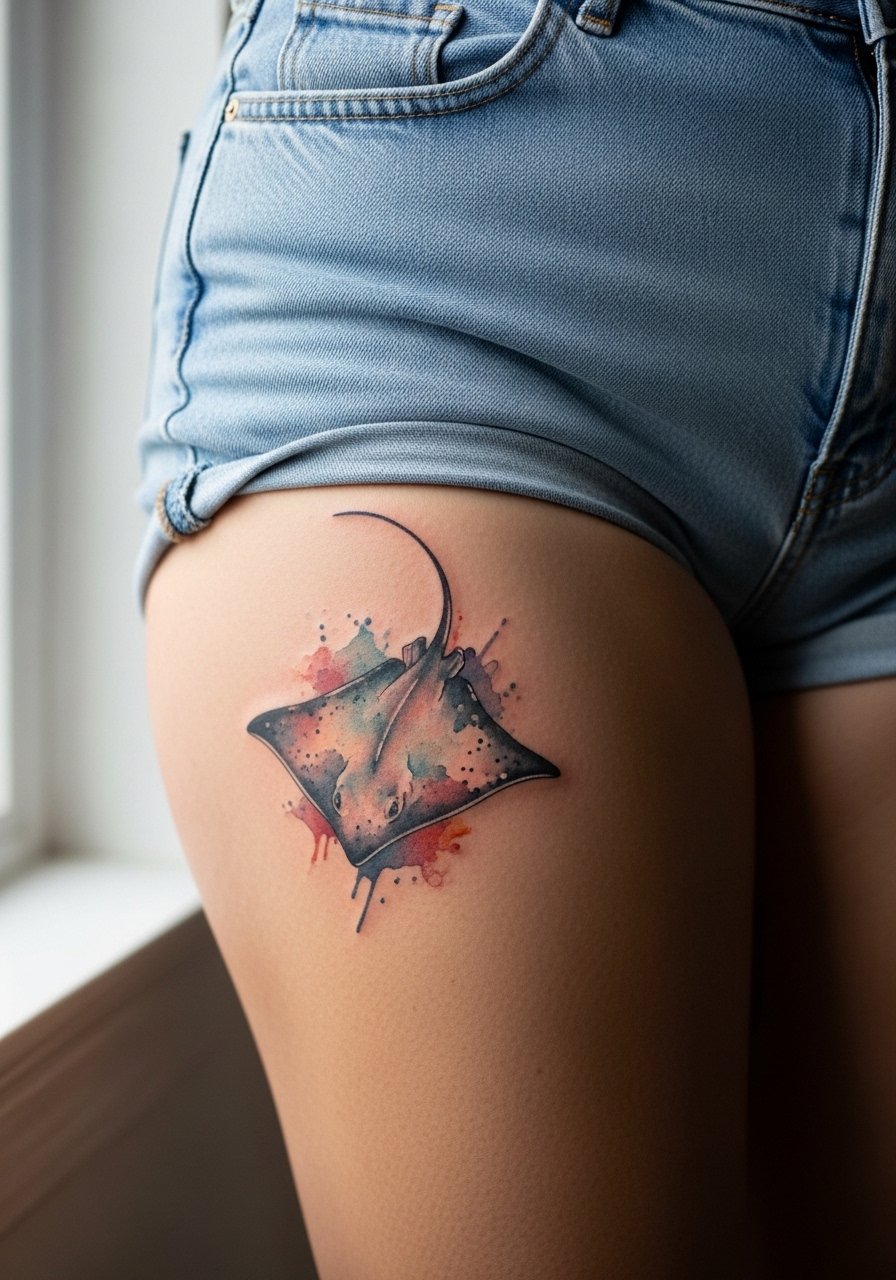
Watercolor washes give sting rays a dreamy motion, but the technique offers less saturation, so colors fade faster. I suggest using watercolor as an accent around a darker linework sting ray rather than the whole fill. The inner thigh is a forgiving canvas that keeps the contours clearer for longer than kneeling or ankle spots. Session time varies by size but plan for two to three hours. For showing off, pair the thigh piece with high-waisted shorts that reveal just the top curve of the wing.
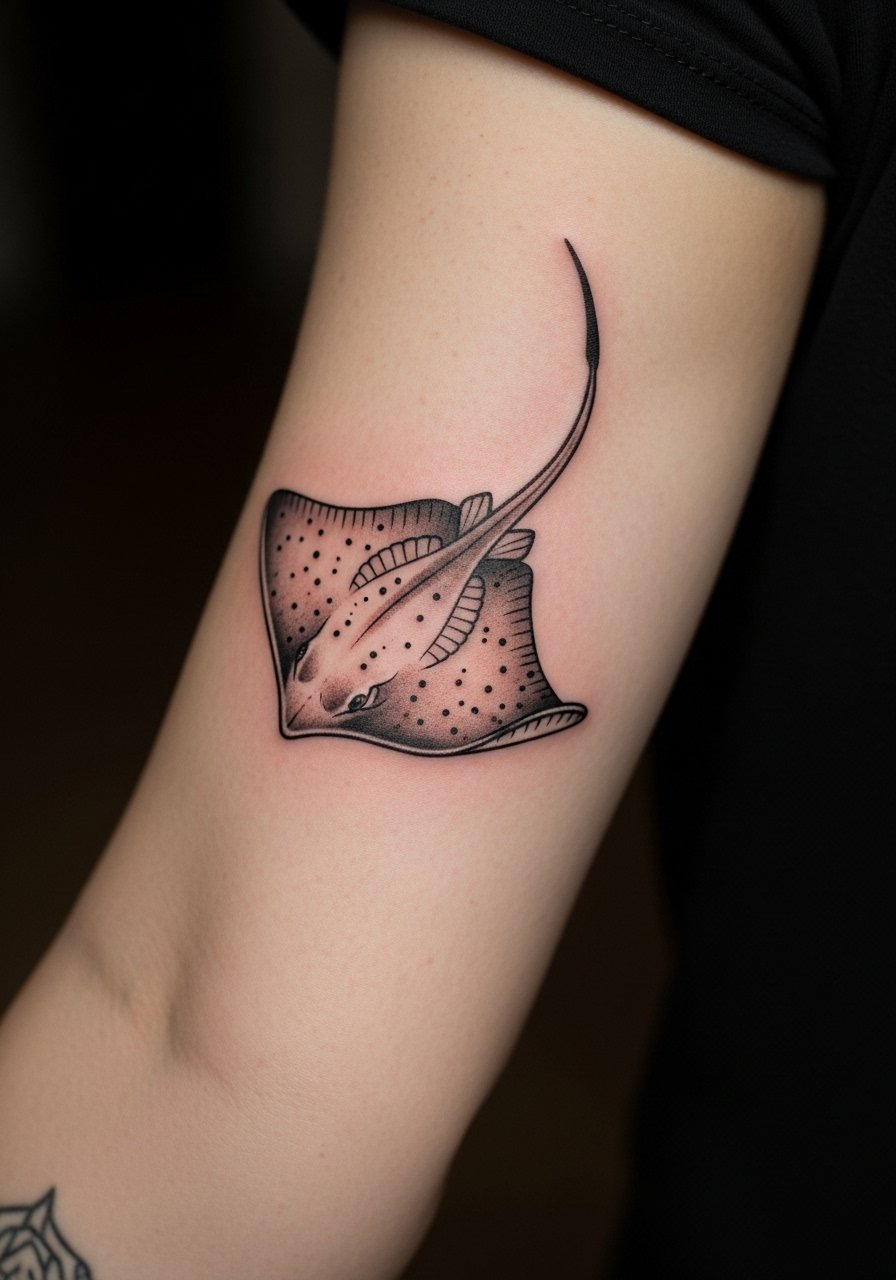
5. Bold Illustrative Sting Ray on the Calf
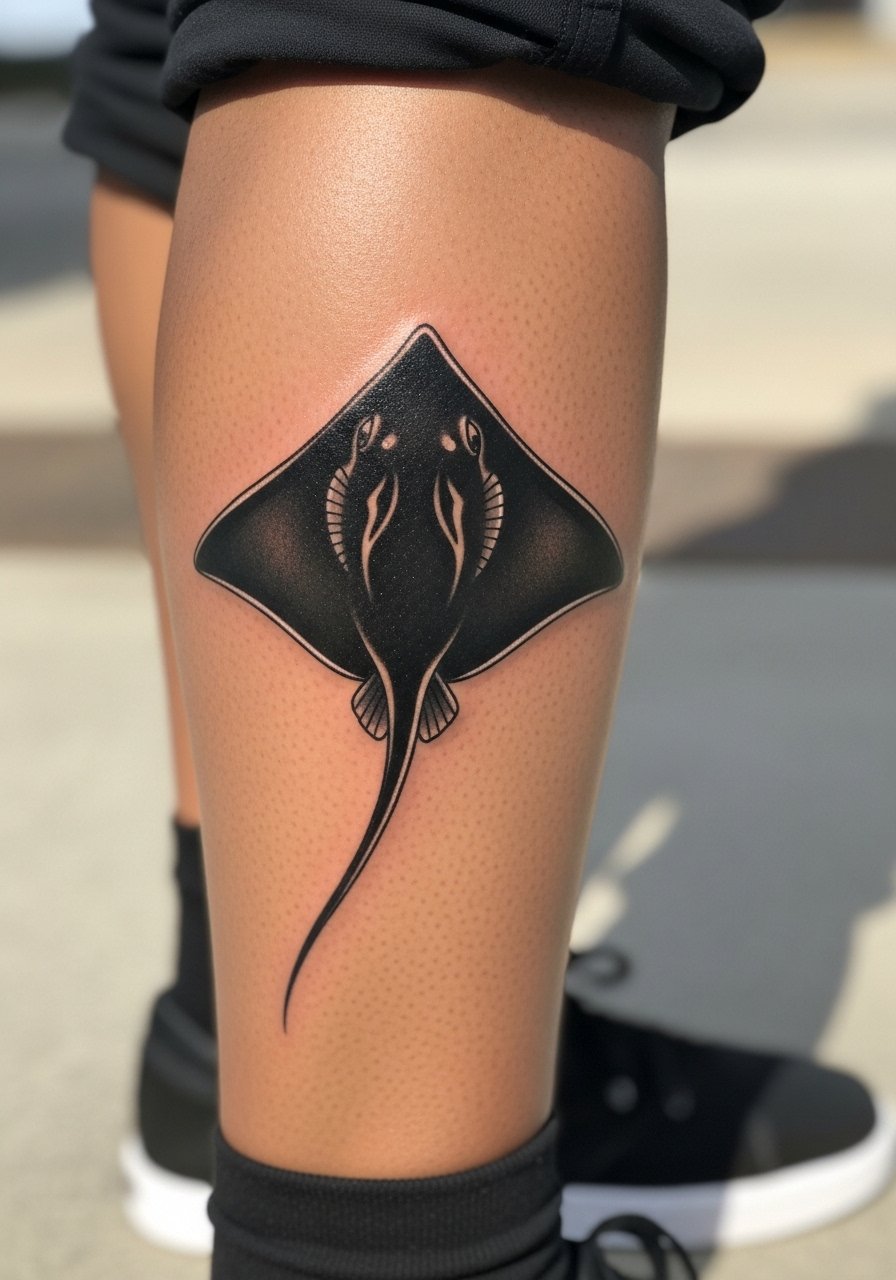
A calf piece reads from a distance and ages well when artists use saturated fills and strong linework. The biggest mistake is trying to miniaturize a design meant to be graphic. If you go bold, expect a two to three hour session depending on shading. Blowout risk is low here compared with the fingers or ribs. For the session wear a pair of loose drawstring linen pants you can roll up without pressure on the fresh ink. Calf work usually needs a touch-up at year three in sun-exposed legs.
6. Geometric Sting Ray Shoulder Wrap
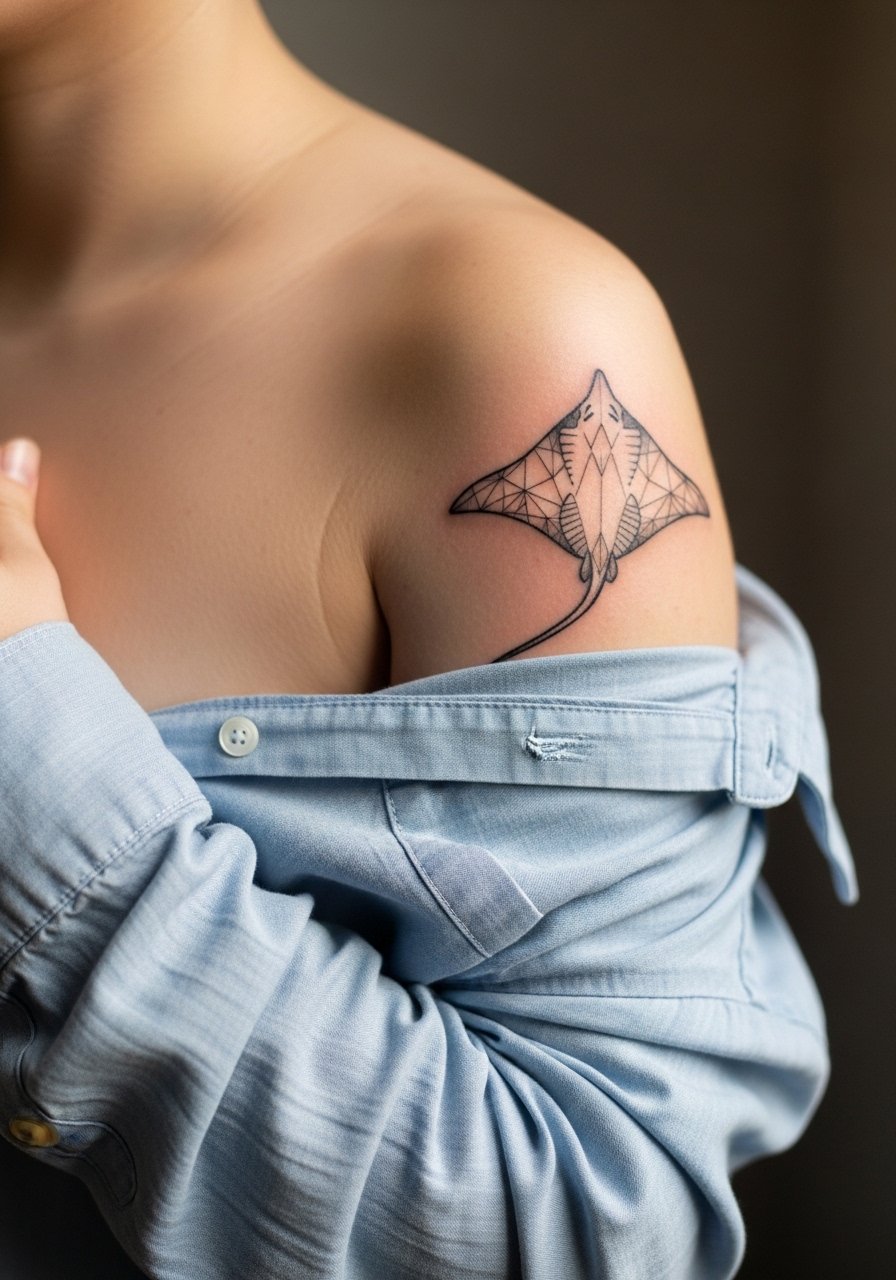
Geometry stabilizes detail. When you combine an illustrative sting ray with geometric elements it gives the piece structure so the wings hold shape as lines soften. Tell your artist you want negative space between geometry and the ray to prevent dense areas from merging. Shoulder pain is moderate, near a four, and session time often fits within two hours for a mid-sized wrap. For showing off, this placement pairs with a loose button-down shirt you can pull aside to reveal the curve without pulling at fabric.
Studio Day Picks
The inner forearm, shoulder, and calf pieces above need different prep than sternum and thigh sessions, so a few targeted items smooth the studio day and early healing.
-
Stencil transfer paper kit. Lets you understand scale and placement before the artist inks, which helps for forearm and shoulder layouts.
-
Topical numbing cream. Applied about 45 minutes prior eases the sting for sternum and inner thigh work without changing how the needle reads the skin.
-
Thin protective film roll. Useful for ankle and calf pieces that rub against clothing during the first week of healing.
-
Fragrance-free gentle body wash. Cleanses without irritating delicate lines on the inner forearm and behind the ear during showers.
-
Aquaphor healing ointment. A thin layer during the first few days locks in moisture for fine line work without smothering the needle channels.
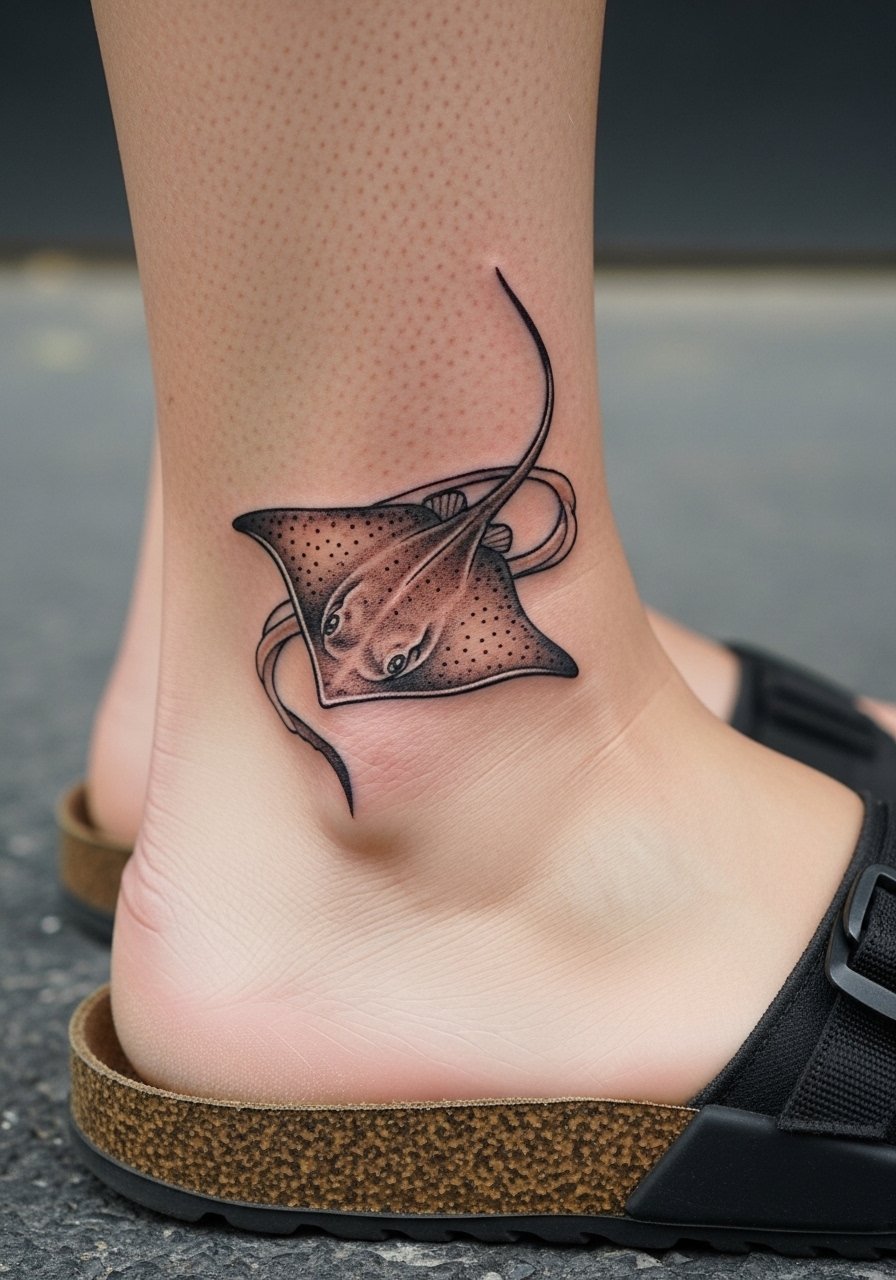
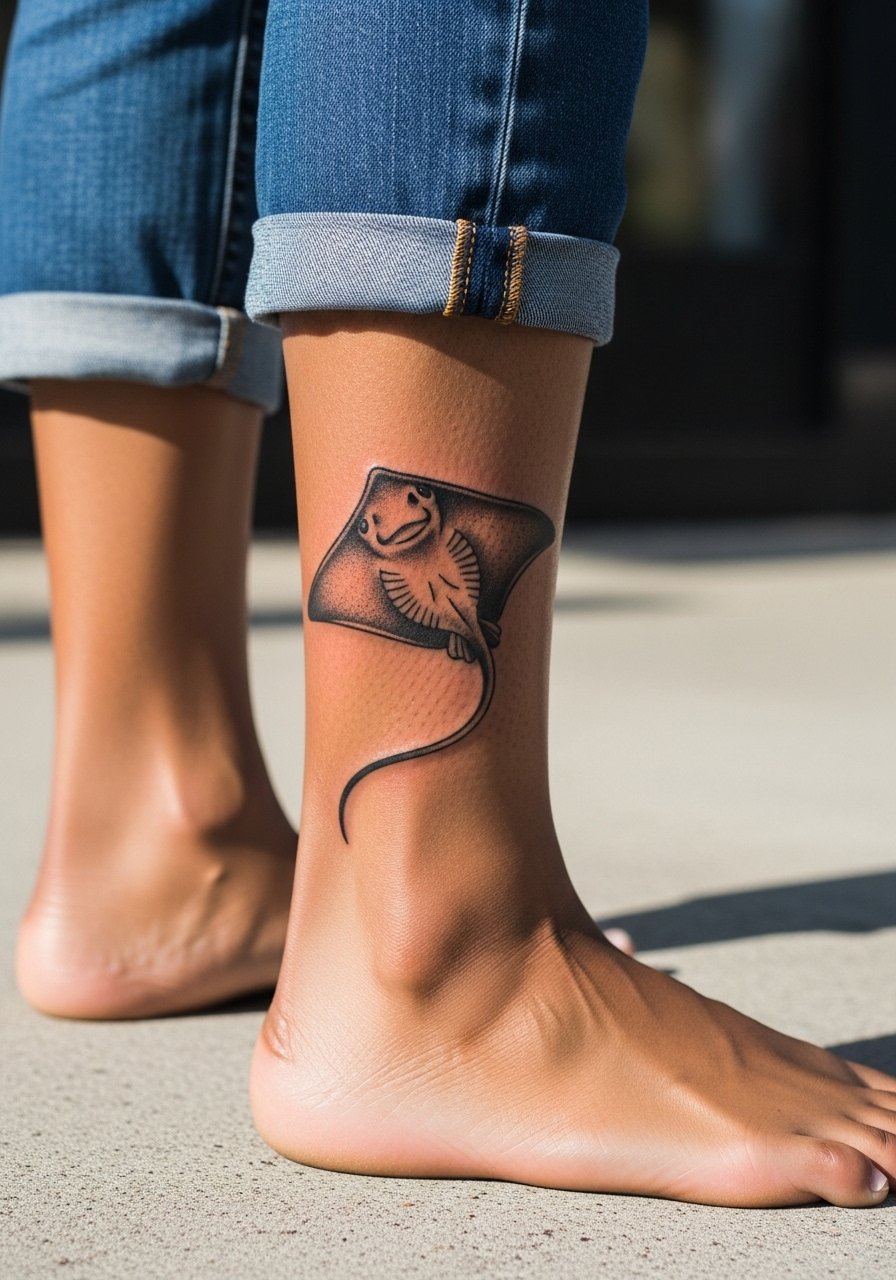
7. Micro-Realism Sting Ray on the Ankle
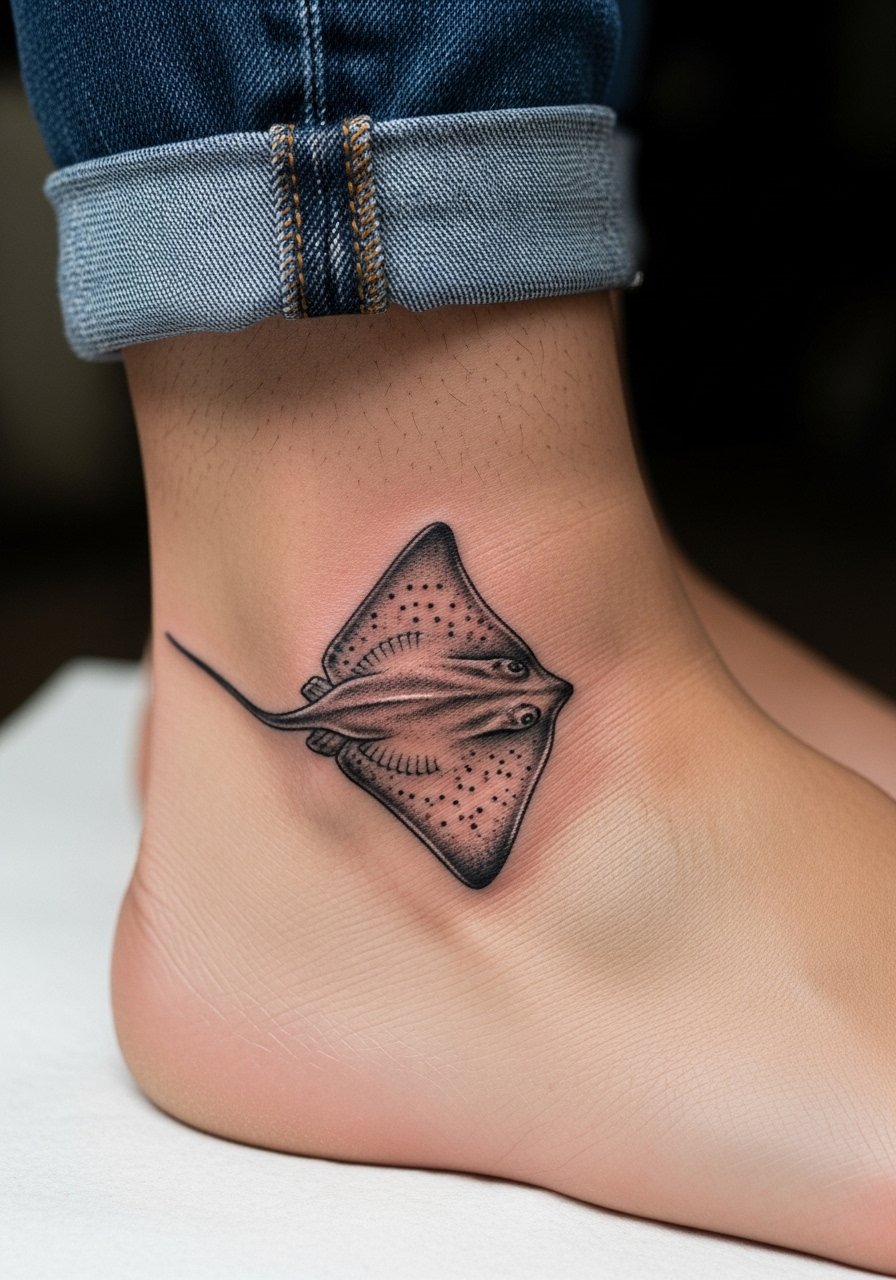
Ankle designs are charming but face constant friction from socks and shoes, so micro-realism needs dense contrast to last. The common mistake is leaving the belly area too pale. Ask for subtle stipple shading under the wings to maintain shape. Pain is about a five because of proximity to bone. Session time for a small ankle piece is under an hour. For showing off, choose sandals or rolled jeans and consider a thin anklet chain that frames the ray without rubbing the tattoo while it heals.
8. Illustrative Sting Ray as a Ribcage Swoop
Rib work divides artists into two camps. One camp says the constant expansion of skin there blurs fine line fast. The other camp argues that with proper spacing and needle depth the design keeps its contour. If you pick ribs, prioritize spacing and slightly bolder anchors at stress points. Pain is high, often an eight, and sessions can be split into two shorter appointments. A common error is squeezing too much detail into the wings. For the session wear a cropped top you can lift easily to reduce wardrobe fuss.
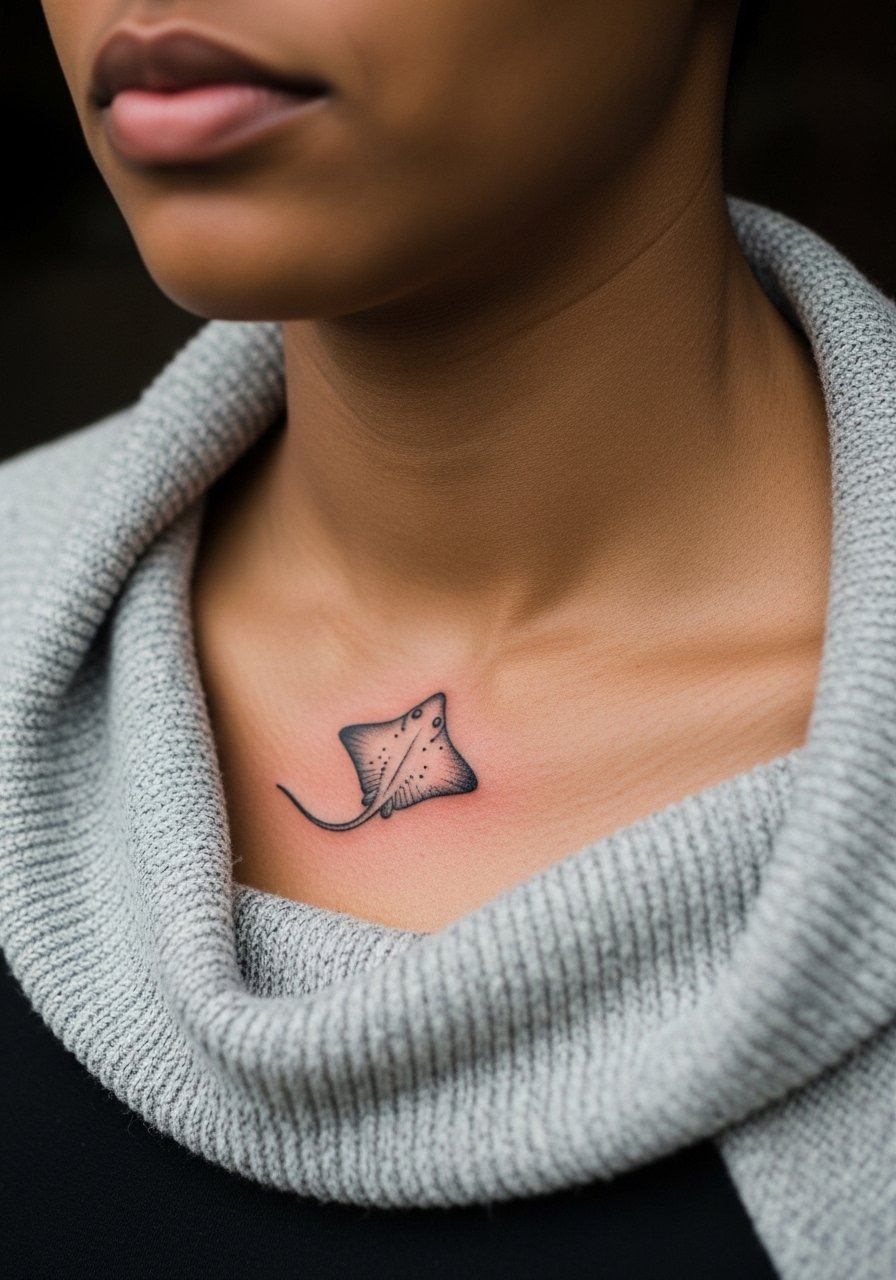
9. Linework Sting Ray on the Collarbone
Collarbone pieces catch light and movement and age differently because of sun exposure. The mistake is making the rays too small across the clavicle band. Instead, ask for slightly heavier anchor lines and airy interior detail so the wings retain shape. Pain is moderate, around a six, because of the bone. Sessions are often an hour. This placement pairs well with open-neck tops and a thin chain pendant necklace that sits above the design without competing.
10. Traditional-Influenced Sting Ray on the Upper Arm
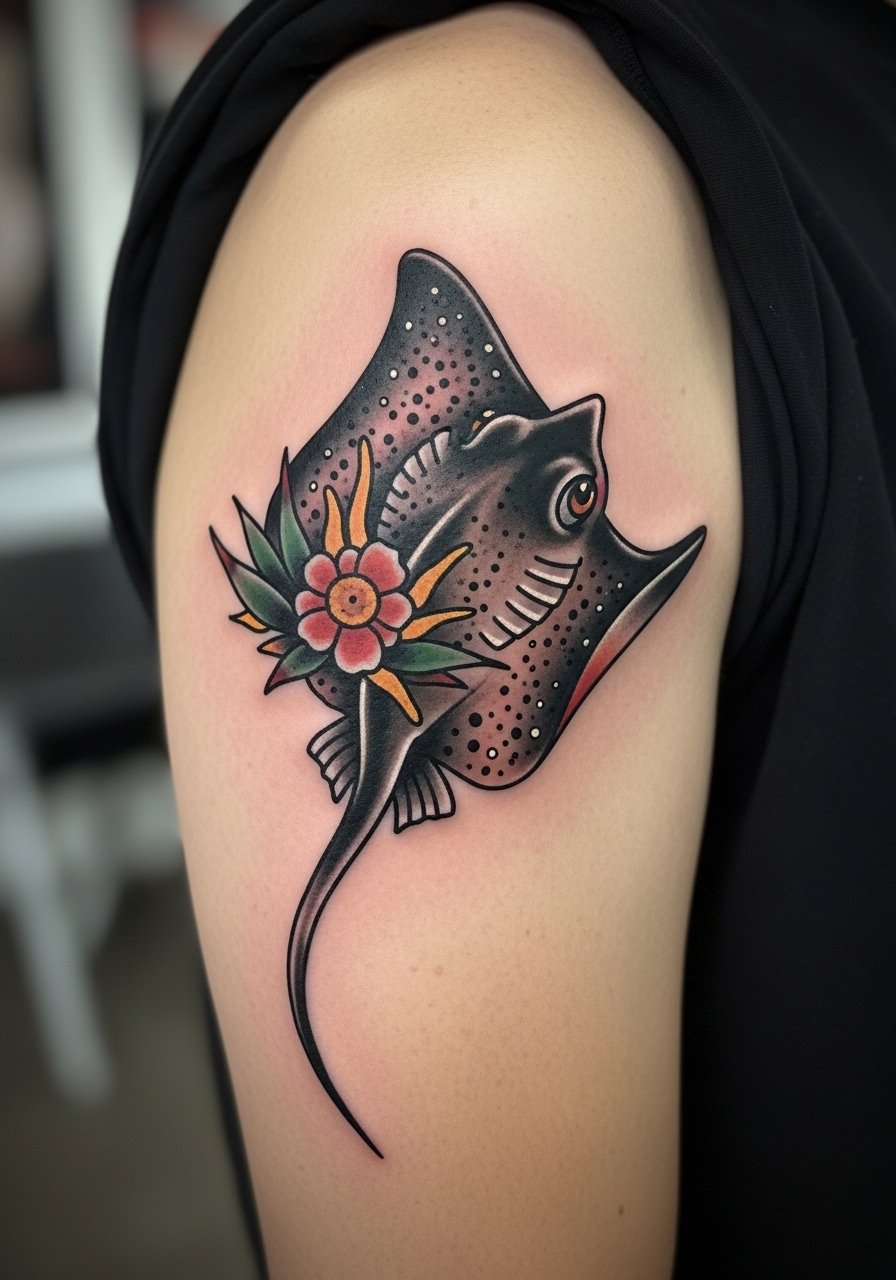
Traditional linework and saturation help this style outlast trendier options. The wings get simple stipple shading and bold rim lines to hold contrast as colors mellow. A common mistake is over-detailing the belly with micro shading that reads muddy after a few years. Upper arm pain is low to moderate, and sessions often fit into two hours. For showing off, short sleeves or a rolled sleeve cotton tee present the piece cleanly in casual settings.
11. Minimal Stick-and-Poke Sting Ray on the Wrist

Stick-and-poke has a distinct handmade look but the technique deposits less saturation so lines can fade faster on high-movement areas like the wrist. If you like the aesthetic, ask the artist for compact contrast at the wing edges and expect touch-ups around year two. Pain is tolerable, about a four. Session time is short. For showing it off, consider stacking a minimalist watch or slim bracelets that do not sit directly over the fresh ink.
12. Negative Space Sting Ray on the Back of the Hand
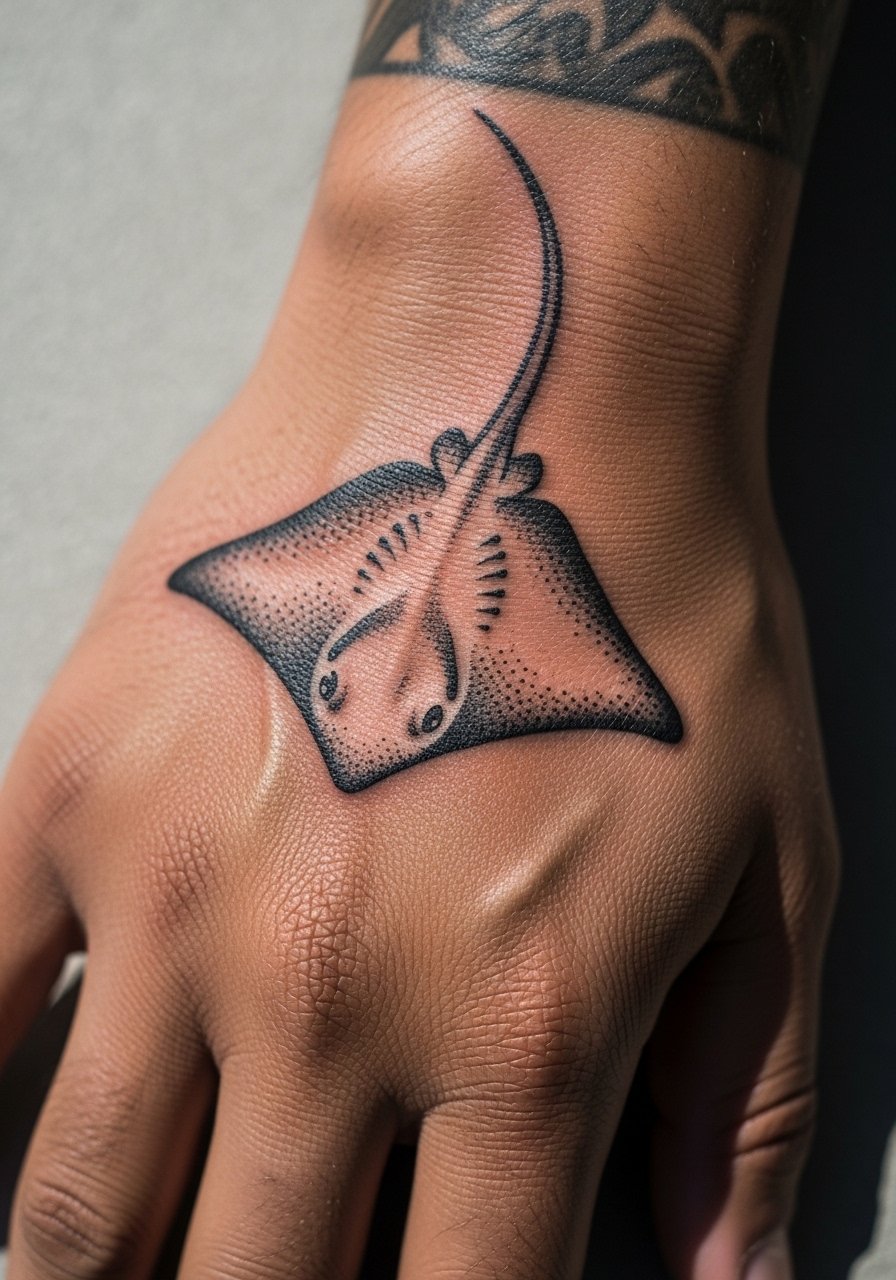
Hand tattoos age differently and carry professional visibility risks. Negative space designs can look crisp at first but the hand is a friction zone that blurs edges. Artists caution that hands need regular touch-ups. If you want a hand piece, make the silhouette bold and avoid micro interior detail. Pain is high, and healing is slower because the area is used constantly. For career considerations, think about how the placement might affect job settings. During the appointment, keep the hand rested on a clean surface so the artist can work steadily.
13. Illustrative Sting Ray Sleeve Anchor on the Upper Forearm
Using a sting ray as a sleeve anchor gives the rest of the sleeve a focal point that reads across movement. The key is scale. Make the ray large enough so the wing tips do not vanish as surrounding filler settles. Tell your artist you want the belly area slightly denser to form the anchor. Pain is modest and sessions may be split into two for shading. For showing off, roll up sleeves or pair with a linen blazer that lets the forearm peek out without covering the piece.
14. Waterline Sting Ray Around the Ankle Bone
Ankle bones demand that linework follows contour. The common error is forcing a flat reference onto a curved surface. Ask your artist to adapt the ray so the wing appears continuous when the foot is relaxed. Pain ranges five to six near the bone. Expect the piece to need a minor touch-up after heavy sneaker seasons. For showing off, sandals and cropped pants work well, and a thin anklet chain can frame the curve without touching the tattoo while it heals.
15. Illustrative Sting Ray with Mandala Texture on the Back
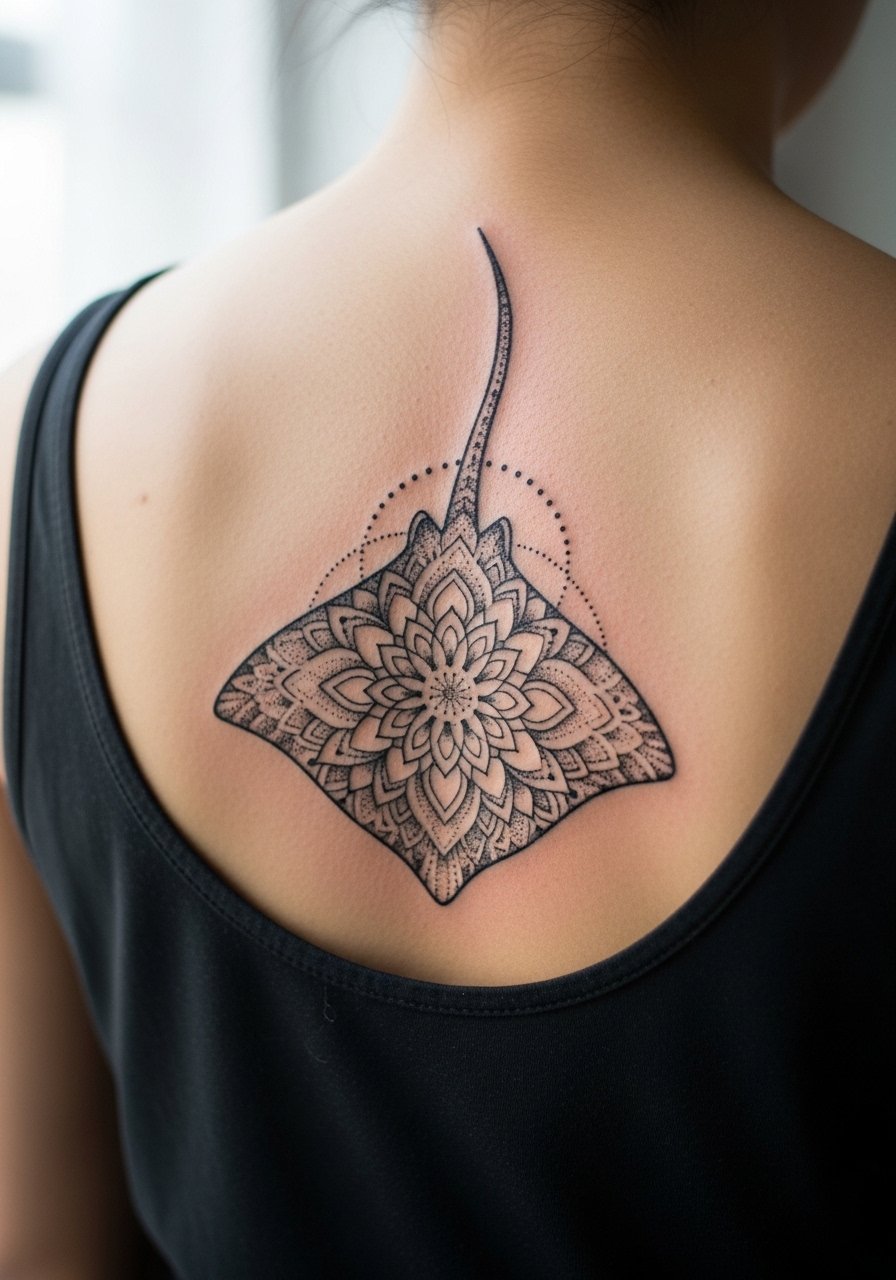
Combining mandala texture with a sting ray adds ornamental interest but comes with cultural sensitivity. Some mandala patterns trace to Buddhist traditions, so many people opt for original patterns inspired by those motifs rather than direct replicas. Ask your artist for a custom pattern that respects the source while fitting the ray's curvature. Mid-back sessions are moderate on pain and often require longer appointments to finish the detail. For showing off, open-back tops present the piece cleanly.
16. Tiny Illustrative Sting Ray on a Finger
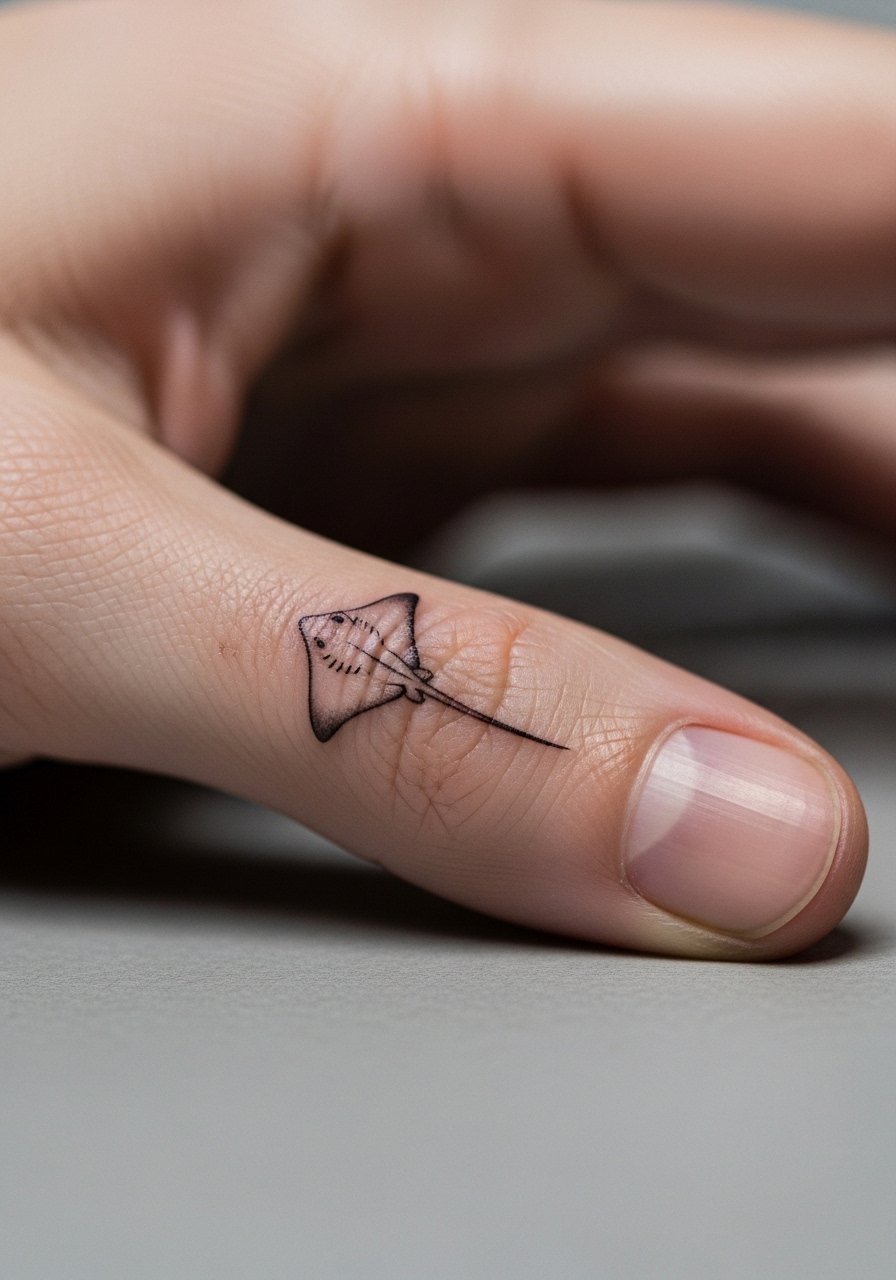
Finger tattoos are the fastest to age because of the skin turnover and constant washing. The common mistake is demanding too much interior detail. If you want a finger ray, keep the silhouette simple and accept annual or biennial touch-ups. Pain is high for such a small canvas. Sessions are quick but require a steady hand. For accessories, choose thin rings that sit away from the tattoo while it heals, and avoid stacking rings directly over the fresh ink.
17. Illustrative Sting Ray Calf-to-Achilles Flow
Flowing pieces that move toward the Achilles look dynamic when the artist follows muscle lines. The biggest mistake is breaking the flow with heavy shading at the joint. Ask for gradual tapering of scale and line weight so the design moves with motion. Pain varies but increases near the Achilles. Session time will stretch if the artist layers stipple shading. For showing it off, rolled jeans and ankle boots reveal the shape without irritating the site.
18. Illustrative Sting Ray on the Hip Curve
Hip pieces sit in a stretch area that can change with weight fluctuation and movement. The common error is placing small, delicate lines across fluctuating skin. I advise slightly bolder anchors and airy interior shading. Pain is moderate and sessions are comfortable if you wear loose bottoms. For the appointment, a pair of high-waisted jeans you can lower slightly is ideal. For showing off, high-cut swimwear frames the curve cleanly.
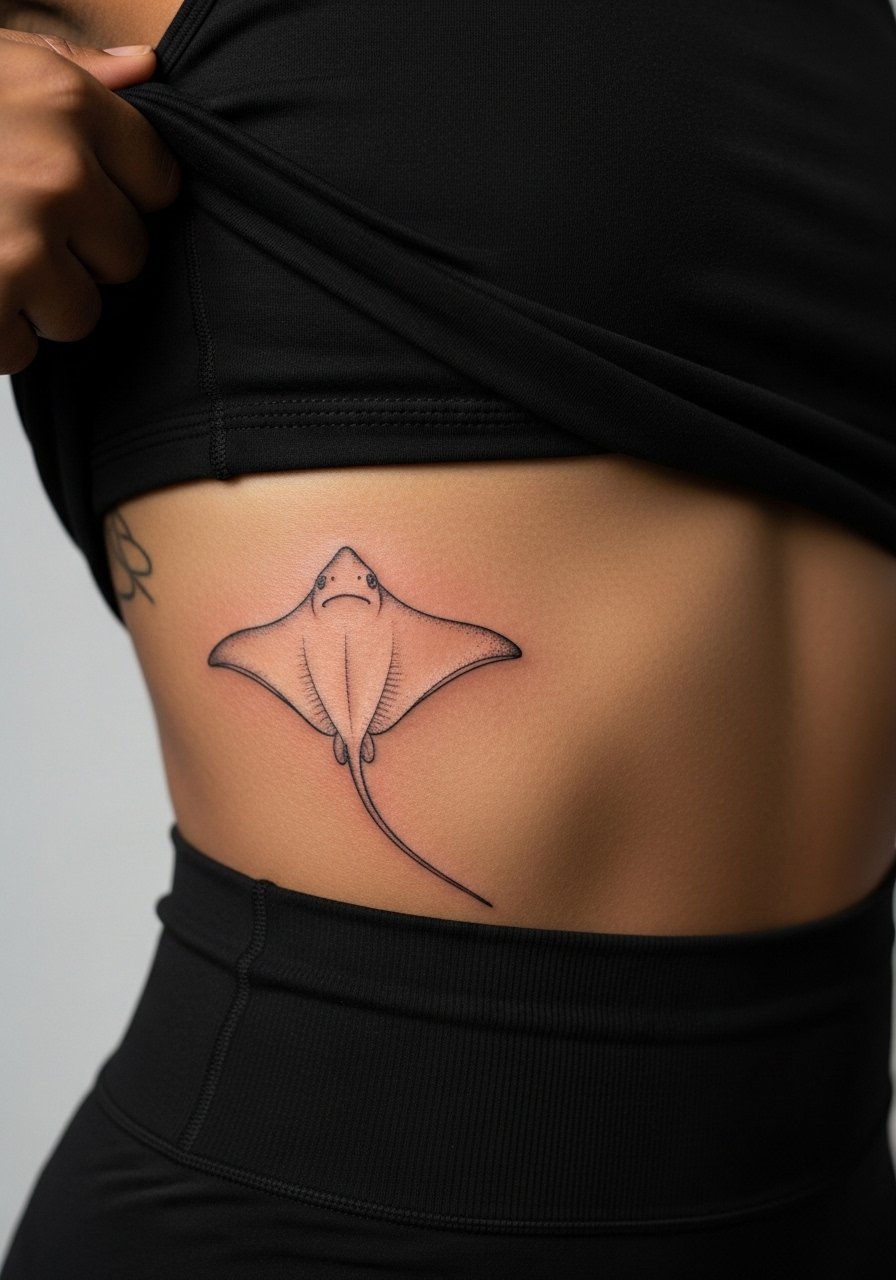
19. Stylized Sting Ray on the Lower Back
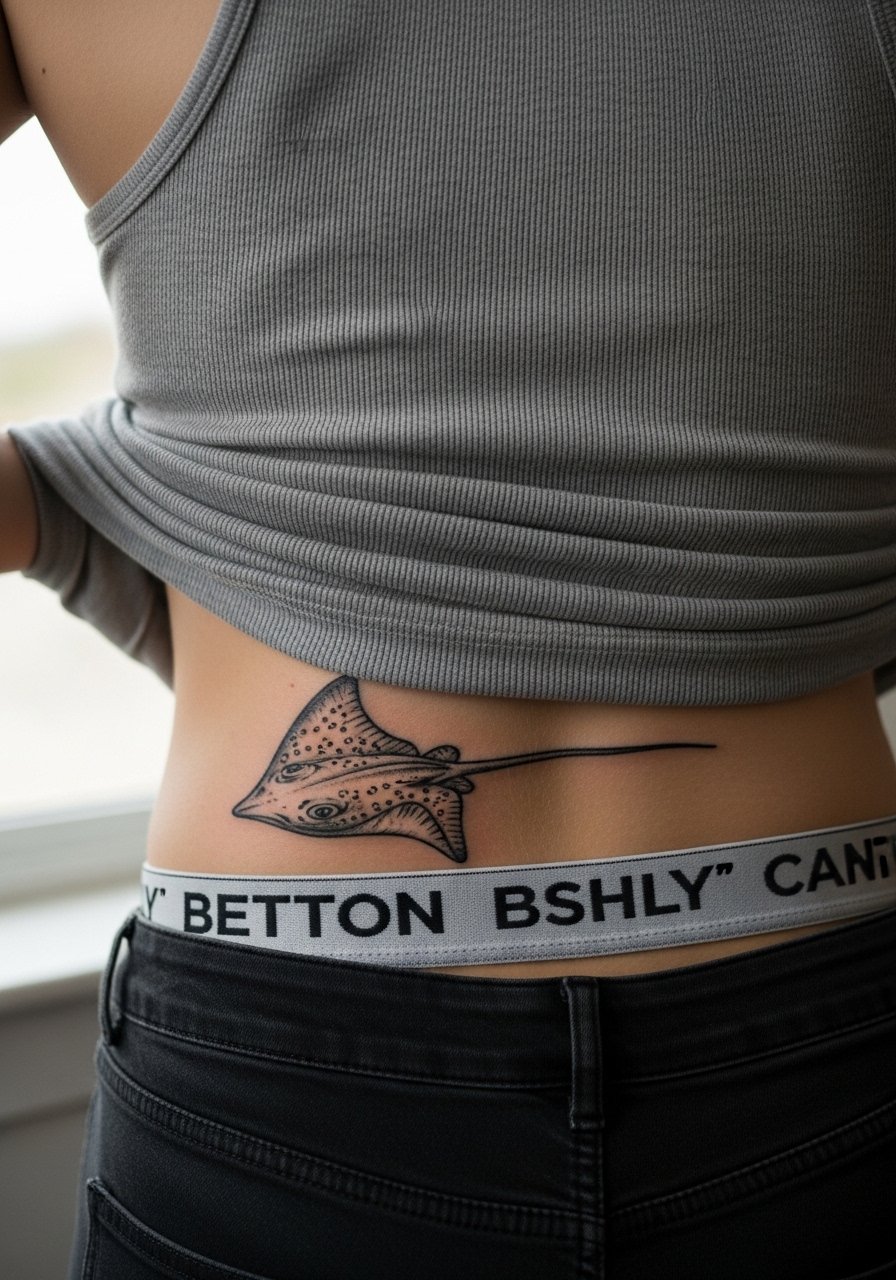
Lower back work reads well under clothing and hides easily if needed. Artists warn against compressing dense detail into a short horizontal span. Wider wings with negative space keep the piece legible as you sit and bend. Pain is moderate and healing is usually straightforward because friction is minimal. For showing it off, high-waisted bottoms or low-slung belts can reveal the piece selectively. Consider how dresses or belts might sit across the wings.
20. Illustrative Sting Ray as a Collar Tattoo Accent
A collar accent is delicate and highly visible, which is exactly the point. The mistake is making the design too fine where sun exposure is strong. Ask for clearer outer lines and a light interior wash instead of detailed micro shading. Pain sits around a six. Sessions are usually under an hour. Pair the piece with scoop or wide-neck tops and a thin chain pendant that sits above it without covering the ink.
21. Illustrative Sting Ray on the Inner Bicep

Inner bicep placements are tucked and age well for detailed work because they avoid constant sun and friction. The main mistake is asking for too much fine detail that needs lots of contrast. Ask for medium linework with stipple shading to hold texture as the piece heals. Pain varies but is often lower than the ribs. Sessions can be comfortable and fit into a single appointment. For the session wear a loose tank top so the artist can access the area cleanly.
Frequently Asked Questions
Q: How long will a fine line illustrative sting ray on the forearm stay readable before a touch-up?
A: From what I have seen, fine line forearm work usually shows noticeable softening around year two to three. If the design has slightly stronger anchor lines and some interior contrast it can stretch that window. Plan for a touch-up in that timeline if you want crisp edges long term.
Q: Are watercolor sting rays a bad idea on the thigh if I want longevity?
A: Watercolor can look great on the thigh because the area avoids constant abrasion and sun. The trade-off is lower saturation so expect color shifts sooner than solid blacks. Consider combining watercolor accents with dark linework to keep the shape legible over time.
Q: Should I avoid getting a hand or finger sting ray because of work concerns?
A: Hand and finger pieces are highly visible and some workplaces still frown on them. Also they need more frequent touch-ups because of skin turnover. Think about your career trajectory and whether a small placement like behind the ear or lower back might offer the visibility you want with less professional risk.
Q: Will a sternum sting ray hurt a lot and how should I dress for the session?
A: Sternum sessions rank high on the pain scale for many people. For comfort and access wear a fitted sports bra or a strapless top so the artist can work without you fussing with clothing. Bring a loose cover-up for after the session to avoid rubbing the fresh ink.
Q: How do I find an artist who understands illustrative sting ray work without naming anyone?
A: Search local directories and hashtag feeds for "illustrative sting ray" plus your city, look for convention booths with illustrative portfolios, and check community forum threads for shop recommendations. When you consult, ask about healed photos and how they handle spacing for skin that moves.
