
Fine line trends and neo-trad keyblades are both everywhere right now, but the pieces that still look clean after a few years are not always the ones that scored the most likes on launch day. Fading, ink stretch with body changes, and blackwork that reads differently on darker skin are the three problems I see most. Read on for 21 specific takes that address those issues and the design choices to ask for at consult.
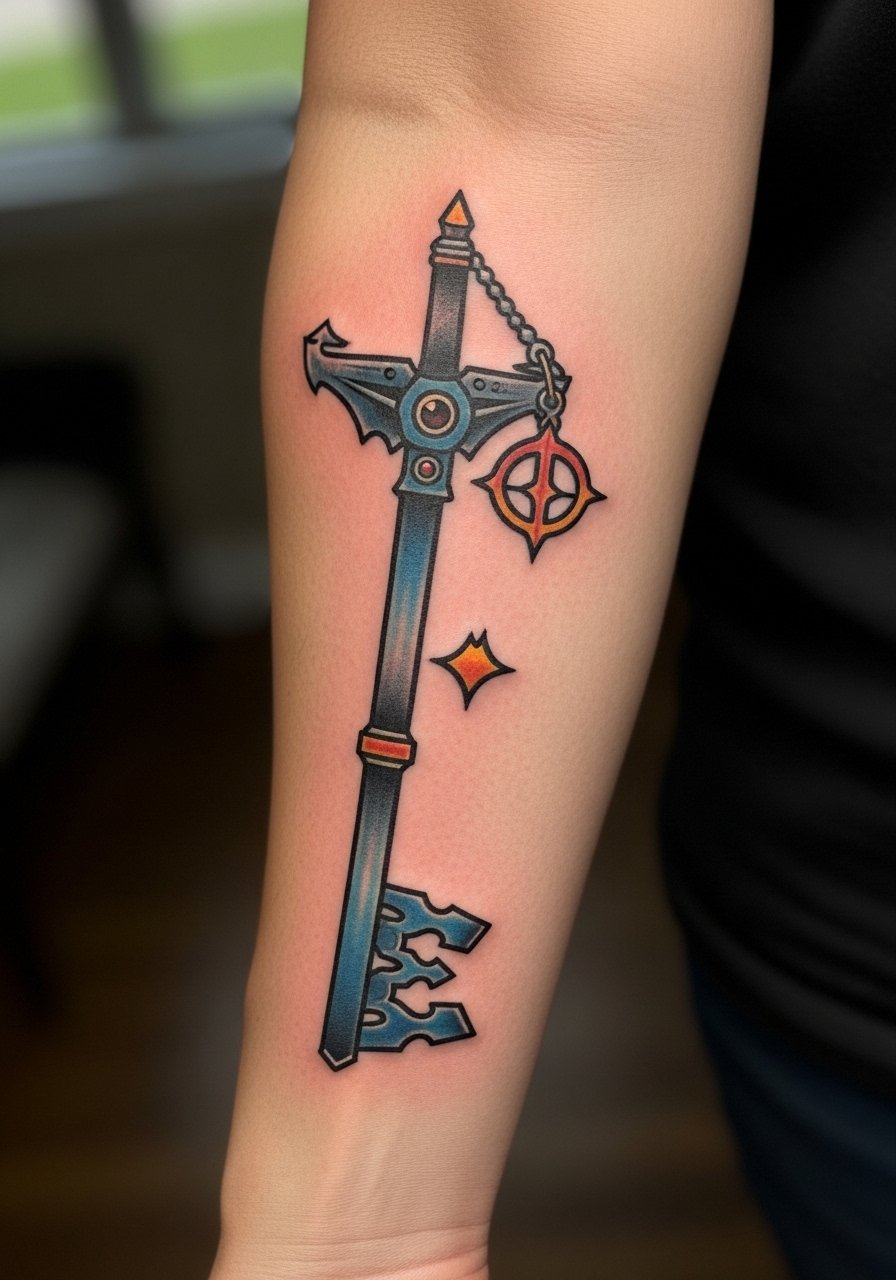
1. Neo-traditional Keyblade with Shattered Heart on Outer Forearm
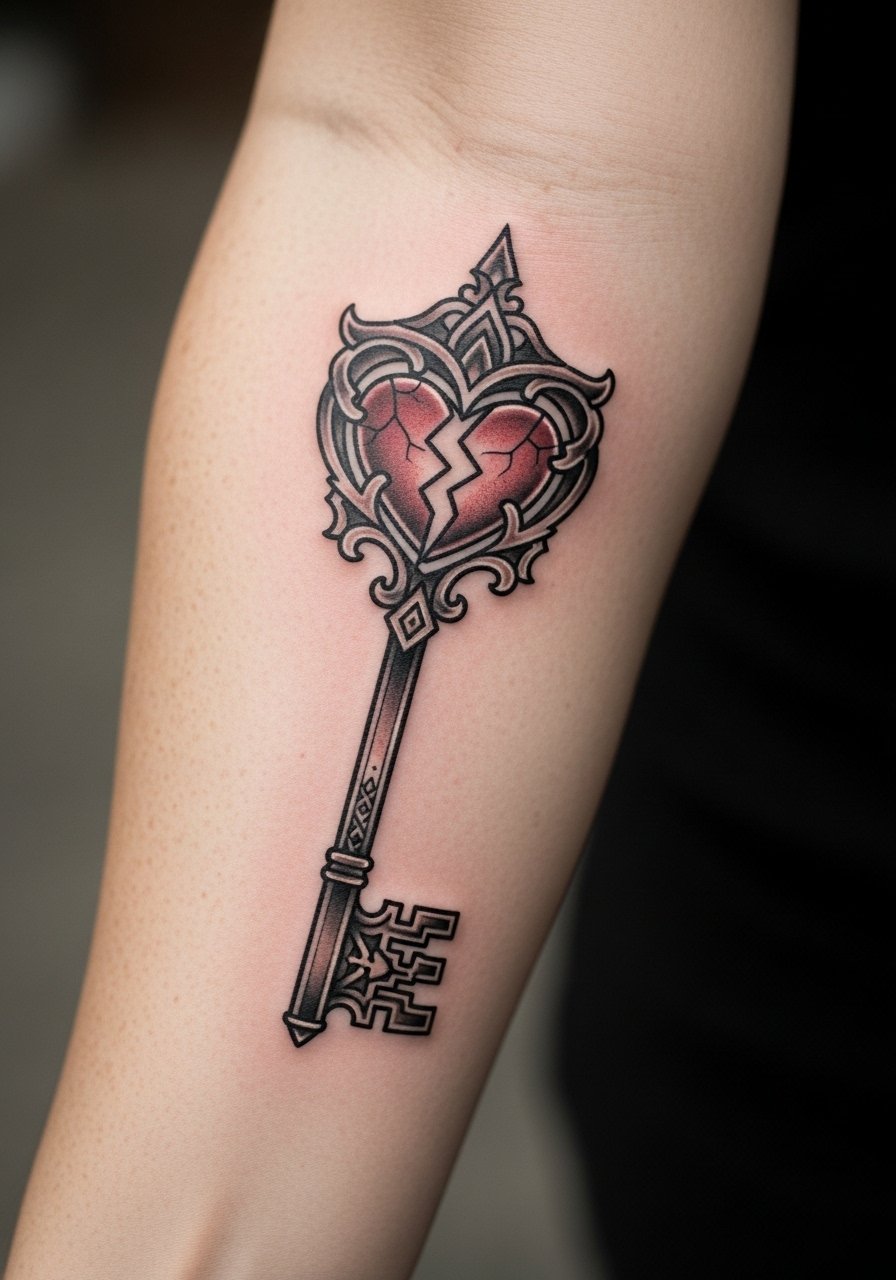
I open with this because forearm keyblades still age well when done with the right lineweight. I recommend asking for thicker outlines around the keyblade and a slightly reduced color palette so the saturation holds without muddying in two years. Common mistakes include requesting tiny filigree on an area that bends when you type, which causes blowout and smoothing. Expect a one to two hour session for a 4-6 inch piece and minor soreness the first day. For showing it off, roll sleeves back and wear a loose fit tank top during the session so the artist has clean access.
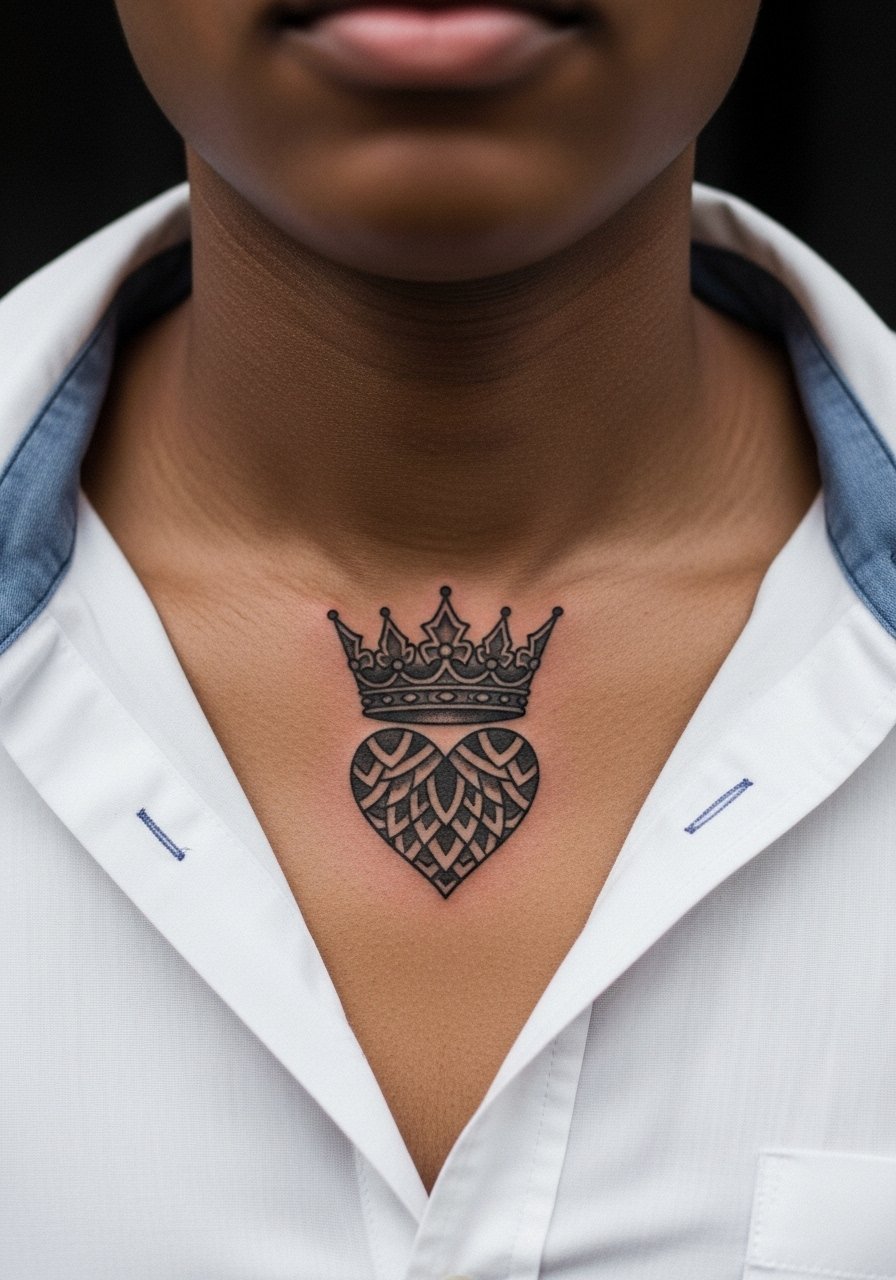
2. Crown Heart Blackwork on the Collarbone
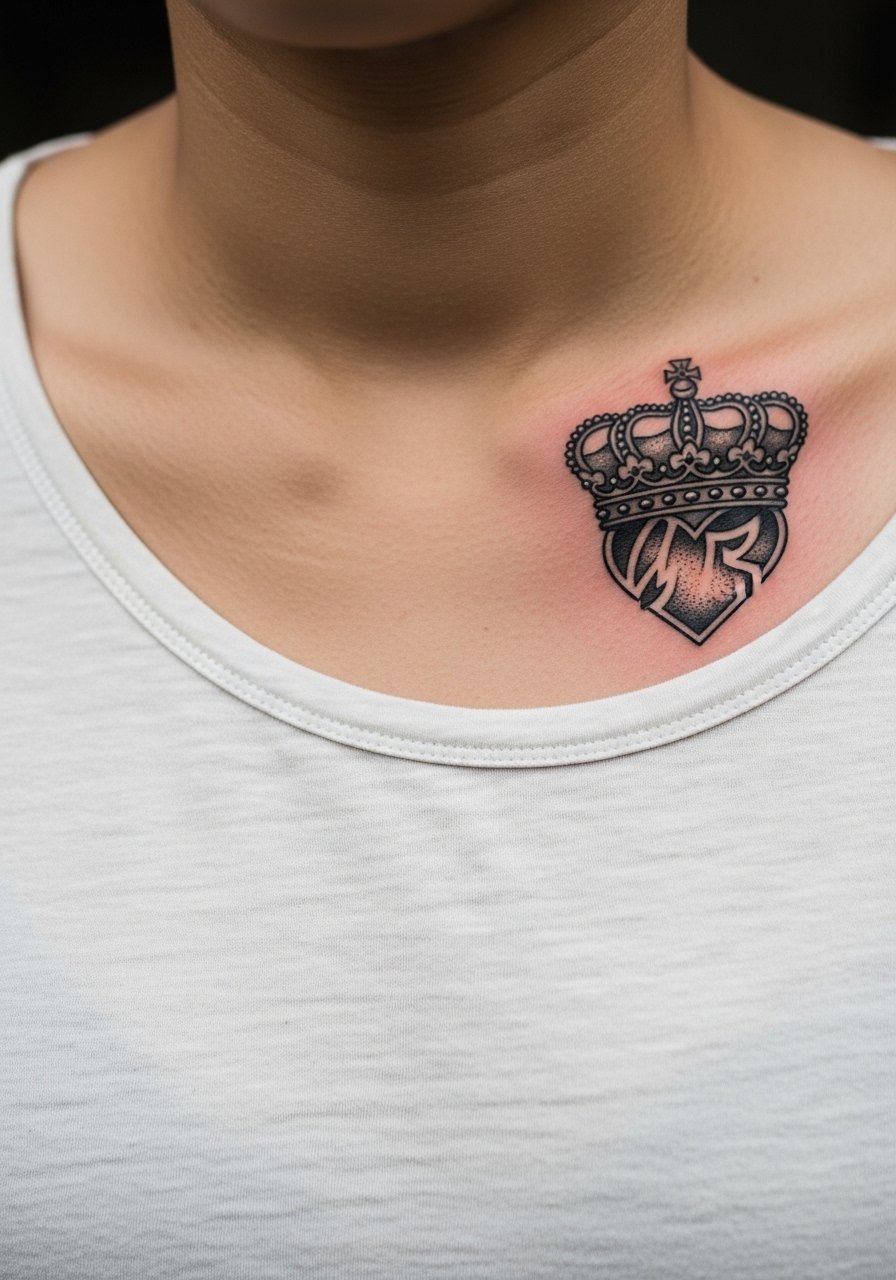
Fair warning: collarbone pieces are highly visible and they show contrast differences across skin tones. The fix is thicker black fills and a small halo of negative space so the symbol reads on medium and dark skin. Tell your artist you want a bold silhouette and to test the stencil on your skin tone under natural light. Pain is moderate and the session is usually short for a 3 inch mark. For nights out, a v neck tee or an off-shoulder sweater frames this piece without covering it.
3. Sora Silhouette Illustrative on the Thigh
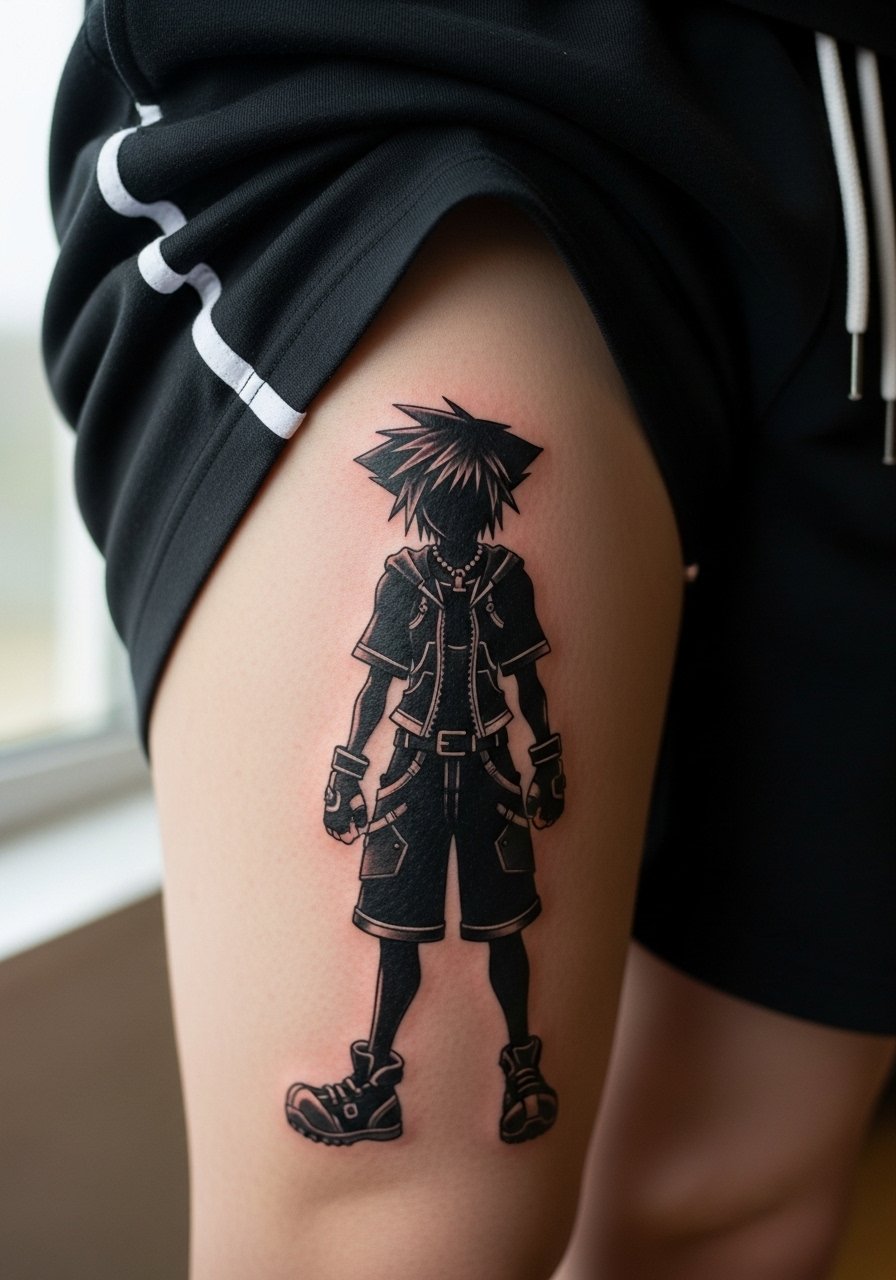
Thigh placement gives breathing room so illustrative silhouettes keep their shape even with weight changes. I tell people to pick a 5-7 inch scale and to request blocky shadow shapes rather than microscopic hairline detail. A common mistake is compressing the pose to fit a smaller area, which blurs when the skin moves. Session time is often two separate visits for shading and refining. For the appointment, throw on high cut shorts so the artist can roll the leg without tugging at fabric.
4. Traditional Heartless Creature on the Calf
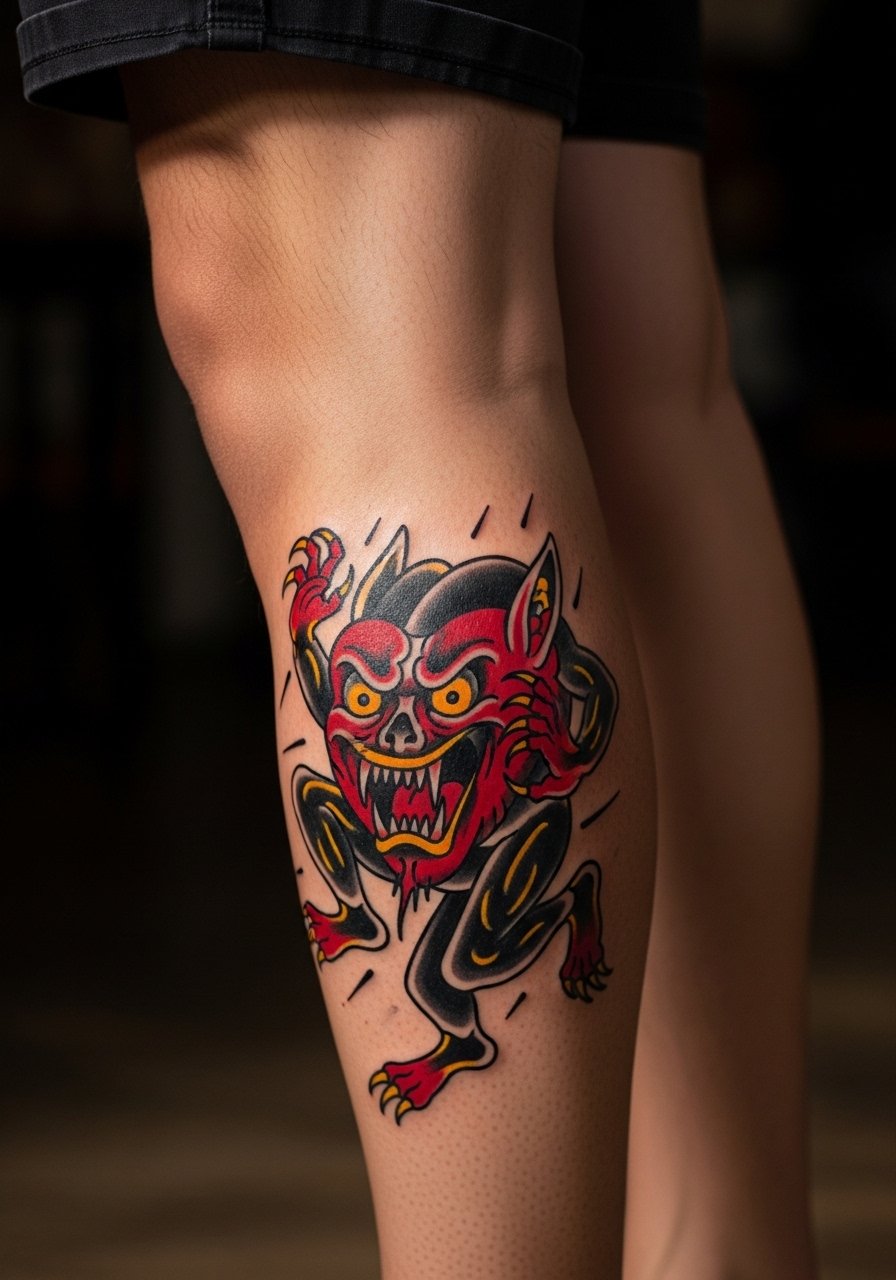
Calf tattoos survive gym life better than some other lower-body spots. For heartless motifs go for bold color blocks and a heavier outline so the dark shapes remain separate after workouts and muscle changes. The typical error is squeezing too many tiny teeth or spikes into a 3 inch spot, which looks busy after six months. Expect one to three sessions depending on saturation and a soreness that affects walking for a few days. Roll mid-calf joggers or wear combat boots with cropped pants when you want to show it off.
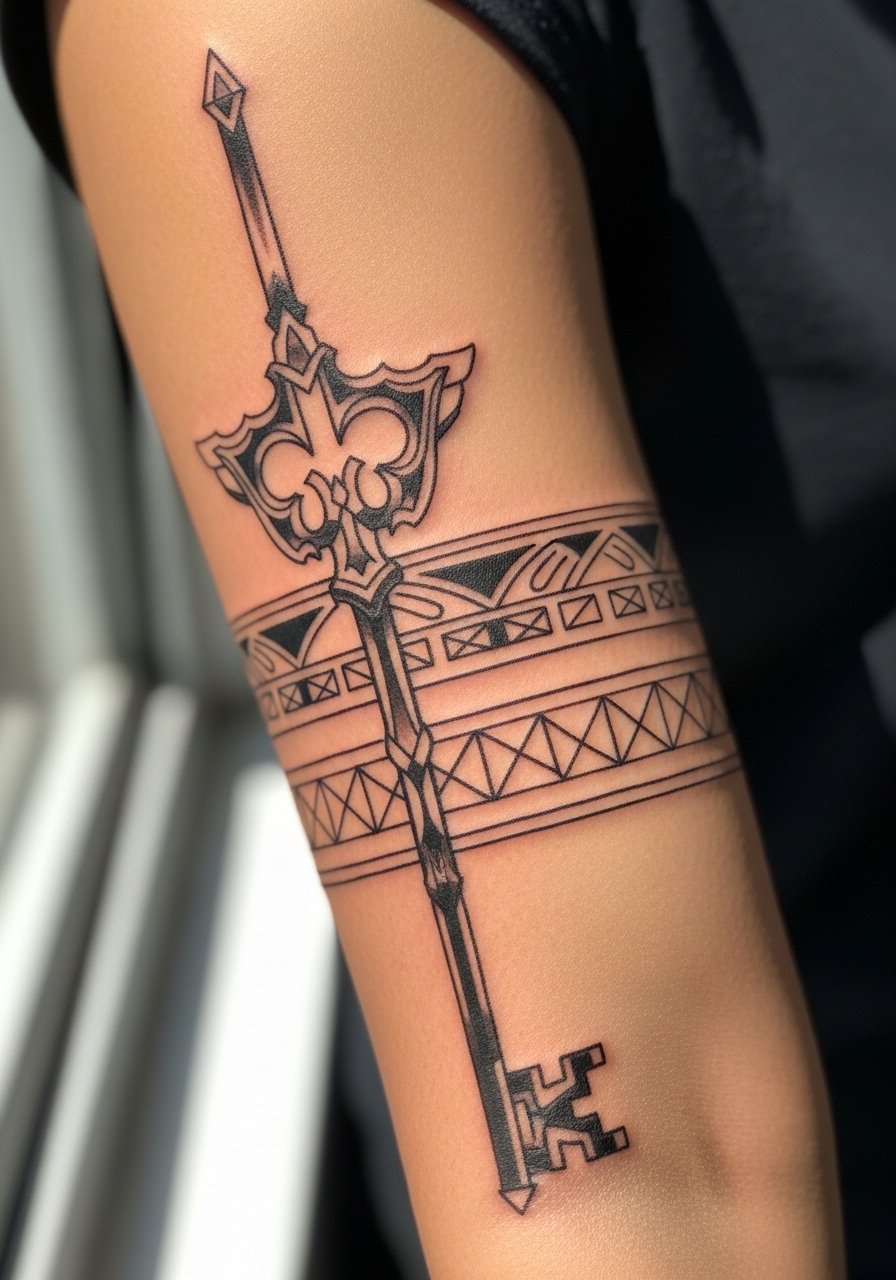
5. Keyblade Crossed with Paopu Fruit, Fine Line Inner Bicep

This is the subtle storytelling tattoo people ask for when they want personal symbolism without a full sleeve. Heads-up on the debate: one camp says fine line belongs on inner arms and settles well when placed correctly. The other camp warns that single-needle work fades faster on moving skin. Ask for slightly denser lineweight at the spine of the keyblade and a touch-up clause after healing. Session feels pinchy because the inner arm is sensitive, but it is short. Wear a loose tank top so the artist can move your arm without snagging fabric.
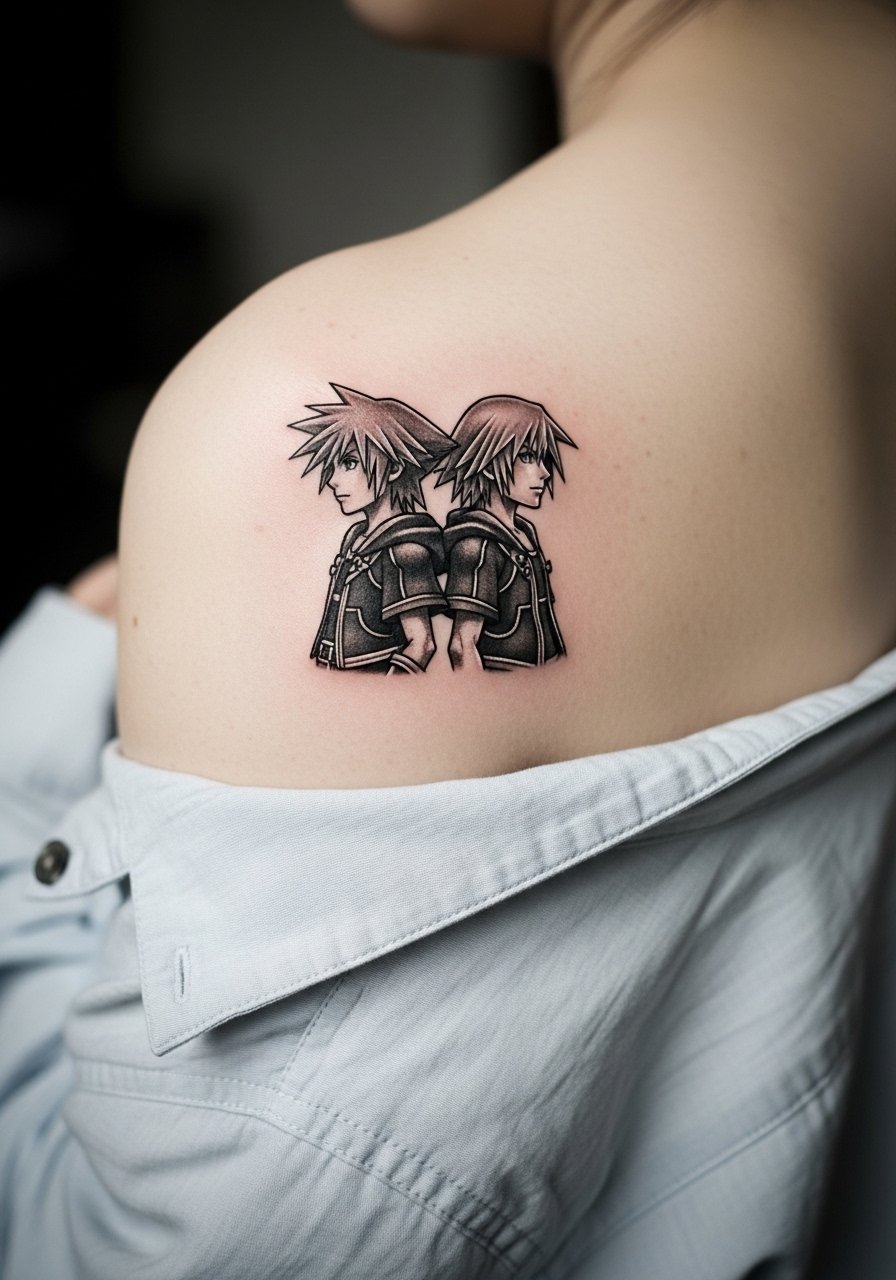
6. Riku and Sora Back-to-Back Micro-Realism on the Shoulder Blade
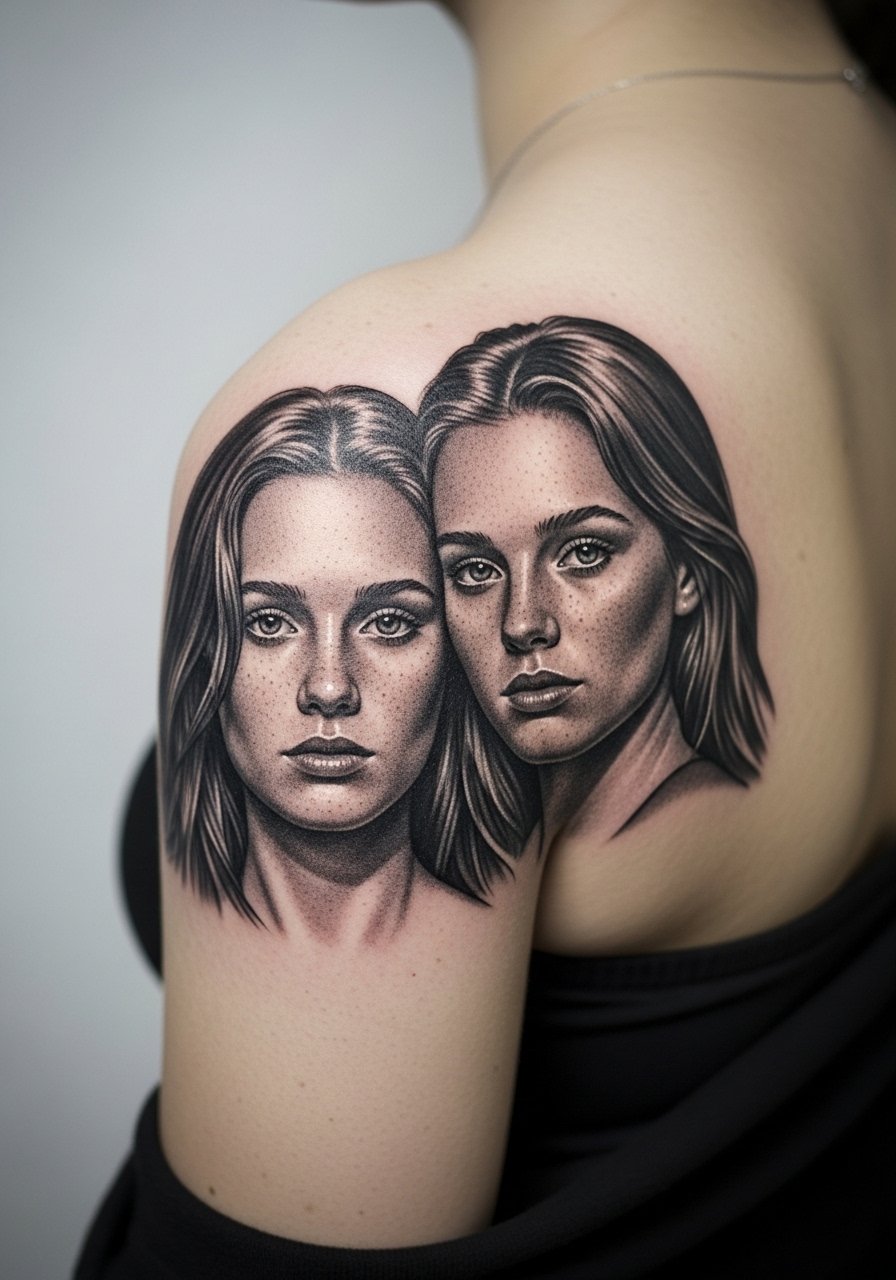
Back-shoulder realism needs space. I advise a minimum of a 5×5 inch canvas and multiple sessions for contrast and highlights. The frequent error is shrinking the portraits to a size that loses facial definition after healing. Expect three sessions and a tender shoulder for a couple of days. If career visibility is a concern, shoulder blades are easy to conceal under shirts. Go for an off-shoulder crop top when you want to reveal the piece without overexposing.
Studio Day Picks
The forearm, collarbone, and inner bicep pieces above need different prep from each other, so these targeted items smooth the session and protect early healing.
-
TattHeal Serum. A thinner balm option that users report sits well on humid skin and avoids the heavy shine some balms cause for color-rich forearm work.
-
InkGuard Wrap. A breathable protective film often recommended for forearm sessions when you expect sweat or light friction.
-
Tatto Hada rice-based lotion. Lighter absorption for blackwork pieces that benefit from dry-feeling balms during the first week.
-
Shadow Balm small tin. Matte finish helps avoid glare on dark ink in photo lighting and keeps lines appearing crisp.
-
Aquaphor healing ointment. A standard thin-layer option for the immediate post-session window on small surface areas like collarbone pieces.
7. Dark Mode Kingdom Logo Ornamental on the Sternum

Sternum work reads as an abstract badge of fandom for people who prefer a darker aesthetic. The sternum is sensitive and the skin sits near bone, so expect a higher pain rating. This placement also calls for a specialist who inks on the chest regularly. When you consult mention that you want geometry that follows the rib curves so the pattern does not warp. There is a split in opinions on healing films for chest work. One camp prefers protective film to reduce scabbing. The other camp favors dry methods to let scabs form and fall naturally. Ask where your artist stands.
8. Kairi Star Constellation Watercolor on the Ribcage
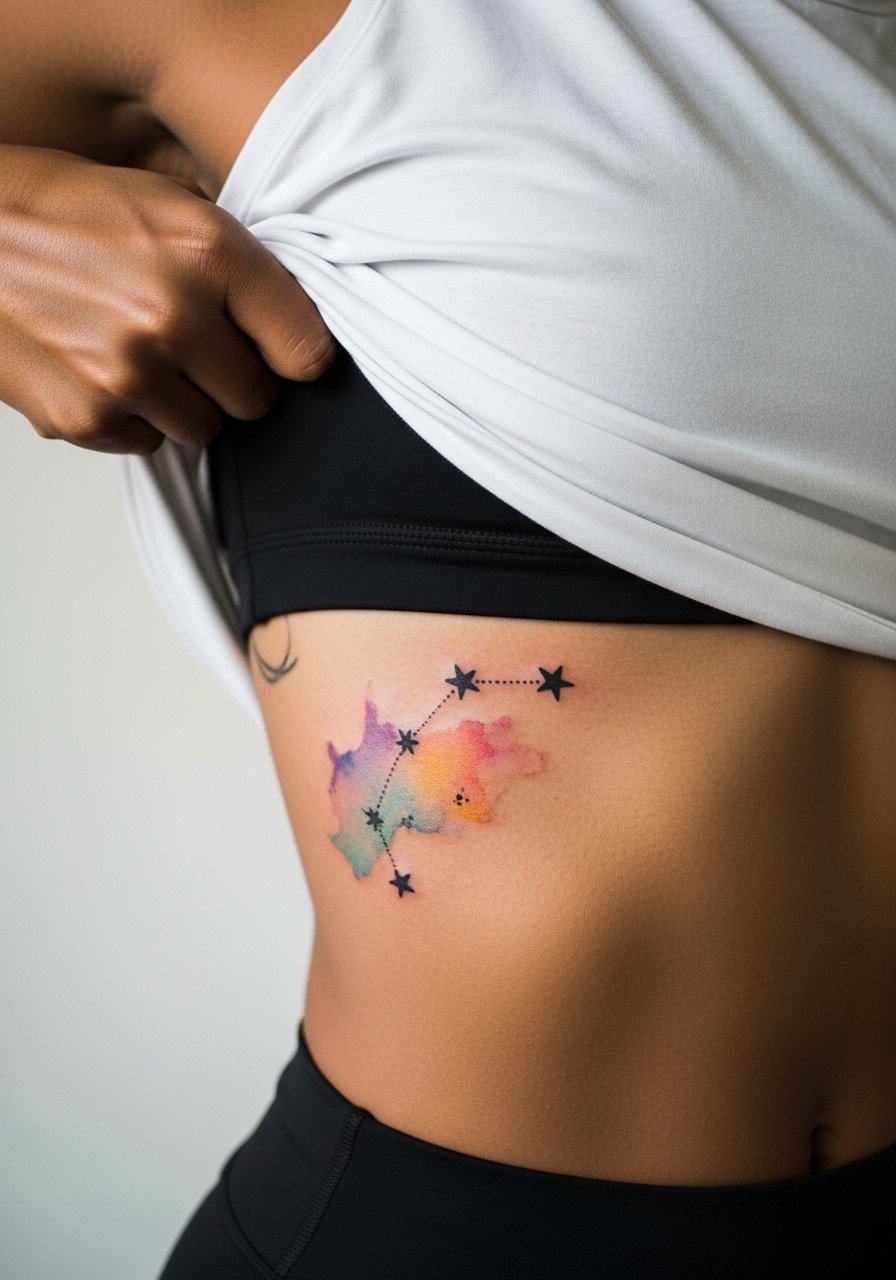
Watercolor on ribs looks dreamy but it is a high maintenance aesthetic. Most watercolor fans accept that the soft edges will mellow within two years. If longevity is a priority, request black ink anchors within the constellation so the design retains a readable shape. Ribcage sits high on the pain chart. Sessions are often split into two so the area can settle. For after-session comfort plan to wear loose, high-waisted bottoms and a crop tank top that does not rub the area.
9. Oblivion Keyblade Bold Line on Outer Forearm
Outer forearm is a showcase location for weapon art because viewers can see the silhouette from a distance. For an Oblivion-style keyblade ask for heavy contour lines and flat color blocks rather than gradients, which hold better after sun exposure. A common mistake is choosing too many tiny decorative ornaments, which blend into a smear as the years pass. Expect two sessions if you want deep saturation and a short recovery. Pair the design with rolled sleeves and a graphic tee gamer when you want casual visibility.
10. Thorned Crown Heart in Black and Gray Realism on Upper Arm
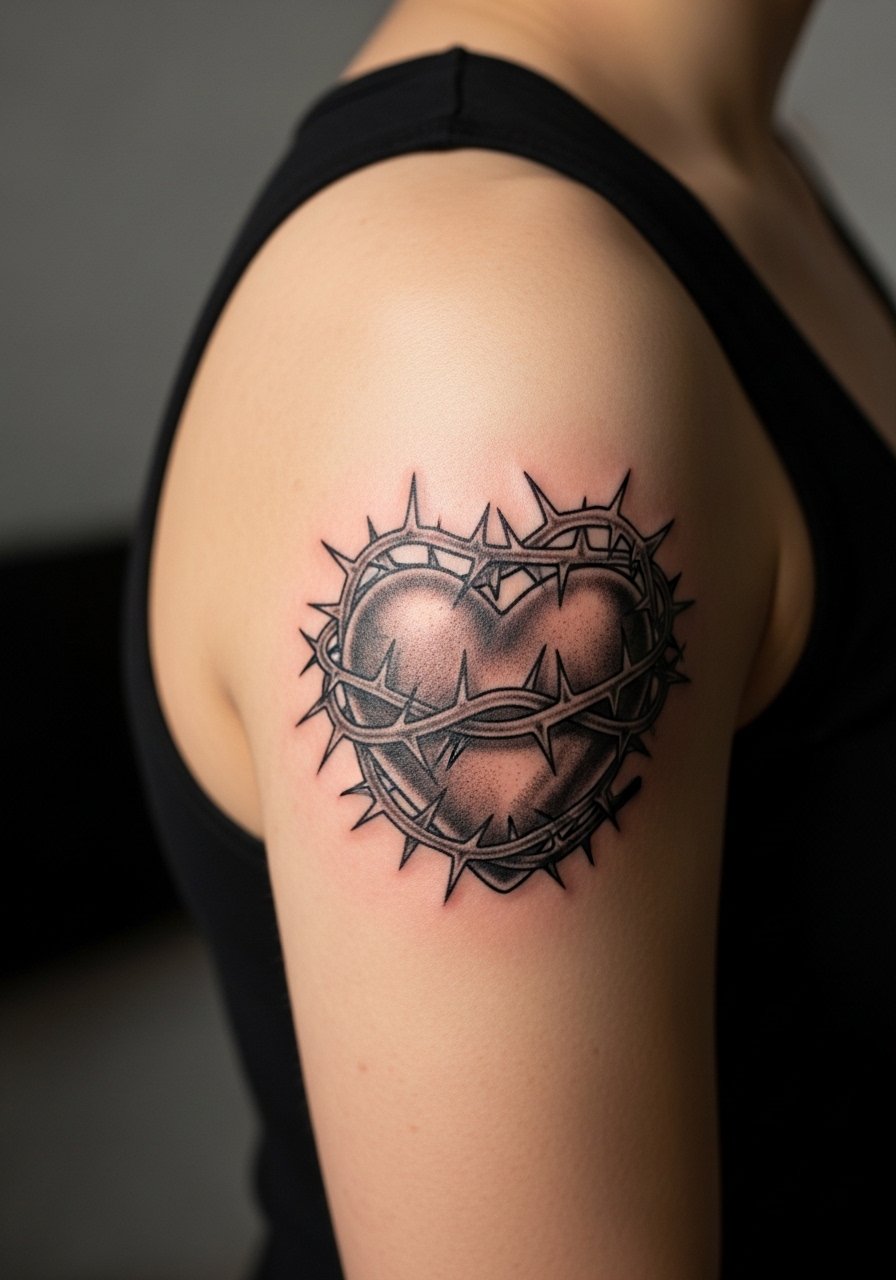
Upper arm realism benefits from muscular structure and is forgiving when you bulk or slim. I recommend asking for layered gray washes rather than heavy black fills to preserve subtle texture. The typical error is requesting extreme micro-detail that softens into gray patches at year three. Sessions are moderate in length and can be split. For session day wear a muscle tank so the artist can work without fabric interference and you can check the stencil in natural light.
11. Heartless Swarm Minimalist Ankle Cluster
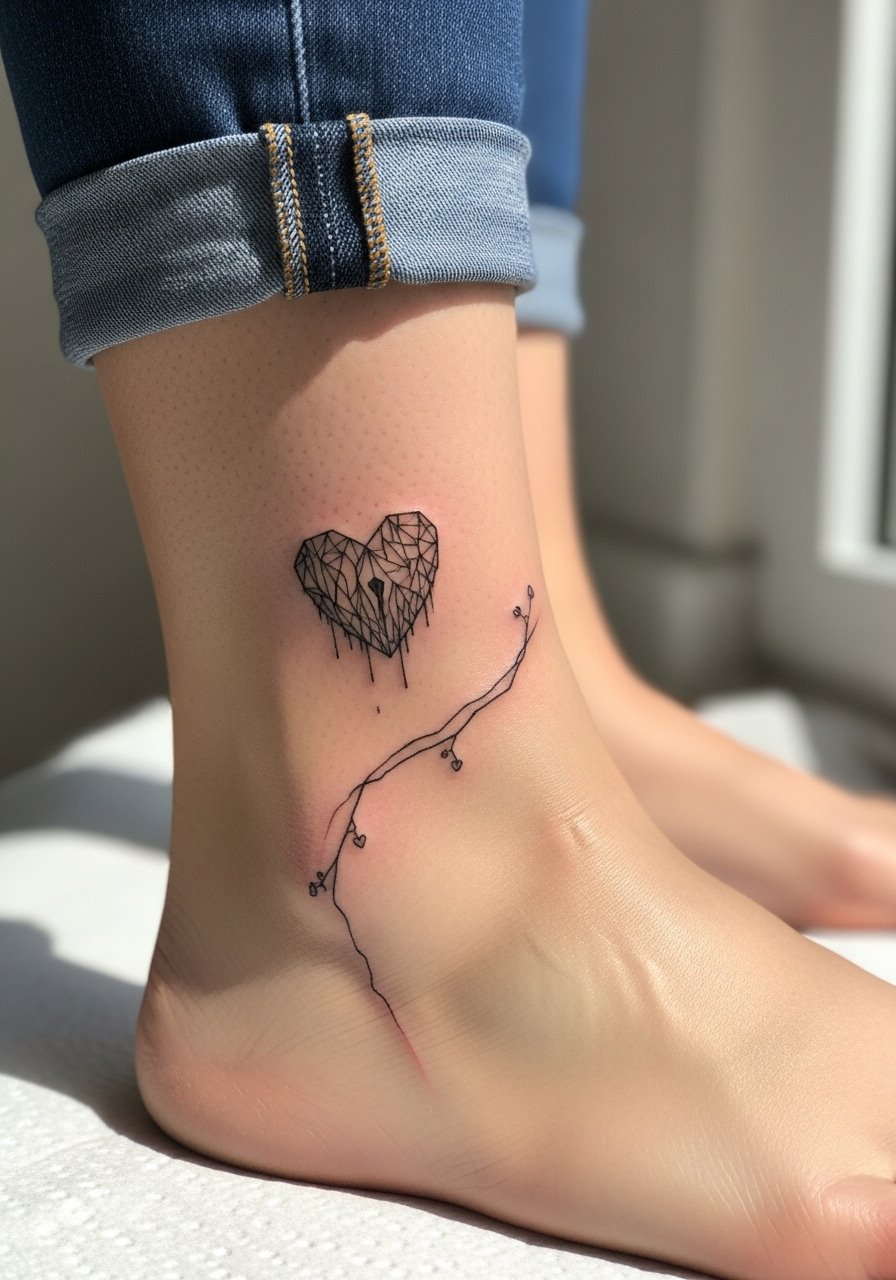
Ankle placements need thoughtful spacing because small elements get lost against movement and footwear. For a swarm set small icons with generous spacing so each silhouette reads apart. The mistake is cramming too many micro shadows into a 2 inch band. Expect a quick session for the ankle cluster and some soreness while walking the first couple of days. Show it off with cropped pants or go for a casual look using ripped slim jeans rolled to the right height.
12. Wayfinder Trio Neo-Traditional Half-Sleeve Start
Half-sleeve planning deserves at least one long consultation. I advise beginning with the three wayfinders in a composition that leaves room for background and flow. Common errors include locking in a single color palette too early, which limits future additions. Expect four sessions in total for a cohesive half-sleeve and schedule them four to six weeks apart for proper healing. For early reveals, wear a vintage band t-shirt with short sleeves rolled to show the work.
13. Paopu Fruit with Birth Year Subtle Wrist Mark
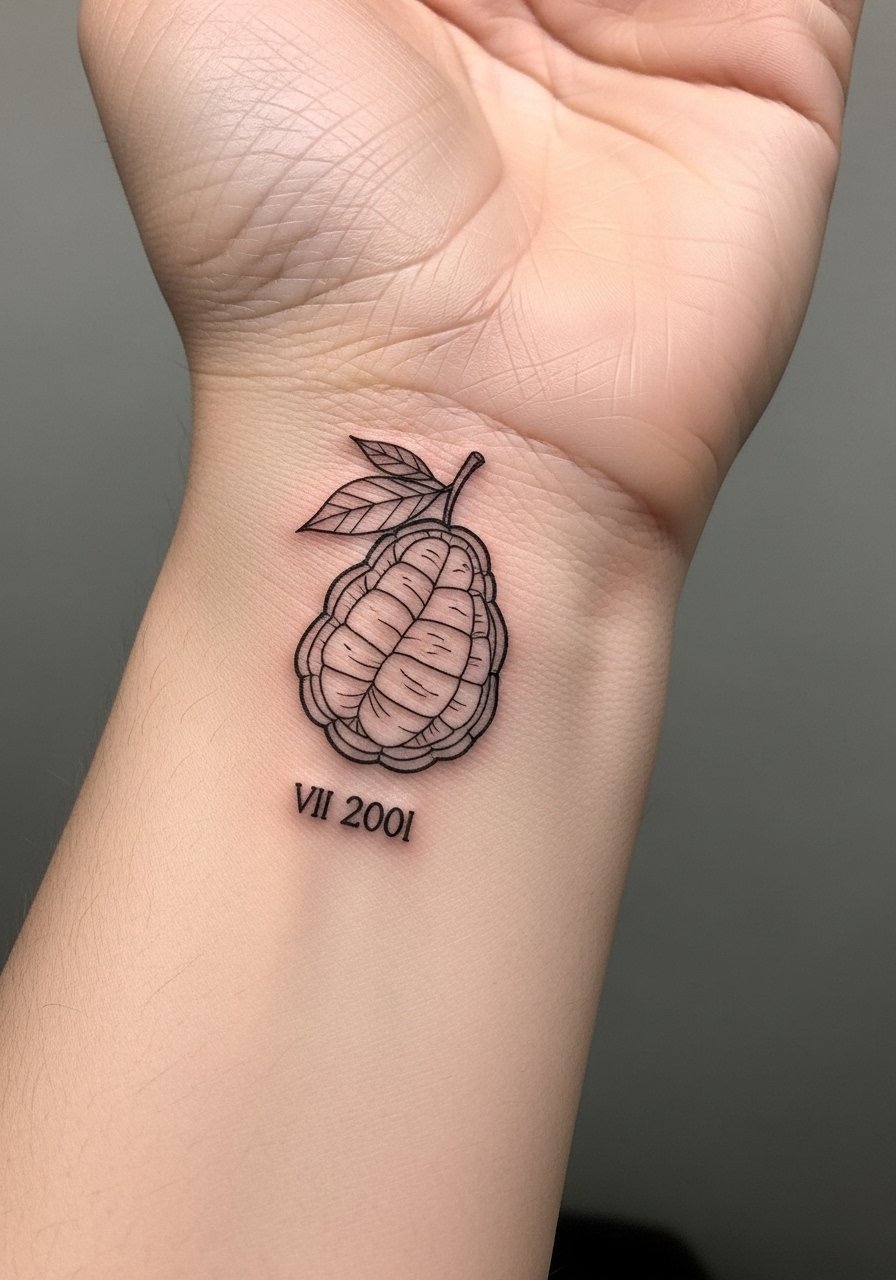
A tiny paopu with a birth year reads like an inside signal for people who know the game. Keep the number in Roman numerals to reduce crowding and ask for slightly beefed-up numerals so they do not blur into the fruit lines. Wrist work is prone to touch-up because of constant washing and friction, so insist on a free touch-up clause at consult. This 2-3 inch piece is quick but sensitive. Accessorize with a thin leather cuff bracelet on the opposite wrist to echo the design without covering it.
14. Knuckle KH Icon Set for Gamers
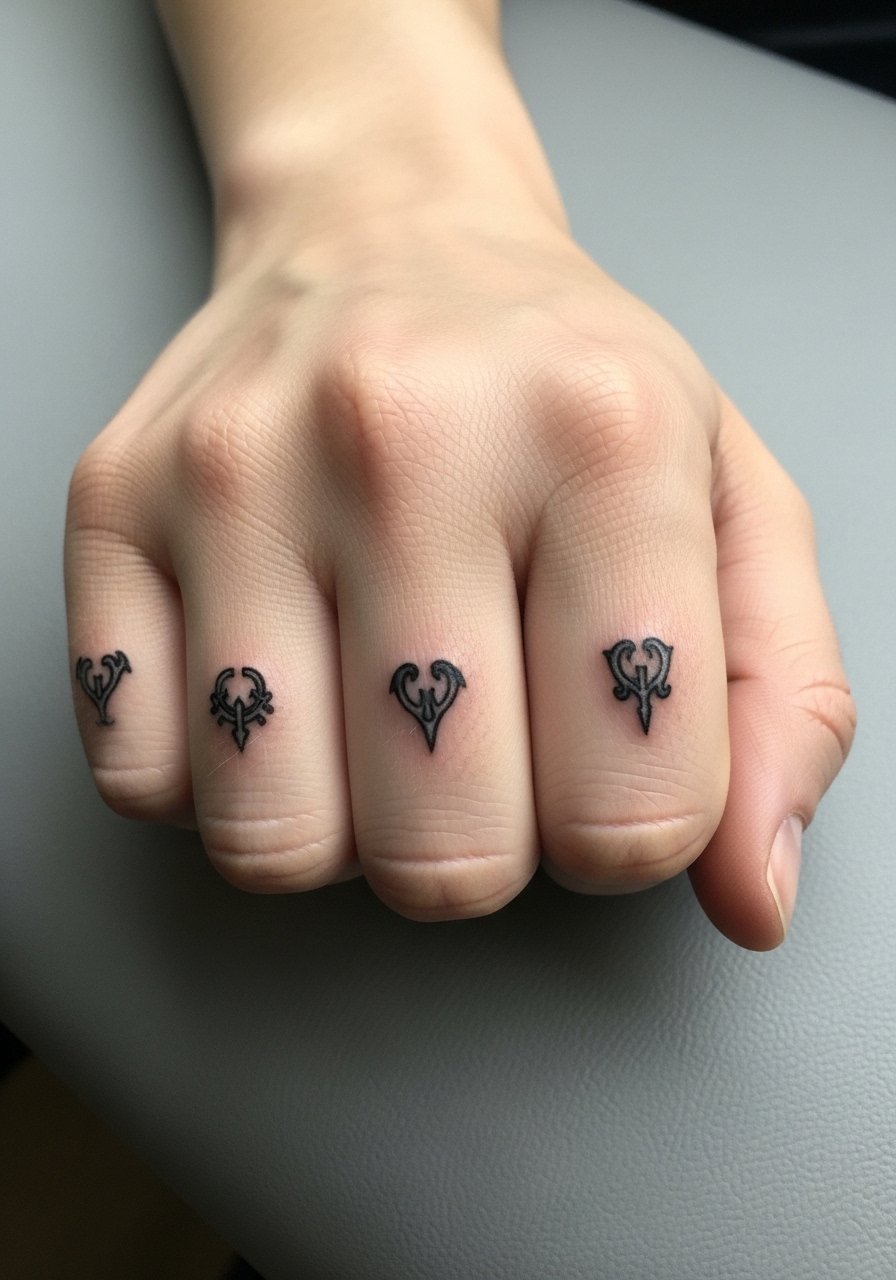
Knuckle tattoos are niche and demand special prep. Grip tape and hand moisturizers can change how the stencil adheres, so discuss that in your consult. Expect a short, intense session and a higher chance of fading due to constant use and washing. Many shops will refuse knuckle work if they feel the client is not ready for the upkeep. Consider this as a commitment and plan for annual touch-ups. Because of visibility, think through career implications before booking.
15. Patchwork Micro Icons Sleeve Starter on Forearm
Patchwork sleeves are ideal for people who want to build over years. Start with a few micro icons spaced out so each has room to breathe as new pieces fill in. The biggest mistake is trying to complete a sleeve in one sitting with tiny motifs that end up merging. Sessions are short and flexible. For initial reveals wear a graphic tee gamer with sleeves rolled so the artist can position new icons around the old ones.
16. Dark Skin Mockup Blackwork Crown for High Contrast
One thing I have seen repeatedly is blackwork that looks washed out in white-skin photos but reads perfectly on dark skin when the lines are thick. Ask for a stencil mockup on your tone and request increased negative space around the crown so the black reads crisp. This is a short session. For styling, a deep red or off-shoulder sweater frames the piece well. Try an off shoulder sweater when you want a dressier reveal.
17. Scaled KH Elements on Calves for Weight-Fluctuation Resilience
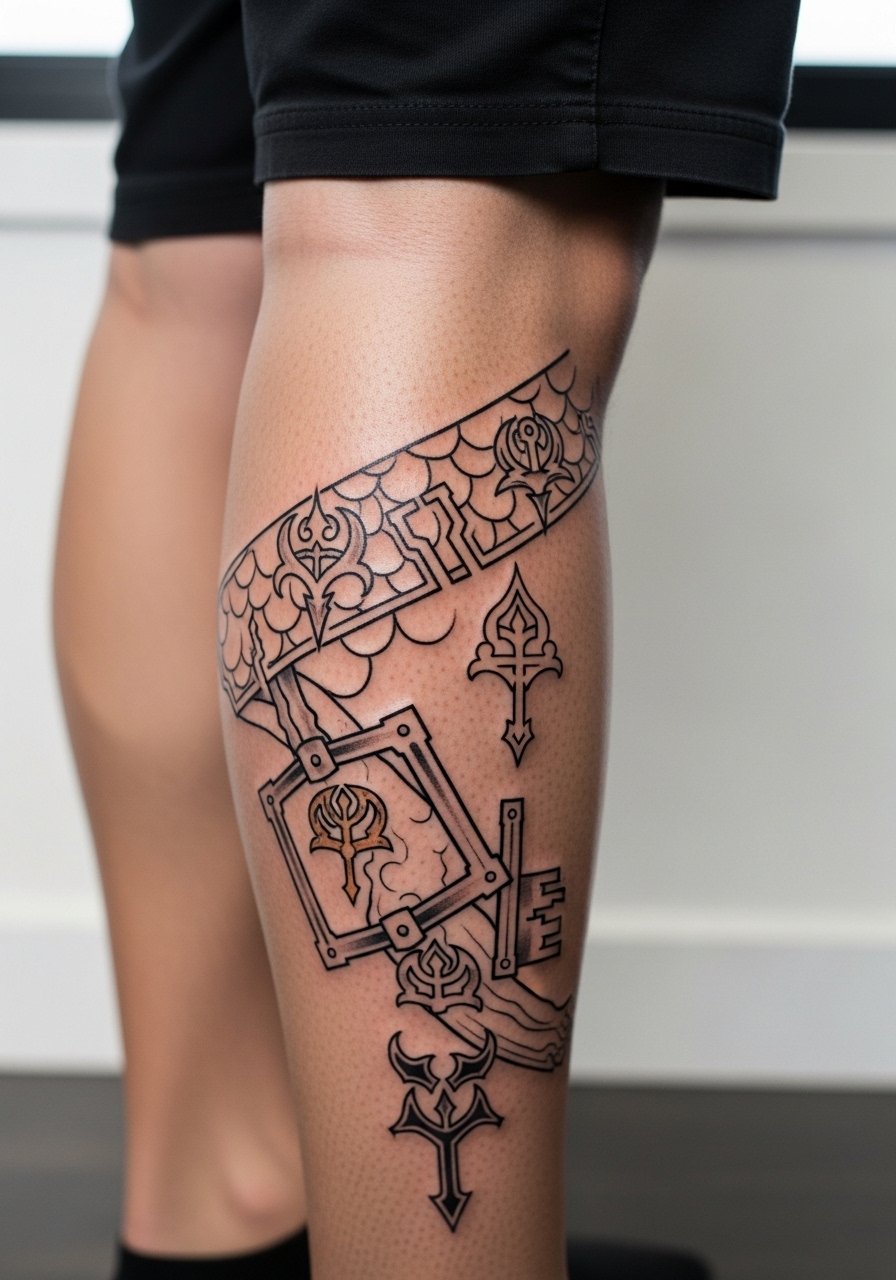
If you expect body changes the calf is forgiving because of its vertical surface. Design with graduated line weights and larger negative spaces so elements stretch without distortion. A typical error is using uniform micro-lines that warp when the muscle changes. Plan for one to two sessions depending on wrap. Show it with rolled joggers or cropped pants and consider combat boots for a seasonal aesthetic.
18. Minimalist Crown on the Wrist for First-Timers
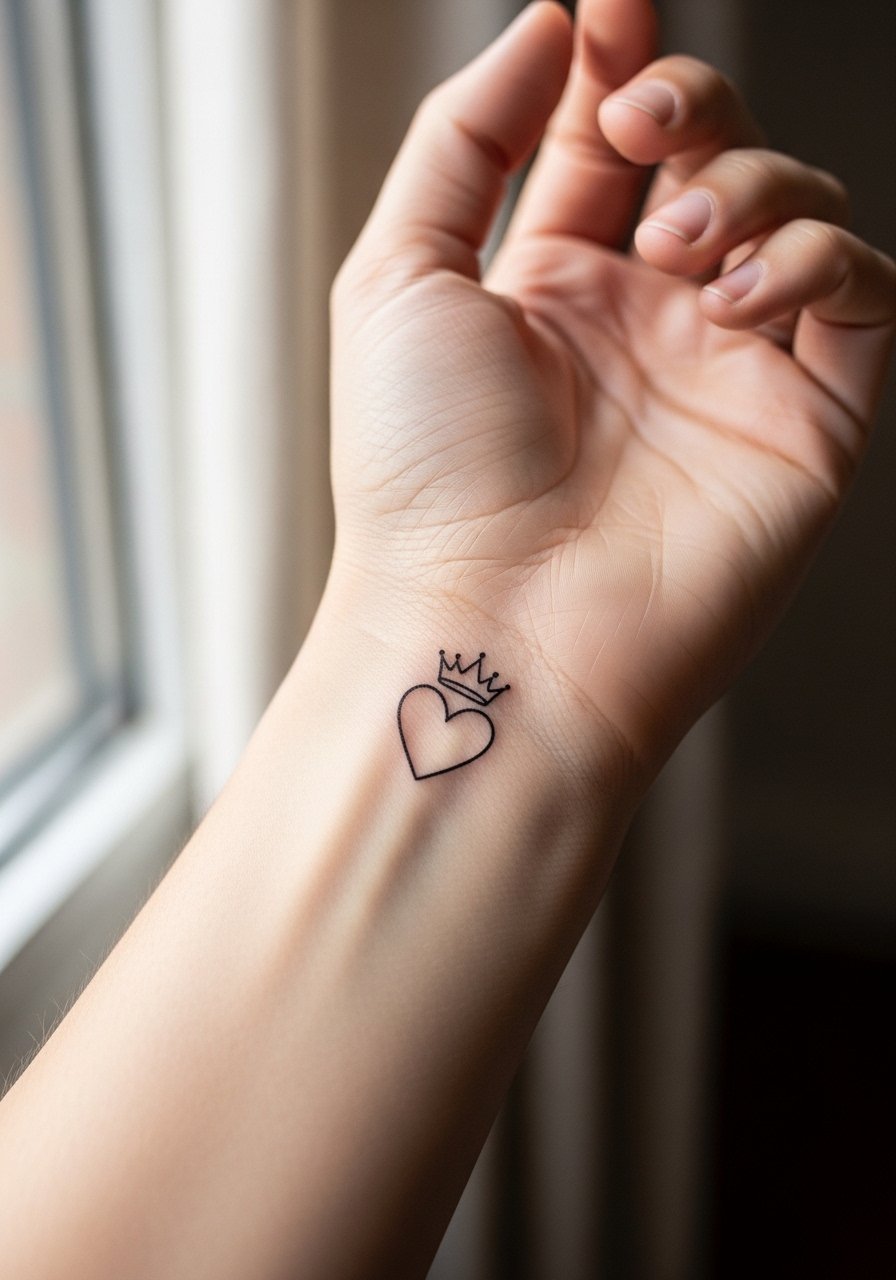
Wrist crowns are popular as intro pieces but they need careful scaling. Fine line proponents say single-needle works well here. The opposing view warns that the wrist faces so much friction it will need touch-ups sooner. My advice is to increase lineweight just enough to protect the icon and sign a touch-up policy into the booking. Session time is short and pain is mild. Pair the piece with a slim fit hoodie pushed up when you want a casual reveal.
19. Edgy Coffin Heart Mashup on the Ribcage
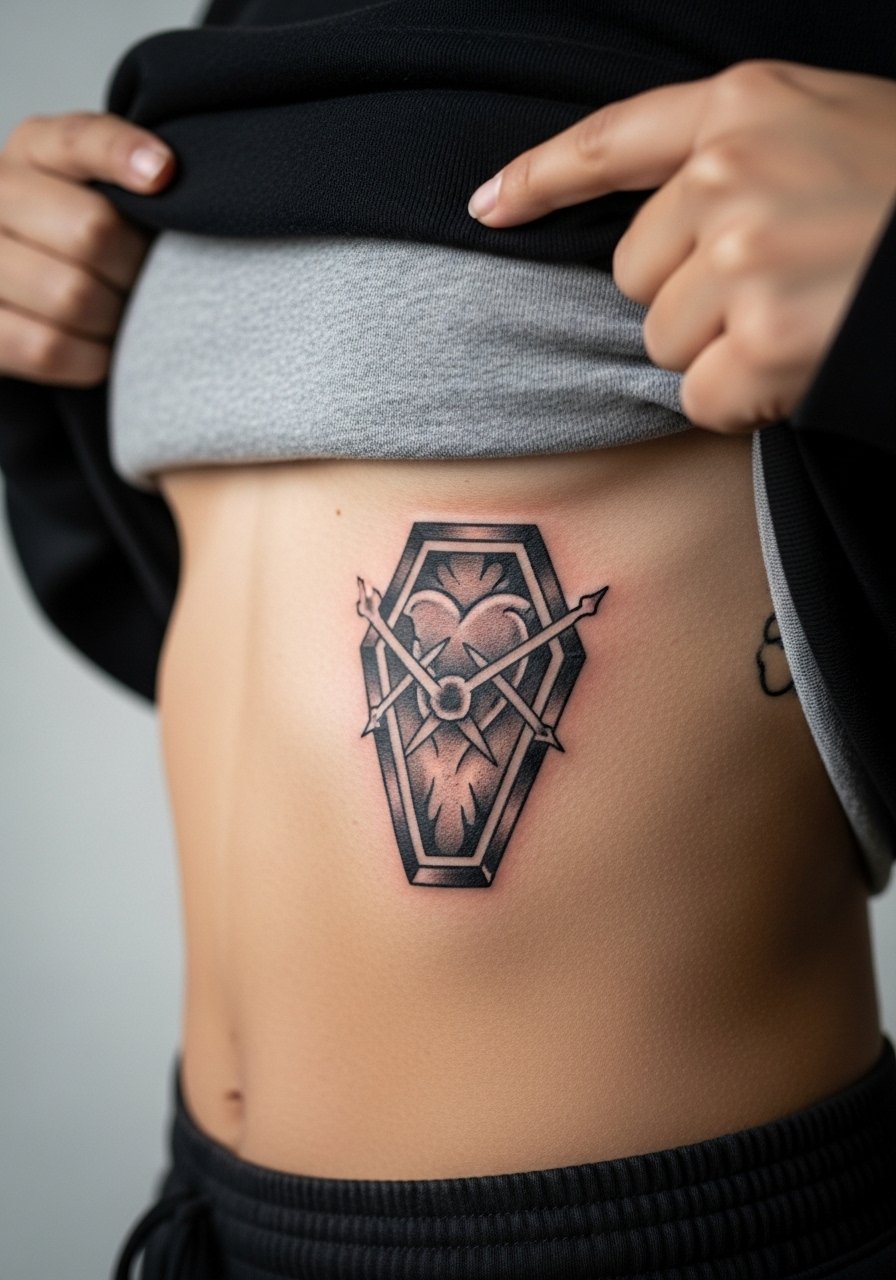
Coffin-heart mashups on the ribs are high on the pain scale but reward with a dramatic canvas. The mistake is asking for super fine gradients across the ribs, which often heal unevenly because of movement. Expect multiple sittings for layering and a recovery period that requires gentle sleep positioning. Because it is intimate and sensitive, the tattoo needs someone experienced with rib work. Think about session scheduling so you can rest afterward.
20. Shoulder Micro Duo Alternative for Career-Conscious Fans
For people who want collectable pieces without full sleeves, two small shoulder blade portraits are a compromise. They are easy to cover with shirts and still allow micro-realism techniques to read. The common error is shrinking portraits so much that facial planes blur. Schedule at least two sessions and keep the portraits at a moderate scale. For consults use discovery pathways like tattoo convention guest spot searches and portfolio filters to find artists who do small realism well.
21. Keyblade Sleeve Sessions: How Four Visits Build the Edgy Look
Sleeves are planning exercises. I advise four visits spaced four to six weeks apart for layering linework, color saturation, background flow, and touch-ups. The first visit establishes the anchors like the main keyblade. The second adds midtones and connecting elements. The third focuses on color saturation and fills. The final visit refines edges and balances negative space. A common wrong move is trying to cram every reference into visit one. For discovery look at hashtags and local guest spot listings and ask for session-by-session quotes so you avoid surprise upcharges.
Frequently Asked Questions
Q: Will fine line Kingdom Hearts pieces on wrists need touch-ups sooner than bold blackwork?
A: In my experience fine line on high-friction spots like wrists tends to need touch-ups earlier than bold blackwork. The trade-off is subtlety versus longevity. If you want a slim icon ask for slightly reinforced lineweight and a touch-up clause at booking so the cost and timing are clear.
Q: How should I plan sessions if I want a neo-traditional keyblade half-sleeve?
A: Plan on at least three to four sessions spaced four to six weeks apart. The first session places anchors, the next ones build saturation and background, and the last refines edges. Break the work into themes so each visit advances the composition rather than filling every corner at once.
Q: What do artists mean by testing a stencil on dark skin for blackwork pieces?
A: They place the stencil on your skin tone and check the contrast under real light so they can adjust lineweight or negative space before inking. It is a practical step that prevents a finished piece from looking lost on medium or dark skin.
Q: Does watercolor style fade faster than blackwork for Kingdom Hearts motifs?
A: Watercolor washes soften over time more than saturated black. For people who want the watercolor look but longer life, ask for black anchors or darker accents inside the watercolor so the design retains structure as the colors mellow.
Q: What are realistic expectations for ribcage pain and healing on a detailed KH piece?
A: Ribs are among the more painful zones for many people. Expect a stinging deep ache during the session and tenderness for a few weeks. Break long designs into multiple shorter sessions to manage pain and allow skin to settle between passes.
