
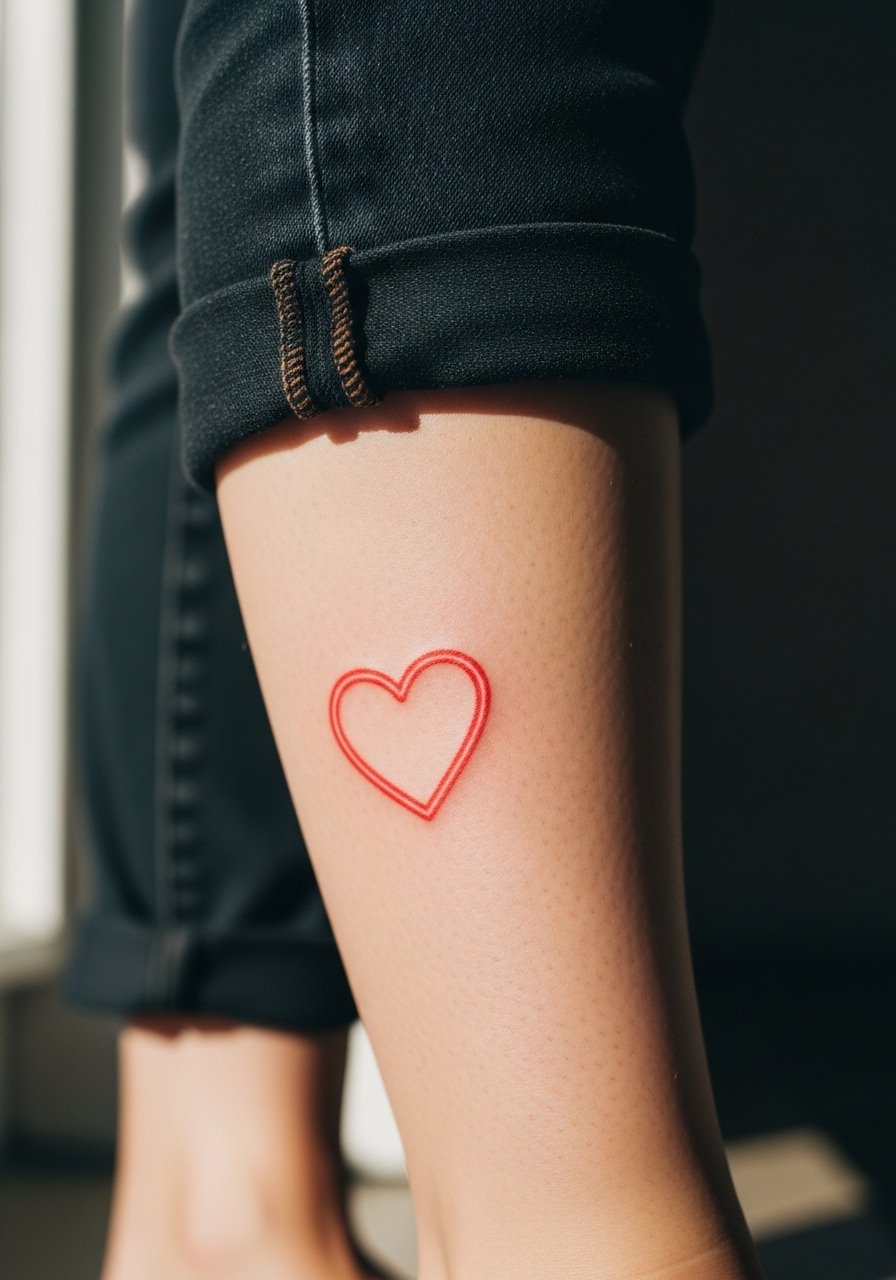
Fine line red hearts are easy to fall for on a saved board. The trend that actually sticks around tends to be a mix of saturated core and smart spacing, not just a tiny outline that blurs. These ideas balance color, placement, and wardrobe so the red stays vivid and the shape still reads years from now. Start with a crisp inner forearm piece that previews how the ink will sit.
1. Tiny Red Heart on the Inner Forearm
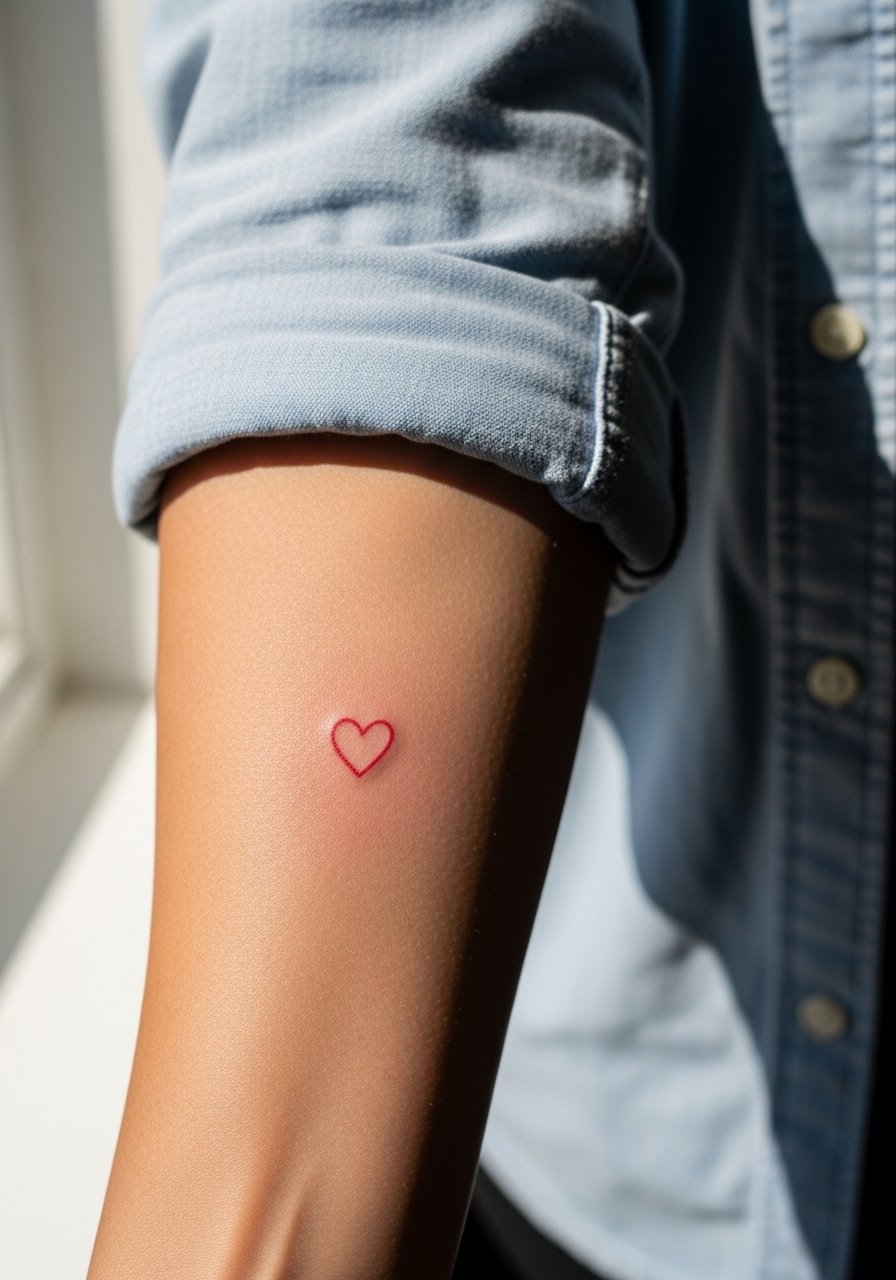
I've seen this placement on people who want a quiet daily reminder but still a visible spot for showing off. Ask your artist for slightly thicker linework around the heart's contour so the tiny shape keeps its silhouette at year three. Fair warning: the wrist edge and inner forearm face frequent sun exposure and friction from sleeve cuffs, so plan touch-ups around year two or three. For the appointment wear a loose button-down shirt you can pull aside to give the artist clear access without rubbing the fresh ink.
2. Saturated Classic Heart on the Upper Arm
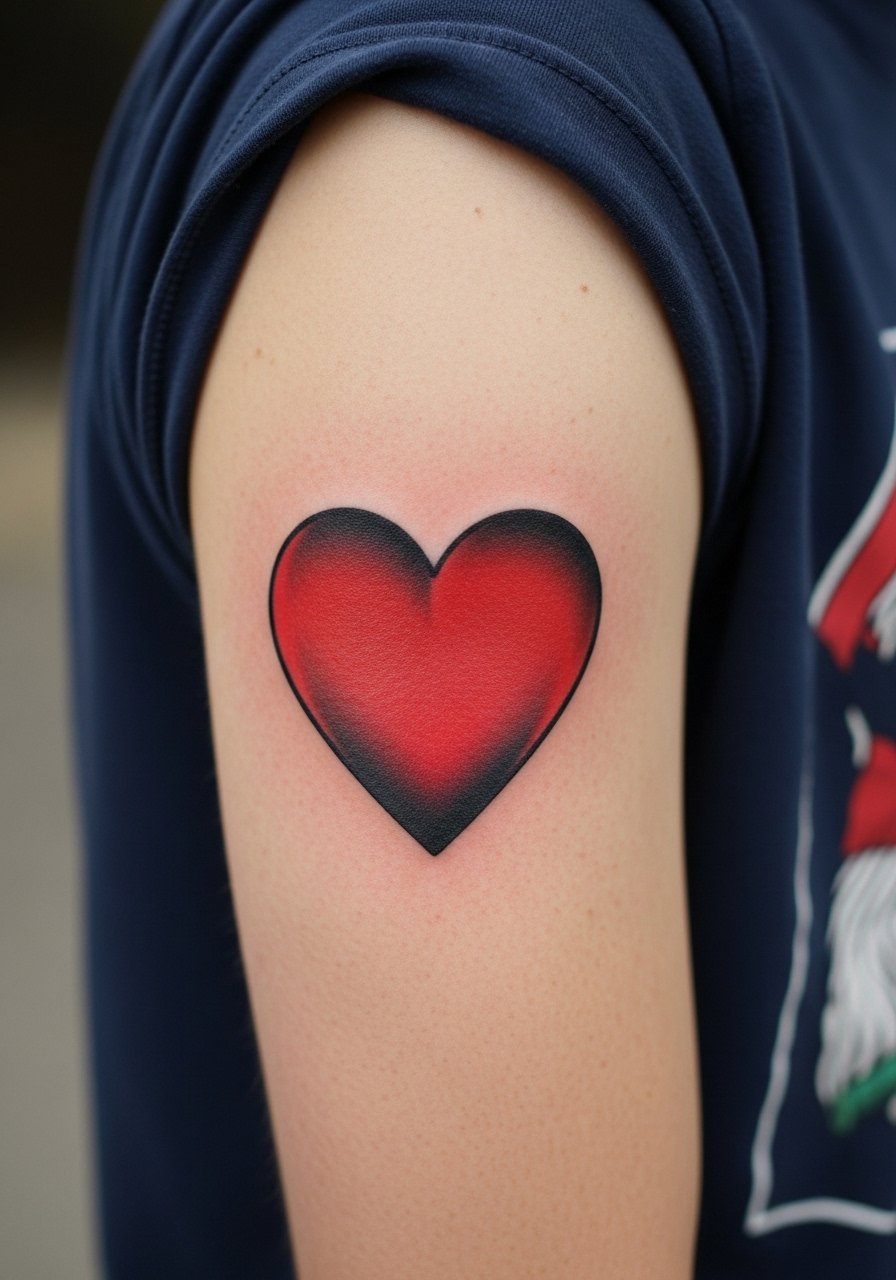
There is something about bold saturation that reads from across a room. Go for classic American color saturation with clean linework so the red holds instead of patching out. Tell your artist you want full saturation and a slightly heavier outline for longevity. Pain level is mild on the outer arm and session time is short, usually under an hour. Most people regret going too small here because a tiny saturated heart can look muddy as the skin ages. Pair it with a rolled sleeve or a short sleeve tee to frame the piece on casual days.
3. Micro-Realism Heart with Vein Detail on the Ribcage

Fair warning: the ribcage is a 7 out of 10 on most pain scales. But the read is dramatic and intimate. One camp of artists says fine detail on ribs blurs with movement and stretch. The other camp says careful spacing and shallow depth keep micro-realism readable. Name both concerns in your consultation and ask for examples of healed ribcage work in similar skin tones. Expect a longer session and a follow-up touch-up around year two if you live in a sun-heavy climate. For the session, wear a cropped athletic top you can lift to expose just the area and keep the rest covered.
4. Watercolor Wash Heart on the Shoulder Blade
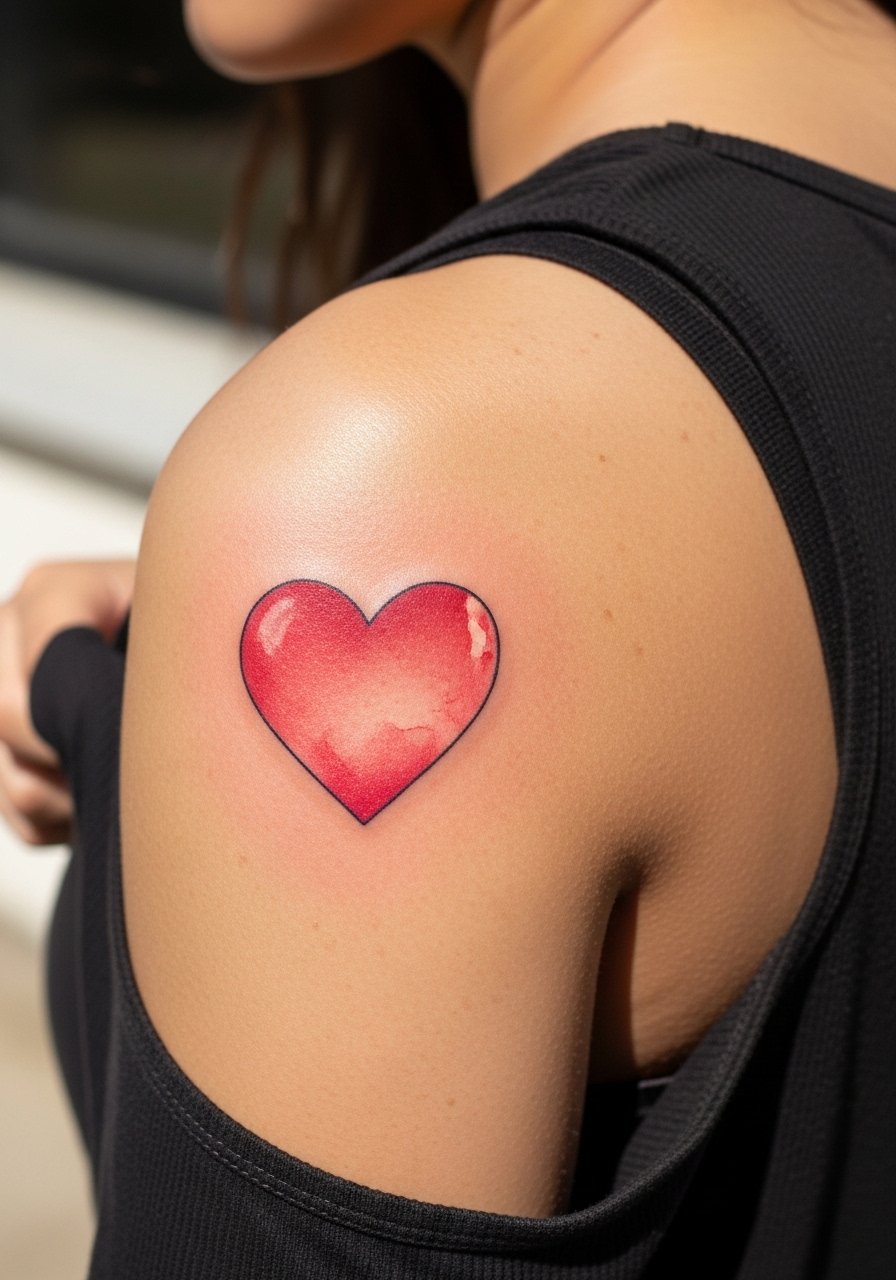
Most watercolor pieces from five years ago lost their edge due to low saturation. This version holds because it pairs a soft red wash with tiny saturated cores at the heart's center. Tell your artist you want anchored saturation under the wash so the color does not completely diffuse. Shoulder blade sessions have moderate pain and sit well under clothing, so plan for one longer session or two shorter ones for layering color. Show-off tip: pair this with an open-back top to let the watercolor breathe at events.
5. Linework Heart with Dot Work Fill on the Ankle
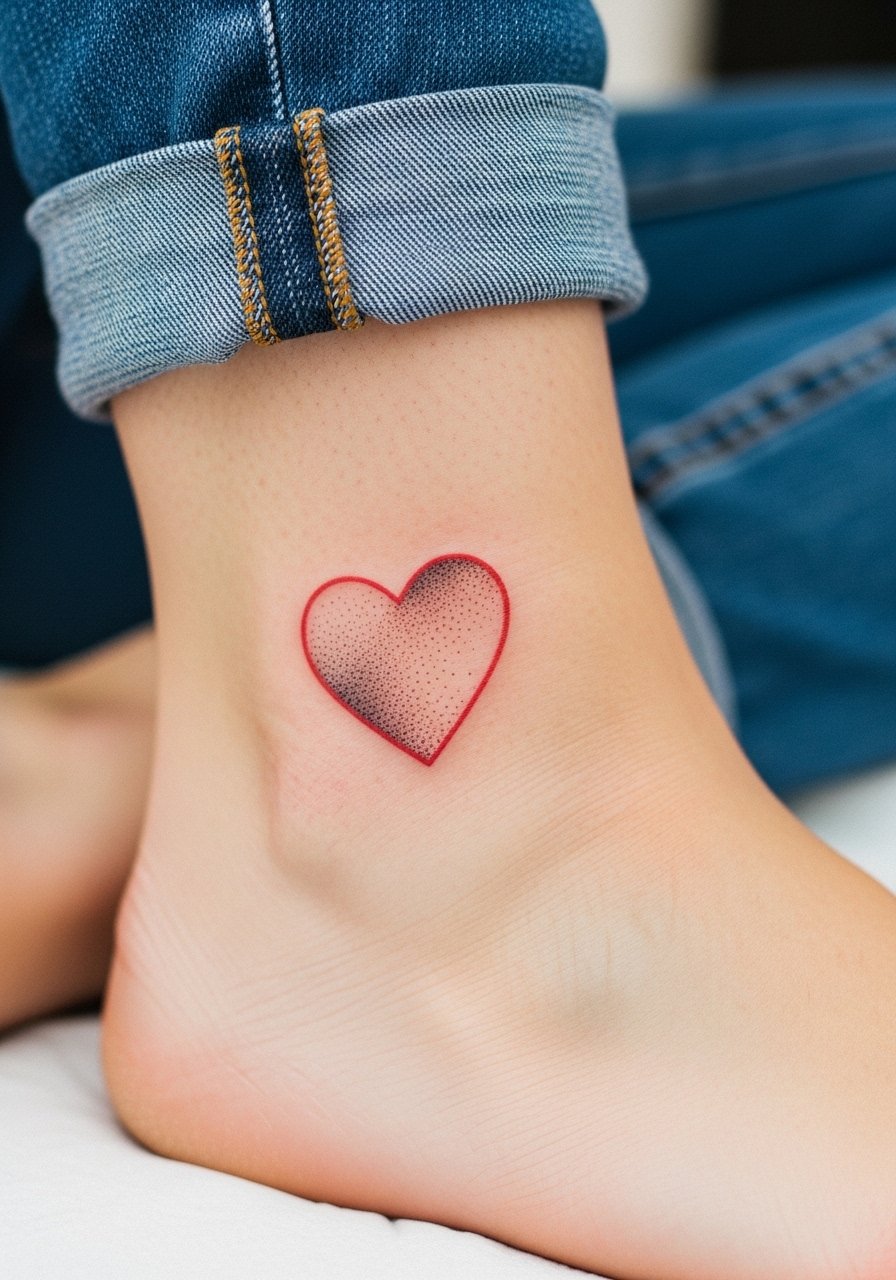
Ankle work is low on the pain chart but high on friction from socks and shoes during healing. Stipple shading inside a small heart gives texture without relying on full color saturation, which often shears from the ankle first. Request slightly larger spacing between dots so the stipple holds over time. Wear sandals or rollable pants to the session so the artist can work without irritation from constrictive fabric. Try an ankle wrap sandal for the week after to reduce rubbing.
6. Collared Heart Over the Collarbone
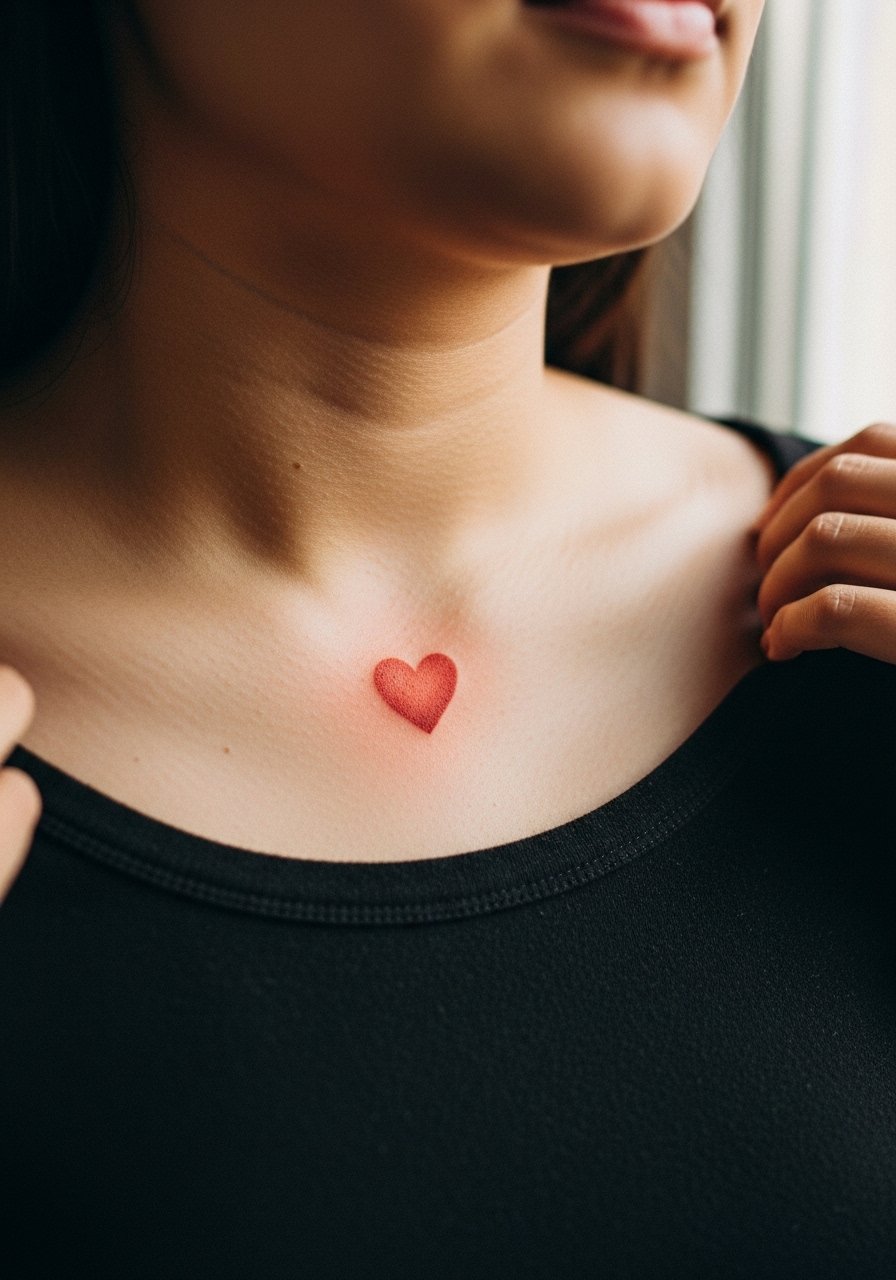
This placement is visible and frames necklaces nicely. A common mistake is centering the heart too close to the neck where it looks cramped as the body moves. Ask for the heart to sit a bit lower and slightly off-center if you want a relaxed look. Collarbone skin can be picky with fine line, so expect a modest touch-up timeline. Pair the placement with a thin chain pendant necklace that sits just above the piece to balance jewelry and ink.
Studio Day Picks
The inner forearm, ankle, and collarbone pieces above each demand different prep and wardrobe, and a few small items smooth the session and the first week.
-
Stencil transfer paper kit. Lets you preview placement against skin texture before the needle meets the surface, useful for collarbone and ribcage ideas.
-
Topical numbing cream. Applied as directed before the session it takes the edge off rib and sternum sensitivity without affecting the artist's linework requests.
-
Thin protective film roll. Helps ankle and finger pieces survive early friction from shoes and daily hand use.
-
Fragrance-free gentle body wash. Cleanses healing skin without stripping color, especially helpful after saturated shoulder or back sessions.
-
Aquaphor healing ointment. A thin layer in the first days helps lock in moisture for fine line work without clogging the needle channels.
7. Minimalist Heart on the Side of a Finger
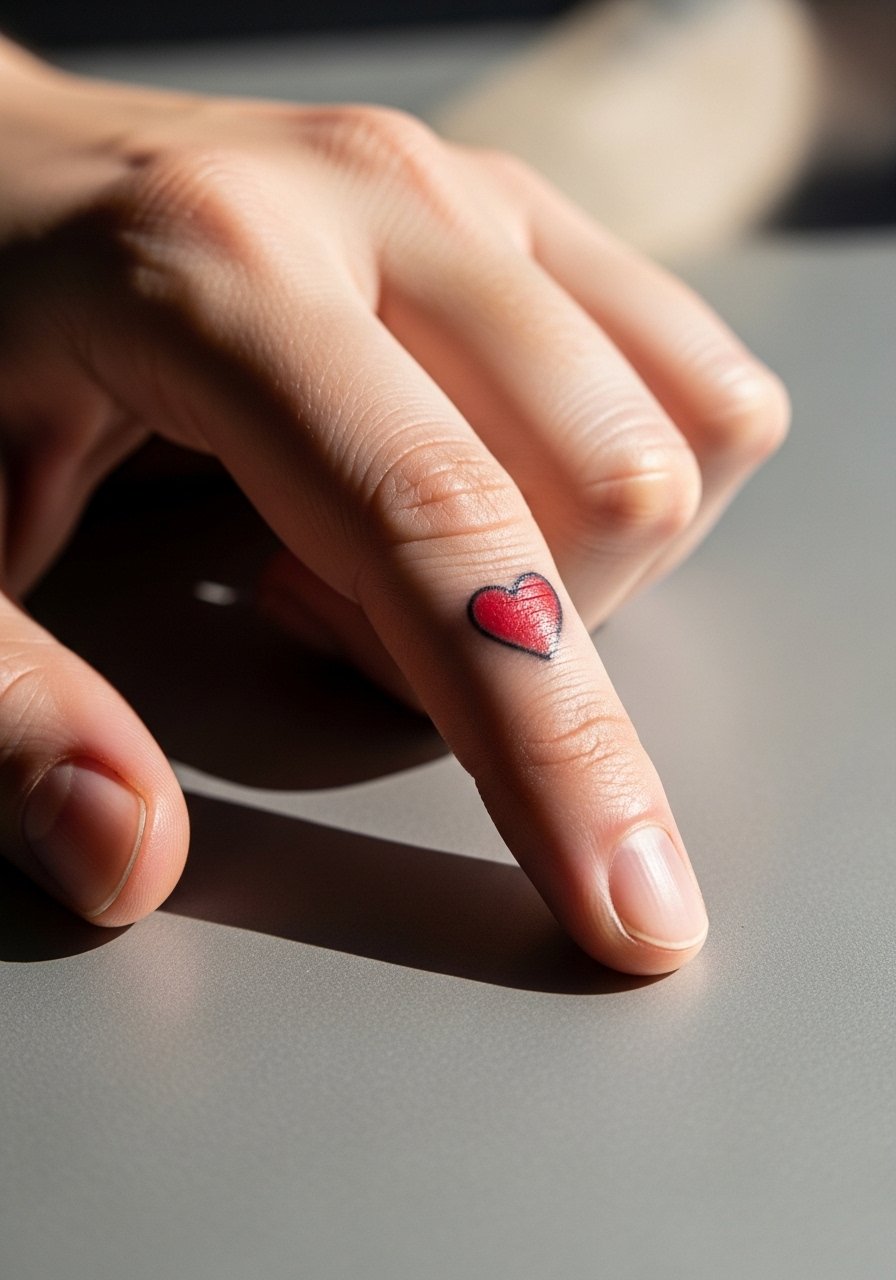
The biggest mistake with finger tattoos is going too small and expecting permanence. Skin on fingers moves a lot and wears against surfaces. If you want a side-finger heart, make it a touch bolder than the thumbnail mock so the linework keeps its shape. Expect faster fading and a likely touch-up in 12 to 18 months. For the session, wear comfortable clothing that avoids hand restraints and bring a friend if you get anxious about the small needle work. Hand tattoos can influence hiring in some fields, so weigh that before booking.
8. Glazed-Red Heart with White Highlights on the Back of the Hand
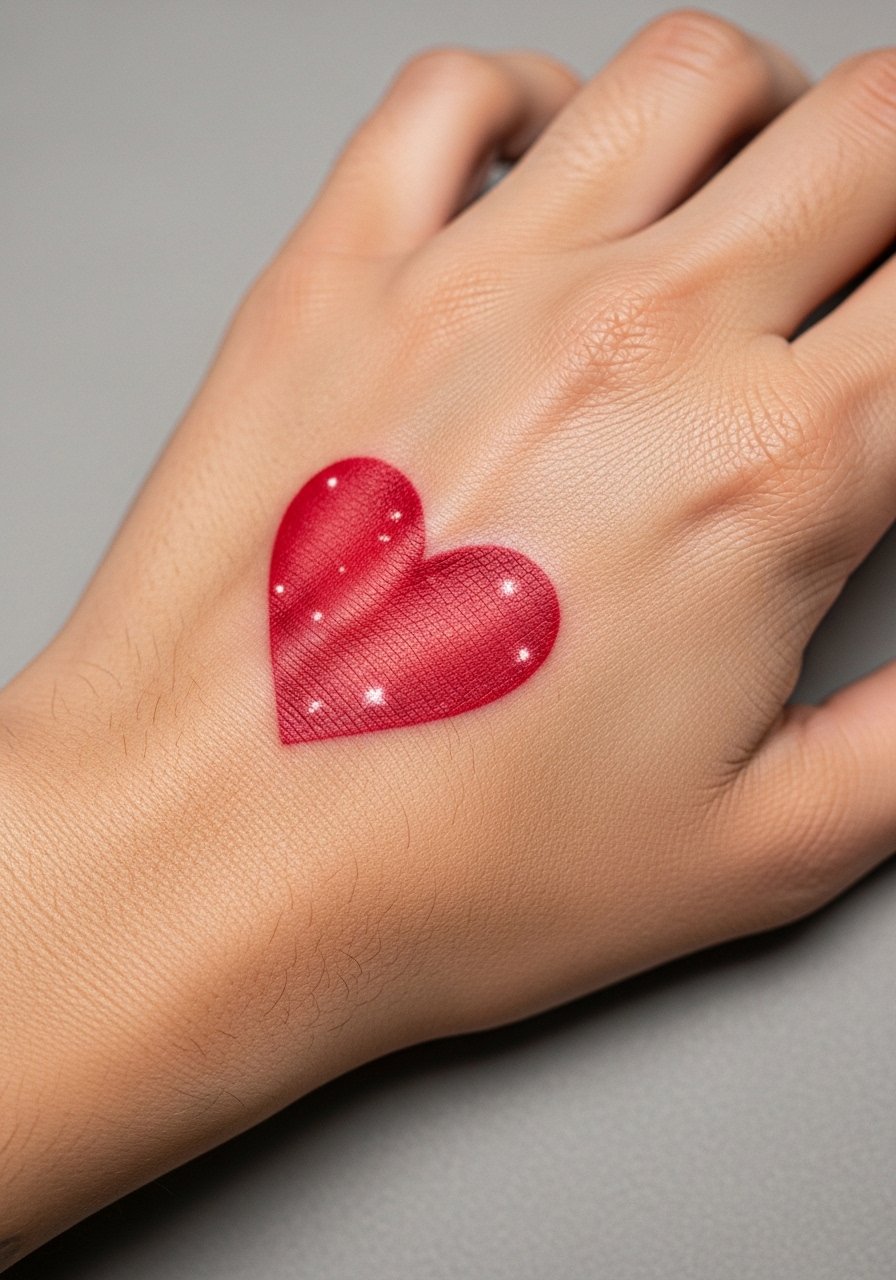
Hands demand maintenance because of washing and sun exposure. The white highlights give a glazed three-dimensional look fresh, but they fade faster than the red. Ask your artist to place highlights sparingly and to add slightly more saturation under the white to avoid early loss of contrast. Session feel is brisk but precise. For showing it off, keep bracelets minimal so the heart is visible, like a stacked dainty bracelet that frames but does not cover the piece.
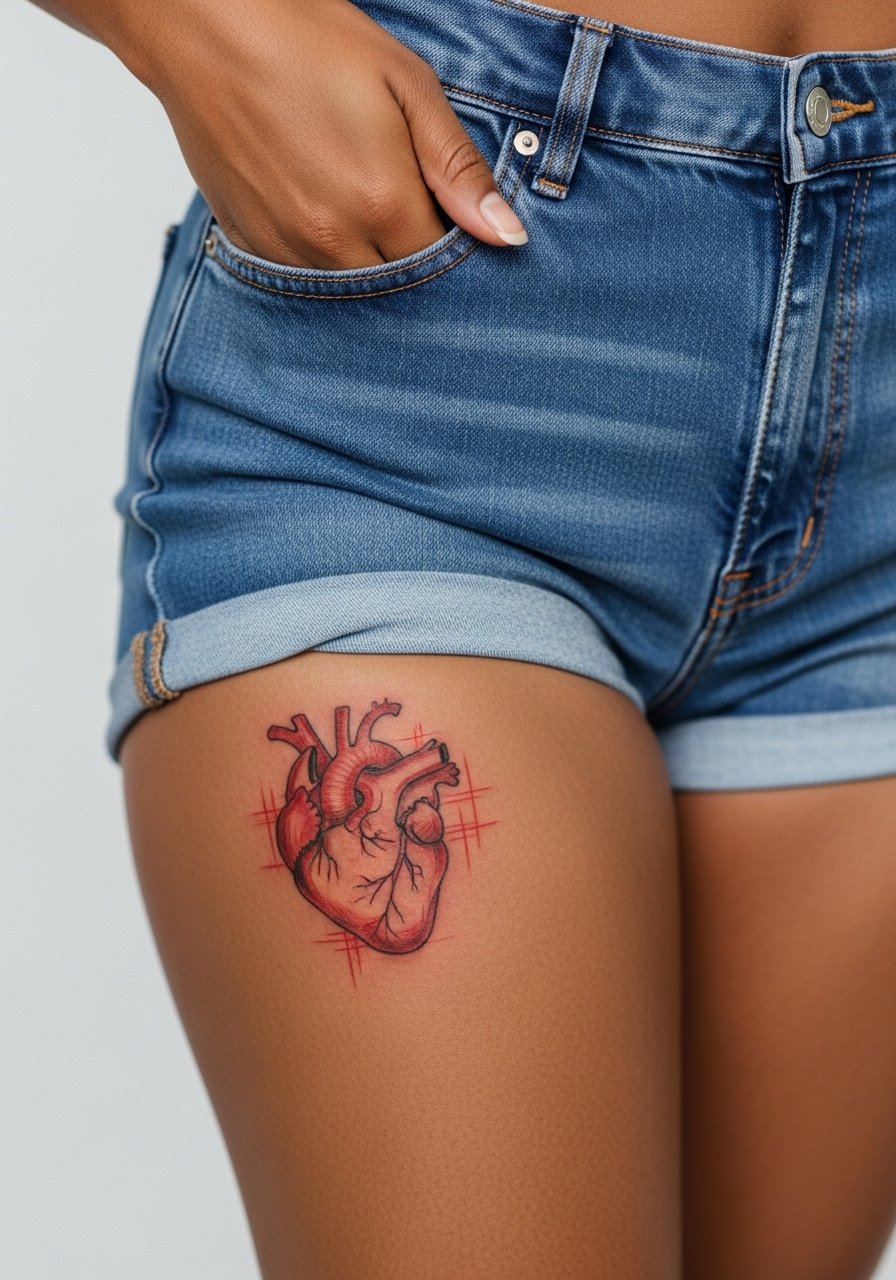
9. Anatomical Heart in Miniature on the Inner Bicep

When you sit down with your artist for this one, bring reference photos that show the exact level of detail you want. Inner bicep skin can handle fine shading if the needle depth is steady. The pain is moderate and the session time varies with complexity. A common issue is asking for tiny vessel details that look great fresh but merge in dense areas once healed. Ask for slight spacing and lean stipple shading rather than continuous tiny lines to keep the silhouette readable. For the session, a tank top gives access without exposing the rest of your torso.
10. Bold Heart with Banner Text on the Upper Chest
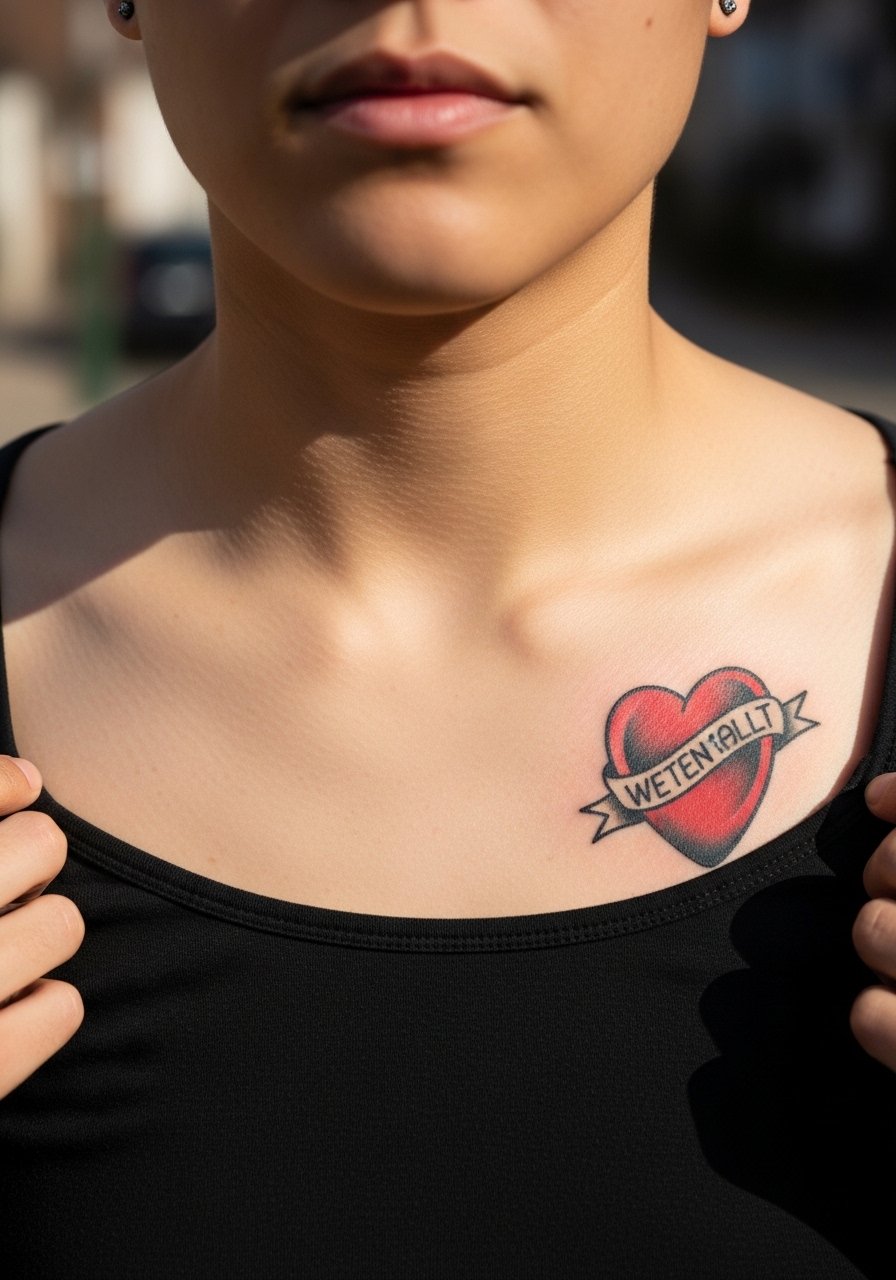
There are two angles to banners with hearts. One is classic and ages predictably well with bold outlines. The other is tiny, thin script in a narrow banner that tends to blur on chest skin. One camp prefers heavier banners for longevity. The other favors thin banners for elegance. State your priority in the consult. Upper chest skin can vary in elasticity so expect a touch-up window around year three. For evenings out wear an open-back midi dress or a wide-neck top to let the chest art breathe visually.
11. Two-Heart Chain Along the Spine
Visual impact lead works here because a vertical chain of hearts reads as rhythm down the spine. Spine placements need an artist who has healed examples for alignment because a shifted stencil will read uneven as the body moves. Pain ranges from moderate to high depending on how close to the vertebrae the work sits. The main mistake is packing too many tiny hearts too close together. Leave breathing room between shapes so each heart keeps its own contour over years. For show-off dressing, open-back styles highlight the chain without forcing constant exposure, try an open-back blouse.
12. Sketchy Red Heart with Cross-Hatching on the Thigh
Most people like thigh work because clothing protects the area during healing. The sketchy, cross-hatched approach looks handmade and modern, but care is needed so tiny hatch marks do not merge over time. Advise your artist to keep hatching slightly wider and to use stipple where density risks blowout. Session times are comfortable and often coverable with a single long session. During the appointment wear high-waisted shorts you can shift to expose only the upper thigh.
13. Neon-Edge Heart for the Calf
Visual impact lead again. The neon-edge trick uses a fine outer line of lighter red or pink to suggest a glow. That outer line must be wide enough to survive fading. Calf skin wears well and keeps color saturated longer than hands or feet. Watch out for a common mistake where artists use a hairline outer stroke that vanishes by year two. Ask for a slightly thicker neon rim and expect modest touch-ups in hotter climates. For casual days try rolled linen pants so the calf shows naturally.
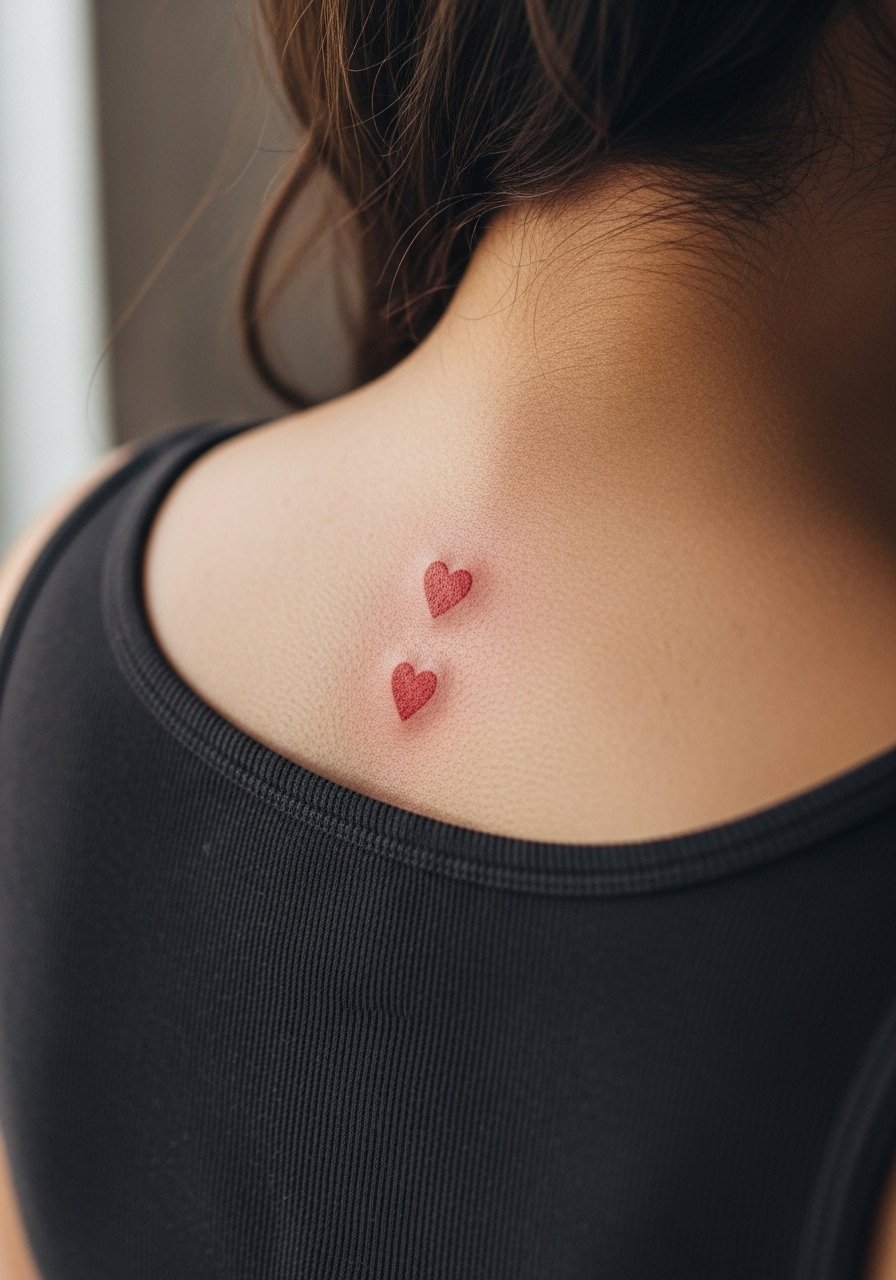
14. Tiny Heart Pair Behind the Ear
Controversy lead applies because small placements near the neck prompt debate about visibility in professional settings. One camp says these hidden spots are fine and discreet. The other worries about workplace perceptions for neck-adjacent tattoos. If discretion is your aim, place the hearts just below the hairline and keep size conservative. Behind-the-ear tattoos need an artist experienced with tight curves. For appointments let the artist see how your hair will sit after healing and consider a low-profile wide-neck shirt so they can work without exposing more than necessary.
15. Red Heart Lock on the Wrist with Key Dots
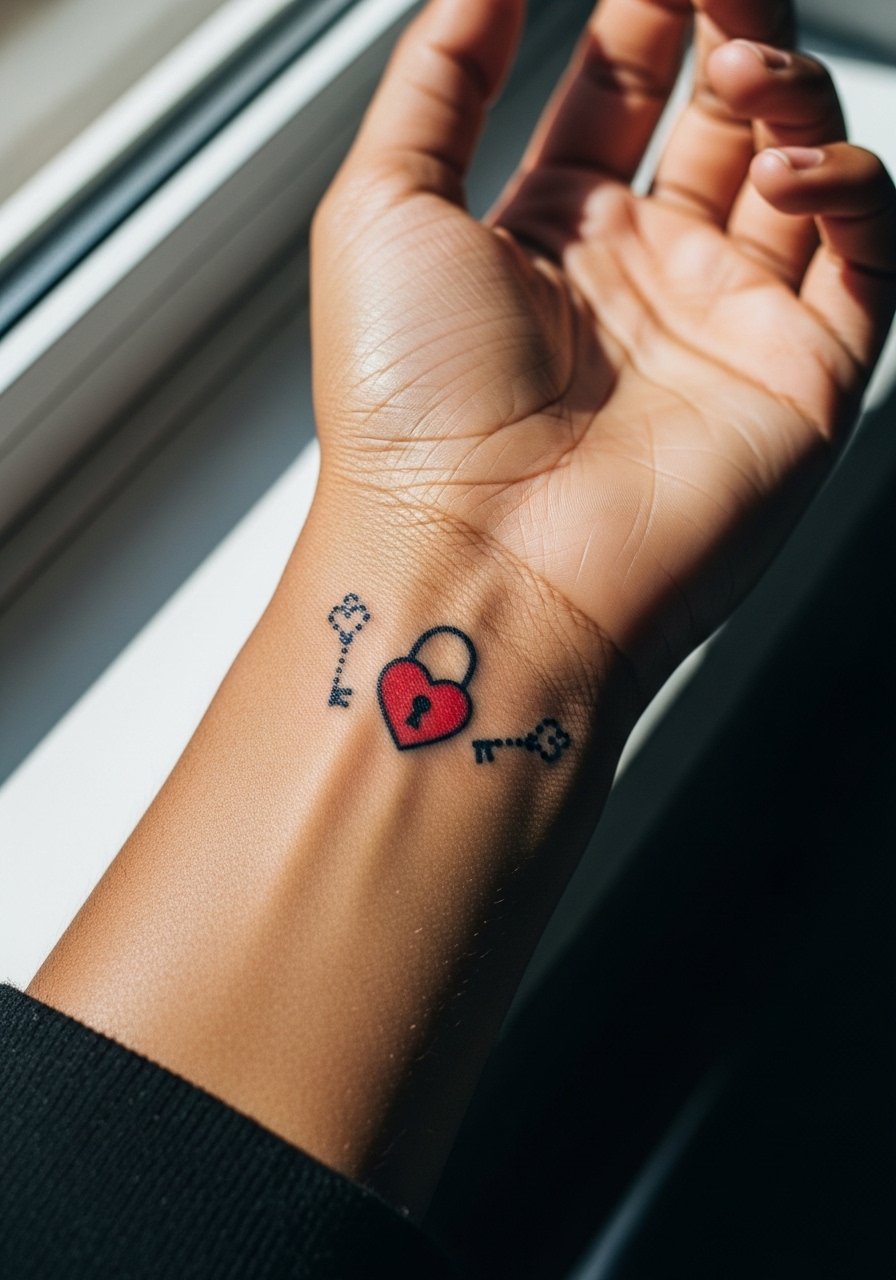
Mistake lead here. The wrist reads big compared to reference photos, so people often choose heart locks that feel too small when actually on the wrist. Ask your artist to scale the motif to wrist proportions and to space key dots so they do not blur into the lock. Expect touch-ups in 18 months if you type a lot or wear bracelets that rub the area. For easy session access wear a loose sleeve shirt that you can pull up without tugging.
16. Split-Color Heart Across the Sternum

Aging and healing lead works because sternum skin stretches differently than arm skin. A split-color heart that crosses the sternum must account for movement during breathing. Some artists avoid heavy fine line here and prefer blocky saturation for stability. Discuss the split placement so the halves align when you stand normally and when you breathe deeply. Sternum sessions can be intense on pain. For the appointment wear a fitted sports bra so the artist can work without you feeling overexposed.
17. Tiny Red Heart Near the Ankle Bone
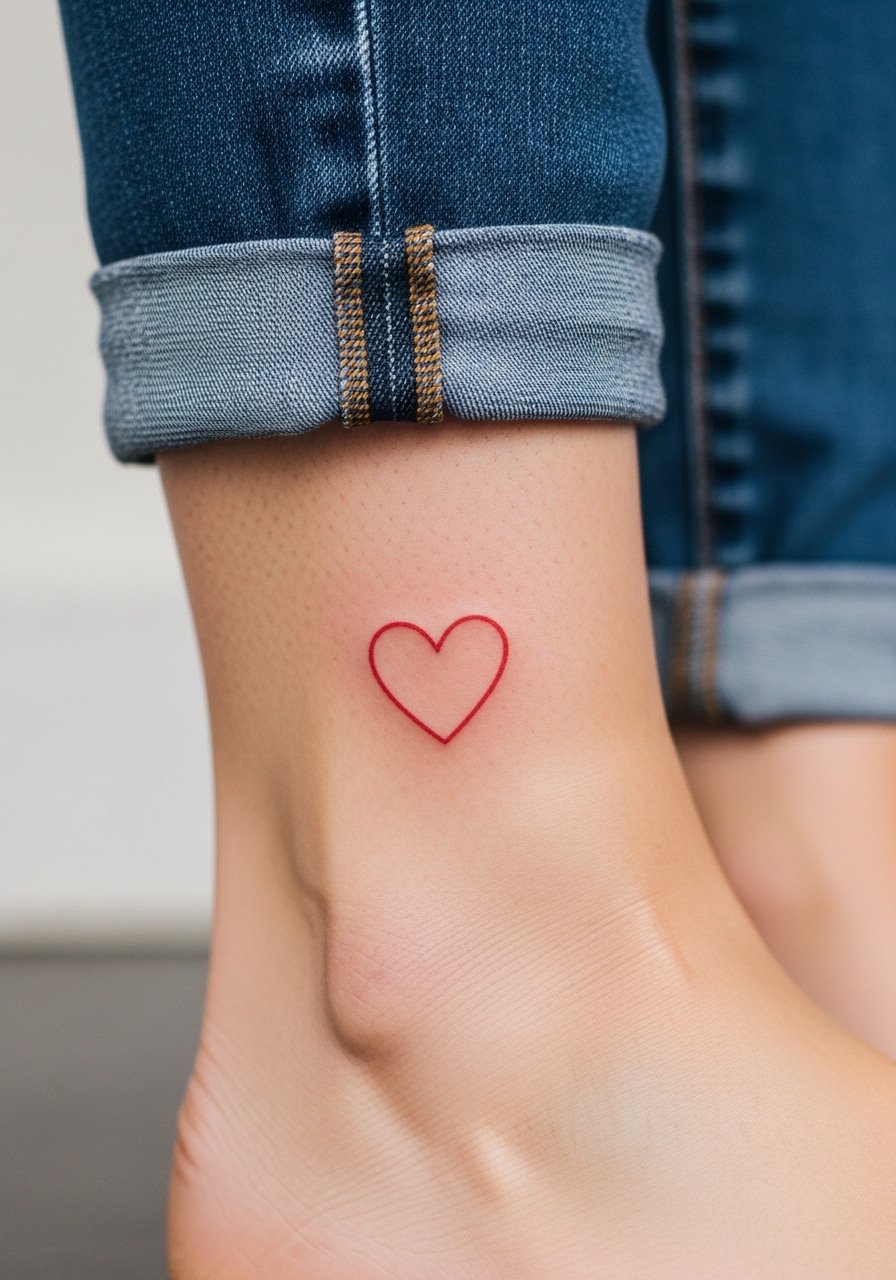
Consultation lead is helpful here. The ankle bone gives a natural anchor point that makes tiny motifs read deliberate. A common error is placing the heart too low where shoe friction will cause early scabbing and color loss. Request placement slightly higher and consider a bolder fill so the red survives constant movement. Healing is sensitive because of low soft tissue coverage and footwear friction. Wear slip-on shoes or sandals during the first week and plan for a possible touch-up around year two.
Frequently Asked Questions
Q: Will fine line red hearts blur faster than saturated ones on the forearm?
A: From what I've seen, fine line work can soften faster on areas that see sun and friction. A tiny saturated core or slightly heavier contour helps the heart read longer on the forearm. Ask your artist for healed photos of similar work and plan for a touch-up around year three depending on your lifestyle.
Q: How should I dress for a ribcage or sternum session?
A: Wear a cropped top or a fitted sports bra that the artist can lift without exposing more than needed. A fitted sports bra or a cropped athletic top makes positioning easier and keeps you comfortable during long sessions. Loose bottoms are fine for rib work so you can sit or lie without pressure on the tattoo zone.
Q: Are white highlights worth it on a small hand or finger heart?
A: White highlights pop fresh but they fade faster than red. On fingers and hands the white often disappears in the first year. If you want that glossy hit, accept it as a temporary contrast and plan to let the red carry the long-term read.
Q: How often do red hearts need touch-ups on high-friction spots like the ankle and wrist?
A: It depends on exposure and activity. In my experience ankles and wrists often need touch-ups every one to three years, while upper arm and calf pieces can go longer. Regular sunscreen and minimizing abrasive contact during the first month stretch the time between touch-ups.
Q: Is there a way to get a watercolor look that stays longer?
A: Yes. Anchor the watercolor with denser saturation near the center and ask your artist to layer color over two sessions. That approach preserves the soft edges while giving pigment a base that resists early diffusion.
Q: Should I be concerned about workplace reactions for collarbone or behind-the-ear hearts?
A: It depends on your field and how visible you want the ink to be. Behind-the-ear and collarbone placements can be tucked or shown based on wardrobe choices, so weigh visibility against your career goals before booking.
