
Sitting in the chair with the stencil on your back shoulder is the moment most people realize questions matter. The shoulder reads large, curves in ways flat photos do not, and a tweak to line weight or spacing at that moment changes how the piece looks at year three. These 21 blackwork back shoulder designs focus on what holds up, what to ask in your consult, and how to wear each piece in the weeks and years after.
1. Bold Mandala Shoulder Cap
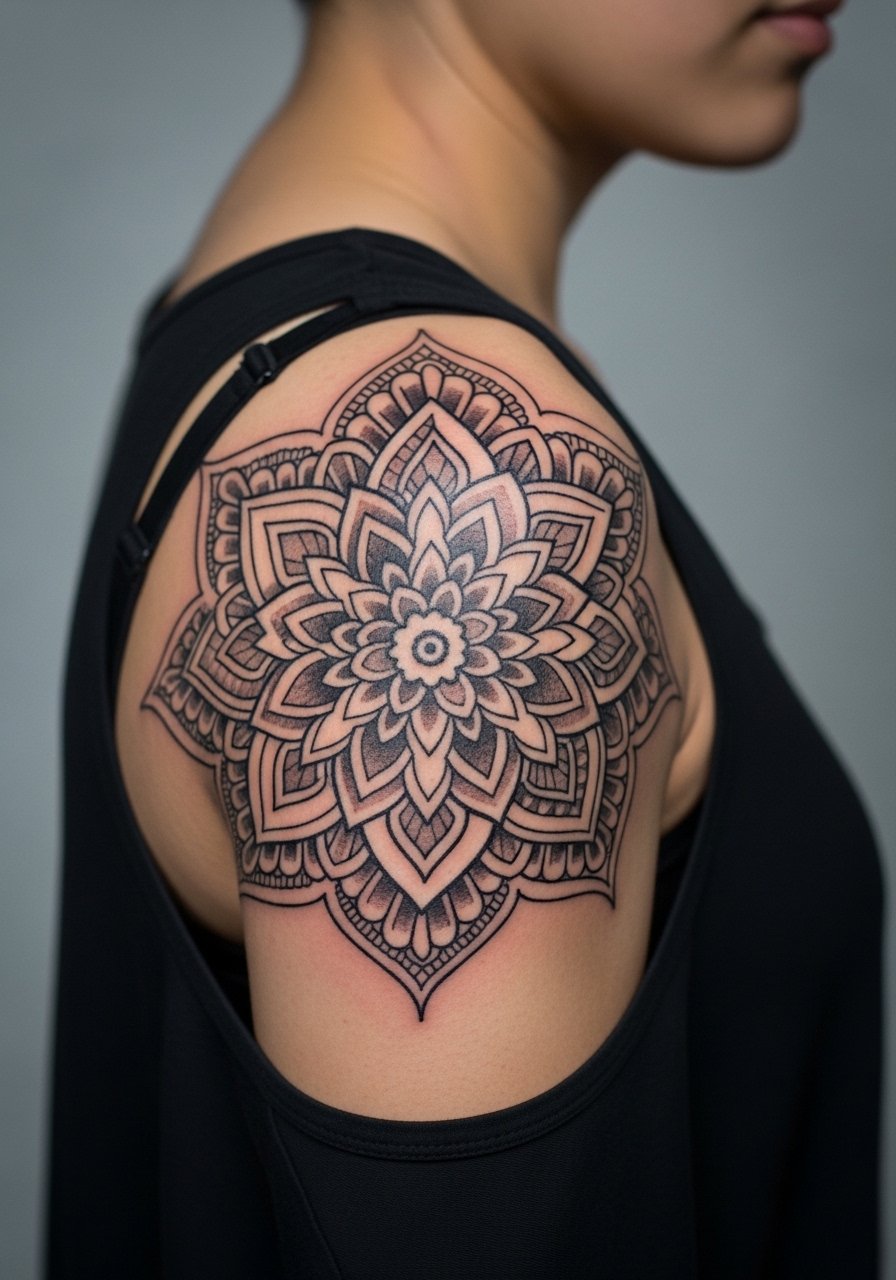
I've seen mandalas read two ways on the shoulder. When scaled and spaced properly they keep crisp petal apertures for years. When artists compress too many inner rings into the shoulder cap the dense linework starts to merge by year three. In your consultation, ask for more space between concentric rings and slightly thicker outer linework so the design breathes as the skin settles. Pain here is moderate, and a single session can run two to four hours depending on size. Common mistake is asking for ultra-fine inner dots that look delicate at the stencil stage. For showing it off, an open-back midi dress or a racerback tank highlights the cap while keeping the area easy to photograph.
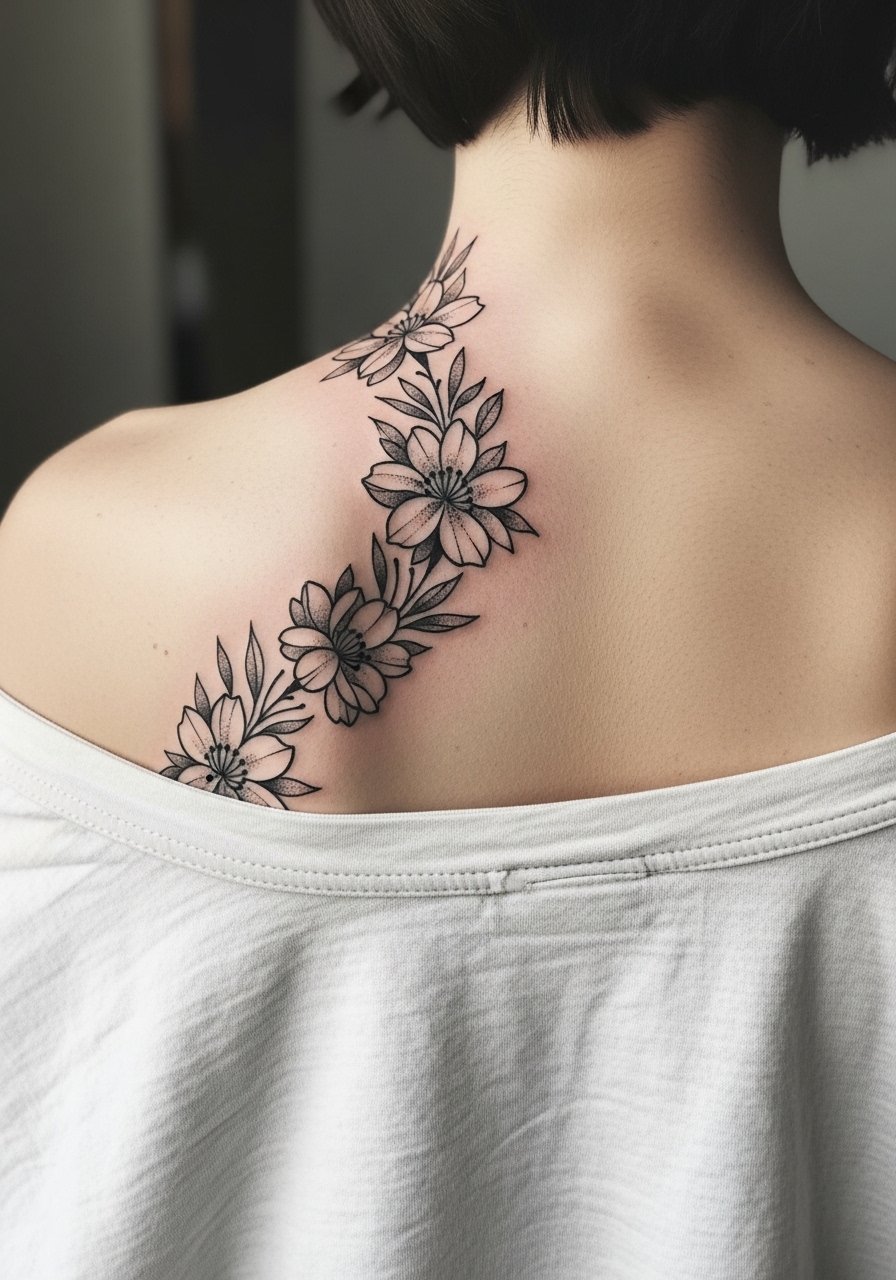
2. Blackwork Floral Shoulder Blade Cluster
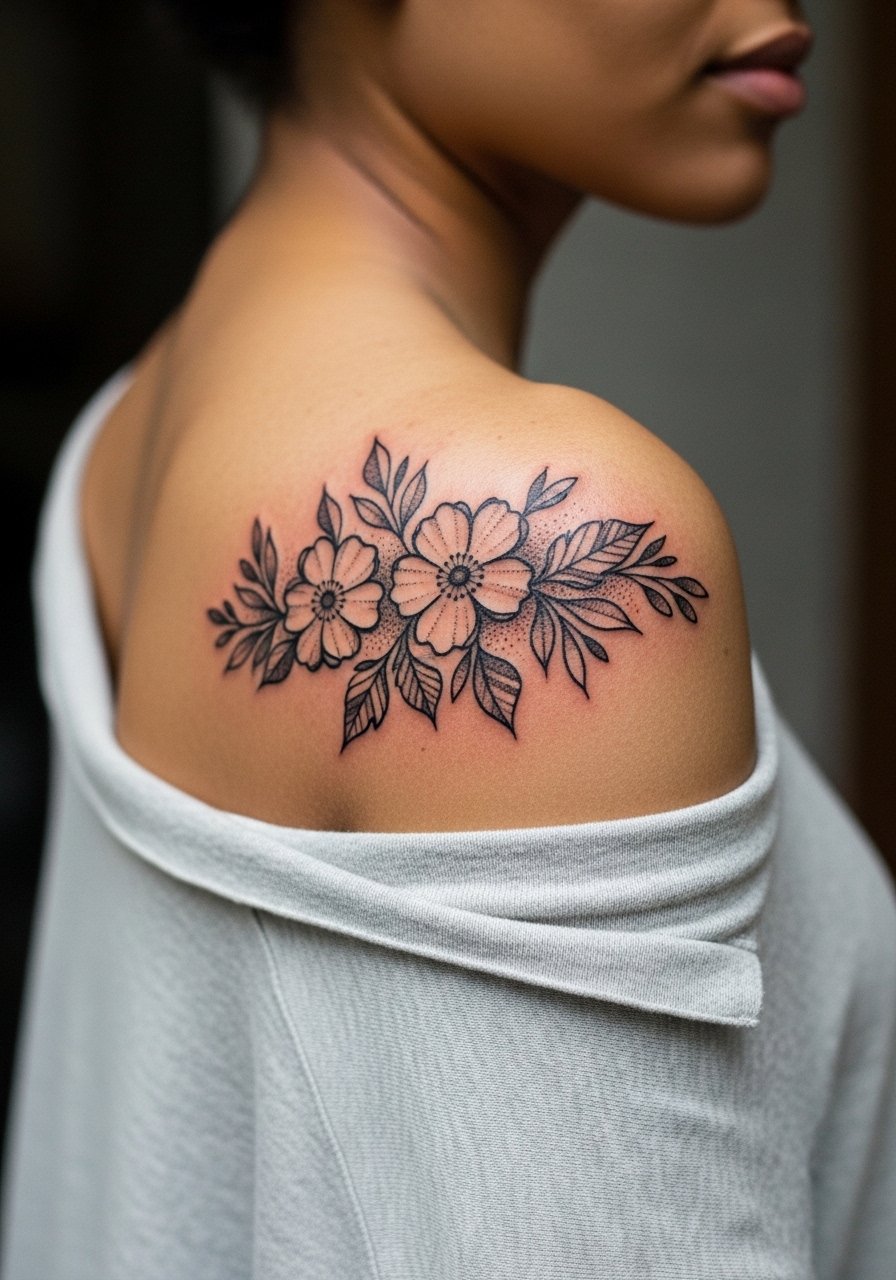
There is real room for drama when black petals are handled as solid silhouettes paired with stipple shading behind them. I recommend telling your artist to treat the flowers as negative space against saturated black fills rather than tiny petal outlines. That approach ages better, because thin petal lines on the shoulder can blur against the shoulder's motion. Sessions are medium pain, often two to three hours. Expect a touch-up at year two if you want the darkest saturation restored. For afternoons out pair this with a wide-neck linen shirt so the silhouette reads cleanly against breathable fabric.
3. Shoulder-to-Back Geometric Panel
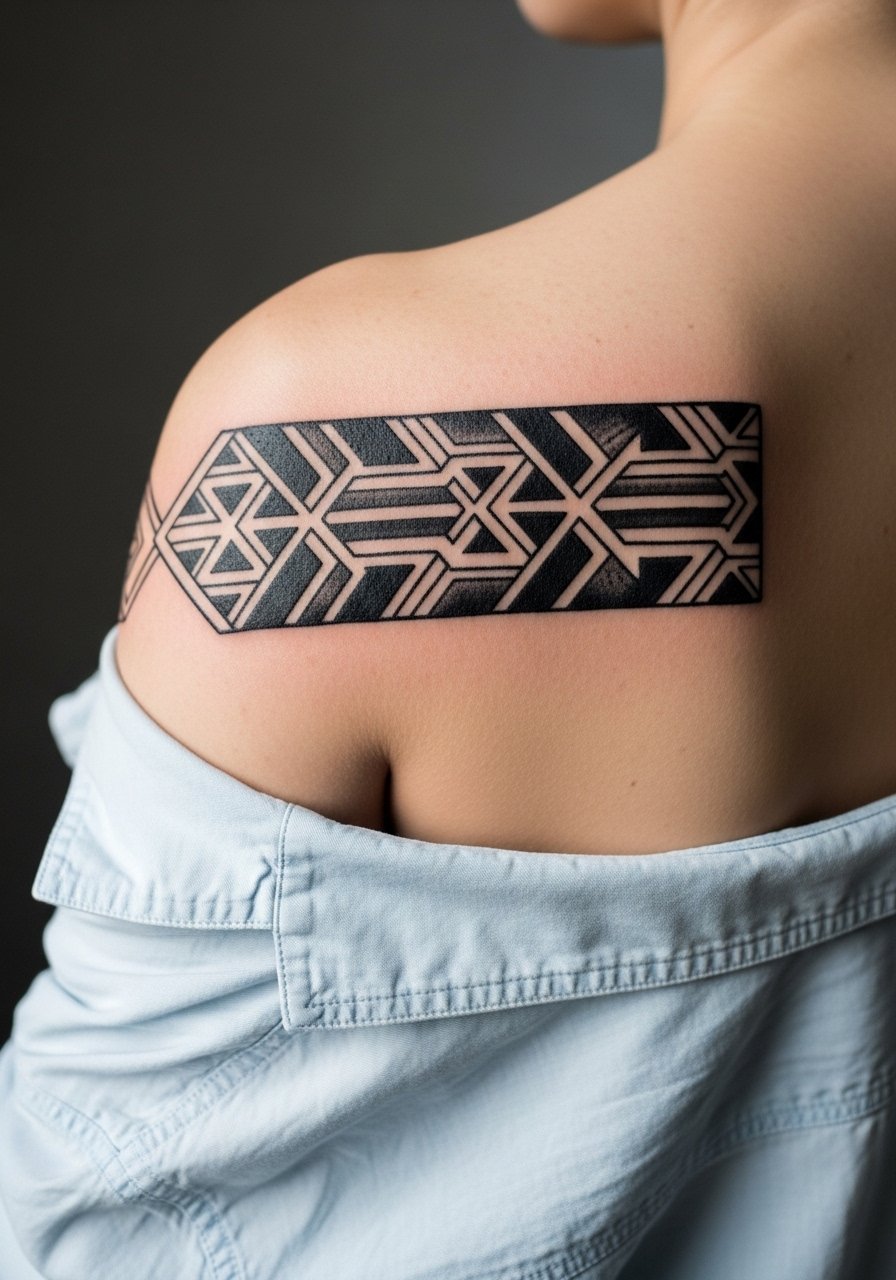
This panel works when you let each motif breathe. The biggest mistake is tightening patterns to fit a photo reference that was shot flat. Ask for a mockup positioned on your body to confirm scale during the consult. The session feels like a long contouring run with steady machine motion, so expect three to five hours and plan on breaks. Blowout risk drops if the artist avoids pushing heavy saturation into the outermost curved areas of the shoulder. For an evening look, wear a loose button-down shirt with the sleeve rolled to highlight the panel edge.
4. Tribal-Inspired Bold Back Patch

Tribal-derived patterns often spark debate. One camp says these motifs carry cultural weight and should be approached with permission and context. The other camp sees them as stylistic influences that can be adapted respectfully with artist collaboration. If you choose this route, discuss origin and intent with your artist and consider subtle modifications instead of direct replicas. Heavier black saturation on the shoulder ages predictably well when done over multiple sessions rather than all at once. Pain is moderate and expect multiple sessions for a bold patch. For sessions wear a racerback sports bra that gives clear shoulder access.
5. Stylized Animal Crest on Upper Back
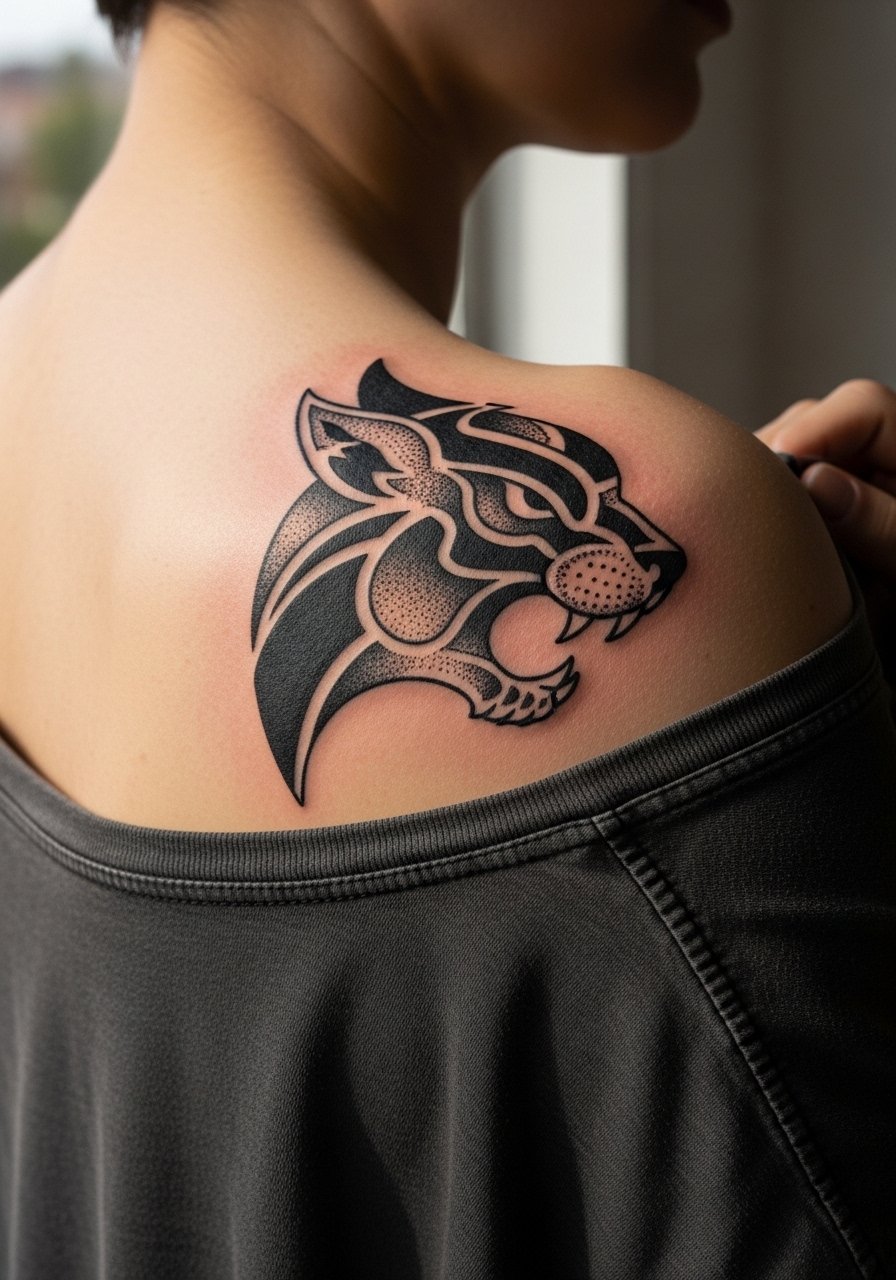
A crest-style animal works well as a central anchor that can read from a distance. Tell your artist you want bold silhouette work for the main shapes and stipple or whip shading for texture. The common mistake is asking for tiny facial detail on an area that moves; faces that are too detailed in blackwork blur faster than abstracted shapes. This placement usually feels tolerable because the shoulder muscle is dense, but sessions can still last three hours for good saturation. Pair the crest with an open-back blouse when you want it visible without exposing much skin.
6. Negative Space Crescent and Stars
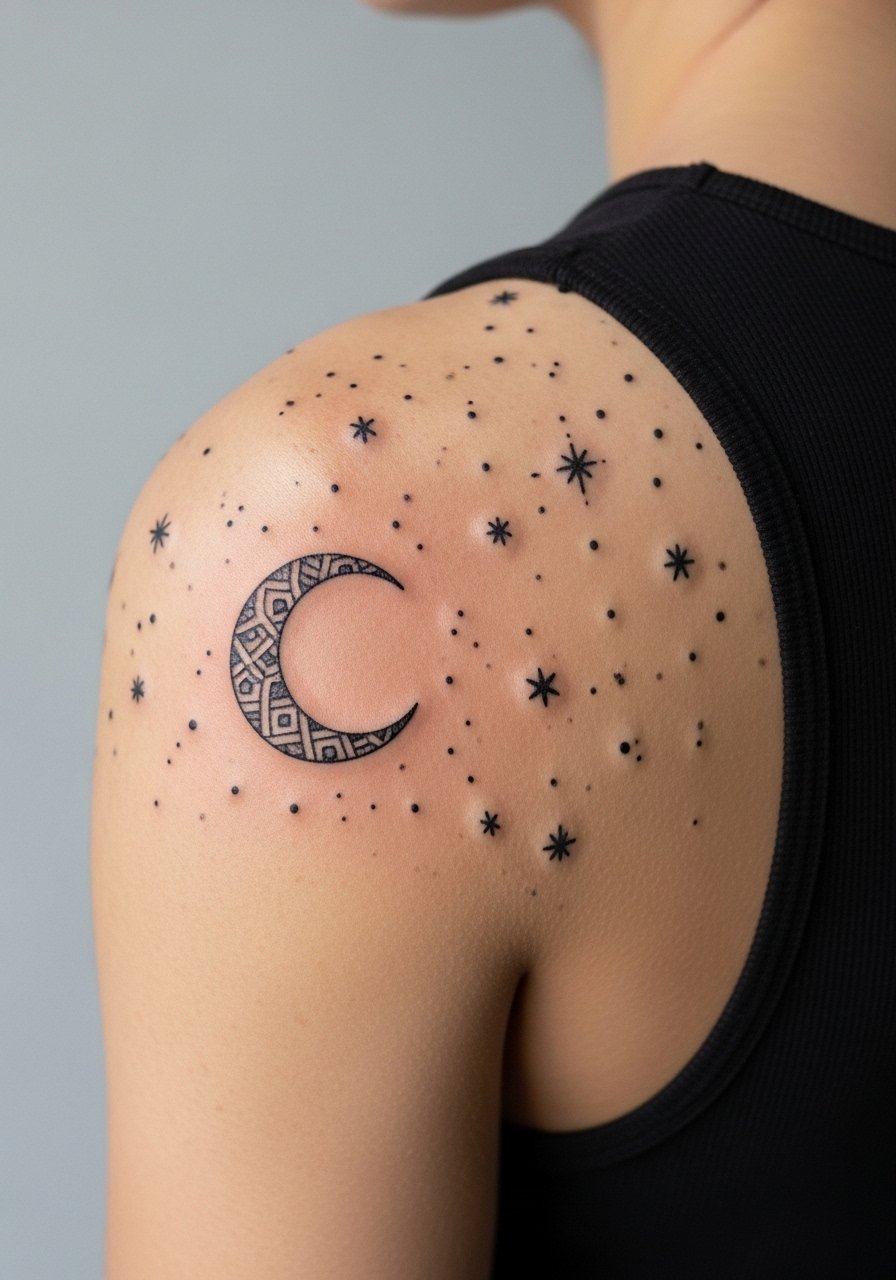
Negative-space pieces rely on crisp surrounding saturation to preserve the shape. The error I see is undercutting the black fills that frame the crescent. Ask for slightly heavier surrounding fills so the moon retains its silhouette after healing. Small star dots should be spaced with room or they risk merging into a blob over time. This is a relatively quick session, one to two hours, and a common touch-up at year two keeps the negative edges crisp. For an everyday look, a racerback tank frames the crescent neatly.
Studio Day Picks
These back-shoulder pieces above often sit under bra straps or dress backs, so a few studio and short-term healing items smooth the session and the first week.
-
Stencil transfer paper kit. Lets you preview placement on the shoulder curve and confirm scale before the first pass.
-
Topical numbing cream. Applied as instructed this reduces discomfort during longer shoulder-to-back sessions without interfering with linework when used properly.
-
Thin protective film roll. Useful for securing the tattoo under straps or dresses during the first 48 hours of healing.
-
Fragrance free gentle body wash. Cleans the area after showering without added perfumes that can irritate fresh blackwork.
-
Aquaphor healing ointment. A thin layer during the initial days helps lock in moisture and reduces scab hardness on large black fills.
7. Single-Line Phoenix Wing on Shoulder Blade
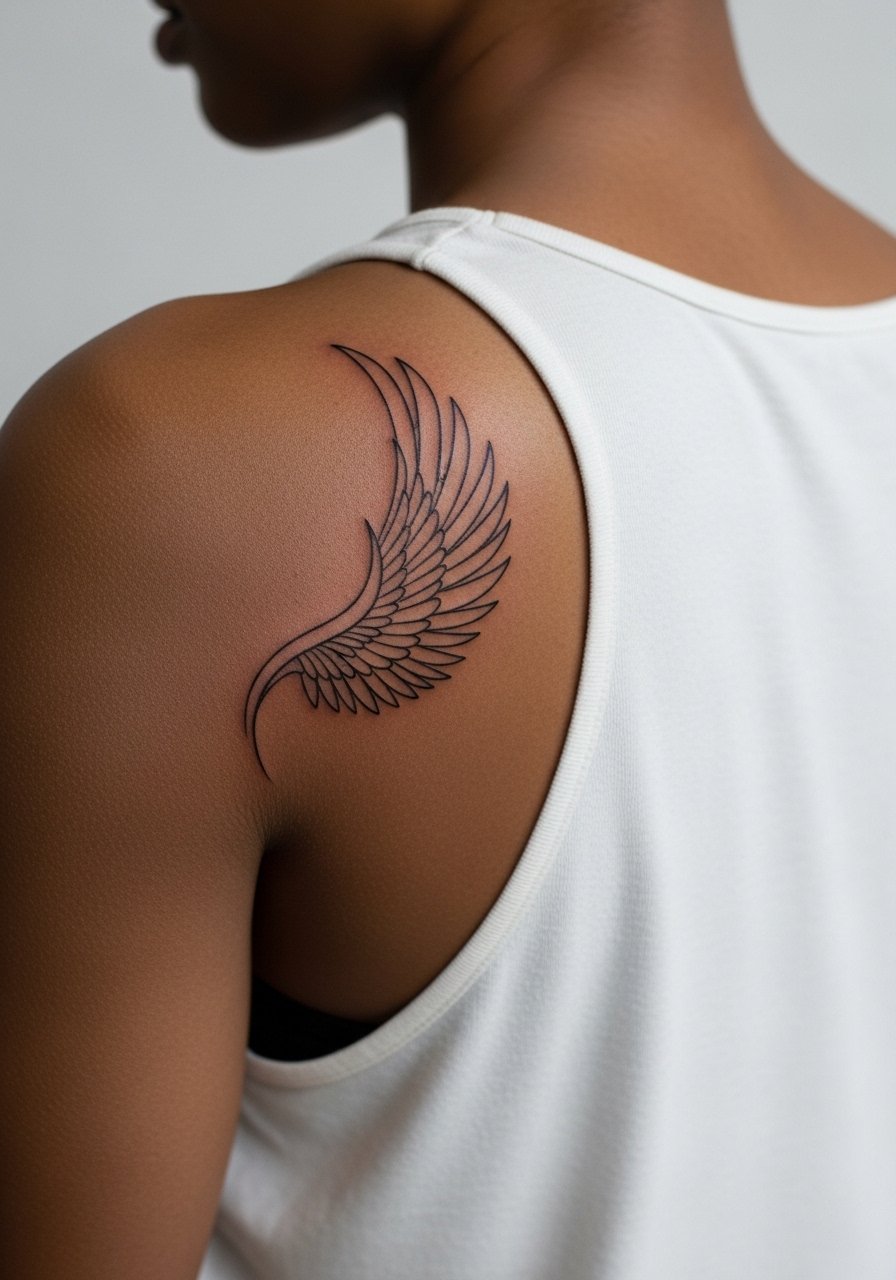
A single-line approach gives movement without heavy saturation. I advise requesting slightly bolder primary strokes so the wing shape remains defined as the ink settles. The mistake people make is insisting on hairline strokes that disappear into the shoulder's texture. Session time is usually one to two hours. For show-off styling, a wide-neck tank or a top with a lowered back displays the curve of the wing without competing details.
8. Heavy Black Shoulder Shield
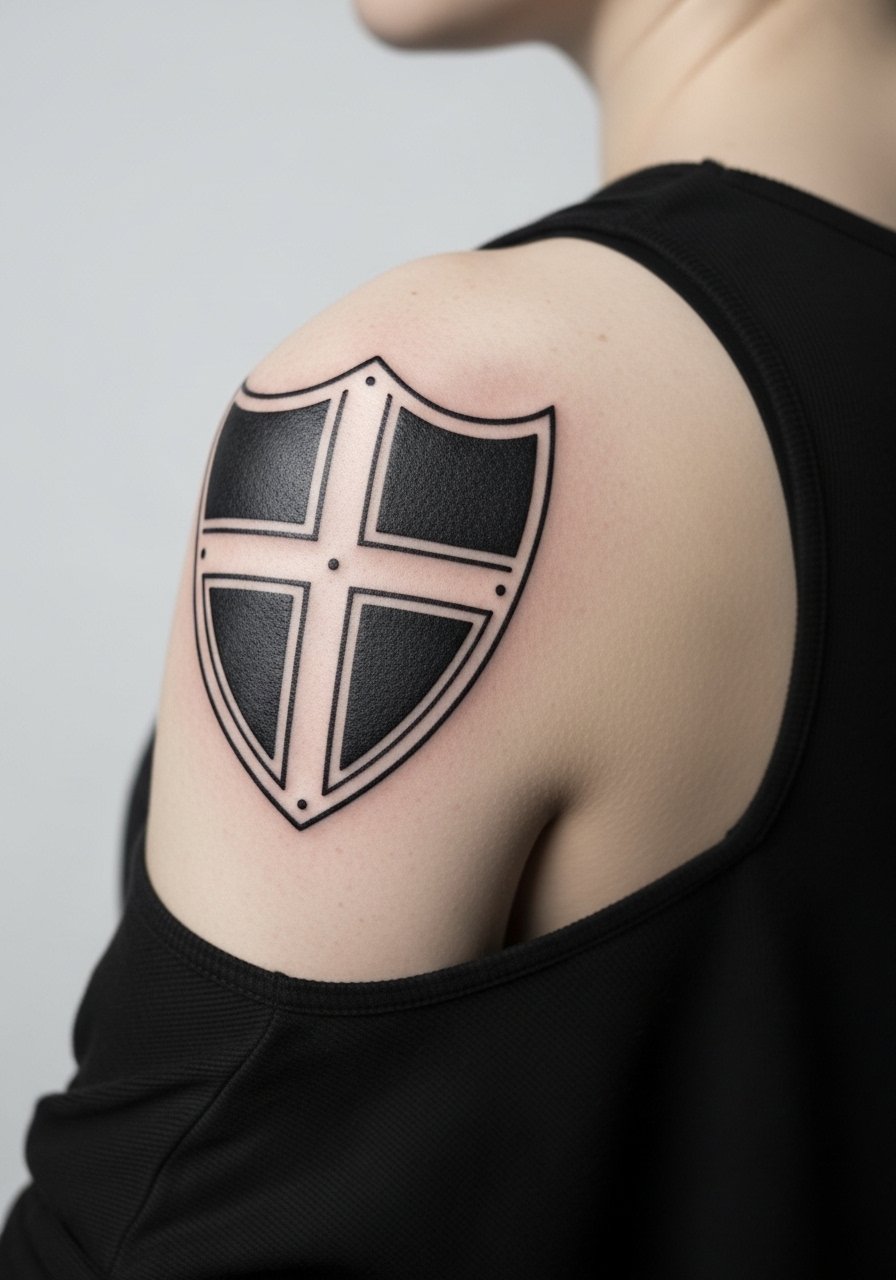
Solid shields age predictably when shaded in layers rather than forced in a single heavy pass. One camp favors full-session saturation for a bold finish. The other camp stages fills across two sessions to let the skin recover and to minimize scarring. Both approaches can work, but I prefer staged saturation for large patches. Sessions for a shield are longer and can be intense on the muscle, plan breaks. For wardrobe, a loose tank top keeps friction low during healing.
9. Dot Work Crescent Over Shoulder
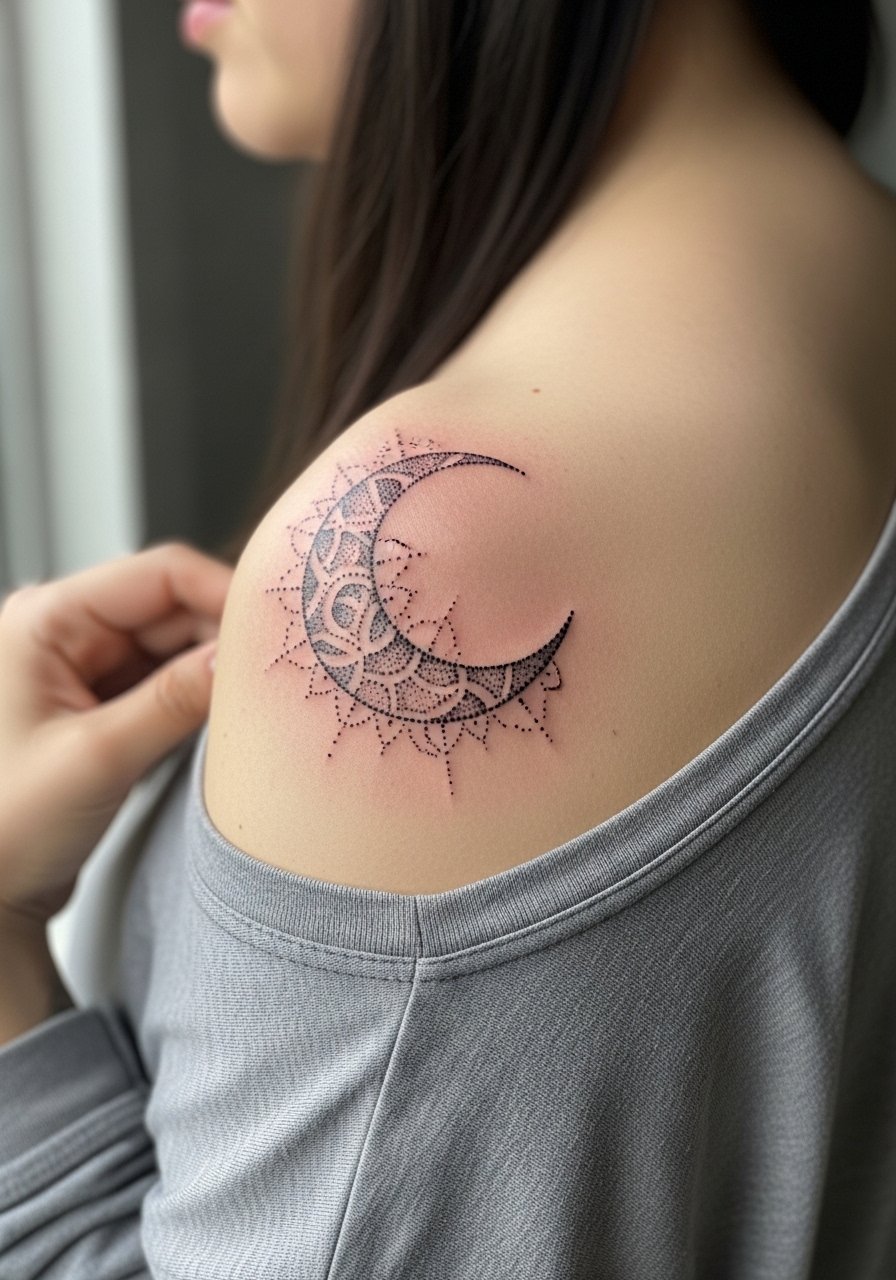
Dot work needs patience. Tell your artist you want clear density gradients and ask to see healed examples at similar scale on their portfolio. A common mistake is compressing the dots too tightly which speeds merging as the skin ages. Dot packs look soft at six months and can lose contrast by year three without touch-ups. Sessions are slow and soothing in rhythm, often split into two visits. For casual wear pick a wide-neck tee so the stippling shows with minimal fabric interference.
10. Scripted Phrase with Negative Backing

When pairing script with large black backing, letterforms must be bold enough to survive the contrast shift. The biggest error is choosing a delicate script that disappears next to heavy fills. Ask the artist for lettering samples at the final scale on skin before committing. Pain is mild to moderate and a single session often suffices. Expect a minor touch-up in a year if the ink pools in high-motion zones. For nights out choose a thin chain pendant necklace that rests above the script without crowding the back.
11. Blackwork Floral Spine Accent
This vertical accent reads best when the flowers are slightly stylized and separated enough to avoid merging across the spine. A common mistake is running too many small blooms in a tight column. Ask your artist to place each bloom with space equal to a thumb width at final size. Sessions are moderate and can be split into two for comfort. Over time the central column keeps shape well because of lower friction, but expect a touch-up around year three to refresh stipple contrast. Pair with open-back tops to show the vertical line without exposing the full back.
12. Crescent Shield with Chain Links
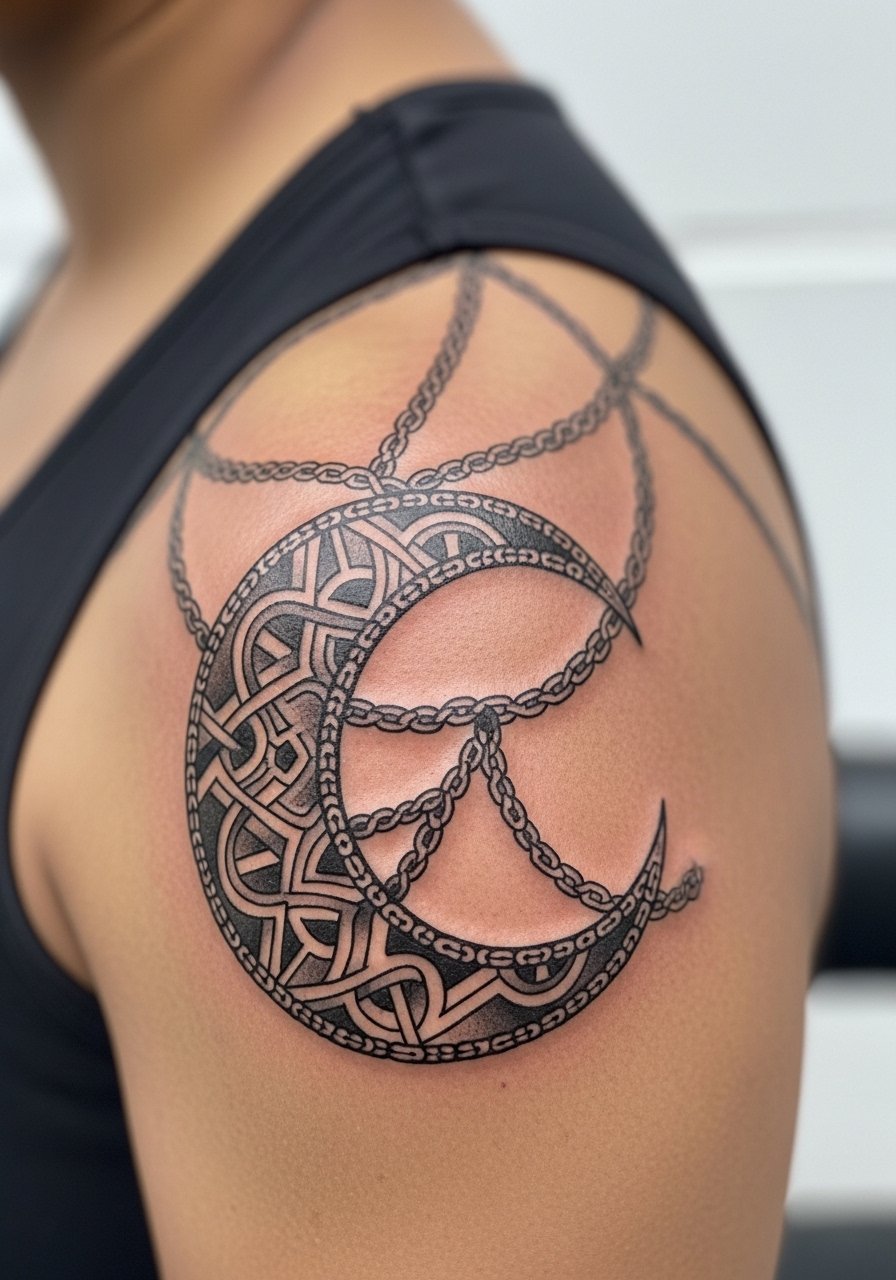
Chain links in blackwork need slightly heavier outlines to hold their shape against motion. The mistake is insisting on hairline connectors that vanish under skin movement. Tell your artist to emphasize the link borders and to avoid packing too many links into a small curve. The session is two to three hours for tight detail. Expect that chain edges may require touch-up at year two if you prefer razor-sharp separation. For jewelry pairing, a stack of thin cuffs sits below the shoulder on the arm and frames the crescent without covering it.
13. Abstract Blackwork Brushstroke Across Shoulder
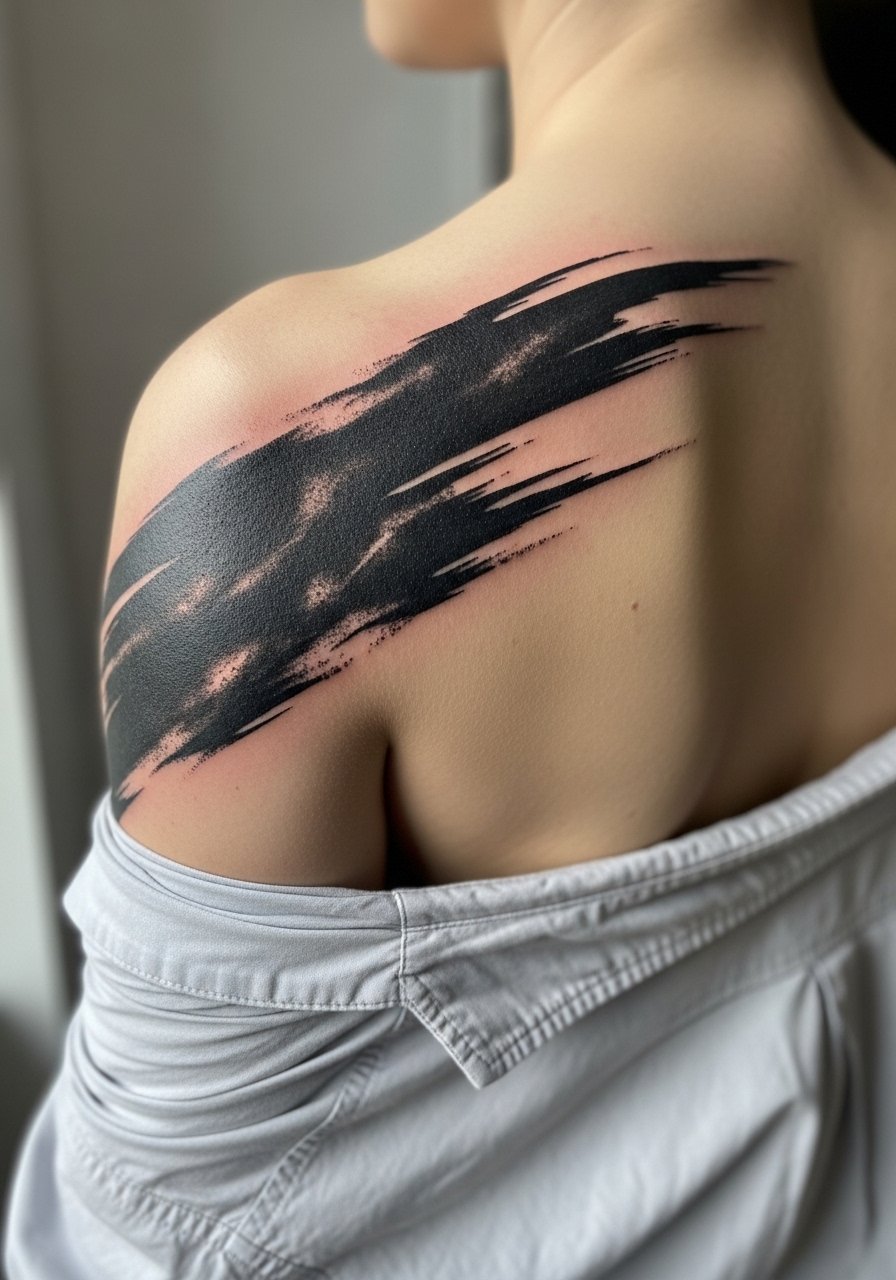
Brushstroke pieces work when they respect muscle direction. A usual error is placing a single aggressive stroke without considering how it will sit while you move. In consult ask for a mockup photo of the stroke on your shoulder in natural positions so you can see how it reads when you reach or shrug. Sessions are variable depending on size but often two hours for a clean edge. For an elevated look wear a loose button-down shirt with the shoulder exposed to photograph the texture without competing prints.
14. Interlocking Geometric Shoulder Knot

Knots need breathing room. The common mistake is shrinking the pattern to fit a smaller area which causes overlap and loss of negative channels. During consultation ask the artist to keep key negative channels at least the width of a ballpoint pen at final size. Sessions can be detailed and take three or more hours. Over time these knots hold well if spacing is respected. For casual styling choose a racerback tank that frames the interlock without obstructing it.
15. Blackwork Compass on the Upper Back

Compass motifs are a good spot to play with heavy points and negative center space. The mistake is overloading the central needle with tiny details that do not survive motion. Ask your artist to keep the central forms bold and the ornamentation more open. Expect a two to three hour session and a likely touch-up at year three for sharp points. For nights out a backless dress will show the compass cleanly without exposing too much skin.
16. Minimalist Line Horizon Along Shoulder

Minimal horizons rely on consistent lineweight. I often see clients choose a thin single stroke that flutters after healing. Tell your artist you want a slightly bolder baseline to prevent wobble over time. This is a fast session, often under an hour, making it a low-commitment option. Over the years expect subtle softening, and plan a touch-up only if you want the original graphic crispness returned. For show-off wear a wide-neck tee or a thin chain necklace that sits above the line.
17. Stylized Sunburst Shoulder Medallion
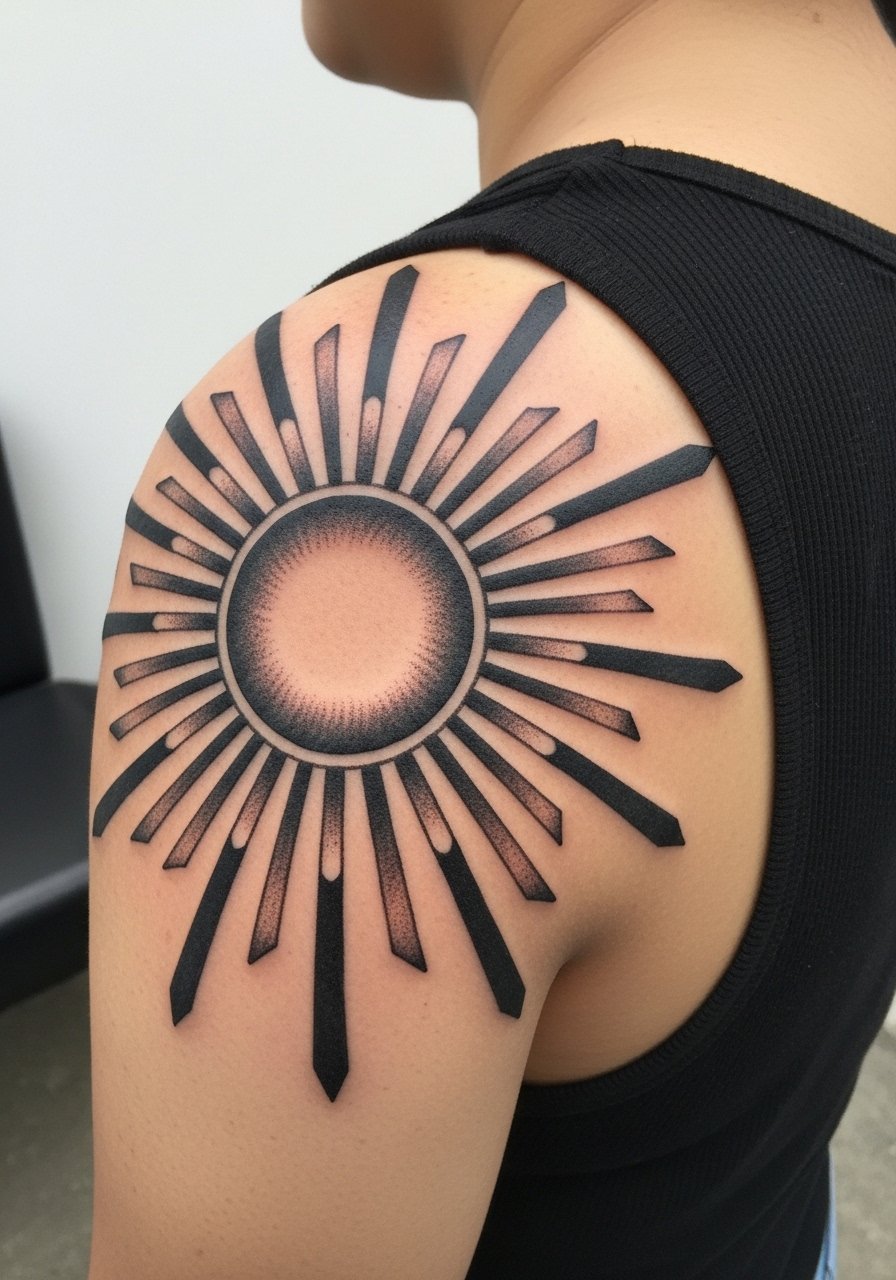
Sunburst medallions benefit from strong outer rays and measured inner spacing. The common mistake is packing too many rays close to the center which make the core look muddy later. Ask for bolder outer rays and sparser inner rays so the medallion reads at distance and close up. Sessions are moderate in pain and can be completed in two sessions for large pieces. For styling, an open-back midi dress shows the radiating pattern without strap interference.
18. Blackwork Lace Panel Over Shoulder
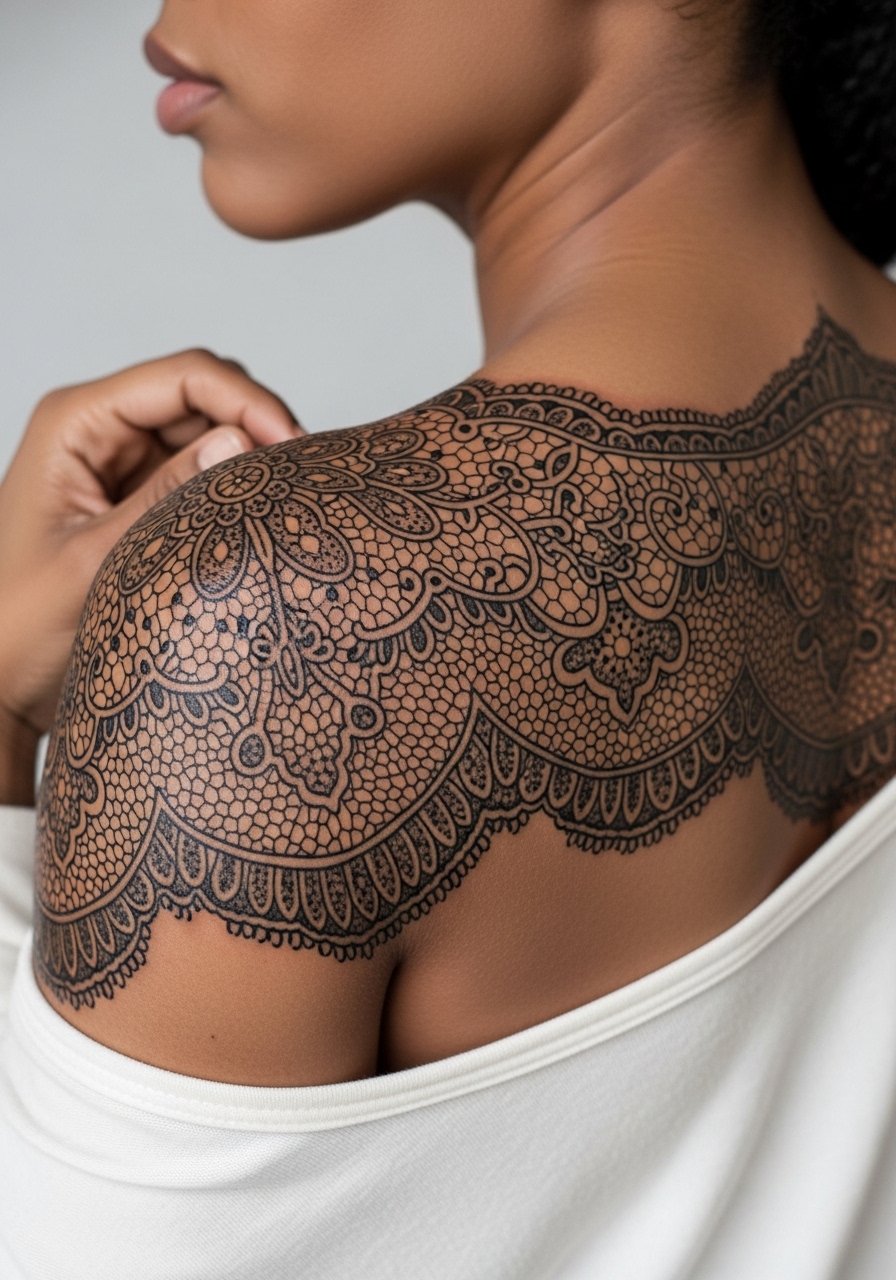
Lace motifs ask for clean negative channels. A mistake I see is treating lace like regular floral work without respecting tiny negative holes, which then close up. Ask your artist to map out the negative holes and preserve them as the primary structure. Sessions are detail-heavy and may need two sittings. Over time, lace holds if negative shapes are respected. Pair with a wide-neck blouse that gives glimpses of the lace without covering it.
19. Folded Ribbon Blackwork Accent
Folded ribbons read well when shadows are suggested with stipple and tapered fills. The common error is using heavy black for both folds which flattens the effect. Ask for contrast between fold edges and inner shadows to keep depth over time. Sessions are moderate and often under three hours for a clean piece. For outfit pairing, a racerback tank or a loose button-down works well.
20. Ornamental Shield with Dot Fringe
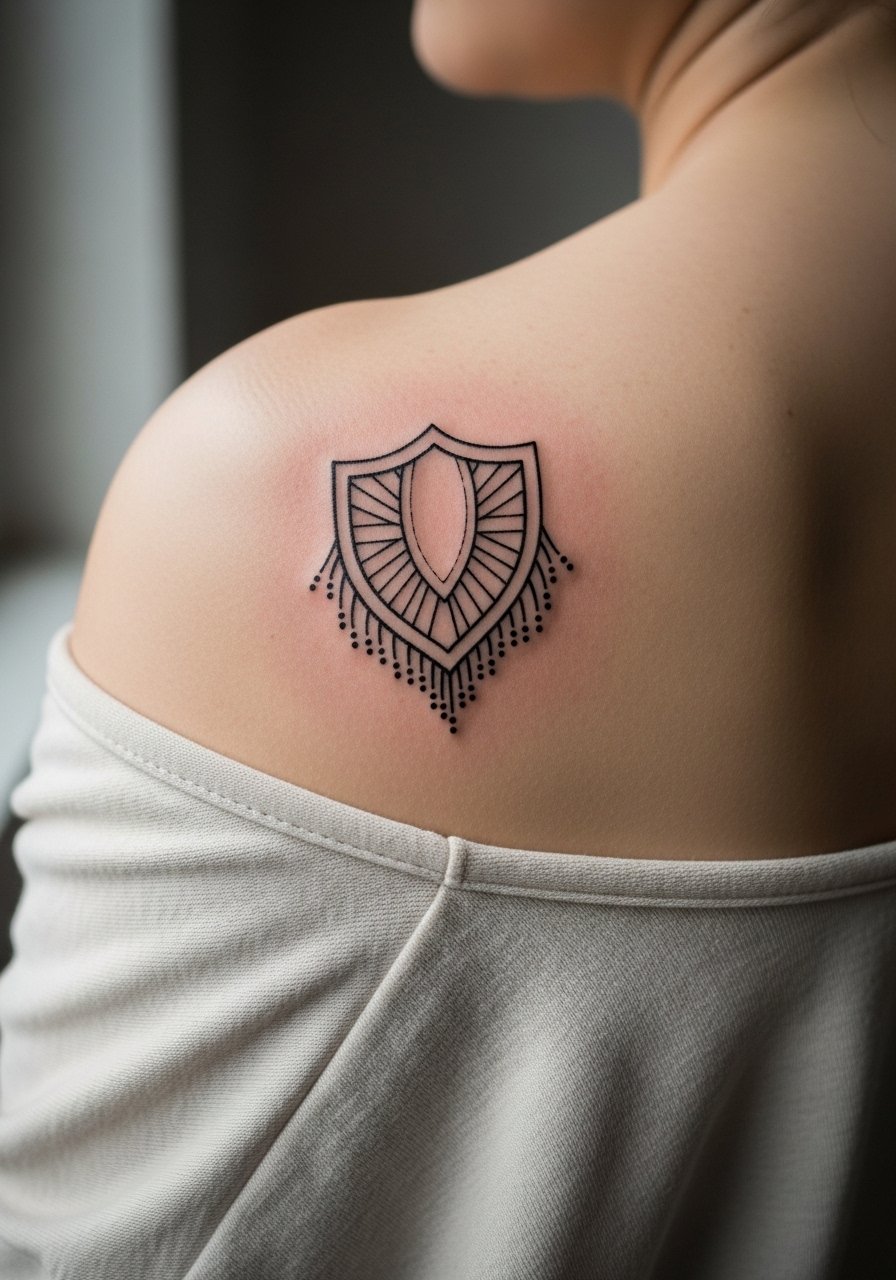
Dot fringe needs spacing to avoid looking like a single mass later. The mistake is placing dots too closely around curved edges. During consult request a test patch or a mockup that shows the fringe even when scaled. Sessions are moderate and benefits from short breaks to maintain consistency. Over years fringe may need a light touch-up for contrast. For evenings choose an open-back blouse to keep the ornament visible without heavy exposure.
21. Asymmetric Blackwork Wave Across Shoulder
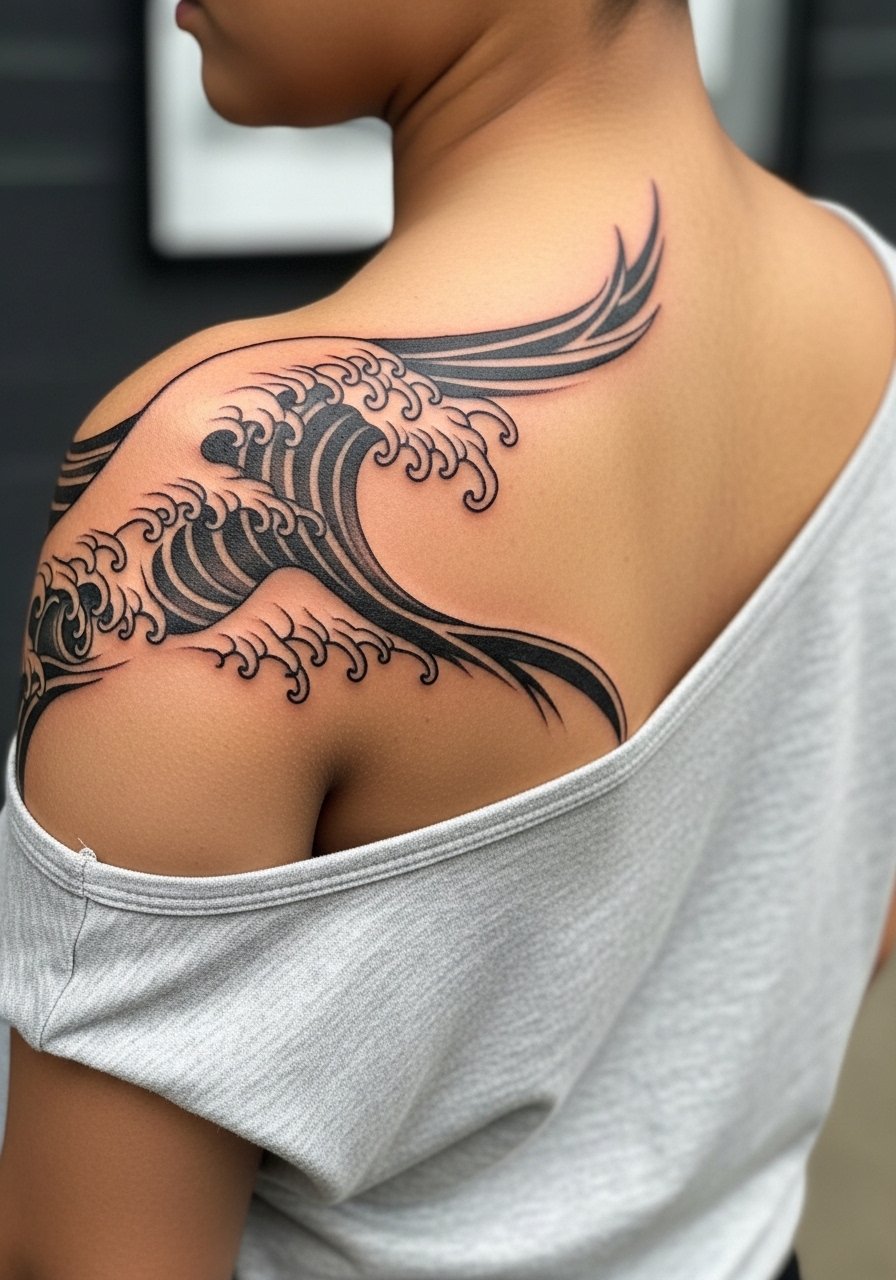
Asymmetric waves read as movement when the thicker masses are placed on the more static side of the shoulder. A common mistake is making both sides equally dense which fights the natural fall of fabric and motion. Ask for a mockup while standing and while shrugging so you can see how the wave reacts to movement. Sessions often last two to three hours. Expect a touch-up at year two if you prefer the original contrast restored. For casual wear pair with a loose drawstring linen pant and a tank to keep the upper body clean and breathable.
Frequently Asked Questions
Q: How badly will a blackwork shoulder tattoo fade compared to other placements?
A: From what I've seen, shoulder blackwork holds color better than inner bony areas because the deltoid has thicker tissue. UV exposure and friction from straps are the main causes of fading. Protect the area from daily sun and be mindful of bag straps that rub persistently.
Q: Should I expect more sessions for large saturated black patches on the shoulder?
A: Yes. Many artists prefer staging large fills across two sessions so the skin can recover and so saturation can be controlled. That staged approach reduces scarring risk and often gives a more even healed finish.
Q: Are there cultural concerns I should consider with tribal-style blackwork on my shoulder?
A: There are two sides to this. One group argues that certain tribal patterns carry cultural significance and should not be copied without permission. The other group adapts motifs respectfully as stylistic inspiration. A good middle ground is to discuss origin with your artist and make deliberate changes that acknowledge the source without direct appropriation.
Q: How long before I can wear regular bras or strap dresses after a shoulder session?
A: Plan to avoid tight straps that rub the fresh tattoo for at least one week. For large fills wait two weeks before regular straps sit over the area without a thin protective barrier. For session day wear, a loose button-down or a racerback sports bra that can be moved aside makes the process easier.
Q: Will fine line detail across the shoulder blur faster than bold black fills?
A: In my experience fine line on the shoulder can blur faster, especially in very dense motifs or on skin that moves a lot. Bold fills and slightly thicker linework tend to read longer without losing their intended form. If you love fine detail ask for spacing adjustments and plan for a possible touch-up at year two.
Q: What should I ask in my consultation to ensure the design fits my shoulder curvature?
A: Ask the artist to map the design on your body in several poses and to provide a stencil preview at final scale. Request that they show you how the piece looks under movement. That visual confirmation is the most useful indicator of how the tattoo will age.
