
Fine line trends look gorgeous on feeds, but the reality is messier. Fine single-needle gladiolus often needs touch-ups by year two, small wrist pieces can cost more than they used to, and dark skin tones sometimes lose photographic contrast unless the artist adjusts saturation. I see people get ghosted after deposits and regret placements after body changes. Read these 21 August flower ideas and you will know what to ask at the consult and which placements actually hold up.
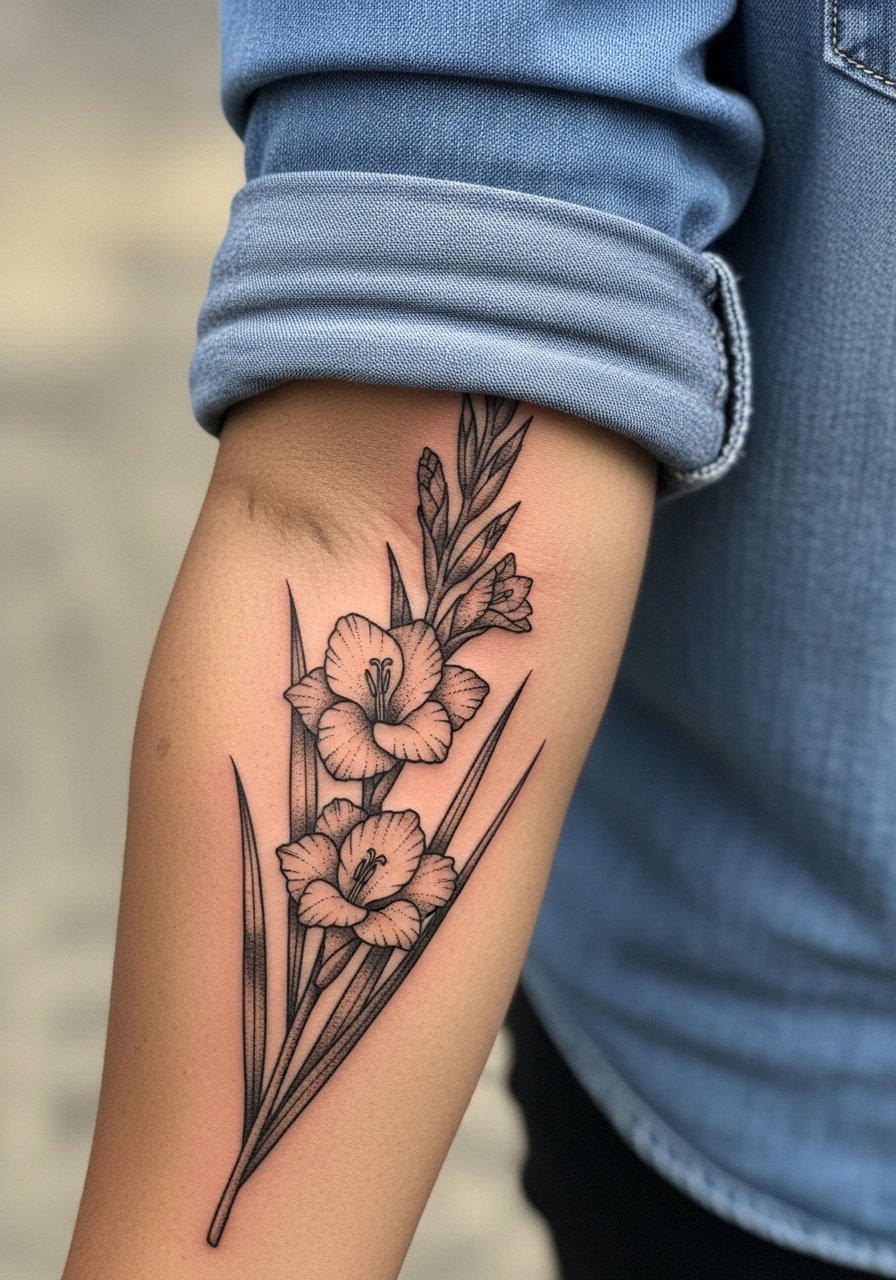
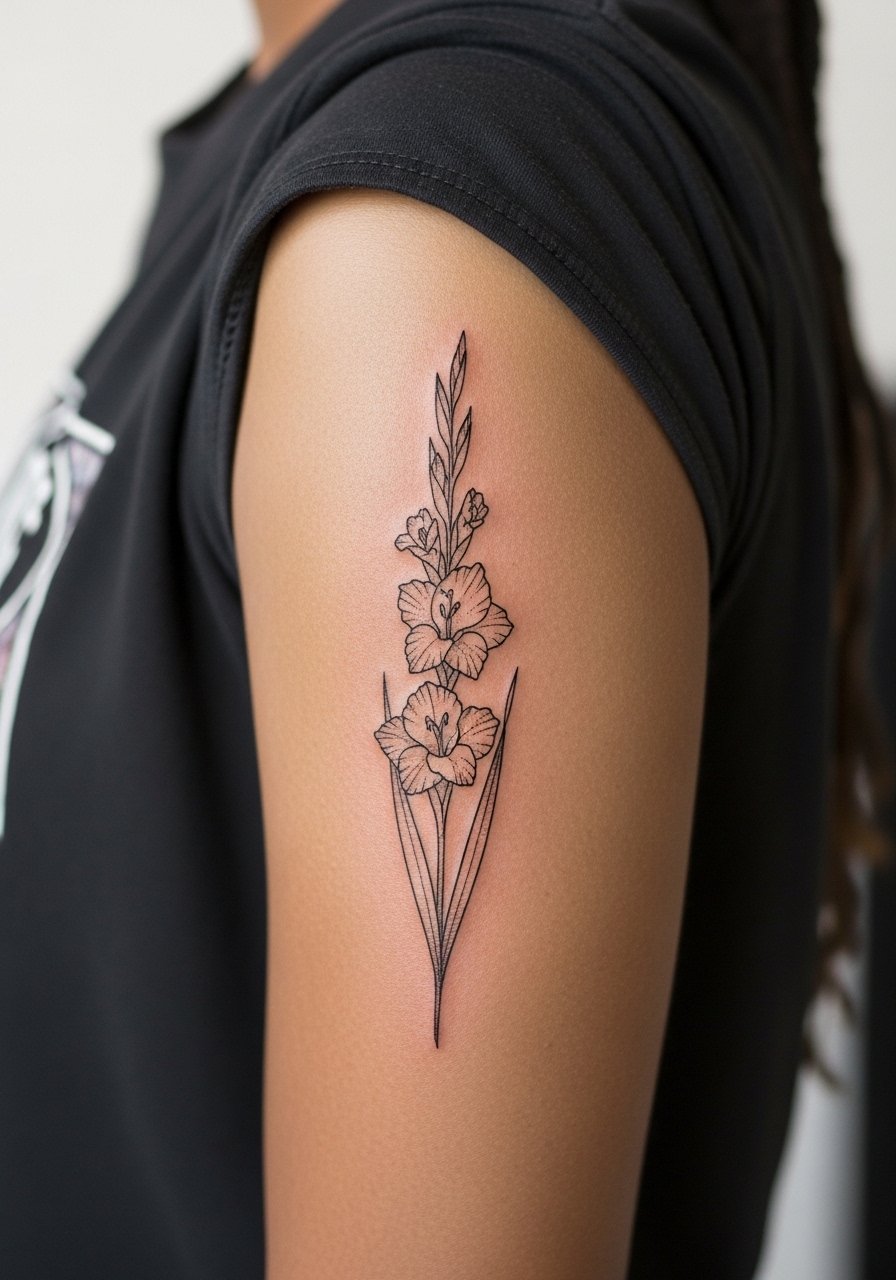
1. Fine Line Gladiolus Stem on Inner Forearm
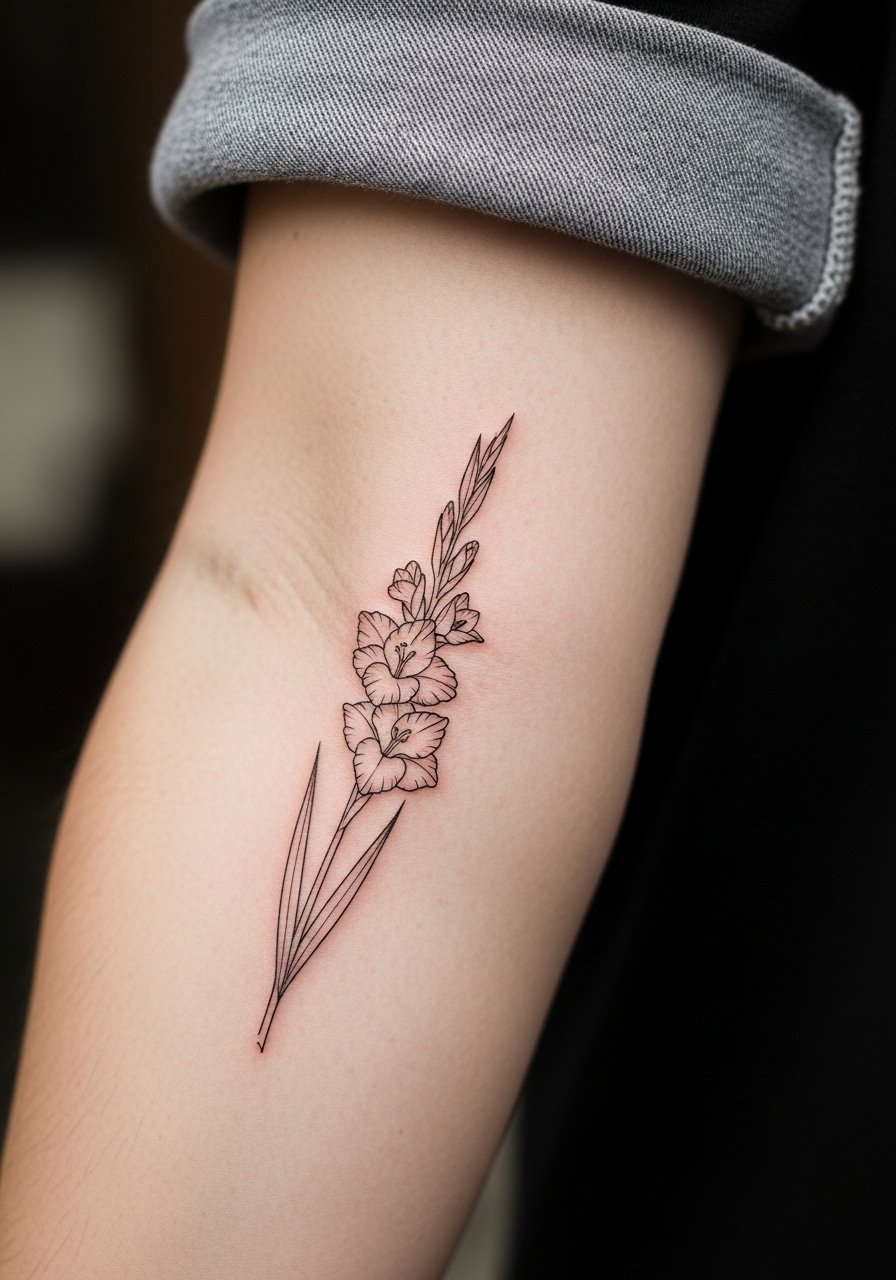
The inner forearm is where fine line gladiolus first caught on for August births. I recommend this when you want a discreet, readable stem that can expand into a sleeve later. Tell your artist you want slightly thicker single-needle linework and spaced petals so the lines have room to age. A common mistake is asking for the thinnest possible lines to match a tiny Pinterest photo. Those lines can fade or ghost fast, so plan for a touch-up at six to twelve months and expect another at year three. Pain is low to moderate and most sessions finish in under an hour. For showing it off, pair it with a rolled cuff chambray shirt in ivory or sage and a subtle chain cuff on the opposite wrist so the linework reads without competing accessories.
2. Watercolor Gladiolus Bouquet on the Collarbone
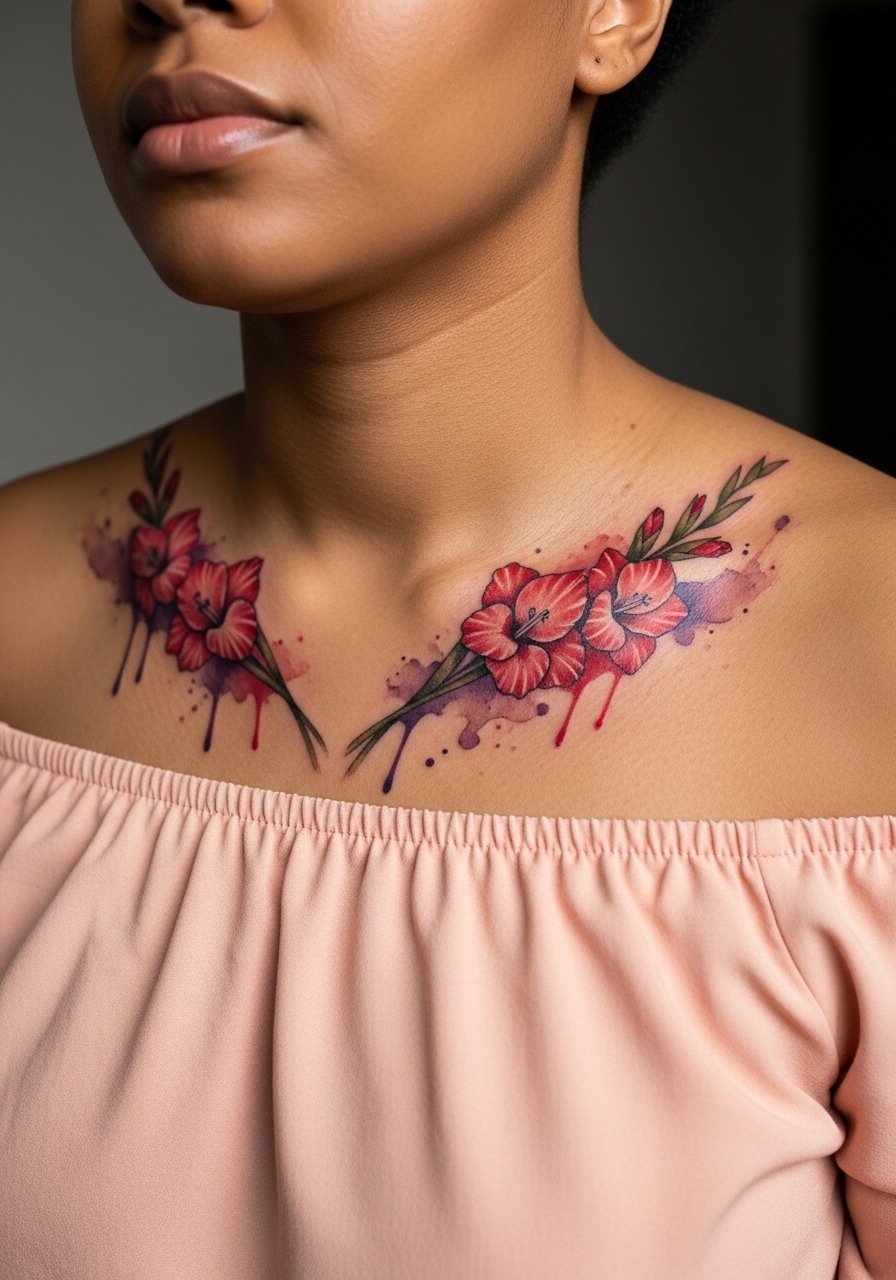
Collarbone watercolor drapes like jewelry and is ideal if you want painterly color rather than crisp linework. Expect two sessions and heavier saturation to keep reds and purples vivid. In consultation say you want layered washes rather than saturated blocks so the artist can plan color blending for long-term vibrancy. The main complaint I hear is watercolor muddling after a year. To avoid that, ask for stronger pigment anchors near the stem and less bleeding in the petal edges. Session pain is moderate because the bone is close to the surface, and you should wear a strapless bralette or off-shoulder blouse so the artist can access the area without excess fabric. Expect touch-ups for color at year two depending on sun exposure.
3. Minimalist Single Gladiolus Bloom on the Wrist
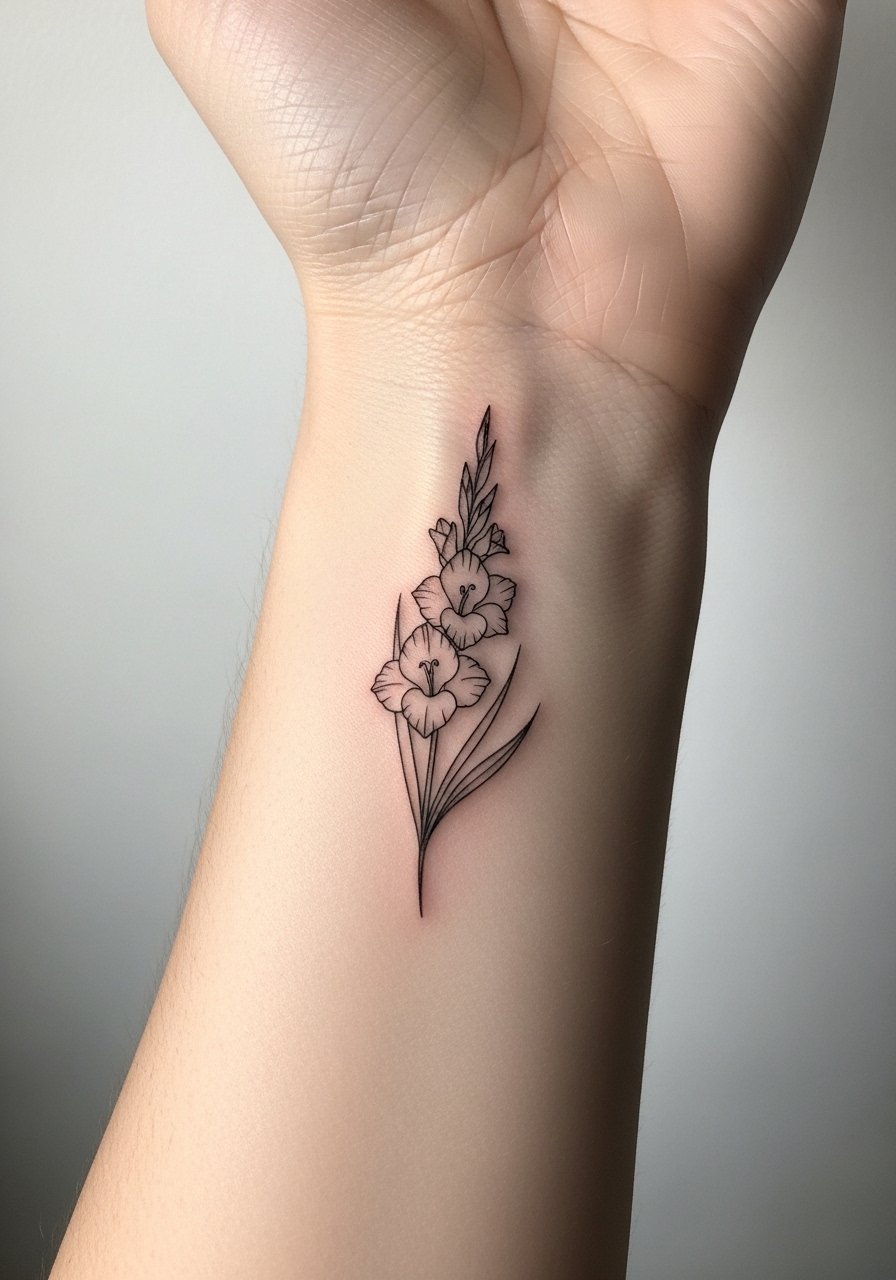
Wrist pieces are a common first tattoo and minimalist glads translate well here if you accept the upkeep. The wrist takes daily wash abrasion and sunlight, so ask for marginally bolder outlines than a true micro line. A common mistake is choosing a 0.1mm look without planning touch-ups. Expect a short session under 45 minutes and a low to moderate pain level. If you work at a keyboard, the friction can speed fading, so plan a touch-up at six to twelve months. For showing it off try a dainty bangle bracelet set on the opposite wrist and a slim watch that does not sit over the tattoo while healing.
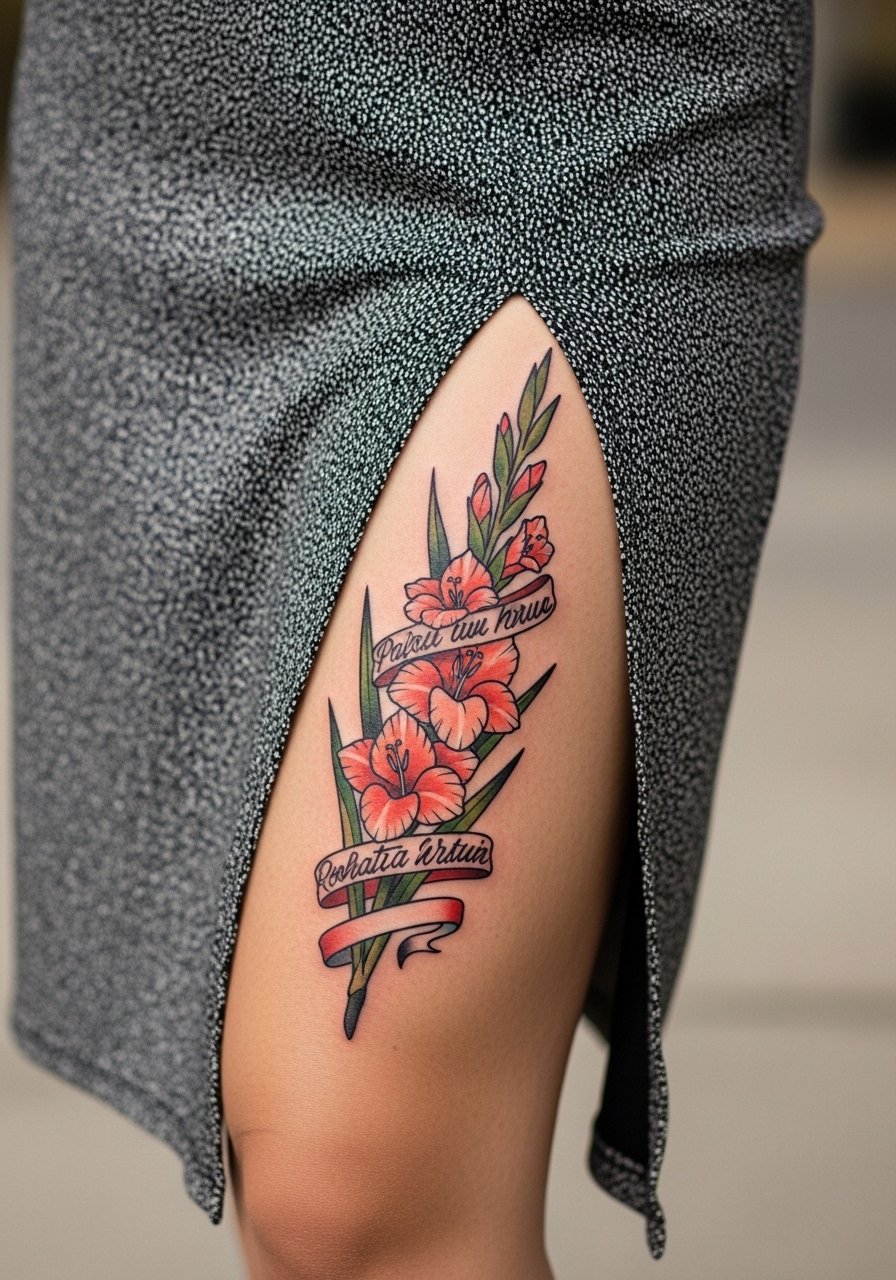
4. Neo-Traditional Gladiolus with Ribbon on Outer Thigh
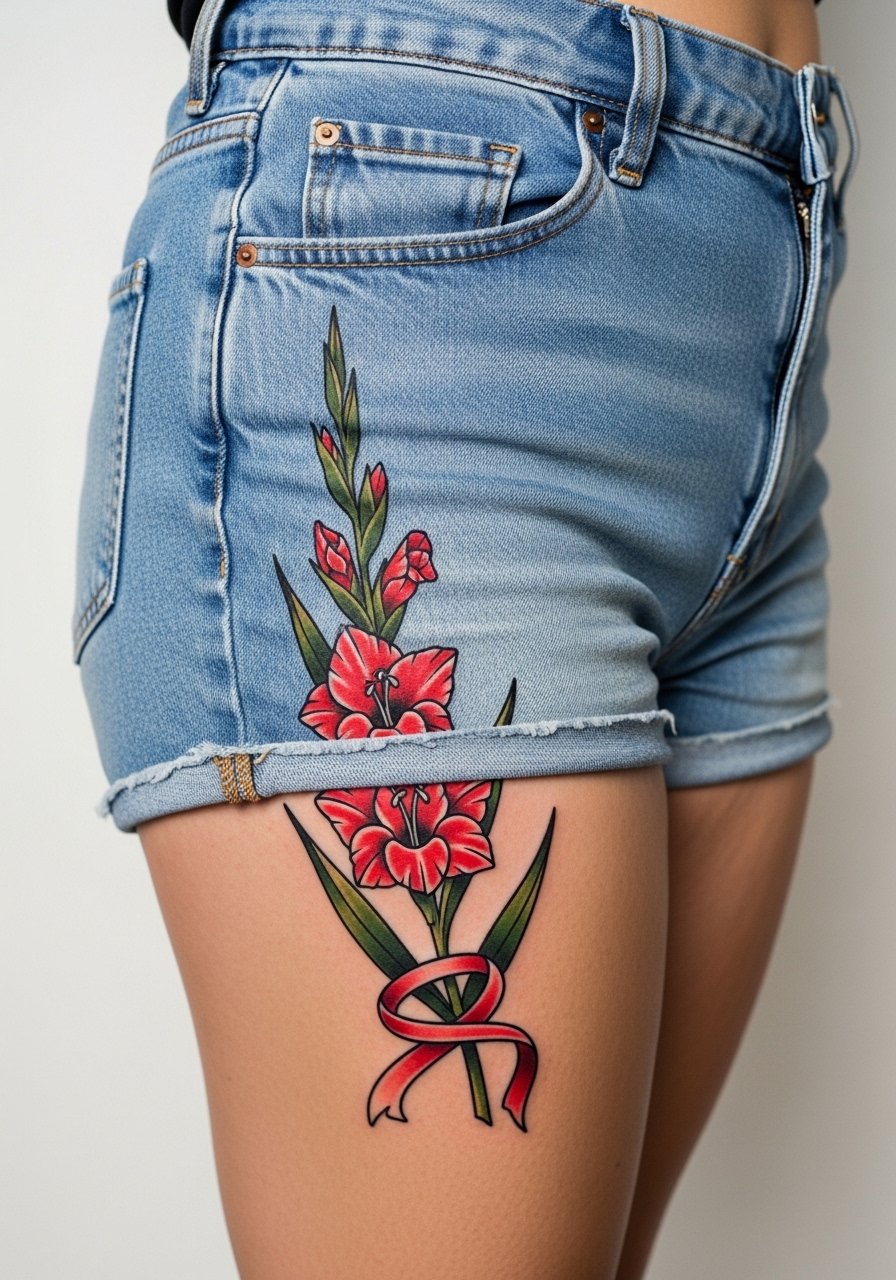
Outer thigh allows for larger neo-traditional statements and the flesh here takes saturation well. This is a great pick if you want expressive color and a piece that can age with strong outlines. Tell your artist you want classic bold outlines and heavy saturation with a clean ribbon band for text that can be read later. Mistakes happen when clients force tiny lettering into thick ribbons; keep text size proportional. Pain is moderate and you will likely need multiple sessions. For summer showing off, pair the piece with high waist denim shorts or a midi skirt with a side slit so the design gets occasional visibility and breathes between sessions.
5. Blackwork Gladiolus Mandala on the Shoulder
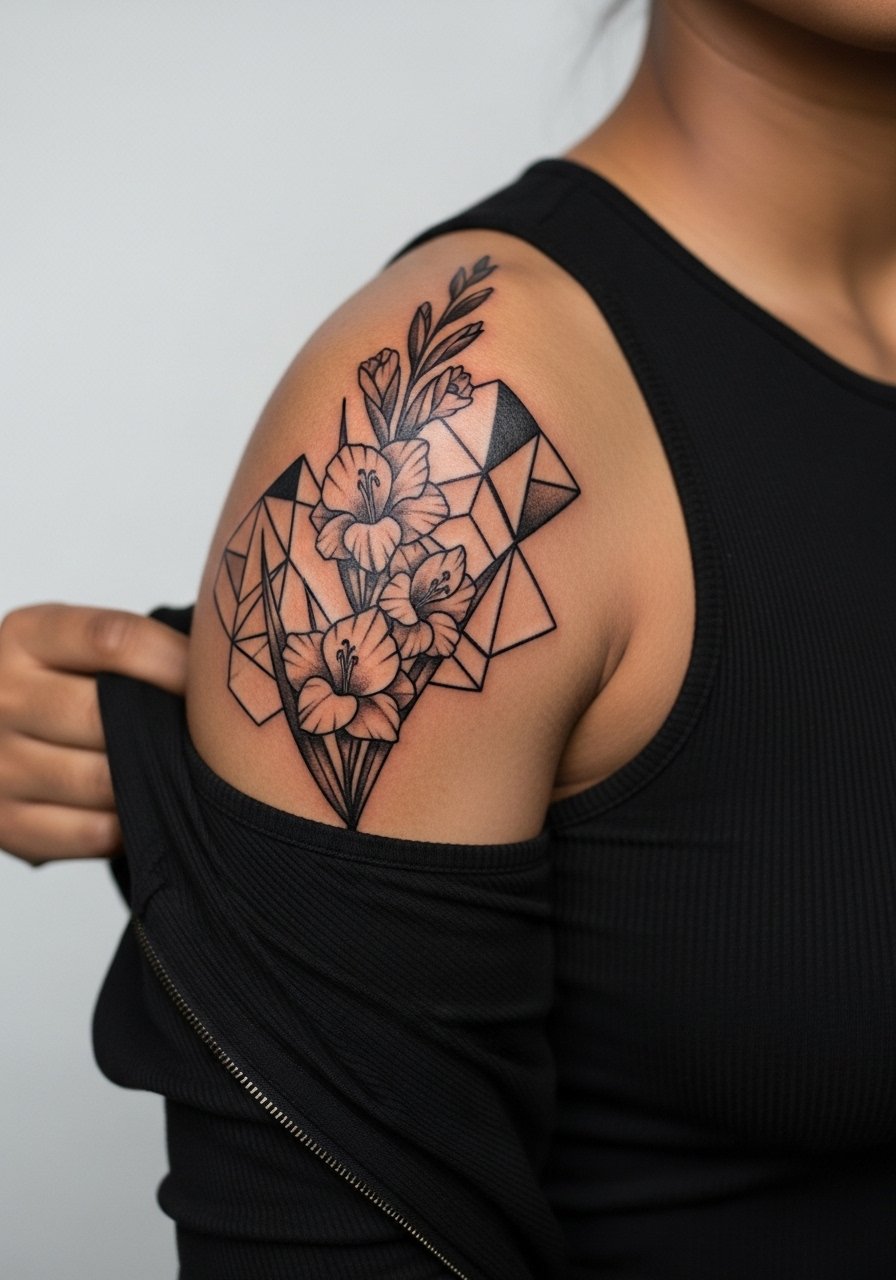
Blackwork is a smart option for people who want something that keeps contrast on darker skin tones. The shoulder takes heavy saturation well and the mandala framing helps the gladiolus read as part of a larger piece. Ask for clear negative space so the mandala does not merge into a solid block over time. One trade-off is the healing window is longer because of the density, and you should expect two to three sessions. Artists split on whether dense blackwork needs more frequent touch-ups or not, and both camps have valid points. For showing this off, a sleeveless black bodysuit or cropped tee keeps the shoulder visible without rubbing.
6. Micro-Realism Gladiolus Bud on the Ribcage
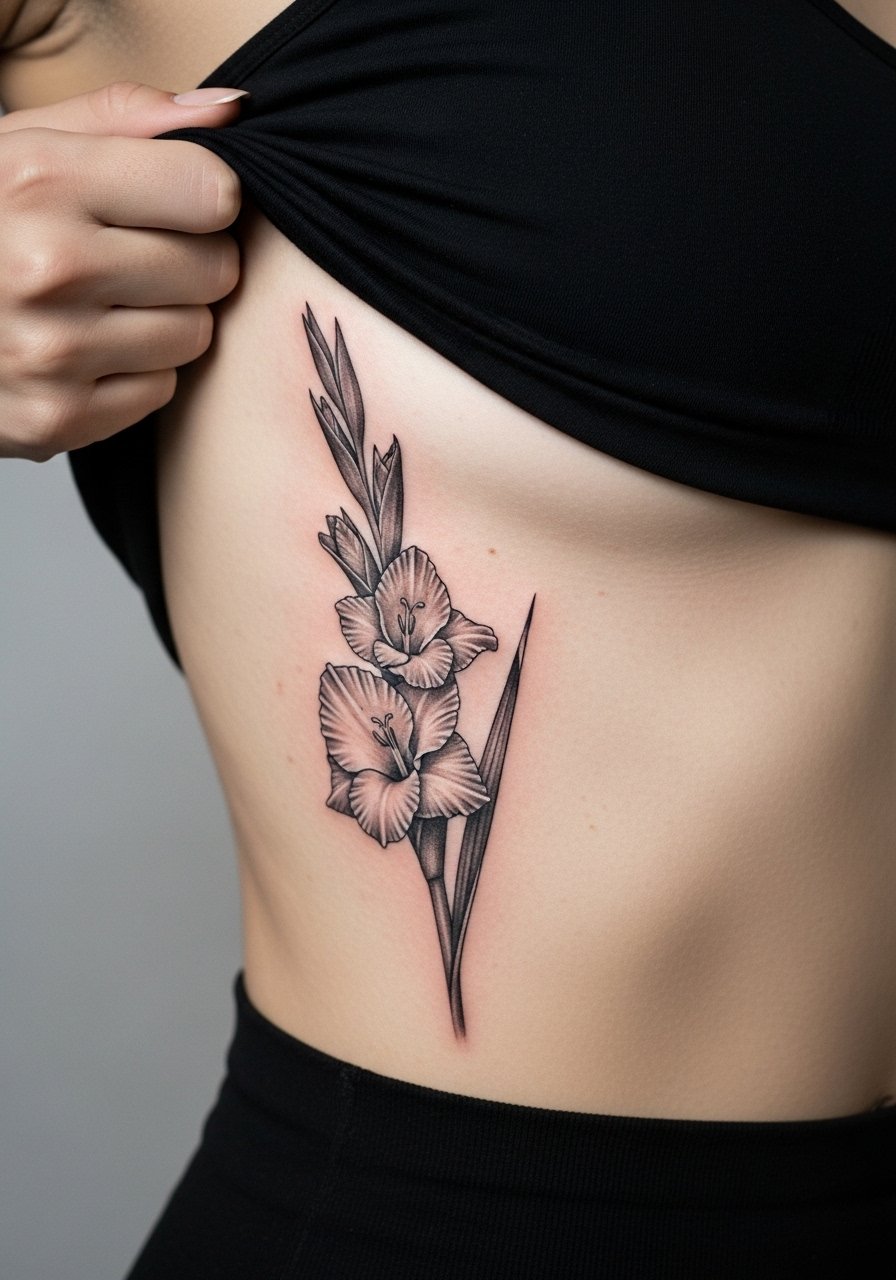
Ribcage micro-realism looks exquisite but is one of the more painful placements. Expect a single detailed session and careful shading to avoid patchy healing. When you book, tell the artist you want tight black and gray gradients and minimal linework to preserve the realism. Fine line on ribs prompts a debate in the community. One camp says the stretching and movement blur single-needle work quickly. The other camp insists depth control and spacing keep fine line readable. Ask where your chosen artist stands and check their healed rib photos. For the session wear, put on a high crop tank top or sports bra you can pull up so the artist has clean access. Expect a touch-up at six to twelve months if any shading shears out during healing.
Studio Day Picks
The small forearm, wrist, collarbone and rib pieces above need different prep than large thigh or back work, so these items smooth out the session and the first week.
-
Tattoo Goo SDS. Users report a matte finish that helps fine line pieces photograph without shine, useful for delicate forearm and wrist glads.
-
Frida Tattoo Balm. A breathable hemp base that can help ribcage and torso pieces in cool, dry months without the greasy feel.
-
Cure Bay Sea Salt Soak. Gentle for itchy floral heals on the collarbone where scabbing and friction meet clothing.
-
InkSafe Spray. A non-sticky UV-block option to reduce early color loss on collarbone and thigh color work.
-
Hustle Butter Deluxe. Lighter than traditional ointments and useful in humid climates to avoid pore clogging during the first few days of healing.
7. Ornamental Gladiolus Vine Around the Ankle

Ankle vines read like jewelry and are festival-ready in summer. The ankle is a high-friction area from shoes and socks, so plan for a two-session approach if you want crisp wraps. Tell your artist to place the heaviest contact points away from where shoes rub and to expect a slower touch-up if lines soften. A common mistake is asking for a full wrap that runs under the shoe line. For the session wear bring loose joggers or a skirt and plan to show off the healed piece with linen wide leg crop pants or strappy sandals. Touch-ups are common within the first year due to friction from footwear.
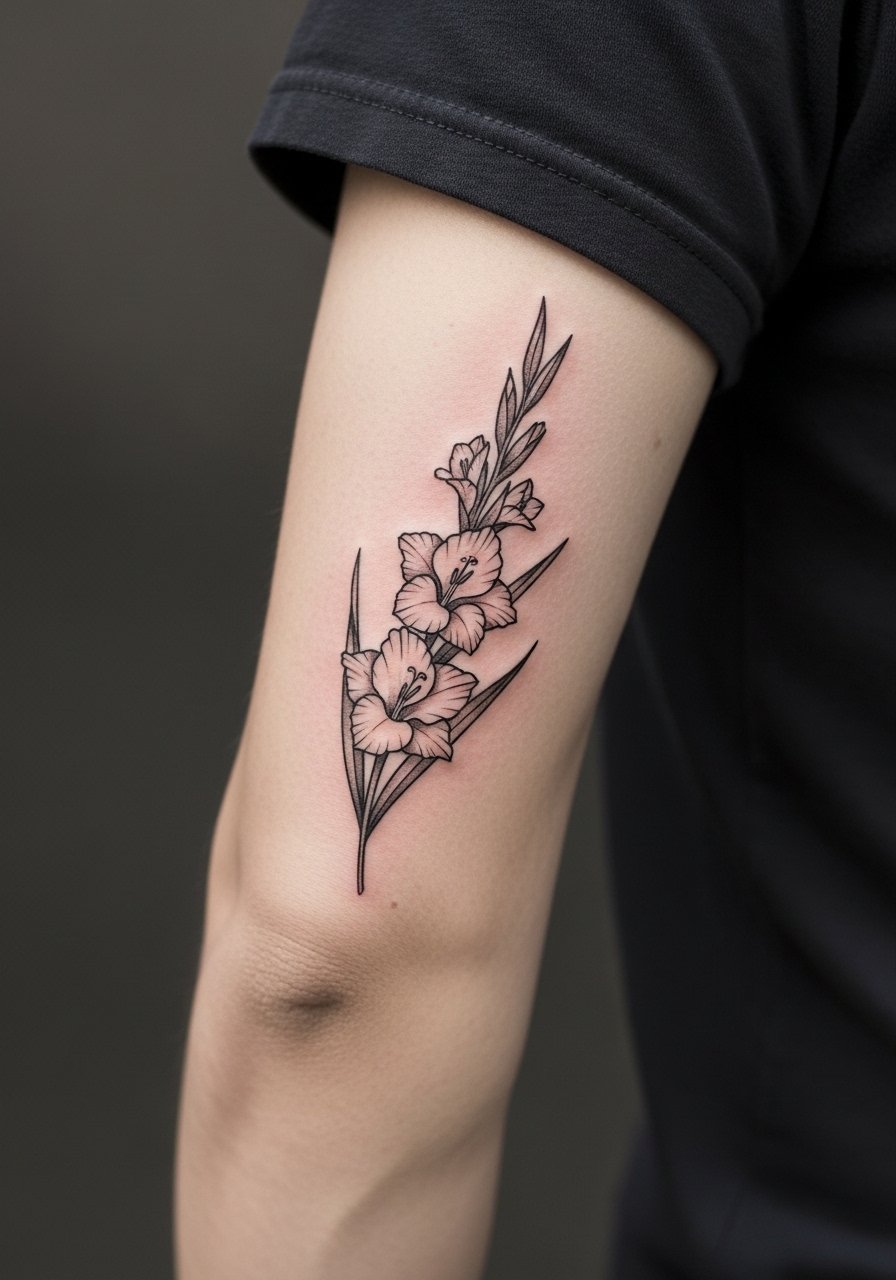
8. Ignorant Style Gladiolus as Playful Forearm Art
If you prefer a doodle-like, naive aesthetic, ignorant style turns the gladiolus into a character with bold strokes and confident mistakes. The forearm is forgiving and this style ages into its own because the bold linework tolerates some blur. When booking, bring playful refs and ask for slightly thicker linework so color accents do not dominate as they fade. A common session mistake is pushing tiny watercolor dots into the design which can muddy later on. For the session wear, use a sage green tank top so the artist has full arm access, and plan for a short two-hour appointment.
9. Traditional American Gladiolus on the Calf
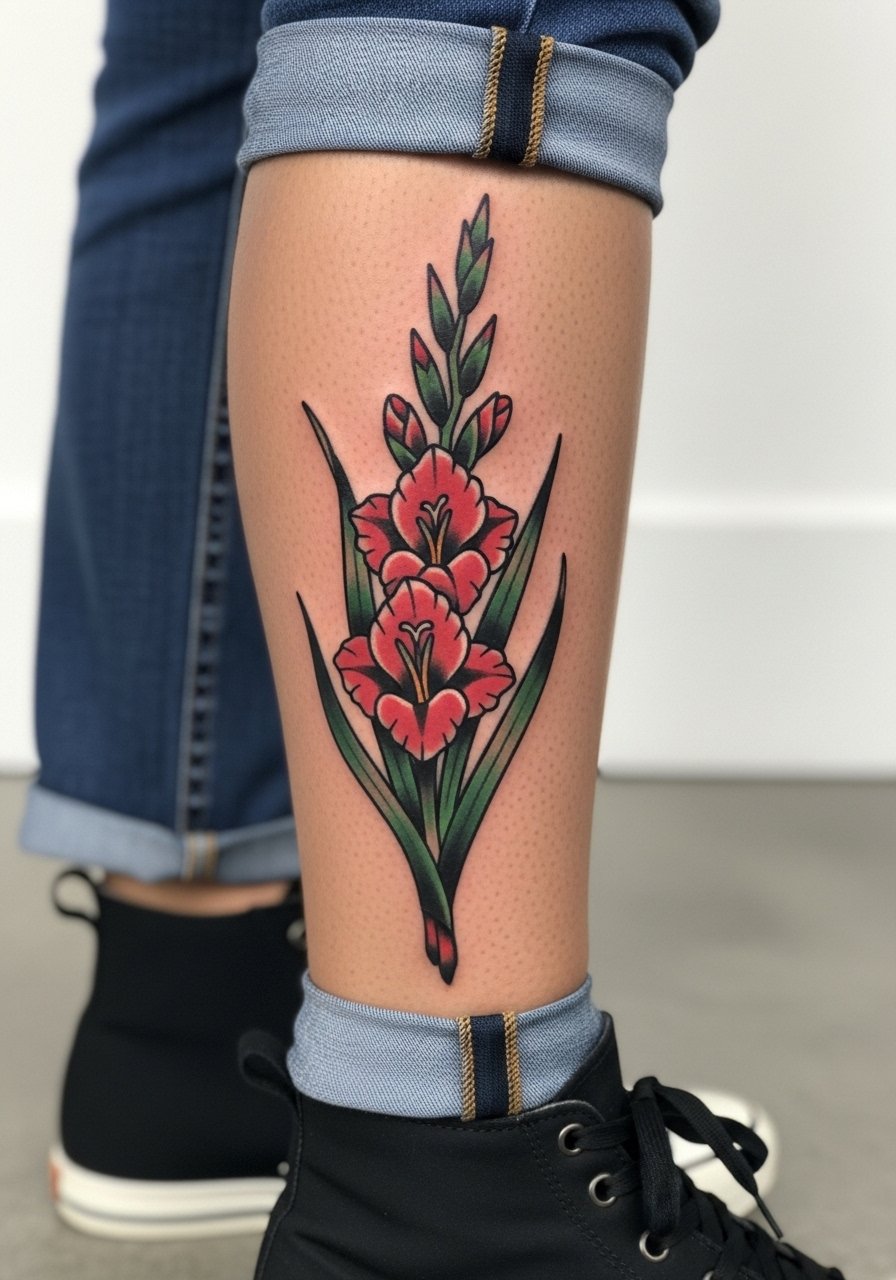
Calf placements are classic for saturated traditional pieces that age into solid silhouettes. This is a low-distortion area and the bold outlines protect against rapid fading. Tell the artist you want high saturation and strong black outlines so the reds and greens survive sun exposure. A common mistake is forcing ultra-fine details into a traditional palette; that look blurs over decades. Sessions usually run longer here because of size, and you should plan for two to three sittings for a six-inch piece. For visibility, pair the tattoo with rolled bootcut jeans or summer shorts so the bold color gets air and sunlight exposure when healed.
10. Patchwork Gladiolus Cluster for Back Fillers
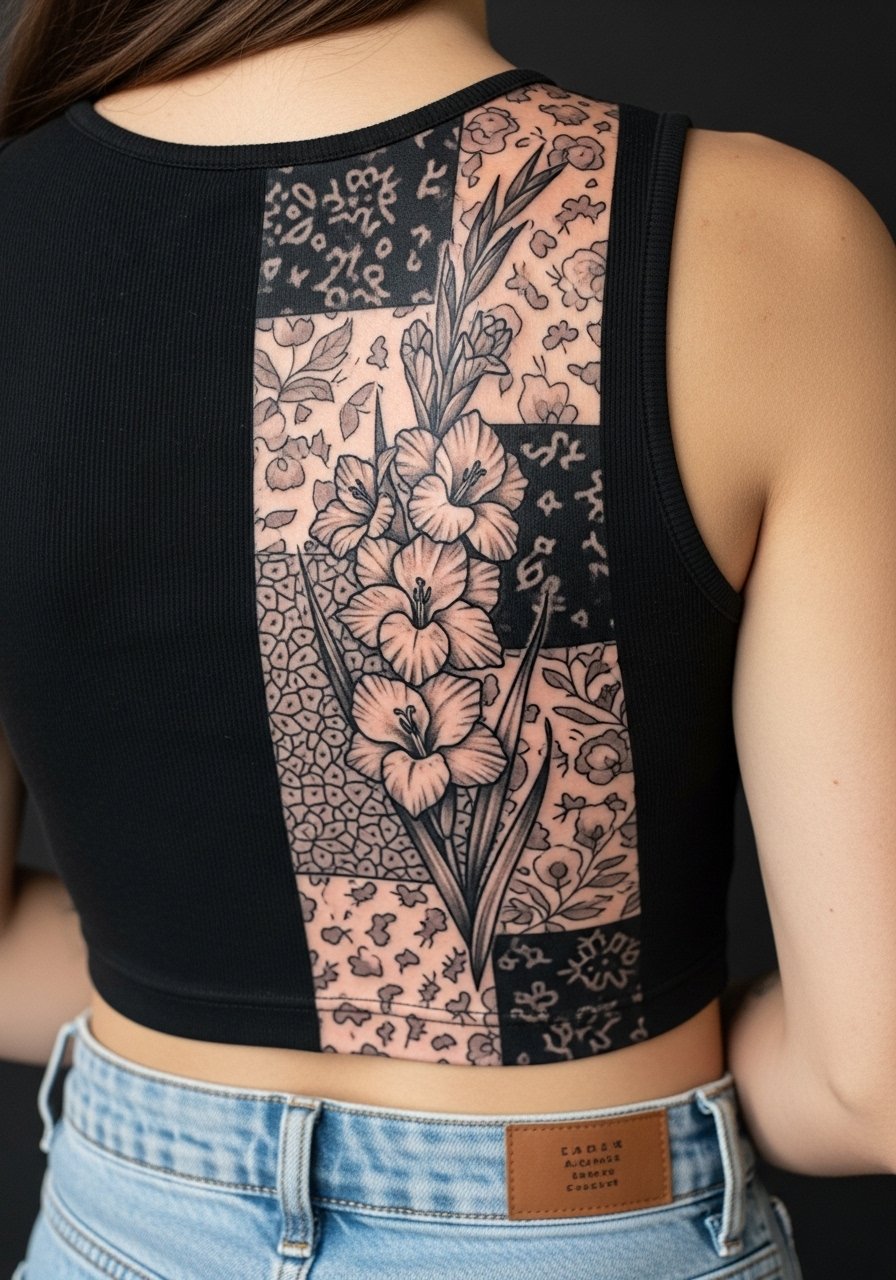
Patchwork pieces are built over time and the back is an ideal canvas for evolving gladiolus clusters. This approach suits collectors who want one element now and a sleeve later. During consults, bring a clear plan for negative space and filler styles so future sessions avoid competing motifs. A typical mistake is committing to inconsistent scale across sessions. Expect multiple sessions stretched over years and plan guest spots or conventions to expedite progress. The back also heals differently than limbs because clothing rub matters, so pick breathable tops the first month and schedule touch-ups as the composition grows.
11. Dotwork Gladiolus Down the Spine
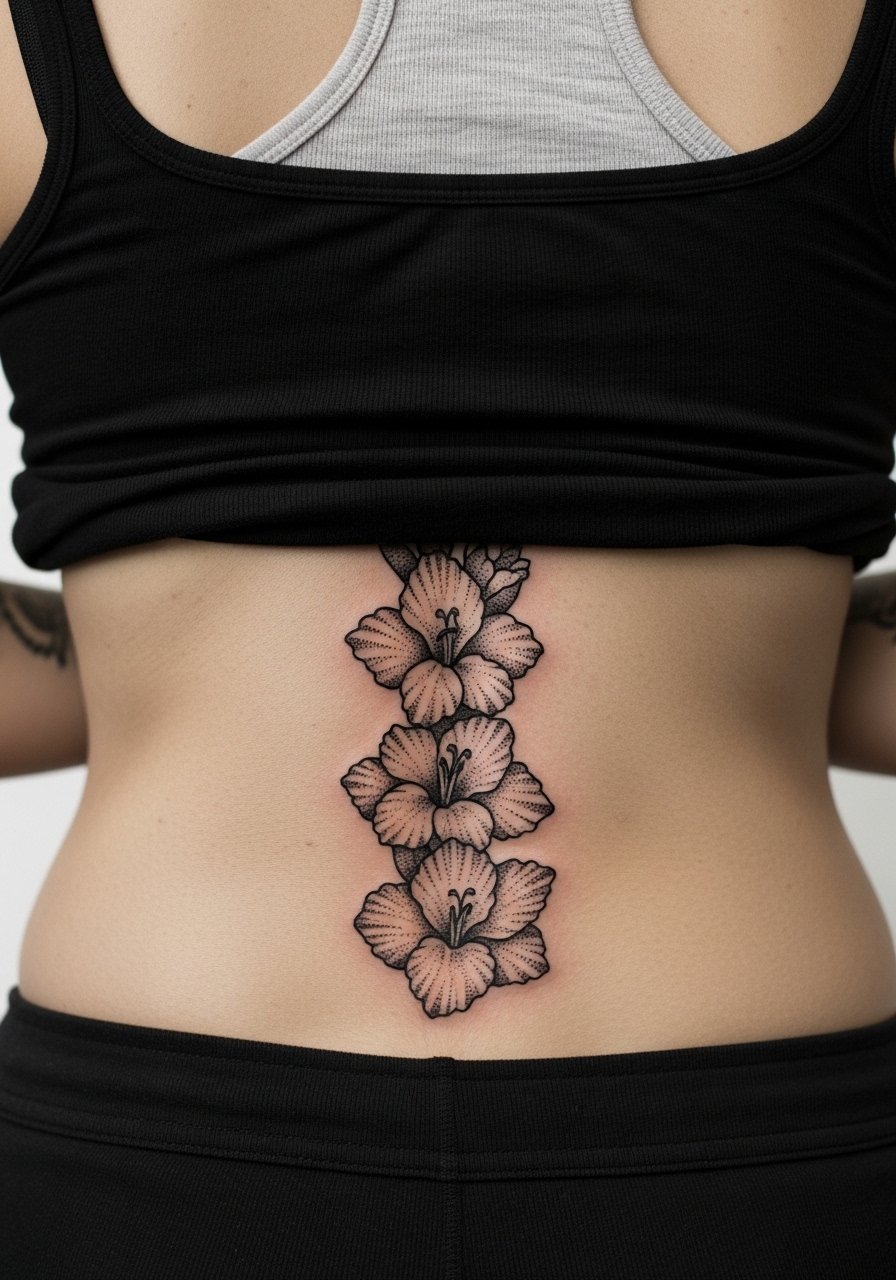
Spine dotwork creates a meditative vertical field that can read as both floral and geometric. The lower spine is a sensitive spot for some pain charts, but dotwork shading can be spread across sessions to manage discomfort. When you consult, ask for photos of healed dotwork on similar placement from your artist so you can judge stipple density. A common error is requesting overly dense stippling too small in scale which can merge into a gray patch. Expect two to three sessions and plan for touch-ups depending on body changes or shifts in the lower back. For career-sensitive folks this area is easy to hide under shirts.
12. Fine Line Gladiolus Duo with Larkspur on the Collarbone
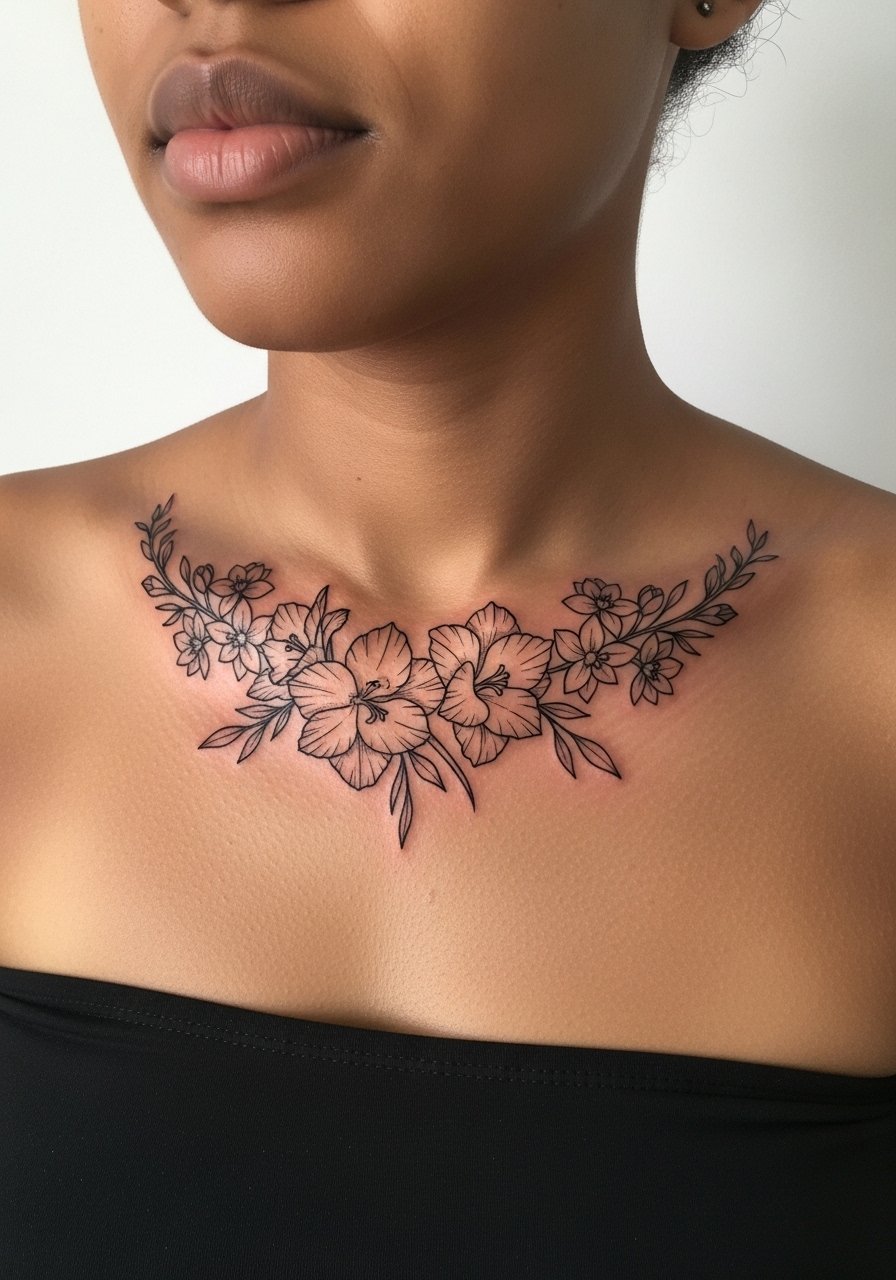
Pairing July and August flowers across the collarbone makes for a sibling or couple set that sits elegantly on the chest. This is best for people who want symmetry and minimal color. Tell the artist you want clear spacing between stems and a slightly heavier anchor line so the larkspur does not blur into the gladiolus over time. A mistake I see is crowding both flowers into a 3-inch space, which compresses detail. Expect a single session if kept small and plan to wear an off-shoulder blouse or layered delicate necklace for show-off looks that sit below the bone without covering the flowers.
13. Finger Wave Micro Gladiolus for Hand Placement
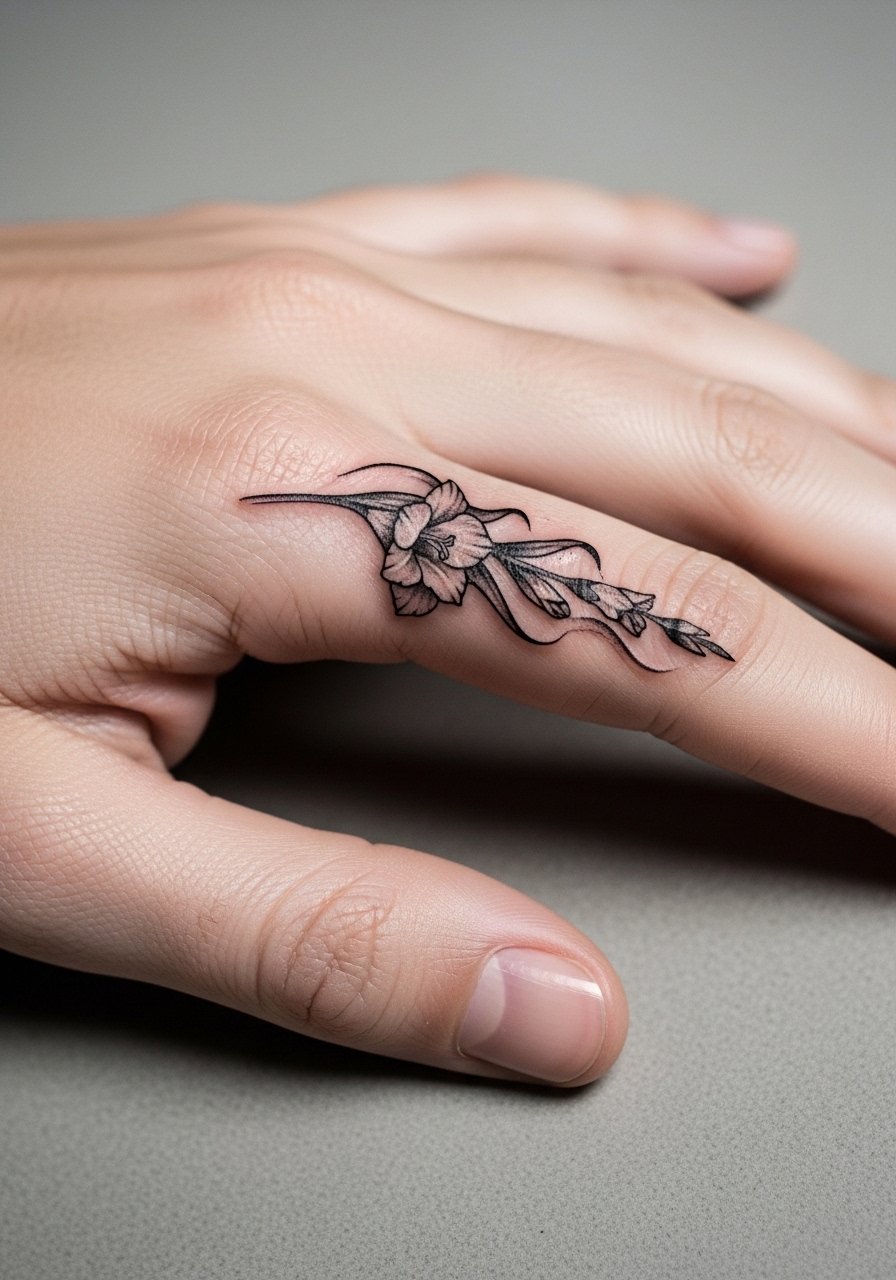
Finger tattoos are high-maintenance because of constant washing and motion. The micro gladiolus here works best as a tiny bud rather than a full bloom. In the consult ask for bold anchors and sparse detail so the design stays readable after frequent touch. A frequent mistake is demanding full shading in a 1cm space. Expect annual touch-ups for finger work and be prepared for faster fading than on the forearm. The session is short but the aftercare window is fussy because of daily hand use. This placement is best if you want a tiny, seasonal reveal rather than daily visibility.
14. Gladiolus with Vintage Locket on the Shoulder Blade
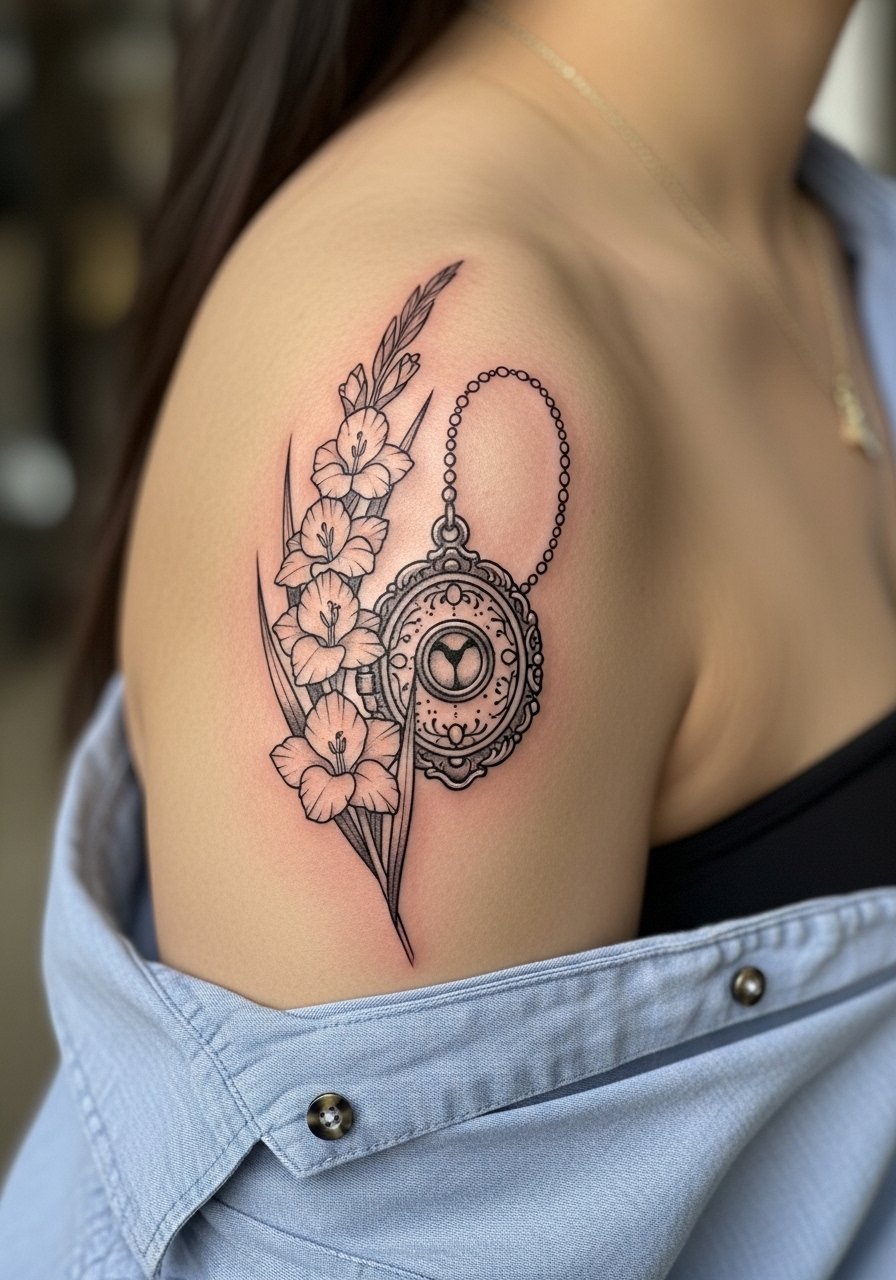
Combining a gladiolus with a vintage locket gives you hidden and visible options depending on your wardrobe. Shoulder blade work is versatile because it can be private under tees or shown with tank tops. Tell the artist you want the locket stylized rather than literal so it reads as illustration, not jewelry. Artists sometimes over-detail the locket, which muddies the floral when scaled. Sessions are moderate and may require two sittings for layered shading. For showing the piece off, a button-front shirt you can pull aside or a sleeveless top gives access during the session and pairs well afterward.
15. Gladiolus Seed Pod Fillers for Sleeve Expansion
Seed pod fillers are a smart move if you want something that scales into a sleeve without regret. They read as motifs when small and expand naturally with leaf clusters. In consults show the artist your plan for negative space and future elements so shapes line up later. A common error is adding unrelated flash that clashes with future themes. These pieces heal predictably on the forearm and respond well to slightly bolder anchors so small pods do not disappear. For casual wear pair the work with rolled cuff chambray shirts that let you reveal the progression as the sleeve grows.
16. Dark Tone Adjustments Using Purple Undertones
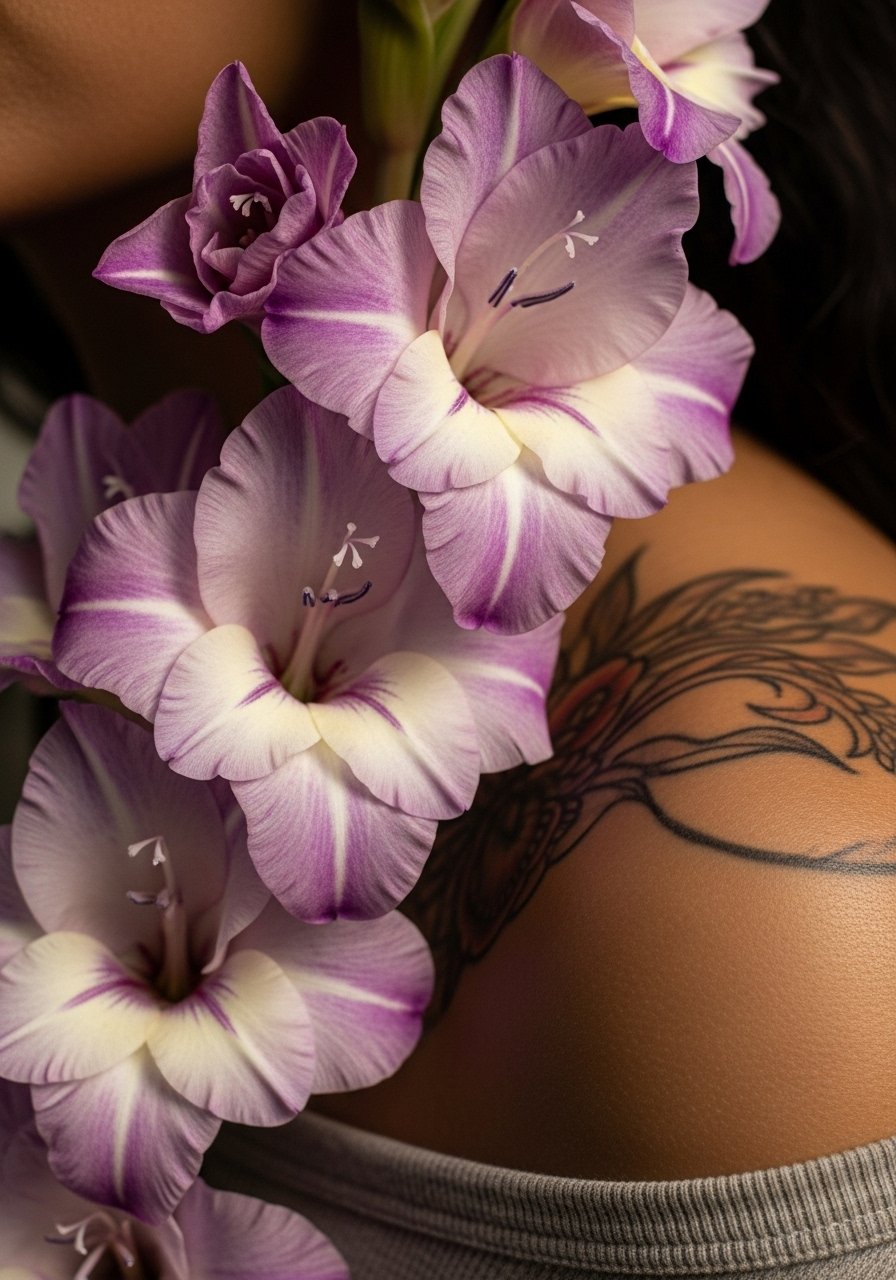
Photographing floral tattoos on darker skin requires thought beyond the initial design. Purple and deep plum undertones can add dimensional contrast without needing fluorescent pigments. When you consult, ask your artist how they adapt saturation and contrast for your skin tone and to show healed examples on similar tones. A mistake is to copy a light-skin reference without adjusting saturation and line weight. Expect artists to recommend stronger anchors or blackwork accents where subtle color would otherwise vanish in photos. This is less about one style and more about color science and portfolio vetting, so ask for healed photos before booking.
17. Elbow-Aging Gladiolus for Flex-Prone Areas
Elbows are tricky because the skin flexes and can distort linework as bodies move or age. If you want a gladiolus near a joint, the trick is spacing and slightly bolder line anchors. Tell the artist you understand the area needs breathing room and that you prefer petal placement away from extreme creases. A common mistake is trying to cram tiny details into a place that needs open space. Plan touch-ups and consider placement slightly above or below the crease for longevity. Sessions are brief but expect more discomfort as the area has thinner soft tissue.
18. Micro-Realism Behind the Ear
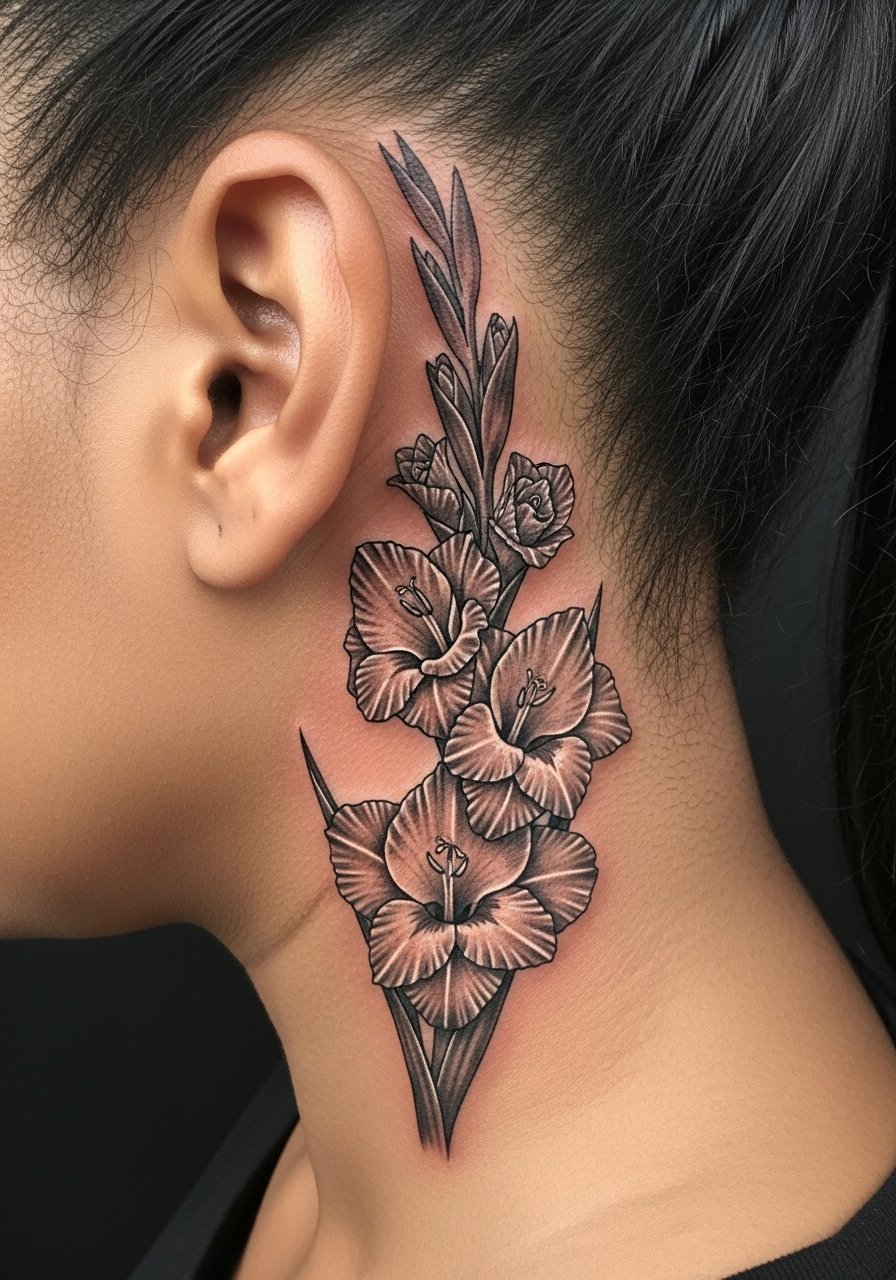
Behind-the-ear micro pieces read as secret accents and heal with minimal friction if hair and clothing are managed. This is ideal for small buds or single-petal motifs. When you book, request minimal swelling techniques and a quick session since the area does not tolerate long sittings. A mistake is expecting heavy detail in a tiny spot. Also, be aware of studio policies for piercing-adjacent work and check the artist's healed behind-the-ear shots. Pain is low to moderate and the piece is easy to hide under hair if needed.
19. Instep Gladiolus for Low-Visibility Foot Art
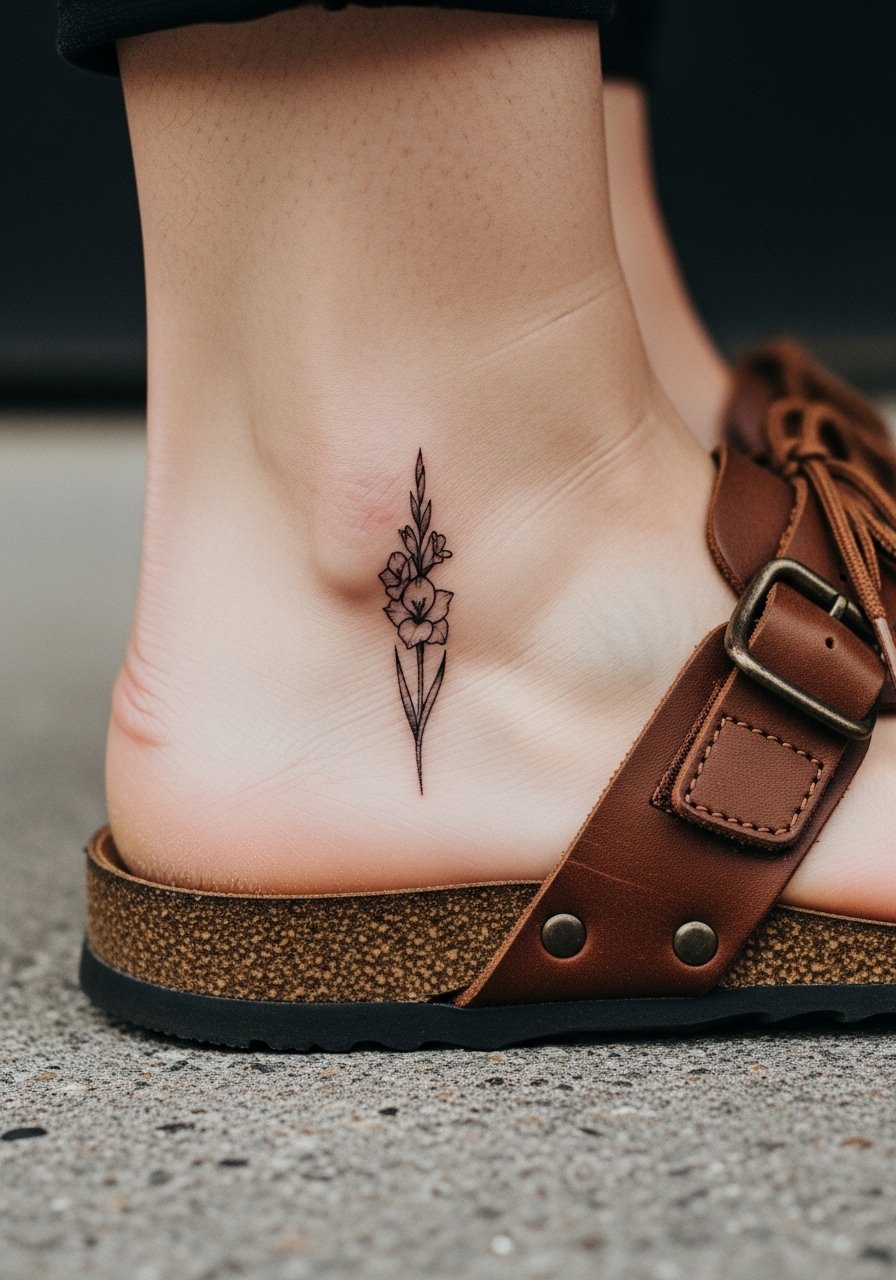
Instep tattoos age fast because shoes and socks rub the area constantly. They are perfect for people who want occasional glimpses rather than daily display. Ask for heavy anchor lines and minimal shading to avoid early loss of contrast. Expect touch-ups more often than calf or thigh work. A common error is picking dense shading that never fully settles because of friction. Sessions are short but healing requires strict shoe choices for two weeks.
20. Thigh Patch with Script and Gladiolus Ribbon
The outer thigh is forgiving for combined script and floral pieces and tolerates bold color. If you want text, ask for letter spacing that reads at a glance and for ribbon width that will hold ink for years. Mistakes occur when clients force tiny script into narrow ribbons; that becomes unreadable. Pain is moderate and sessions may be spread across two appointments for linework and color saturation. For show-off looks, pair the piece with midi skirts with side slits and high-waist shorts.
21. Sleeve Starter: Single Gladiolus as Anchor
Starting a sleeve with one strong gladiolus gives you a focal point for future fillers and themes. This works when you want time to plan out color, style transitions, and filler motifs. Tell your artist your long-term vision so scale and negative space are set from the start. A common mistake is failing to size the anchor appropriately which makes later fillers fight for space. Expect multiple sessions down the line and check guest spot calendars or app listings to find the right collaborators. The upper arm is forgiving for touch-ups and provides a readable canvas for dotwork and whip shading as you build.
Frequently Asked Questions
Q: Will fine line gladiolus on the wrist blur faster than one on the forearm?
A: Yes, typically wrist pieces face more wash and friction which accelerates fading. The forearm has slightly more tissue buffering and is less exposed to soap and sleeve abrasion. Ask for marginally thicker linework and plan a six to twelve month touch-up for wrist pieces.
Q: How should I adjust a watercolor gladiolus for darker skin tones so the color pops?
A: Ask your artist to include deeper undertones like plum or purple and to add black anchors near petal edges for contrast. Request healed photos on similar skin tones and expect stronger saturation initially, with color touch-ups at year one if photos show loss.
Q: What is the Saniderm versus dry healing debate and which camp is better for collarbone watercolors?
A: Two camps exist. One prefers protective films like Saniderm to keep scabs minimal and reduce early abrasion. The other favors dry healing to avoid maceration and trapped sweat. For collarbone watercolor, many artists recommend short-term film use only for the first 48–72 hours and then a gentle dry routine, but ask the artist how they handle color work on that placement.
Q: How do I find guest spots or travelling artists who do gladiolus patchwork?
A: Use style hashtags and location filters on image platforms, search guest spot listings on booking apps, and check tattoo convention calendars. People often post travel schedules there, which helps if your local shop is booked or has cancellation issues.
Q: If I plan to lose or gain weight, which gladiolus placements handle changes best?
A: Stable sites like the collarbone, upper arm and shoulder tolerate body changes better than forearms and thighs. If you expect significant fluctuation, prefer smaller, simpler stems on bony areas over broad, wrapped pieces on high-change zones.
Q: Can I show off a collarbone gladiolus while still protecting it during summer?
A: Yes. Wear wide-neck tops for visibility and use lightweight sun protection after the initial healing window. For evenings, an off-shoulder blouse shows the collarbone without rubbing the area during the day.
