
The tattoos that still read clean at year ten are not always the ones that looked hottest the day they were done. Heavy blackwork and smart spacing tend to age into clarity. Fine detail that dazzles on screen often softens faster than people expect. Read these 17 sleeve sketches with practical notes on how each style heals, what to tell your artist, and the wardrobe choices that help the design live well on your arm.
1. Blackwork Tribal Full Sleeve
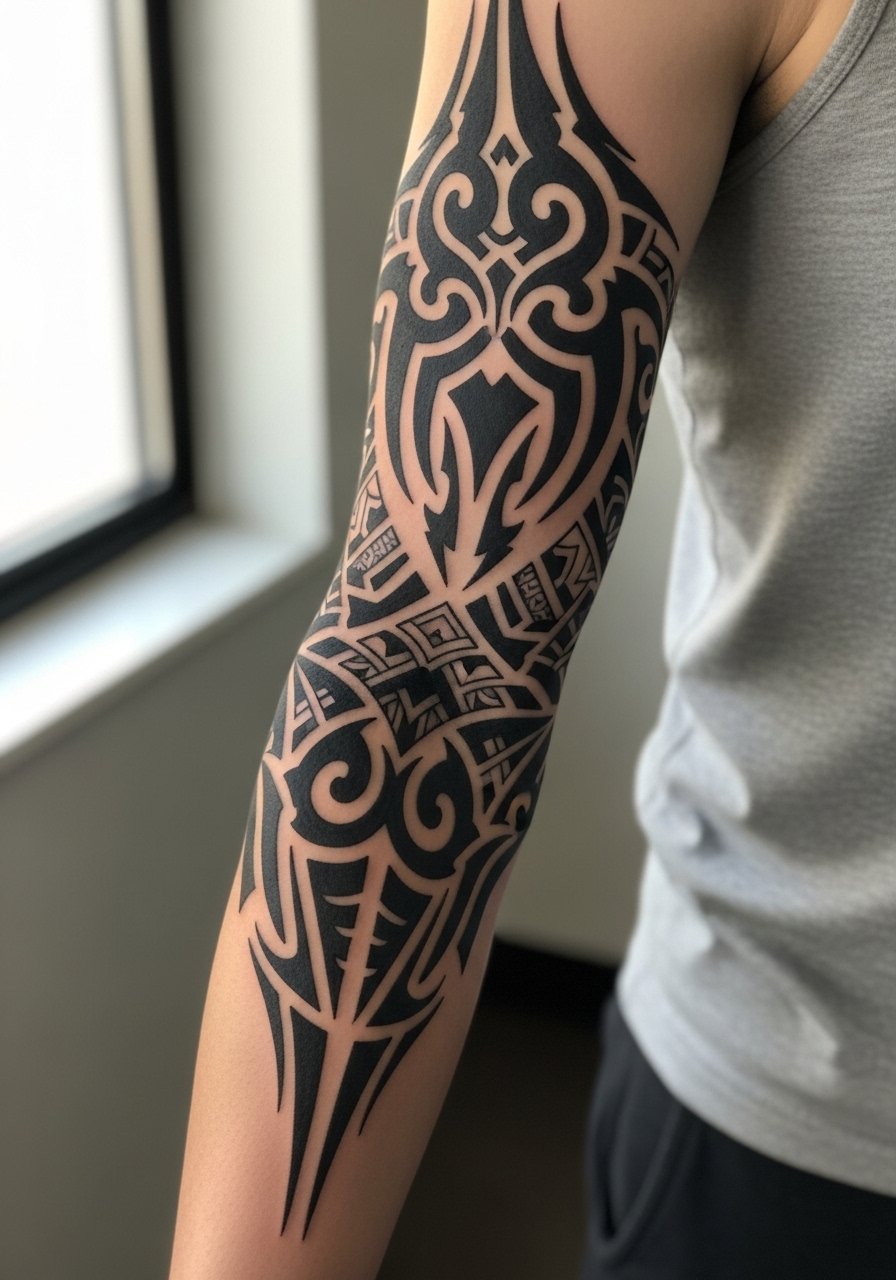
I recommend a blackwork tribal when you want coverage that reads from a distance and holds up while you gain or lose weight. Tell your artist you want large negative-space corridors between solid blocks so the shapes keep breathing as they settle. The session feels steady but long, expect four to six appointments and heavy saturation work that can be tiring on the skin. Common mistakes are trying to cram tiny motifs into a full sleeve and using skinny linework inside solid blocks. Blowout risk is higher near the inner elbow, so ask for slightly thicker edges there. For touch-ups plan a session at two years to restore saturation and crisp edges.
2. Neo-Traditional Lion on the Outer Bicep
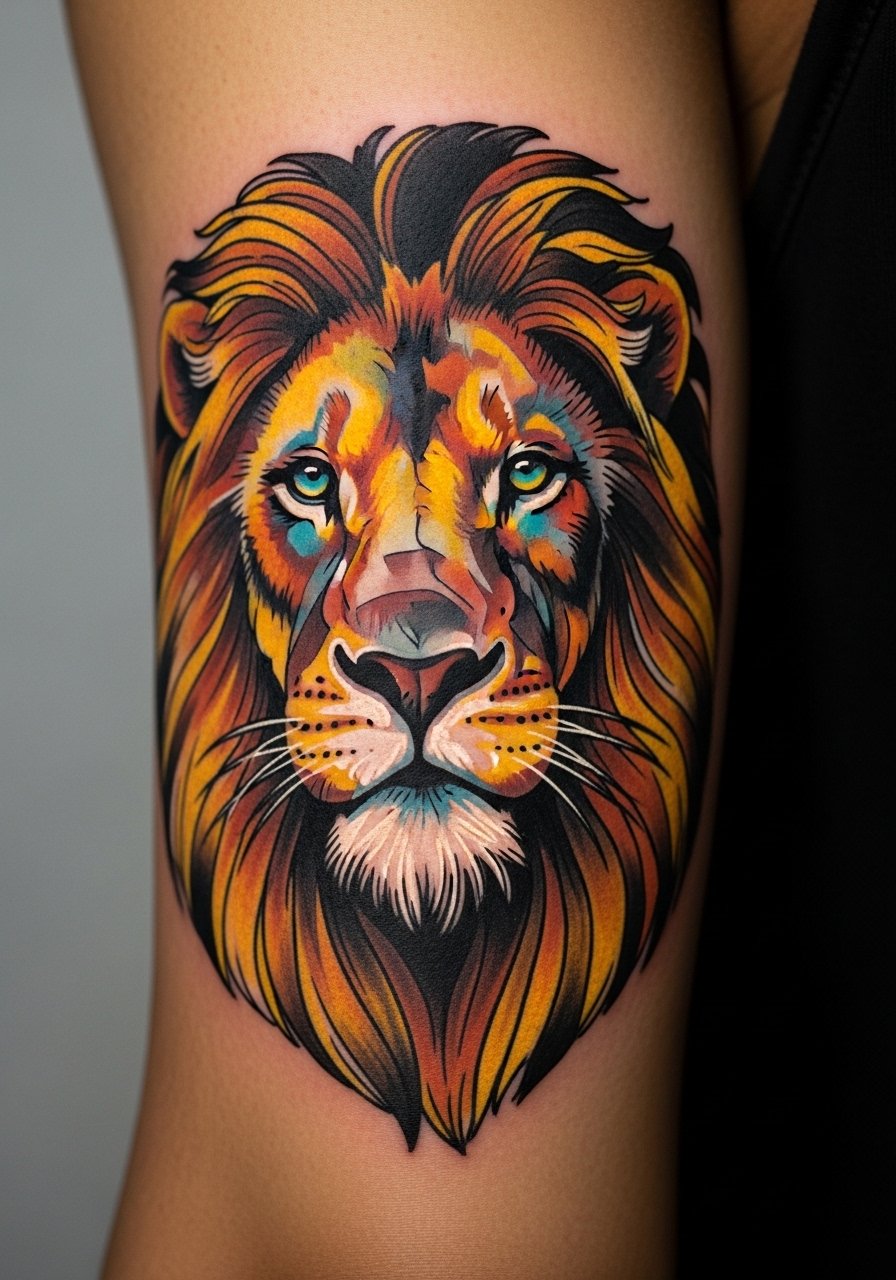
I've seen this lion style age well when artists prioritize bold outlines and controlled saturation over tiny brush strokes. In consultation mention you want defined outlines and color pools rather than micro-texture, that way the mane keeps separation after a few sun seasons. The outer bicep tolerates color and larger detail, pain is moderate and sessions run three to five hours. A common misstep is asking for ultra-realistic fur at a small scale, which blurs over time. For showing the piece, an open-front kimono jacket or a loose muscle tee frames the bicep without hiding the work.
3. Realism Portrait Full Sleeve
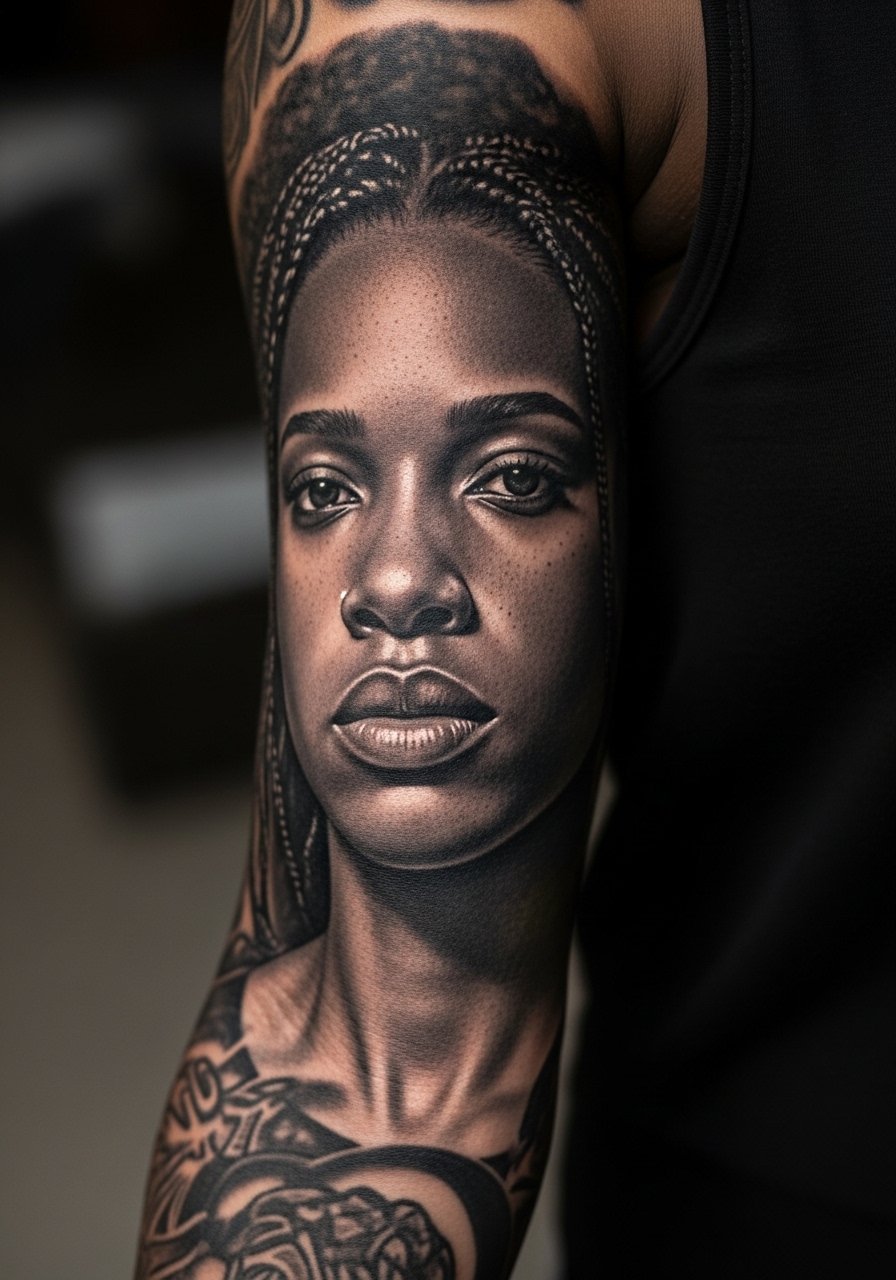
Realism portraits demand planning. When you bring reference photos, bring several lighting variations and say where you want high contrast versus soft fade-outs. Expect long black and gray sessions with precise shading work that can stretch across six to ten appointments. The mistake is requesting a photo-perfect copy at an arm scale without discussing skin tone adaptation. On darker skin, ask the artist about contrast strategies so the face stays legible in photos. Touch-ups at year three are common if subtle halftone areas have softened. For placement, upper arm portraits survive weight change better than inner forearm portraits, which can stretch unevenly.
4. Traditional Anchor and Rose Forearm Half Sleeve
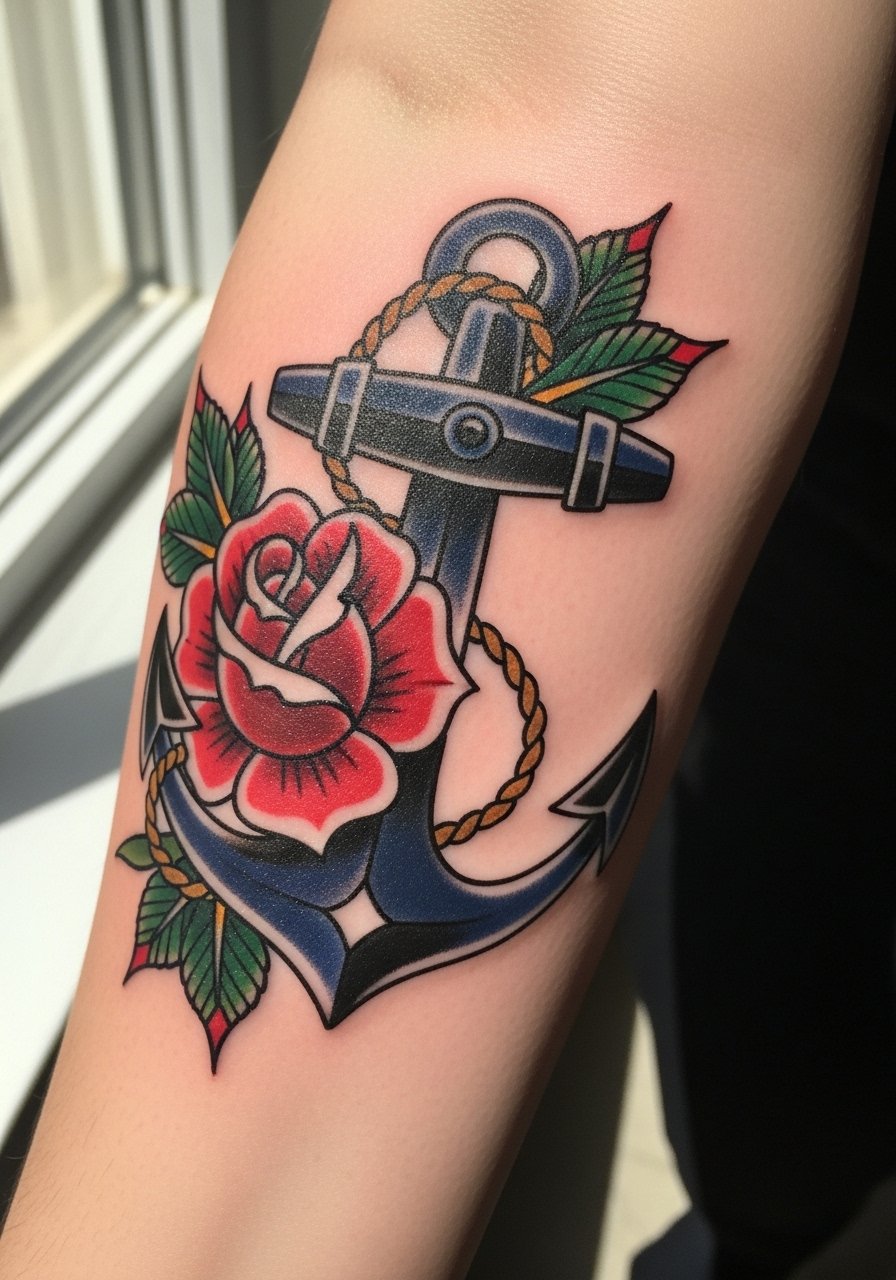
This classic half sleeve is forgiving in the long run if you keep the outlines stout and avoid micro-shading. Tell your artist you want an open composition so each element can be read on its own after a few years. Session time is short compared with a full sleeve, often three to four hours per sitting, and pain on the forearm is lower than inner-arm placements. Popular mistakes include tiny roses with delicate petals that lose definition in two years. For showing it off pair with a roll-up sleeve shirt in navy or white, the clean collar balances the bold linework. Expect a light touch-up at year two to refresh color saturation.
5. Japanese Irezumi Dragon Full Wrap
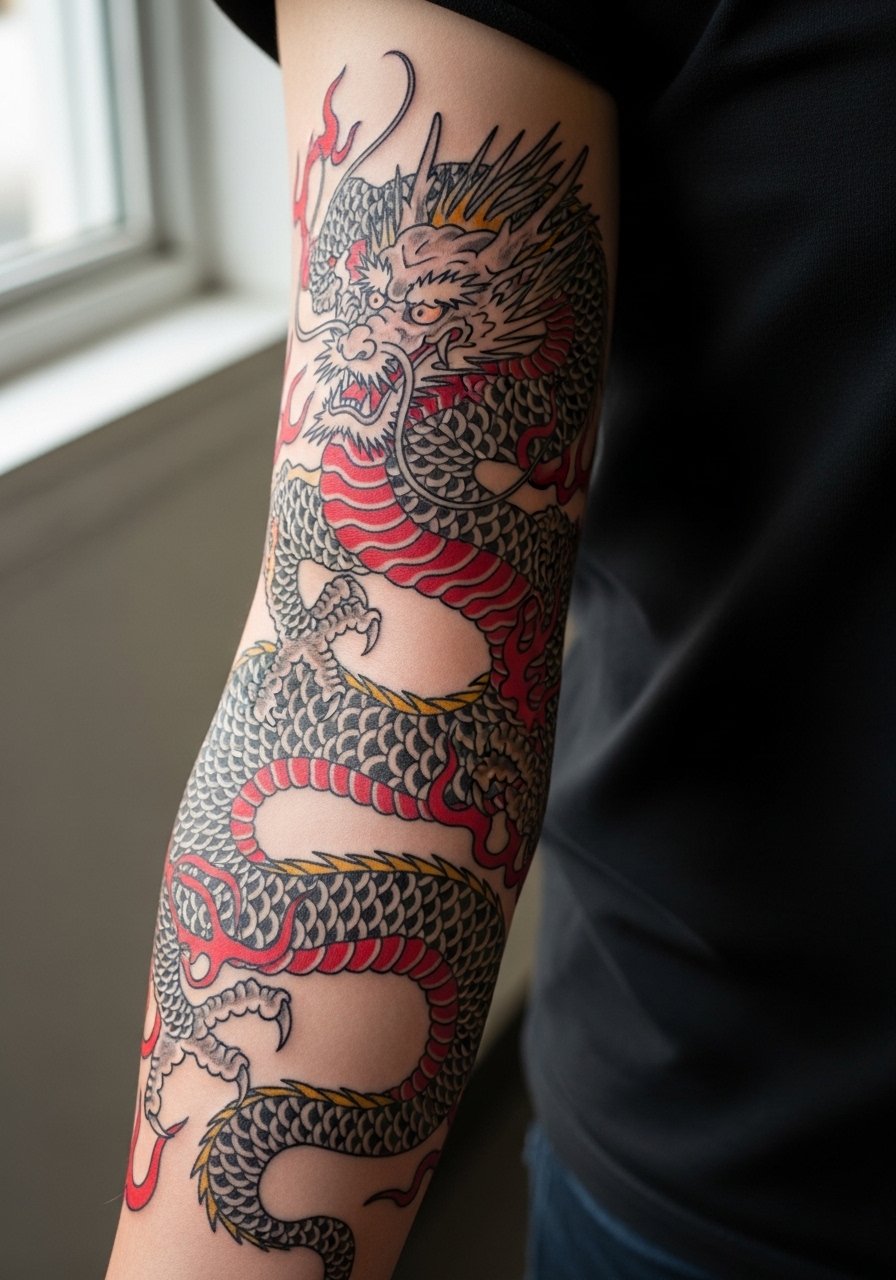
This type wraps with the arm's curves, so ask for a mockup that follows muscle lines and avoids abrupt seams near the elbow. I always remind people that original Irezumi has cultural roots, so consider respectful adaptation rather than a direct historic copy. Color-heavy Irezumi takes many sessions and layered saturation, often six to twelve sittings, and the sessions can be lengthy. A mistake is compressing too many motifs into a narrow band which causes visual clutter as the ink settles. For evenings try an open-front kimono jacket over a solid base to echo the sleeve's flow while keeping attention on the dragon.
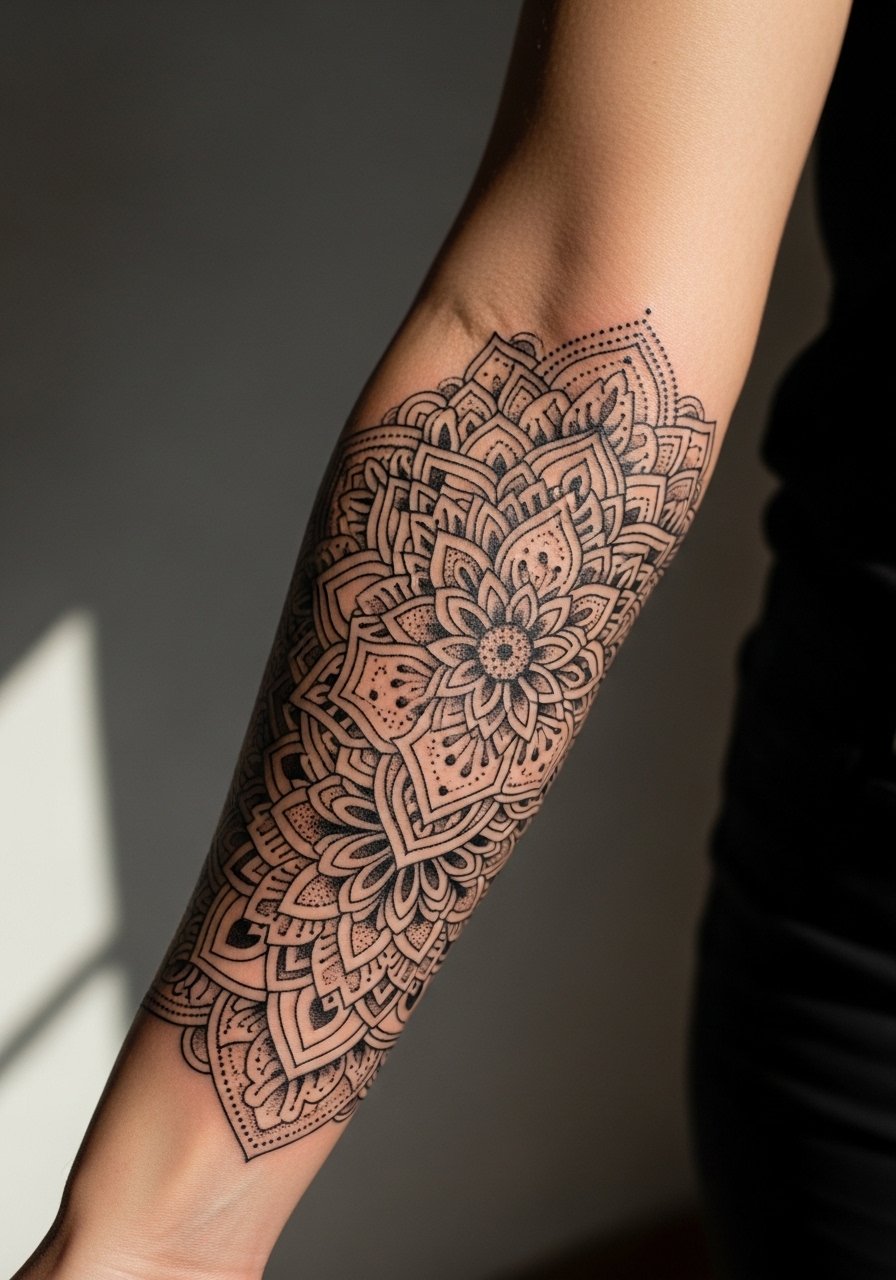
6. Geometric Mandala Inner Forearm Sleeve
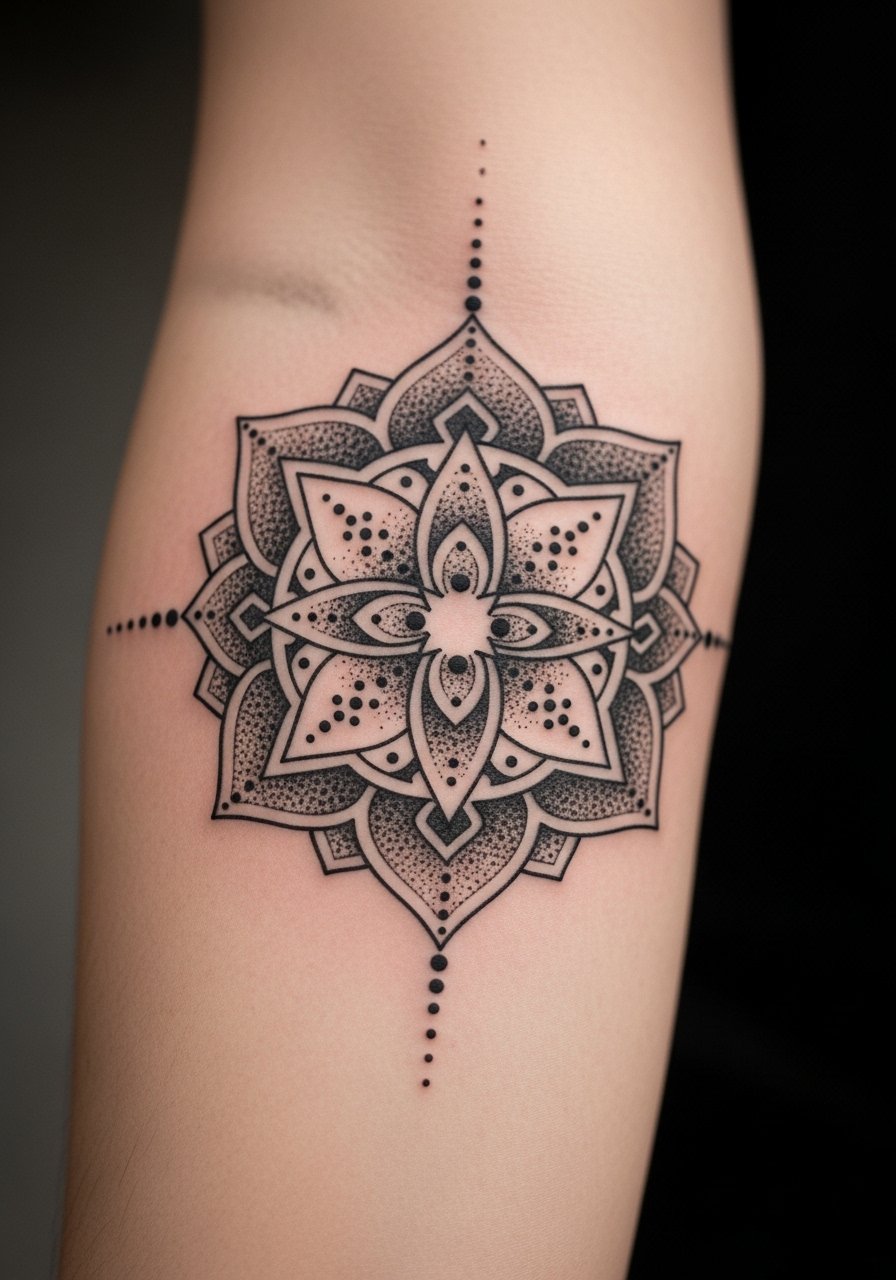
Geometric mandalas need breathing room to avoid merging lines as they heal. My consultation tip is to request slightly wider spacing between repeating elements and stipple shading rather than packed solid fills. Inner forearm healing is straightforward but the area sees a lot of friction, which can soften tiny dots over time. Many people err by asking for ultra-fine detail at a small scale, then need touch-ups at year two. For wearing this design pair with a neutral henley shirt rolled to mid-forearm and a minimalist watch on the opposite wrist. Expect a two-year touch-up to reconnect any merged dot work.
Pre-Session Essentials
The forearm, bicep, and inner arm designs above have different session needs, so these five items smooth the day and the first week.
-
Stencil transfer paper kit. Lets you preview placement directly on skin before the needle touches it, which matters for wraparound sleeves and mandalas.
-
Topical numbing cream. Apply about 45 minutes before a wrist or inner-arm session if anxiety and sensitivity are concerns.
-
Thin protective film roll. Useful for forearm and wrist placements that see a lot of rubbing during the first days of healing.
-
Fragrance-free body wash. Gentle cleansing helps maintain crisp edges on fine-line forearm work without irritating the skin.
-
Aquaphor healing ointment. Thin layers during the initial healing phase lock in moisture for dense blackwork and fine detail.
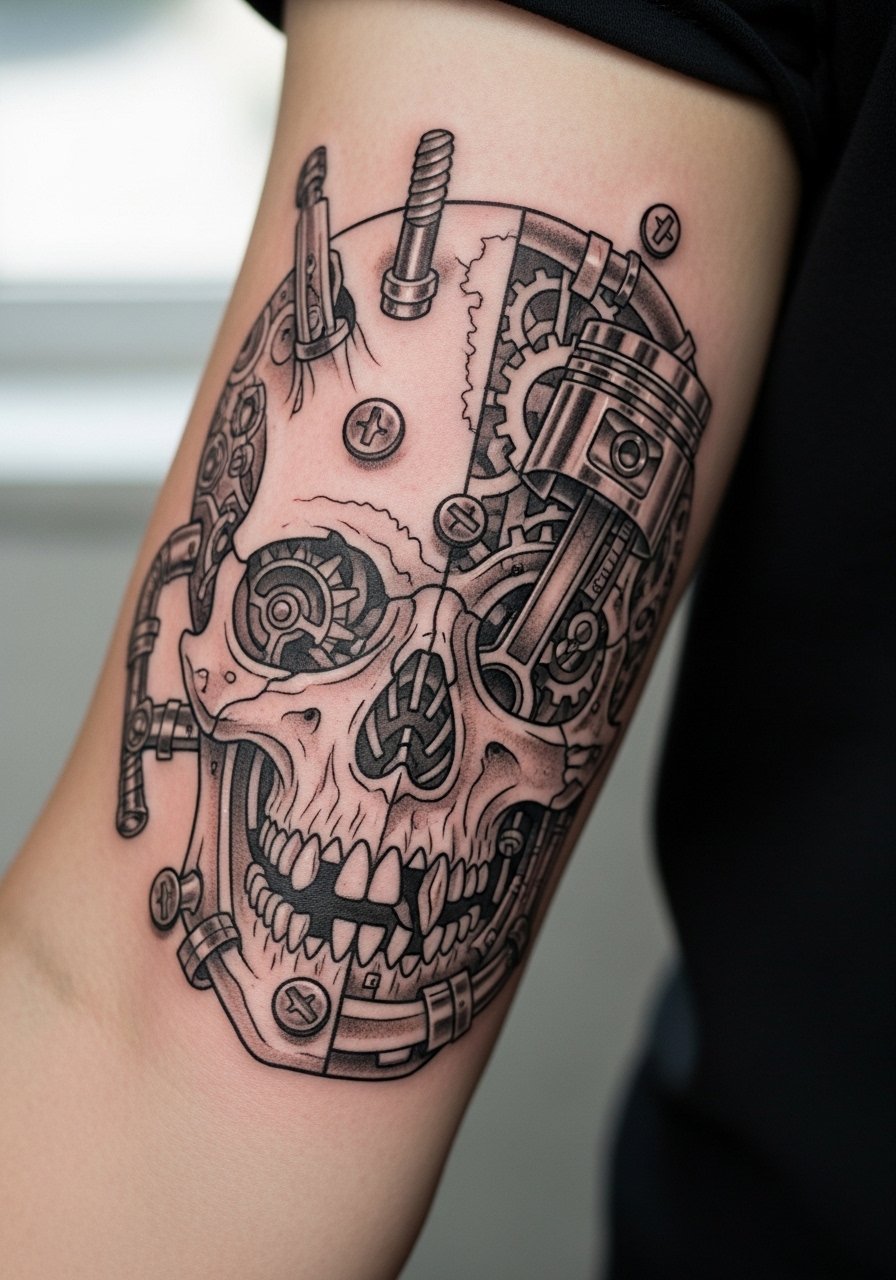
7. Skull and Mechanical Upper Arm Half Sleeve
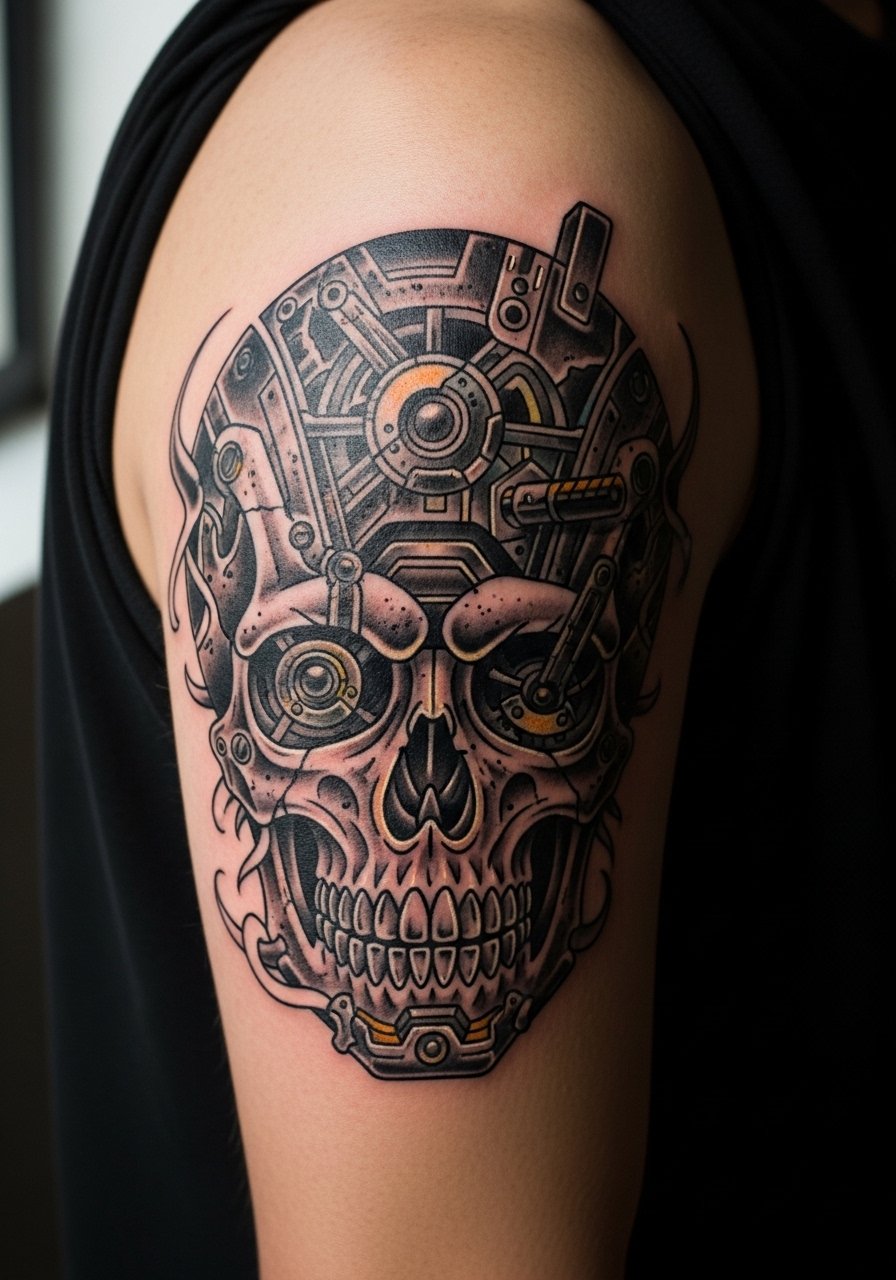
This fusion plays well on the upper arm where the canvas curves naturally. In consultation specify how mechanical parts should interact with bone structure so the gears feel integrated rather than pasted on. Sessions are moderate in length and pain on the upper arm is manageable. A common error is over-detailing gears at small scale which loses clarity after healing. For showing it off wear a thin chain necklace that frames the shoulder without covering the artwork. Plan a touch-up at three years if the gray washes flatten.
8. Floral Realism Forearm Extension
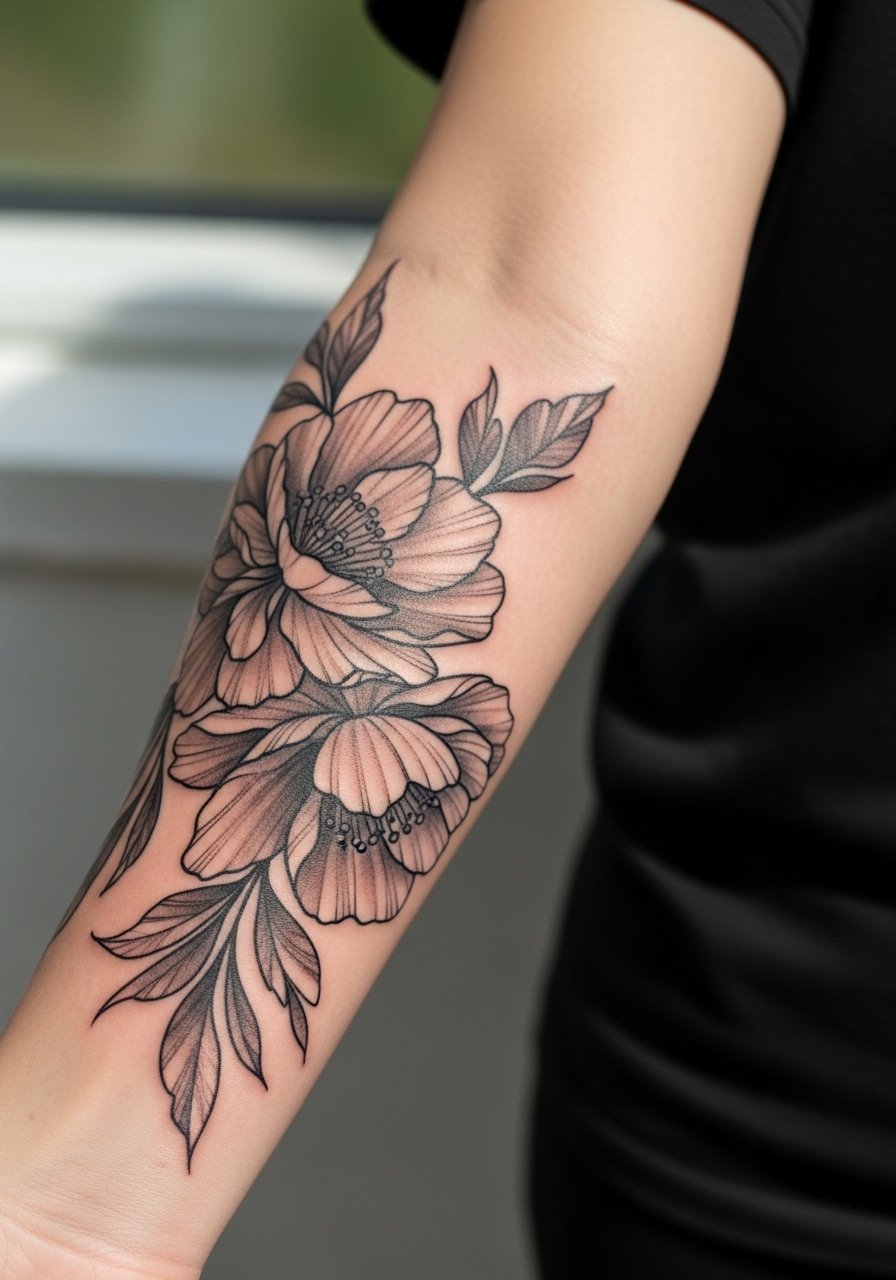
Floral realism softens beautifully if you allow contrast in the petals and avoid extreme micro-detail. Tell your artist which flowers to emphasize and where you want high contrast so the composition reads at arm distance. Forearm sessions are tolerable and often completed in two to four sittings. A misstep is asking for lace-thin veins on tiny petals which can blur into gray patches. To show this piece pair with a short sleeve cotton tee and roll the sleeves to mid-forearm. Expect a minor refresh at year two to restore crisp petal edges.
9. Black and Gray Landscape Full Sleeve
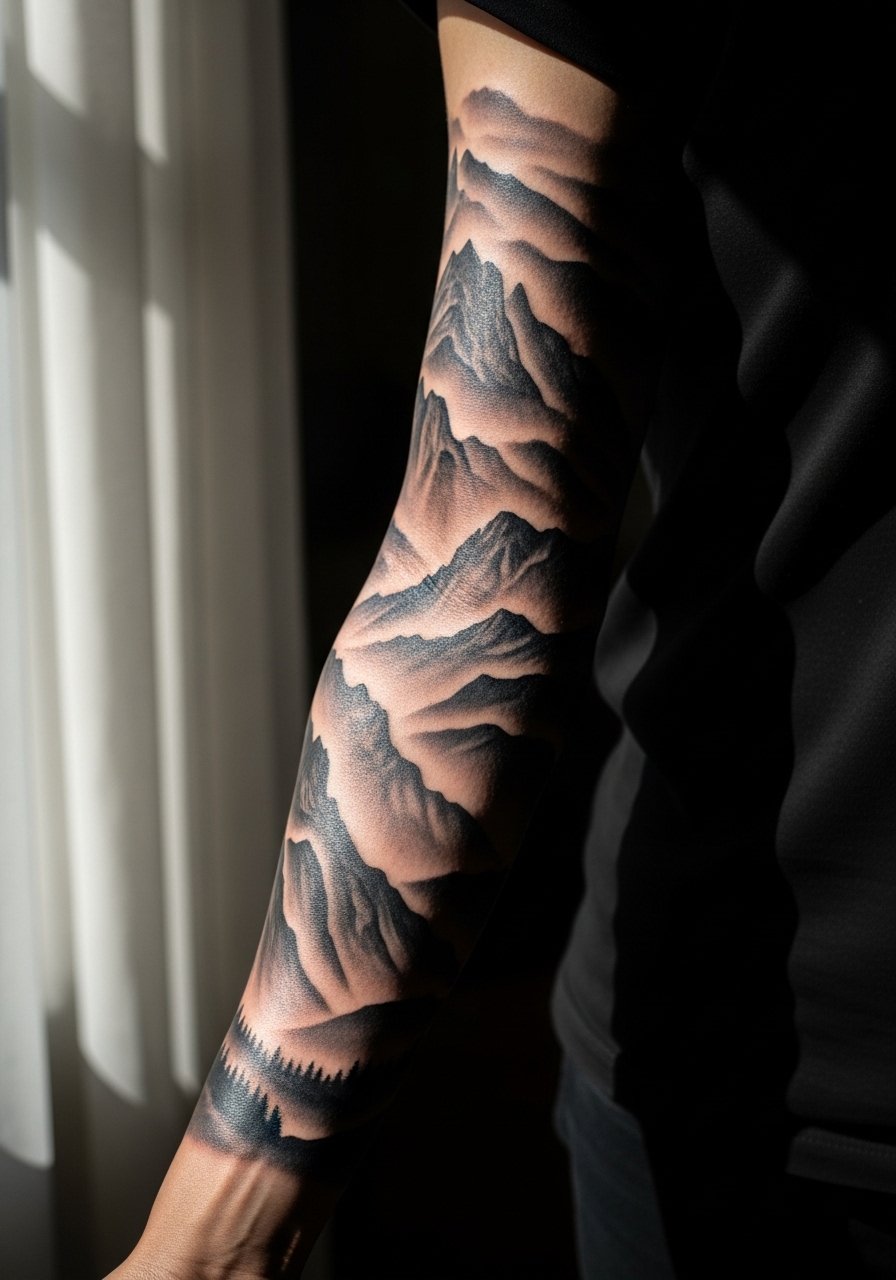
Landscapes let a sleeve tell a continuous story across the arm. When you meet the artist bring references that show the exact mood you want, such as high-contrast dawn or soft overcast scenes. Sessions involve many shaded passes and gradient work, and the skin can get fatigued after long shading days. People often underestimate the time needed to layer depth, which leads to rushed shading and muddy transitions. On curved areas like the forearm expect certain silhouettes to read differently from the back of the hand. Touch-ups at years two to three preserve the midtone gradients that give the scene dimension.
10. Patchwork Skull Forearm Sleeve
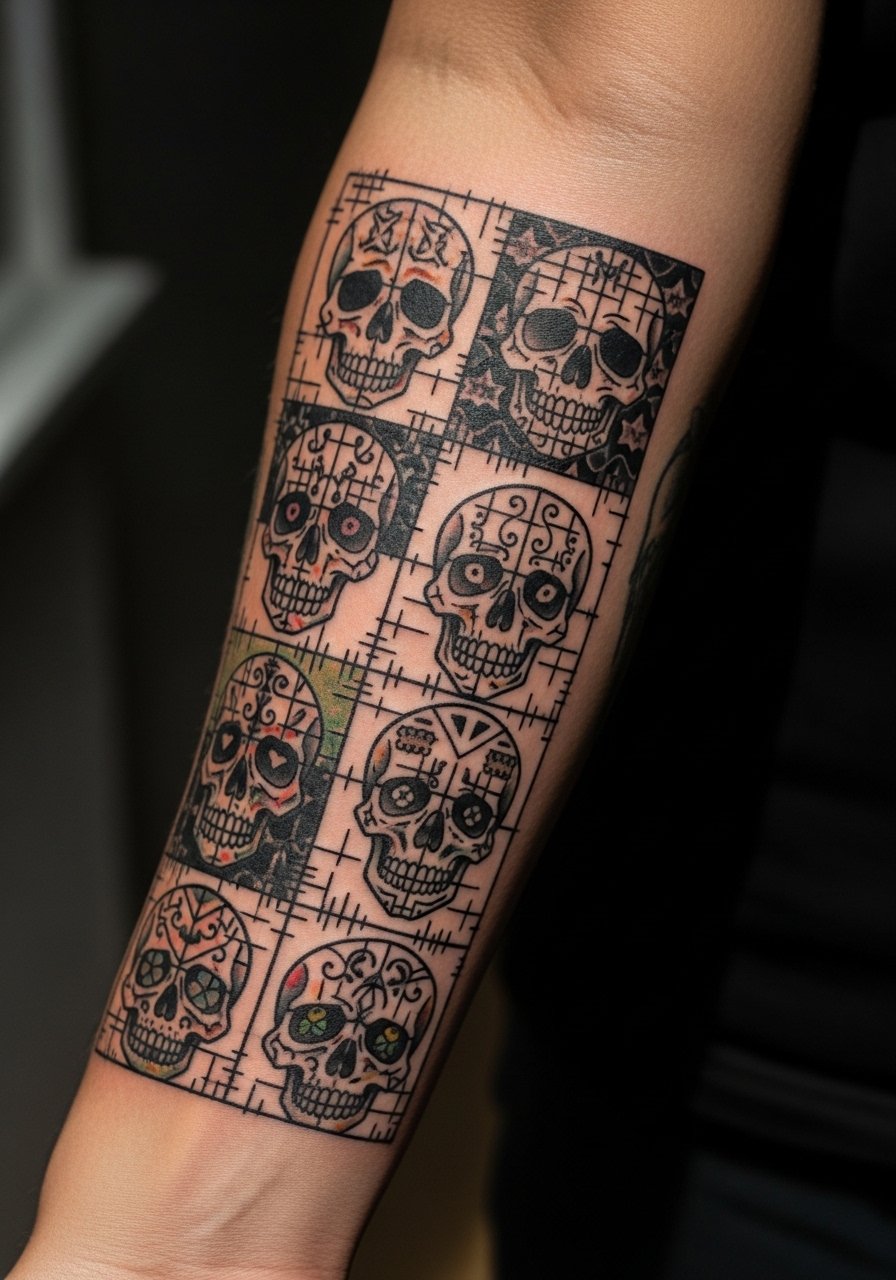
Patchwork sleeves are ideal if you want to phase a sleeve over time. Start with a cohesive palette and set common margins so future patches slot in without crowding. My budgeting advice is to plan each module as a mini-session so you can save between appointments and test how the theme reads on your skin. Common mistakes are letting each patch have wildly different line weights, which creates a mismatched look over time. For session day wear a short-sleeve tee so the artist has easy access. Expect to touch up early patches once the later modules shift your sleeve's negative space.
11. Oriental Phoenix Rising Full Sleeve

A phoenix needs dynamic motion that follows the arm's anatomy, so ask for sketch wraps during the consultation. Color saturation is crucial for the fiery feathers, and multiple color-sitting passes preserve vibrancy. The error I see most is compressing wings too tightly around the elbow, which breaks flow when you bend the arm. For longevity, favor larger color pools and bold outlines over tiny hatch shading. This style benefits from planning touch-ups every two to three years to keep color pop. If cultural motifs are present, consider small adaptions that respect the original tradition.
12. Abstract Linework Waves Half Sleeve
Abstract wave linework reads best when the artist maps the longest continuous lines to the arm's longest curves. In consultation point out where you want the main flow to pause and where you want intersection points. Sessions are usually short and less taxing because the work is primarily linework, though consistency of line weight matters. The number one mistake is going too small with loops, which merge into a visual haze after healing. For showwear, a black fitted tank top keeps the silhouette clean and echoes the lines. Expect low-maintenance touch-ups unless the lines experience blowout.
13. Micro-Realism Inner Bicep Mini Portrait

Inner bicep micro-realism looks intimate and detailed but requires a conversation about scale and healing. The inner bicep skin stretches differently and can blur fine shading, so ask the artist about slightly increasing contrast and line separation. Sessions here often feel more sensitive because of nerve distribution. A common mistake is insisting on photo-level detail at a tiny size without accepting a stronger outline. Plan for a touch-up at year two if delicate halftones soften. Also remember inner bicep work needs an artist experienced with that placement, so look for portfolio pieces that include healed inner-arm photos.
14. Dotwork Geometric Elbow-to-Wrist Sleeve
Dotwork uses stipple shading to create gradients that age softly if spaced correctly. Tell the artist you prefer stippling with visible negative space rather than packed dots that can merge. The elbow area sees a lot of movement which can compress dots, so ask for looser patterns around joints. Sessions take time because stippling is meticulous, and the pain varies near the elbow bone. A common error is requesting dense dot fields at small scale which flatten into gray patches. To show this work off, wear a henley rolled to mid-forearm so the pattern reveals across motion. Expect touch-ups at three years if gradients lose contrast.
15. Mechanical Skull Hybrid for Industrial Types
This industrial fusion benefits from bold linework and clear separations between organic and mechanical elements. In consultation specify which parts should read anatomical and which parts are decorative so the narrative stays consistent as the arm moves. Sessions are moderate and can be phased so you can test how each module sits. Mistakes include over-detailing metallic textures at small scale which blurs with friction. For session wear choose a loose short-sleeve top so the forearm is fully accessible. Touch-ups may be needed earlier on areas near the wrist because constant abrasion can dull the mechanical shading.
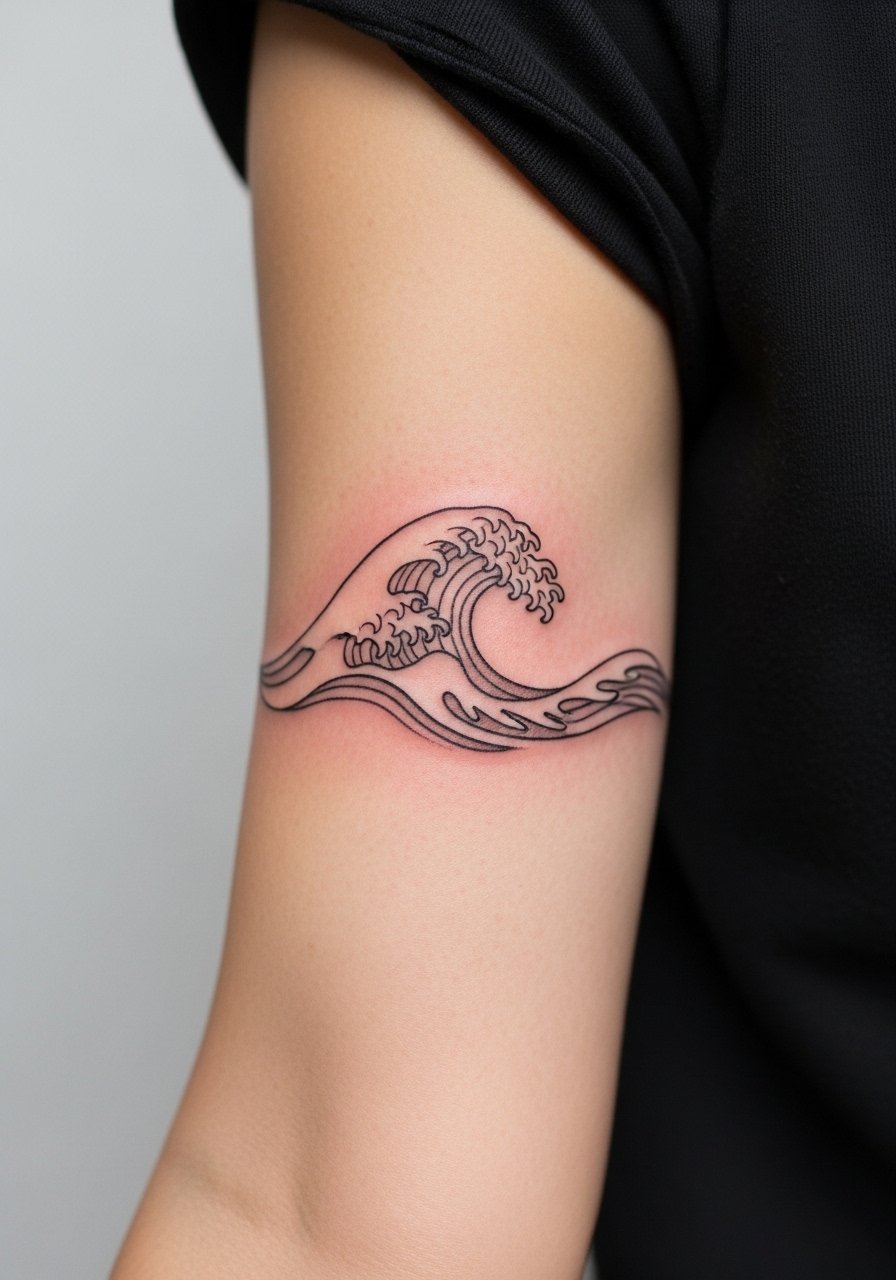
16. Wave Linework Flow Half Sleeve

Wave linework lives with the arm's motion, so ask for a stencil that you can test while moving your wrist and elbow. I suggest specifying where lines should compress and where they should breathe. Sessions are typically short but require precision for smooth continuous lines. People sometimes ask for too many intersecting waves which creates visual noise after healing. Pair this with a solid black shirt and an open cuff to let the flow remain visible during casual wear. Expect a low-maintenance approach; touch-ups are usually minor.
17. Forearm Script and Small Icon Patchwork
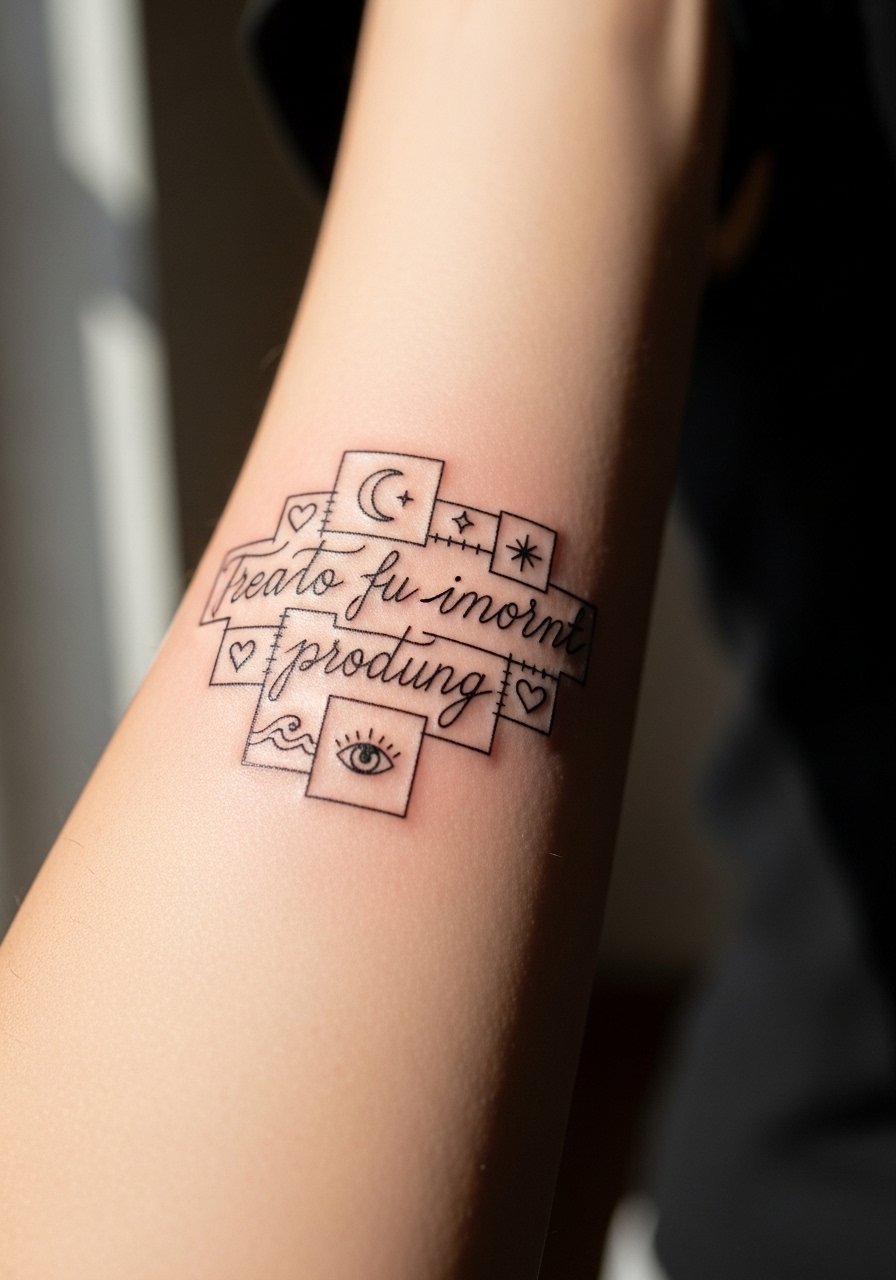
Script plus icons is a great phased approach for people unsure about a full sleeve. When you consult, pick typefaces that scale well and icons that have clear silhouette shapes. The most common mistake is using ultra-fine script with tiny flourishes, which blurs into a gray line eventually. Forearm script heals well but takes frequent washing and movement, so plan a small touch-up at year two if letter edges soften. For everyday wear choose a loose button-down shirt you can pull aside during the session. This patchwork approach makes it easy to add motifs later without reworking composition.
Frequently Asked Questions
Q: Will fine line elements in a sleeve blur faster than blackwork blocks?
A: In my experience fine line details tend to soften earlier than heavy blackwork, especially in high-friction zones like the wrist. The trade-off is detail versus longevity, so ask your artist to increase spacing and slightly thicken critical lines if you want the look to last.
Q: How should I phase a full sleeve to manage cost and cohesion?
A: Plan modules around negative-space corridors and a shared palette so future additions slot in naturally, and budget to save between sessions. Start with anchor pieces that establish scale and spacing, then fill with smaller patches over 6 to 12 months.
Q: Artists argue about Saniderm versus dry healing, which camp should I trust?
A: Artists split into two camps. One prefers protective film like Saniderm to reduce mess and limit infection risk. The other prefers traditional dry healing for better scab formation. The right approach depends on your lifestyle and the shop's aftercare protocol, so ask the artist how they handle long sleeves before booking.
Q: Will a sleeve look bad if I have a lot of arm hair?
A: Heavy arm hair can obscure fine detail when the hair grows back after sessions, and it can make photos less crisp. Shaving the area before the appointment and choosing stronger linework over ultra-fine detail helps keep the design legible.
Q: Do color-heavy sleeves on darker skin wash out in photos more than blackwork?
A: High-contrast blackwork generally photographs more consistently across skin tones, while some colors can appear less saturated in photos. Talk to an artist who has healed examples on your skin tone to see how specific pigments hold up.
Q: How often will a full sleeve need touch-ups?
A: Expect minor touch-ups every two to four years depending on sun exposure and friction. Areas near the wrist and elbow often need attention earlier than the upper arm. Regular sunscreen on healed work extends time between touch-ups.
Q: Where should I look to find artists who specialize in these sleeve styles?
A: Search by style hashtags and city plus the style term, use local studio listings, check forums for healed-portfolio threads, and consult booking apps that show guest spots. Those discovery paths help you verify healed examples rather than just fresh photos.
