
Fine line and bold script are both trending for the same phrase, and the choice you make now will determine how the piece looks in a year and in five. Fine line lovers accept faster fading for a delicate look. Bold blackwork fans trade subtlety for longevity. Add rising shop rates and placement changes from weight or work, and planners get nervous fast. These 27 takes on the "all we need is love" tattoo aesthetic pair clear guidance on placement, what to ask at consultation, and outfit tips so the healed result reads the way you expect.
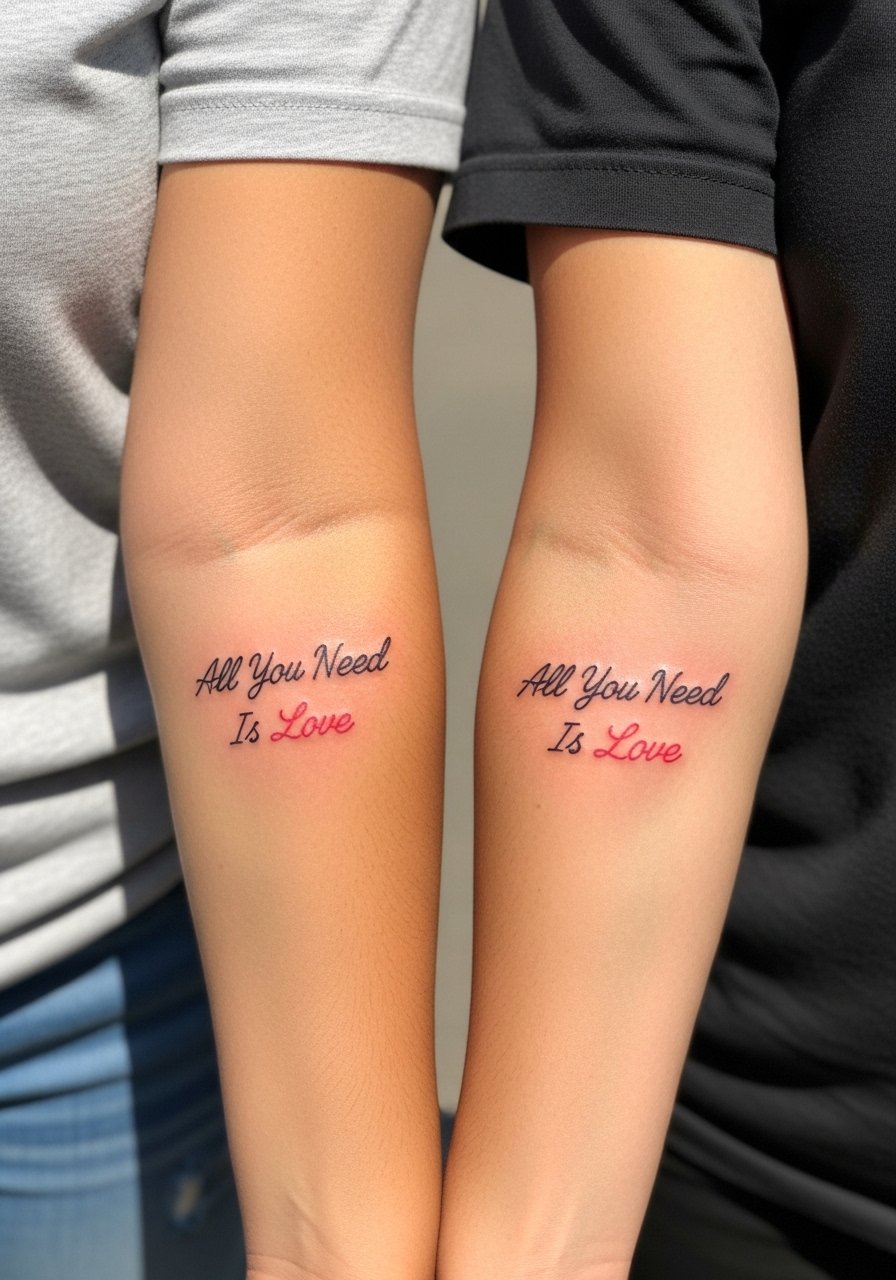
1. Script Banner Heart on Outer Forearm
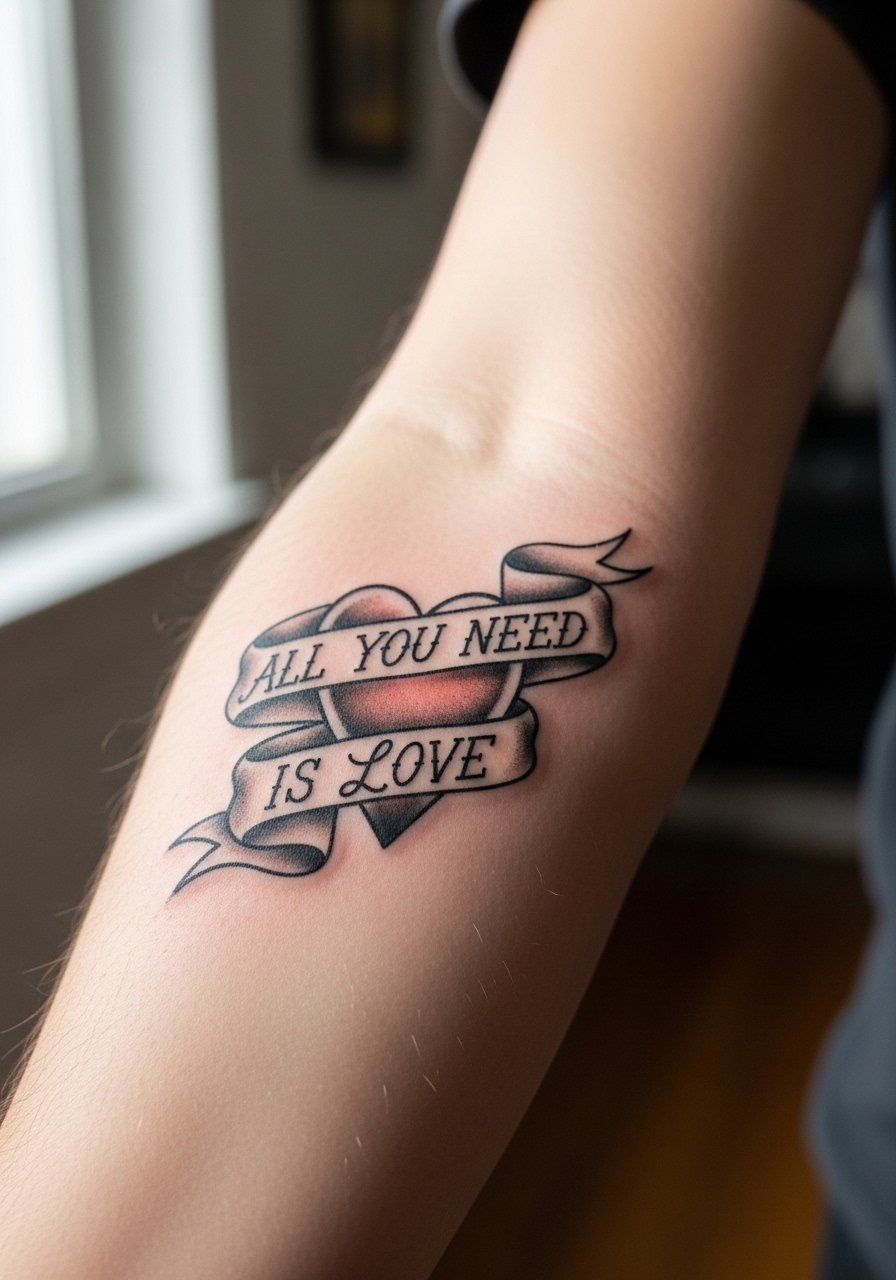
I recommend the banner script on the outer forearm when you want visibility and a piece that ages into readable linework. Ask your artist to keep the banner width at least two inches so the letters do not collapse together over time. A common mistake is requesting ultra-thin lettering in this placement, which looks crisp fresh and softens into unclear loops by year three. Expect a one to two session build and moderate pain. For showing it off, roll up a chambray shirt and add a thin leather cuff on the opposite arm to balance the view.
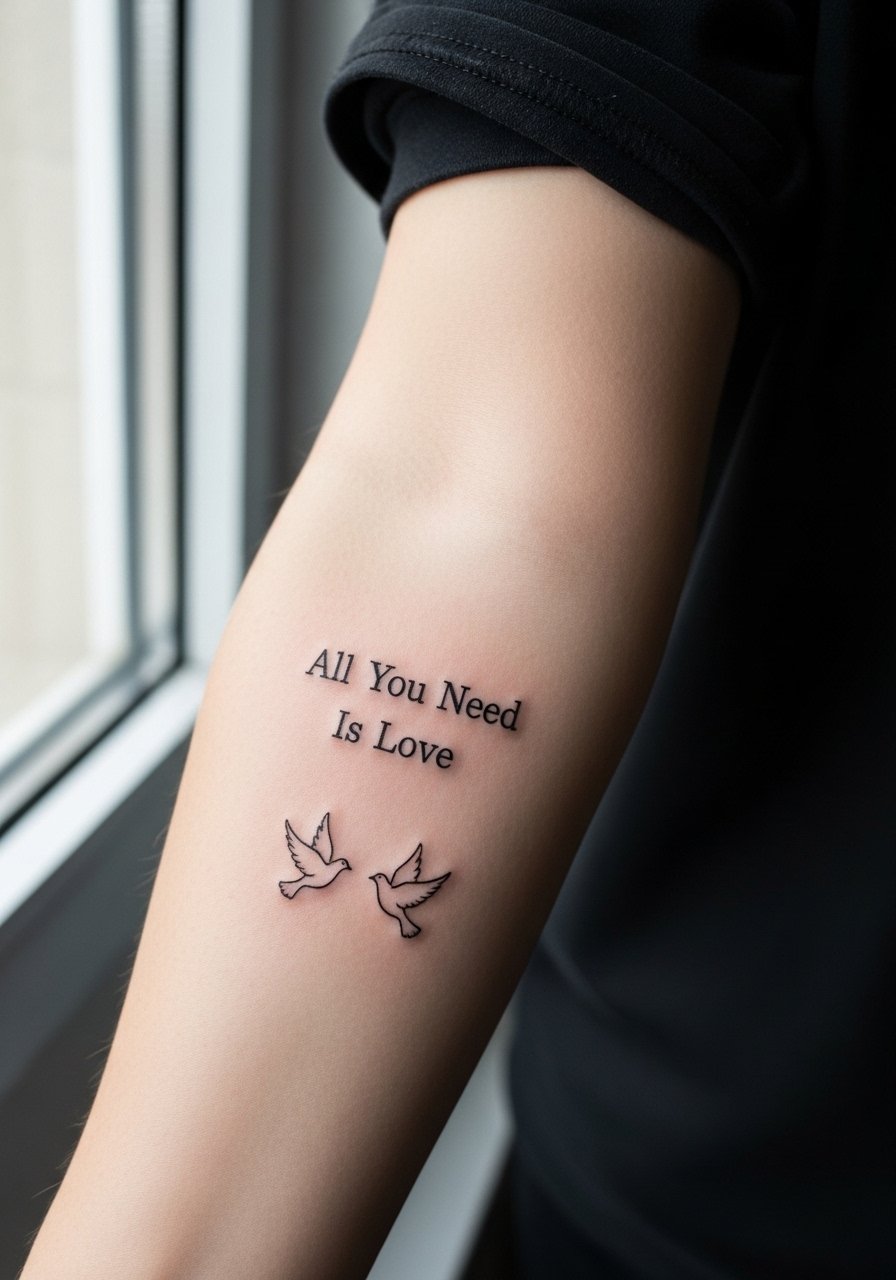
2. Minimalist Script with Doves on Inner Wrist
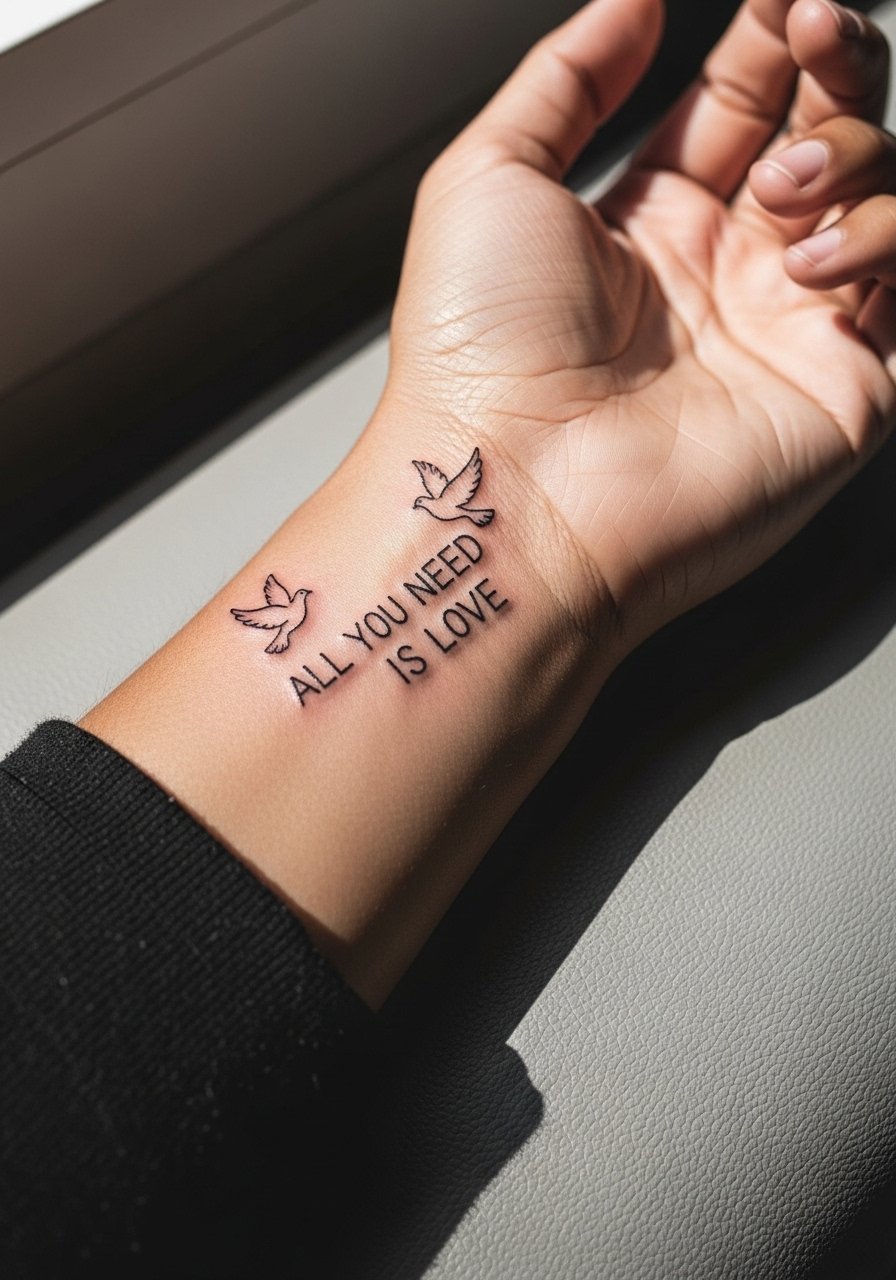
The inner wrist is ideal for a first-timer who wants a quiet reminder. Fair warning: the wrist area has higher touch-up rates now because shops have raised small-piece prices and some clients expect ultra-fine lines for less money. During consultation say you want slightly increased line weight and clear spacing between letters. That preserves the minimal look while improving longevity. The session is short but can sting near the bone. Pair the healed result with a neutral linen cuff bracelet to frame the script without crowding it.
3. Watercolor Phrase with Blooming Flowers on Collarbone
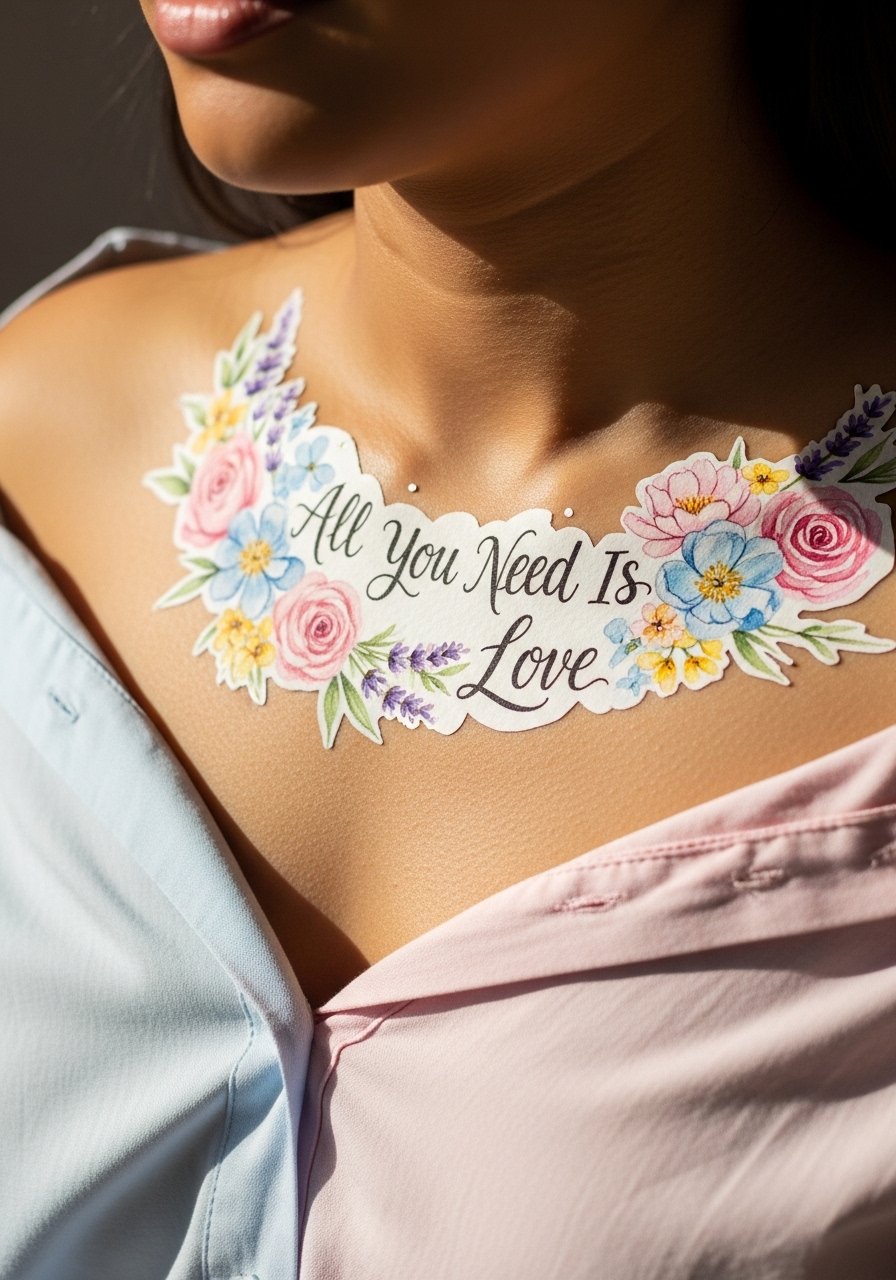
Watercolor on the collarbone reads poetic and moves with the body when done with soft edges. Most watercolor fades faster where clothing rubs, so ask the artist to anchor the piece with darker outlines at contact points. A common version that ages poorly uses too much blended pigment at the edge near straps. This variant uses refined saturation at focal points to keep color visible at year two and beyond. Session time is usually one to three sittings. Show it off in an off shoulder blouse that sits below the piece so the colors breathe.
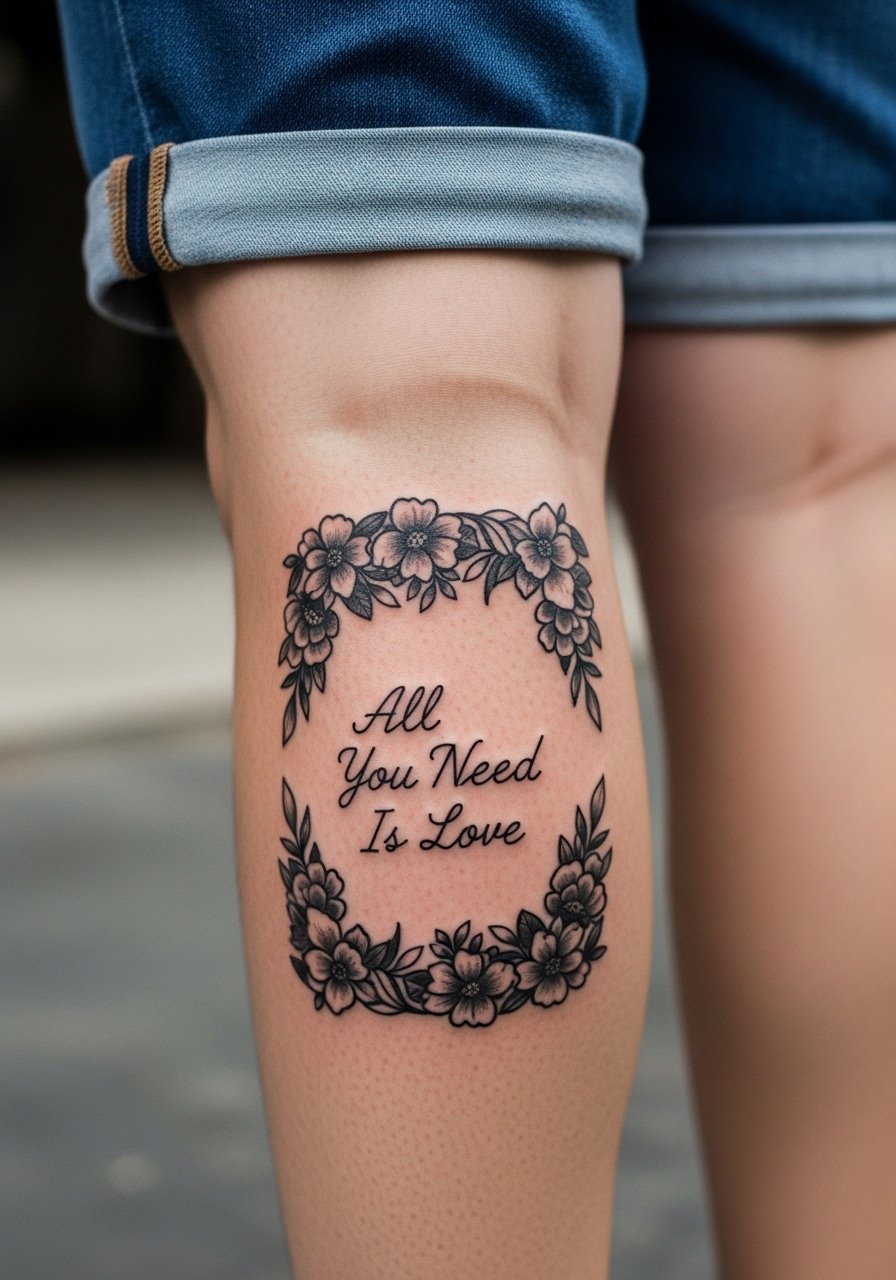
4. Neo-Traditional Heart and Phrase Banner on Outer Forearm
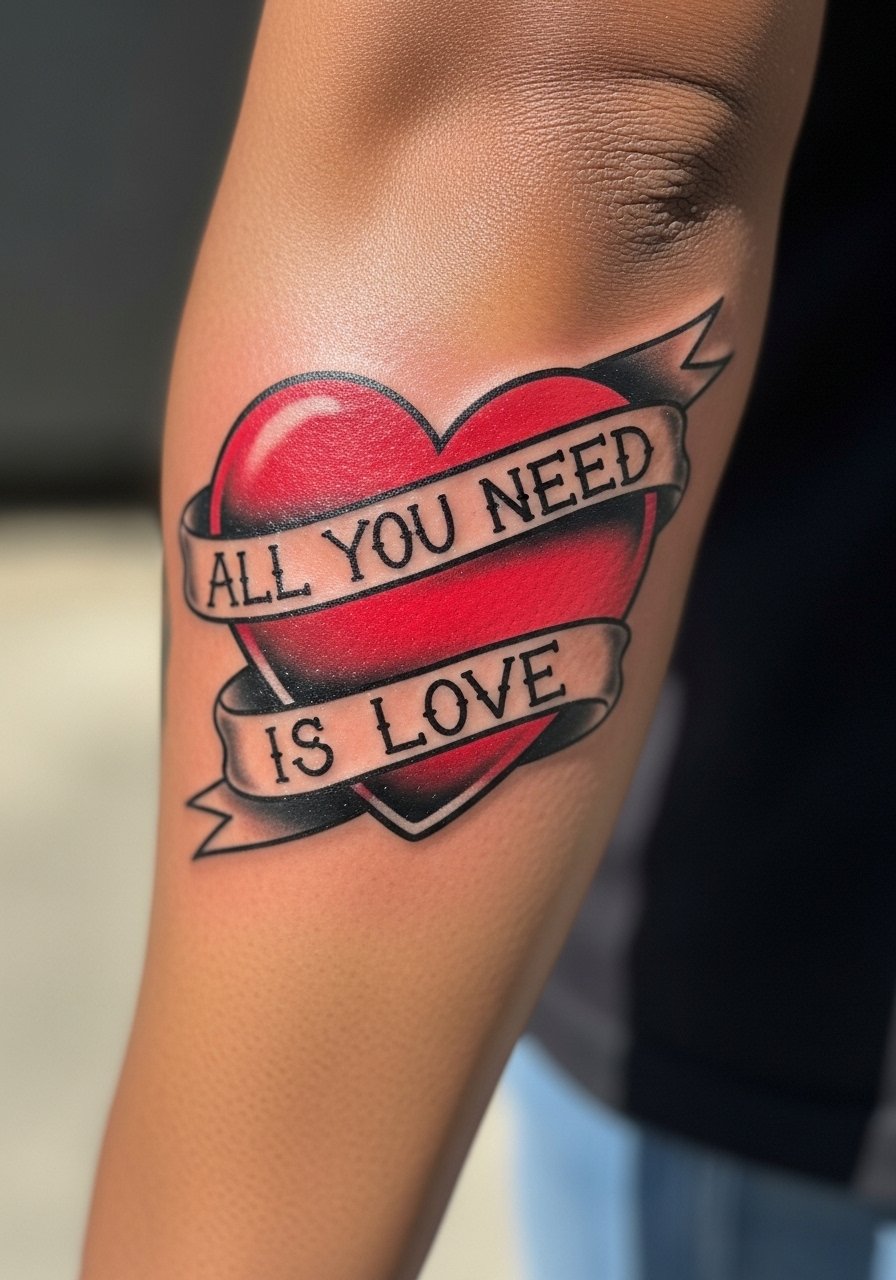
There is visual punch to neo-traditional work that stands up to daily wear. I steer people to this when the goal is visibility and fewer annual touch-ups. Tell your artist you want robust outlines and medium saturation, not a watercolor fill. The big mistake is asking for small detail inside the heart in a spot that gets sunlight and abrasion. Expect two sessions and low to moderate pain. Roll sleeves or wear a short sleeve button down to reveal it without competing patterns.
5. Dotwork Geometric Mandala on Shoulder Blade
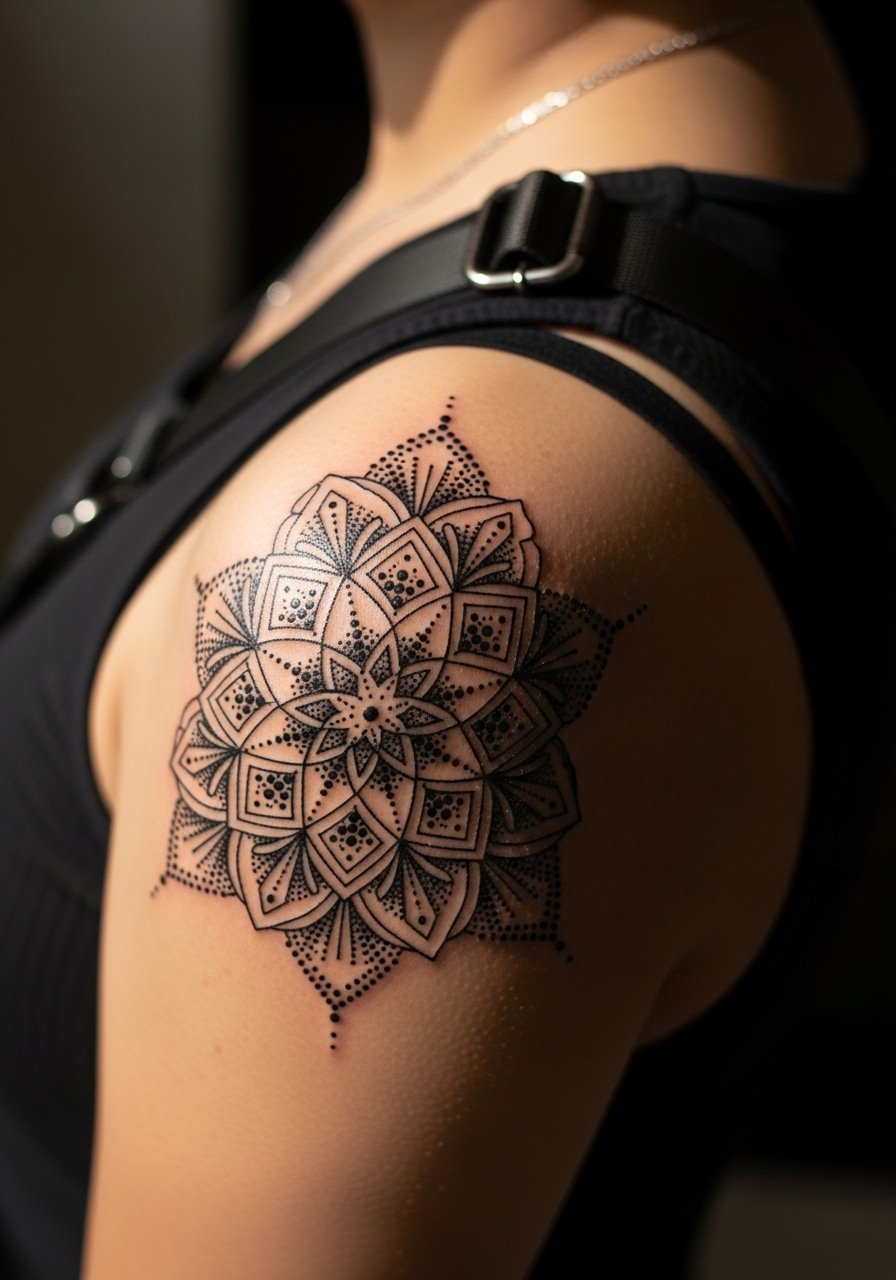
Dotwork mandalas read as thoughtful and modern, and they scale well on the shoulder blade. The main error is going too tight with dots in the center. Leave breathing room so the dot density does not merge into a gray patch at year three. Touch-ups are typical in the first two years to keep crisp contrast. For the session wear a sleeveless muscle tank so the artist has a clear canvas and your shoulder stays comfortable. This placement is low to moderate on the pain scale.
6. Fine Line Intertwined Hands on Ribcage

Fine line on the ribcage splits artists into two camps. One group says the skin stretch and movement blur these lines within two years. The other group argues that with proper needle depth and spacing it settles fine. When you book, ask where your chosen artist sits in that debate and request slightly heavier line weight to hedge against stretching. Rib pieces are higher on the pain scale so plan for a focused session. The common mistake is asking for micro-detail too close to the sternum. Expect a single session for this scale and a possible touch-up at year two.
Studio Day Picks
The wrist, forearm, and ribcage pieces above each have different prep and healing needs, so a small kit smooths the session and first week.
-
Stencil transfer paper kit. Lets you preview placement on the skin before the needle touches it, especially useful for the forearm banner and wrist script above.
-
Topical numbing cream. Applied as directed before a ribcage or sternum session takes the edge off higher sensitivity areas.
-
Thin protective film roll. Keeps wrist and ankle pieces clean during the first days when friction from clothing or shoes is highest.
-
Fragrance-free gentle body wash. Gentle cleansing avoids irritating delicate linework on the inner wrist and collarbone.
-
Aquaphor healing ointment. A thin layer in the initial days locks in moisture for fine line work without clogging the needle channels.
7. Blackwork Floral Frame on Calf

Blackwork on the calf reads graphic and resists sunlight when packed densely. I recommend this if you want a statement piece that handles outdoor exposure. The mistake is requesting tiny inside details that disappear in a solid block. Calf sessions are moderate and often split across two appointments for saturation. For showing it off, cuff a pair of slim fit chinos rolled or wear athletic shorts so the frame sits cleanly against fabric. Expect touch-ups focused on saturation rather than linework.
8. Script Phrase with Daisy Chain on Ankle
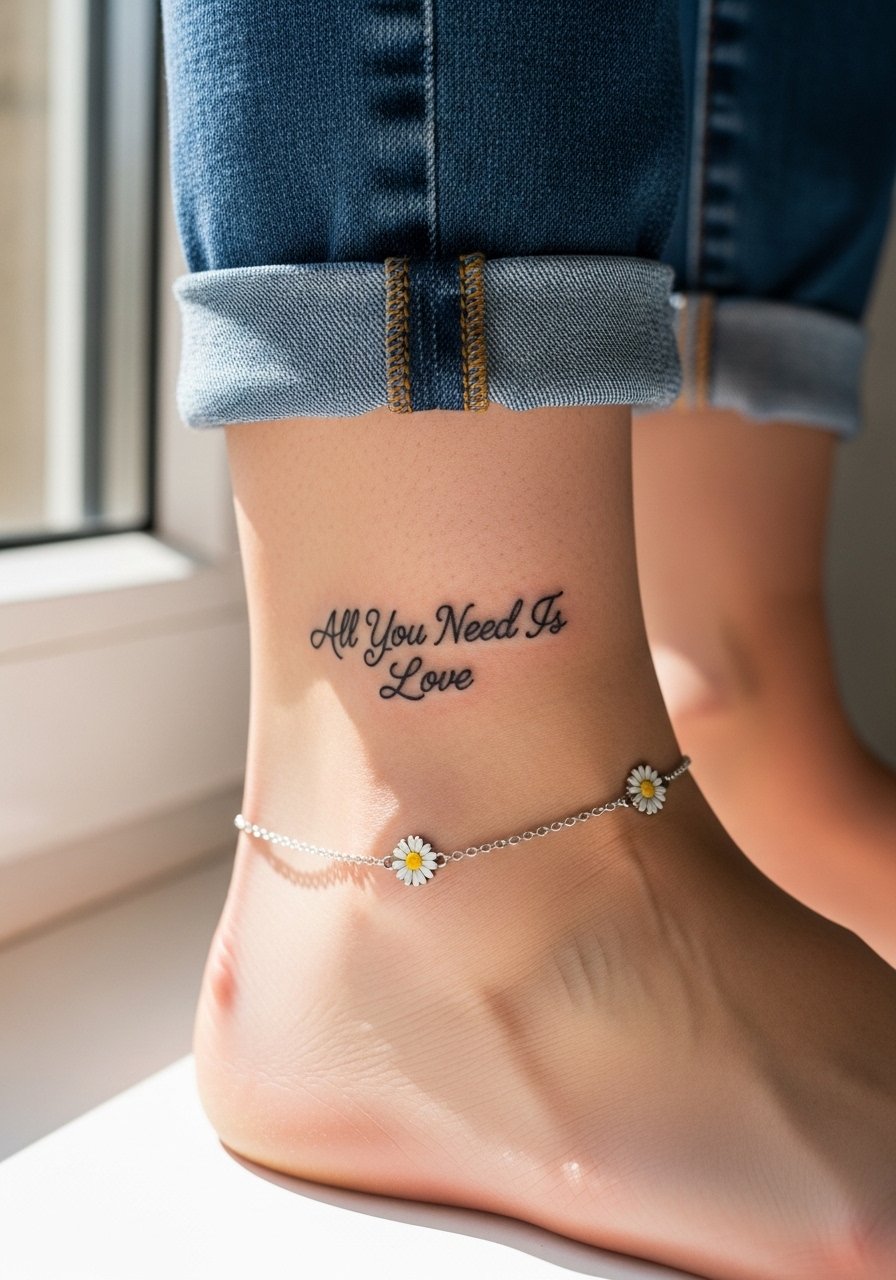
Daisies shift the phrase toward friendship instead of romantic connotations. The ankle is a high-friction zone so ask for slightly bolder petals and contrast around the chain so the small flowers do not vanish into scuffed lines. The pain is low to moderate and sessions are short. For casual show-off pair it with cuffed boyfriend jeans or a flowy skirt that keeps the ankle visible without rubbing the area.
9. Micro Script Behind the Ear with Tiny Heart
Behind-the-ear placements need a careful stencil and a small margin for error. This spot is subtle and works if you want something private that peeks out with hair up. Tell your artist you want the exact lettering size and spacing shown on paper, and request a slight increase in weight for darker skin so the piece photographs. Pain is low but the curve of the skull can make needle angles tricky. Note that hair and collars can irritate the area while it heals.
10. Tiny Finger Script on Side of Finger
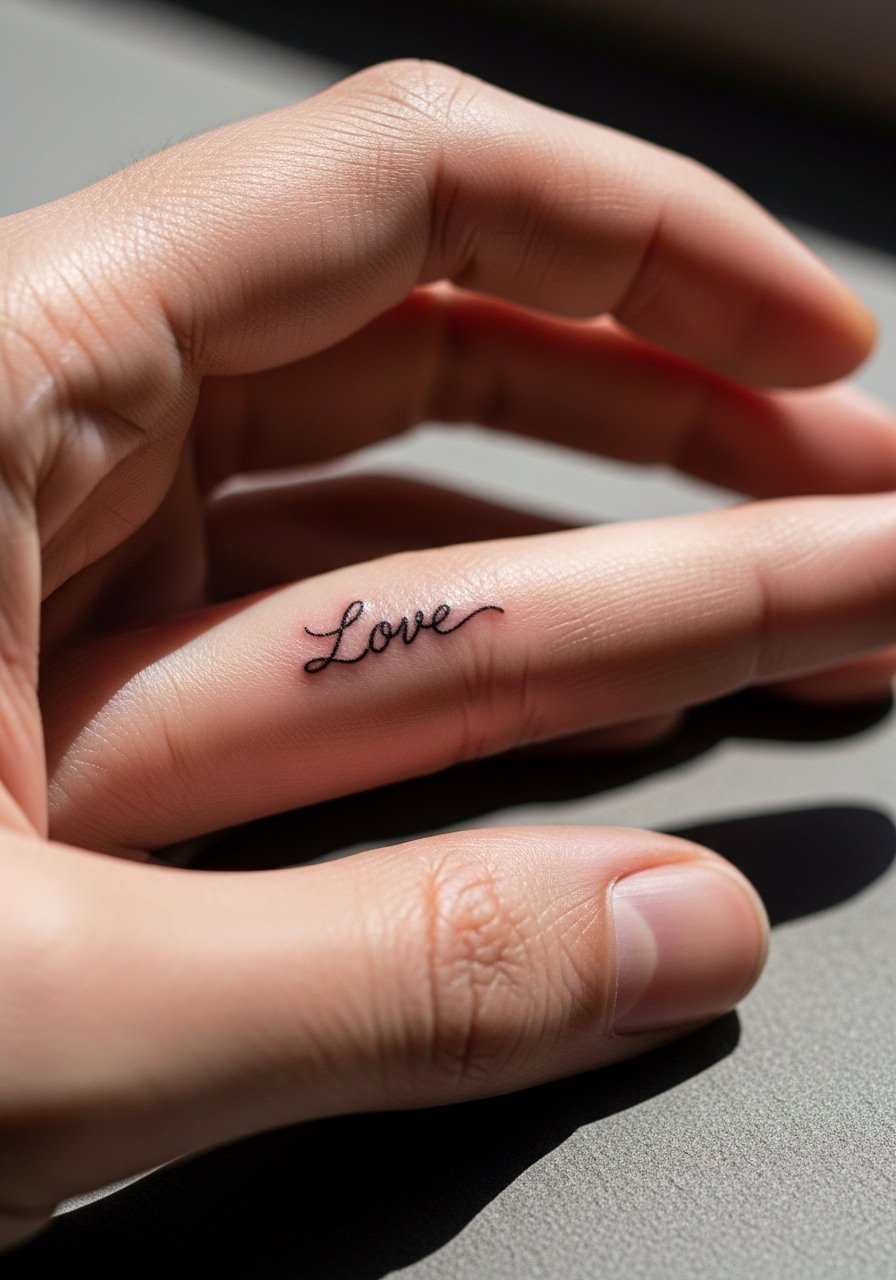
Finger placements wear fast because of constant washing and friction. I suggest keeping the lettering bold for readability in the first year and acknowledging that annual touch-ups are common. The typical mistake is requesting micro-lettering that looks fine fresh and fades into a smudge. Sessions are brief and the pain is sharper than expected. For daily wear pick a minimalist leather ring or let the piece stand alone. Expect touch-ups sooner than for forearm work.
11. Matching Couple Banner on Inner Forearms
Couple matching banners are popular but require alignment and scale that works on both bodies. In consultation plan for identical spacing and ask the artist to mark each with the same ruler measurements. Avoid trying to mix four different styles into matching pieces. Expect low to moderate pain and one session if size is small. For showing off choose rolled sleeves or a short sleeve button down so both pieces read together.
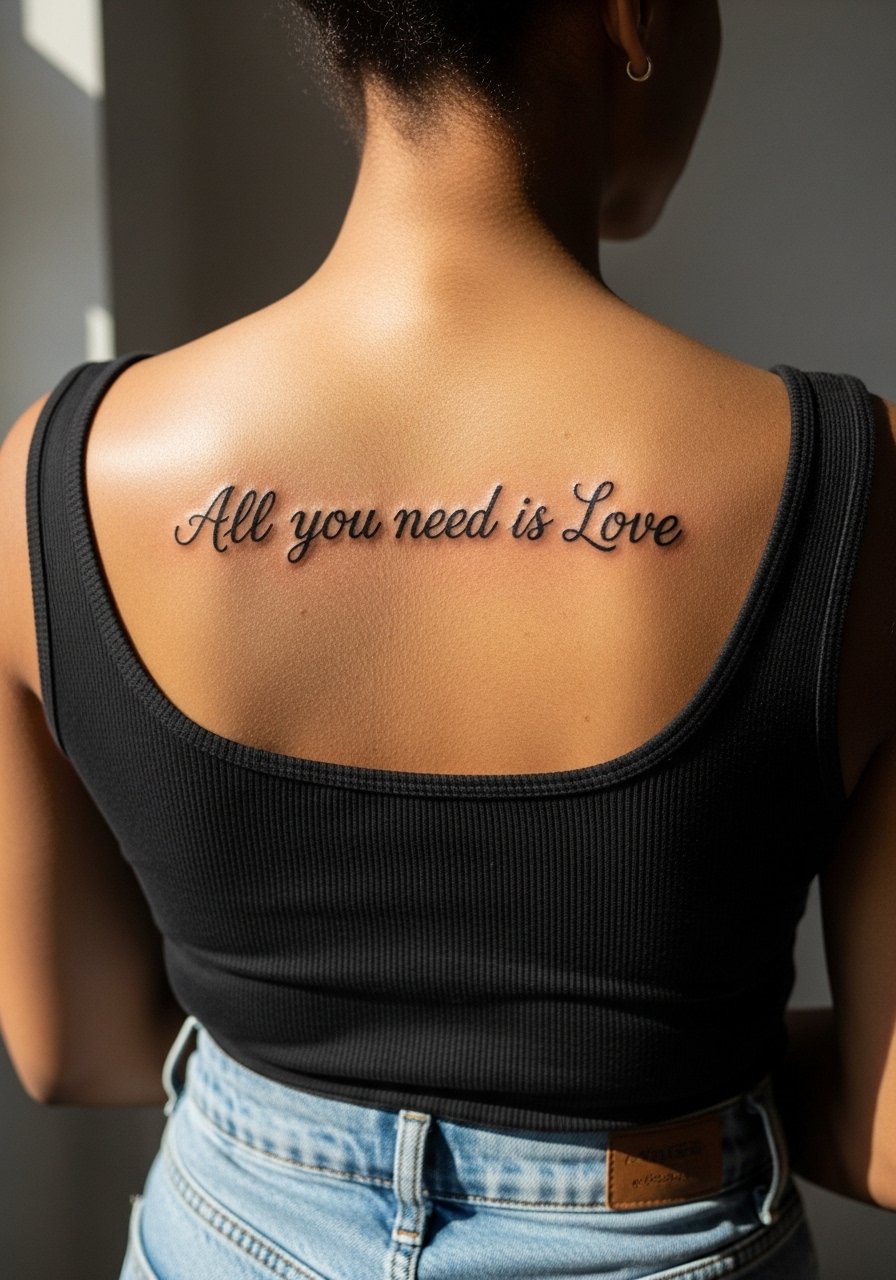
12. Stacked Script and Mini Hearts on Collarbone Strip
Stacked script on the collarbone can look elegant, but thin parallel lines too close together tend to feather into a gray band over time. Ask for spacing and a single heavier anchor line so the stacked look keeps definition. Session discomfort is low and healing depends on clothing friction. For nights out try a delicate chain necklace that sits above the script without touching the ink.
13. Geometric Block Letters on Upper Arm
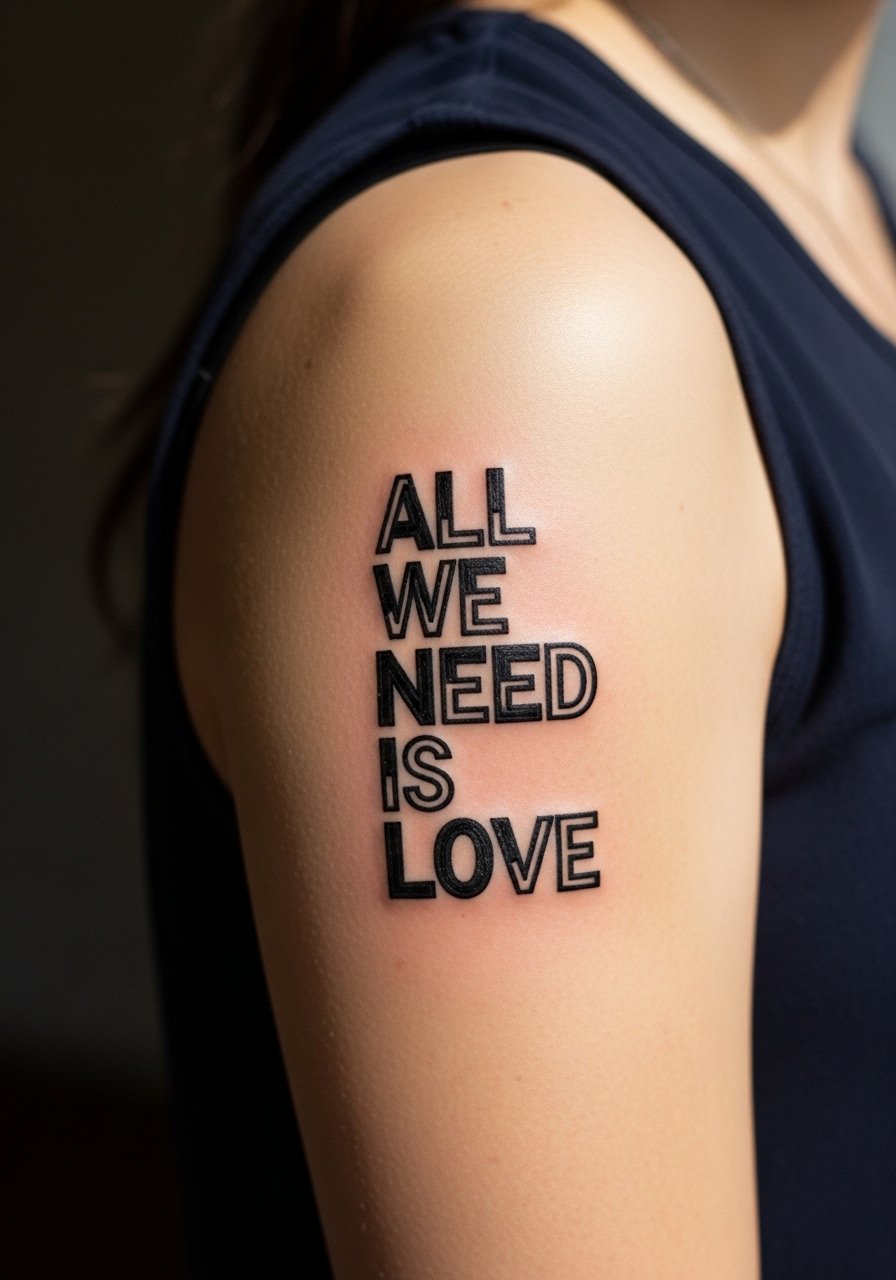
Geometric lettering gives a modern, structured feel and it scales well on the upper arm. The common mistake is compressing letters too tightly in a short band. Ask the artist to space letters so they remain legible after natural skin movement. Upper arm sessions are low pain and often done in one sitting. For casual showing, a rolled sleeve or tank top keeps the block clear against neutral fabric.
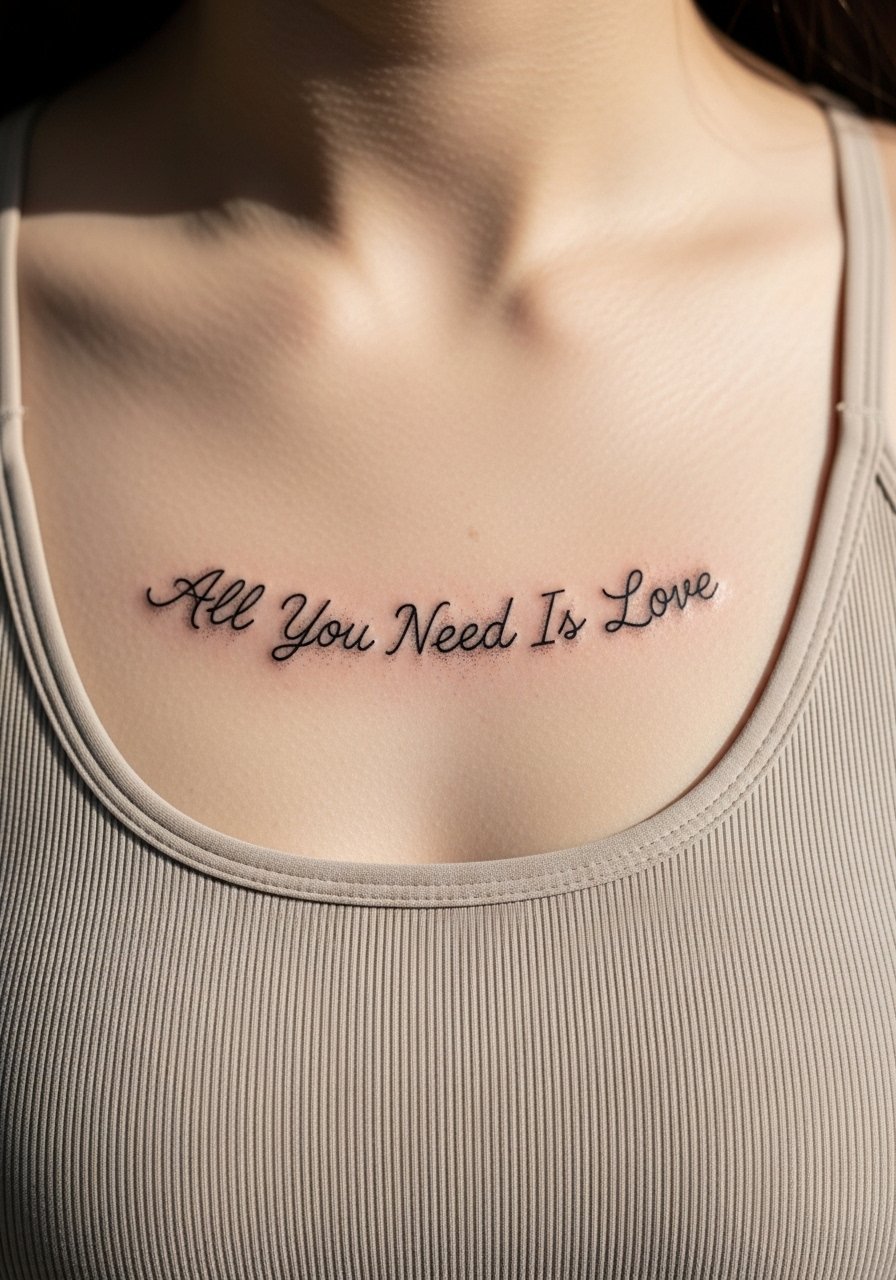
14. Watercolor Spectrum Flower Wreath on Chest
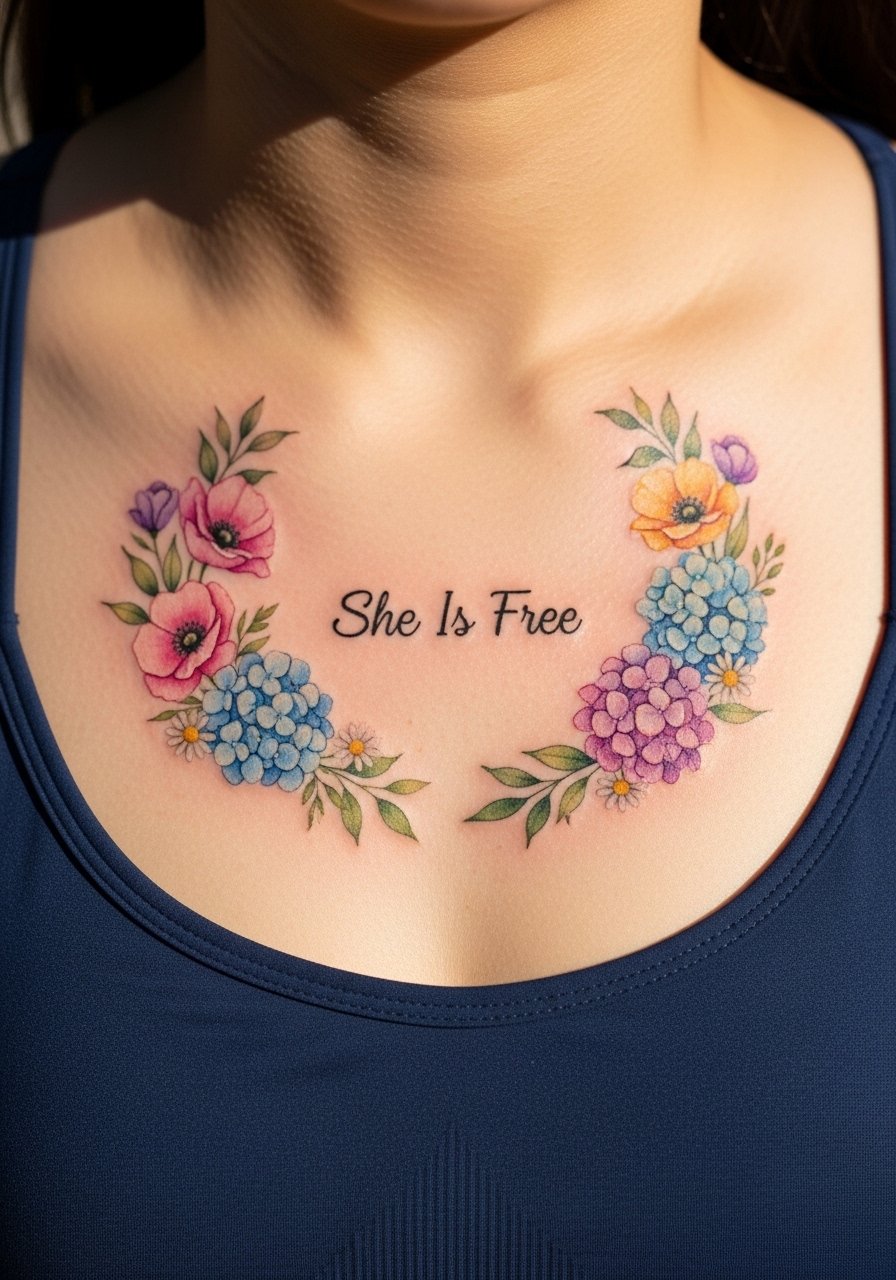
Chest watercolor pieces are beautiful but face more rubbing from clothing. I advise asking for slightly bolder edges where the wreath meets straps. The mistake is heavy bleeding of color into coatlines that become patchy. Sternum and upper chest sessions can be more painful and may require a couple shorter sittings. Opt for a fitted top the day of the appointment for easy access.
15. Minimal Lower Forearm Script with Tiny Doves
Lower forearm pieces sit where sleeves, watches, and bracelets often interact. If you want longevity, request a slightly reinforced baseline in the letters so daily friction does not erase thin tails. The mistake is expecting micro-weight for less cost. Sessions are fast and discomfort is low. Show it off with a minimalist leather watch on the opposite wrist to avoid crowding the inked side.
16. Blackletter Script on Upper Back
Blackletter makes a statement but requires scale to keep the gothic counters open. Small blackletter compresses and becomes illegible over time. Upper back pieces are low pain and photograph well when healed. The session usually takes one longer sitting for clean lines. Wear a loose button-down the day of to allow easy access without rubbing the area post-session.
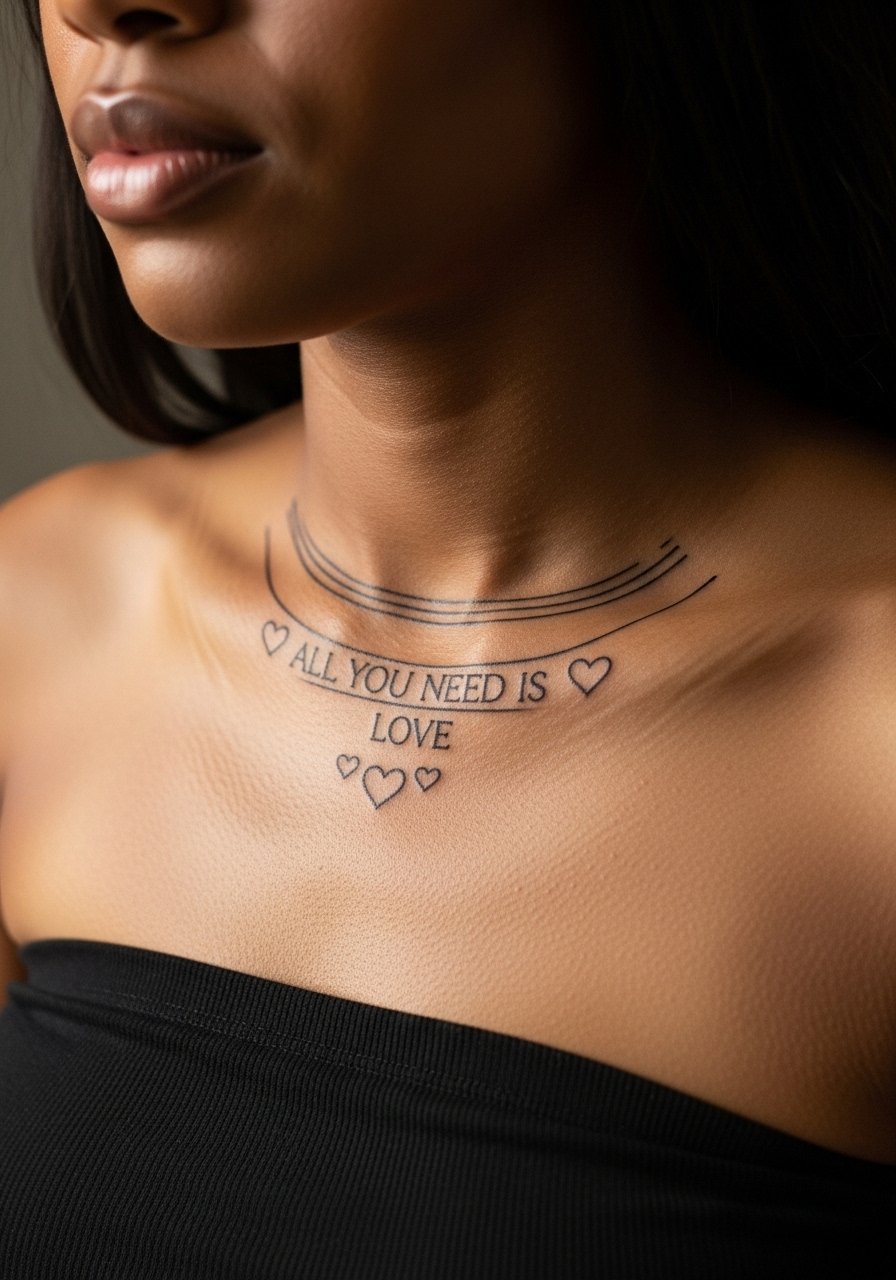
17. Single-Needle Script with Stippling Frame on Sternum
Sternum pieces lie in a high-motion area and people often underestimate healing friction. Artists debate whether single-needle there keeps for years, and opinions vary. When you book, ask how they handle depth on sternum skin and request slightly more spacing in stipple areas. Expect higher pain and possibly two sittings. The common mistake is asking for dense stipple too close to the midline where movement blurs it.
18. Tiny Script Wrapped as Ring on Finger Base
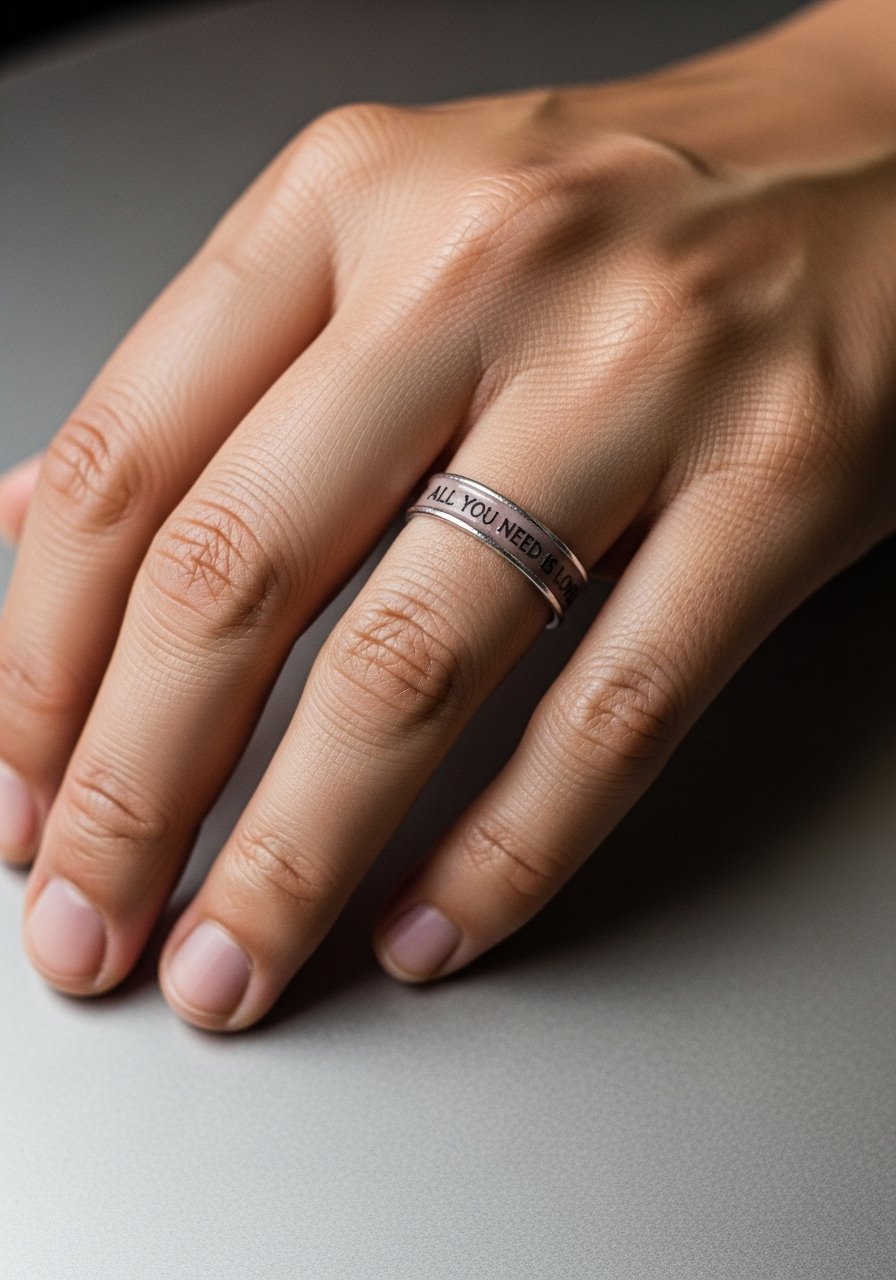
Ring-style finger tattoos are charming but notoriously short-lived. Skin oils and frequent contact mean quicker fading. I suggest a bolder script and accepting yearly touch-ups. The session is short and the pain sharp. Avoid placing letters on the top knuckle where abrasion is worst. If you want jewelry that complements the piece, a thin ankle-style chain on the same or opposite hand looks intentional.
19. Interlocking Hearts and Script on Upper Thigh
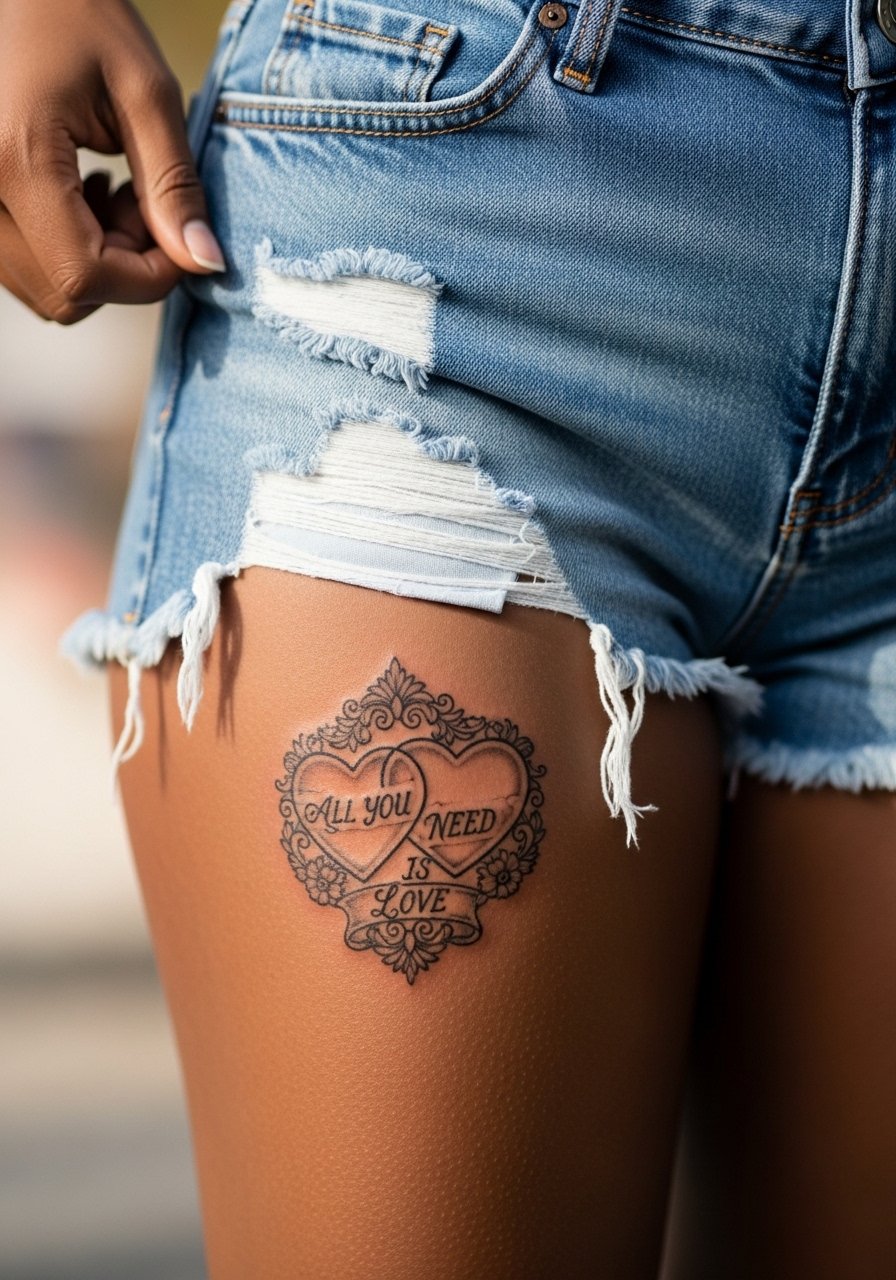
Upper thigh pieces wear well because they avoid sunlight and friction for many people. This spot keeps color and detail longer than ankle or fingers. The main mistake is excessive micro-detail in a small field. Sessions are moderate on pain and often relaxed. For the appointment wear loose shorts so the artist can slide a leg out easily and the area stays comfortable afterward.
20. Tiny Script on Collar of Shirtline Behind Neck
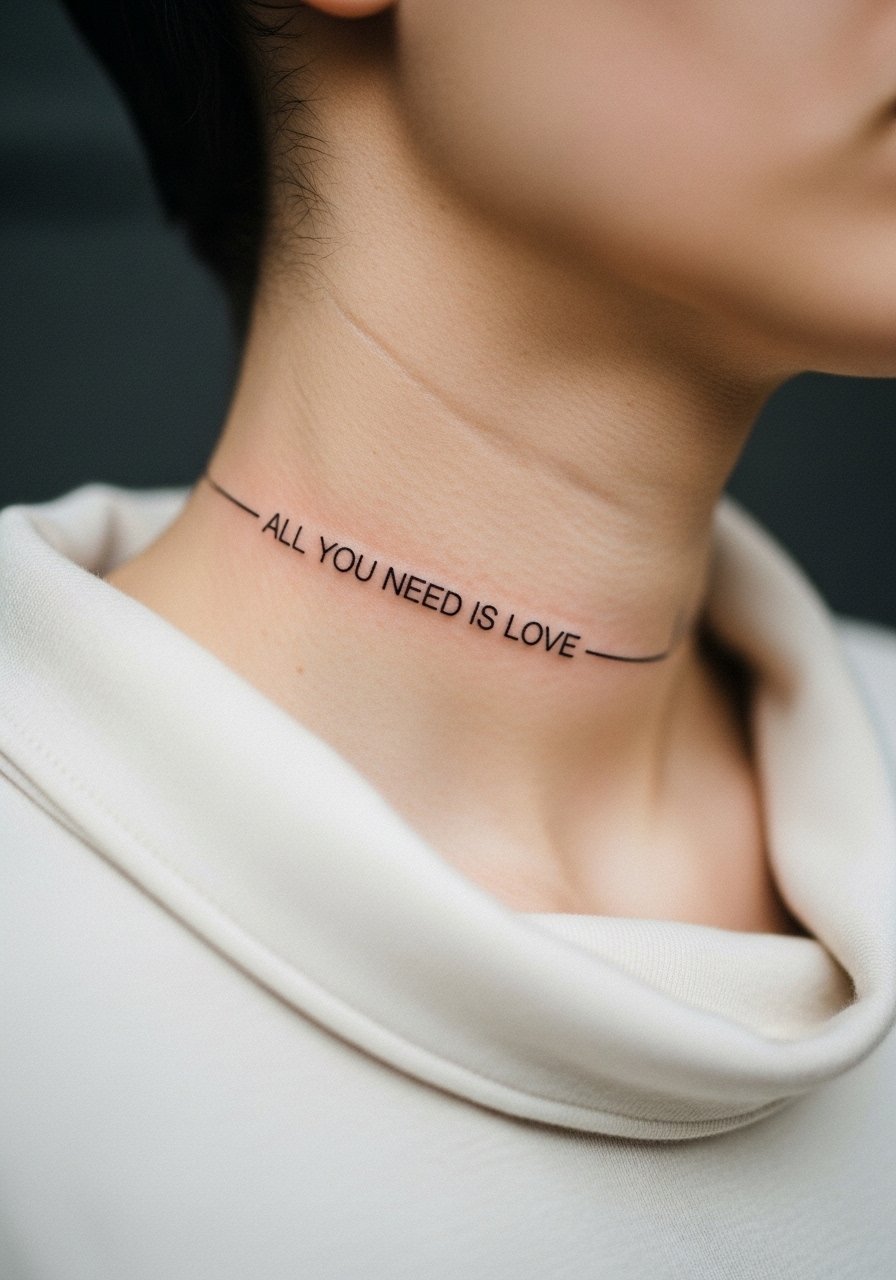
Neck placements require a career consideration because they sit where collars and hair styles may reveal them. If you want the piece subtle, ask for smaller script tucked toward the hairline. The error is overexposure in size and location. Expect moderate pain and careful aftercare. A wide-neck shirt the day of helps the artist access the area without tugging.
21. Mandala Burst with Script on Shoulder Cap
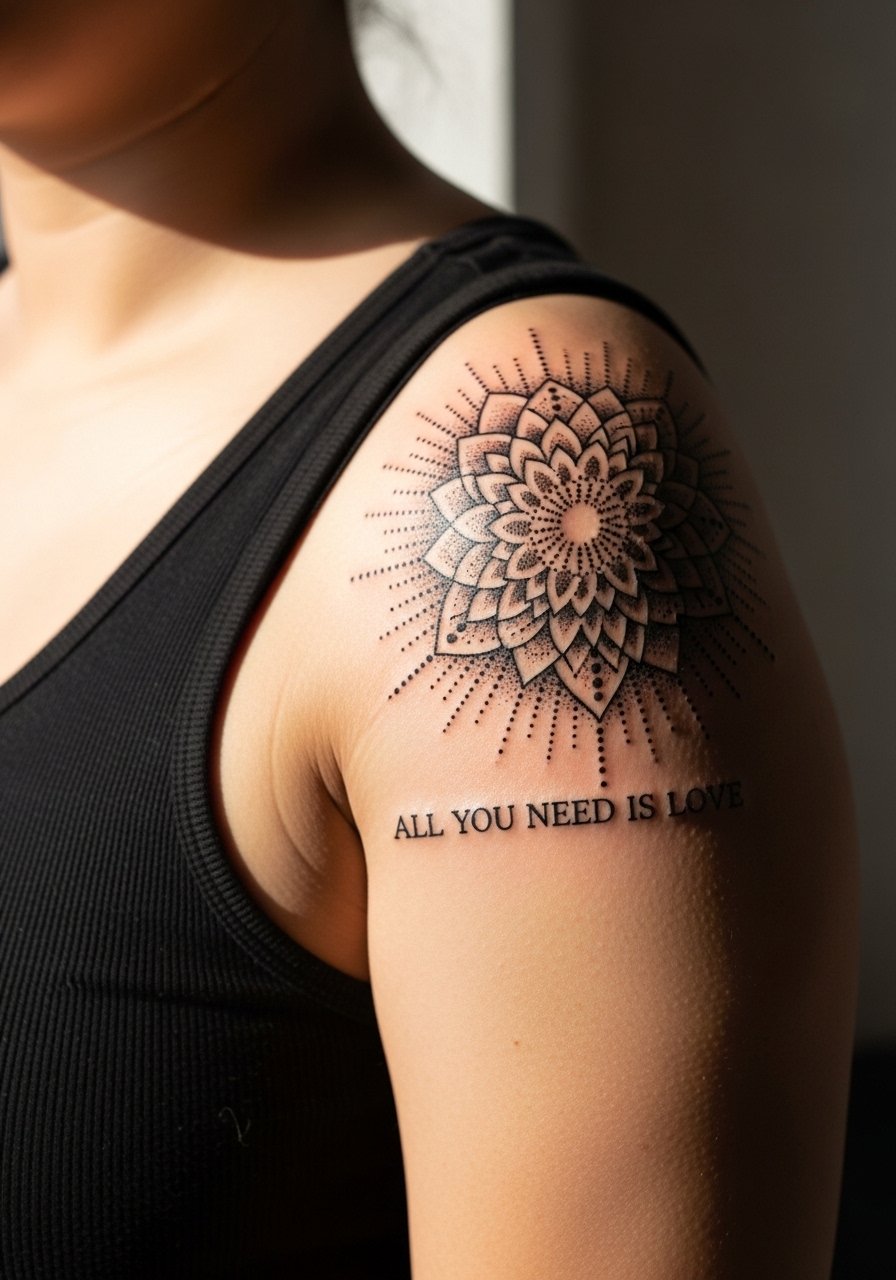
Shoulder cap work is forgiving of detail and stands up to sun better than the forearm. The pitfall is packing too many tiny dots into the center. Ask for graduated dot density so highlights remain crisp at year three. Sessions are low pain and often completed in one go. For showing it off keep sleeve cuts high or wear a sleeveless muscle tank so the burst reads without fabric lines crossing it.
22. Minimal Single-Word Script on Sternum Edge
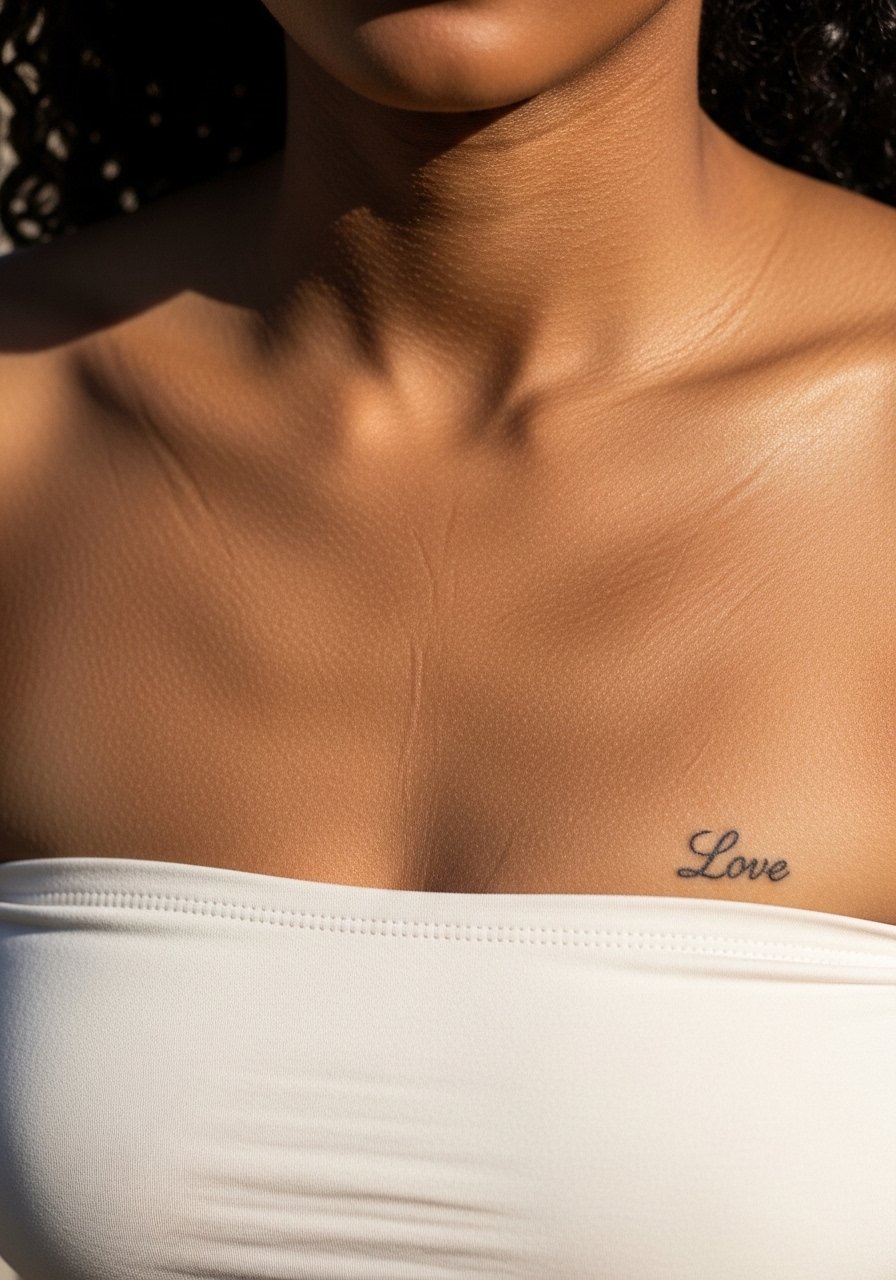
Single-word placements near the sternum offer intimacy and scalability. Because motion can blur thin script, ask for a slightly heavier baseline in the lettering. The mistake is expecting a micro-line that never needs touch-up. Sessions are higher on the pain scale and heal over a few weeks. For appointments choose a fitted top you can remove easily.
23. Script Overlaid on Floral Blackwork for Contrast on Calf
Overlaying fine script on blackwork requires negative space planning so the letters do not get absorbed by saturation. Request the artist carve out clean negative channels during stencil stage. Sessions may be longer because of fill work and then overlay detail. This choice resists fading because the blackwork creates a durable backdrop. Pair with shorts or rolled chinos to keep the contrast visible.
24. Chain of Small Hearts and Script on Ankle Wrap

Ankle wraps are delicate and need reinforcement to survive shoes and sock friction. Ask the artist to thicken anchor points and outline tiny hearts so they hold through seasonal wear. Mistakes include ultra-thin anchors that vanish. Sessions are short but healing requires mindful sock choices. For styling add a thin ankle chain or sandals that avoid rubbing the area.
25. Stippled Heart Halo on Upper Arm
Stipple halos let the phrase breathe without heavy outlines. The error is crowding stipple too close to letters. Ask for a one to two centimeter cushion between text and dot shading. Upper arm work is low pain and predictable in healing. For the session wear a loose button-down shirt that you can pull aside easily so the artist has full access without fabric friction.
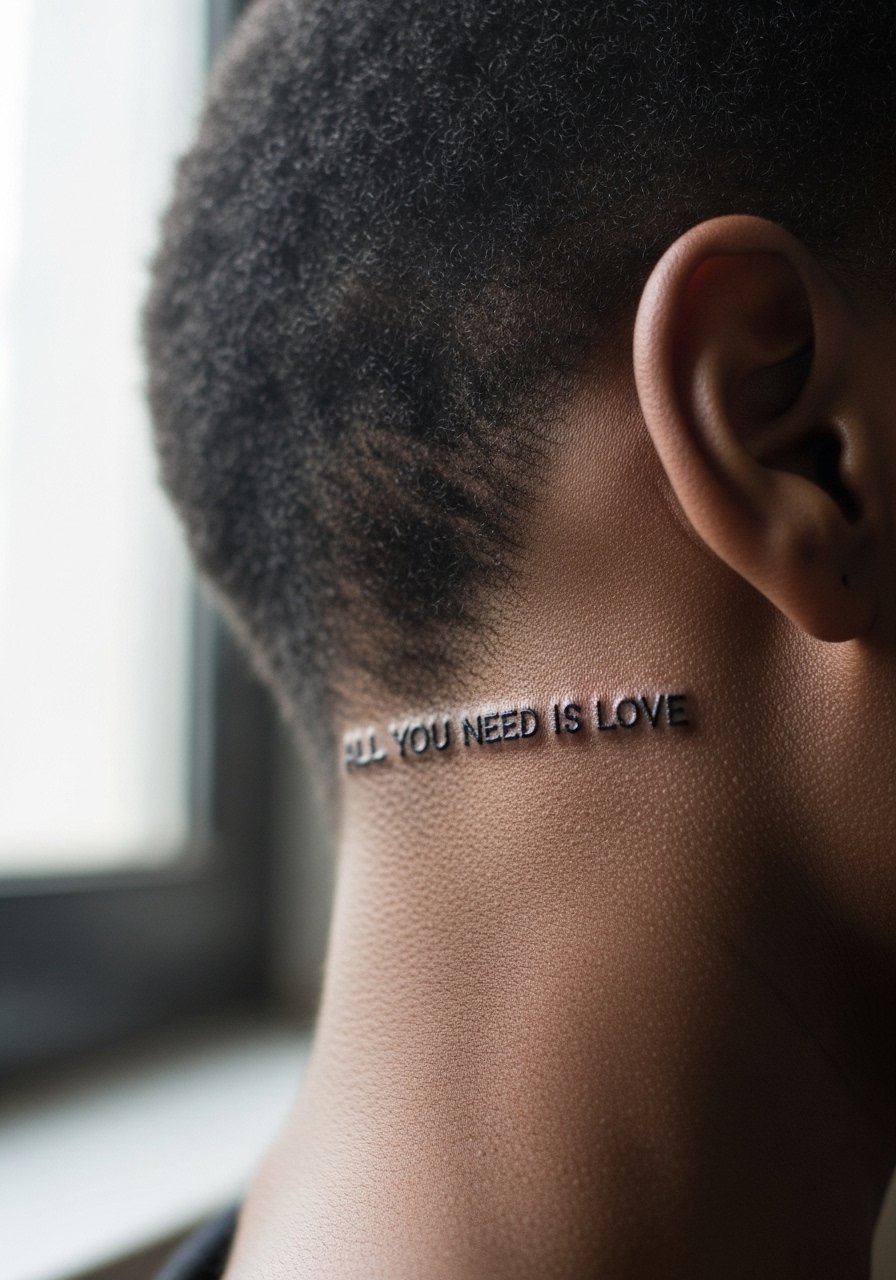
26. Small Script at the Base of the Neck
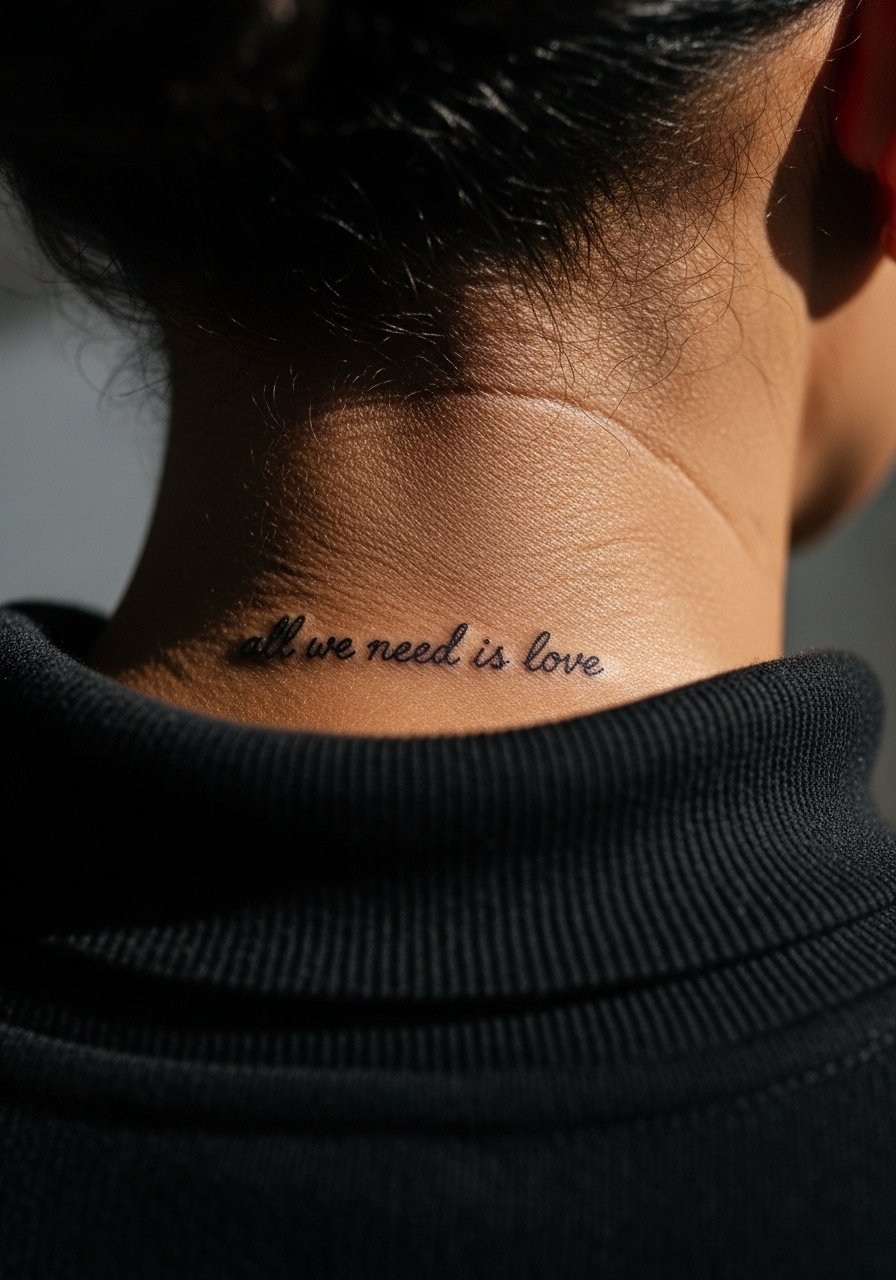
Nape placements can be hidden with hair or revealed with styles, which makes them versatile. The common mistake is asking for tiny script that contradicts hair coverage and results in constant rubbing during sleep. Ask for optimized spacing and consider longer letters for readability. Pain is moderate and touch-ups are possible depending on collar friction. For appointment wear a wide-neck shirt you can adjust without removing your hair style.
27. Minimalist Lower Back Script with Small Florals
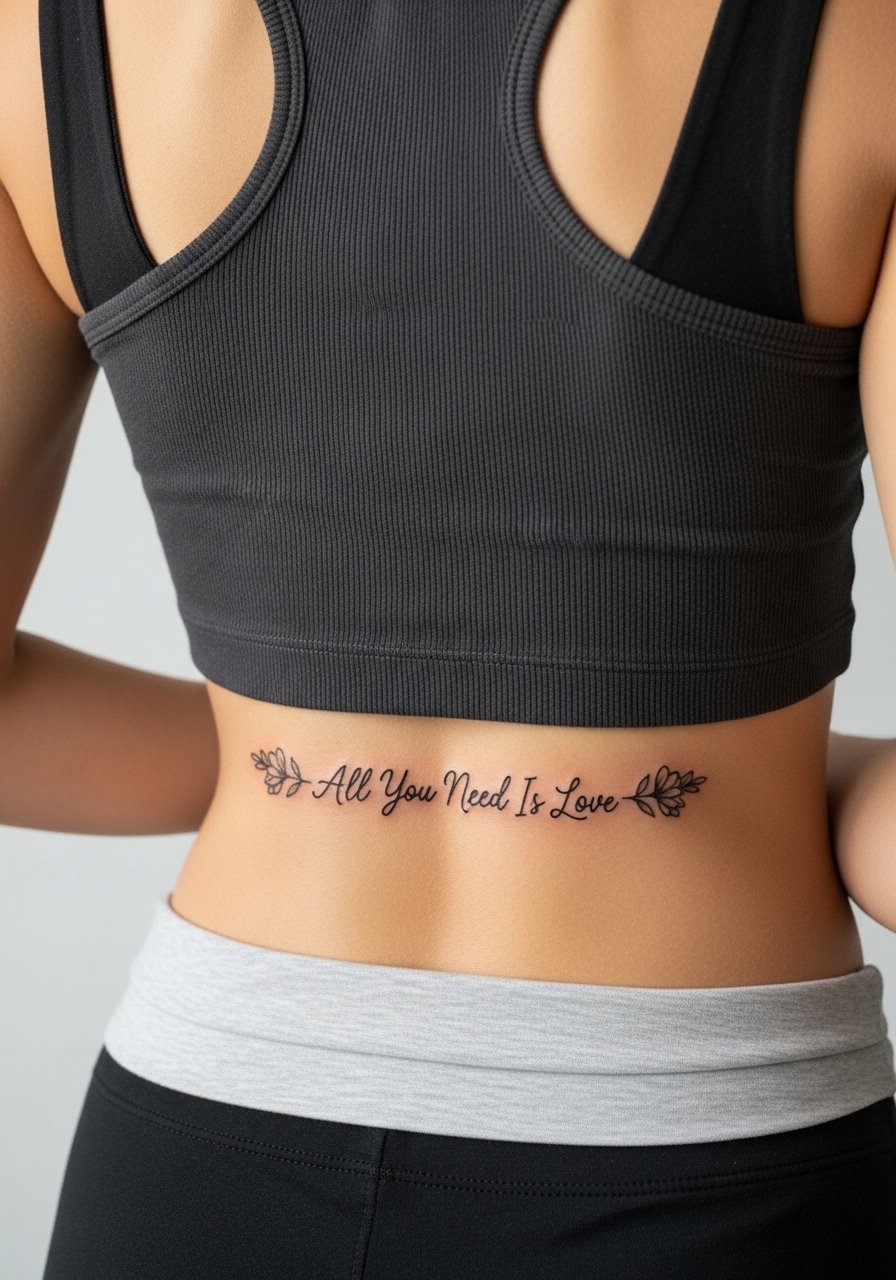
Lower back placements avoid daily abrasion for many people and keep detail for longer. The mistake is overloading that small field with too many tiny elements. Keep the florals simplified and ask for slightly heavier stems to maintain shape over years. Sessions are low to moderate on pain. For the session choose high-waisted bottoms that you can shift slightly so the artist has clear access without exposing more skin than necessary.
Frequently Asked Questions
Q: Will fine line scripts like the wrist and ribcage pieces fade faster than bold banners?
A: Fine line scripts tend to show softness earlier than bold work because the ink sits in tighter channels. Placement matters a lot. Wrists and fingers face more washing and abrasion so expect touch-ups sooner. Ask your artist for slightly heavier weight if you want a longer visual lifespan.
Q: How should I choose between watercolor and blackwork for collarbone or chest pieces?
A: Watercolor reads softer and can be very flattering on the collarbone, but it needs guardrails like darker anchors where straps rub. Blackwork holds up better in sun and friction. Decide whether you want color that may need refreshes or saturation that resists fading, and discuss trade-offs in your consultation.
Q: Are daisies a better choice than hearts if I want the phrase for friendship not romance?
A: Daisies carry a stronger platonic association for many people. If your intent is friendship, ask your artist to use daisy spacing and open centers rather than dense hearts. Small daisies around an ankle or ankle chain look intentional and age more predictably than tiny filled hearts.
Q: Do I need different session clothing for sternum, ribcage, and shoulder blade appointments?
A: Yes. Wear a fitted sports bra or bandeau for sternum work so the artist can access the area without removing layers. For ribs a cropped top that you can lift slightly works. For the shoulder blade a tank or button-down you can pull aside is easiest. Comfortable, easy-access clothing reduces friction after the session.
Q: How do I find reference work that matches a shop's portfolio without naming artists?
A: Use discovery paths like the hashtag #AllYouNeedIsLoveTattoo and filter by style on apps like Tattoodo. Search city-specific queries such as "your city fine line love tattoo" to find shops with the styles you want. Bring 2 to 3 clear references to your consult and ask the artist what adjustments they recommend for your skin and placement.
