
The stencil peeled back a little off the outer forearm and everyone in the room held their breath for one beat. The artist smoothed the skin, redrew the anchor point, and the lines settled exactly where they should. That small reset is everything when you want a bold forearm piece that still reads clean at year five. Below are 27 outer forearm concepts that favor spacing, saturation, and smart placement so your next arm ink looks deliberate from the start.
1. Bold Botanical Band on Outer Forearm
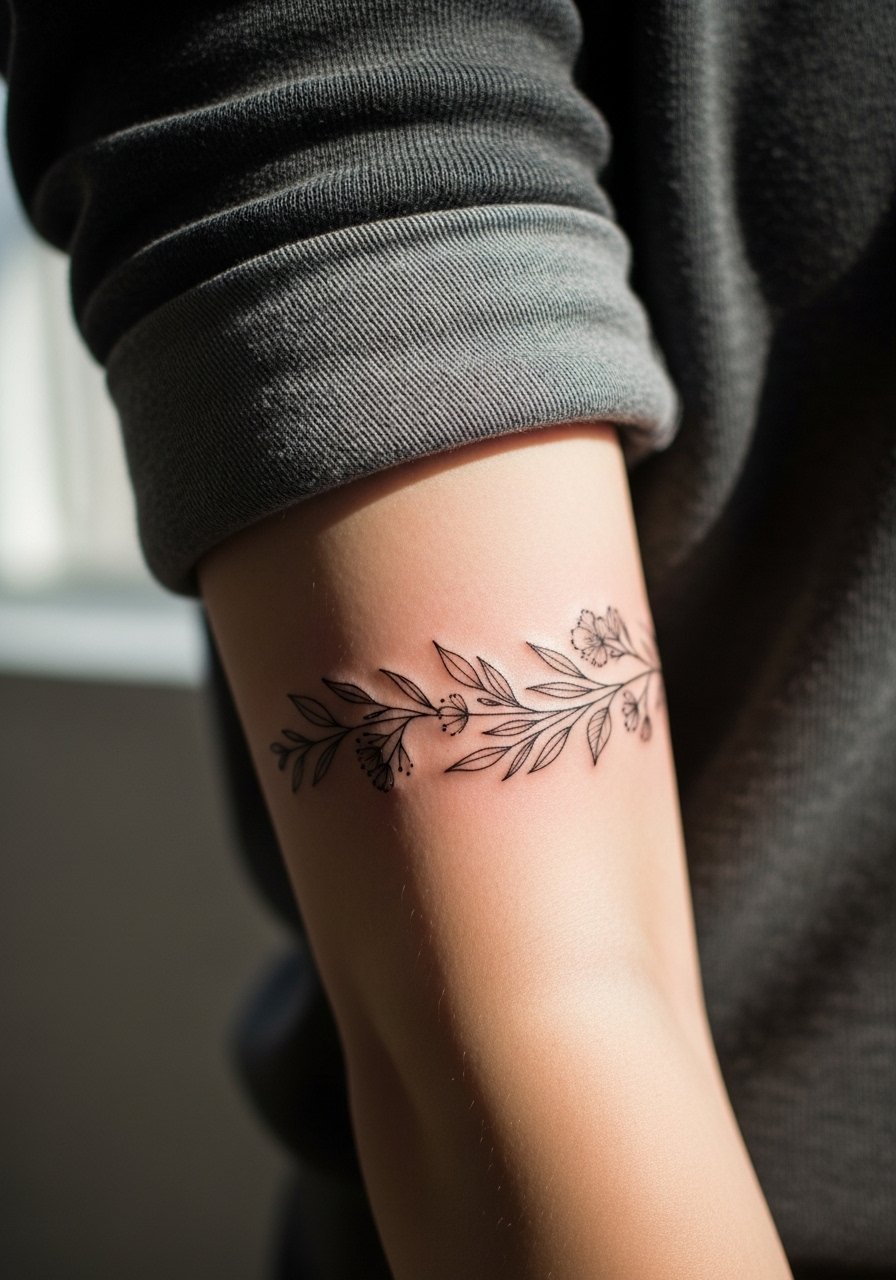
I recommend a wrapped botanical band when you want something bold without heavy color. I've seen this hold up best when artists use slightly thicker linework for the outer edge and lighter stipple shading inside. Tell your artist you want clear spacing between leaves so the veins do not merge over time. Common mistake is asking for ultra-fine leaf veins that blur into the background after two years. Pain is mild for the outer forearm and most sessions are one to two hours. For showing it off, rolled sleeves work well, try a rolled sleeve linen shirt that keeps attention on the band.
2. Single-Needle Script Ribbon
I've seen single-needle script look elegant when the lettering is spaced for movement. Ask for slightly increased letter spacing and avoid ultra-thin strokes across long words. The common failure is requesting a long phrase at tiny scale; the letters fuse after a few years. Expect a light sting along the forearm and a session under an hour. Touch-ups are often needed around year two to three for this type of script. Pair with a thin chain pendant necklace when you want the arm to read as a styling detail on nights out.
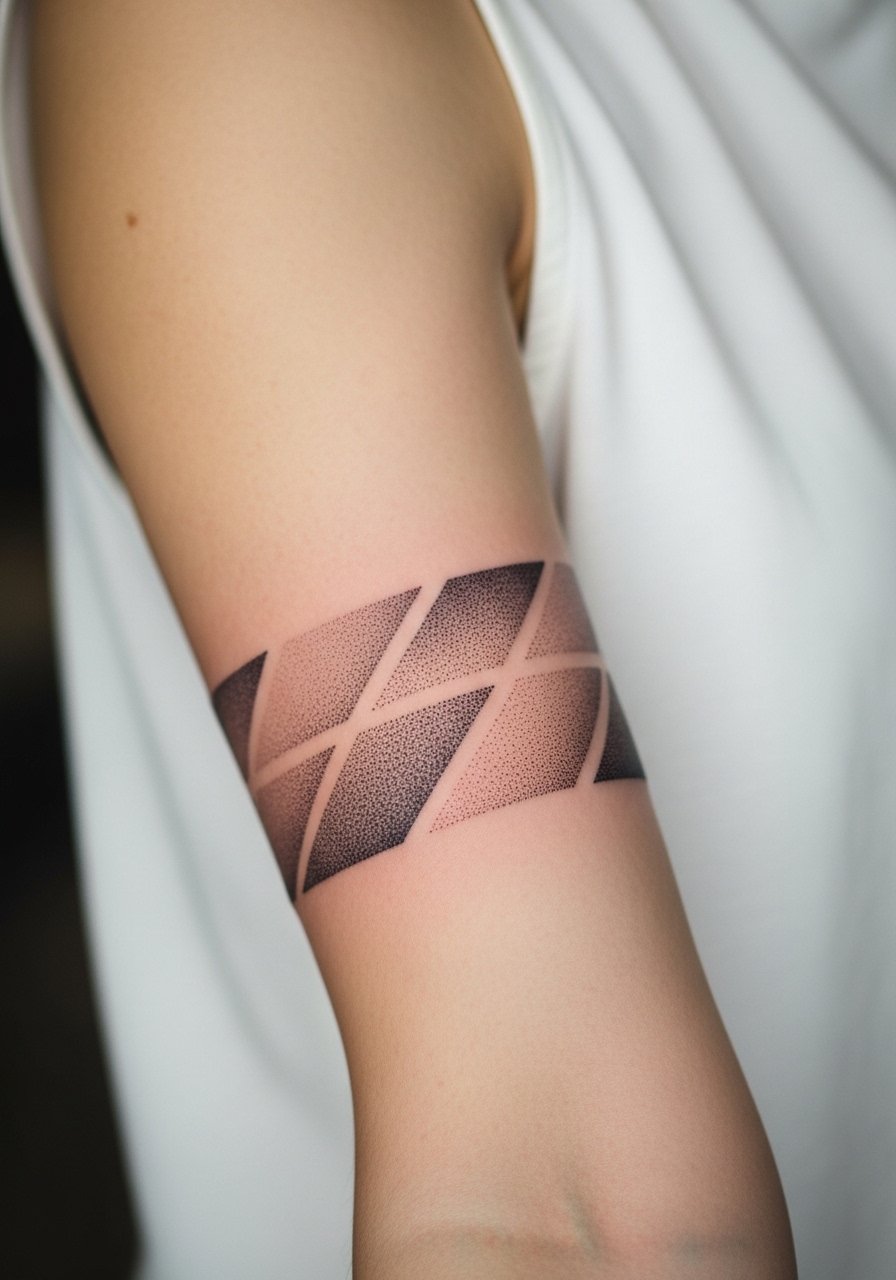
3. Geometric Band with Negative Space
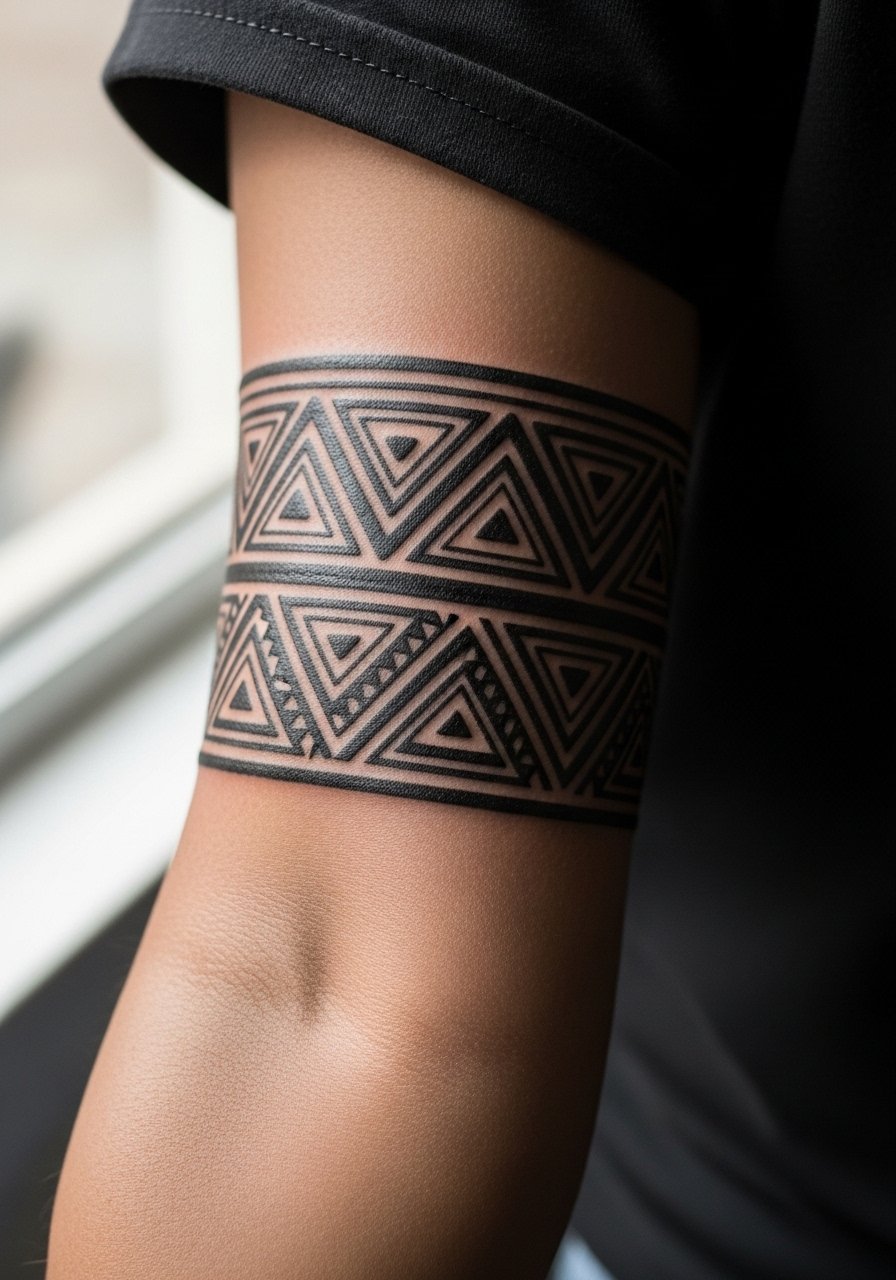
There is visual impact when negative space is used to let shapes breathe across the outer forearm. I tell clients to ask for at least 4 millimeters between dense lines so the triangles do not blur. A common mistake is compressing the geometry to fit a small area; that creates a muddy look after healing. This style is forgiving on the outer forearm because the skin is flat and holds saturation well. Sessions usually take one to one and a half hours. Wear a short-sleeve button-down to show the band without covering it.
4. Neo-Traditional Rose with Bold Outlines
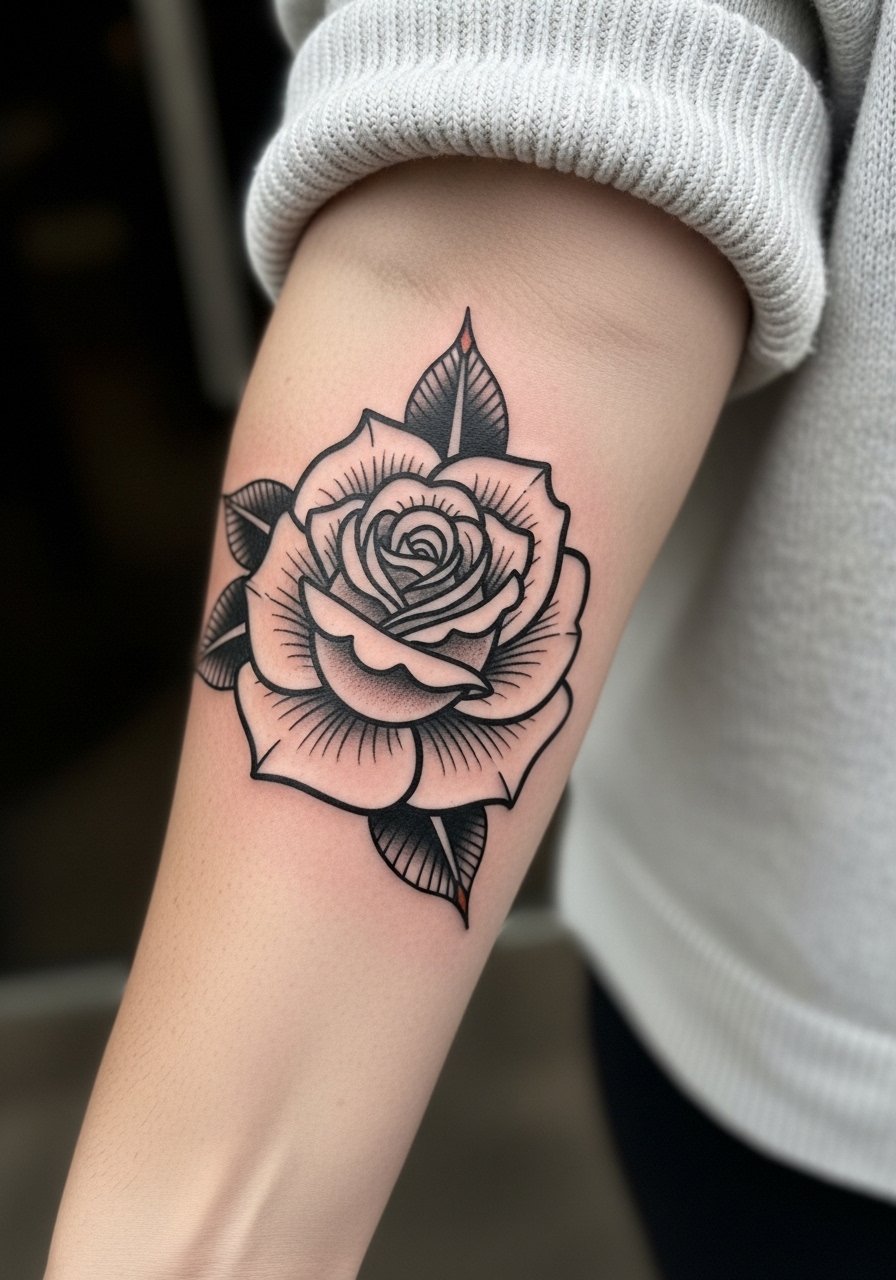
The neo-traditional rose reads well on the outer forearm because bold outlines age into a clear silhouette. When consulting, request stronger saturation in the petals and midline shading that respects the bloom shape. The biggest mistake is asking for washed-out color to mimic a watercolor look; that loses form as it fades. Expect moderate discomfort near bony sections, session time two to three hours for color fills. For evenings, pair this with a v-neck linen top that keeps the arm visible without distraction.
5. Micro-Realism Animal Portrait
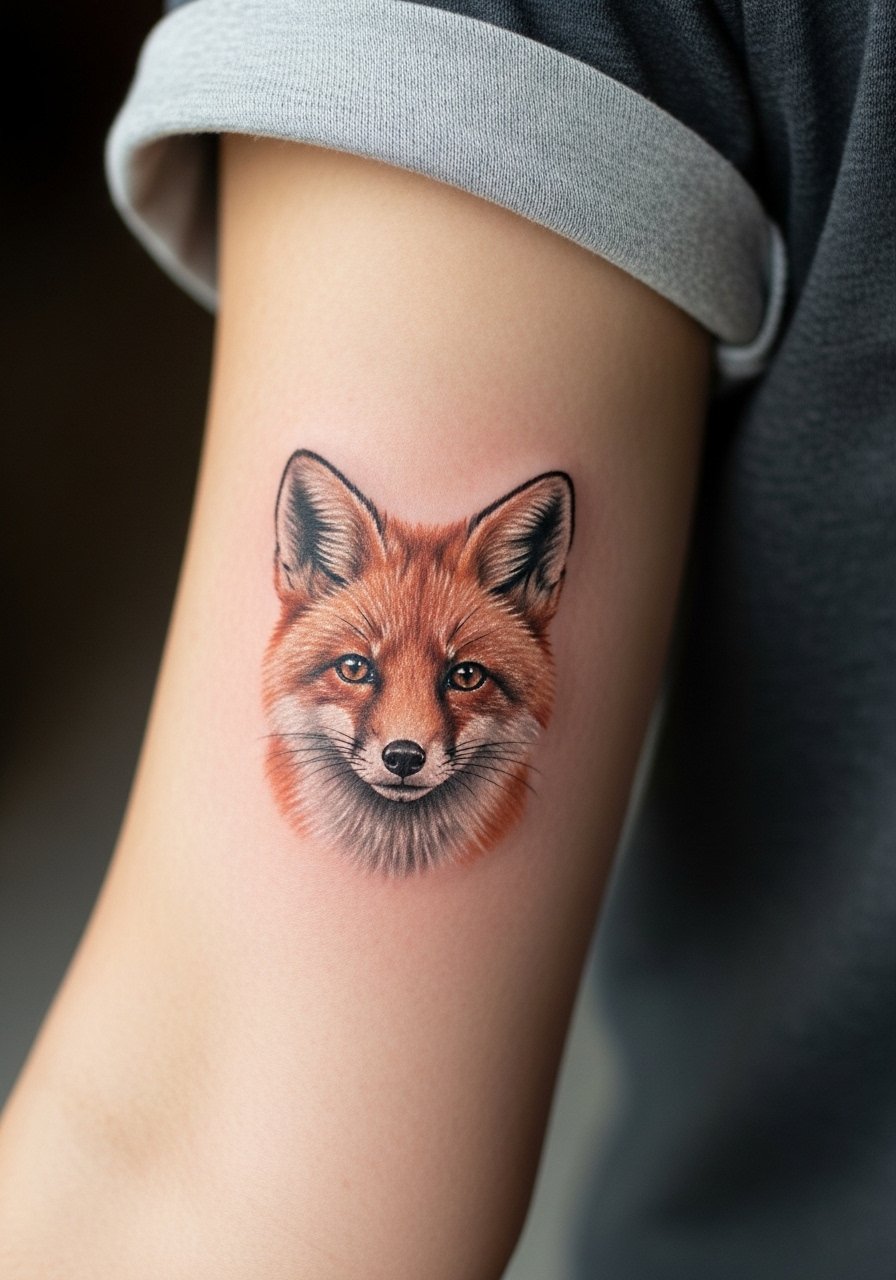
Micro-realism needs the right scale to survive on forearm skin. I tell clients to pick portraits under 3 inches only if the artist shows healed photos at the same size. A common error is scaling a detailed face too small, which blurs into a gray patch. Expect a longer session with more needle passes and moderate soreness after. Touch-ups are more likely than for bold work, often at year one to maintain crispness. For casual days, tuck a rolled cuff tee so the portrait sits in clear view without fabric rubbing the area.
6. Solid Blackwork Band with Negative Cutouts
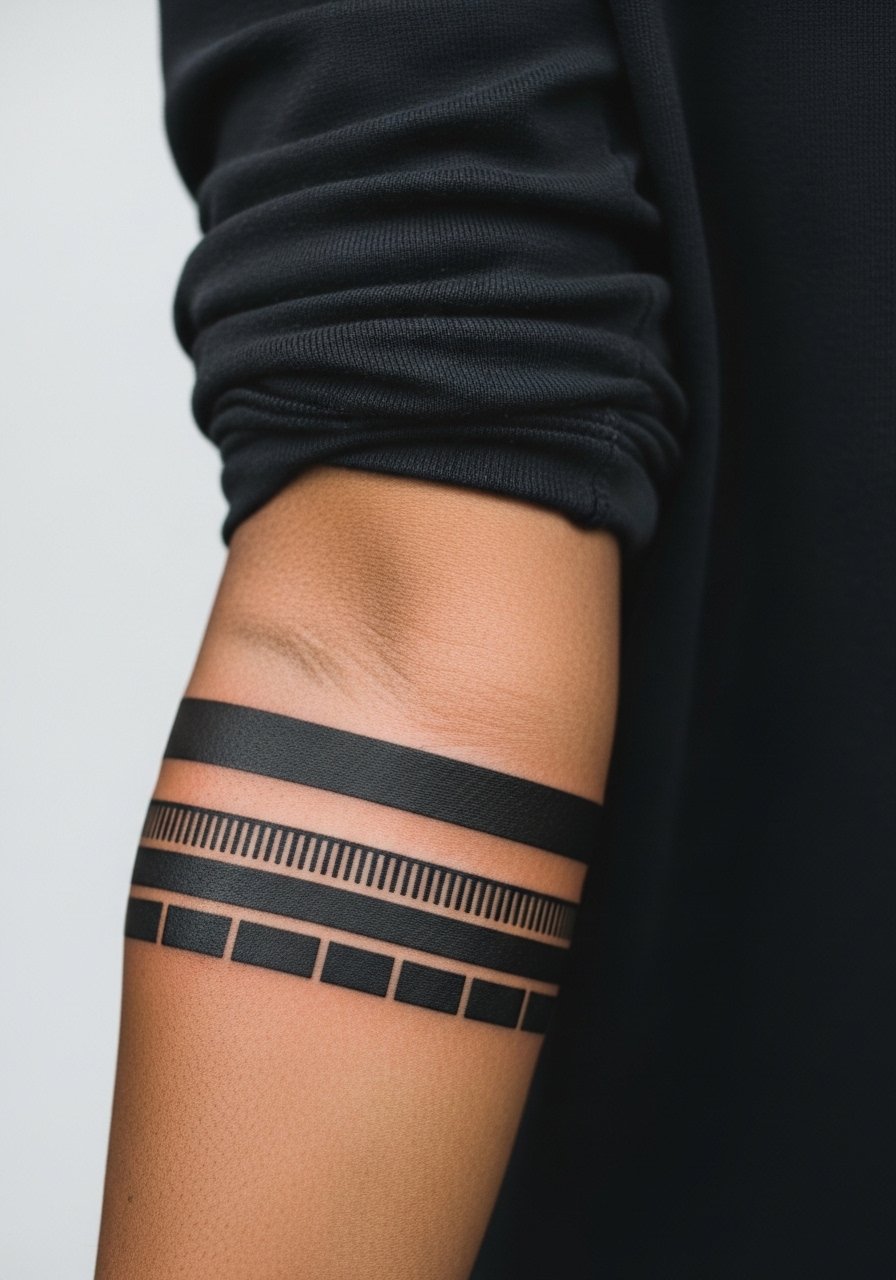
Bold solid black bands read from a distance and age predictably when sized correctly. In consultation, ask the artist to map the band to muscle flow so the cutouts sit on flatter skin. A common mistake is picking too thin a band which looks inconsistent after a year. Expect a medium pain level from repeated passes over the same area and plan for a one-hour session per inch of coverage. Pair with a minimalist watch to frame the band without overcrowding the wrist area.
Pre-Session Essentials
Those outer forearm pieces above can be sensitive to motion and daily friction, so a few targeted items smooth the appointment and the first week.
-
Stencil transfer paper kit. Lets you preview placement and line weight on skin before the needle hits, which matters for the wrapped botanical and band styles above.
-
Topical numbing cream. Applied 45 minutes before can reduce discomfort on areas that need heavy saturation like the blackwork band.
-
Thin protective film roll. Keeps forearm tattoos clean during the first week of washing and avoids rubbing from sleeves.
-
Fragrance-free gentle body wash. Cleans the healing area without irritating delicate linework on micro-realism and script pieces.
-
Aquaphor healing ointment. Thin layers in the first couple of days help maintain moisture for fine areas without suffocating the skin.
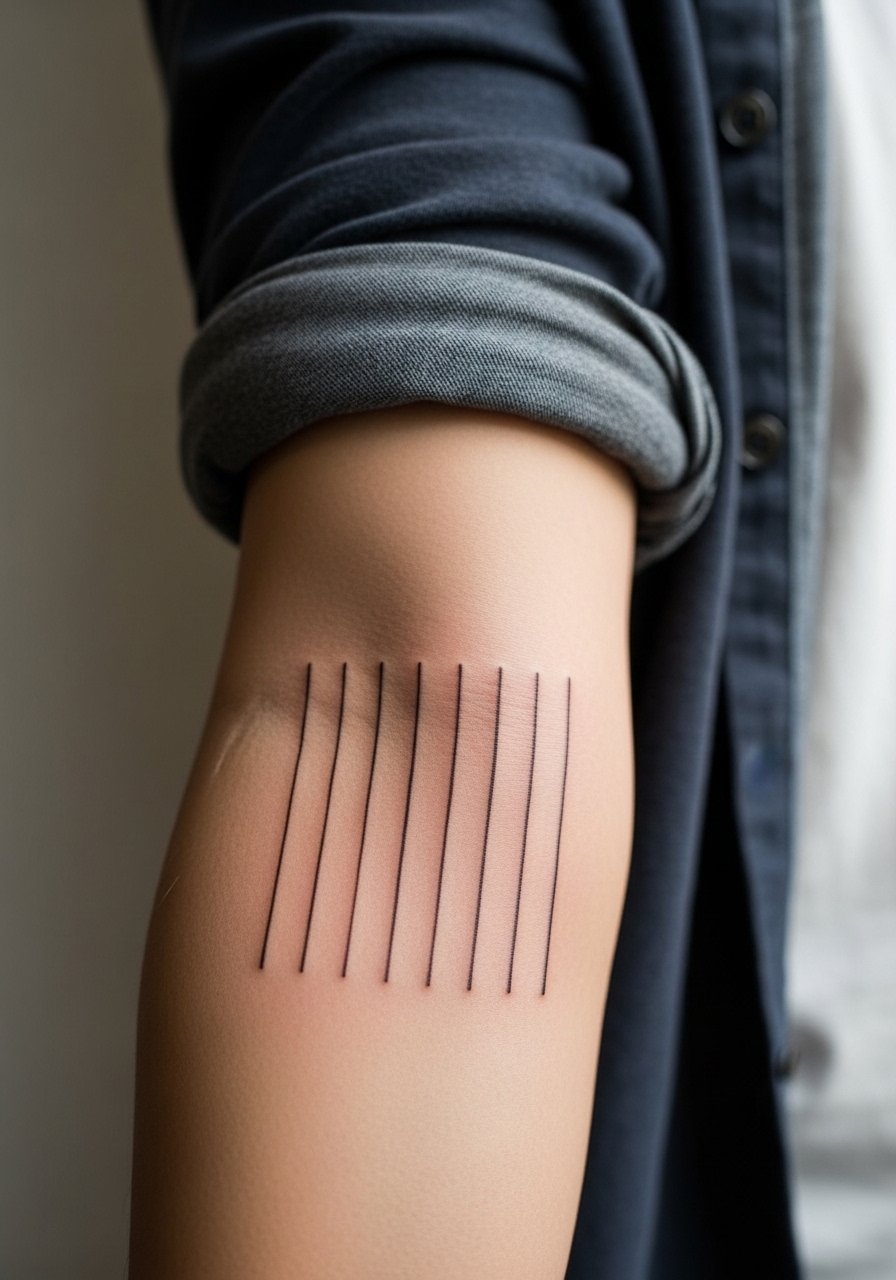
7. Minimalist Arrow with Motion Lines
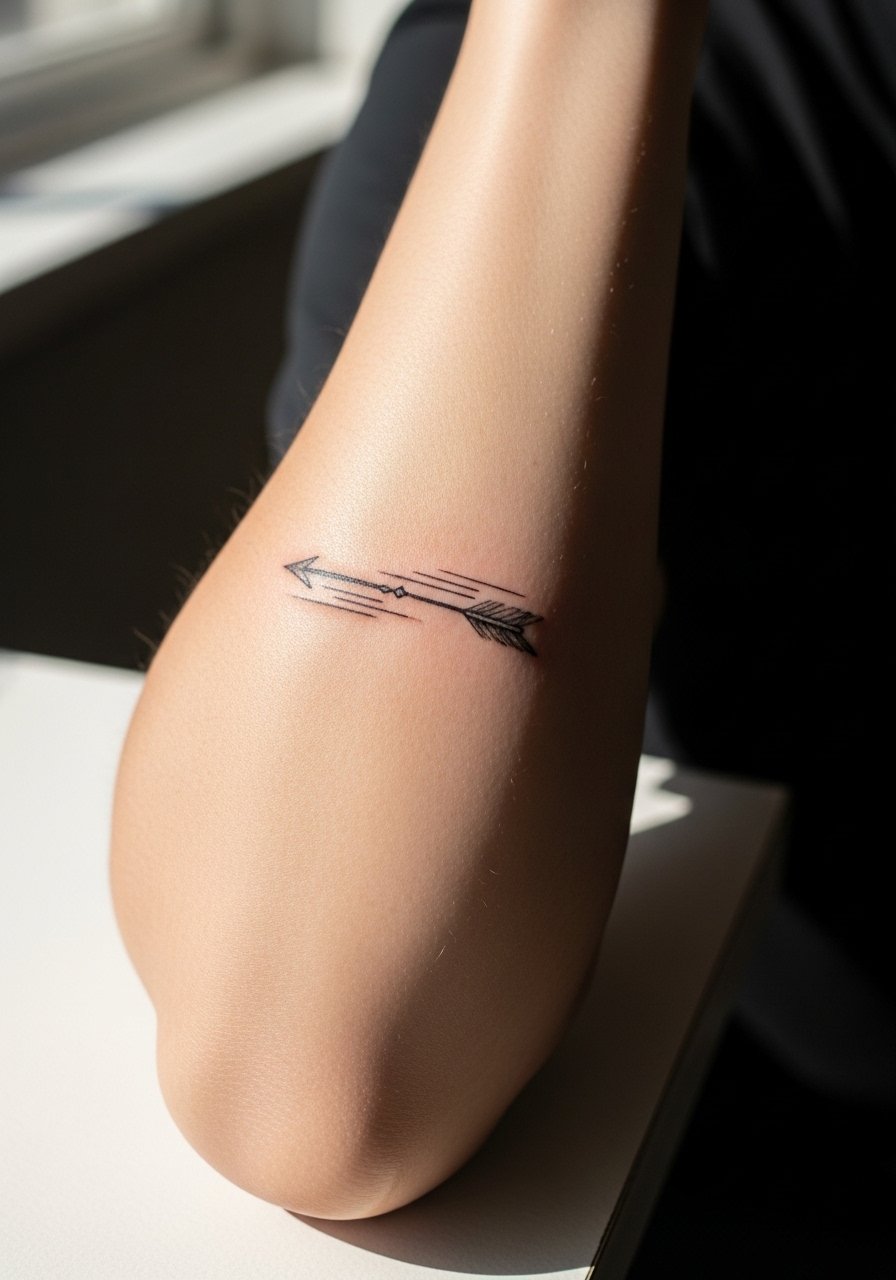
Personal observation tells me arrows work when the line weight is a touch bolder than ultra-fine. Ask for motion lines that are spaced and not packed into one area. Most mistakes come from squeezing a long shaft into a short space which forces lines too close together. This placement feels like a mild vibration rather than sharp pain and sessions run under an hour. The arrow ages cleanly if the shaft has breathing room. For a casual look, roll sleeves up and wear a thin leather bracelet that complements the arrow without covering key strokes.
8. Abstract Brushstroke Blackwork
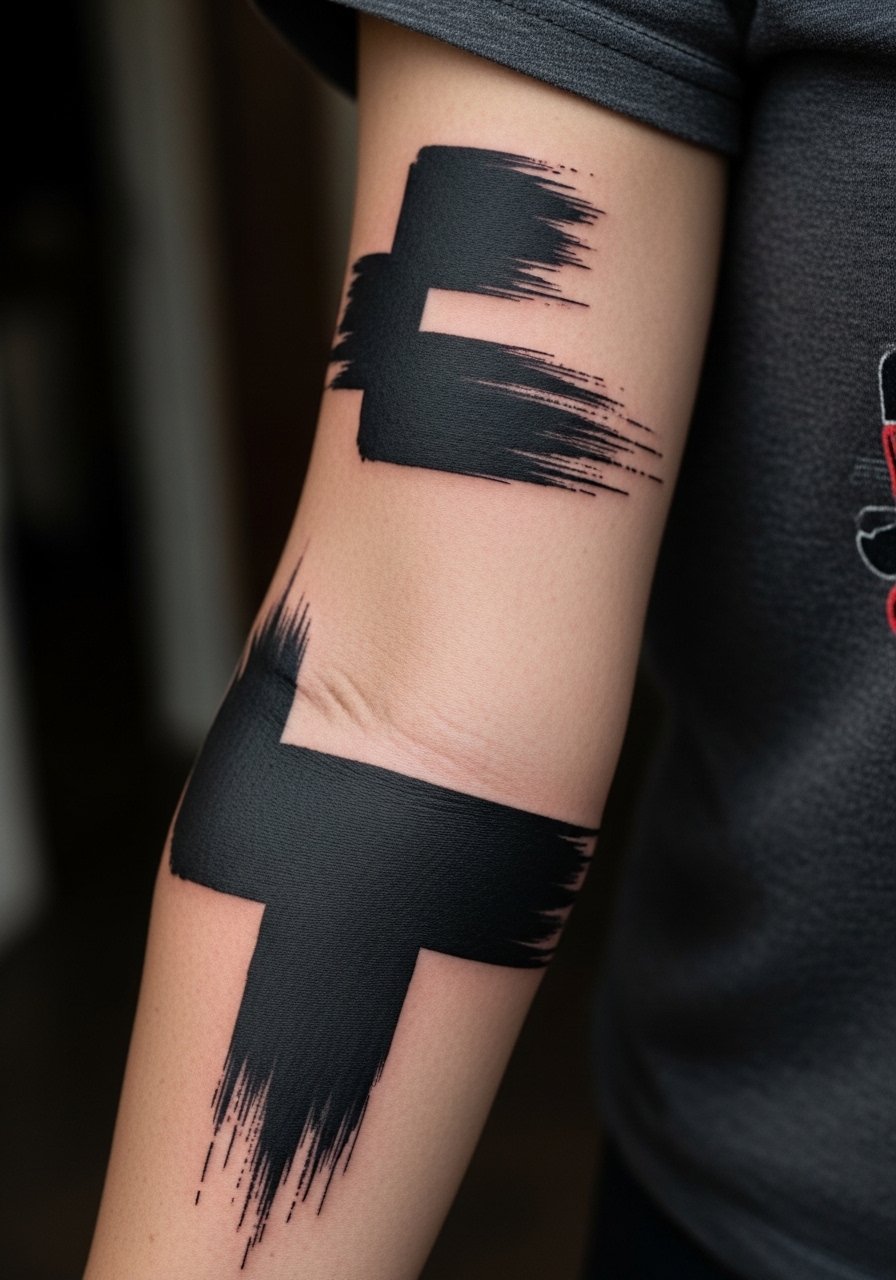
There is a visual impact to brushstroke tattoos because they mimic motion across the arm. In a consultation, describe the direction you want the stroke to follow with arm movement. The common error is asking for too many overlapping strokes which blends into a single dark patch. Expect moderate discomfort where the needle revisits saturated zones and a session time of one to two hours depending on coverage. This style holds well on the outer forearm where skin is stable. Pair with a rolled sleeve tee to show the strokes when you move.
9. Cartographic Compass and Line Map
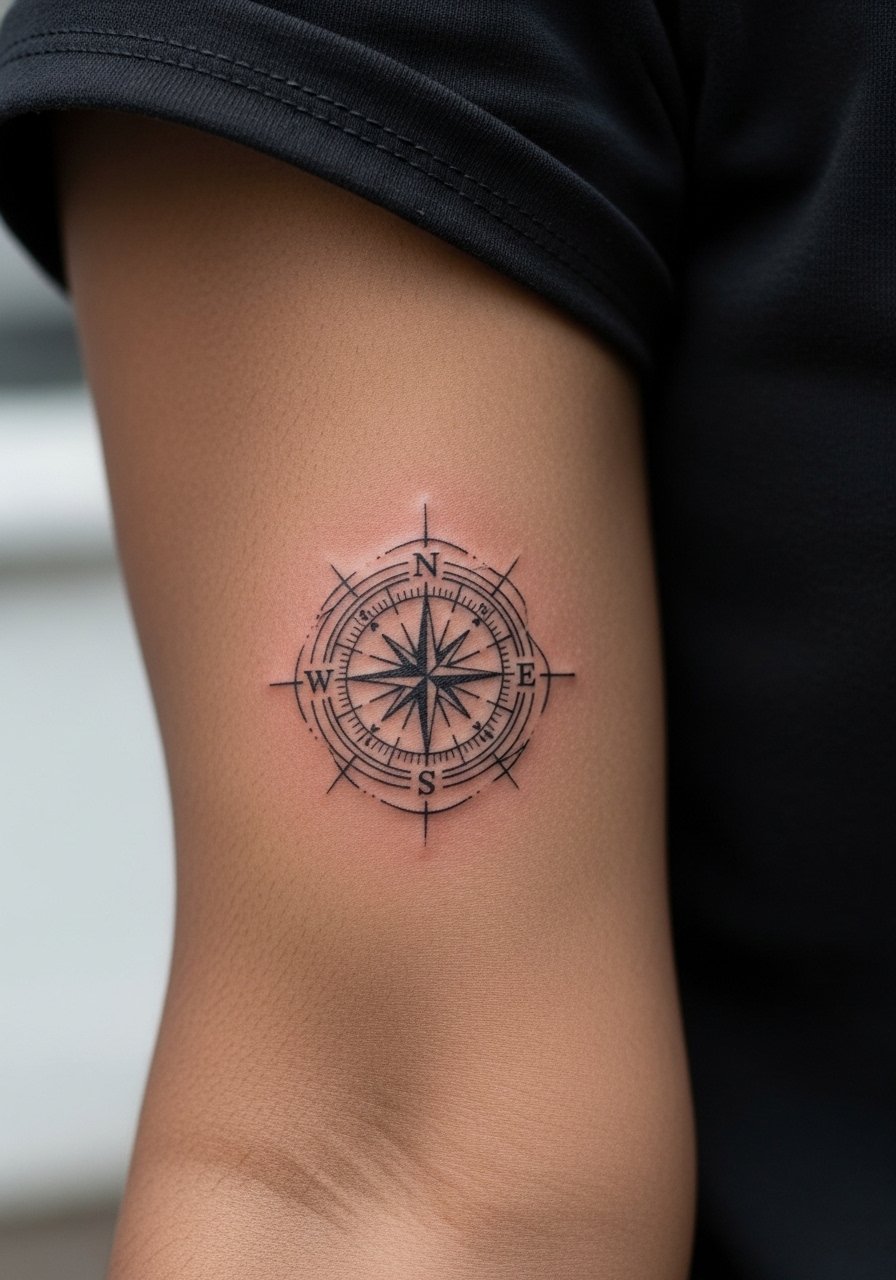
When people want travel-themed forearm ink, I recommend keeping map lines sparse to preserve clarity. Tell your artist you want the compass slightly larger than postcard scale so cardinal points remain readable. Too much tiny map detail is the usual mistake because it blurs into gray. Sessions can be one to two hours for crisp blackwork. For outfits, a button-up shirt with sleeves rolled frames the compass elegantly and keeps attention on the arm.
10. Stipple-Shaded Geometric Sleeve Strip
Stipple shading loves the forearm when you ask for gradients that breathe. In consultation, request larger dot clusters at the darkest points and wider gaps toward edges. A common problem is asking for micro-dots at tiny scales which can merge into blotches as the skin ages. Dot work sessions are slower and can run two to three hours depending on coverage. For a simple daytime look, roll a sleeveless linen shirt so the stipple shows without fabric rubbing.
11. Bold Linework Animal Silhouette

Visual impact is clear with a solid silhouette on the outer forearm because it reads at a distance and does not rely on tiny detail. Tell your artist you want a single field of saturation with crisp edges to avoid feathering. The usual mistake is asking for interior micro-detail that contradicts the silhouette approach. Pain is moderate for longer fills and session length depends on size, often one to two hours. For casual wear, pair with a simple cuff bracelet that allows the silhouette to remain the focal point.
12. Lace Filigree Panel
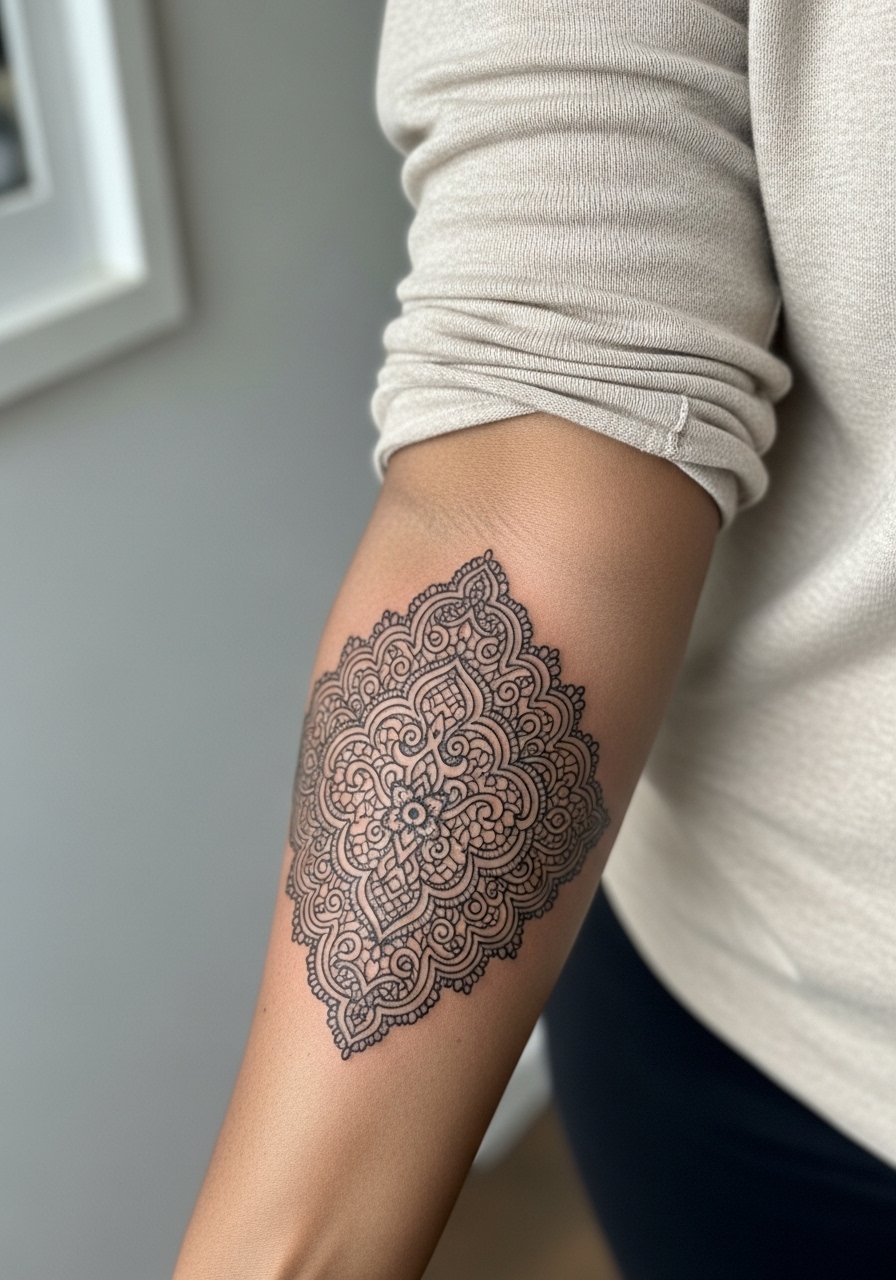
Fine filigree looks best when the artist spaces arches and avoids packing tiny loops. I advise asking for reference photos that show healed lace work at the same scale. A common error is asking for excessive tiny curls which lose definition over time. Expect a longer session because of delicate linework and a moderate pain level for precision work. Pair with an open cuff bracelet that echoes the lace without covering the panel.
13. Mandala Half-Arc Facing the Wrist
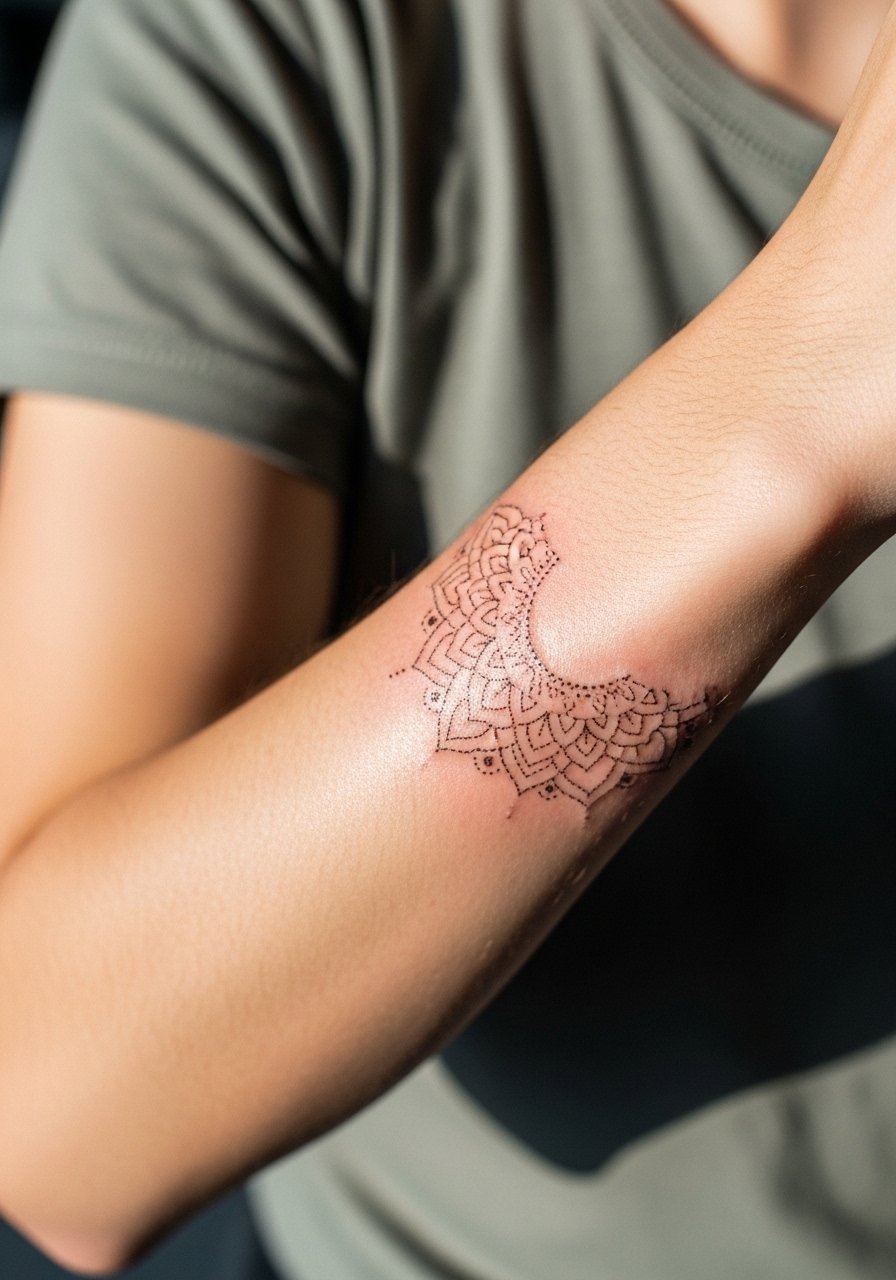
When mandala elements approach the wrist, spacing and negative gaps are essential. During consultation, tell your artist to scale the center motifs larger than the outer ones. Artists split into two camps on mandalas near joints. One camp says dense mandala detail holds if spaced widely. The other camp warns that wrist movement and skin stretch blur tight mandala segments within a couple of years. Ask your artist where they land before booking. Expect a one to two-hour session and touch-ups at year two are common.
14. Scripted Phrase with Underline Accent
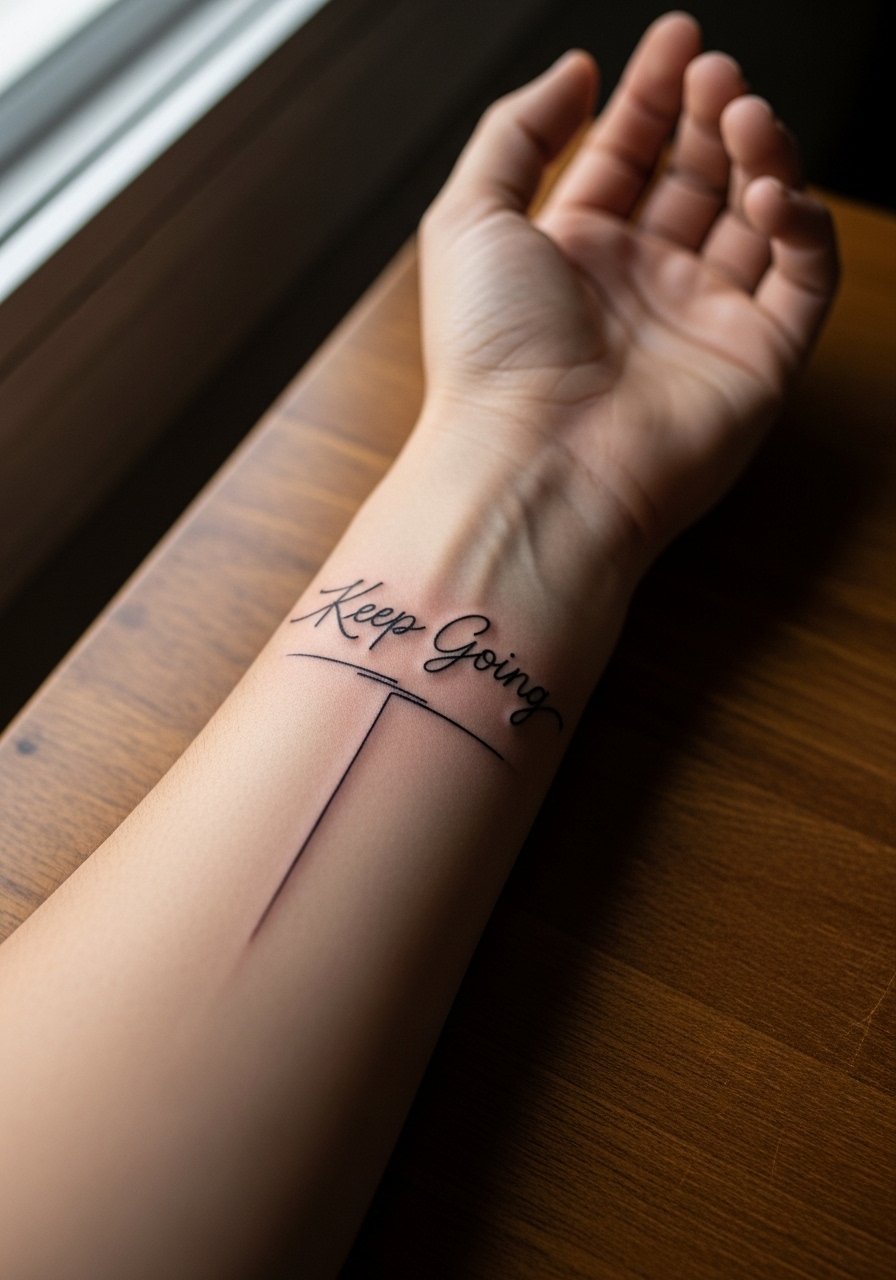
Consultation matters for script phrases. I always ask clients to see the exact font at life-size because spacing that looks fine on screen can compress on skin. The error I see most is long phrases squeezed into a narrow area. Expect light to moderate pain and a session under an hour for short phrases. For showing it off, wear a short sleeve tee so the phrase sits where it reads naturally with arm movement.
15. Abstract Line Cluster

My eye for these clusters is that less is more. Ask your artist for intentional overlaps and avoid random line density. The mistake is packing too many crossings that later look like unintended smudges. Sessions are short to moderate and pain is manageable for most. This reads well with layered accessories, try a set of thin stacking rings on the opposite hand to balance the composition.
16. Japanese Wave Strip with Crest
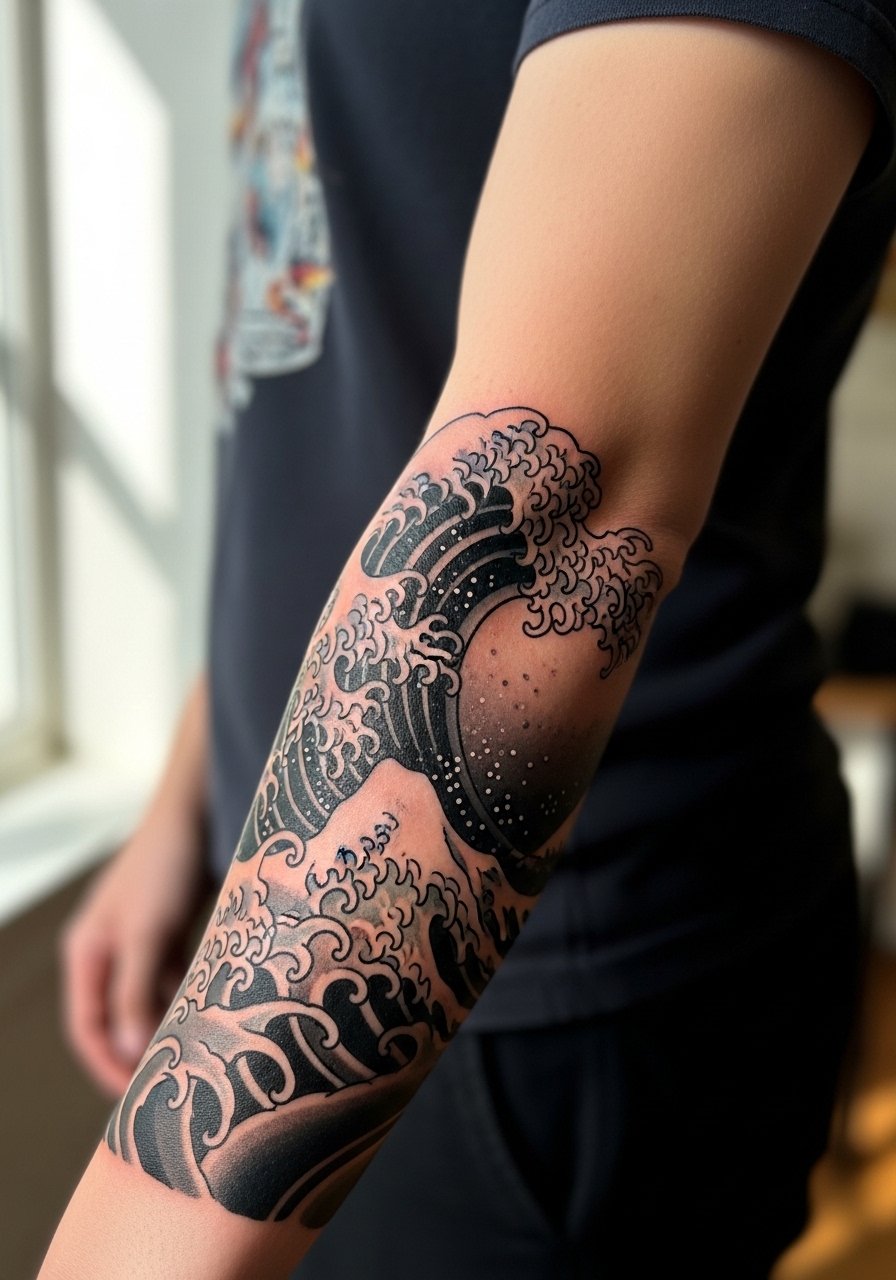
A wave strip carries motion when the crest aligns with the arm's length. In the studio request clear separation between crest lines and background shading to avoid merger. The error I see is trying to compress multiple crest elements into a thin band. Expect moderate discomfort during shading and a session of one to two hours depending on detail. This style benefits from rolled sleeves and a linen button-down to showcase movement when you walk.
17. Celtic Knot Wrap
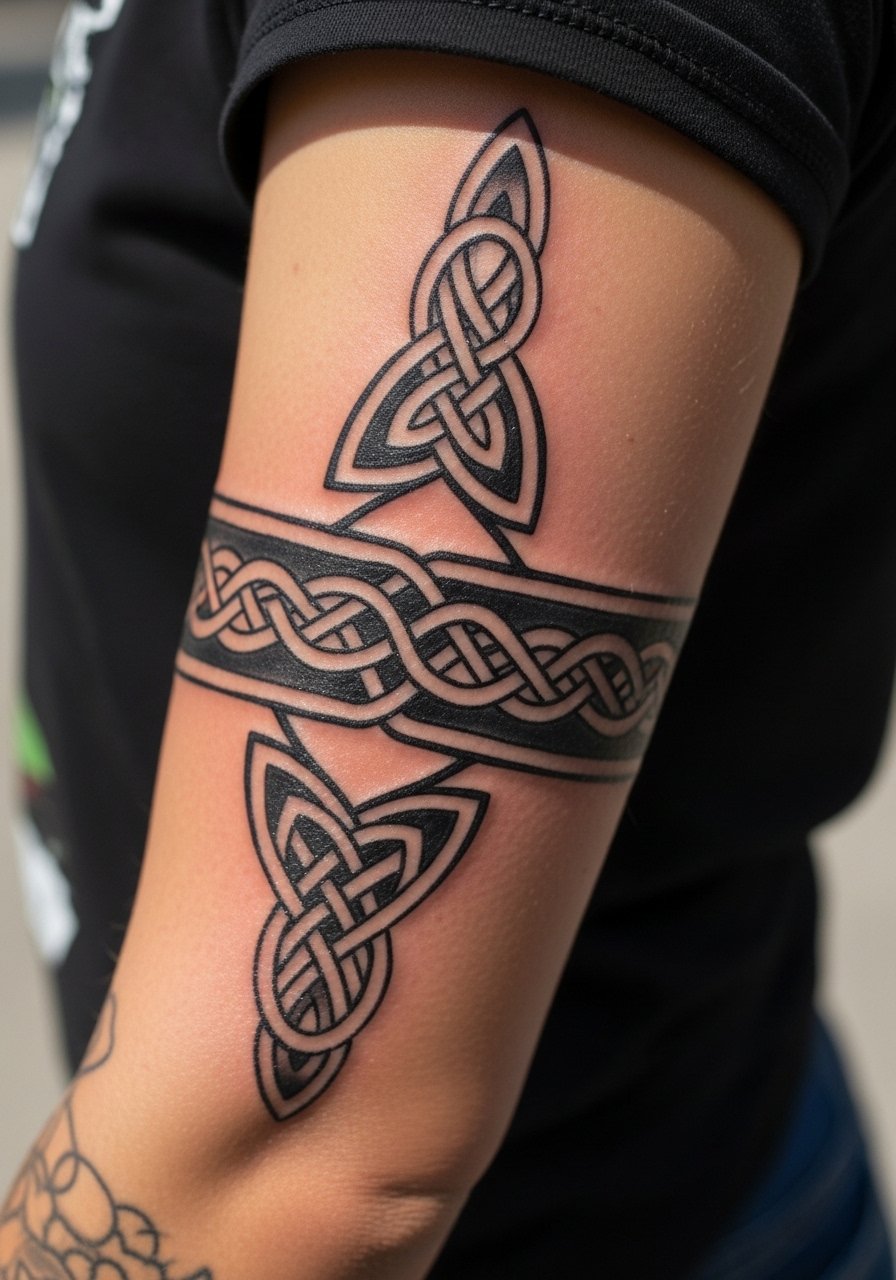
When people ask for Celtic knots I suggest mapping the band to avoid awkward breaks near the elbow. Tell the artist to test how knots look with the arm in motion. A frequent mistake is insisting on tiny interlaces that later lose separation. Expect moderate pain for wrap coverage and a session that can stretch beyond an hour. For evenings, pair with a rolled-sleeve denim shirt that frames the knot without hiding it.
18. Cosmic Constellation Path
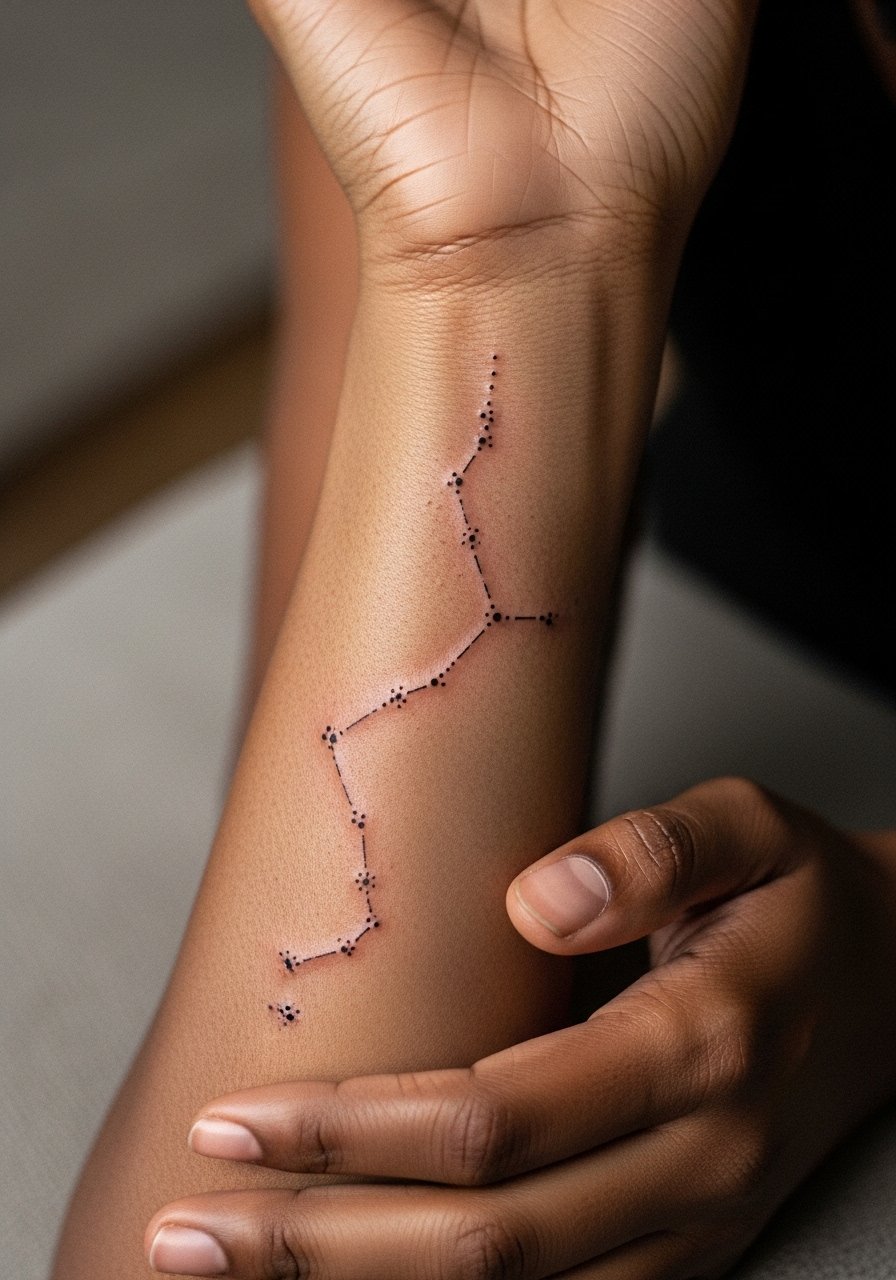
Aging is the main consideration for tiny star dots and connectors. I tell clients to enlarge primary stars slightly and widen spacing between connectors to avoid merging. The usual mistake is asking for identical micro-dots across a long path which creates a gray wash as it heals. Sessions are quick and pain is low, but touch-ups are likely at year two. Wear a short sleeve cotton tee to keep the constellation visible and safe from rubbing.
19. Anatomical Heart with Floral Overlay
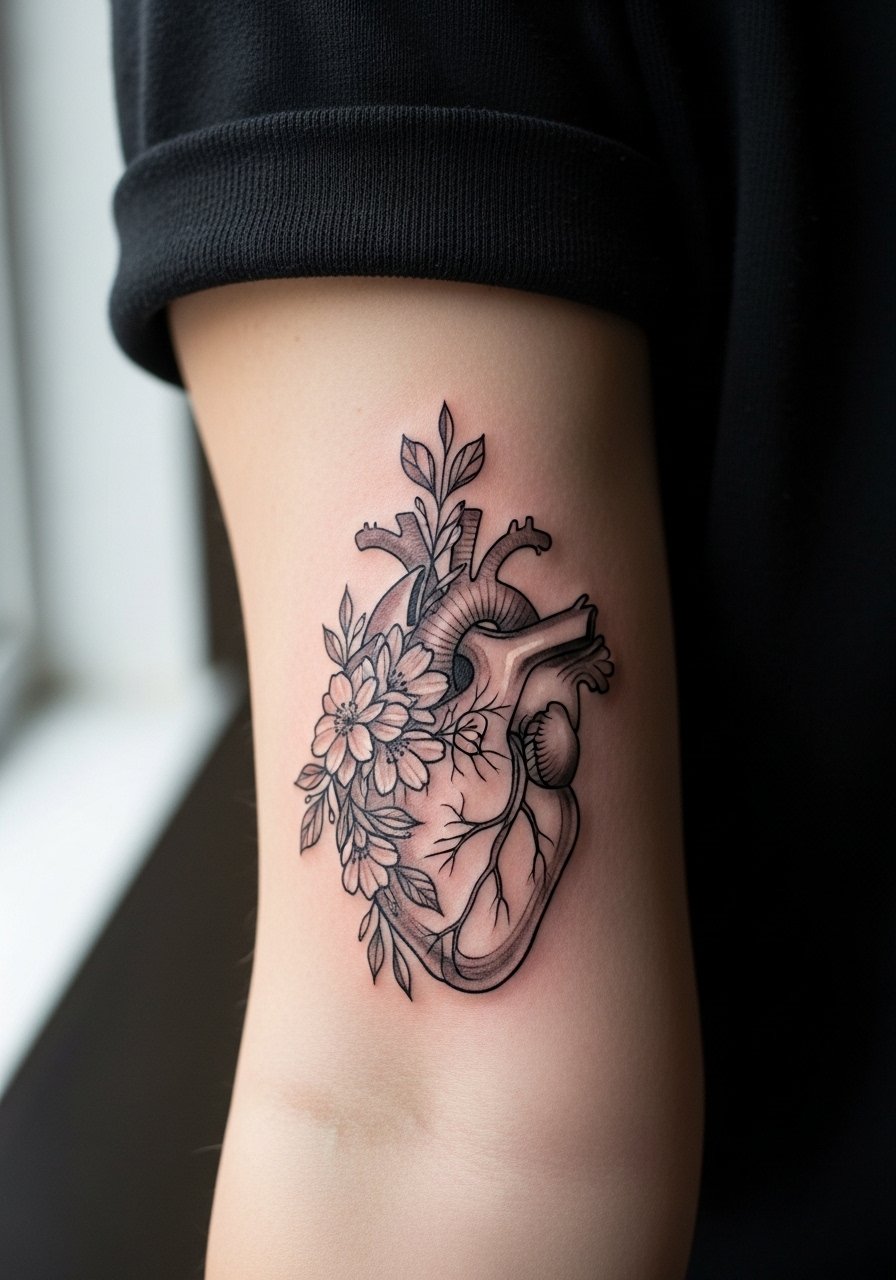
This hybrid reads well if the anatomy lines are bold enough to remain distinct under the floral overlay. Tell your artist you want the heart outlines slightly heavier than the flower filigree. The mistake is letting the overlay compete with the structural lines which blurs meaning over time. Sessions are moderate in length and can feel sore where shading accumulates. Pair with a v-neck tee on casual days to keep attention on the arm art.
20. Neo-Tribal Linear Panel
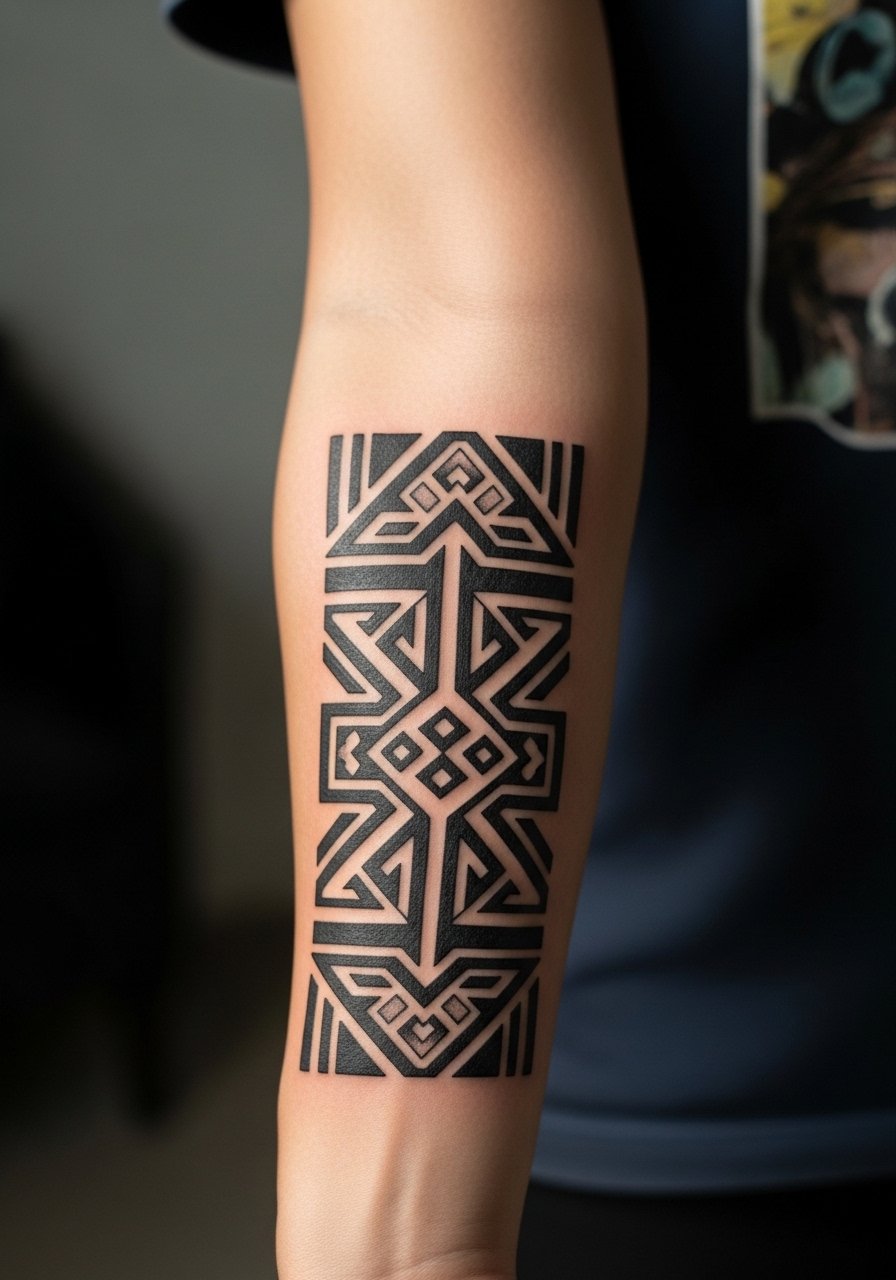
Controversy exists among collectors about neo-tribal motifs versus culturally specific tribal art. One camp sees neo-tribal as a contemporary aesthetic that references form without direct cultural claims. The other camp urges caution and recommends avoiding motifs that belong to living traditions without permission. My advice is to choose motifs inspired by form and to discuss origin respectfully. For the panel itself ask for broad strokes and clear gaps to avoid muddying lines. Sessions are one to two hours and pair well with a short sleeve polo.
21. Barcode or Coordinate Minimal Block
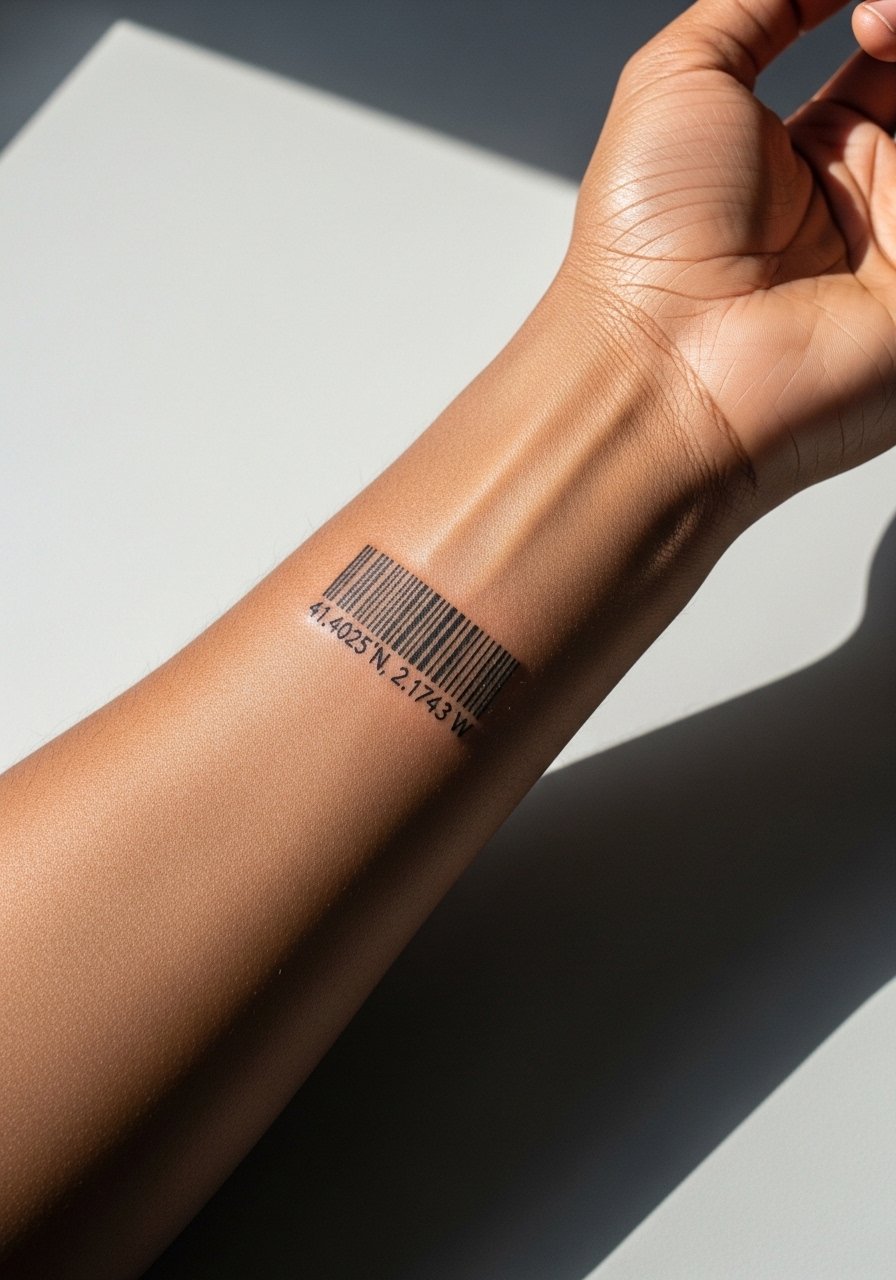
Text accuracy matters for coordinate tattoos so bring the exact string. I suggest bold, even bars with space between groups to avoid smudging. People often try to compress long numbers which leads to illegibility later. Pain is low and sessions short. For a discreet look tuck under a rolled sleeve denim jacket when you need to downplay visibility.
22. Floral Watercolor Accent with Black Outline

Watercolor accents can look painterly when the outlines anchor the color. Ask the artist to use the black outline to contain washes and to avoid feathered color beyond the line. A common error is asking for uncontained watercolor at small scales that fades into discoloration. Expect light to moderate discomfort during color layering and a session of two hours for layered washes. Pair with a ruffle-sleeve blouse for evenings to let the color pop.
23. Mechanical Gear Strip
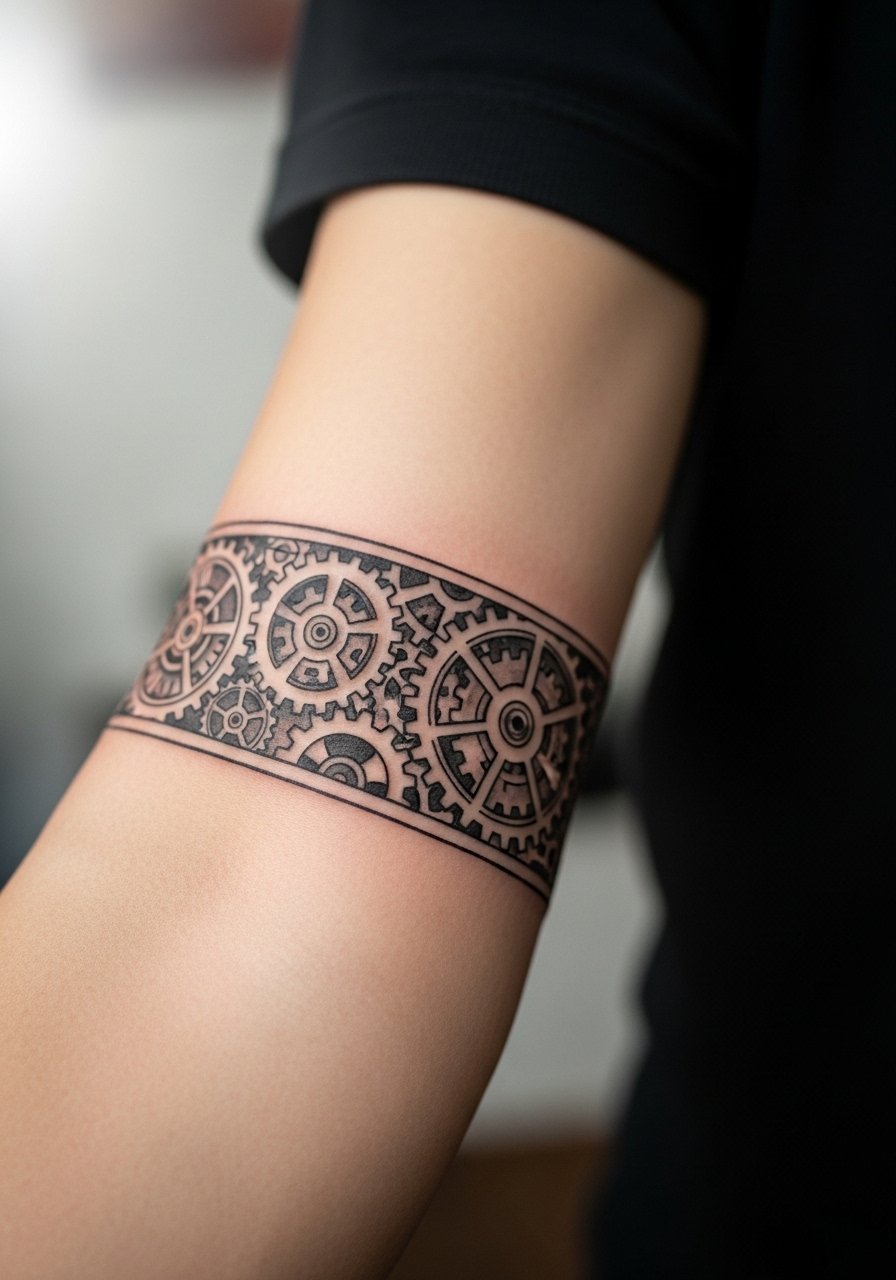
I recommend gears when you want industrial rhythm that follows the arm. During consult ask for clear separation between teeth and larger gear centers so the detail lasts. Small teeth packed tightly are the biggest mistake because they merge into a single dark area. Sessions run one to two hours and pain is moderate. For a style nod, wear a leather cuff bracelet that complements the mechanical aesthetic.
24. Pinstripe Tattoo Panel
Pinstripes can look modern if spacing is planned for aging. Tell the artist to set at least three millimeters between stripes for longevity. The usual error is too-narrow stripes that join into wider bands later. Expect a short session and low pain. This design pairs neatly with a rolled sleeve button-down when you want the arm to feel tailored.
25. Solar Motif with Radiant Lines

Solar motifs age well when rays are given breathing room. Ask your artist to keep primary rays bold and secondary rays faded for depth. A common mistake is filling every ray with the same density which produces a flat look as color fades. Sessions are moderate and can take one to two hours. For nights out, pair with a short sleeve linen shirt that lets the radiance catch the eye.
26. Chain-Link Bracelet Illusion
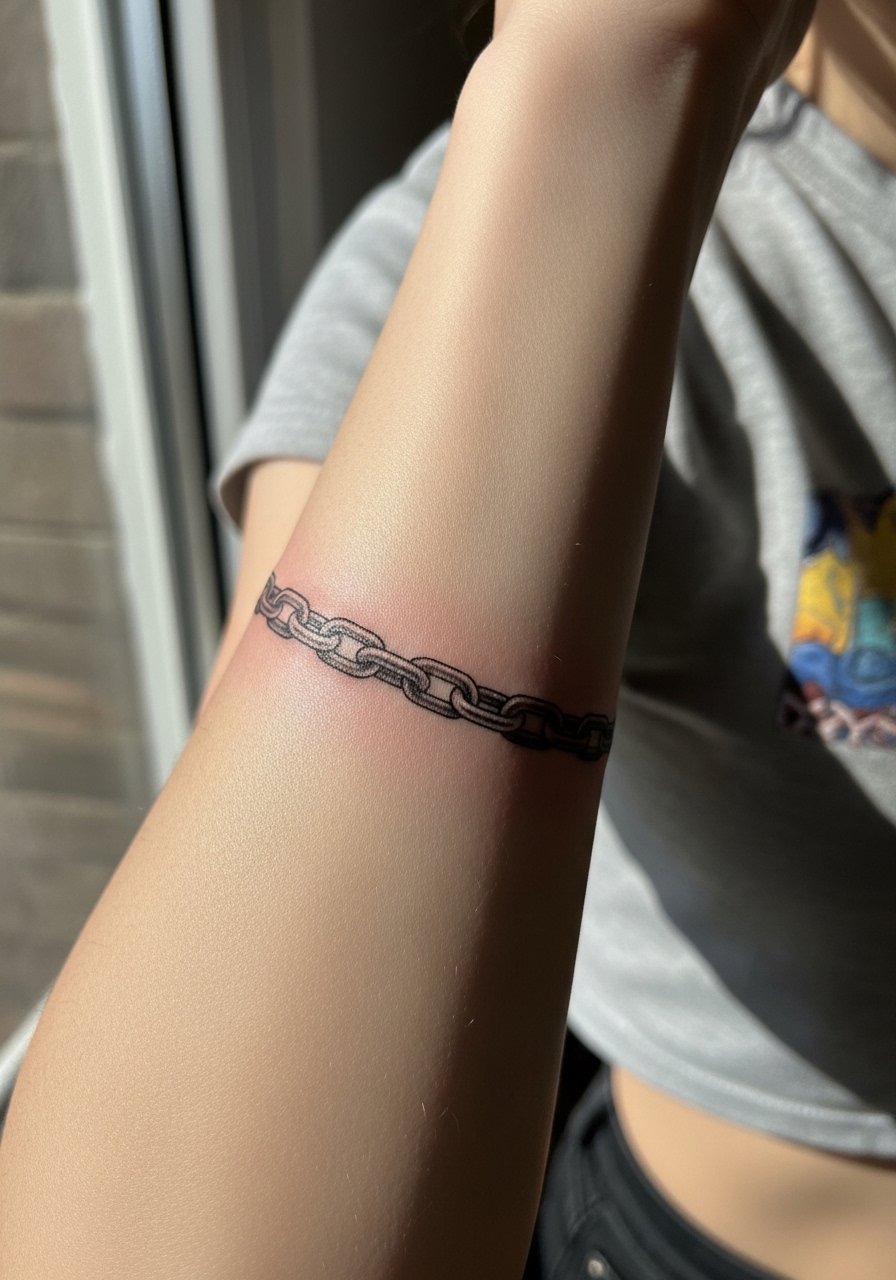
A chain-link illusion needs consistent link scale so it reads like jewelry rather than a flat band. In the consult ask for slightly raised edge shading to suggest dimension. People often ask for tiny links that do not hold up as the skin moves. Expect moderate discomfort where shading accumulates and a session under two hours for a single wrap. Wear a minimalist watch on the opposite wrist to balance the look.
27. Bold Crest with Banner and Year
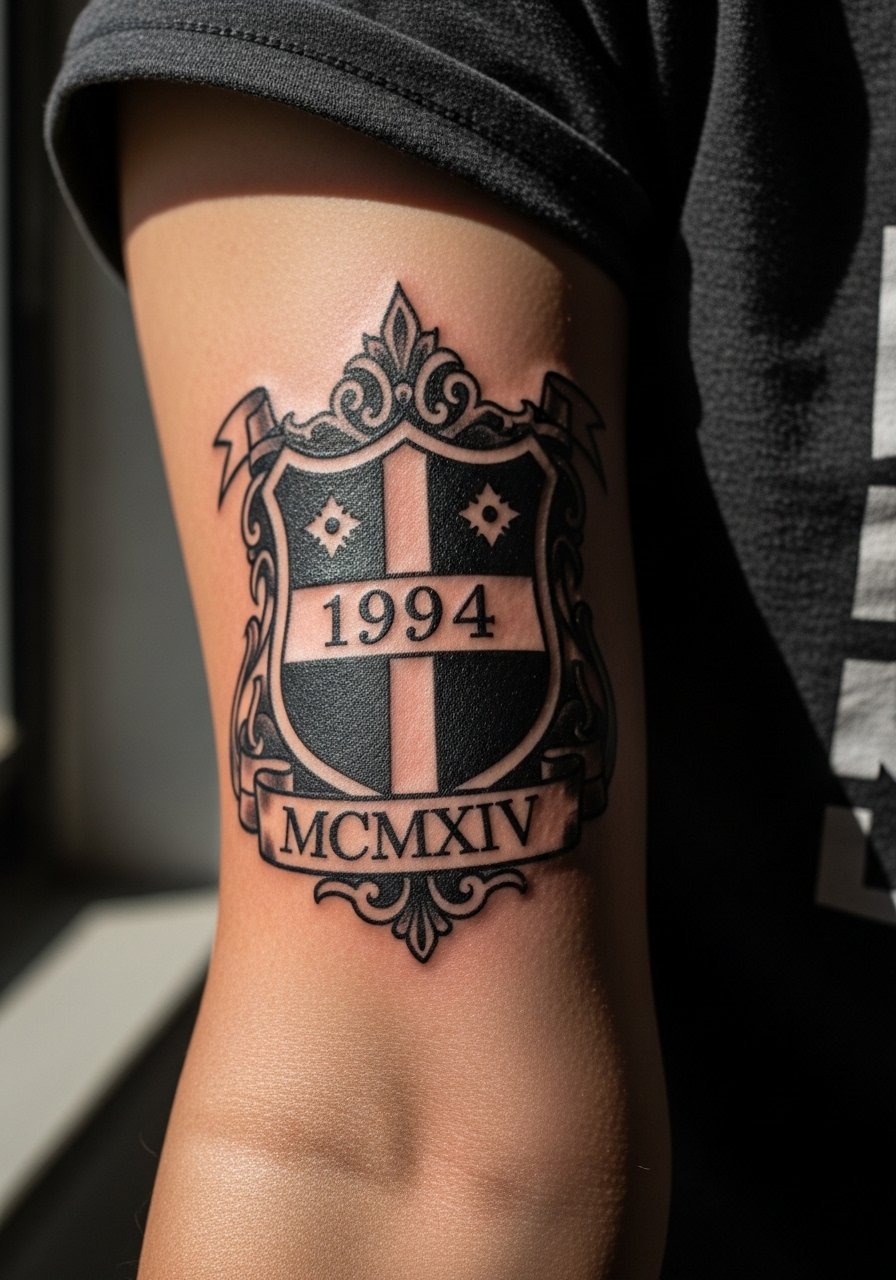
When a crest includes text like a year, specify exact formatting and size because numbers can blur. I advise bold outlines for shield edges and simplified interior elements for longevity. The mistake I see is over-detailing the crest interior which fades into a flat tone. Sessions take longer for bold fill and heavy linework, and the sensation is more intense where saturation is dense. For a heritage look, style with a short sleeve polo that echoes classic silhouettes.
Frequently Asked Questions
Q: How long will a bold outer forearm tattoo stay crisp before needing a touch-up?
A: It depends on style and skin type. Bold blackwork and solid silhouettes often stay readable for five to ten years with good sun protection, while fine single-needle script and tiny dot work usually need touch-ups by year two to three. Regular sunscreen and avoiding friction speed longevity.
Q: Should I pick thicker linework for an outer forearm piece if I want it to age well?
A: For most bold concepts, slightly thicker primary lines and deliberate negative space help the design read longer. Ask your artist to show healed photos of similar line weights at life-size during the consultation to confirm scale.
Q: Are there forearm designs I should avoid if I work with my arms a lot?
A: Designs with lots of tiny hairline detail and very shallow shading suffer most from constant contact and washing. If your job involves repeated forearm friction, pick bolder shapes or plan on touch-ups. Consider placement slightly higher on the outer forearm where fabric contact is reduced.
Q: Can I wear jewelry with these outer forearm tattoos without harming them?
A: Jewelry is fine once healed, but avoid tight bands and metal that rides over a fresh tattoo during the first month. After healing, use accessories like a minimalist watch or thin bracelets to frame the art without rubbing.
Q: How do I find an artist who specializes in the style I want without naming specific shops?
A: Use discovery pathways like local shop directories, hashtag searches for healed work, convention portfolios, and community forums. Look for healed photos of the same technique and scale you want, and ask to see time-lapse or healed shots during consultation.
Q: Do certain skin tones affect how these outer forearm concepts look once healed?
A: Yes, tone influences contrast and color saturation. Bold blackwork and solid silhouettes tend to translate uniformly across tones. For color work, ask an artist experienced with your skin tone to show healed examples so saturation choices and contrast are tailored correctly.
