
Fine line and bold blackwork are both trending for dad and daughters rib pieces, but they age very differently. Some people pick the most detailed reference they can find and then wonder why touch-ups come sooner than expected. These 27 ideas focus on designs that fit the curve of the ribs, ways to ask for them in consultation, and practical styling and session tips that make the pain and healing worth it.
1. Matching Fine Line Koi That Flow with the Ribs
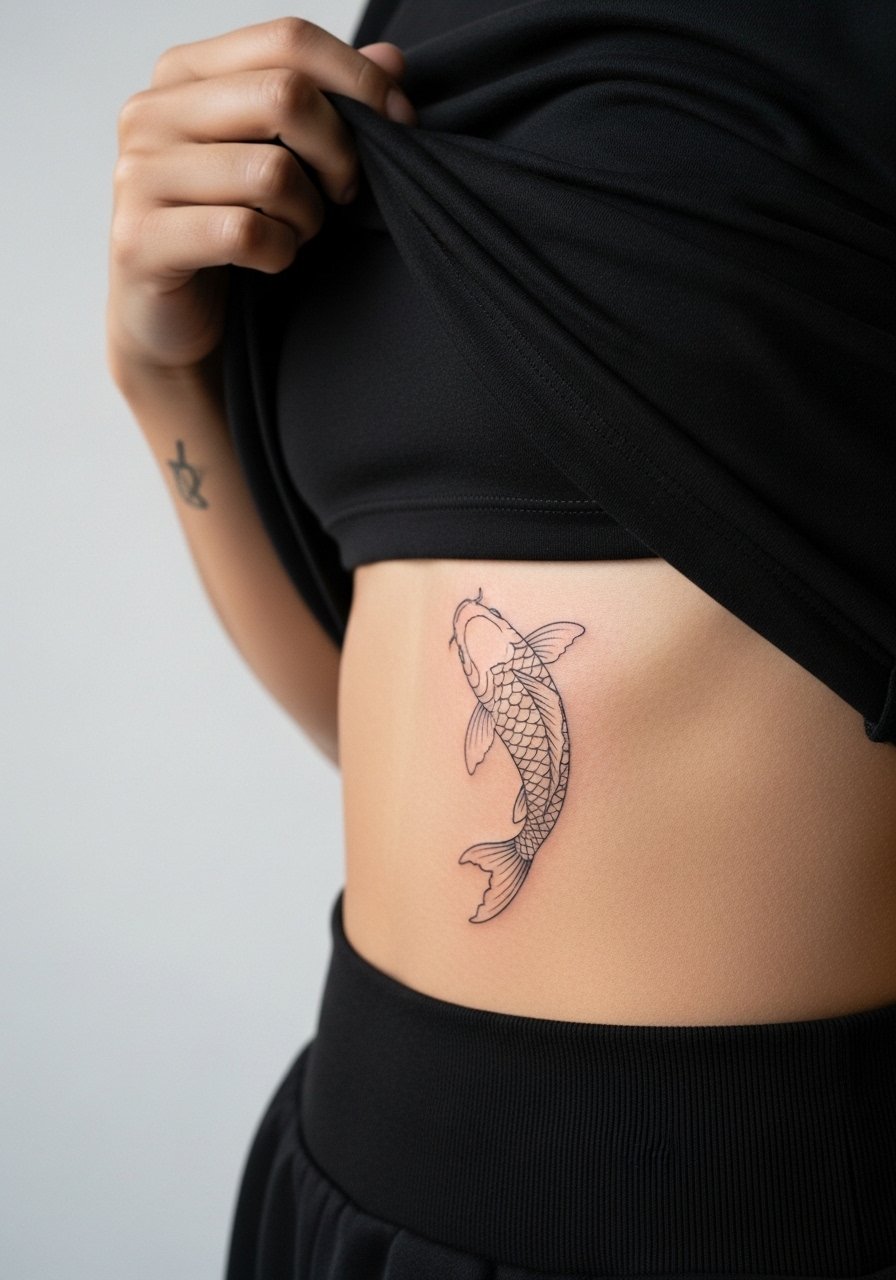
Most people underestimate how the ribs curve affects a koi composition. I suggest a 2-4 inch tall fine line koi that mirrors the curve, not one packed with tiny scales. Tell your artist you want linework at slightly deeper depth and minimal stipple shading for texture, because that choice helps the piece stay readable at year two. Fair warning about fine line on ribs. One camp says it blurs fast, while another says spacing and correct needle depth keep it crisp. For the session, wear a loose tank top you can lift easily so the artist has access.
2. Overlapping Triangles, Scaled for a Father-Daughters Stack
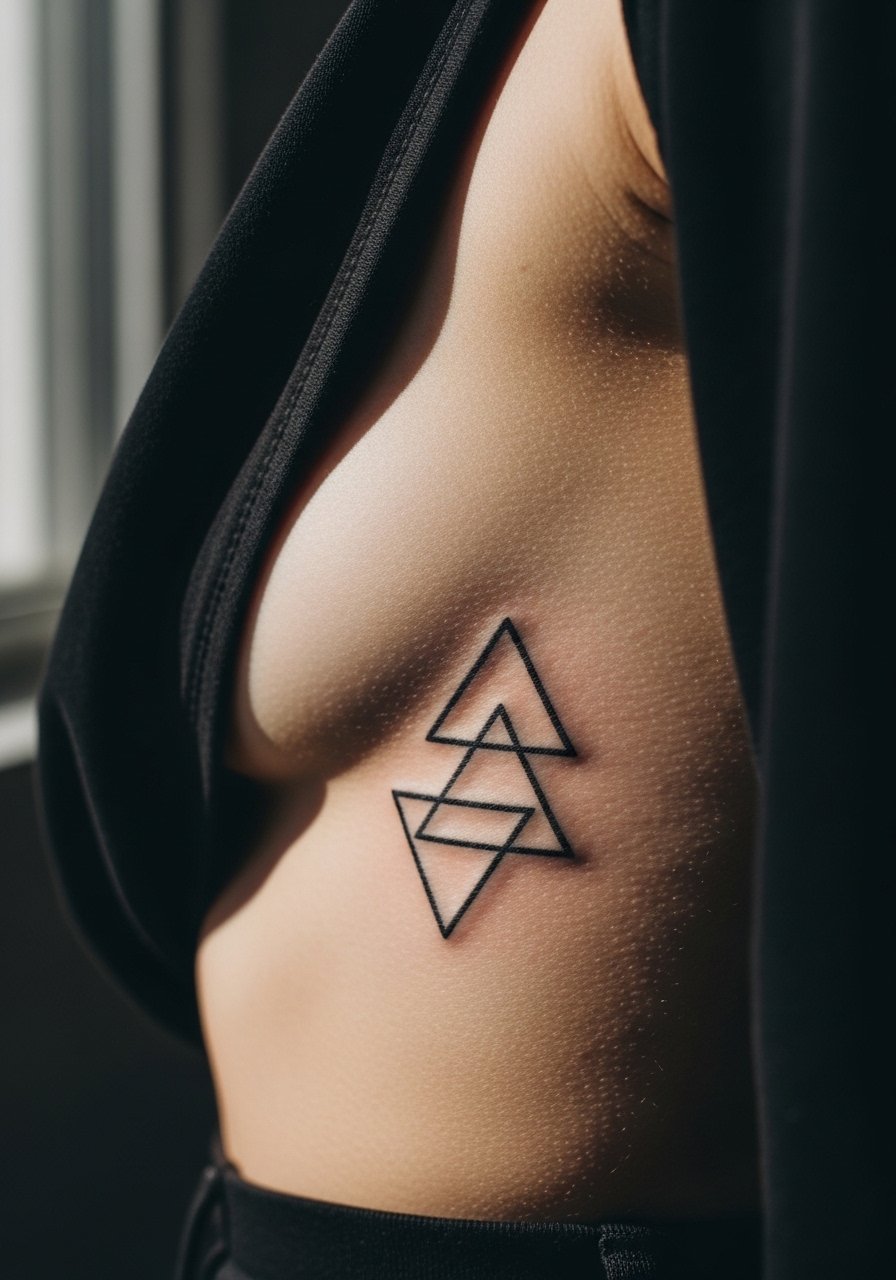
Most geometric designs suffer when drawn too small. The common mistake is making the triangles tiny so they read like a blur after motion. For ribs, ask for slightly heavier linework and 1-2 mm spacing between lines to avoid merging over time. This is a single-session piece that usually takes under an hour, and it ages into solid blackwork better than whisper-thin lines. Pair it with a linen crop top when you want to show it off, the neutral texture keeps attention on crisp linework.
3. Sailboat Minimalism, Side-Rib Storytelling
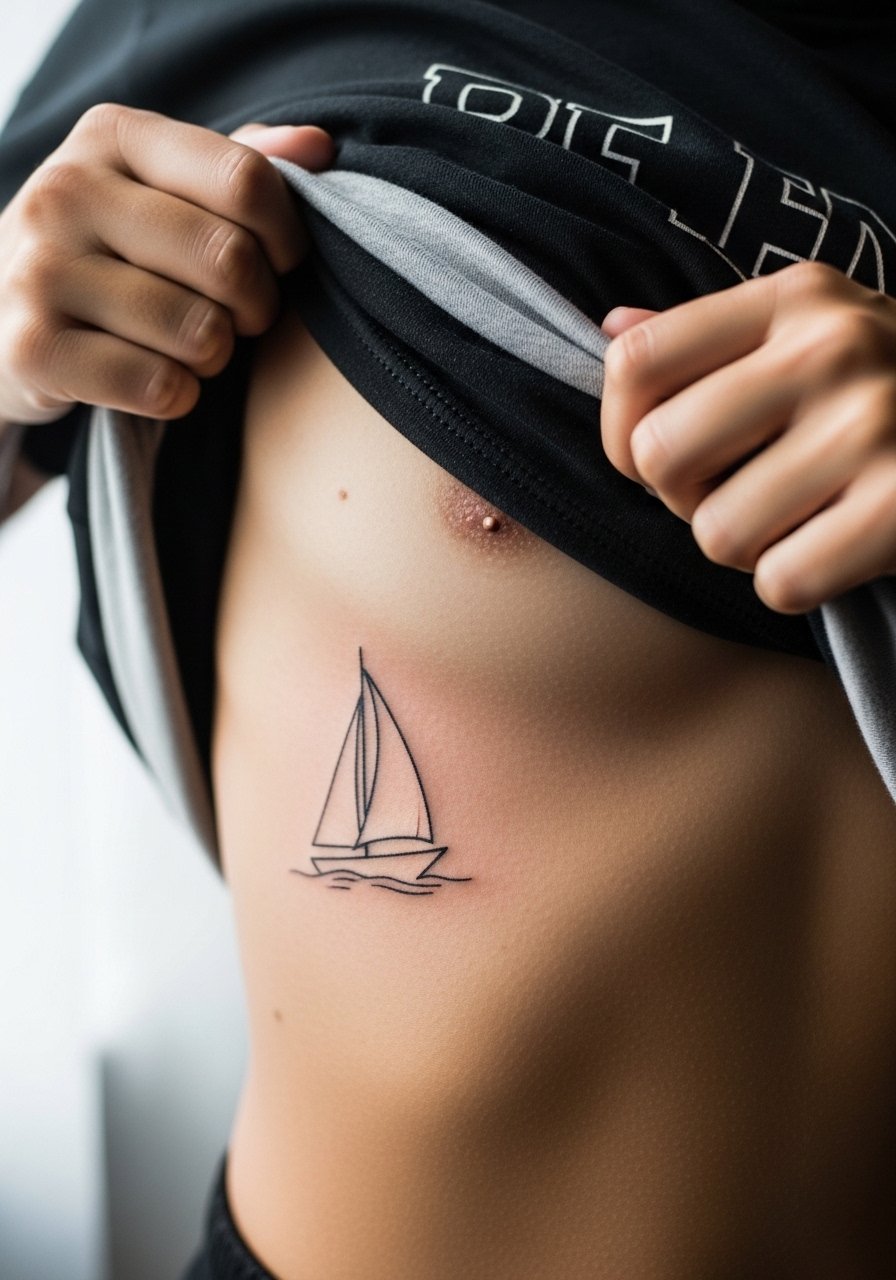
Consultation tip, bring reference photos that show the boat at the exact scale you want. A 3-inch sailboat works well on side ribs and reads better if the mast follows the body curve. The rib session is sharper than an arm piece, so expect intermittent twinges instead of steady pain. For the appointment wear a strapless bralette or a loose wrap top that lets the artist access the whole side without tight fabric rubbing the fresh ink. Over time the simple lines soften, but vertical orientation helps resist stretching.
4. Half-Lion Faces That Align When You Hug
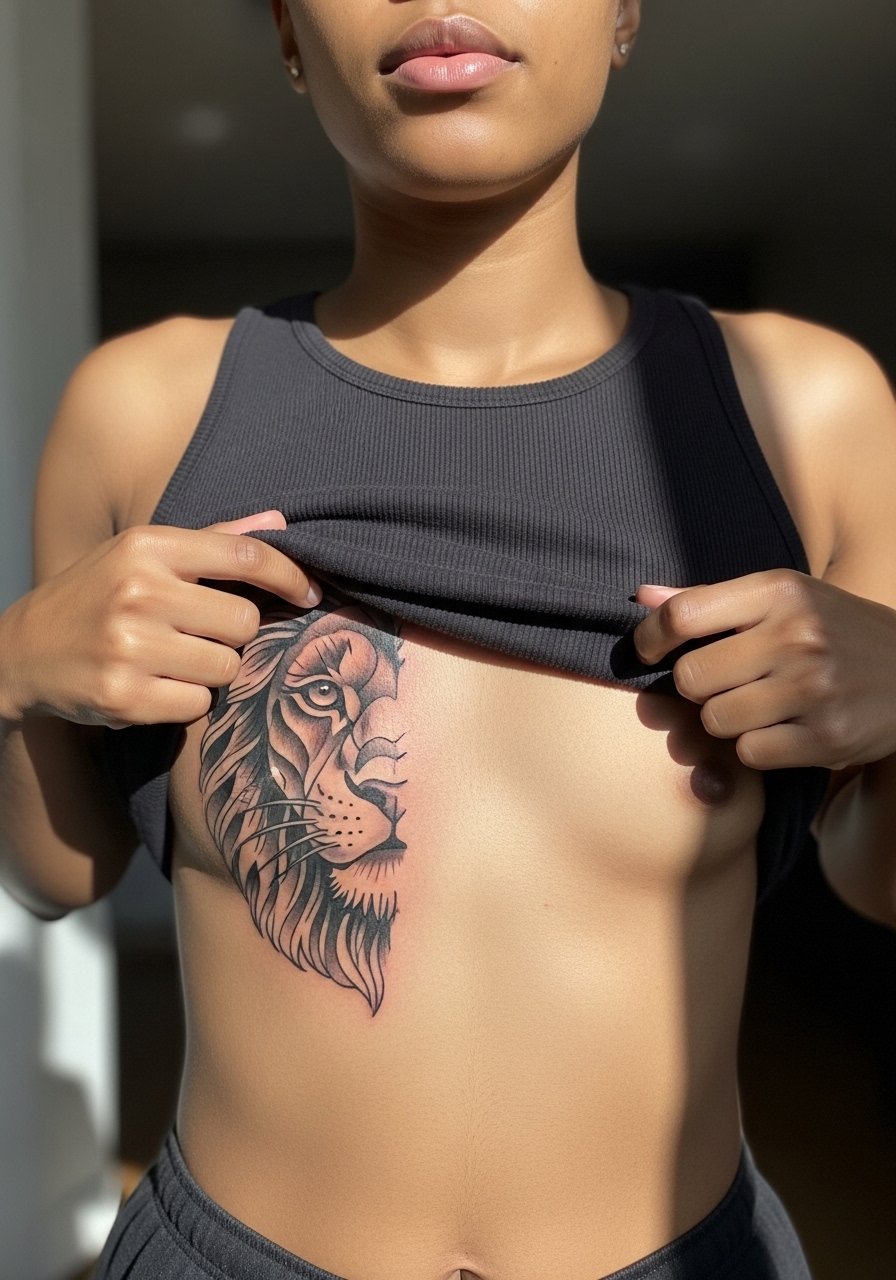
Aging and alignment matter here. The half-lion idea is powerful when both halves line up during a hug, so plan negative space and angle during consultation. The inner ribs can be tender, so keep sessions to 1-2 hours and discuss numbing with the artist if needed. A frequent error is asking for too much fine detail in small halves, which can merge after healing. For showing off, an off shoulder blouse frames the upper ribs without squeezing the area.
5. Big-and-Little Giraffes, One Dad, Many Daughters
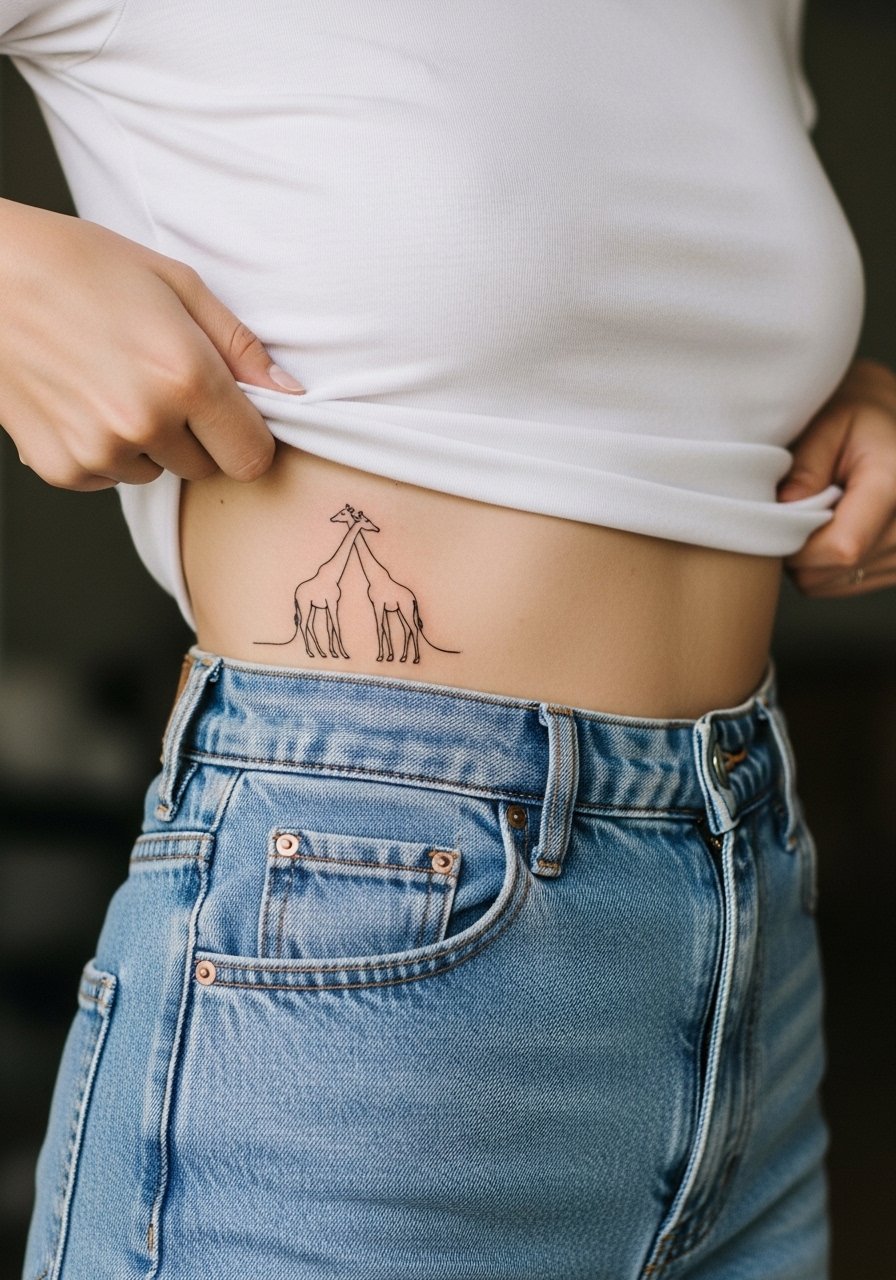
This is great for families with multiple daughters. Design the dad giraffe taller with a slightly thicker lineweight so the pair reads as parent and child at a glance. A common mistake is putting them too close together on the curve, which can make the smaller figure look cramped after weight changes. Vertical neck curves that follow the ribcage help the pieces age with the body. Wear high waist biker shorts when you want a casual reveal, they sit below the lower ribs and let the tattoo show.
6. Fine Line Elephant and Calf, Herd Memory
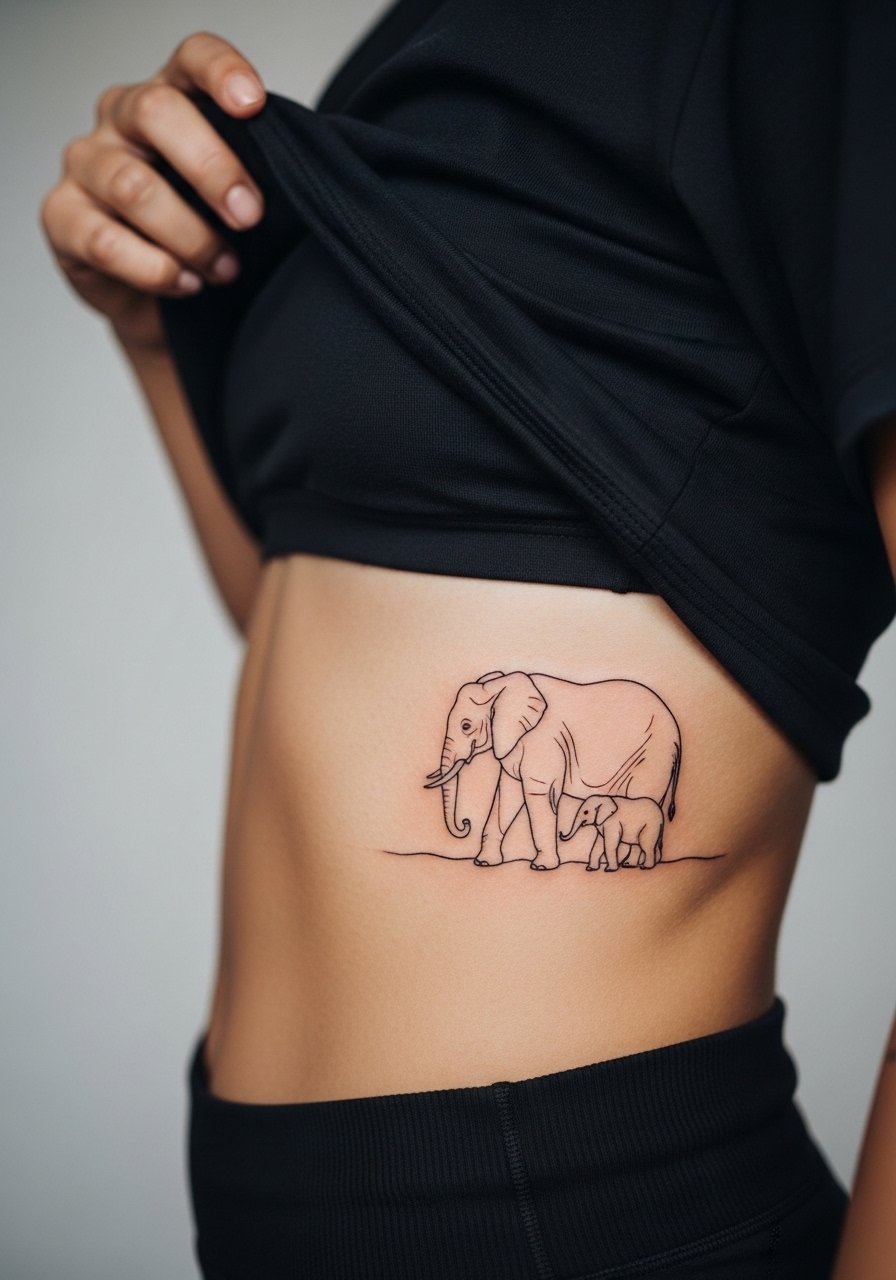
Most people choose the elephant for memory or family herd symbolism. Ask your artist to keep the calf slightly simplified and to use a single-session layout so the shading stays consistent. For ribs, blowout risk is real with ultra-fine dots, so request slightly bolder dot work and whip shading rather than tiny stipple. During the session wear a ribbed tank top fitted you can pull aside cleanly. Touch-ups at year three are common for very fine texture.
Chair Day Prep
The rib pieces above demand more access and longer shifts than arm work, so a small kit for the chair day keeps things manageable.
- Hustle Butter Deluxe. A non-greasy balm many people prefer for humid climates, useful during the first week when ribs sweat more under fabric.
- Frida's Finest Indie Balm. A lighter artist-recommended option for people who want breathable post-session coverage on bony areas.
- Australian Tea Tree Salve. Helpful for calming irritated spots, skip if you have sensitivity to tea tree.
- Plain Unscented Lotion CeraVe. A simple lotion many people use after the initial healing window for maintenance on larger rib pieces.
- Aquaphor healing ointment. A mainstream go-to for the very first days that locks in moisture on fine line work before switching to lighter balms.
7. Blackwork Arrow Piercing a Heart, Upper-Rib Statement
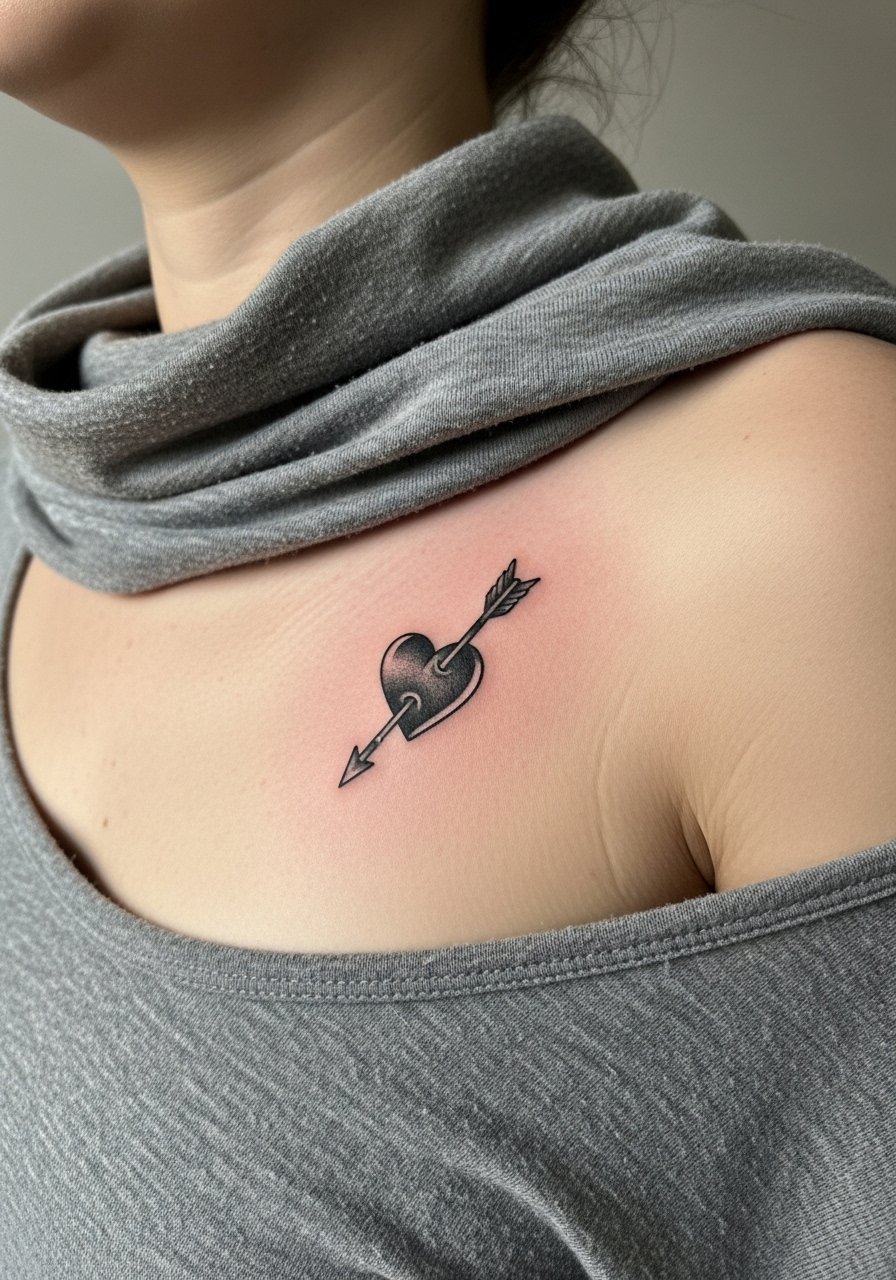
There's a reason bold blackwork can outlast delicate work on ribs. Saturation and solid fills age into a graphic statement that still reads at year five. The trade-off is more initial soreness during the session because saturation requires multiple passes. Tell the artist you want clean edges and solid fill rather than tiny crosshatching. Pair the finished piece with an off shoulder blouse that leaves the upper ribs visible. Expect touch-up at two to five years depending on sun exposure.
8. Watercolor Infinity with Initials, Soft Side Ribs
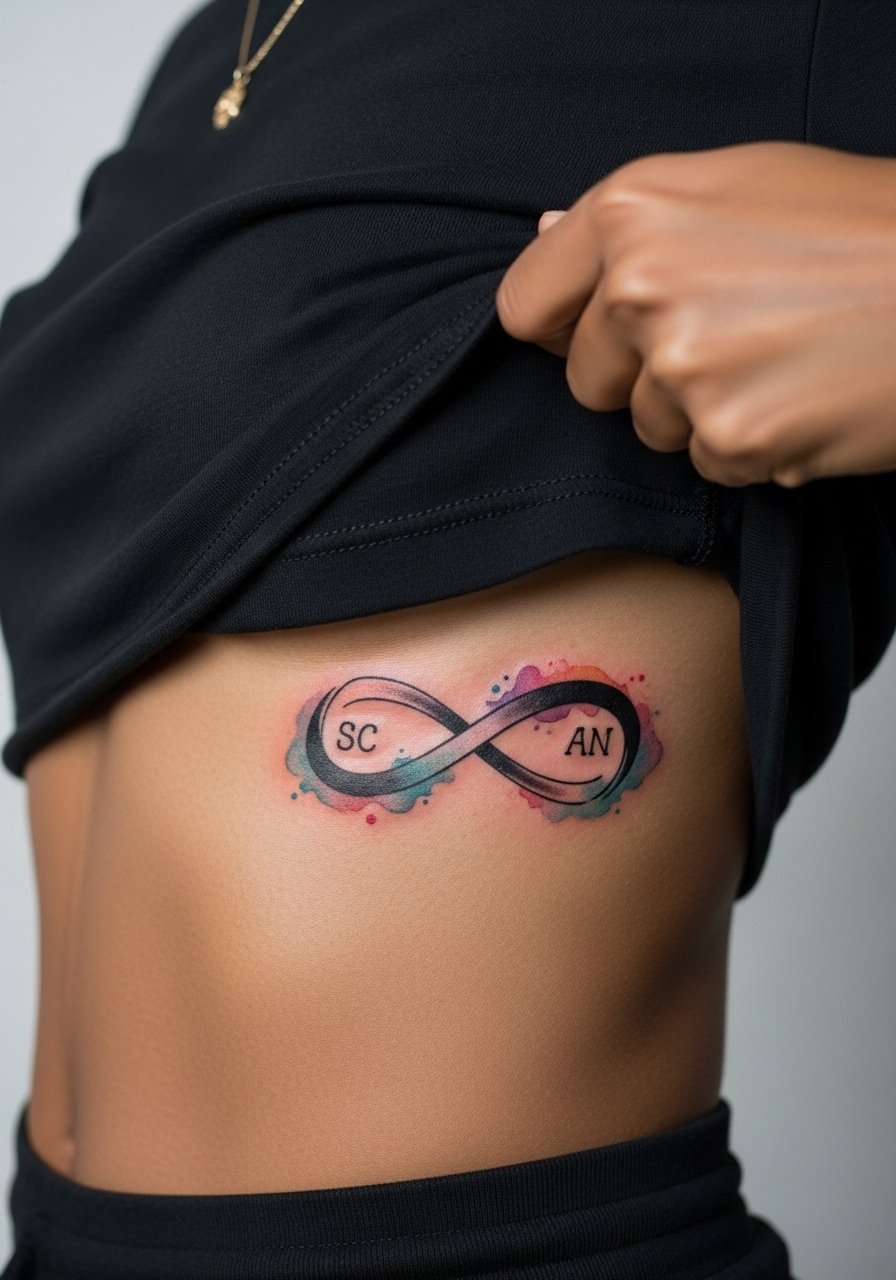
Watercolor on ribs is eye-catching, but it sparks debate. One camp prefers watercolor despite fade concerns, because the look remains poetic. Another camp says blackwork underlay and stronger saturation hold far better, especially on curved skin. If you want the watercolor feel, ask for a black base line or slight black anchoring so colors will sit and fade more gracefully. For showing off choose a side slit maxi dress that reveals the curve without pinching fresh ink.
9. Micro-Realism Split Portraits for Aligning Hugs
These take planning. A central vertical placement that splits a face demands precise composition so both halves align when you and your daughter hug. Sessions run longer and require 2-3 sittings. Common mistakes are asking for too small a portrait, which loses facial detail after healing. Ask the artist for reference portfolios of healed micro-realism on ribs. For reveal photos, high-waisted jeans with a cropped hoodie lift easily and keep the rest of the torso covered.
10. Ornamental Tree with Roots, Vertical Growth Motif
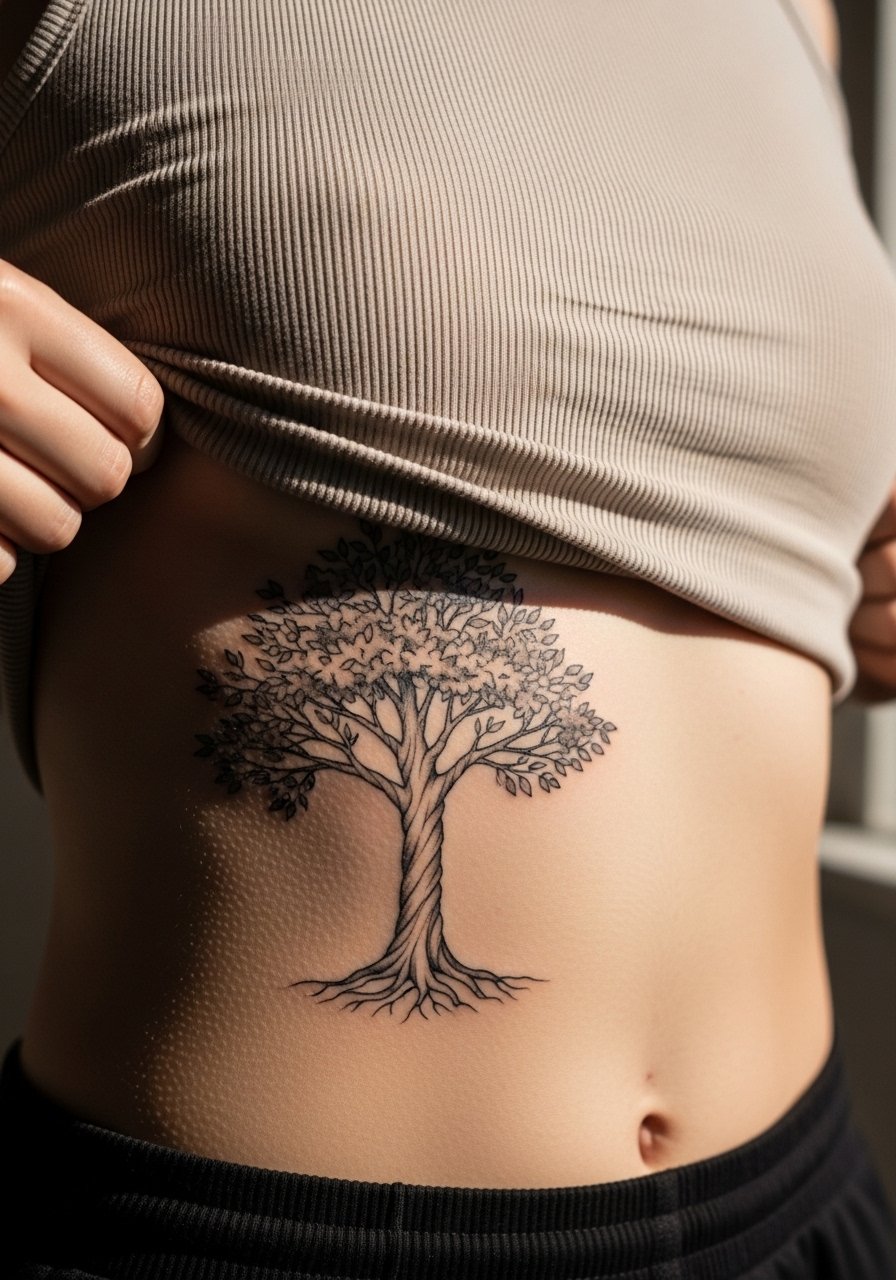
Vertical designs like a tree take advantage of the ribcage curve and resist stretching when placed longways. In consultation, map where the roots and branches should sit relative to natural body folds. A common issue is compacting fine branches too tightly, which leads to merging over time. Expect two sessions if you want both fine line branches and a gray wash for depth. Pair this with a sheer blouse over a fitted ribbed tank to show the design subtly.
11. Ignorant Style Bear and Cub Hug, Playful Lower Ribs
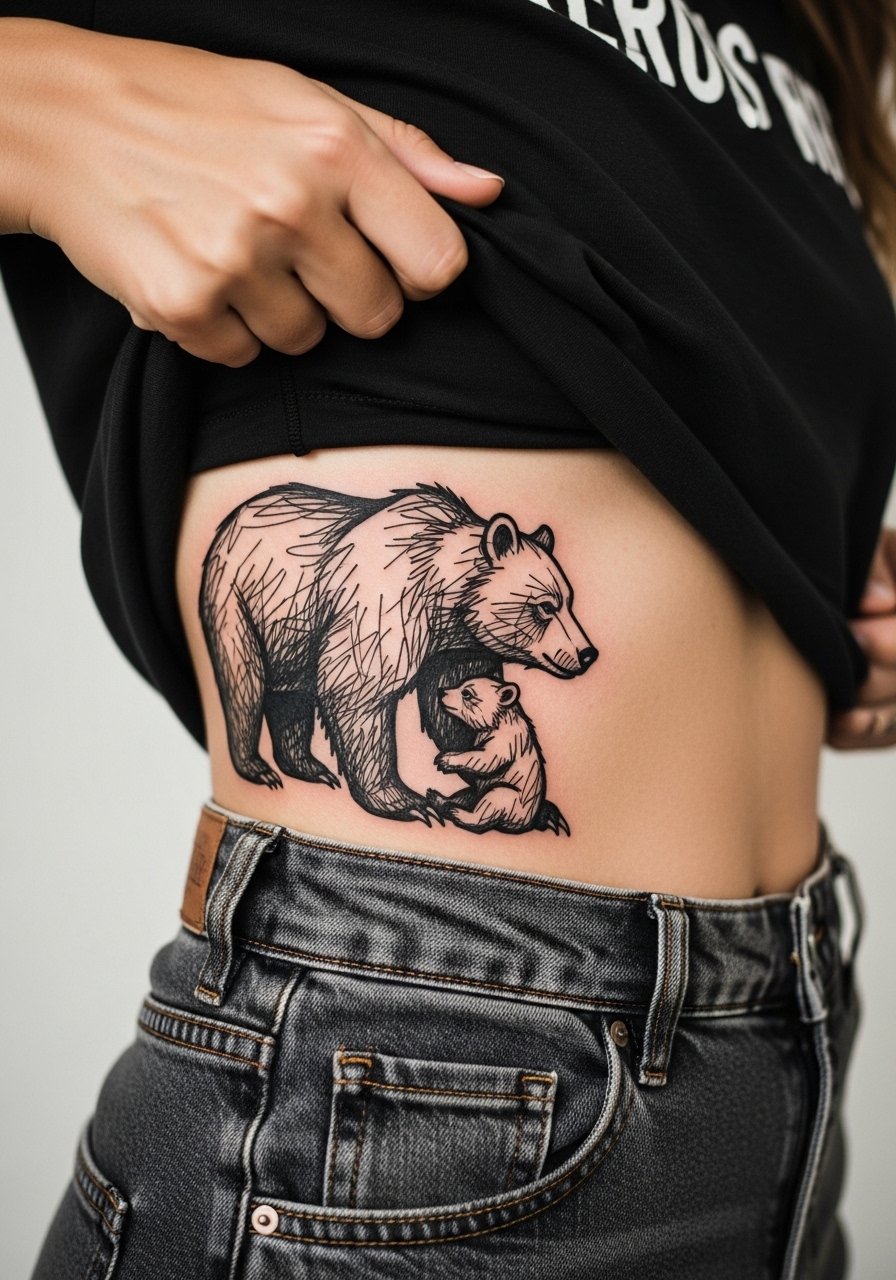
The ignorant style reads playful and raw, and it usually heals with character rather than precise lines. It is low-risk for blowout because the lines are intentionally bold and messy. Discuss scale so the cub remains distinct at one to three years. Wear high-waisted shorts for a casual reveal without risking waistband friction. Pain levels on lower ribs are variable, expect short sharp moments between steady soreness.
12. Traditional Anchor with Ribbon Name, Nostalgic Side Rib
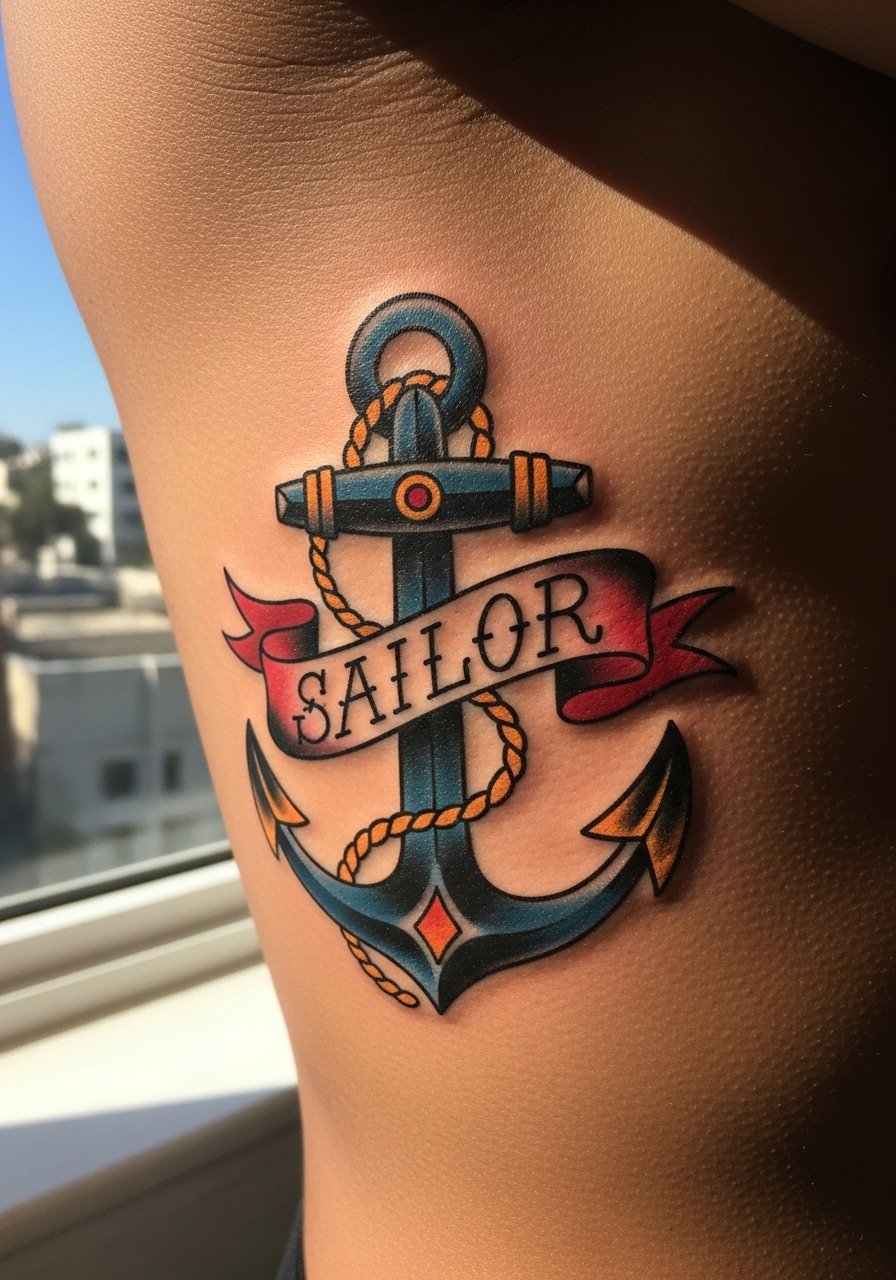
Traditional work handles ribs nicely when scaled correctly. The solid fills maintain saturation and age into a classic look. The risk is asking for too much script in a thin ribbon, which can blur. Tell the artist to space letters and consider black outlines for longevity. For the session wear a loose button-down shirt you can pull aside. Expect touch-ups sooner if you spend a lot of time in sun.
13. Multi-Daughter Ribbon Cascade, Family Adaptation
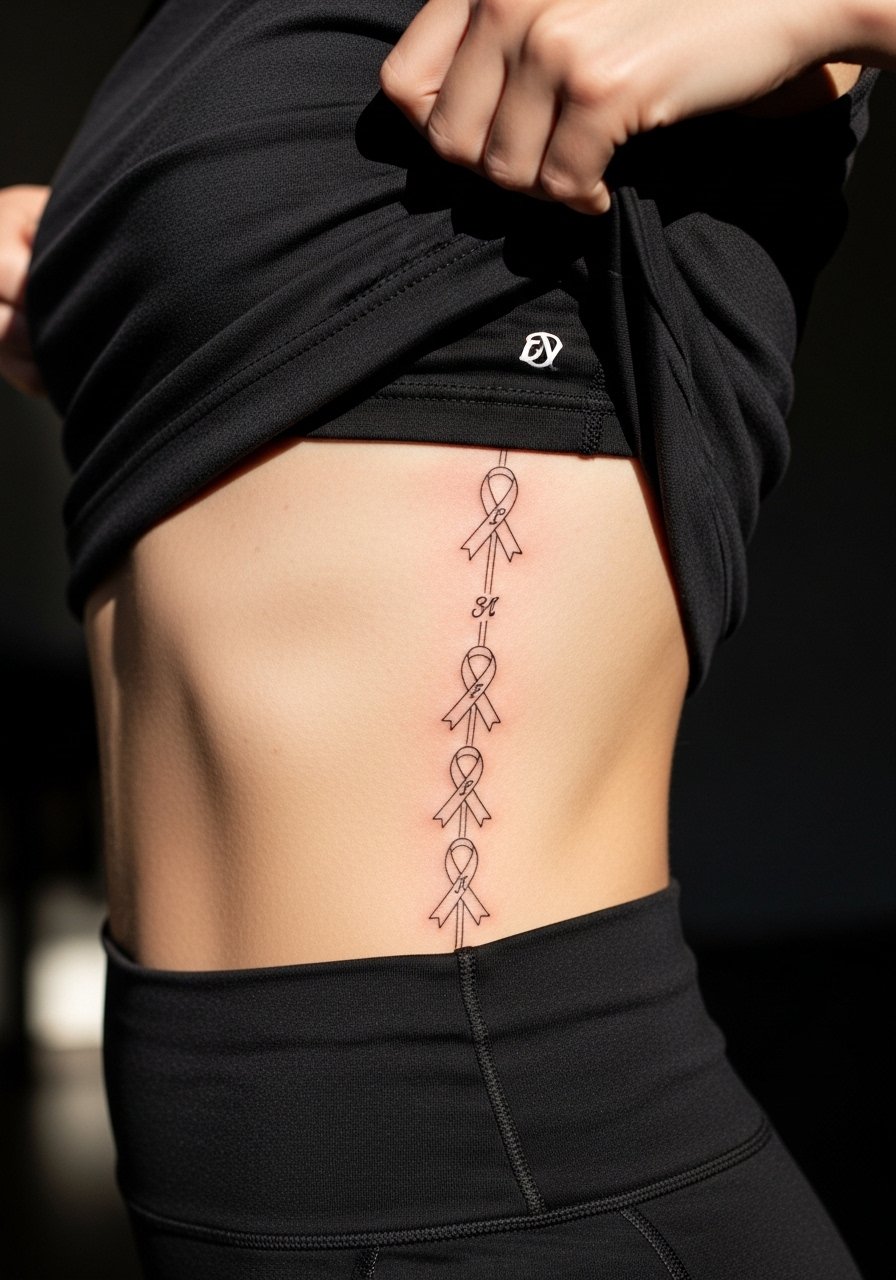
This design fills a real gap I see online. The father takes a central anchor ribbon and each daughter gets a branching ribbon below. During consultation decide on length and spacing so each ribbon can be added later without overcrowding. Ask for vertical orientation to resist stretch after weight changes. Session-wise you can space ribbons across separate appointments to manage pain. For a casual reveal try a loose tank top you can lift to photograph individual ribbons.
14. Mini Realism Paw Prints, Size for Memory

Tiny realism can be emotional and subtle. The most common mistake is making prints so small that the pads blur together after healing. Ask for slightly larger scale with crisp negative space between pads. These are quick single-session pieces that still need careful aftercare during the first week. For photos, a high waist straight jeans look pairs well without covering the lower ribs.
15. Script Date in Roman Numerals, Quiet Memorial
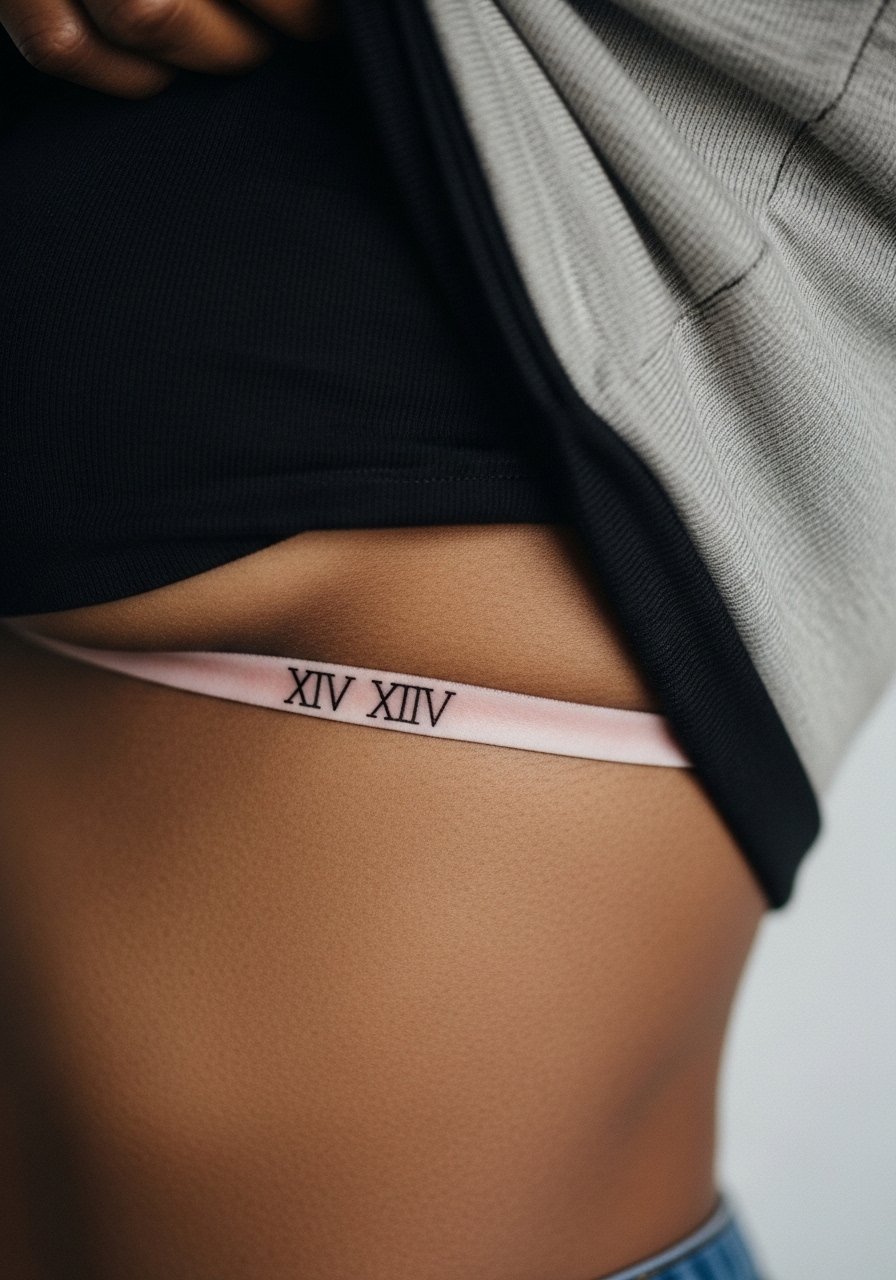
Text on ribs needs scale and font choice more than flourish. If you want a date in Roman numerals, specify the exact lettering style during consultation so the artist can plan spacing. A frequent error is choosing a condensed font, which crowds the numerals as skin moves. Keep the lineweight steady, and plan for a one-hour session. For showing it off pick a backless halter top or a strapless piece that leaves the side clean.
16. Nautical Compass, Directional Dad-Daughters Design
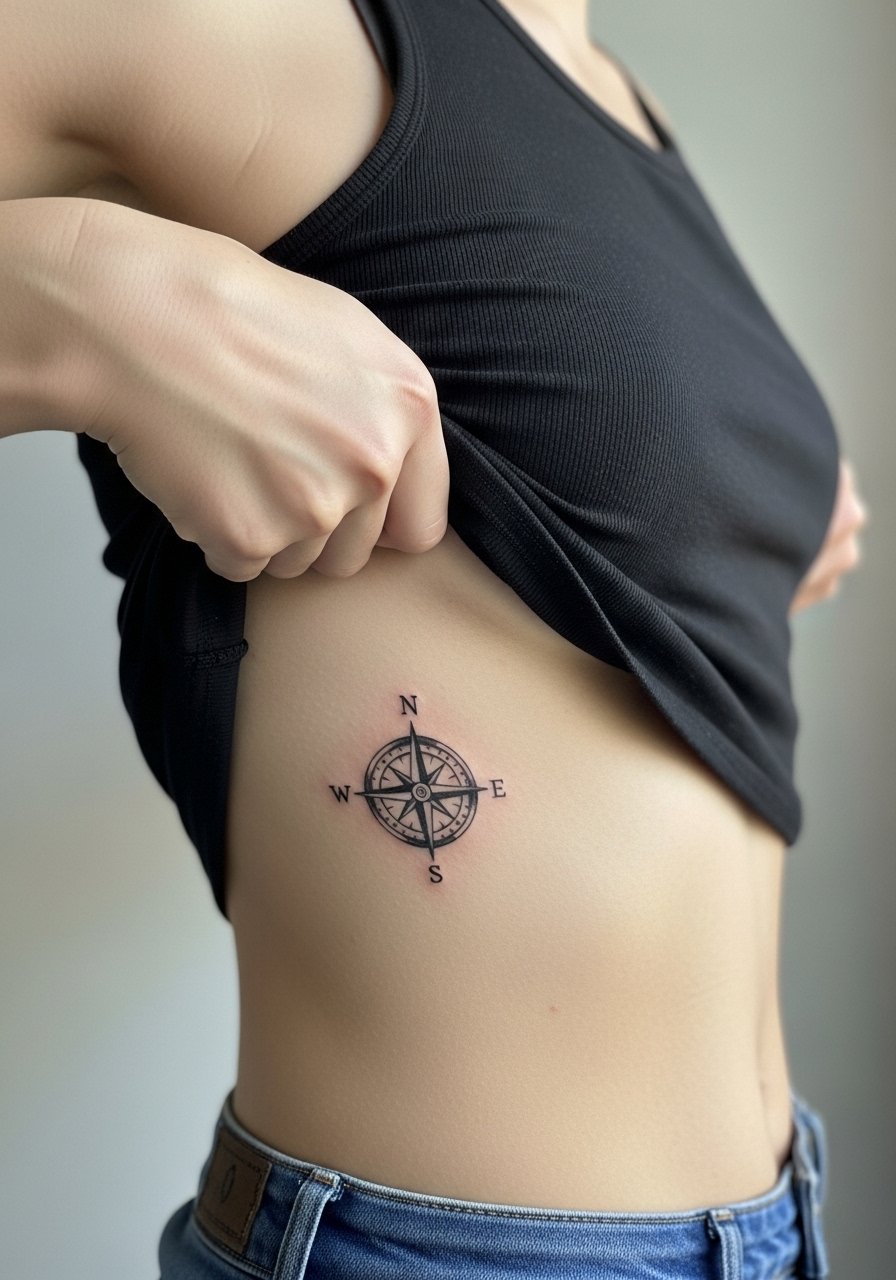
A compass symbolizes guidance, and ribs are an intimate place for that metaphor. The design benefits from a slightly bolder outer circle to protect inner detail from softening. A common mistake is packing tiny directional marks into a small circle. Ask for clearer cardinal points and plan for a single-session outline with a short shading follow-up if desired. For reveal photos an open-knit cardigan layered over a fitted tank keeps attention where you want it.
17. Tiny Giraffe Neck Cascade for Multiple Daughters
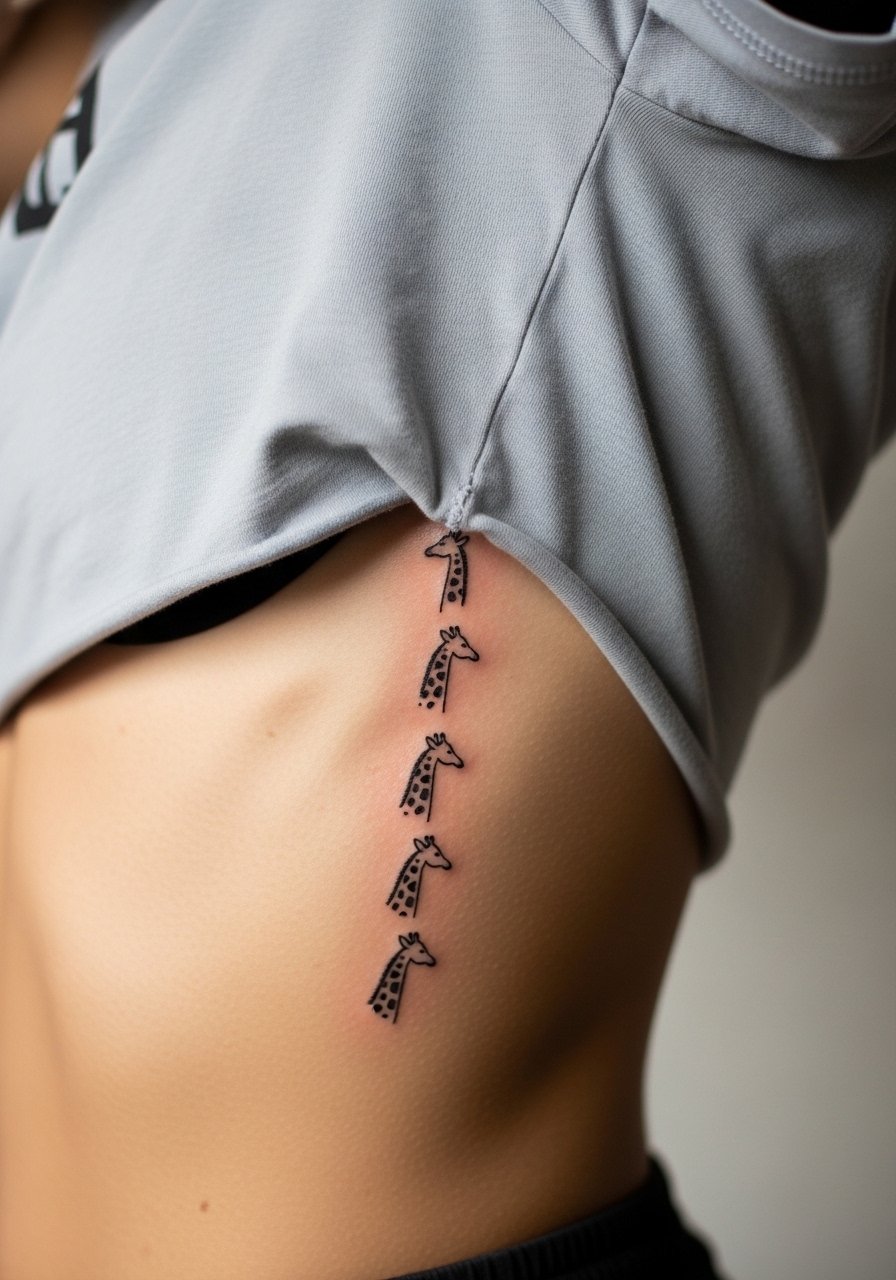
This riff on the giraffe pair solves the multiple daughters problem without crowding. Space each neck vertically so each silhouette breathes as the body moves. During consultation, plan the curve so the necks follow the natural rib sweep. Session time is short per giraffe so you can add them across visits. For casual days wear high waist biker shorts to reveal the lower rib silhouettes without friction.
18. Arrow with Daughter Initials, Directional and Personal
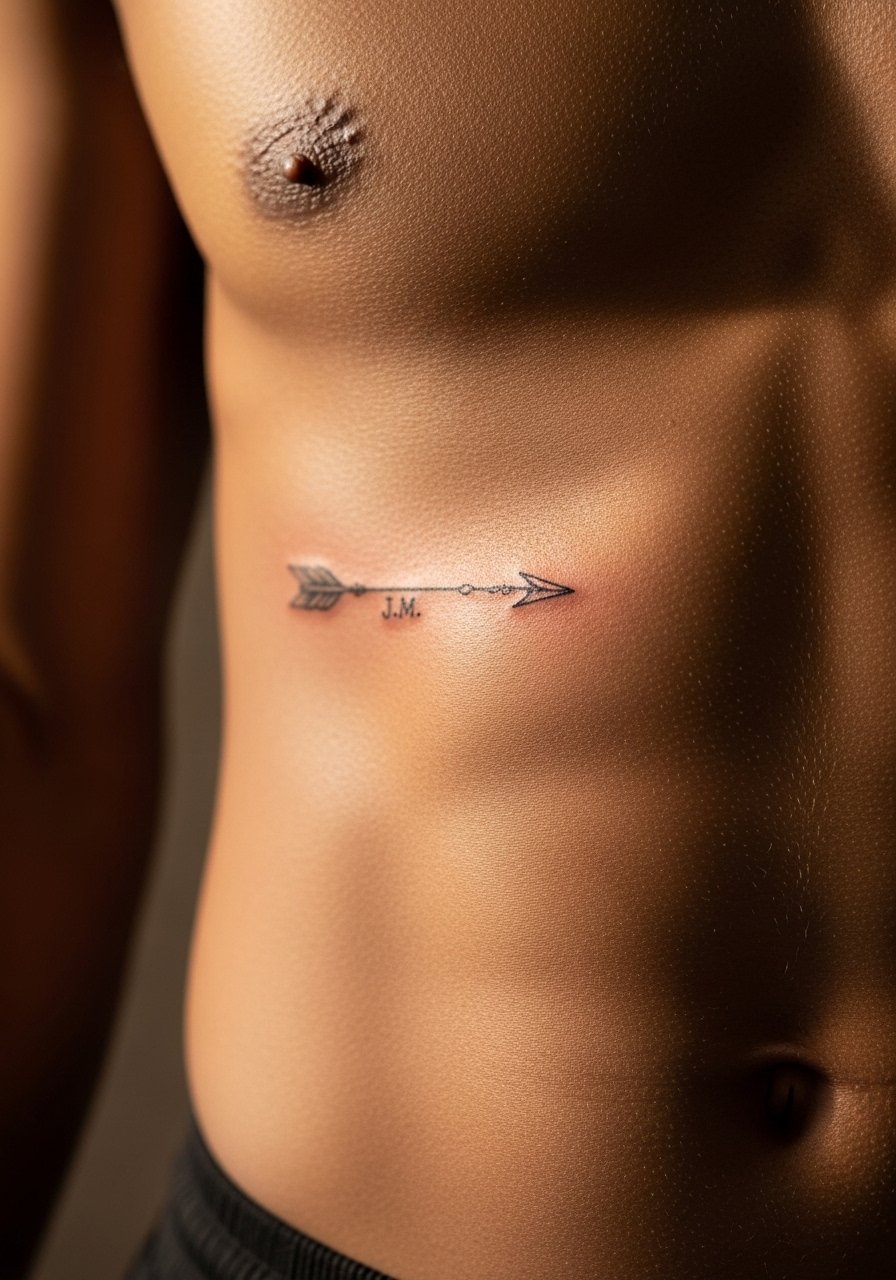
The arrow reads clean on ribs if scaled to 2.5 inches and kept linear along the curve. Ask for initials spaced along the shaft rather than clustered near the arrowhead. A typical mistake is choosing tiny initials that blur into the shaft. For session wear a loose button-down shirt you can move aside. Expect a touch-up at year three if lines soften from movement.
19. Constellation Map for Shared Birthdates
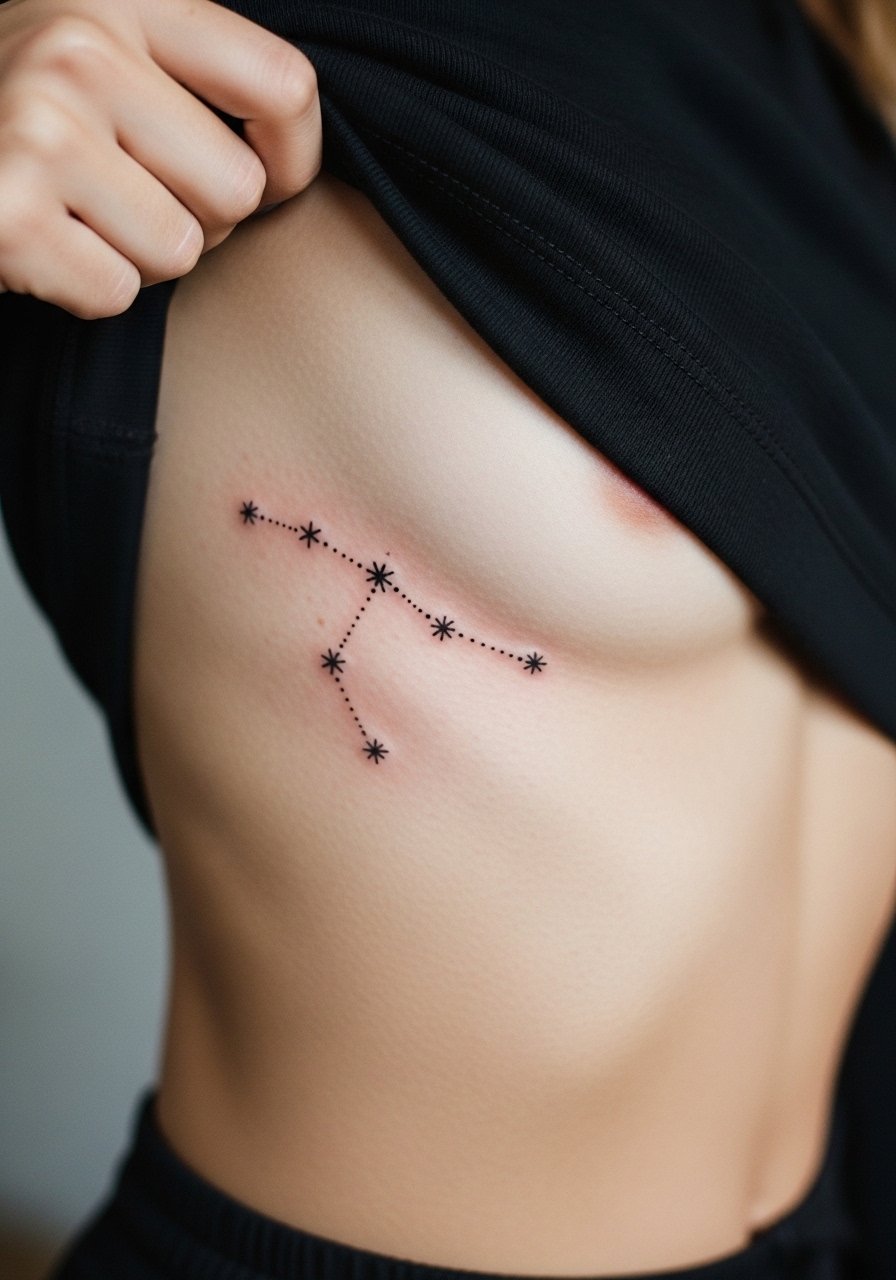
Dot work on ribs looks delicate but the common mistake is clustering stars too tightly. Space them and use slightly larger dots to avoid merging into a blotch. Discuss stipple shading options with your artist to add subtle depth without heavy shading. For photos, a loose tank top pulled aside keeps the look airy. Healing can be tricky in summer, so plan session timing around cooler weeks if possible.
20. Botanical Stem with Initial Tags, Organic Side Rib
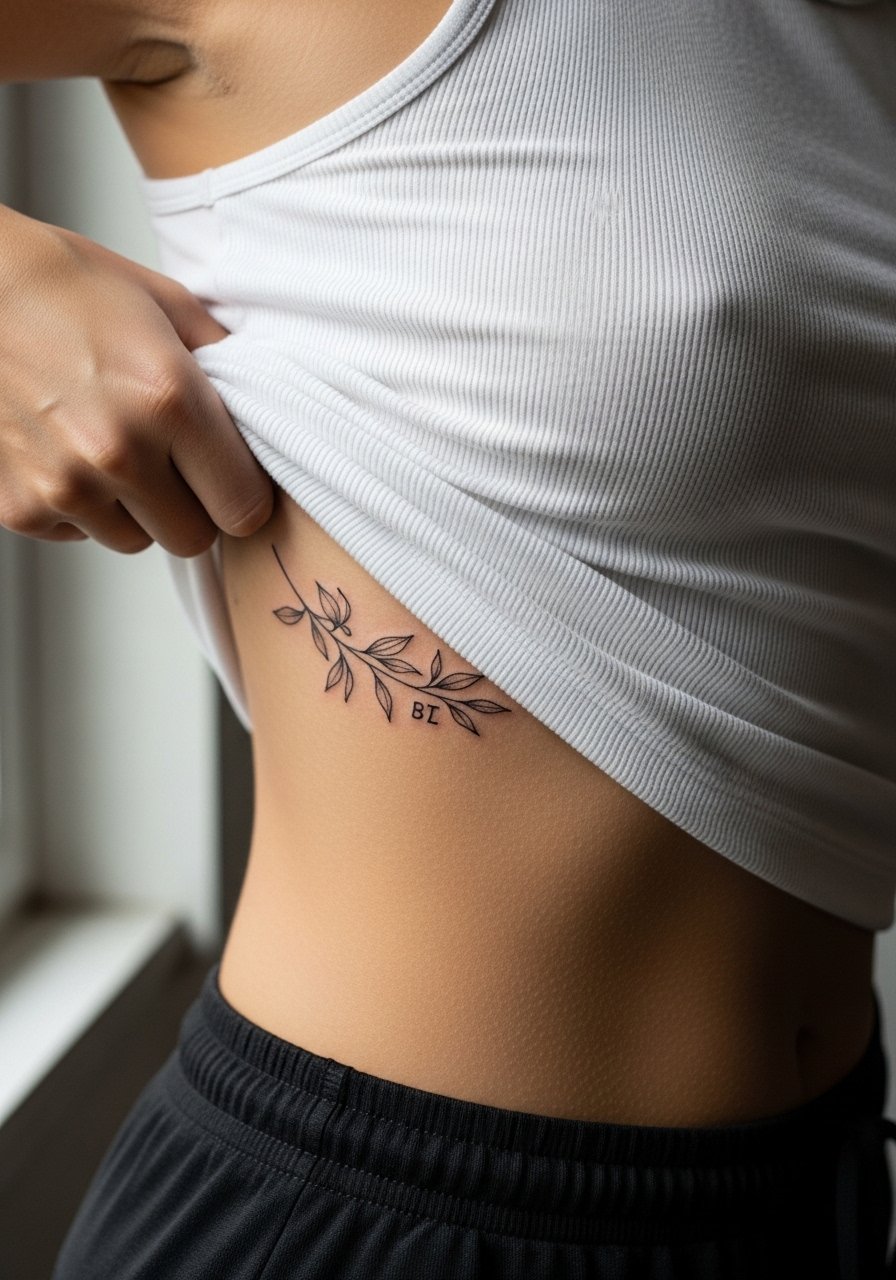
Botanical pieces follow rib curves naturally. For durability ask for slightly thicker main stems with delicate leaf veins done in whip shading. The mistake people make is micromanaging leaf detail that fades. This layout fits a 3-4 inch vertical strip and usually finishes in one session. Pair it with a sheer blouse over a fitted tank to let the stem peek through layers without rubbing.
21. Matching Half-Sun and Half-Moon, Complementary Ribs
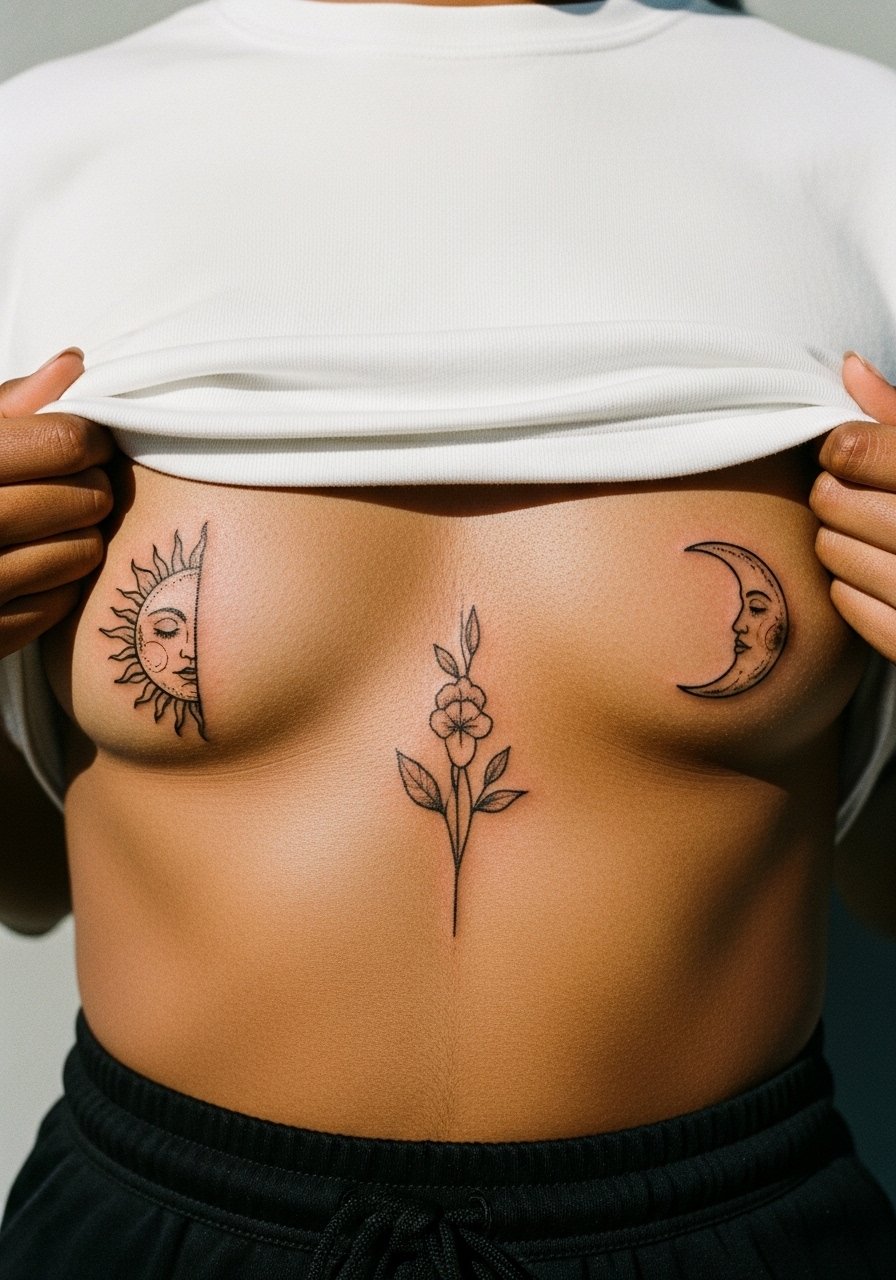
When two people share halves, symmetry and scale are everything. Ask for a visual mockup that shows both halves separated and then aligned so the meeting point looks intentional. A common error is mismatched lineweight between the two sessions, which ruins the pair. These are quick sessions if scaled to 3-4 inches. For photography try a backless halter top that reveals side ribs without full exposure.
22. Simple Heart Outline with Tiny Dates, Emotional Marker
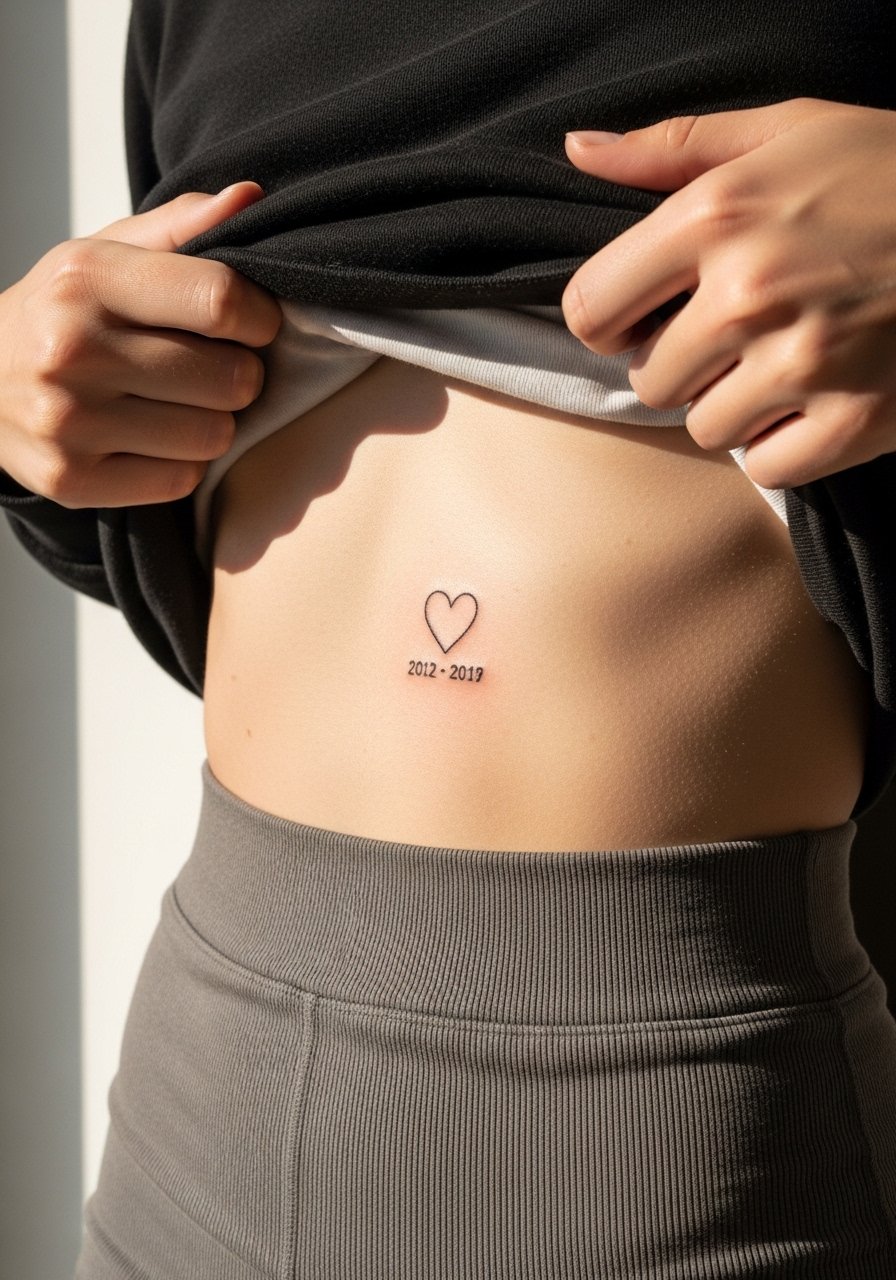
Small hearts can be meaningful, but script or dates next to a thin heart need scale. Ask the artist for slightly bolder outline and modestly larger numerals to ensure legibility after movement. Session time is short, under an hour, and pain tends to spike around rib edges. For casual wear pick high waist straight jeans and a cropped hoodie to show the lower ribs without irritation from waistbands.
23. Geometric Family Tree, Roots on Ribs

A geometric tree lets you stylize growth while keeping clarity. The risk is overfilling dense branches, which merge on the rib curve. Ask for deliberate spacing and a moderate gray wash to define depth. Vertical placement here resists stretch better than horizontal bands. During the session wear a loose tank top so the artist can access the full length without fabric pressure.
24. Simple Anchor Mini, Tiny Stability Mark
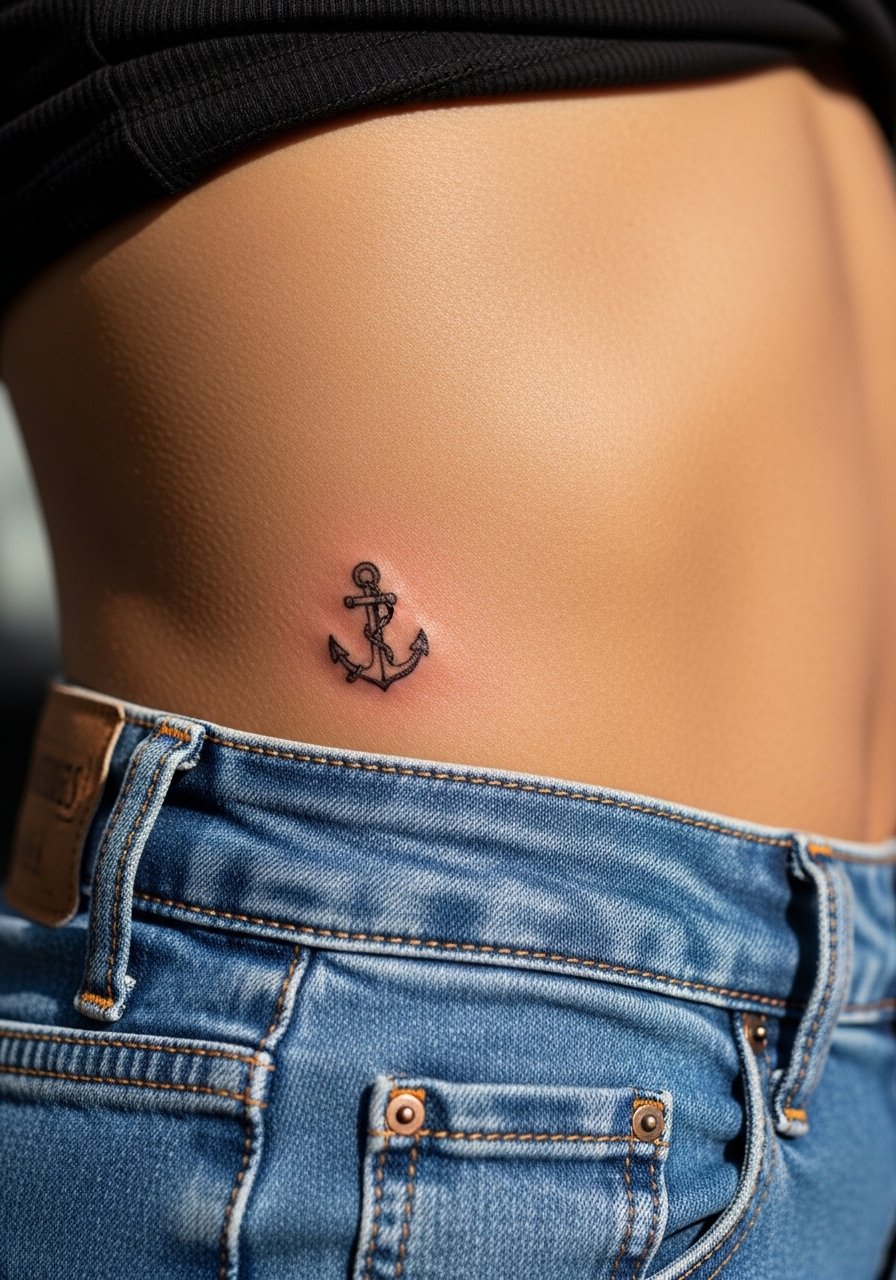
Tiny anchors read classic, but packing a lot of detail in a 1-2 inch design is a recipe for blurring. Request modest lineweight and consider a small surrounding blank to preserve clarity. This suits people who want a subtle reminder rather than a bold statement. For sessions wear drawstring pants you can lower slightly for lower rib access.
25. Micro-Realism Flower with Parent Initial, Tender Tribute
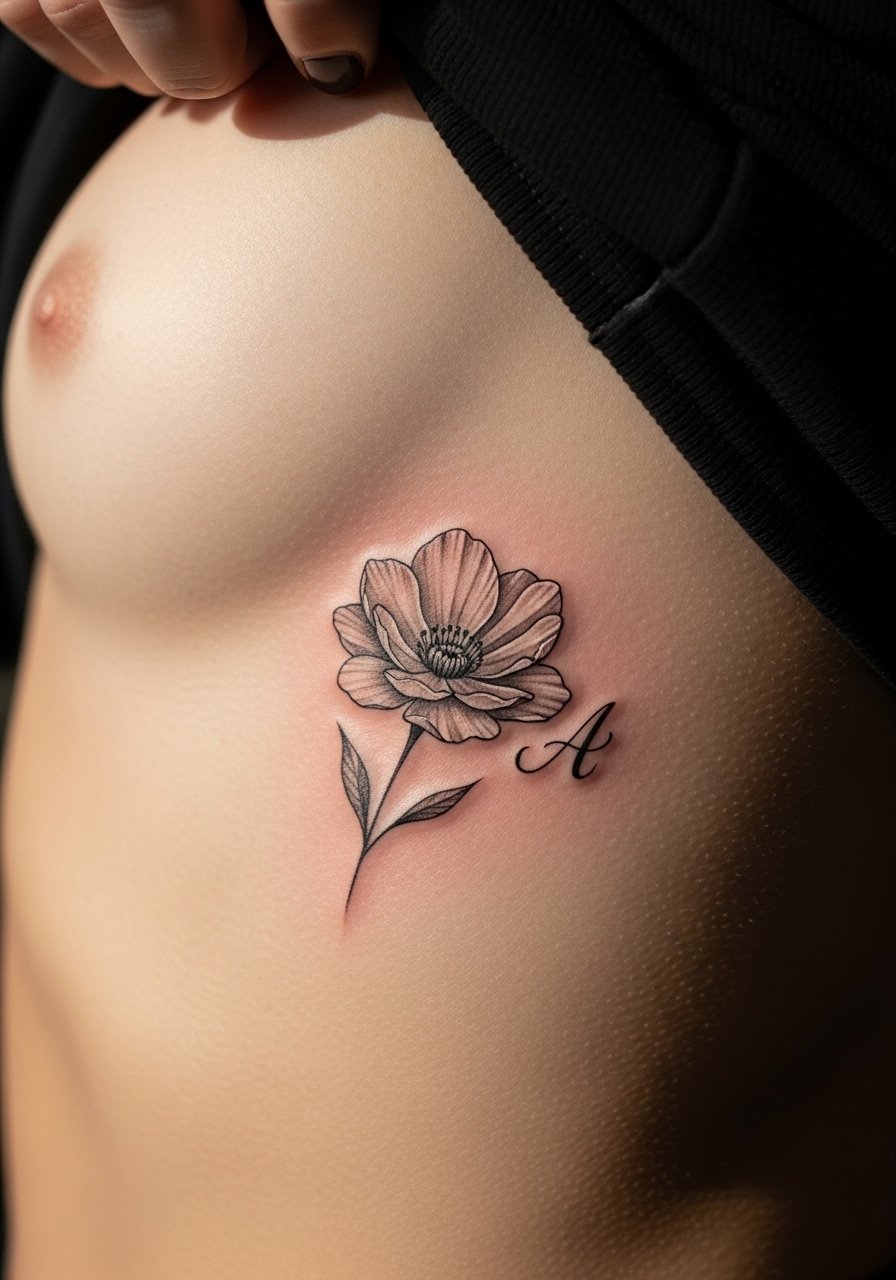
Delicate realism requires careful scaling. If the petal textures are too tiny they lose contrast after one year. Ask the artist to prioritize contrast between petals rather than micro-detail everywhere. These usually take 1-2 sessions depending on shading. For outfits choose a fitted ribbed tank for a soft reveal without rubbing.
26. Small Compass Rose with Daughter Coordinates
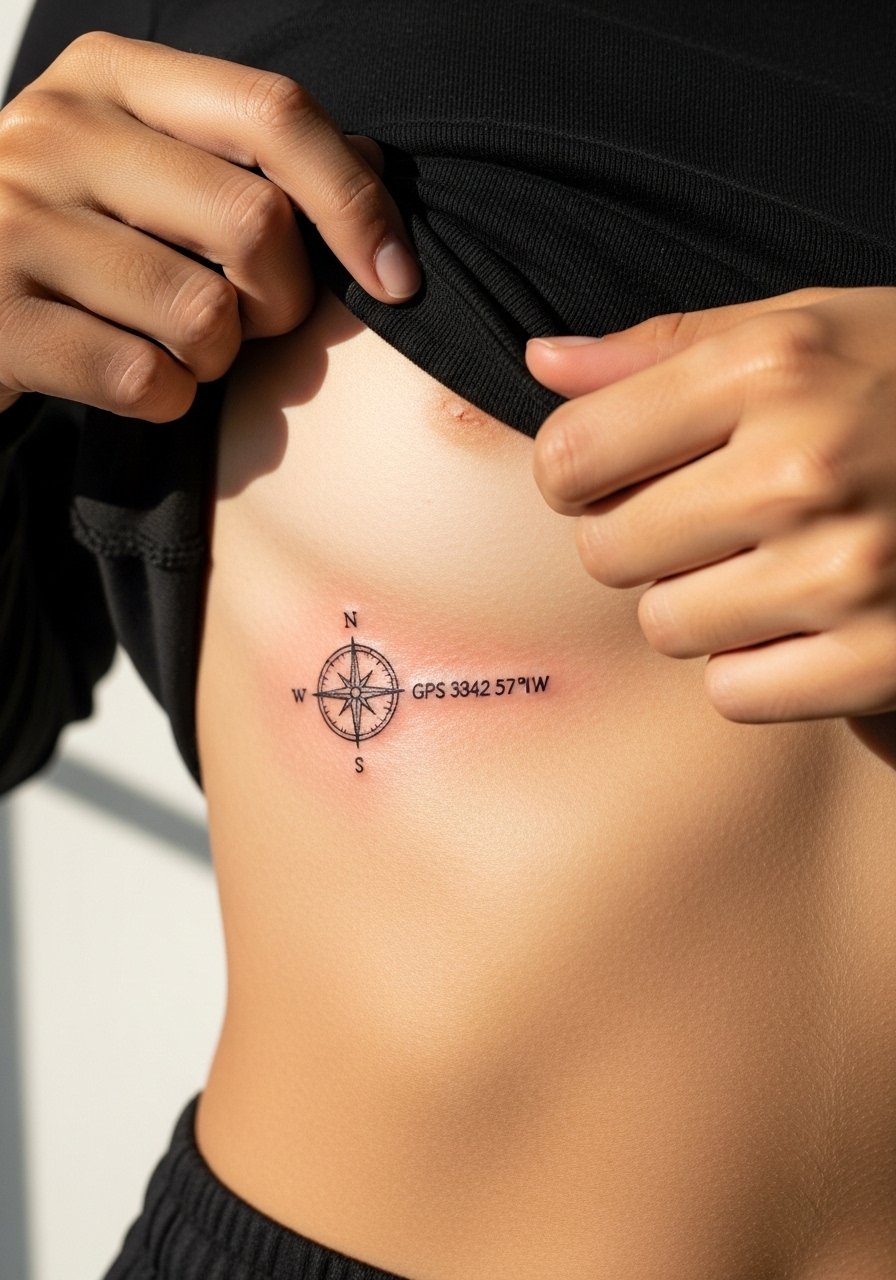
Text and numbers must be planned for scale. When adding coordinates, give exact text and request a slightly wider spacing so numerals do not run together during healing. This piece takes under an hour for simple linework, and it photographs well when the skin is dry and healed. A loose button-down shirt pulled aside during the session keeps the area unobstructed.
27. Minimalist Ribbon Knot, Symbol for Connection
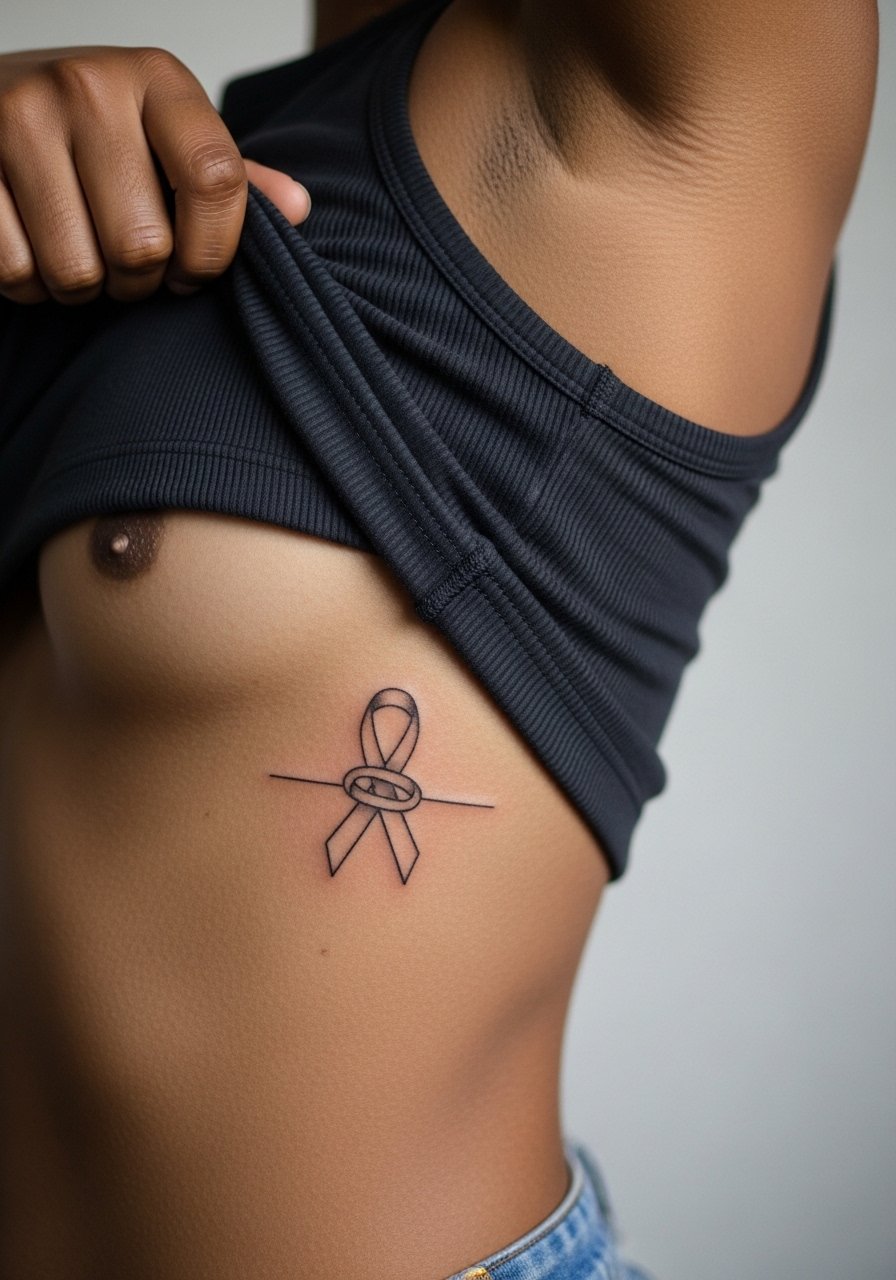
A ribbon knot is subtle but meaningful. Avoid asking for hairline loops that risk blurring. Instead pick a slightly bolder continuous line and clear negative space between overlaps. This is a quick single-session piece and works well when you want something private but visible in certain outfits. For showing it off, a linen crop top keeps textures soft and the knot readable.
Frequently Asked Questions
Q: How painful are ribs for a dad and daughters matching session, and how should we plan appointments?
A: Ribs rank higher on most pain scales because of thin tissue over bone. For matching dad-daughter work, split the designs into 1-2 hour sessions so nobody sits through a marathon. Bring a plan for staggered appointments if needed, and talk to your artist about topical numbing if they are comfortable using it.
Q: Should we choose fine line or blackwork for longevity on the ribs?
A: Both camps have merit. Fine line gives a delicate look but often needs touch-ups sooner. Blackwork holds saturation longer on curved skin. The right choice depends on your tolerance for future touch-ups and how visible you want the piece to remain. Discuss lineweight and spacing during the consult, and ask to see healed rib portfolios.
Q: What clothing should we wear to the studio for a rib session and for showing the healed pieces?
A: For the session wear loose, front-open tops or a loose tank top so the artist has access and nothing presses on fresh ink. To show healed rib pieces, cropped linen tops, high-waisted bottoms, and backless or off-shoulder styles all reveal ribs without pinching the area.
Q: How does skin tone affect choice between fine line and blackwork on the ribs?
A: For darker skin tones, blackwork provides stronger contrast and photographs more consistently. Fine line can read beautifully but may need bolder lineweight to remain visible in photos. Ask the artist about healed examples on similar skin tones and consider black anchors under color or fine work for added longevity.
Q: Are there specific aftercare methods for ribs that differ from arm tattoos?
A: Ribs sweat and rub more, so loose clothing during the first week matters. Some people prefer breathable balms rather than occlusive ointments for the ribs, but the debate between protective film and dry healing exists. Follow your artist's aftercare guidance and be ready to adjust if the area traps moisture.
Q: Can we add more daughter pieces later to an existing dad rib design?
A: Yes, many rib designs are built to accept future additions. Ask your artist to leave deliberate space or plan connecting negative space so additional elements layer without looking crowded. Vertical orientations tend to be more flexible for later additions than tight horizontal bands.
