
Fine line filler tattoos are everywhere on feeds right now, but what you see trending and what actually lasts on fingers are two different things. Fingertip friction and frequent washing mean the designs that survive are about line weight and placement, not just flash. Read through these tiny ideas with realistic aging notes so you can pick a finger bridge space that still looks clean after a year.
1. Dots and Tiny Stars on the Side Finger
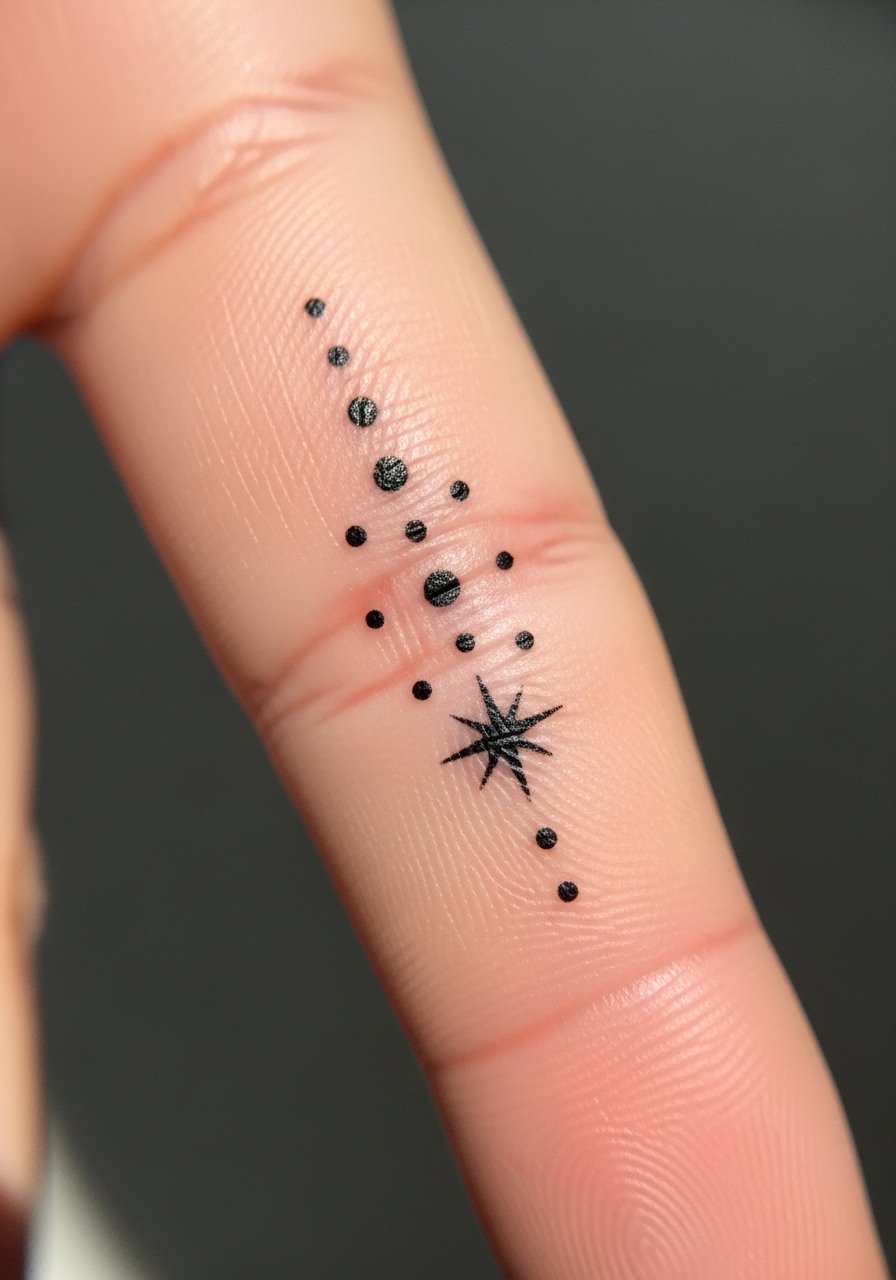
Dots and 1–3 millimeter stars work when you need to bridge spaces between larger pieces without competing for attention. I recommend telling your artist to space the dots as a constellation rather than a straight row so the pattern breathes and avoids merging. Pain is low for side finger placement and a single short session often does the job. The common mistake is asking for lines that are too thin for fingers, which will soften into blur by year two. Expect touch-ups sooner than on arms, often within a year, and skip rings during healing to avoid pressure on the dots.
2. Tiny Crescent Moon at the Knuckle Base
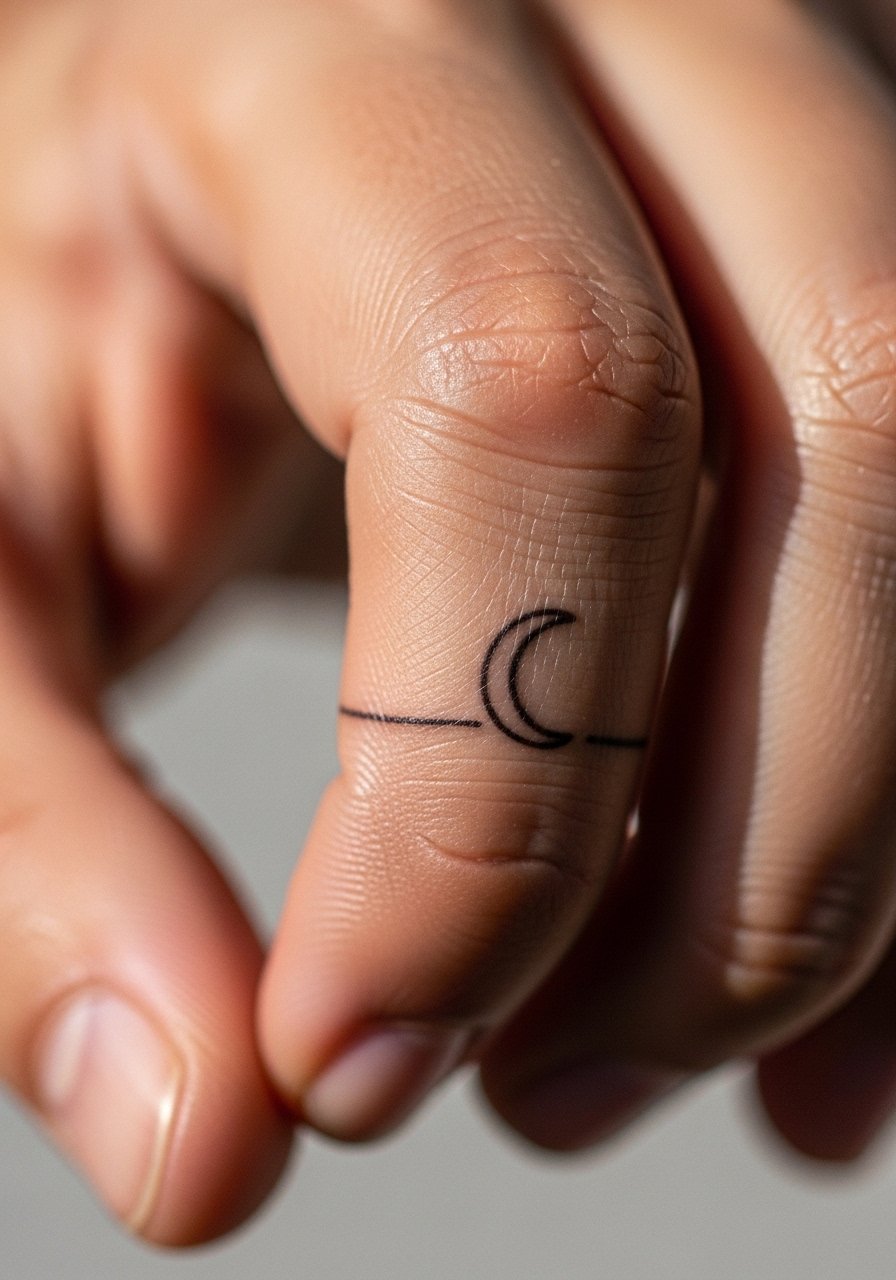
A 2–4 millimeter moon sits nicely at the knuckle base and adds a cosmic cue between bolder pieces. Tell your artist you want enough negative space around the crescent so the curve does not visually merge with adjacent work. Knuckle placement is higher on the pain chart and the skin moves a lot while you use your hand, so expect faster fading. If you plan to show it off, pair this with a gold pinky ring or muted nail polish to keep attention on the crescent while your other fingers remain understated. Ask about touch-up timing at booking.
3. Micro Leaf Sprig on the Inner Finger
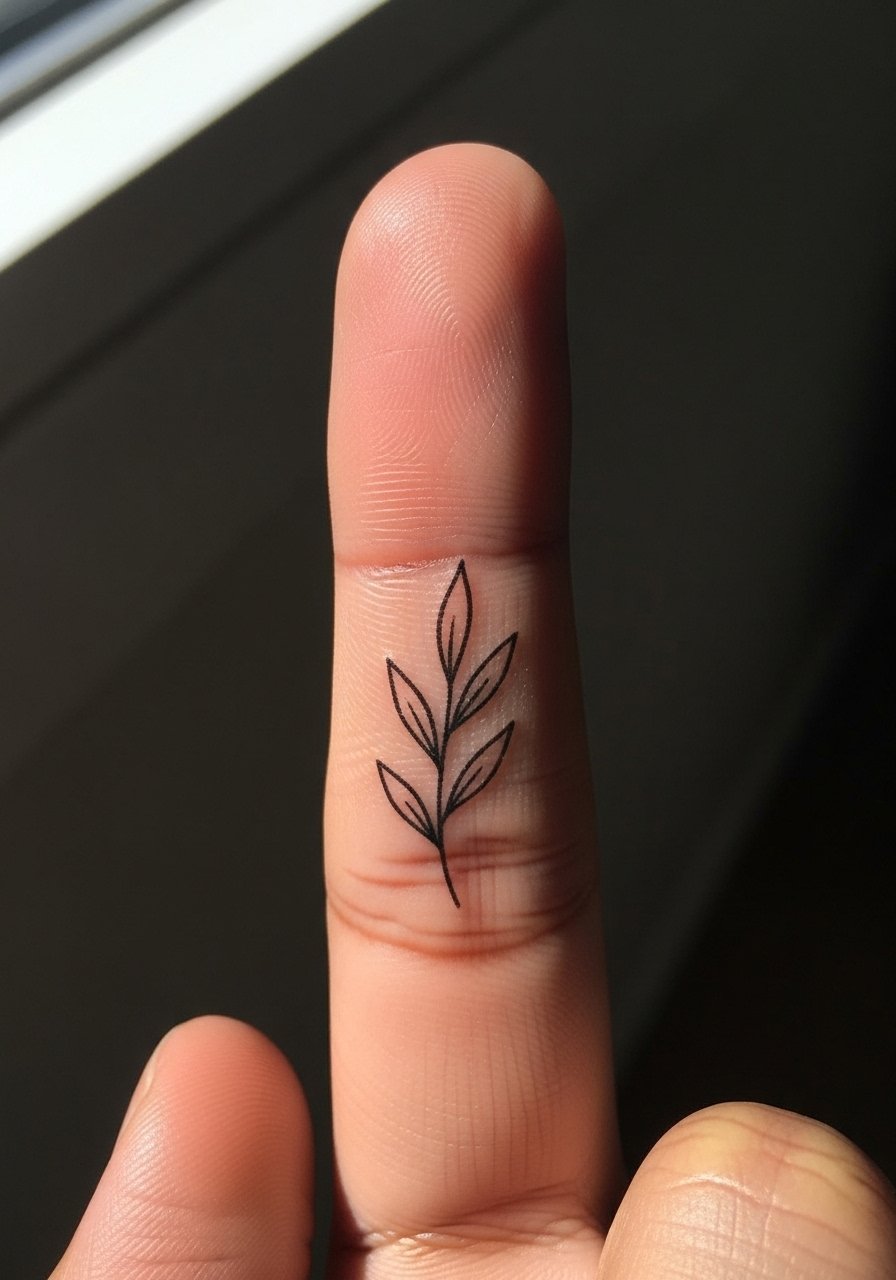
Micro botanical sprigs flow with surrounding nature-themed pieces and help bridge spaces along the inner finger. For dark skin tones, request slightly thicker linework or a dot-work stem in the consultation so the design reads after healing. Inner finger sessions feel scratchy and close to the bone, so plan for a 20–30 minute appointment window. A typical mistake is asking for hairline stems that disappear in a few months. For showing it off, try a thin silver ring stack on a non-tattooed finger and keep nails neutral to let the sprig read.
4. Micro Bee on the Side Finger
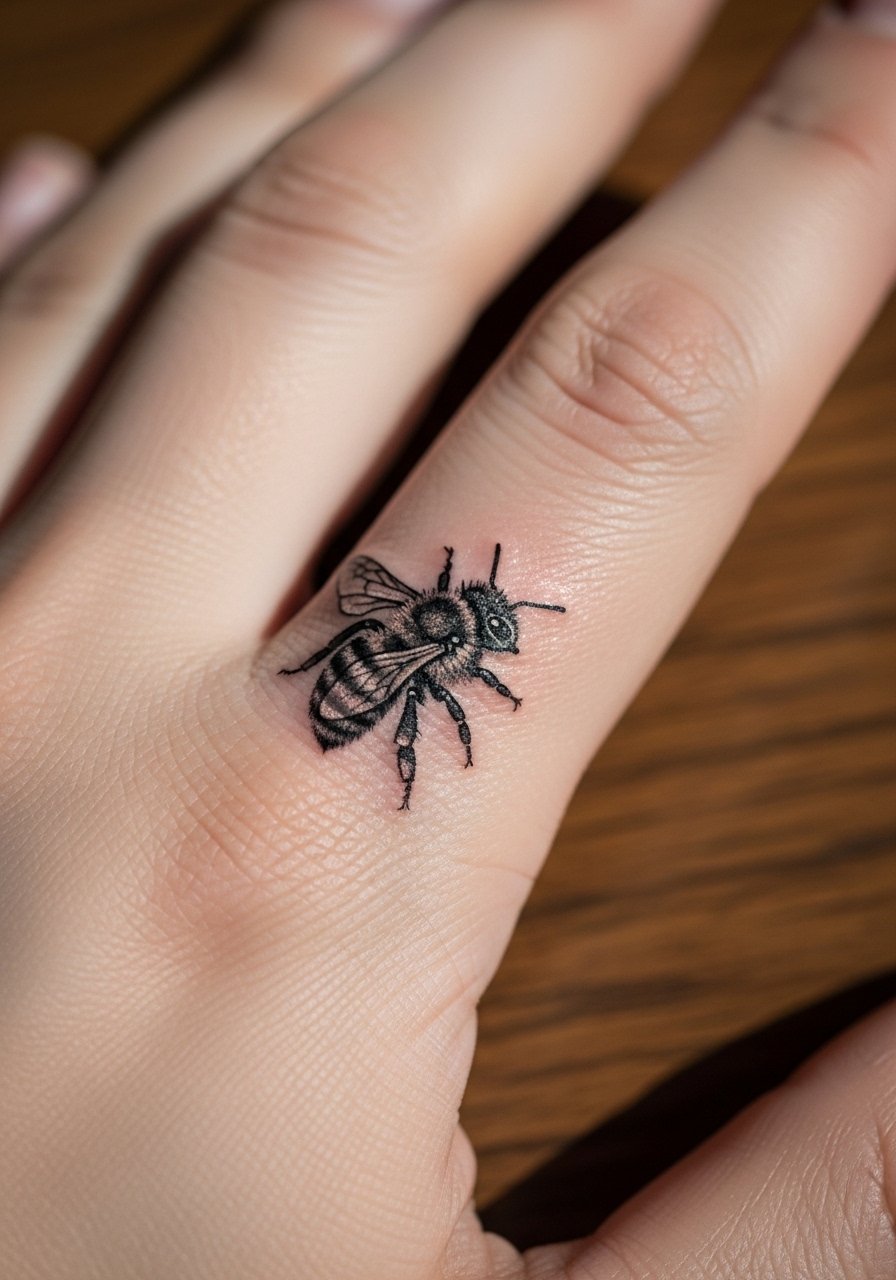
A 2–5 millimeter bee gives a playful symbol without crowding the finger. Ask your artist for strong contrast in the wing linework and a compact abdomen so the shape survives friction from daily tasks. Side finger placement hurts less than knuckles but still registers as sharp for a minute or two. The most common error is over-detailing the wings; micro-realism needs simplified forms to avoid turning into a gray smudge over time. For sessions wear, remove rings and choose a loose short sleeve so the artist has unobstructed access.
5. Abstract Swirl That Wraps a Joint
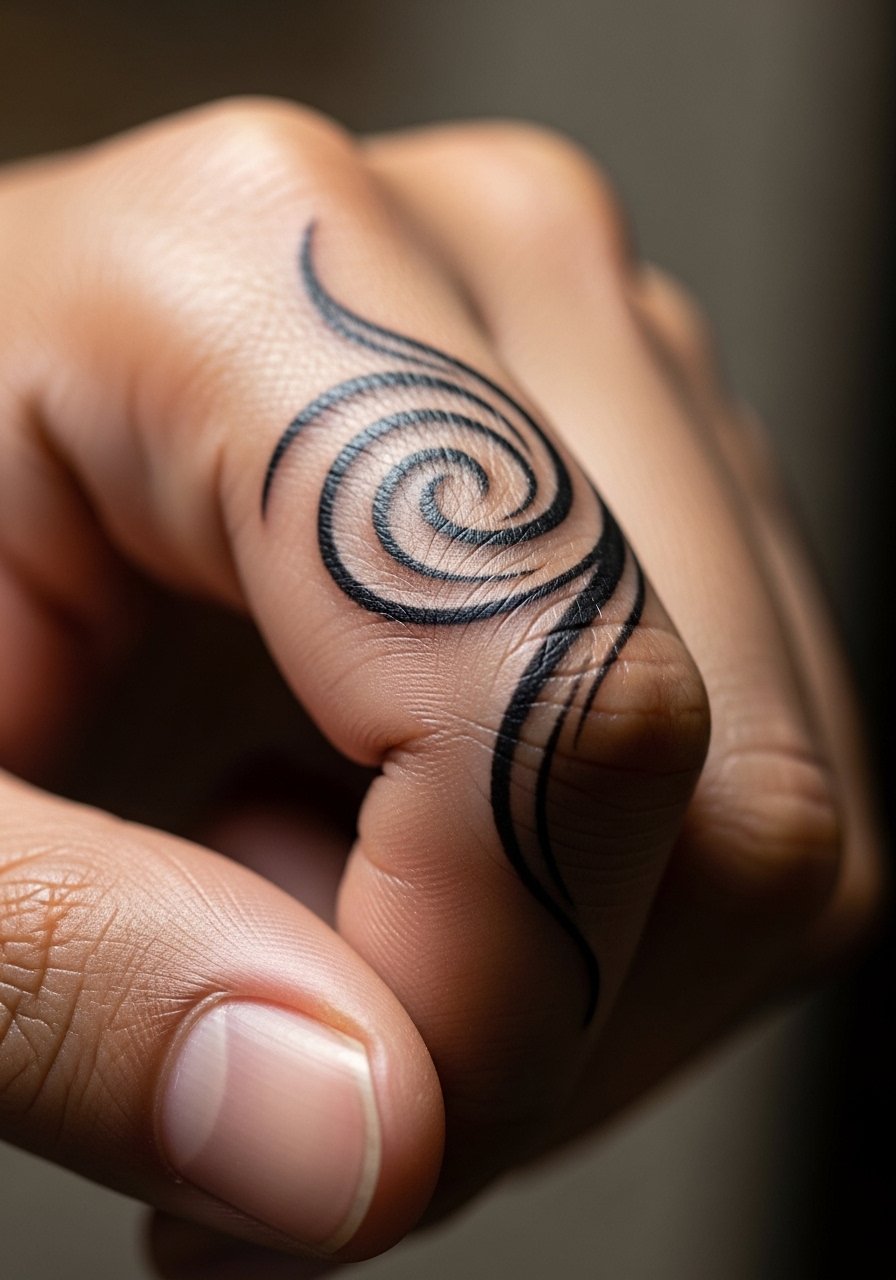
A 3 millimeter blackwork swirl adds texture by wrapping around a joint, creating a subtle 3D illusion for awkward gaps. Tell the artist you want a clean outer edge and a slightly thicker inner line so the wrap keeps its silhouette after a year. Wrapping designs risk distortion if drawn too tightly around the joint, which is the most common mistake. Expect a bit more pain on the joint itself and plan for a touch-up at year one or sooner if you use your hands a lot. Pair this with a black onyx ring set on the opposite hand for contrast.
6. Cluster of Music Notes at the Base Finger

A tight cluster of 1–4 millimeter music notes personalizes a small bridge space for musicians and listeners. During consultation, show rhythm or motif references and ask for slightly bolder stems to prevent fading into one dark smudge. Base finger placement is moderate on the pain scale and takes around 15–25 minutes in most sessions. A mistake is asking for ornate notation on this scale; simplify to solid note heads with short stems. For an evening reveal try a dainty chain bracelet to frame the wrist and keep attention on the hand.
Before You Book
The finger and knuckle pieces above face different challenges than arm work, so a few specific items smooth the session and the first week.
-
InkGuard Balm. A non-greasy balm alternative that many people prefer for high-friction finger areas, helpful in the first days when scabs are forming.
-
HealFast Tattoo Ointment. Reported to help scab drop more predictably, which reduces the risk of ink pull on tiny linework.
-
Aussie Tattoo Goo. Useful for dry climates and situations where a thinner product prevents clogging around fine dots and tiny stars.
-
Hifumi Paste. Breathable paste that some people prefer over heavy ointments when fingers see a lot of movement.
-
Zensa Healing Cream. A thinner, less occlusive option for finger tattoos where moisture management without clogging is important.
7. Micro Geometric Triangle Cluster on the Finger Side
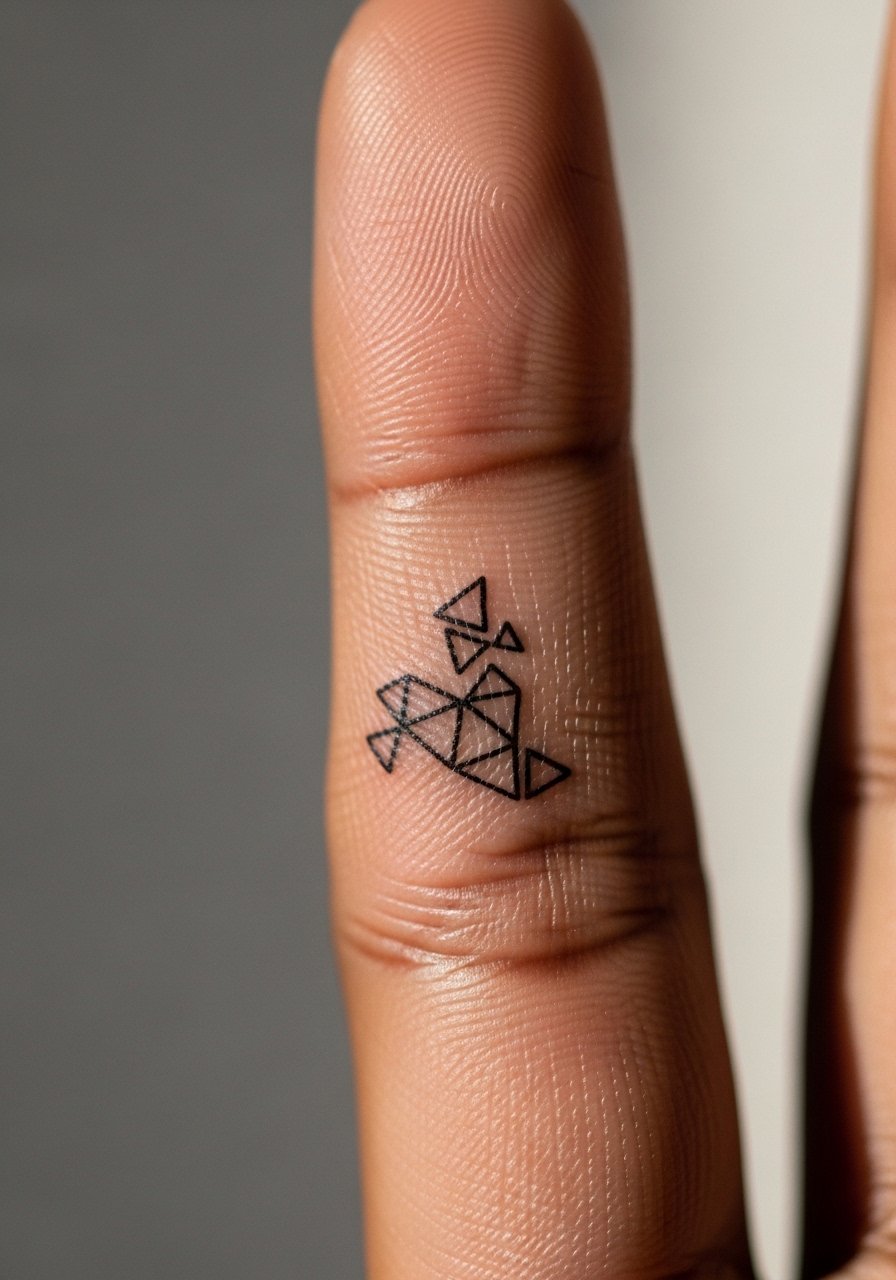
Micro geometric clusters upgrade plain hand gaps with crisp shapes that can bridge irregular spaces. In my experience the line weight matters more than the motif, so ask for 1–2 millimeter lines and some breathing room between triangles to avoid merging. Geometric pieces on fingers can look brittle if scaled too small, which is the usual mistake. This placement takes roughly 20 minutes and tends to need a touch-up within 12–18 months on average. For showing it off, a minimalist ring set complements the precise shapes.
8. Stipple Shaded Mini Dot Cluster on Knuckle
Stipple shading uses dot work to create a soft gradient that reads as texture on knuckles and small bridge areas. Ask your artist to scale the stipple so individual dots remain distinct once healed, and to avoid dense packing that leads to muddy appearance. Knuckle sessions are painful for many people, so expect a sharp sting and a short recovery. A common error is over-compressing the dots to fake shading, which causes faster fading. Touch-ups for stipple on hands are normal at year one to restore crispness.
9. Tiny Traditional Star with a Color Pinprick
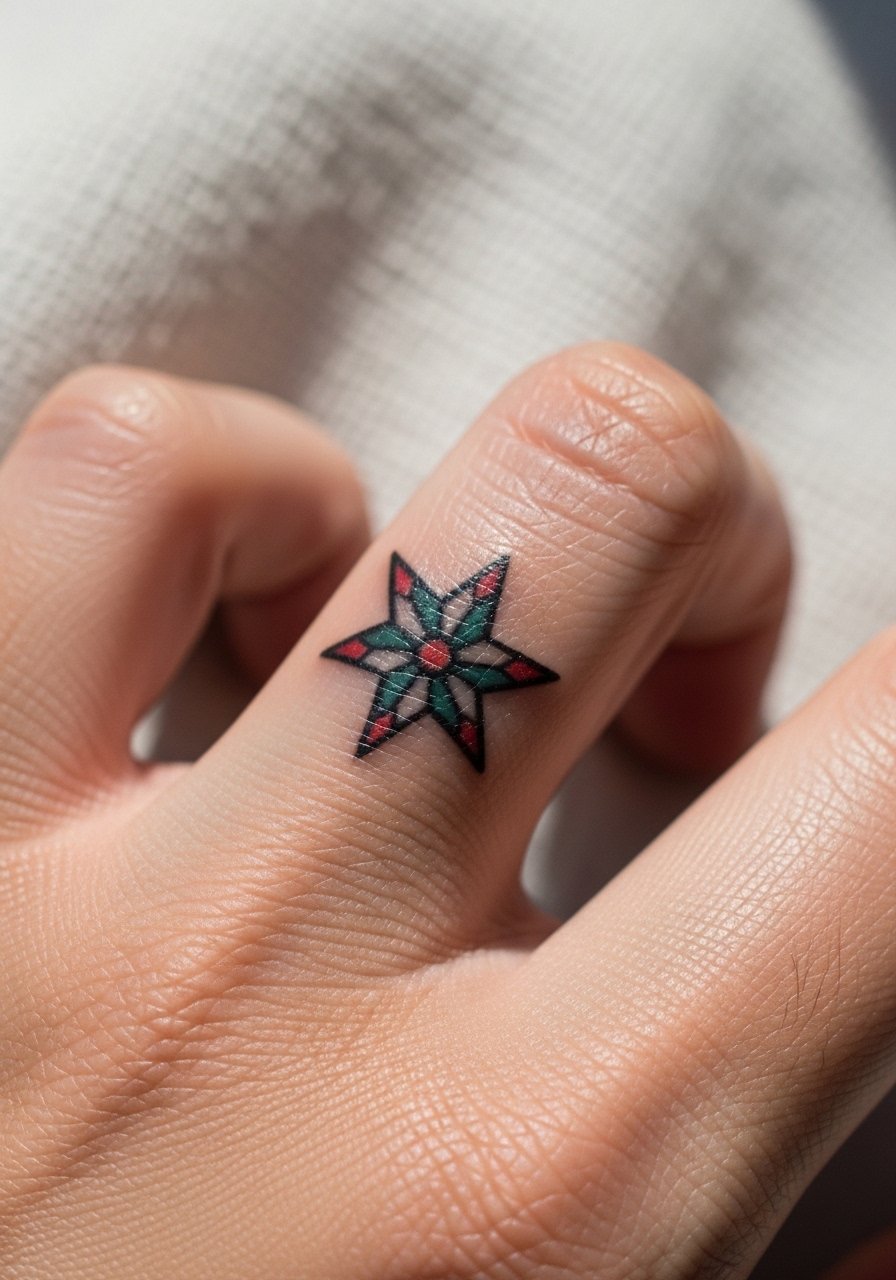
Traditional 2 millimeter stars hold up well when the outline is bold enough to resist blur. For colored accents ask the artist to keep color minimal and saturated rather than watercolor style, so it does not wash out on the finger. Back-of-finger placement is lower on the pain scale but higher on exposure to contact and sunlight, so expect color to fade faster than black. The mistake is asking for a very thin outline with pastel fills, which rarely lasts. Pair this design with black gel nail polish for a cohesive look.
10. Tiny Traditional Eagle Head on the Side Finger
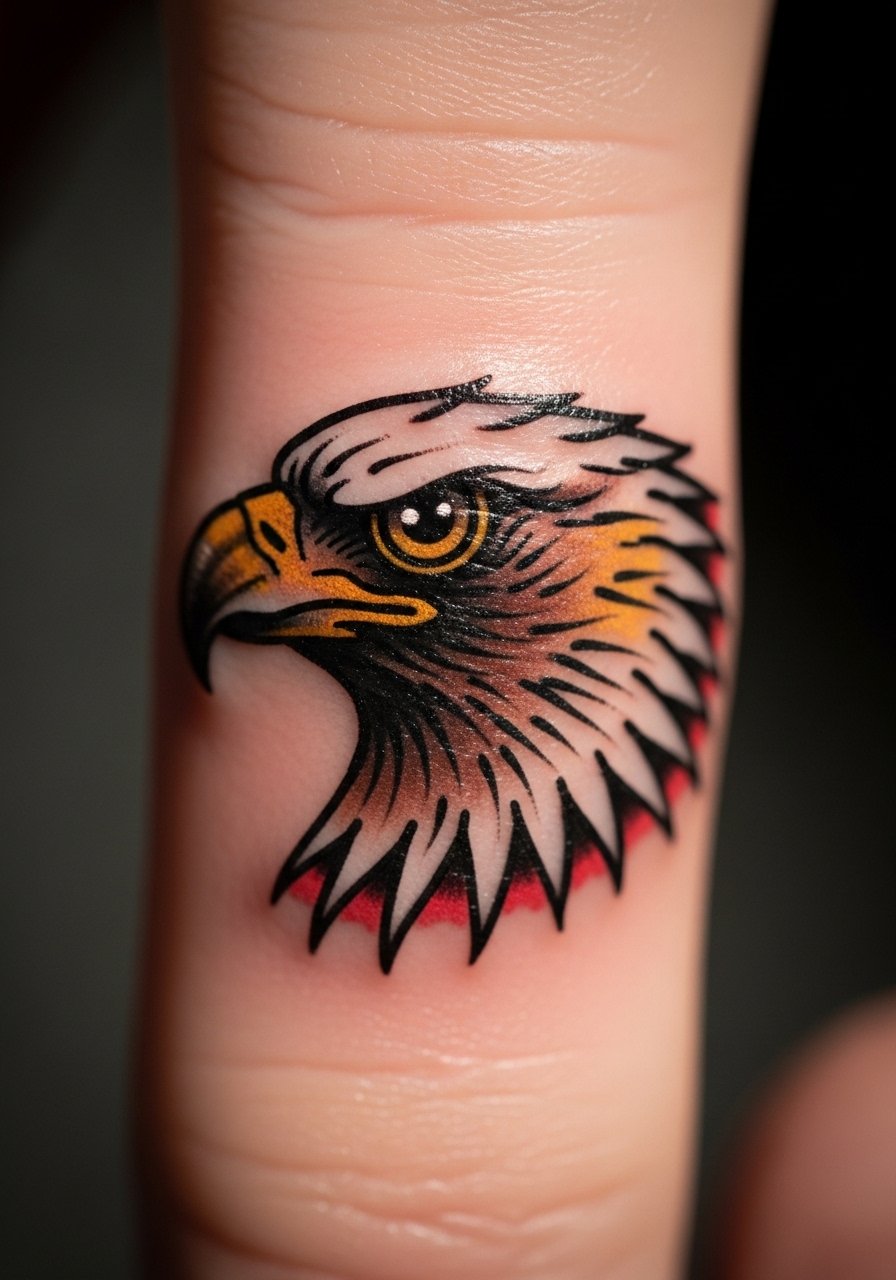
A 4–6 millimeter traditional eagle head can fill odd-shaped bridge spaces where a square or circle would look awkward. Request simplified features and strong linework during consultation so the beak and eye remain legible after healing. Side finger placement can be uncomfortable near the bone, but sessions are short. People often overcomplicate the head with tiny feathers and color gradients that lose definition. Expect to see the most of the design's shape after a touch-up around year one, especially if you work with your hands a lot.
11. Message-in-a-Bottle Icon at the Base
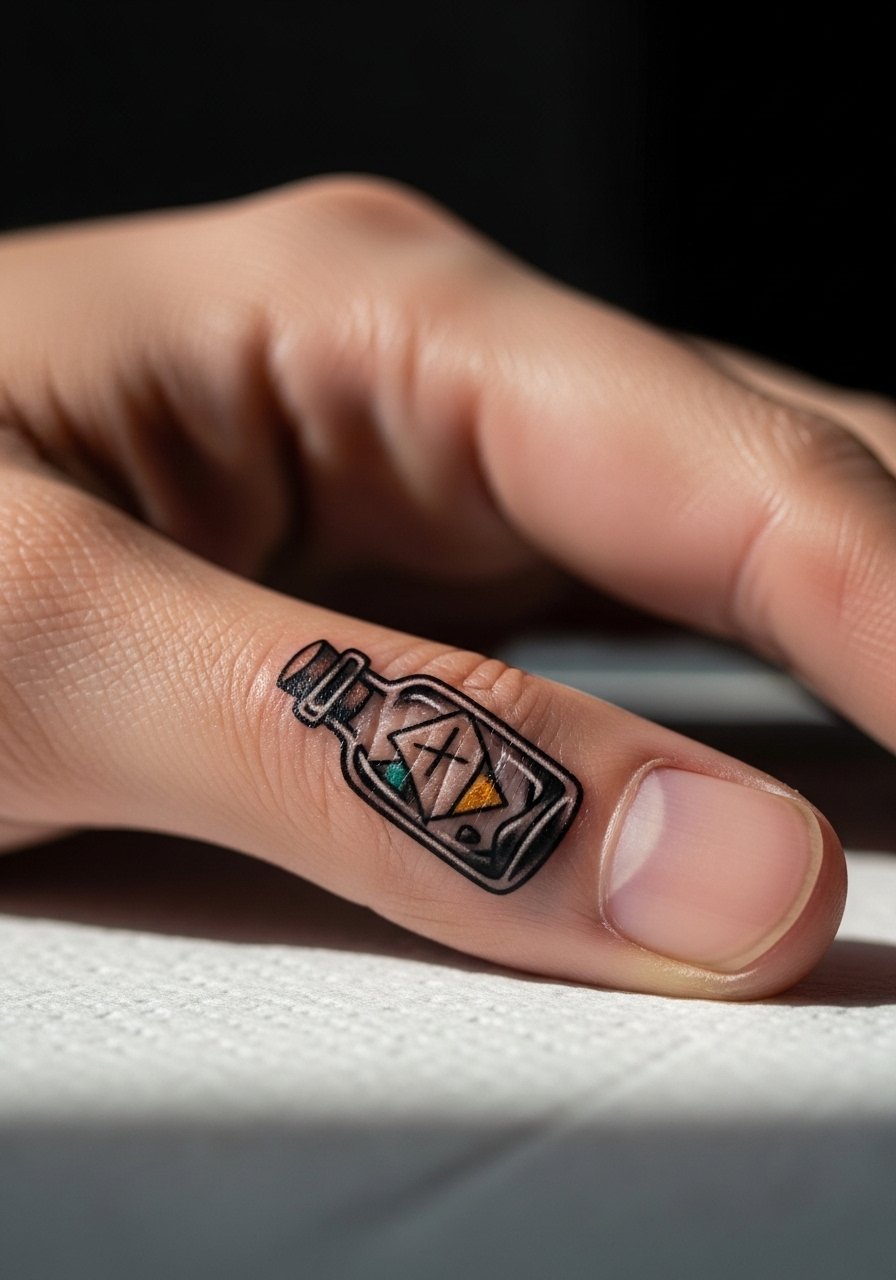
This tiny pop culture nod reads as nostalgic without dominating the hand. Ask for a simplified silhouette and a single color pop so the bottle shape stays clear after a few months. Base finger placement can scuff easily during everyday tasks so plan for an initial fade and a likely touch-up in the first year. For the session wear choose a loose short sleeve so the artist has clear access. To frame the reveal consider a cream linen shirt rolled at the elbow.
12. Micro Shark Head Wrapping the Finger
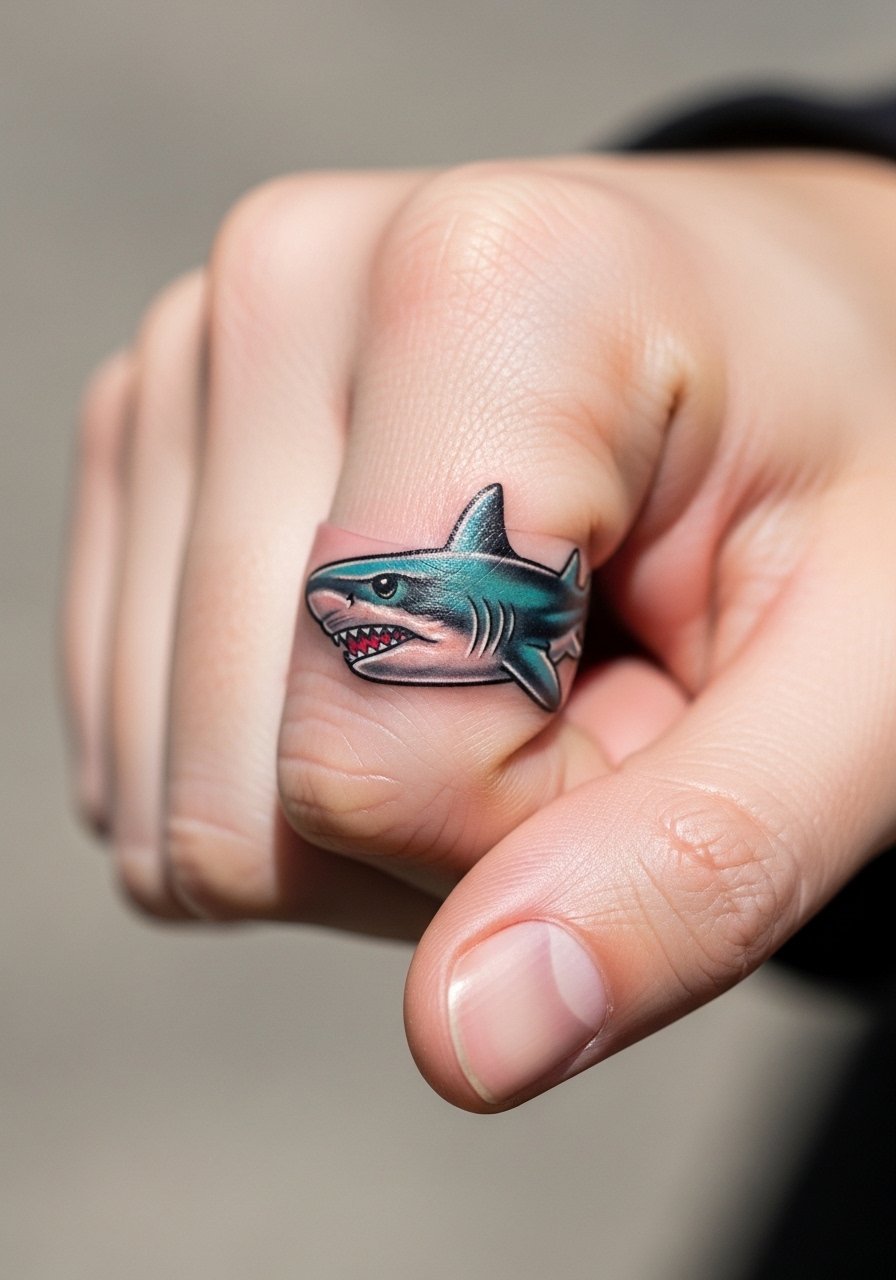
A compact shark design adds fierce movement to a narrow bridge space, particularly when the mouth follows the finger curve. Tell your artist to limit fine internal detail and to prioritize a strong silhouette so the shark reads from different angles. Wrapping designs must avoid tight curves that distort when fingers flex, which is the primary mistake. Sessions are a bit longer for color, and vibrant pigments often need refreshing sooner on hands than on limbs. Consider revealing this with a vintage style watch on the opposite wrist.
13. Single Tiny Heart at the Fingertip
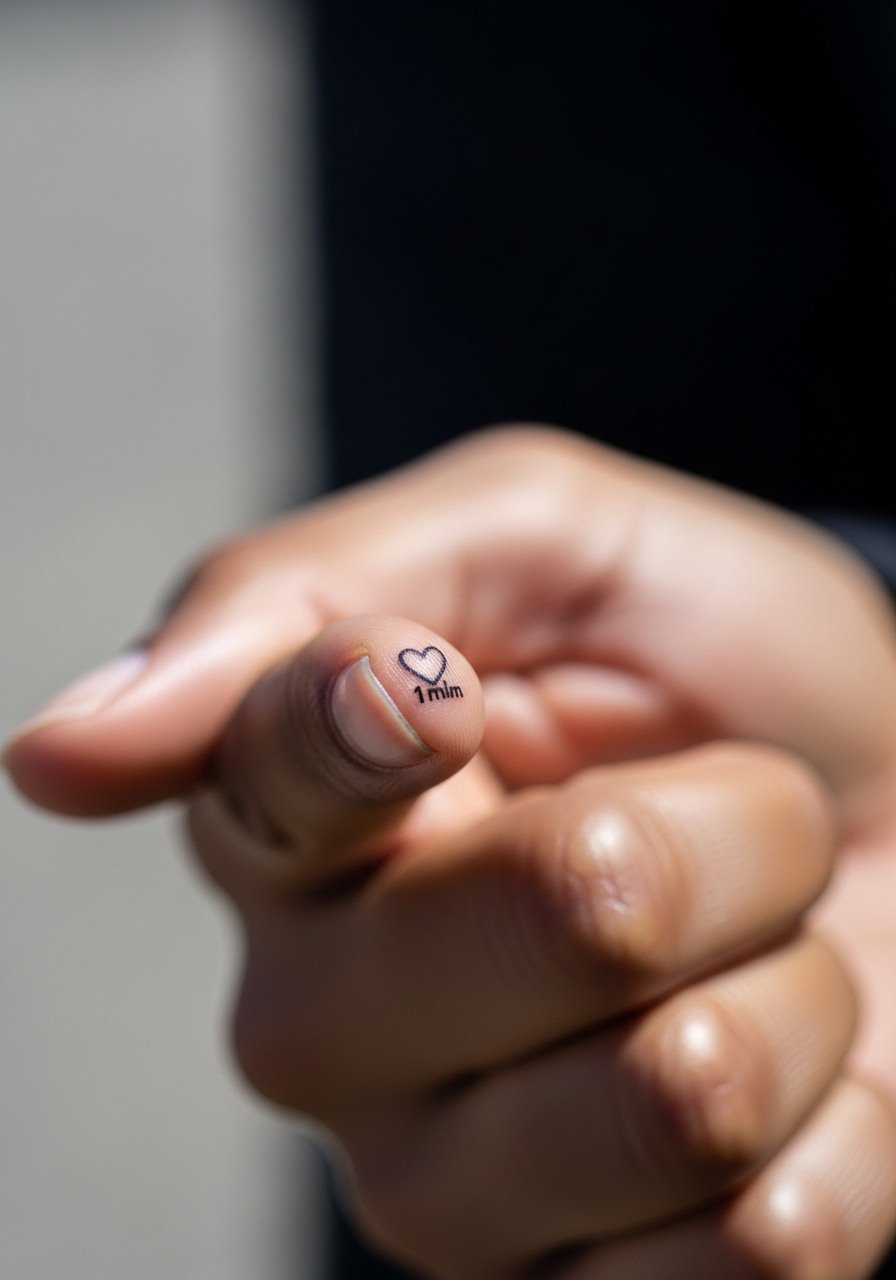
A 1 millimeter single-line heart on the fingertip is an intimate, low-visibility option for first finger filler ideas. Because fingertip skin renews quickly, request slightly thicker linework than you think you need to avoid disappearing after a few months. The pain is surprisingly intense at the tip, and the session is brief. The usual regret is choosing an ultra-thin script heart that skips the touch-up window. For a subtle reveal pair with a nude nail polish set so the fingertip reads cleanly.
14. Micro Script Word Along the Finger Back
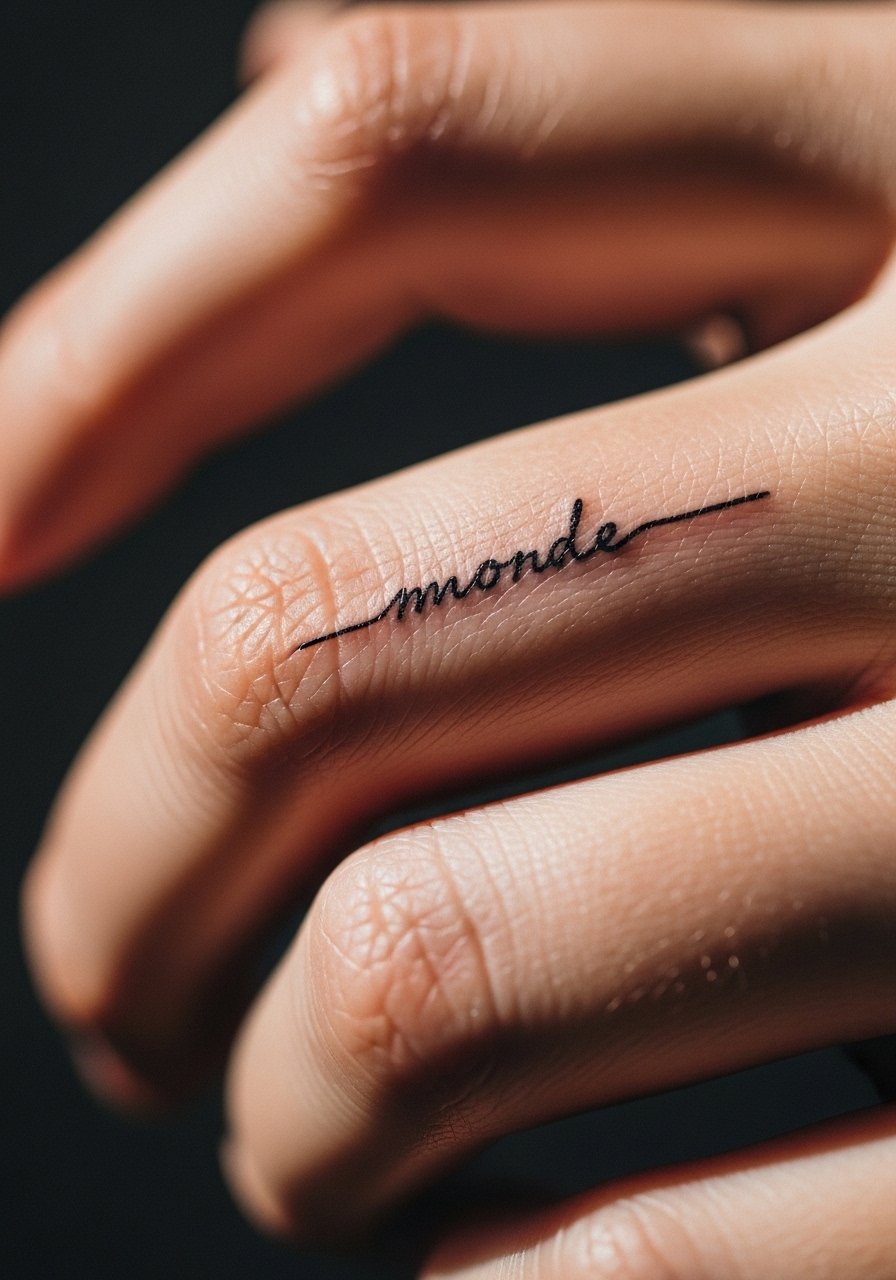
A tiny script word can bridge a narrow space and read like a whispered label on the hand. When booking, specify exact text and font so the artist can scale the letterforms for legibility. The back of the finger sees sunlight and contact, so expect faster softening of fine curls and tails. A common slip is asking for tiny flourishes that collapse into blobs. Keep the word short, and plan a touch-up in the first 12 months to restore clarity.
15. Tiny Constellation Chain on the Finger Back
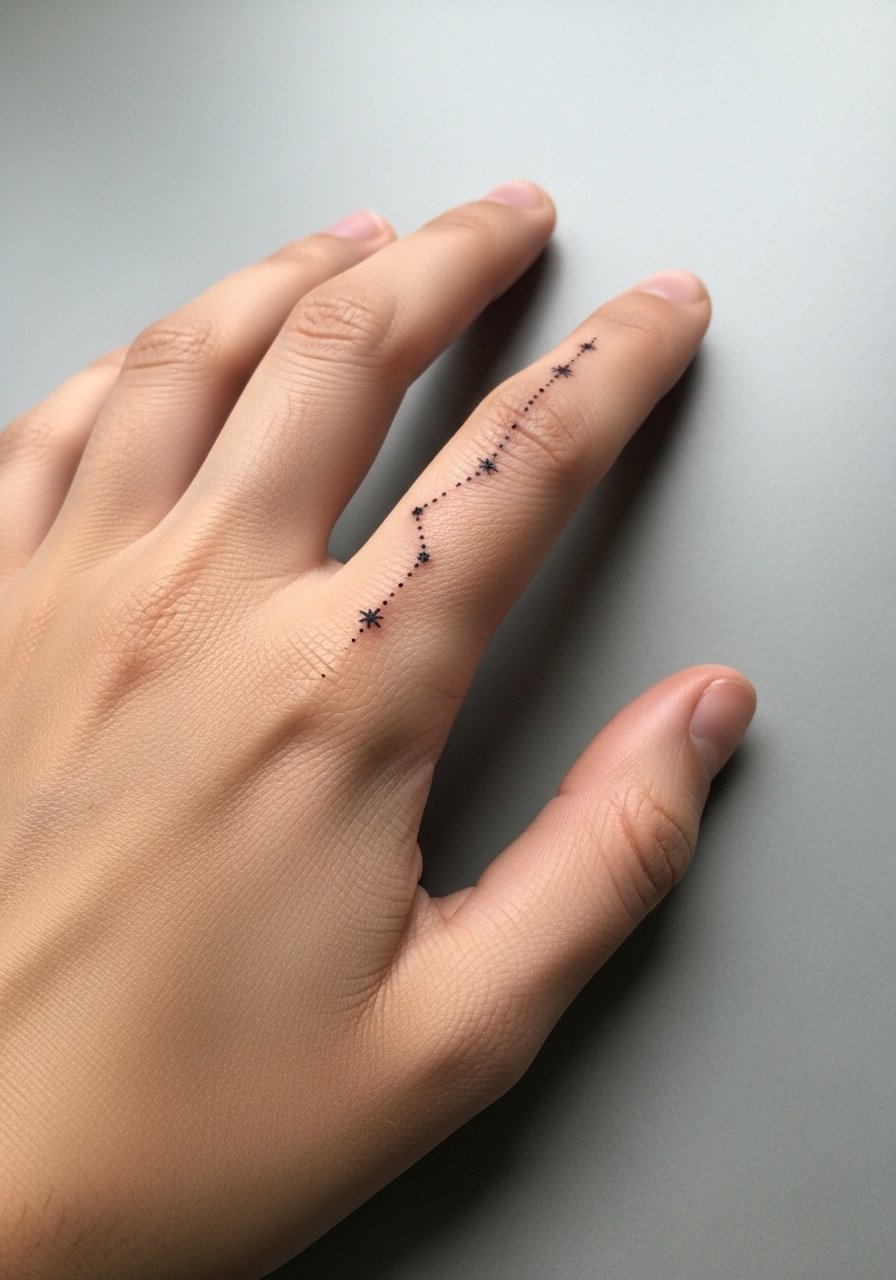
A chain of tiny dots and subtle connecting lines creates an elegant bridge across the finger back. Ask your artist to use dots as anchors and to keep connecting lines lightly spaced so they do not merge into a single band. The controversy around fine line on fingers applies here. One camp says fine line fades rapidly in high-friction areas and needs frequent touch-ups. The other camp argues that with correct needle depth and spacing, fine line can settle well even on hands. Bring up this debate at consultation and ask the artist which method they recommend. For styling, a dainty gold ring on the same finger can accent the constellation.
16. Micro Pop-Culture Sprite on the Side Finger
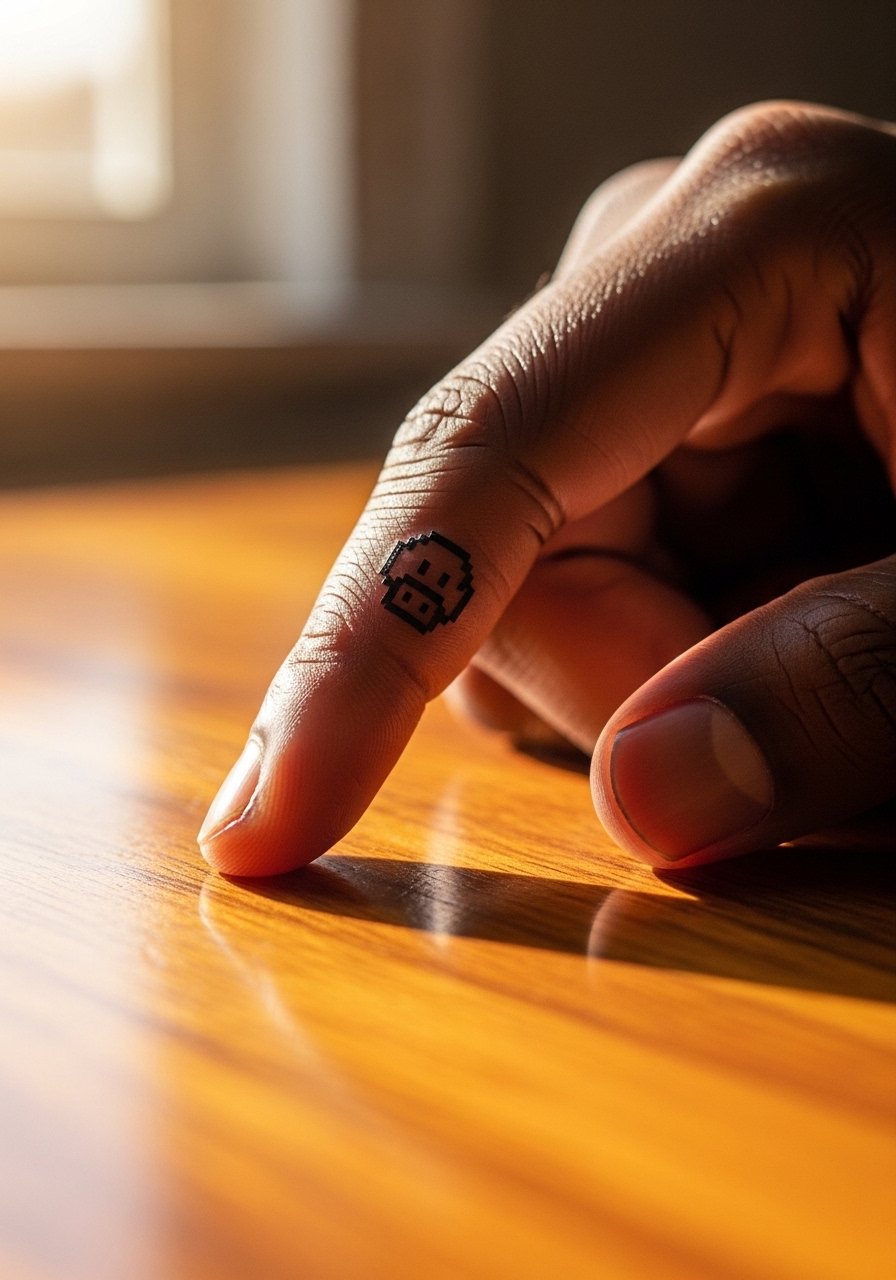
Nostalgic micro sprites work in narrow bridge spots by using blocky, simplified pixels rather than fine curves. Tell your artist the exact sprite and the pixel count so the composition stays recognizable after healing. Side finger placement helps shelter the tiny pixels from constant palm contact. A common mistake is over-detailing a sprite that becomes illegible. Sessions are short, and touch-ups depend on how much you expose the area to friction.
17. Shading Gradient Band Around the Finger
A narrow shading gradient band provides depth without relying on hard outlines, which makes it useful for smoothing an irregular bridge space. Request a soft gray wash with stipple transitions rather than a solid block so the skin can age with texture. This technique can be riskier on fingers because wash can lose contrast over time, so expect a touch-up at least by year two. For session comfort wear a white cotton tee you can roll up for access, and avoid rings during healing.
Frequently Asked Questions
Q: How long do tiny finger fillers usually stay crisp before needing a touch-up?
A: Expect finger fillers to need a touch-up sooner than arm work. In my experience most tiny finger pieces show noticeable softening within a year to eighteen months, especially on knuckles and fingertips. Bold linework and black saturation extend that window, but plan for at least one touch-up in year one.
Q: Which styles work best on darker skin tones for finger fillers?
A: Solid blackwork, dot work, and slightly thicker outlines tend to read best on darker skin tones. For fine line botanicals or scripts ask for a bolded rehearsal line during consultation and consider a small test patch if you are unsure. If you want a show-off pairing, a thin silver ring stack can help frame the design visually.
Q: Are knuckle fillers worth the pain versus side-finger options?
A: Knuckle fillers deliver strong visual cohesion where sleeve pieces meet the hand, but they are on the higher end of the pain scale and fade faster due to constant movement. If pain and longevity matter more than immediate impact, side-finger or base-finger placements are often the better compromise.
Q: Should I use Saniderm or the dry healing method for finger tattoos?
A: Artists are split on this. One camp likes Saniderm for quick protection and less mess during the first 24 to 72 hours. The other camp favors dry healing or breathable balms to let scabs form and drop naturally. Decide based on how your skin typically scars and what your artist recommends for hand placements.
Q: How do I find artists who do tiny fillers without sloppy results?
A: Look for healed portfolios and search discovery tags like #fingerfillertattoo and #handgapfiller on social platforms, then vet healed photos rather than fresh work. Use booking tools to find guest spots and ask for healed images in consultation so you can see how the artist's tiny linework holds up over time.
