
Fine line behind-ear work is everywhere on feeds right now, but what actually lasts and what turns into a faded smudge is a different story. Pain on the bone, sweat under helmets, and tiny designs that need touch-ups are the real tradeoffs most people learn the hard way. Flip through these 17 clean behind-ear options and you will see which ones age better, which ones hurt, and what to ask at your consultation.
1. Minimalist Cross Outline in Black Ink
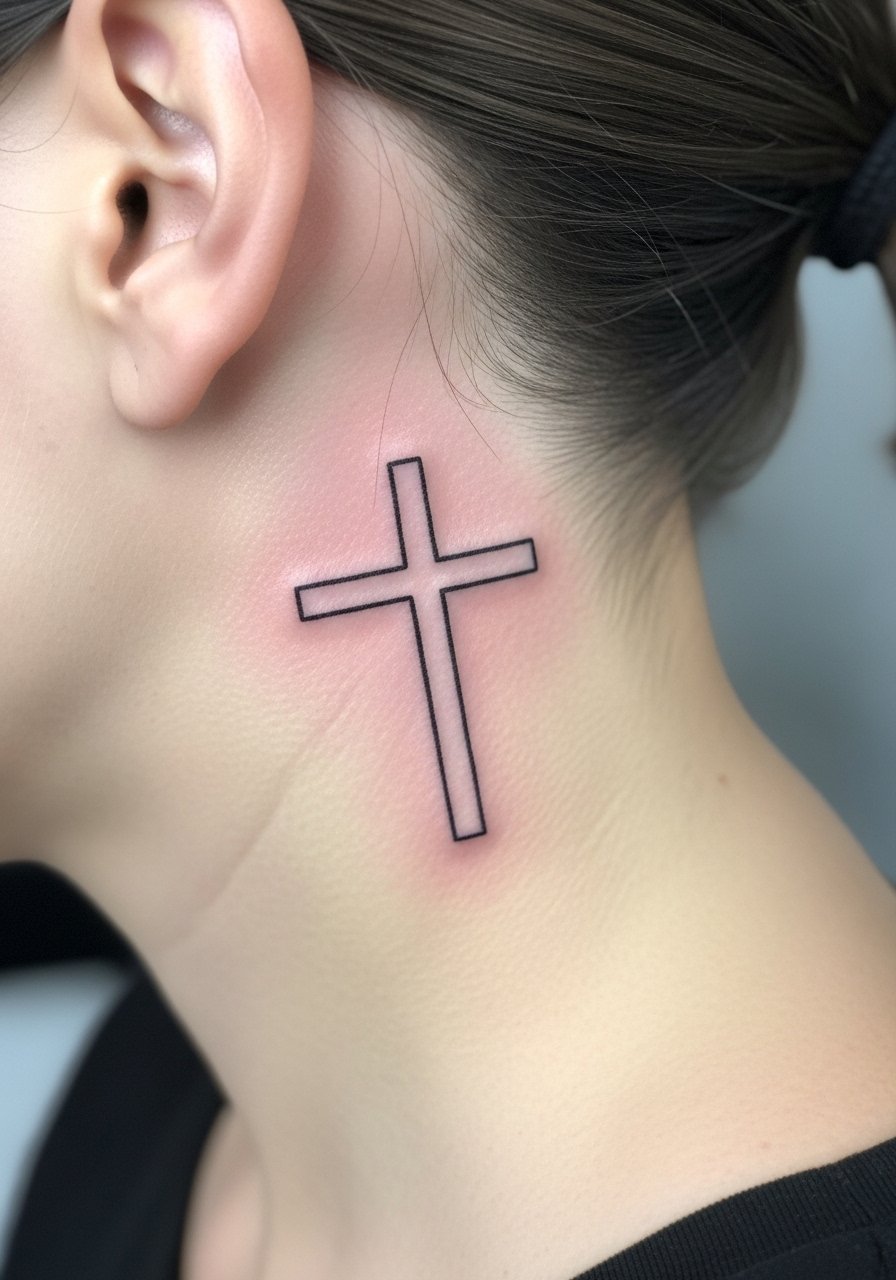
This one is the classic pick for anyone who wants a tiny mark you can mostly cover with hair. I recommend it when you want an understated nod to faith or memory without a large session. Tell your artist you want one to one-and-a-half centimeters and ask for slightly heavier line weight than a delicate single-hair stroke so it holds at year two. Pain on the bone is sharp but brief. Expect a 20 to 30 minute appointment. Common mistake is asking for lines that are too thin, which leads to early softening. For showing it off, pair with an open collar button shirt that you can pull aside during the session and wear after to frame the jawline.
2. Fine Line Arrow Following the Ear Curve
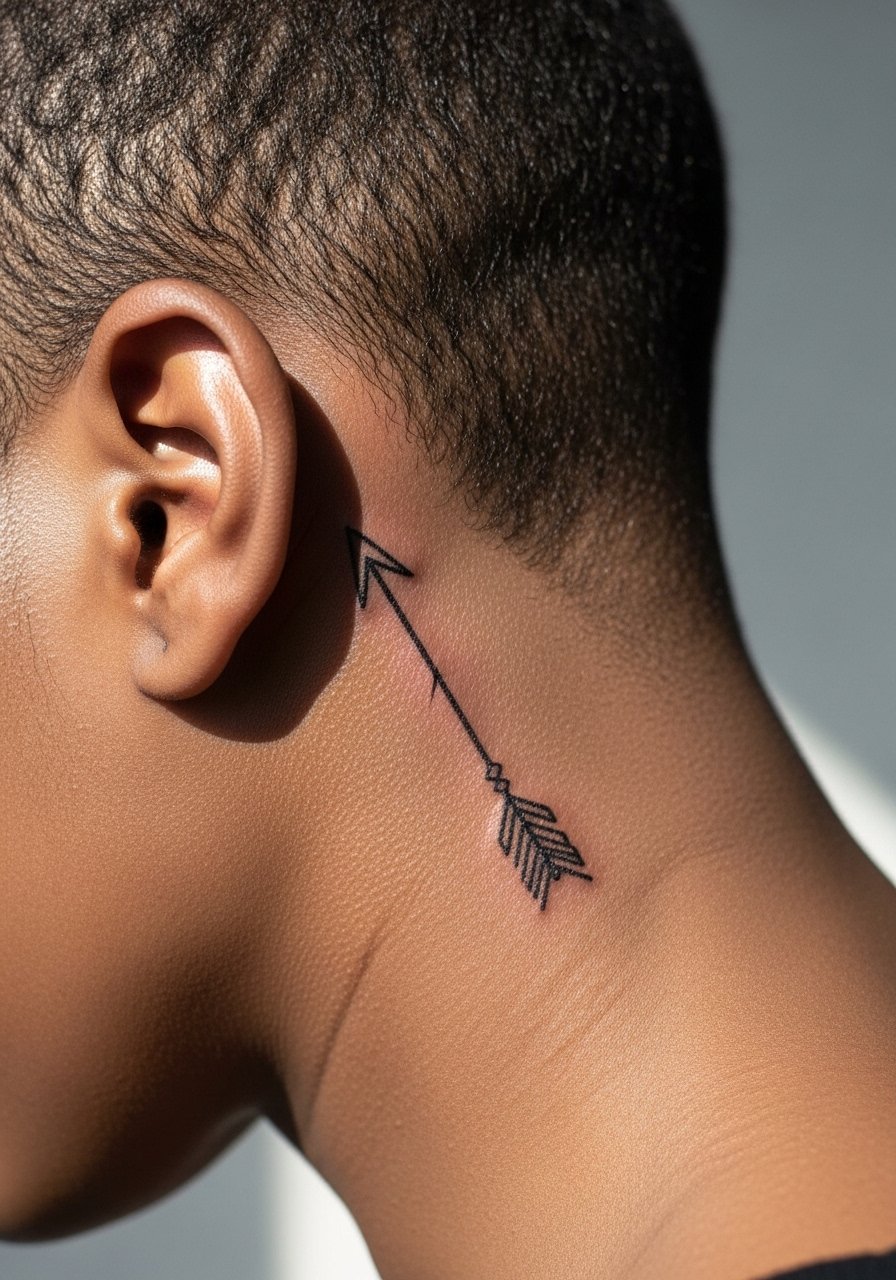
The arrow reads as direction and focus without needing big commitment. Artists are split on fine line behind ear work. One camp says thin lines age into soft gray faster because the ear skin sits close to bone. The other camp argues that with slightly deeper placement and a confident single pass the lines settle more cleanly. Say explicitly in consultation that you want single-pass linework with a touch-up built into the booking. Expect a 30 to 45 minute session and a sharp sting by the bone. A common error is requesting ultra-hairline lines that vanish at month six. Pair this with a high fade haircut guide for the reveal when you buzz the sides.
3. Blackwork Skull Silhouette at the Lobe Base
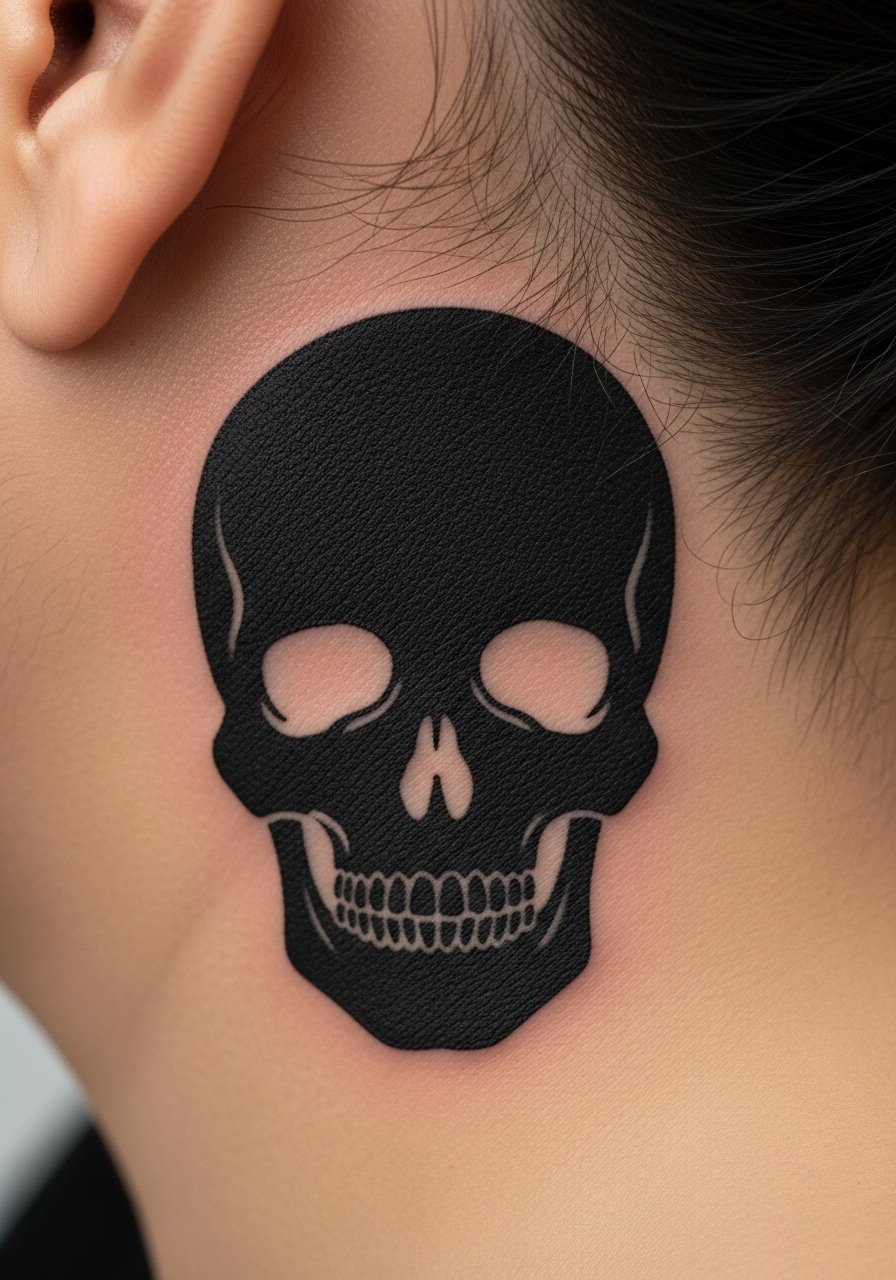
This is a compact, tough motif that still hides under longer hair. It fits men who want a bold reading without color. Tell your artist you want solid saturation and crisp outer edges so the shape reads even through hair growth. Session time is generally under an hour and pain varies because the lobe area is less bony than higher spots. Blowout risk is low if the artist avoids shallow passes and keeps line thickness consistent. For show-off styling, short cropped hair and a leather biker jacket men silhouette keep attention on the line and contrast.
4. Micro-Realism Eye, Upper Behind Ear
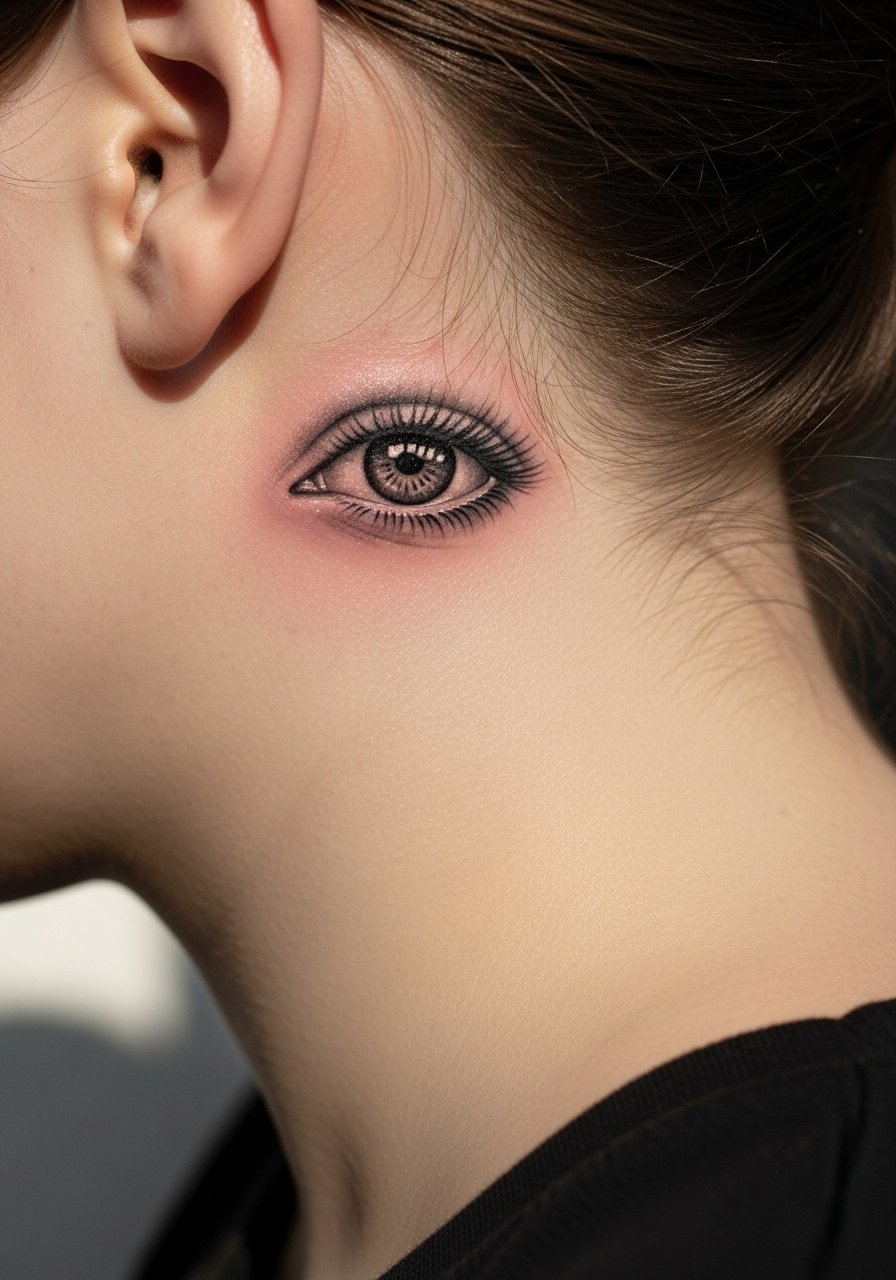
The tiny eye is a collector move that gives a watchful vibe. I suggest this for people who already have small realism pieces and want another compact study. It often needs two sessions to build crisp shading and depth in such tight space. Expect more needle time than a simple outline and a sharper sensation near the cartilage. A common mistake is packing too much detail in one small centimeter. Ask your artist to sketch the shading scale on the stencil so you know how it will read at six months. Pair it with a minimalist chain necklace men for contrast when it peeks from under the collar.
5. Traditional Anchor at the Base of the Ear
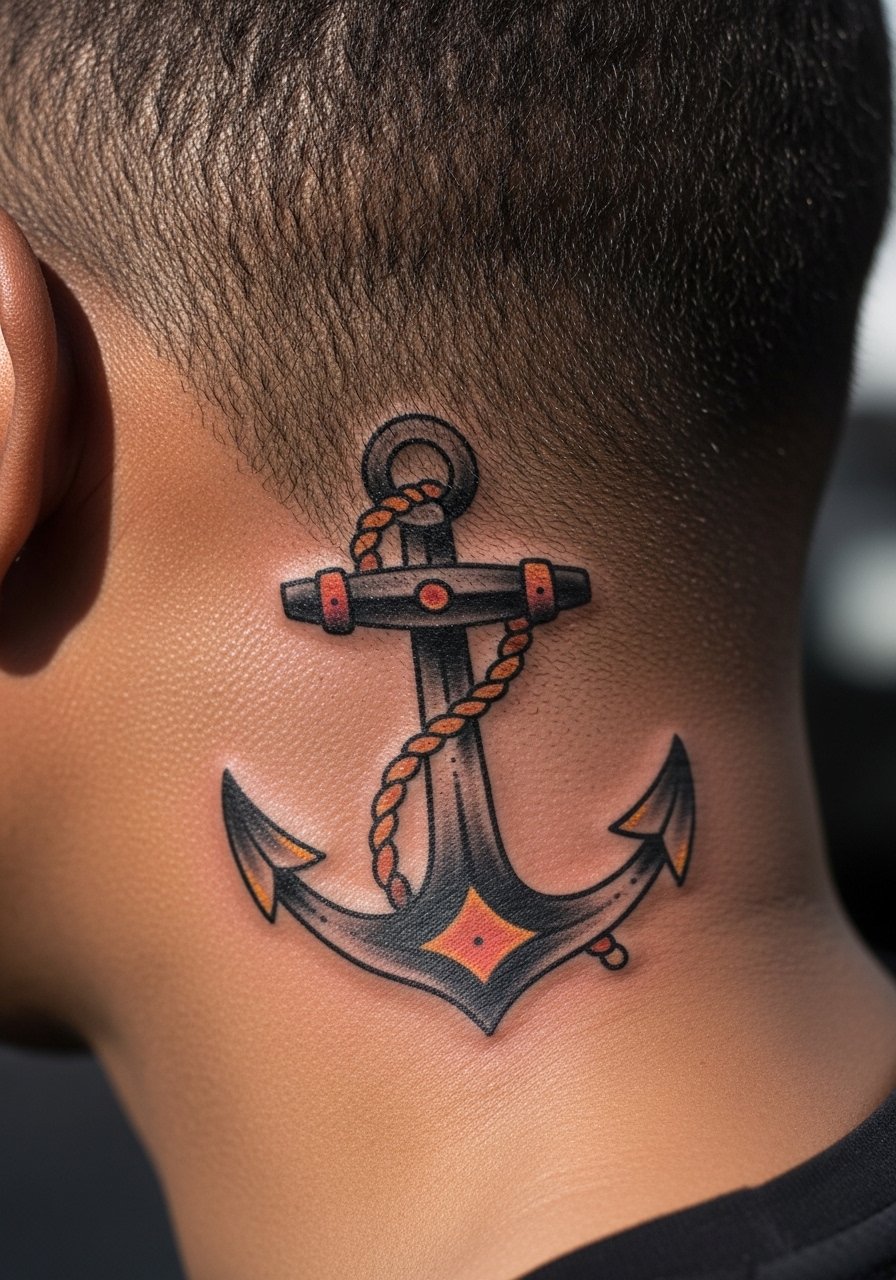
The anchor borrows classic saturation techniques that age predictably. Ask for slightly bolder outlines than a wrist anchor so the pigment holds where skin angles and friction happen. This style usually finishes in one visit and the session is short. Expect a solid throb on the bone but less sting than very high placements. A common error is asking for tiny color fills that sun and sweat fade quickly. For a framed look, a trimmed beard and a henley shirt men work well to balance chest and ear details during reveal.
6. Ornamental Geometric Triangle Centered Behind Ear
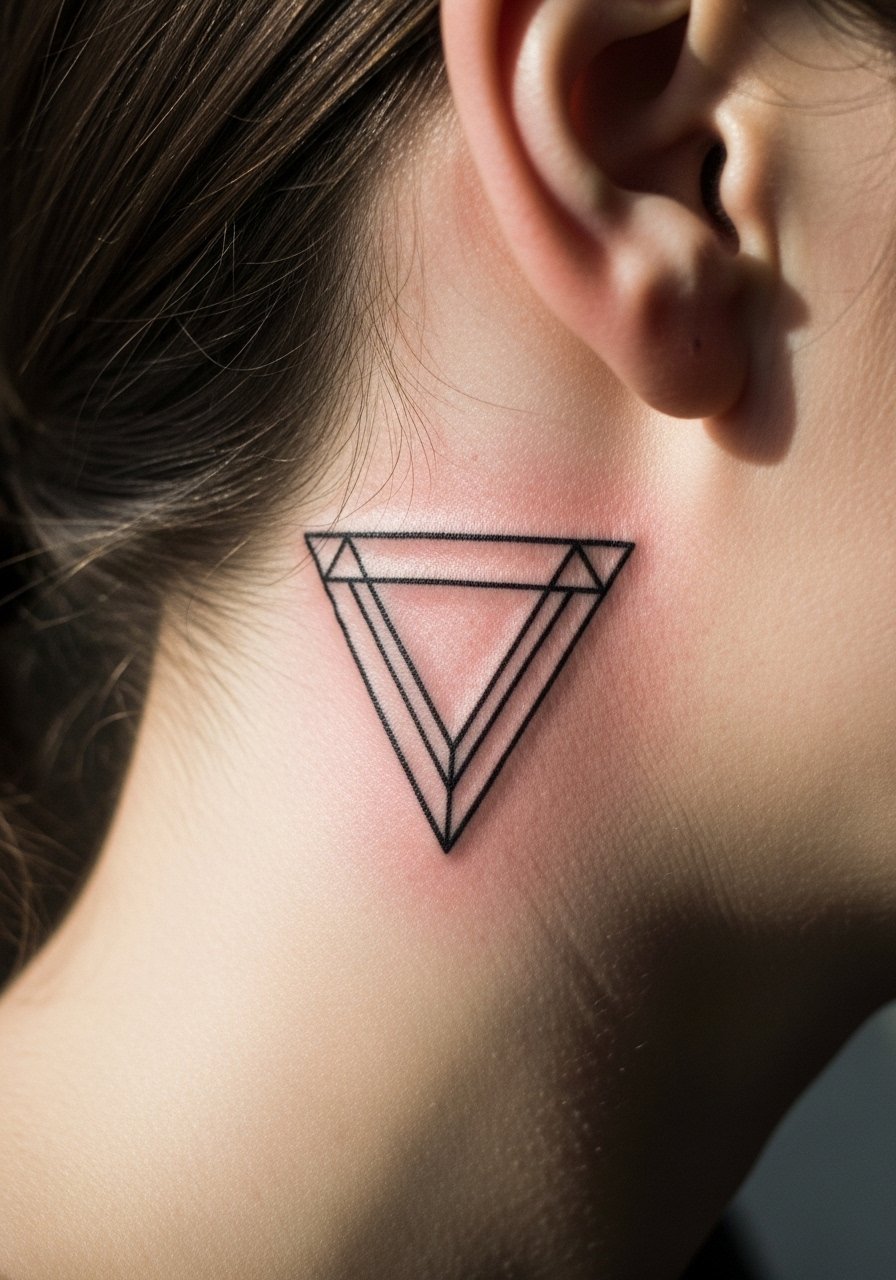
Triangles read modern and play well with short crops. The trick is spacing. Too many intersecting lines too small will blur as the skin settles. Tell your artist you want consistent negative space so the geometry breathes. Expect 30 to 50 minutes for precise placement and a mild bone sting. If your haircut will reveal it often, plan touch-ups at year two for fine intersections. For session comfort, wear a loose tank top or an open collar so the neck area is fully accessible.
Studio Day Picks
Those first six designs sit near bone and hairlines, so a few kit items smooth the session and the first week.
-
Tattoo Soother Spray. Non-greasy spray that users mention helps cool the area after a short behind-ear session without smearing fresh linework.
-
Ink Fix lightweight lotion. A thinner lotion that stays light on the neck area during humid healing windows, useful when sweat is a concern.
-
HealR breathable patches. Small patches that cover the exact behind-ear zone and reduce helmet or headphone friction during the first days.
-
DryHeal powder. Absorbs excess moisture in tight sweat-prone spots without leaving a greasy film that can pull at fine linework.
-
Aquaphor healing ointment. Thin layers used briefly help seal tiny lines while you sleep the first nights when the area is most sensitive.
7. Neo-Traditional Lion Head Extending to the Neck
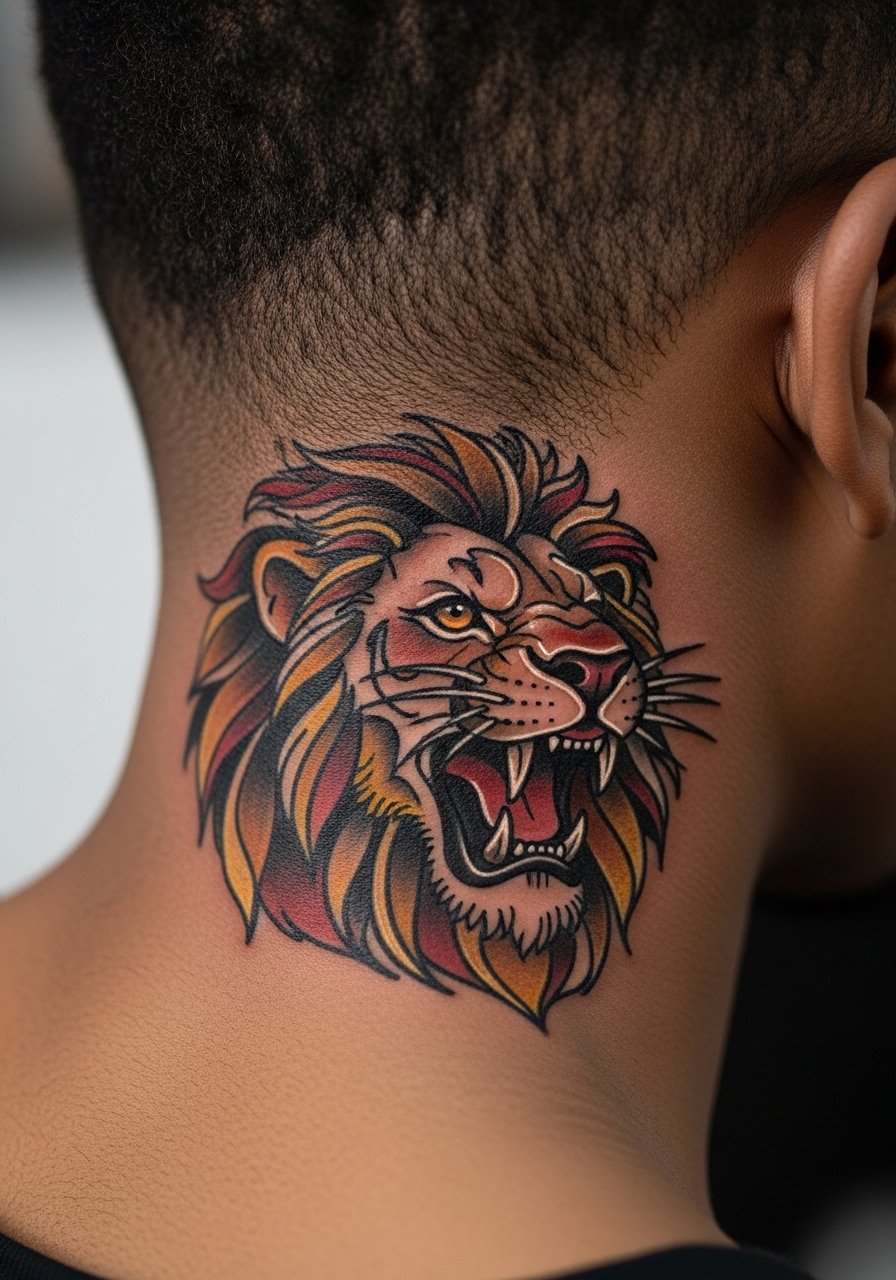
This one leans into size and stretch with a small neck extension so it still reads as a character. Ask for bold outer lines and restrained color so saturation carries through the curvature. Two sessions are common here because of shading around the ear curve. Pain ramps up where the design overlaps cartilage. A frequent mistake is compressing the face details too small. Tell the artist which features you want emphasized so they allocate space. For framing, an undercut or longer top with a men's hoodie neutral at rest keeps the piece visible or covered depending on mood.
8. Watercolor Splash Abstract Lower Behind Ear
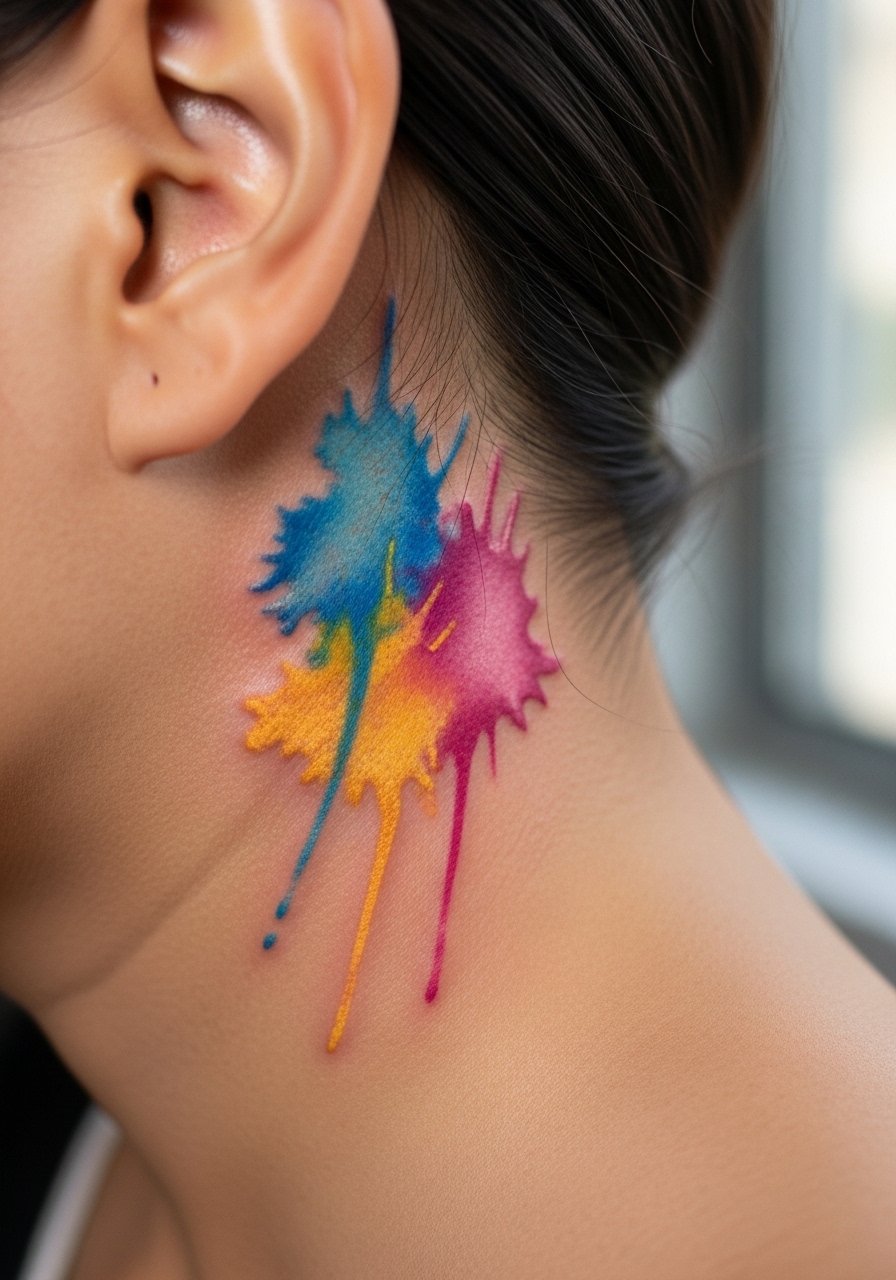
Watercolor imparts an artistic, painterly feel but it competes with the sun and sweating. The safe move is to limit color to soft patches and keep most of the definition in blackline anchors. Plan for one to two sessions and expect softer edges that will blur more quickly than blackwork. A common error is asking for saturated bright tones in a tiny zone that cannot hold pigment well. For styling, messy textured crops and a textured crop hair product let the color edge peep through without a busy shirt pattern stealing focus.
9. Ignorant Style Wave That Follows the Curve
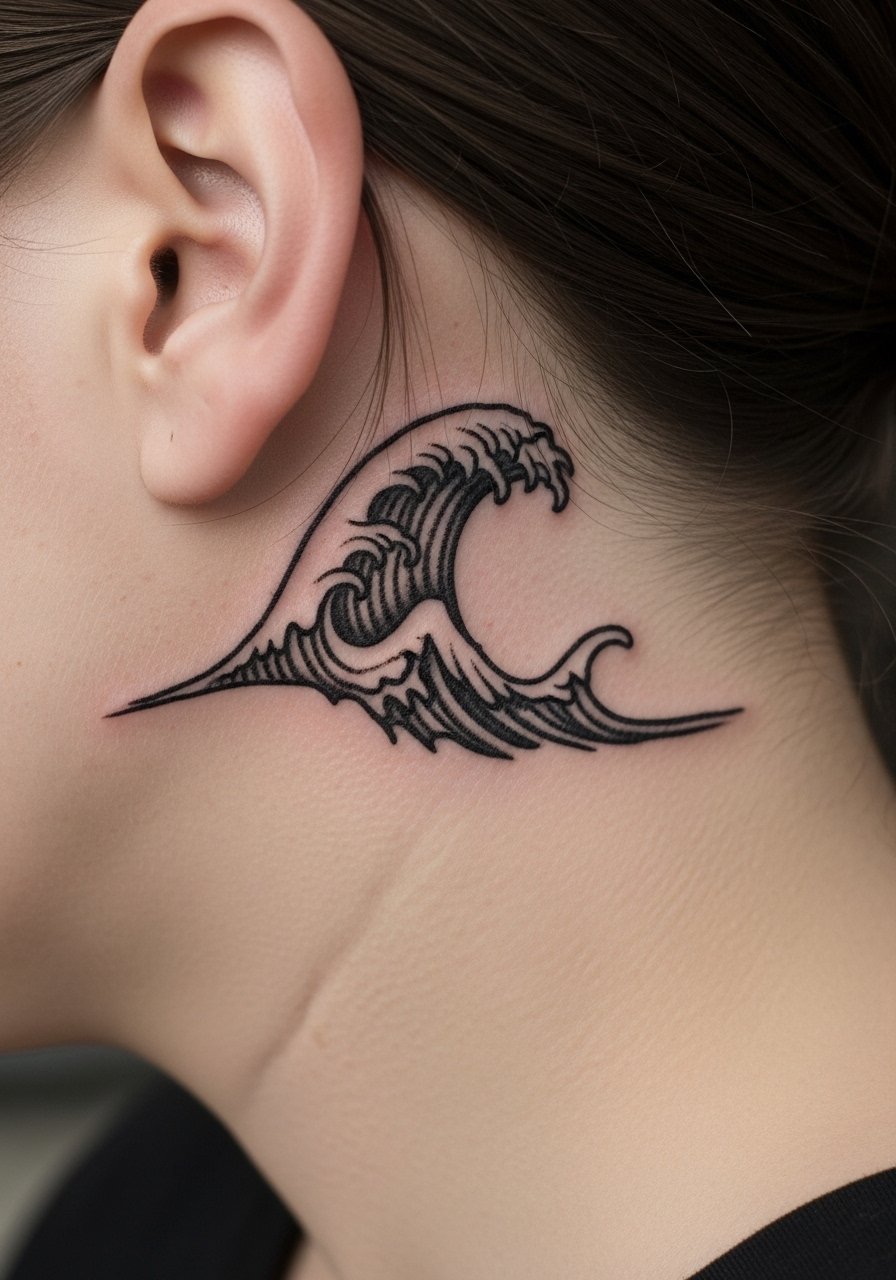
The ignorant style suits a surfer or casual aesthetic and reads like a sketched stroke. It is forgiving because the rawness becomes part of the charm as it ages. Ask for a slightly heavier outline so the scribble keeps contrast after sun exposure. Sessions are quick and the pain is brief. A frequent mistake is asking for micro-scribbles that lose character when blurred. This pairs well with summer board shorts and a relaxed tee, and the session is easiest in a solid v-neck tee you can wear into the shop.
10. Fine Line Snake Coil Wrapping Slightly Behind Ear
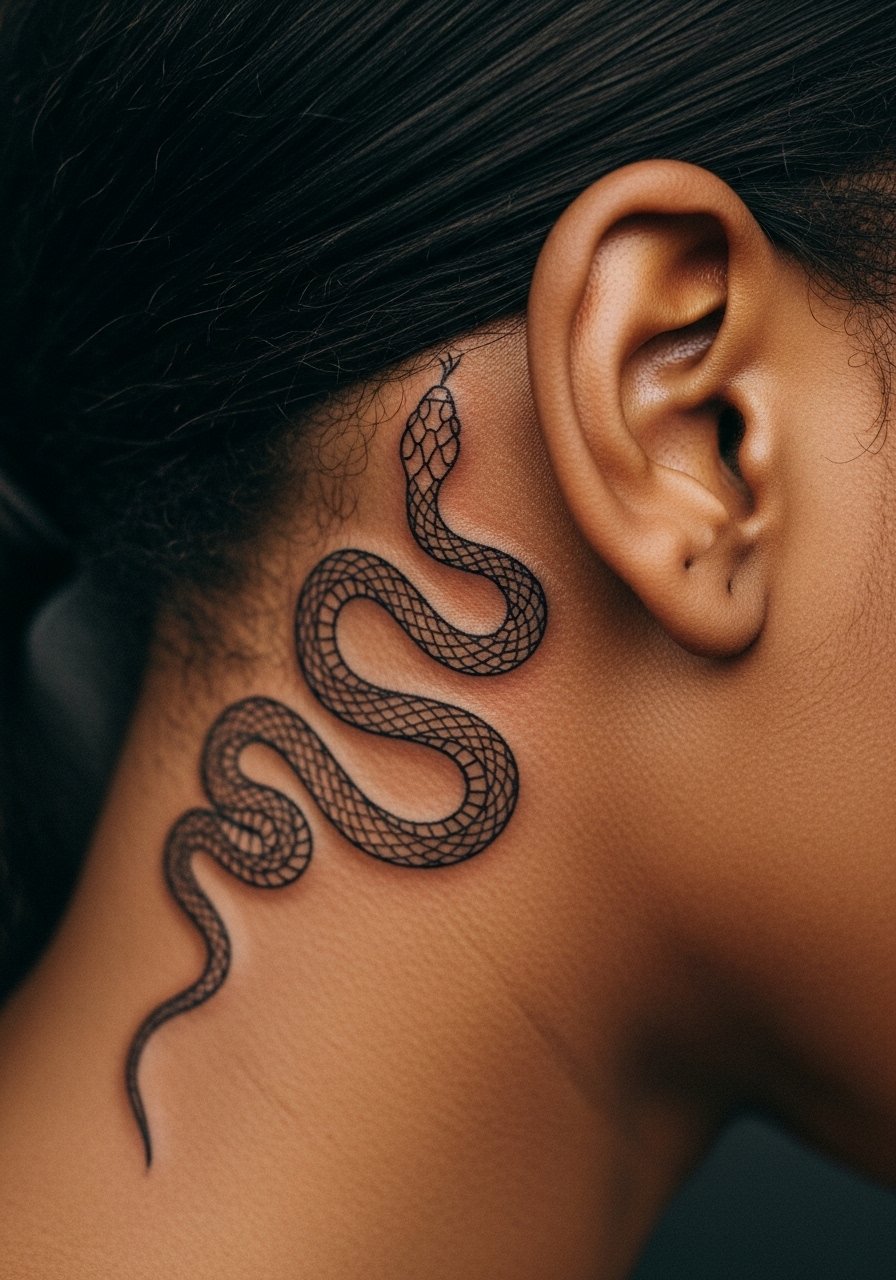
A snake coil has movement that flat icons lack. Artists debate fine line for coils on the ear area. One group insists that thin spirals blur too fast because the skin flexes and ink spreads. The other group says coils can work if you increase line weight and let the spacing breathe. That difference matters for touch-up needs. Expect 30 to 60 minutes and a sharp sting on cartilage. Tell your artist you want the coil spaced so each turn reads at two-year, not just day-one. For a neat reveal, a taper fade clippers result keeps the coil visible when you buzz sides.
11. Blackwork Dagger Vertically Behind Ear
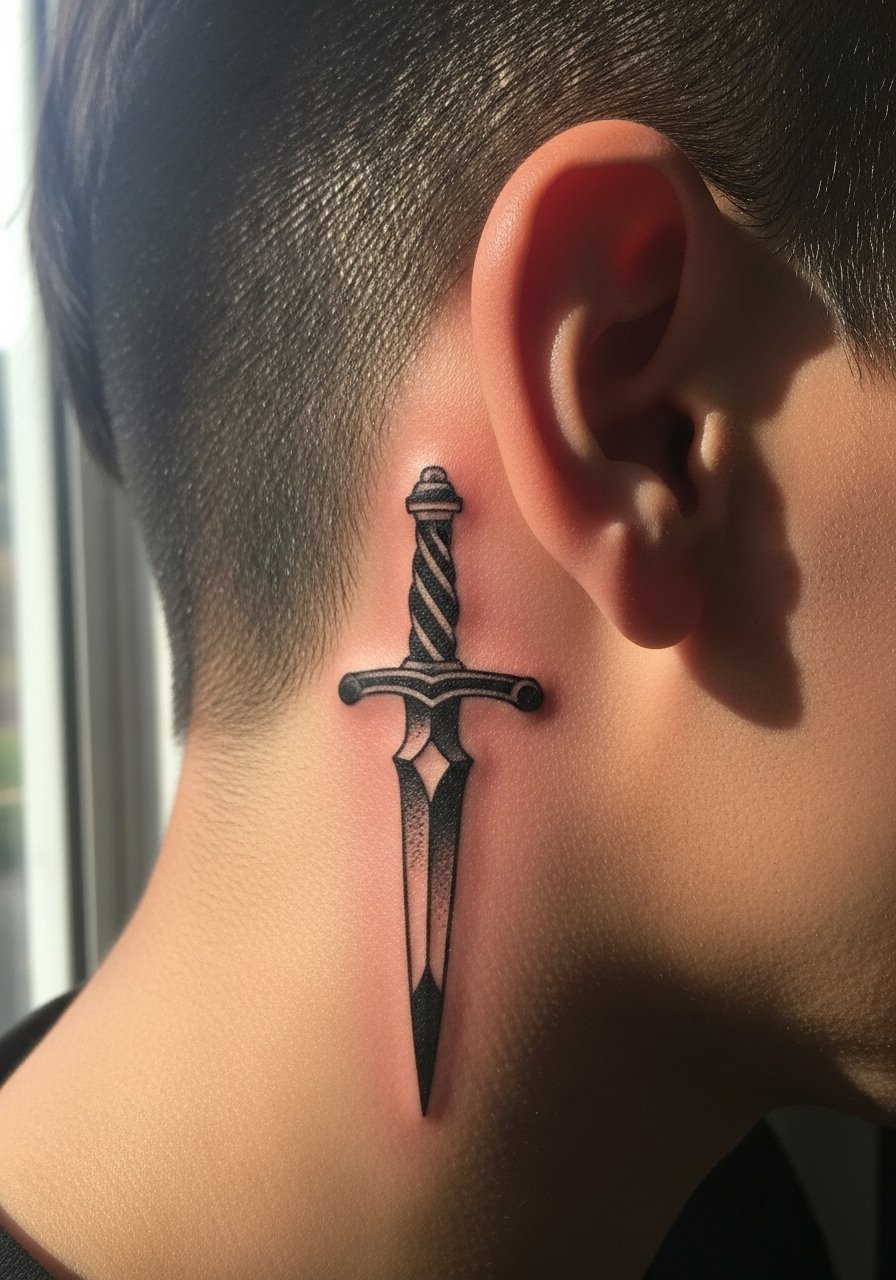
The dagger gives a vintage tough read without needing color. It works for those who want a graphic, durable piece. Request a single bold spine line and solid fill so patina over time looks intentional. Sessions are brief and the biggest risk is over-thinning the tip, which can blur into a blotch later. A common mistake is insisting on needle-thin tips that cannot hold. Touch-up needs are lower for blackwork than for fine lines in the same spot. If you wear leather, a raised collar can frame the line and make it pop.
12. Minimalist Infinity Loop Top of Behind Ear
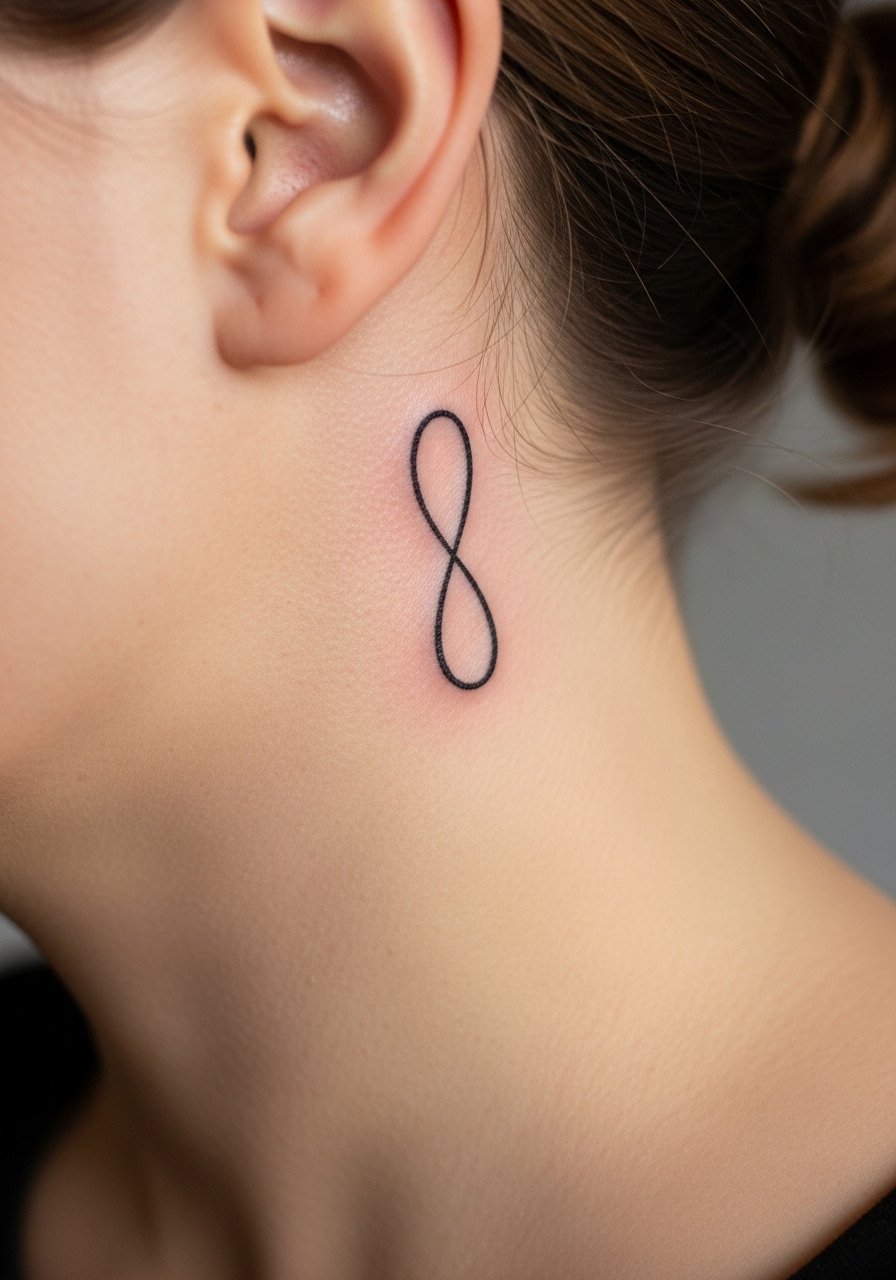
The infinity loop is understated and a smart first behind-ear piece. It is best when scaled to one to one-point-five centimeters and with slightly stronger lineweight than micro script. Session time is short and the main complaint is early loss of crispness when clients ask for ultra-fine single-hair lines. Tell the artist you want a very slight bolding so the mark still reads at six months. Wear a white crewneck t-shirt after healing to let the black line contrast without busy patterns.
13. Micro-Realism Feather Angled Behind Ear
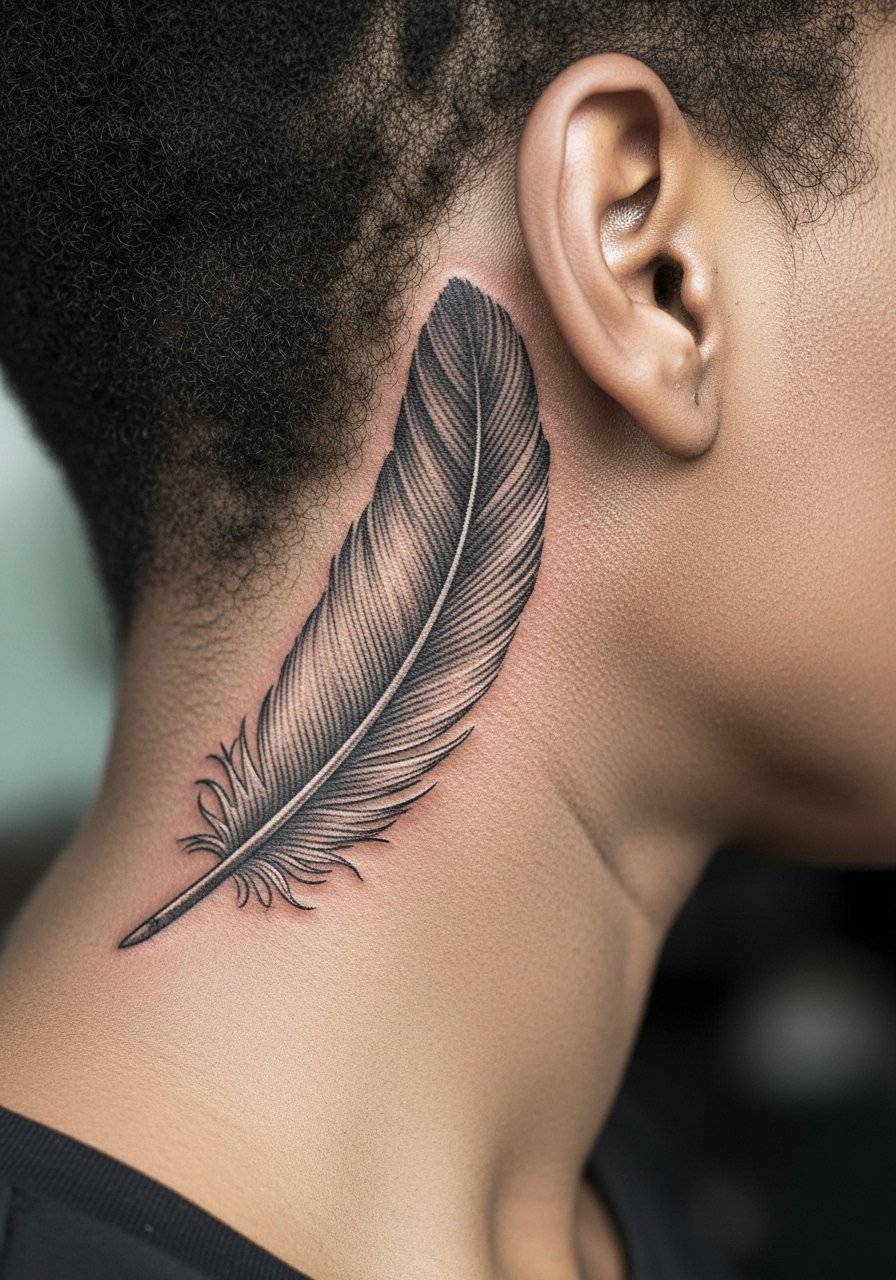
Feathers translate well to this thin canvas because they can read with fewer strokes. Ask for a gentle taper in the quill and ask the artist to show the stencil from three angles so you know how it follows the ear curve. Expect a little extra time for graduated shading and a sensitive spot when the needle hits tight contours. Common mistake is over-detailing barbs that cannot hold. For session wear, keep earrings off the tattooed side during appointment and the first week.
14. Tiny Roman Numeral Band Near the Mastoid
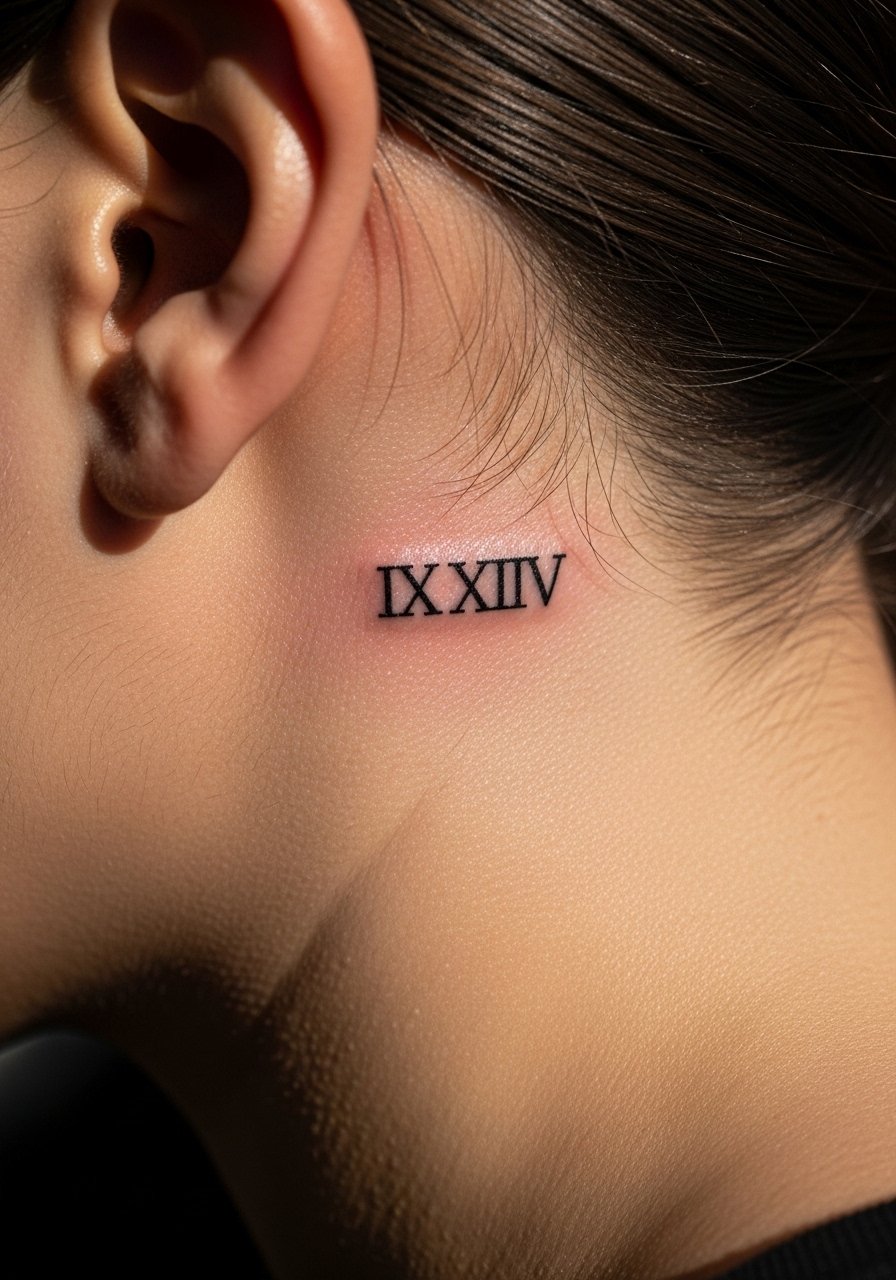
Dates in Roman numerals give a crisp, architectural look behind the ear. The main risk is scale. Too-small numerals collapse into blobs when lines are close. Ask your artist to space numerals and preview the stencil at actual size. Appointment time is short and pain is sharp on bone but over quickly. A mistake is asking for a full line of tiny characters instead of splitting the numbers or increasing size. For showing it off, a thin chain pendant sits above without crowding the neck.
15. Tiny Constellation Cluster Behind Ear
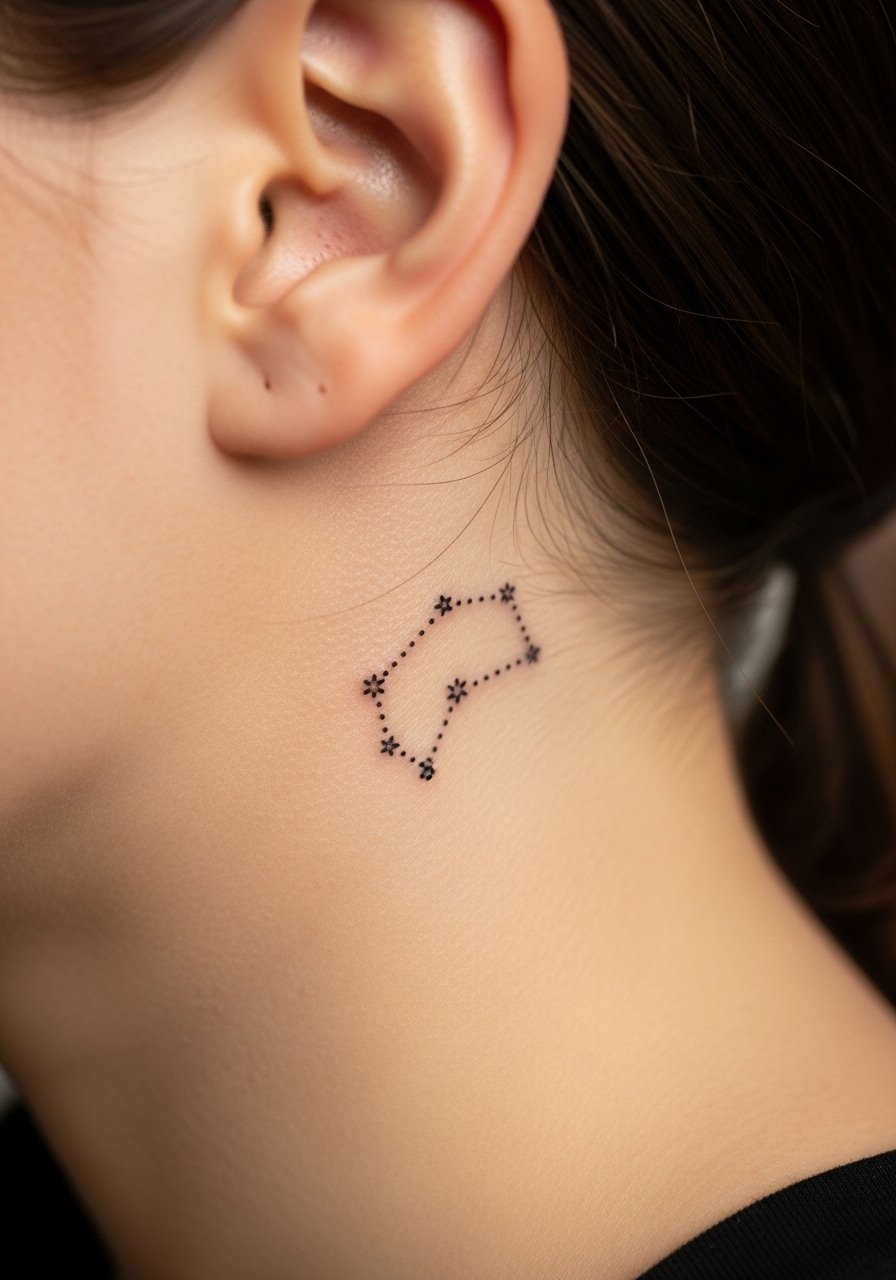
Constellations are a natural fit for behind-ear placement because the dot-work can follow the curve. Tell your artist you prefer dots spaced for long-term clarity rather than dots so tiny they blur together. Sessions are quick and the pain is a sharp twinge. A common error is packing too many stars into too small an area. If you wear short sleeves and a crew neck, the cluster peeks across the jaw when you turn toward light.
16. Scar-Friendly Fine Line Adaptation
Scar tissue needs a different approach. If you have healed scar in the behind-ear zone, ask your artist to tattoo around the texture and test a tiny patch to see how pigment settles. Artists who work with scars often pick slightly heavier lines or subtle blackwork fills to keep the design readable. Sessions can be longer if the artist needs to be cautious. The mistake is assuming a needle reacts the same over scar tissue as over regular skin. Use discovery pathways like tattoo forums and booking apps to find artists who post healed scar examples rather than relying on a single portfolio shot.
17. Headphone-Safe Dot Row for Active Lifestyles
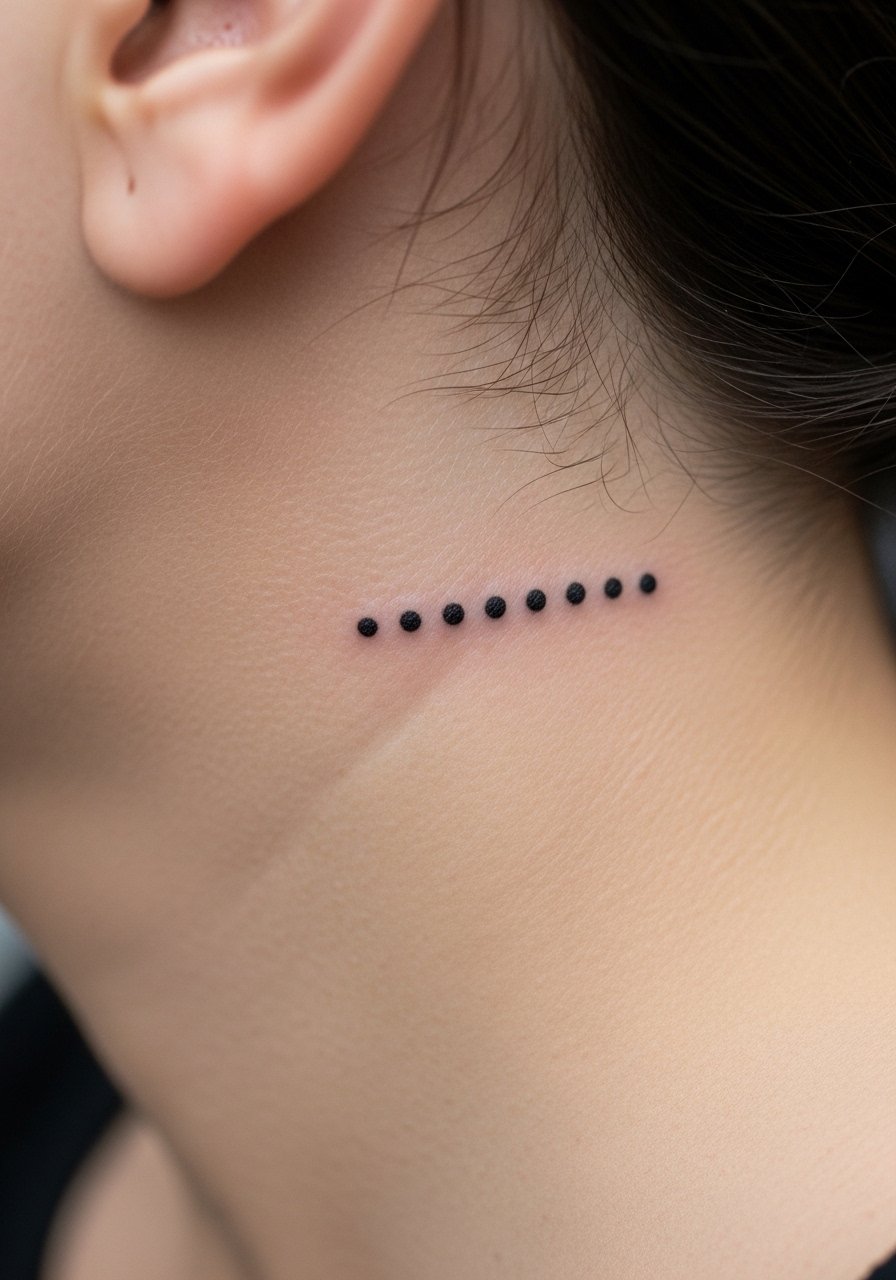
This is one of the under-covered ideas that solves a real problem. Place the dots where headphone pads or helmet straps normally sit so the design avoids constant abrasion. Tell your artist you need placement maps during consultation so the row avoids friction points. Sessions are very short and the main risk is irritation from external gear during healing. Wear loose headphones or skip heavy straps for the first two weeks. This design pairs with a cropped routine or buzzed sides so the dots peek when you want them to.
Frequently Asked Questions
Q: How painful is a behind-ear tattoo compared with a forearm piece?
A: Expect a sharper, more concentrated pain near the bone than on a fleshy forearm. The session is usually shorter so the sting ends quickly. Consider topical numbing if you are anxious about the bone pain, but ask your artist about how numbing might affect the needle feel.
Q: Will fine line designs like arrows and snakes fade faster behind the ear?
A: Fine line tends to soften faster than bold blackwork in that area. Artists split on this. One camp says thin lines blur because of skin and movement. The other says proper depth and spacing make fine line last. The safest move is to ask for slightly heavier line weight and plan on a touch-up at year one or two.
Q: How should I protect a behind-ear tattoo while I ride a bike or wear headphones?
A: Avoid tight straps and heavy headphone pads during the first two weeks. If you must use gear, swap to lighter models and position them away from the fresh ink. For active days, a breathable patch can help during the worst itch window while the area scabs and seals.
Q: What should I wear to the appointment for access and comfort?
A: Choose clothing that gives the artist clear neck access. An open collar button shirt or a loose tank works well for behind-ear placements. If you plan to show off the piece afterward, a men's crew neck t-shirt slim or a simple henley will frame the jaw without distracting patterns.
Q: Are there long-term visibility tradeoffs if I keep my hair long?
A: Yes. Long hair will cover the piece most of the time. If you want occasional reveal, pick line weight and placement that still read when hair parts or when you buzz the sides. Bold blackwork and slightly bolder outlines are more forgiving under hair than ultra-fine lines.
