
Bold, saturated traditional roses on the back tend to age more gracefully than the delicate, fussy versions that look perfect on an iPhone. Saturation, clear linework, and the right placement matter more than tiny detail when you think about five-year wear. Below are 21 ways to place a traditional rose on the back so it reads like a classic piece now and in the years to come. The first idea starts with a simple centerpiece that shows why scale and spacing make the biggest difference.
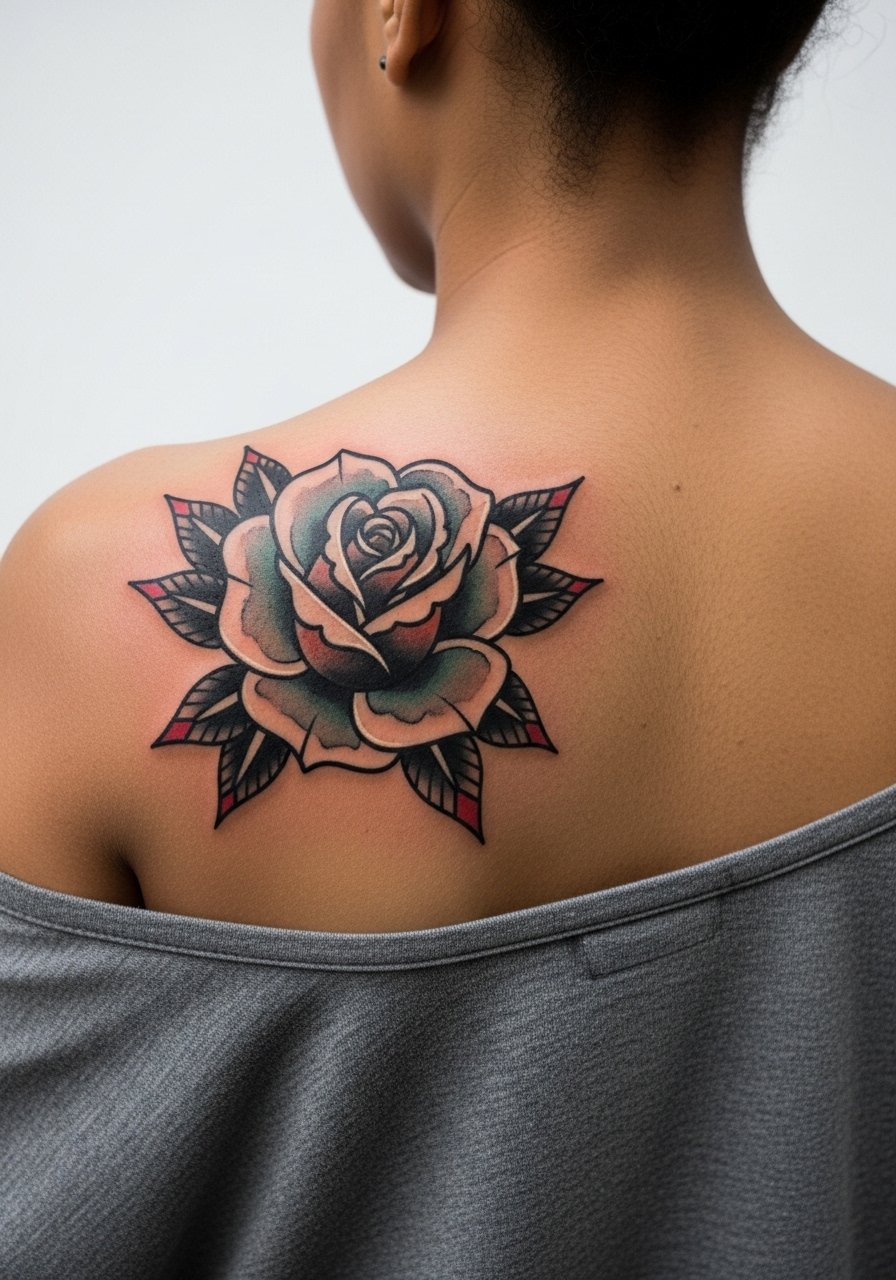
1. Center Spine Rose That Anchors a Backpiece
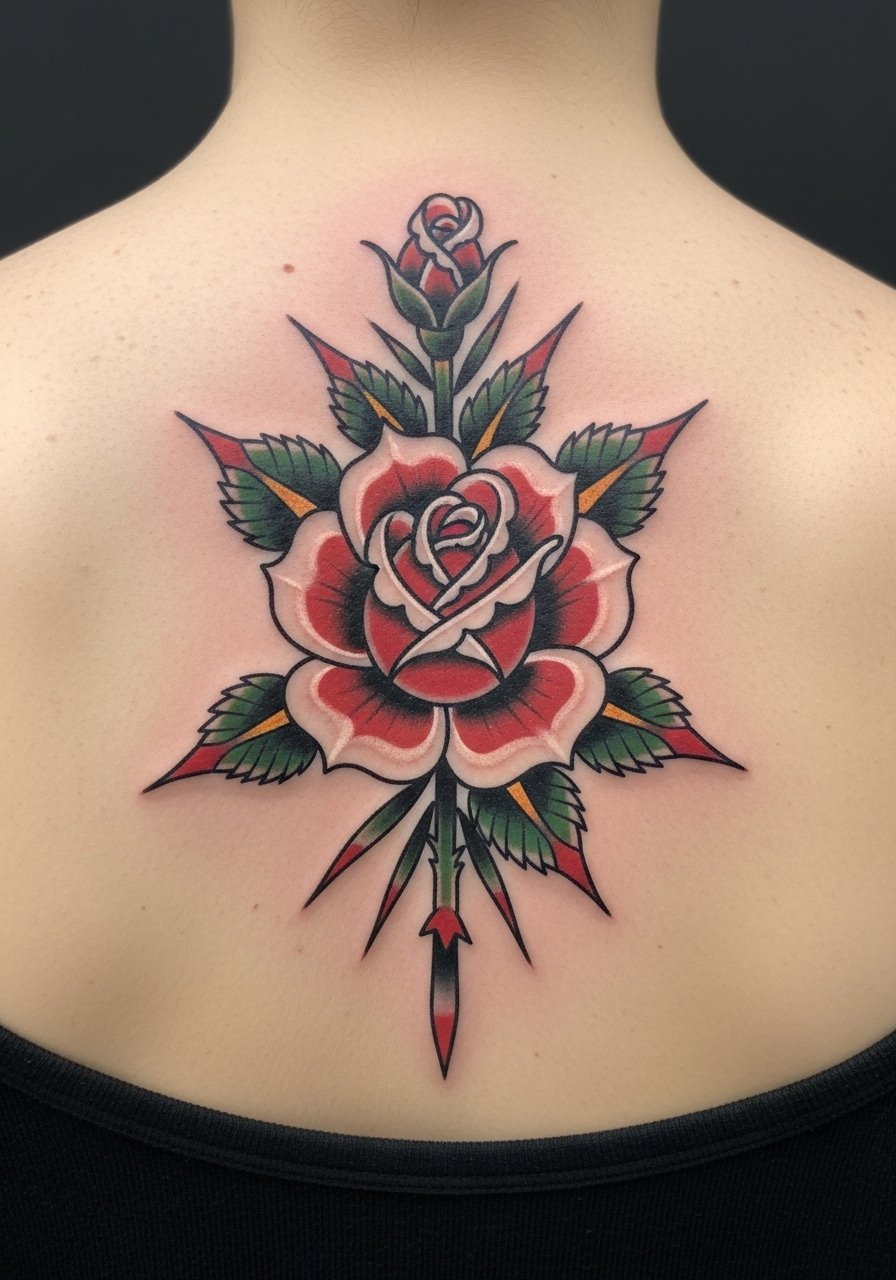
I've seen this exact placement work when you want one focal image that can expand later. Fair warning, the spine is a higher pain zone for many people, so plan a longer session split into two sittings for cleaner saturation. Tell your artist you want bold outlines and slightly larger petal shapes so the form keeps its silhouette as the skin moves. A common mistake is asking for tiny petals and too much internal detail. At six months the petals will look bold, at two years the saturated fills hold, and by five years a touch-up is common around the outline. Best for people who expect to build a full backpiece over time and who accept a moderate pain level.
2. Shoulder-Blade Single Rose for Subtle Show-Off
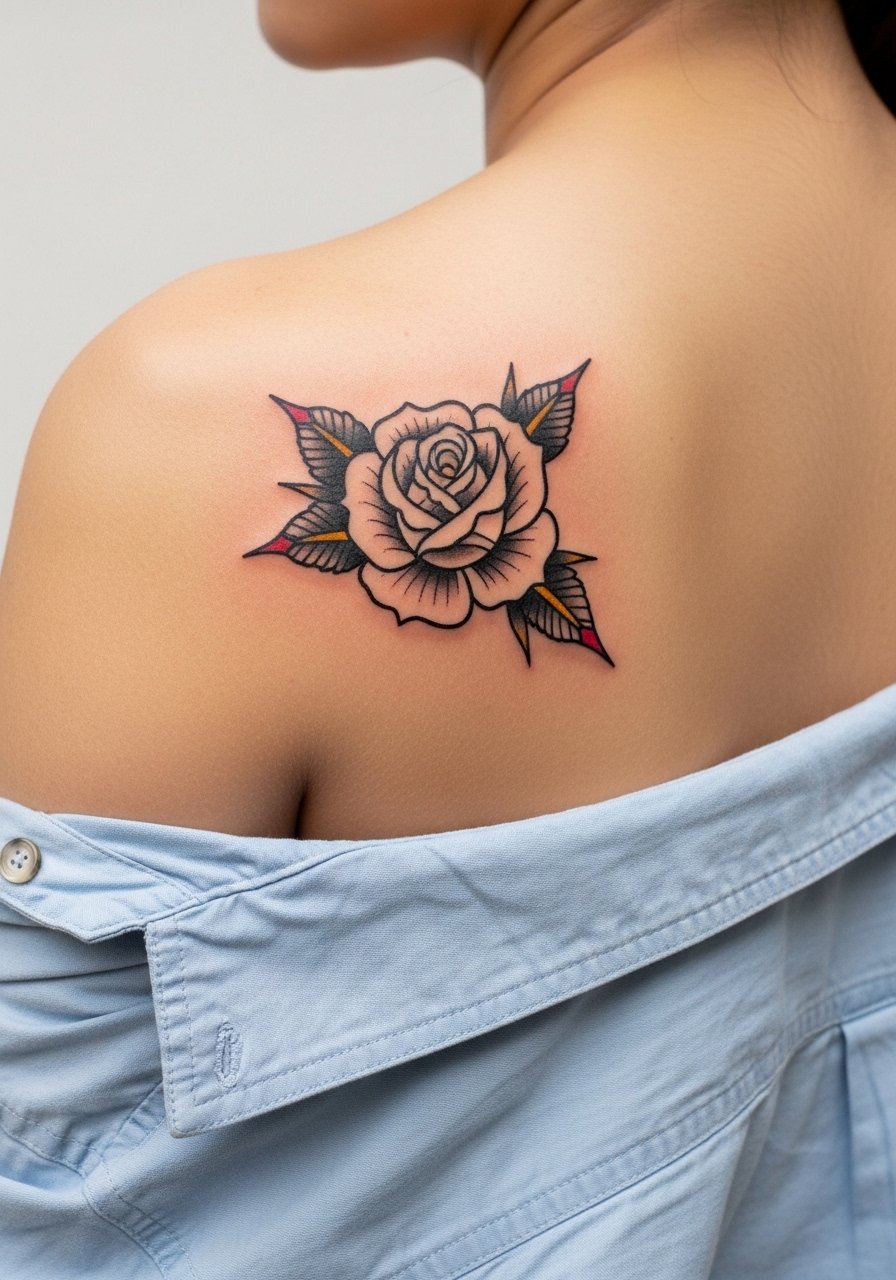
I've noticed shoulder-blade roses hold shape well because the skin there moves less than the lower back. For a look that reads from afar ask for higher saturation and a compact silhouette. The usual error is making the bloom too small and detailed. The session feels like a mid-length appointment with manageable pain. At six months the color will have softened slightly, at two years the outline remains the most reliable anchor, and a touch-up is often planned around year three. Pair this with open-back tops when you want to show it off, or wear a loose button-down shirt the day of the appointment so the artist can work without you feeling exposed.
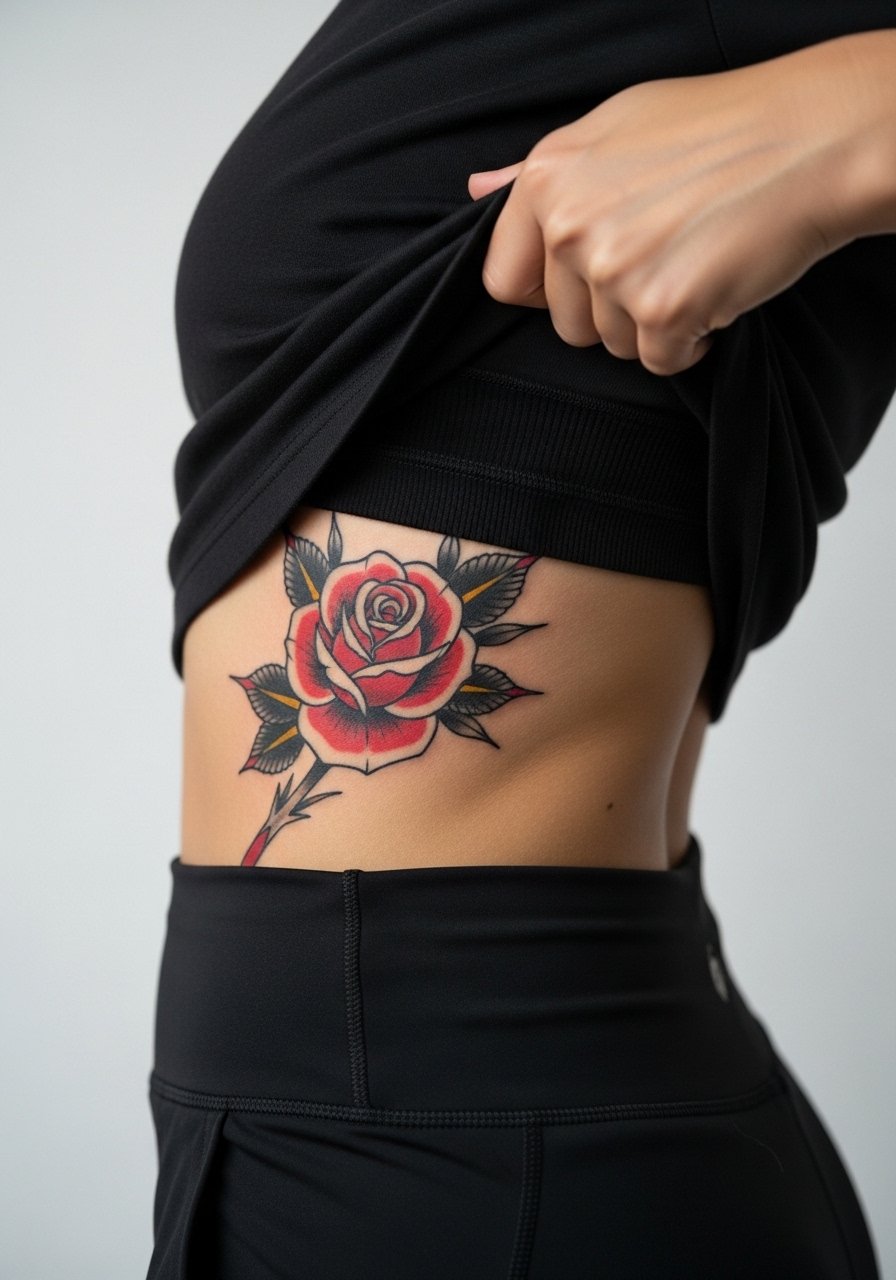
3. Lower Back Cluster of Three Roses for Curves
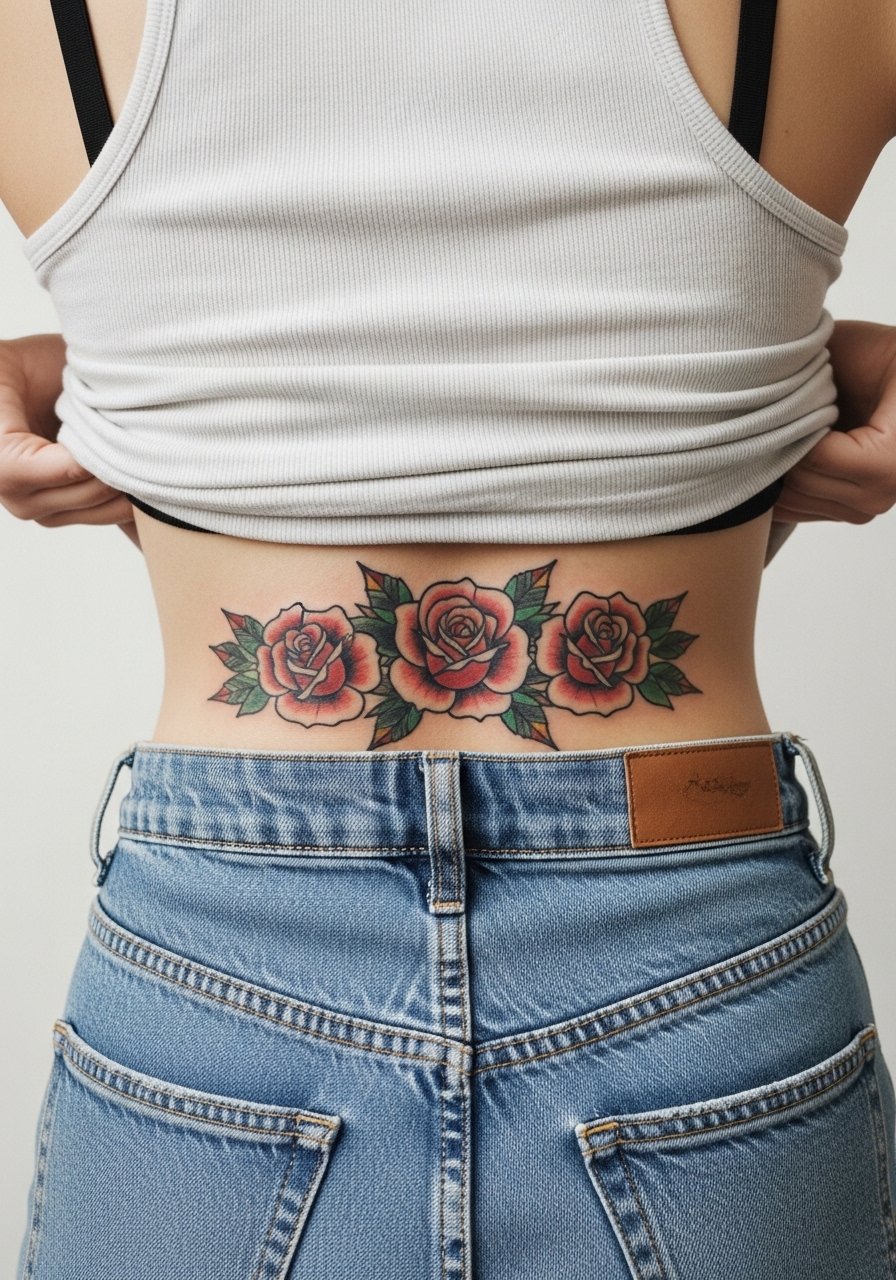
If you want curvature that follows the hips, a trio of roses placed low on the back frames clothing lines nicely. Expect a longer session if all three are saturated. A frequent mistake is spacing them too close which leads to visual merging as the piece ages. For consultations request slightly wider spacing and bold linework so the group keeps separation at two and five years. Pain is lower here than on the spine, but the lower back can bruise if you sit wrong after the session. For showing it off, low-rise skirts or high-waisted jeans that reveal a sliver of skin make the cluster read intentional.
4. Single Rose Between Shoulder Blades with Whip Shading
When whip shading is added to a traditional rose, it softens the edges without sacrificing clarity. The main consultation note is ask for shading that reads airy rather than dense. One camp argues whip shading on the upper back fades unevenly. The other camp says it holds if the artist spaces the strokes. Name both views and ask which one your artist prefers. The session feels like a focused single-piece appointment and pain is moderate. Expect good visual clarity at six months and a need for a subtle touch-up at three to five years if you want the shading refreshed. For the session wear a racerback tank so the artist has clear access.
5. Tiny Rose at Nape Edge for Peeking Detail
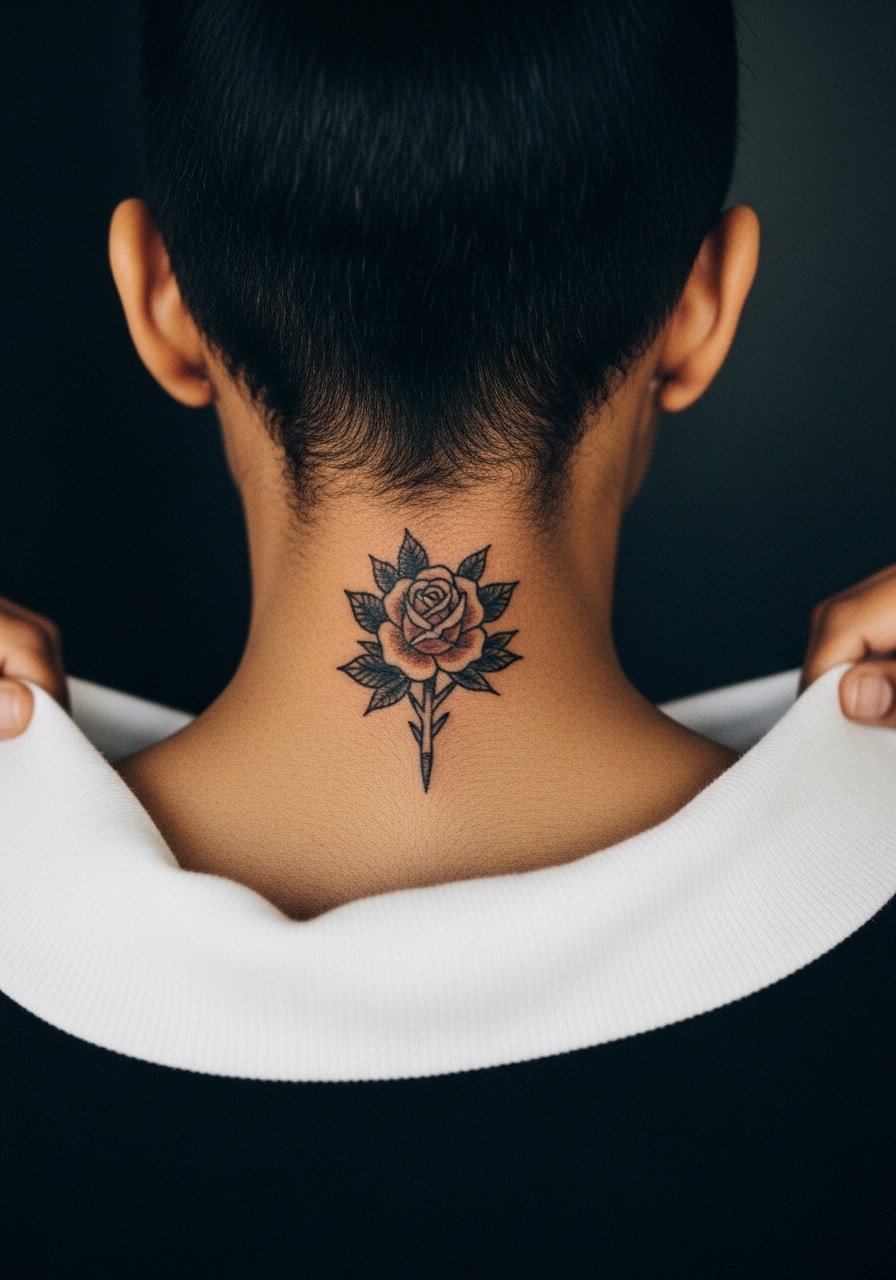
A small rose tucked near the nape reads delicate and private. Most people under-request size and then see rapid softening. The mistake is keeping the petals too fine. Ask for a slightly bolder lineweight than you think you want. Pain at the top of the back is lower than on the spine but the area is sensitive to touch. At two years expect softer edges. If you want to wear it with hair up, try high ponytails or half-up styles that make the bloom peek out. For the session pick a wide-neck shirt you can pull aside easily.
6. Rose with Banner Across Upper Back for Name or Date
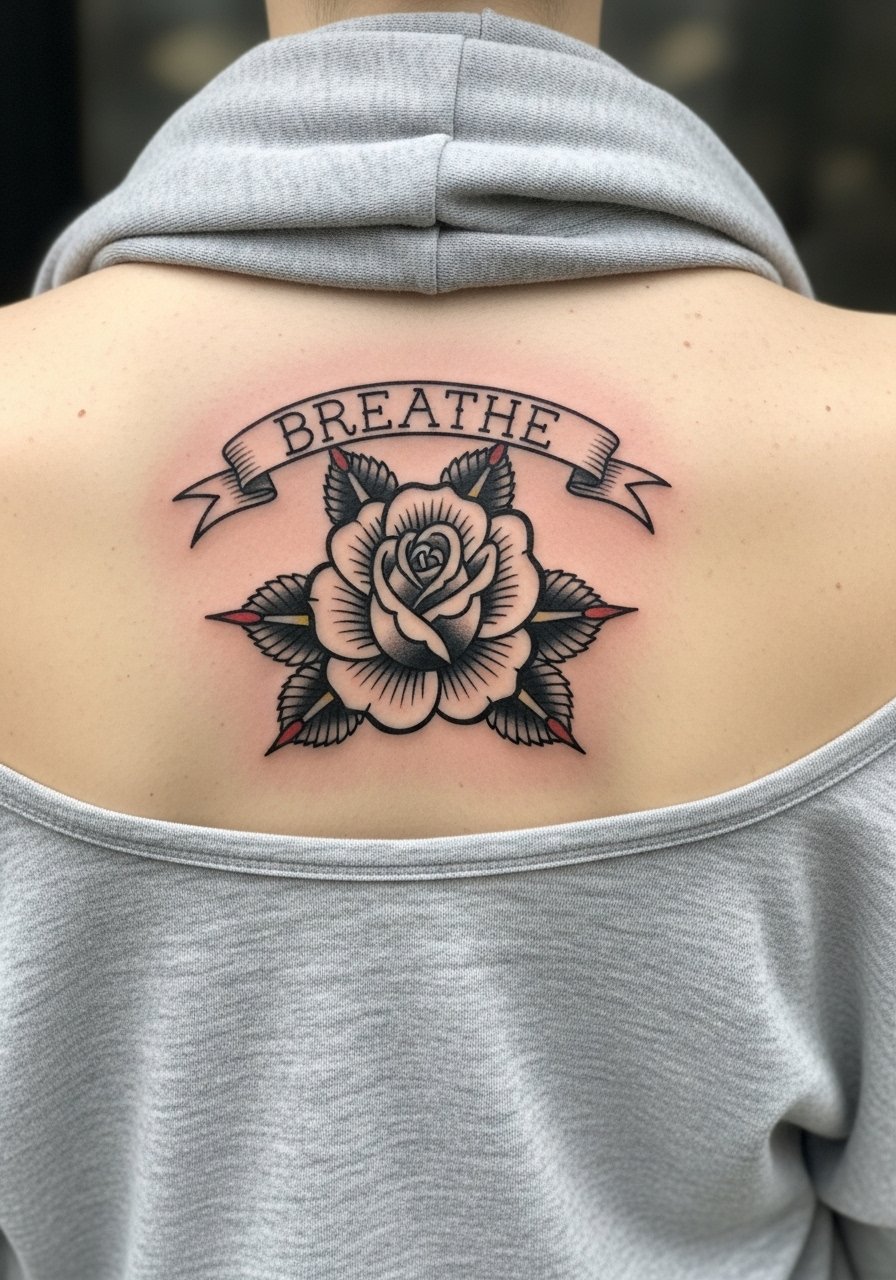
Banners add a narrative anchor, but large text across the back needs proper spacing. The common error is choosing a condensed script that blurs over time. Pick a medium-weight script and ask the artist to space letters wider than usual. Pain is moderate and the session takes longer because of the lettering. At six months the banner will read clean if the letters were sized for the skin. Expect to schedule a touch-up on the lettering by year three if you want sharp edges. For showing it off, open-back dresses make the banner read intentional and framed.
Pack Smart
The upper-back pieces above and the lower-back cluster ask for different prep, and a few targeted items smooth the session and the first week of healing.
-
Fragrance-free cleansing foam for sensitive skin. Gentle cleansing helps back tattoos avoid irritation from sweat and friction from clothing in the first week.
-
Thin silicone healing patches. Useful on lower-back pieces that rub against waistbands, these reduce scabbing friction during movement.
-
Roll of protective film for large placements. Keeps freshly inked areas clean while you navigate chair time and travel after a long session.
-
Topical pain-relief spray. For longer upper-back sessions it eases the edge without affecting linework when used as directed.
-
Aquaphor healing ointment. A thin layer in the immediate days after the chair helps maintain moisture on saturated traditional fills without clogging.
7. Half-Back Rose That Follows the Rib Curve
A rose that sweeps from the center back toward the ribs creates motion and a half-back silhouette. Expect higher sensitivity where the piece spills onto the side torso. Artists split into two camps on this expansion. One camp says detailed work over ribs blurs faster due to skin stretch. The other camp counters that with proper spacing and depth the design can settle clean. Ask where your artist stands. Plan a two-session approach if you want clean saturation. For the session wear a cropped athletic top you can lift slightly so the artist has access while you stay covered.
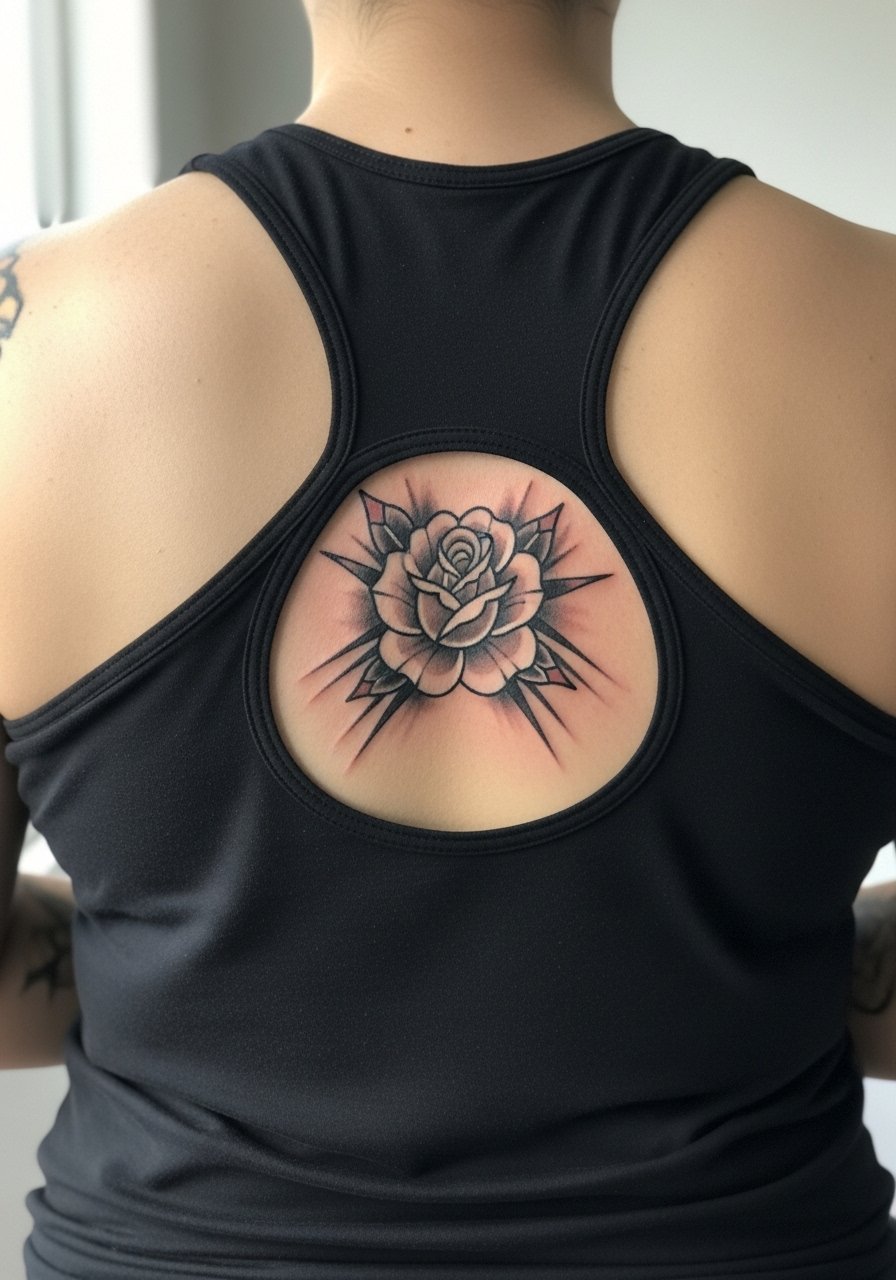
8. Small Rose Cluster Along the Spine as a Vertical Accent
Vertical clusters work if you allow breathing room between blooms. A common mistake is stacking them too tightly which leads to early fusion of outlines. Pain along the spine is higher and the session feels intense in short bursts. Tell your artist you want deliberate spacing and slightly heavier outlines to keep each bloom readable at two and five years. Touch-up timelines vary but expect one around year three for tighter pieces. For after-appointments try low backs and open-backed tops to let the vertical line be visible.
9. Watercolor-Adjacent Rose with Traditional Outline
Mixing watercolor fills with a strong traditional outline gives you the best of both approaches. The key is containment. The mistake is using washed-out fills with weak outlines that age into muddy patches. Talk to your artist about saturation levels for the base colors so they remain visible on your skin tone. At six months the outline defines the piece, and the watercolor areas will likely require a color top-up by year three if you want them bright. Session time is moderate to long depending on color work. For showing this off, wide-neck tops help center the composition.
10. Mirror Roses on Either Shoulder Blade for Symmetry
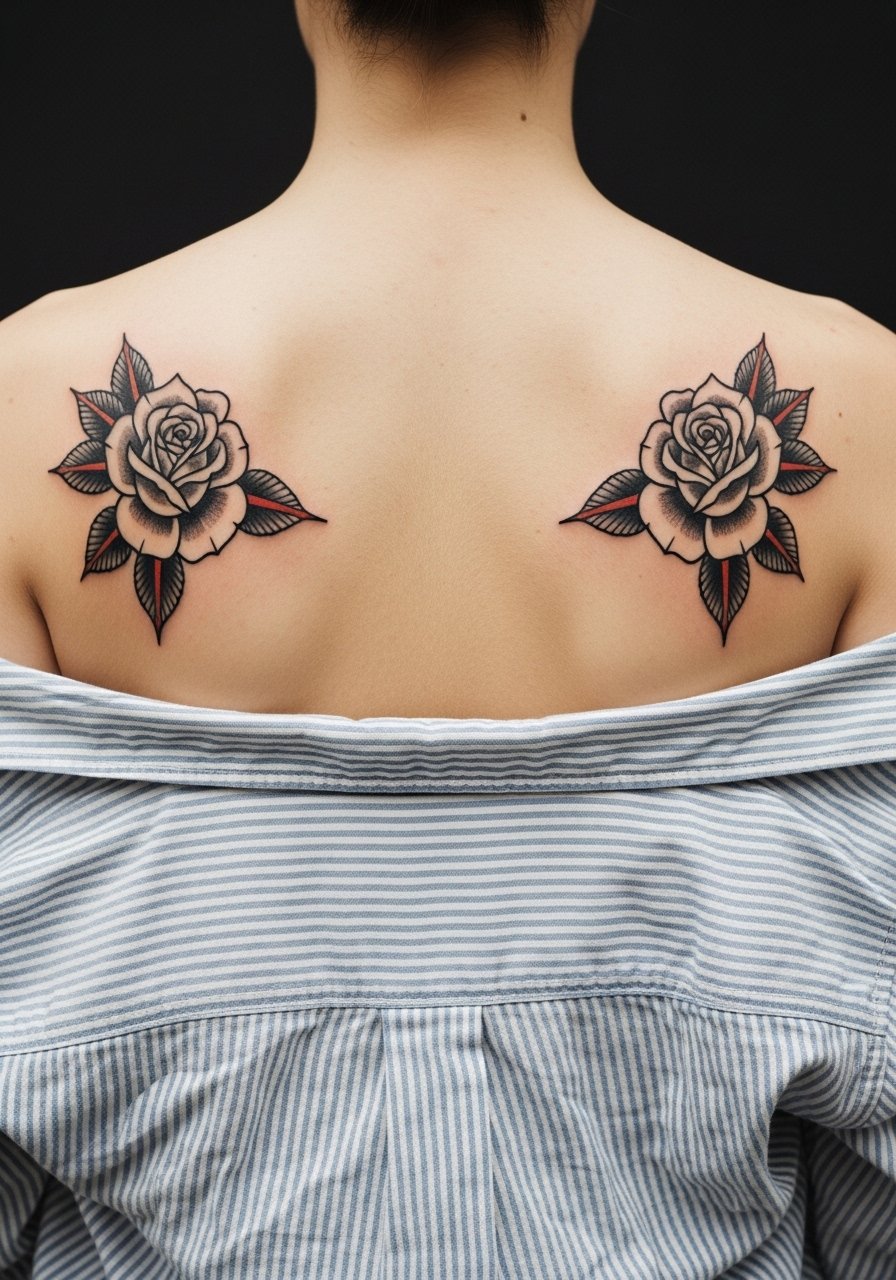
Symmetry reads strong on the back but requires precise stencil placement. The common error is letting one bloom sit even slightly higher which makes the eyes see imbalance. During consultation bring photos and ask the artist to test the stencil mirrored on your skin before inking. Sessions can be split into two equal sittings to maintain energy and saturation. Healed at six months and two years the symmetry holds if your artist planned for it. For the session wear a loose button-down shirt so you can pull either side down for access.
11. Large Backpiece Rose Surrounded by Leaves and Vines
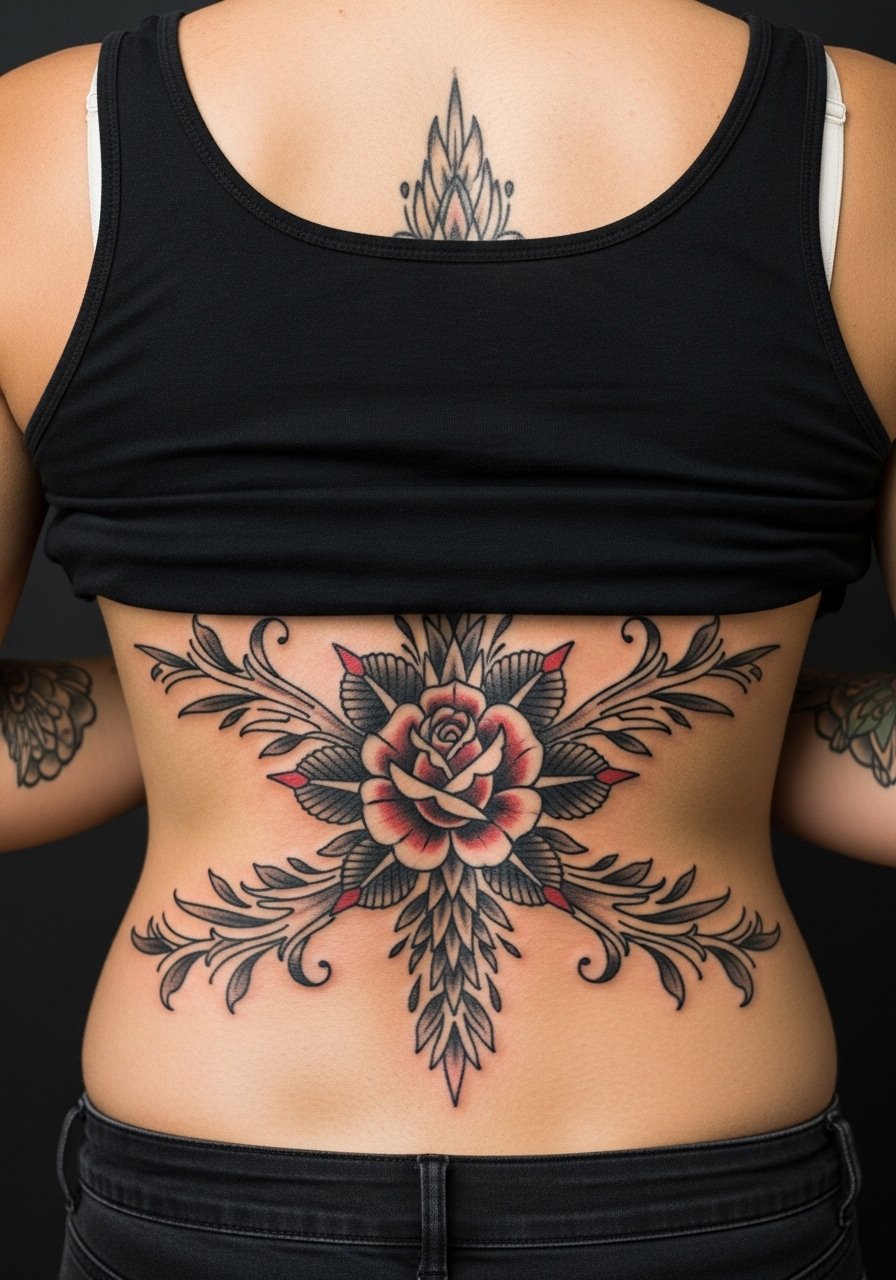
If you plan a large backpiece, think of the rose as the central anchor and let leaves provide the negative space. A frequent mistake is overfilling with small motifs which makes the piece visually congested as it ages. Tell your artist you want negative space around the bloom for longevity. Sessions are long and may require multiple days. Pain varies by exact placement. At two years the large shapes maintain readability; at five years the leaves often need less work than the focal bloom. For long sessions pick comfortable loose clothing like a tank top that you can adjust without disturbing the area.
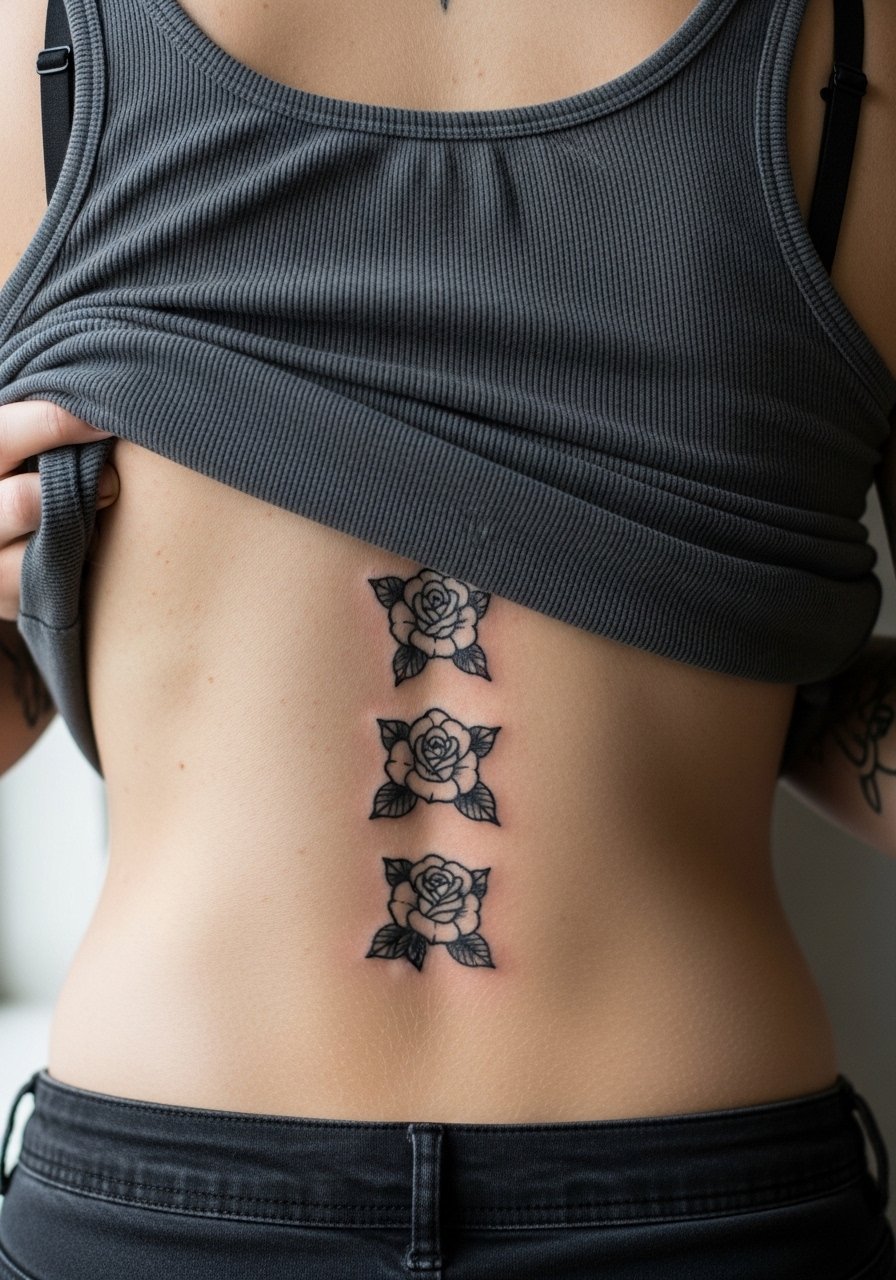
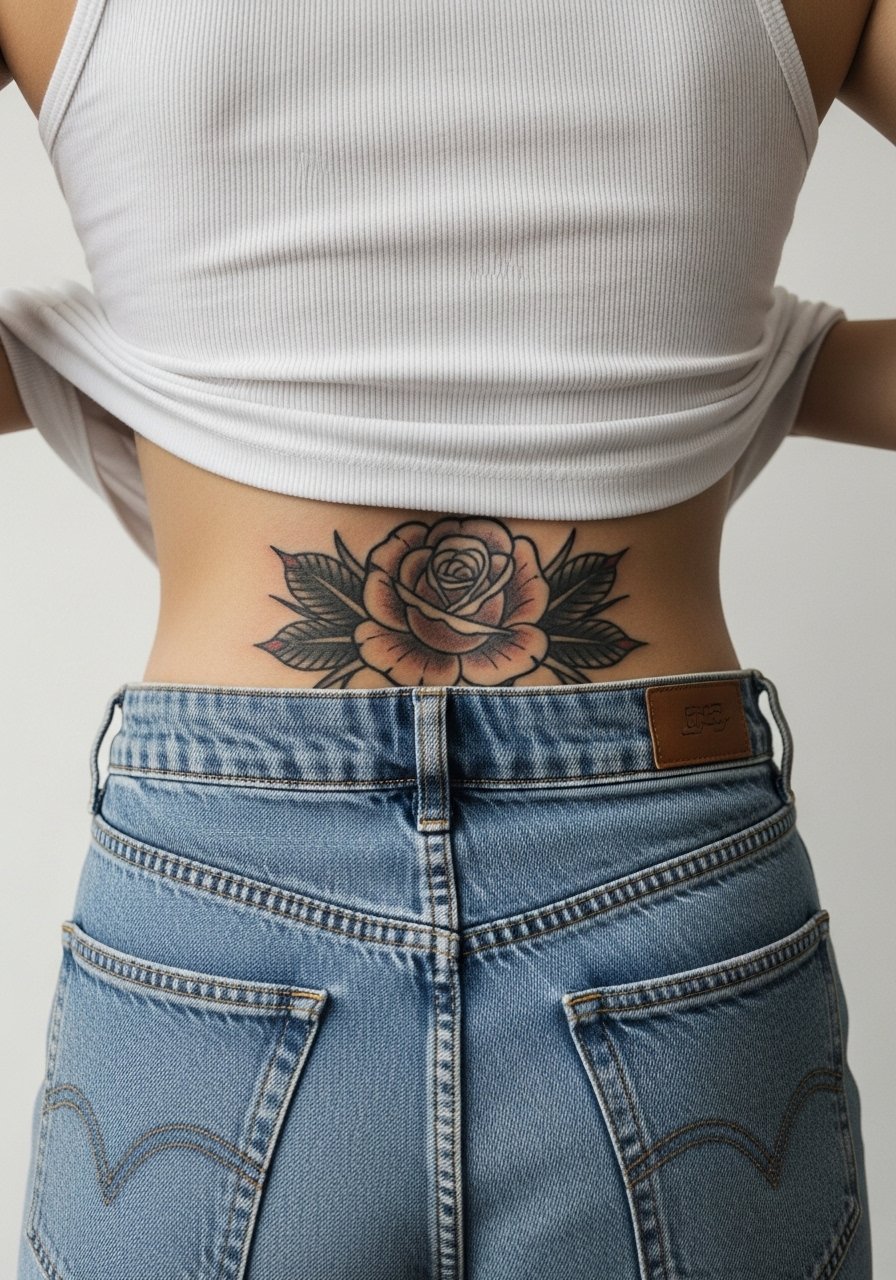
12. Micro Rose Trio Near the Lower Spine for Discrete Placement
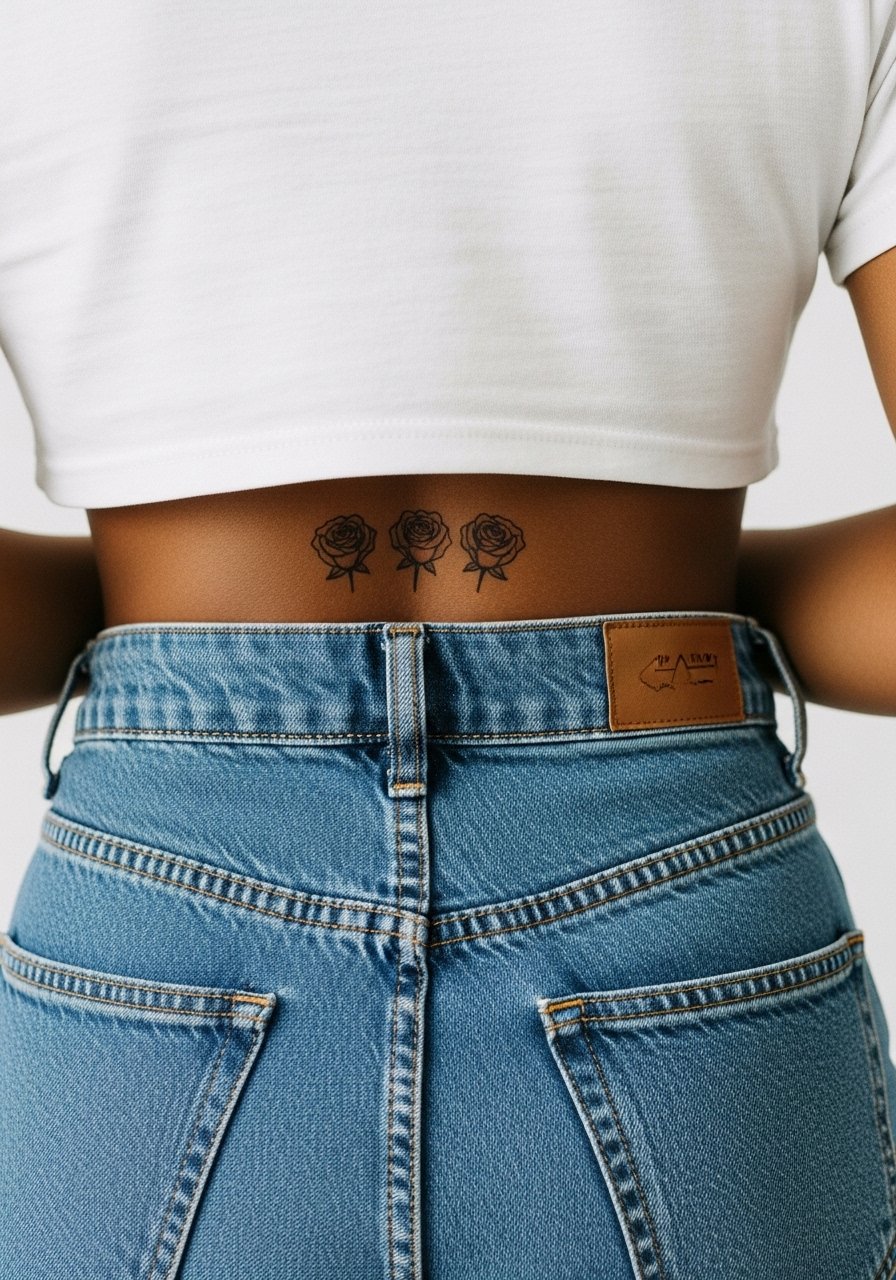
Micro traditional work on the lower spine is discreet and can be a fun starter backpiece. The mistake is making the motifs too small which leads to early blurring. Ask for slightly bolder linework than in typical micro pieces so the roses read at two years. Pain is lower compared with ribbed areas but the lower back can feel stiff afterward. Sessions are short and easily completed in one appointment. For showing it off try low-rise or high-waisted combinations that reveal a peek of the cluster.
13. Rose-and-Dagger Across the Mid-Back for Edge

Adding a dagger creates a narrative motif and a diagonal composition that reads dynamic on the back. The common error is aligning the dagger too sharply with natural body folds which distorts the image when you move. Ask for a slight curve in the blade to follow your body's plane. Session time is moderate and pain depends on how much linework is used. At two years the blade outline is what preserves the composition. For styling, diagonal motifs peek best with asymmetrical tops or a one-shoulder look.
14. Rose Mandala Hybrid Centered on Upper Back
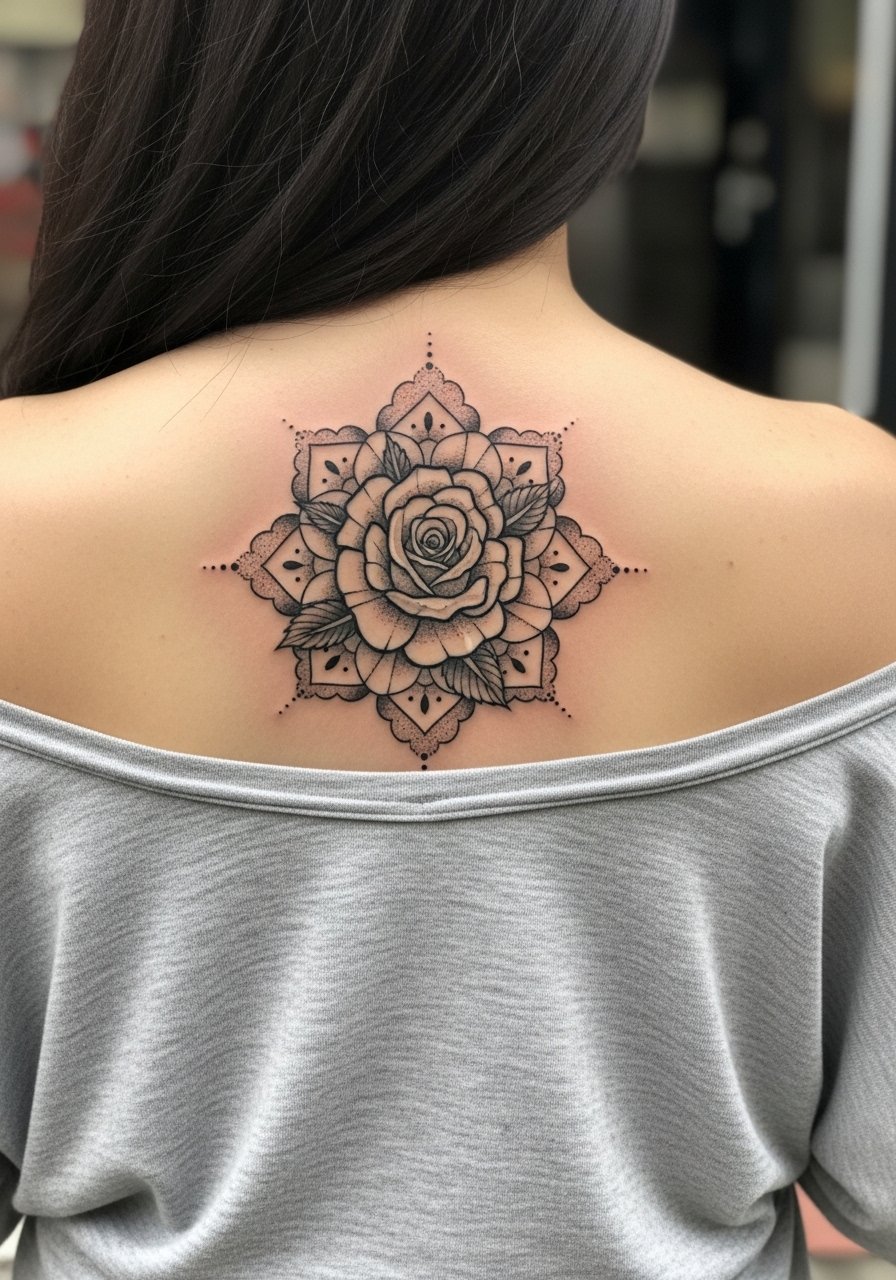
Combining traditional roses with mandala geometry gives a structured backdrop while keeping a classic center. The biggest mistake is cramming mandala detail too close to the bloom. Demand clear breathing room so the geometric dots and stipple shading age distinct from the saturated petals. The session may require a touch more time because of the detailed dot work. At two years the geometry keeps the rose looking intentional. This placement pairs well with open-back or halter tops when you want the pattern to read as a framed piece.
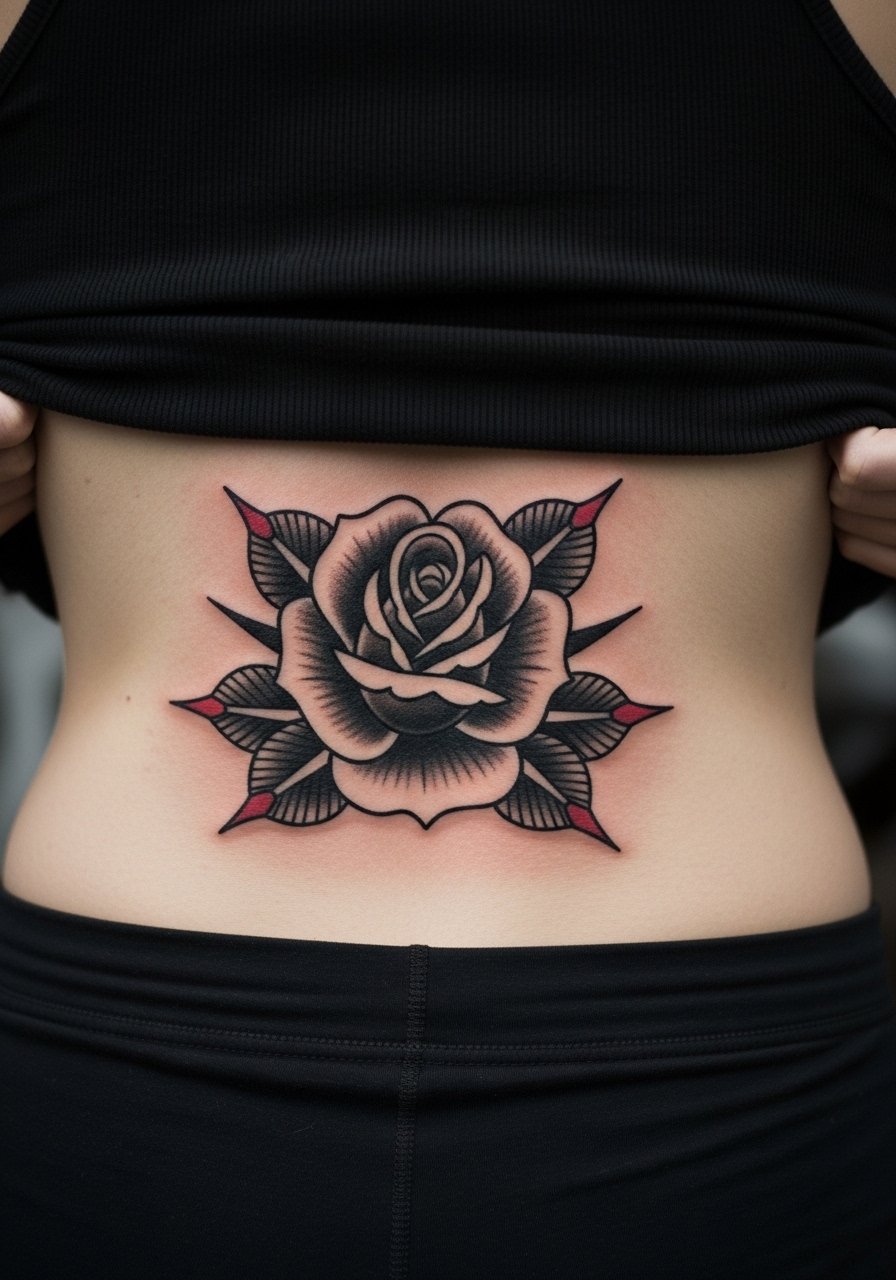
15. Single Rose with Bold Leaves on Lower Back
Oversized leaves give visual drama without relying on micro detail that fades. New clients often ask for tiny veins in leaves which disappear quickly. Ask for graphic leaf shapes and heavy saturation so the negative space defines the form as the piece ages. Pain is moderate and the session length depends on fill area. Plan for a touch-up at three to five years for the darkest fills if you want them to stay vivid. For the appointment, loose high-waisted pants make access easy and comfortable.
16. Rose Chain Along the Upper Back Horizontal Line
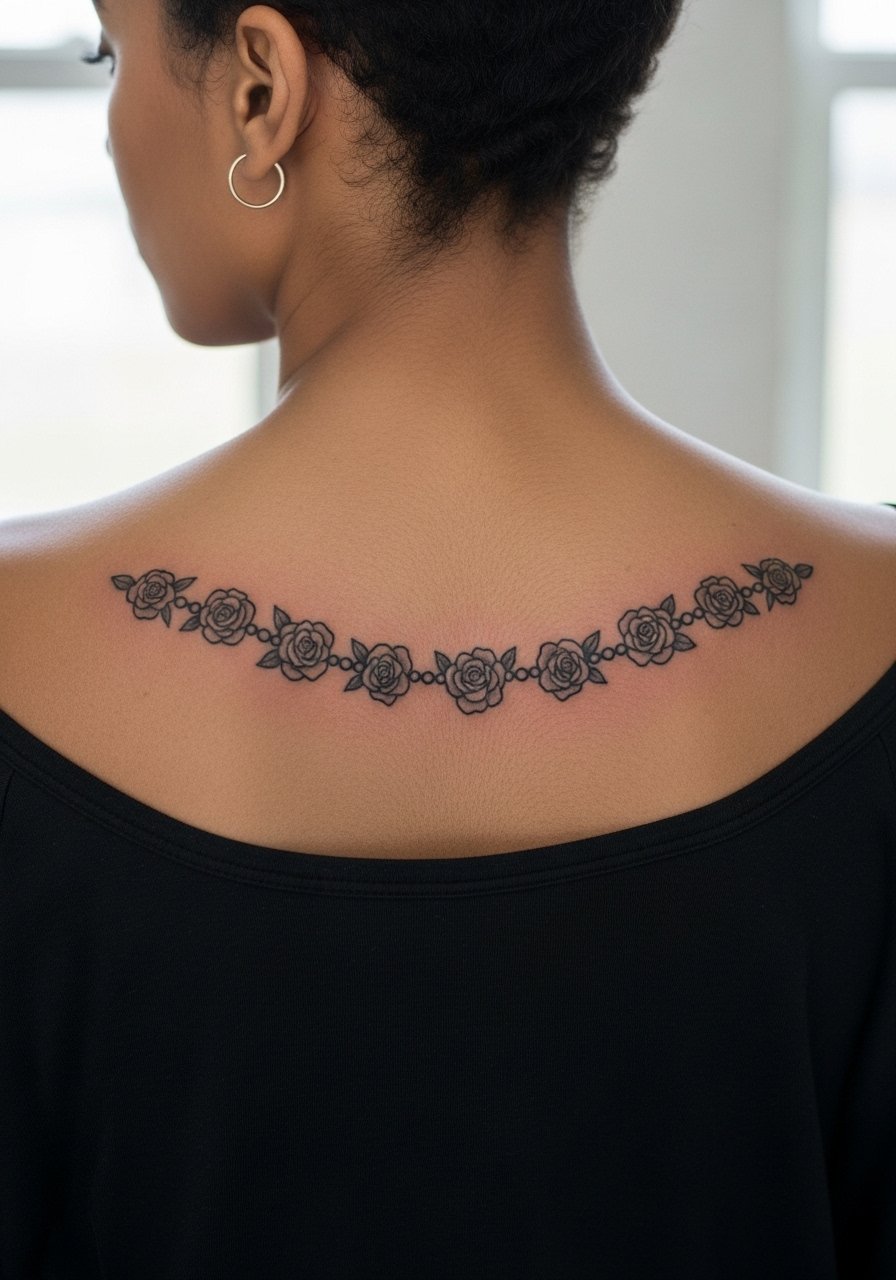
A horizontal chain reads like a built-in strap across the back and frames shoulders well. The common mistake is using rose sizes that are too similar to delicate wrist flowers. Scale them up slightly for longevity. Sessions are short to moderate depending on how many links you choose. At two years the chain effect persists if outlines were slightly bolder. For showing it off try open-shoulder tops or strapless styles that let the horizontal line remain visible. For the session, a wide-neck shirt you can pull aside works well.
17. Rose Overlapping a Scar for Concealment and Art

Using a rose to incorporate a healed scar requires an artist experienced with scar tissue. The mistake is treating scar tissue like normal skin. Scarred areas accept pigment differently and sometimes need extra passes or touch-ups. During consultation ask about prior experience with scar coverage and realistic expectations. Pain can be higher and healing unpredictable. From what I've seen a staged approach with a follow-up session often yields the best color match. For modest show-off choices, high-waisted bottoms and cropped tees help the area read intentional rather than hidden.
18. Gothic-Influenced Rose with Deep Saturation on Mid-Back
Deeper saturation creates a dramatic, almost gothic look while keeping the traditional outline language. The mistake is relying on pure black fill in the wrong area which can overpower the petals. Ask your artist for layered saturation and tonal variation so the bloom keeps dimensionality. Sessions tend to be longer because of dense color packing. At two years these deep fills often hold very well compared with pastel choices. If you like moody clothing, pair the piece with dark open-back garments to echo the palette.
19. Small Rose with Vine Trail Up the Shoulder
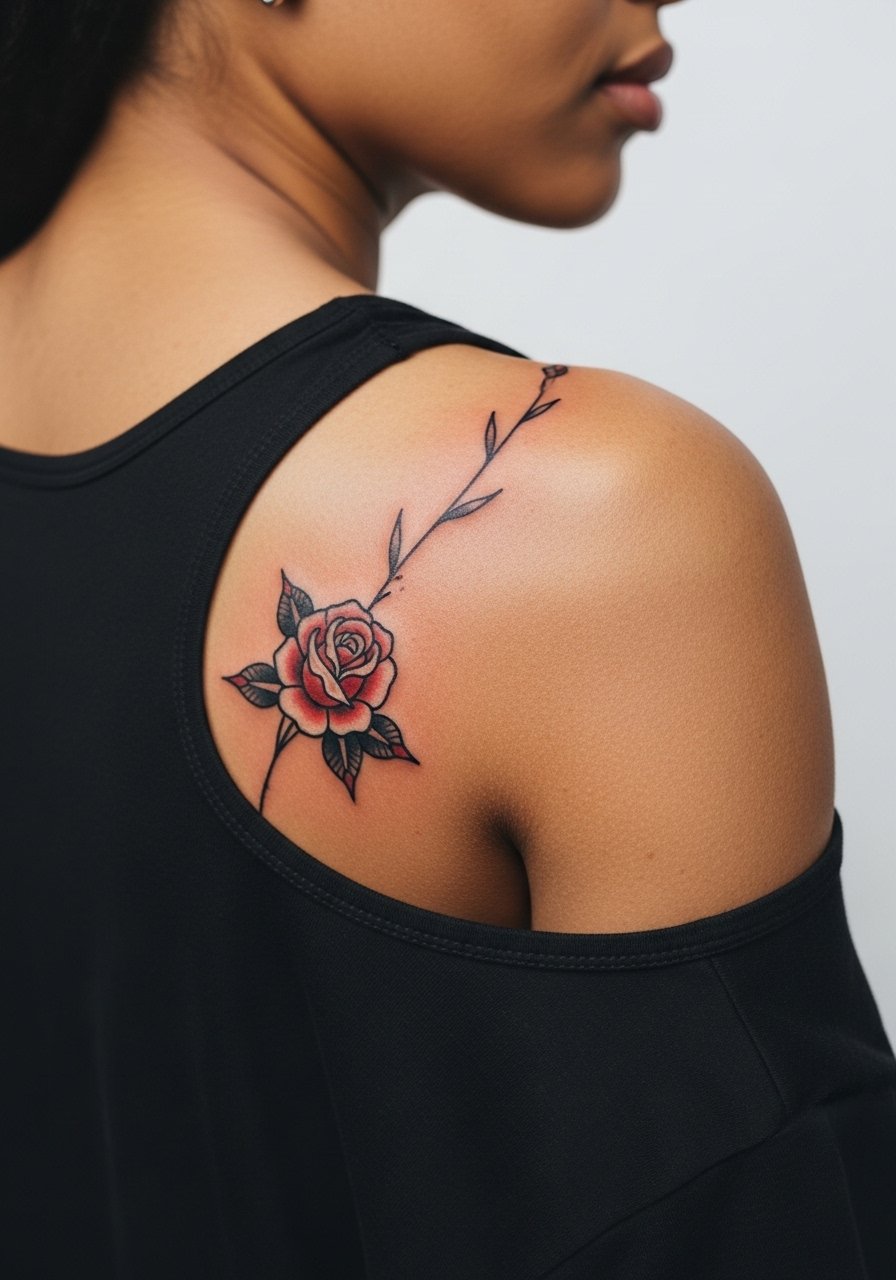
Trails that snake over the shoulder create an organic movement that reads well with certain outfits. The usual error is making the vine too thin which can lead to early fading. Request a vine with small but solid linework and steady spacing. Sessions are moderate and the shoulder crossing adds light sensitivity. For the session wear a tank top you can adjust so the artist can work on both the back and the shoulder without you feeling exposed.
20. Rose with Script Curving Along the Upper Back
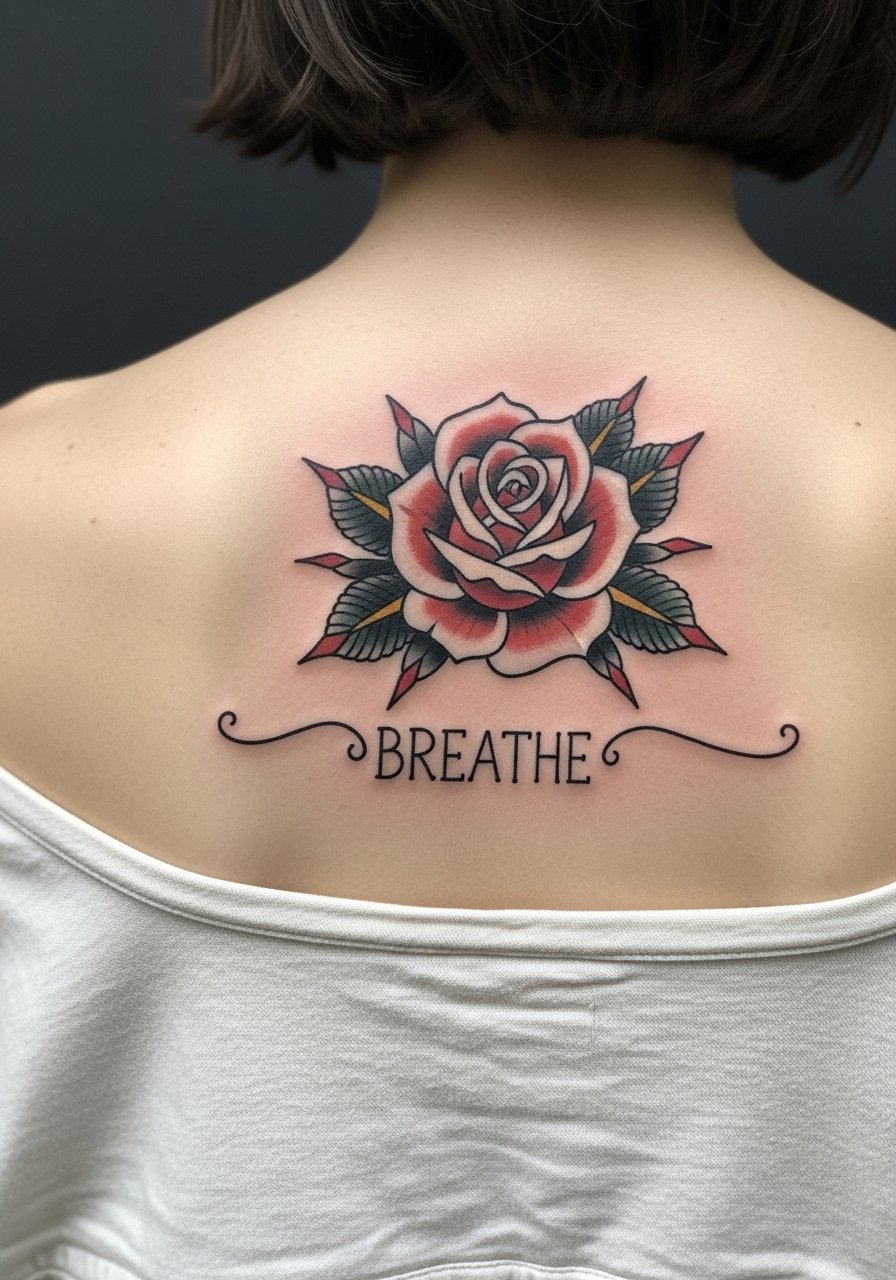
Curved script under a rose needs open letter spacing to remain legible with body movement. The mistake is choosing a crammed or ornate font that blurs. Ask for a clean medium-weight script and have the artist stencil it curved to your body's contour before inking. Sessions are moderate and the lettering may need a touch-up around year three to maintain crispness. For wearing options a wide-neck or scoop-neck top frames the script without crowding the rose.
21. Full Back Rose Bouquet For a Timeless Canvas
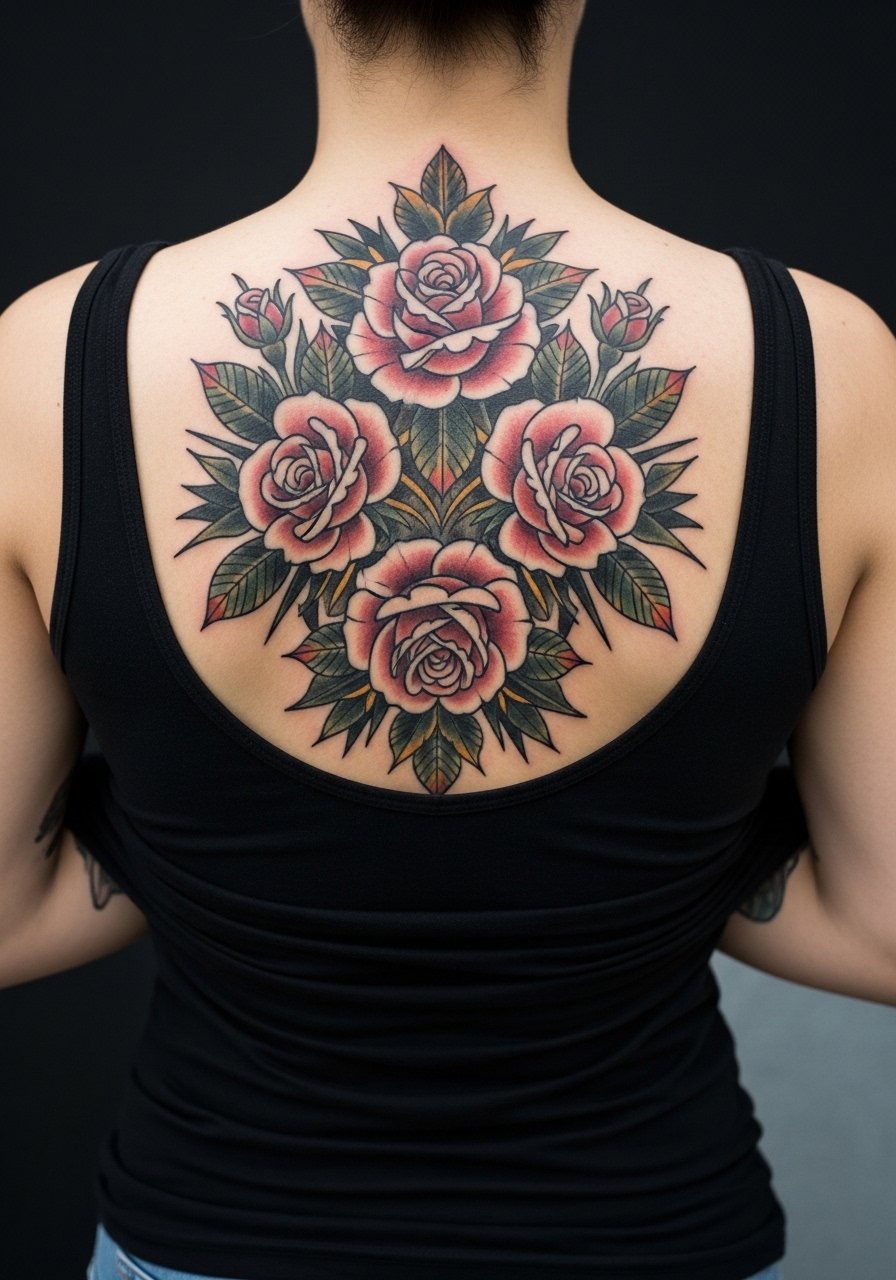
A full-back bouquet is a long-term commitment and a statement that ages predictably when done with traditional rules. Mistakes include over-detailing small blooms and skipping planning for future touch-ups. Ask your artist for broad shapes, strong outlines, and planned negative spaces so the work reads at a distance and up close. Sessions are extensive and will likely be split into multiple days with healing windows in between. Expect strong readability at two years and a realistic touch-up plan by year three or five depending on exposure. For long sessions choose breathable, loose clothing you can take on and off easily.
Frequently Asked Questions
Q: How does a traditional rose on the lower back age compared with one between the shoulder blades?
A: From what I've observed, lower-back pieces can be exposed to more friction from waistbands which speeds softening of edgework. Shoulder-blade placements usually move less and hold linework longer. Ask your artist about spacing and plan a protective first-week routine to minimize rubbing.
Q: Will script in a banner across the upper back need touch-ups more often than the rose itself?
A: Yes, lettering often needs sharper edges to remain legible over time. Script sits on a flatter plane but the ink in letters is small by design. Ask for slightly larger letterforms and expect a possible touch-up around year three if you want crisp lines.
Q: Are there special artist skills to look for when covering a scar with a rose on the back?
A: Look for portfolio examples showing healed scar coverage and ask about staged sessions. Scar tissue responds differently so artists who have worked with scars will explain realistic saturation and touch-up timelines. Use discovery pathways like local conventions, portfolio directories, and community forums to find those portfolios.
Q: Can I wear a regular bra the day of a back tattoo session or do I need special clothing?
A: For upper-back work a wide-neck shirt or a racerback tank you can shift is easiest. For lower-back pieces high-waisted pants and a cropped top that reveals only the area are more comfortable. Pick clothing that you can remove or shift without stretching the skin.
Q: Do watercolor fills work on darker skin tones for back roses?
A: Watercolor fills can read differently on darker skin tones. Strong outlines and slightly higher saturation help the color read. Discuss pigment choices and expected fade with your artist. If brightness is a priority, plan for color refreshes as part of the long-term maintenance.
Q: How do I find an artist experienced in traditional backpieces without naming specific shops?
A: Use discovery pathways like visiting local tattoo conventions, browsing portfolio directories, searching targeted hashtags, and reading community forum threads. Pay attention to healed photos in portfolios and ask for recent healed images during consultation. Trust your artist after you verify healed work and clear communication about expectations.
