
Fine line Kingdom Hearts pieces look gorgeous fresh, but what keeps them legible five years down the line is rarely the reference image. Placement, spacing, and how much negative space you leave matter more than the tiny details everyone saves on their phone. Read these ideas with an eye for longevity and wardrobe pairings, and you will leave the consultation with a clearer brief for the artist.
1. Minimal Keyblade on Inner Forearm
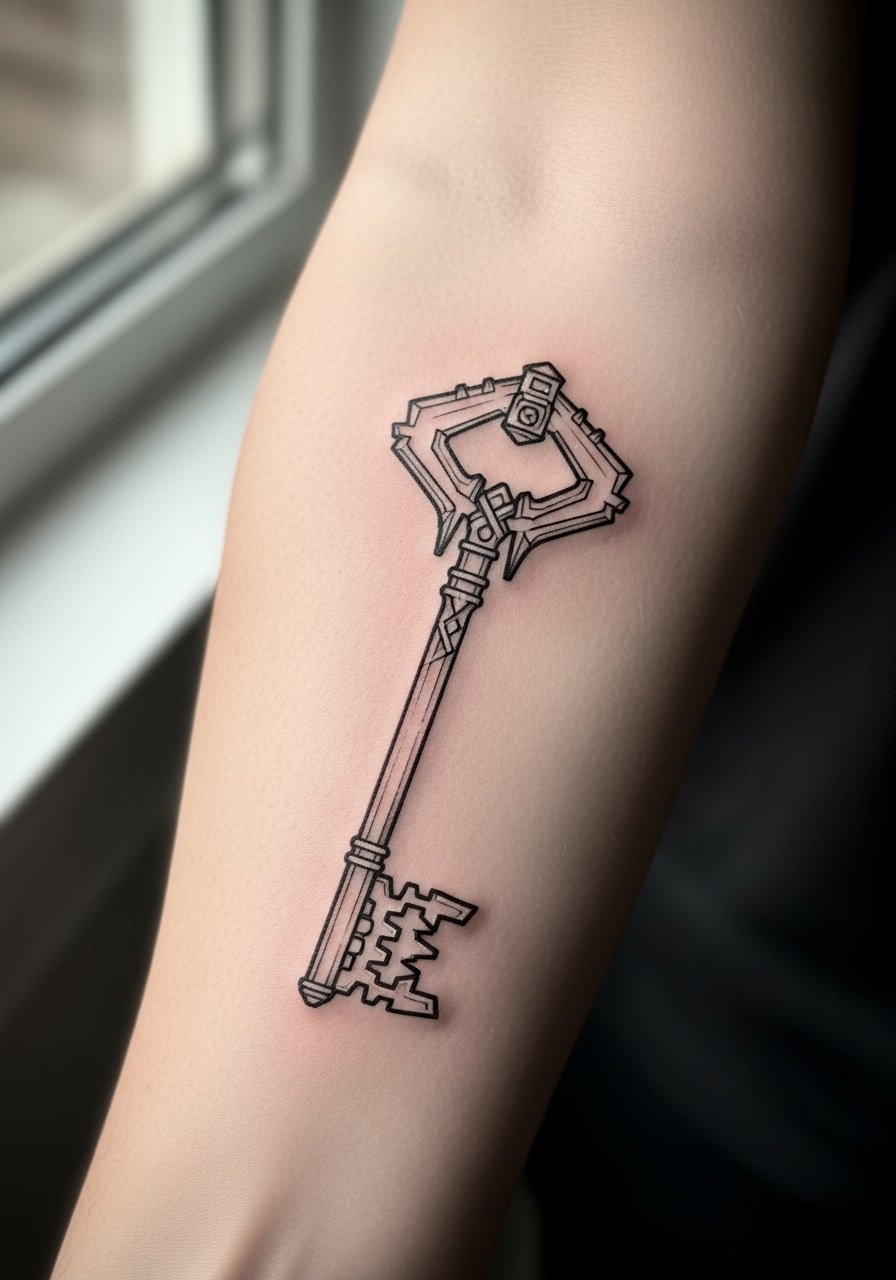
Start this one when you want subtlety that still reads when you roll up a sleeve. Ask your artist for slightly heavier linework than a hairline so the teeth and guard keep shape as the ink settles. Expect a low-to-moderate pain level and a single one-hour session for a neat result. Common mistake is requesting micro-detail in a tiny area, which blurs by year two. For showing the piece off, rolled-up sleeves or a loose linen shirt frame the forearm without hiding the linework.
2. Watercolor Oathkeeper with Soft Washes on Shoulder
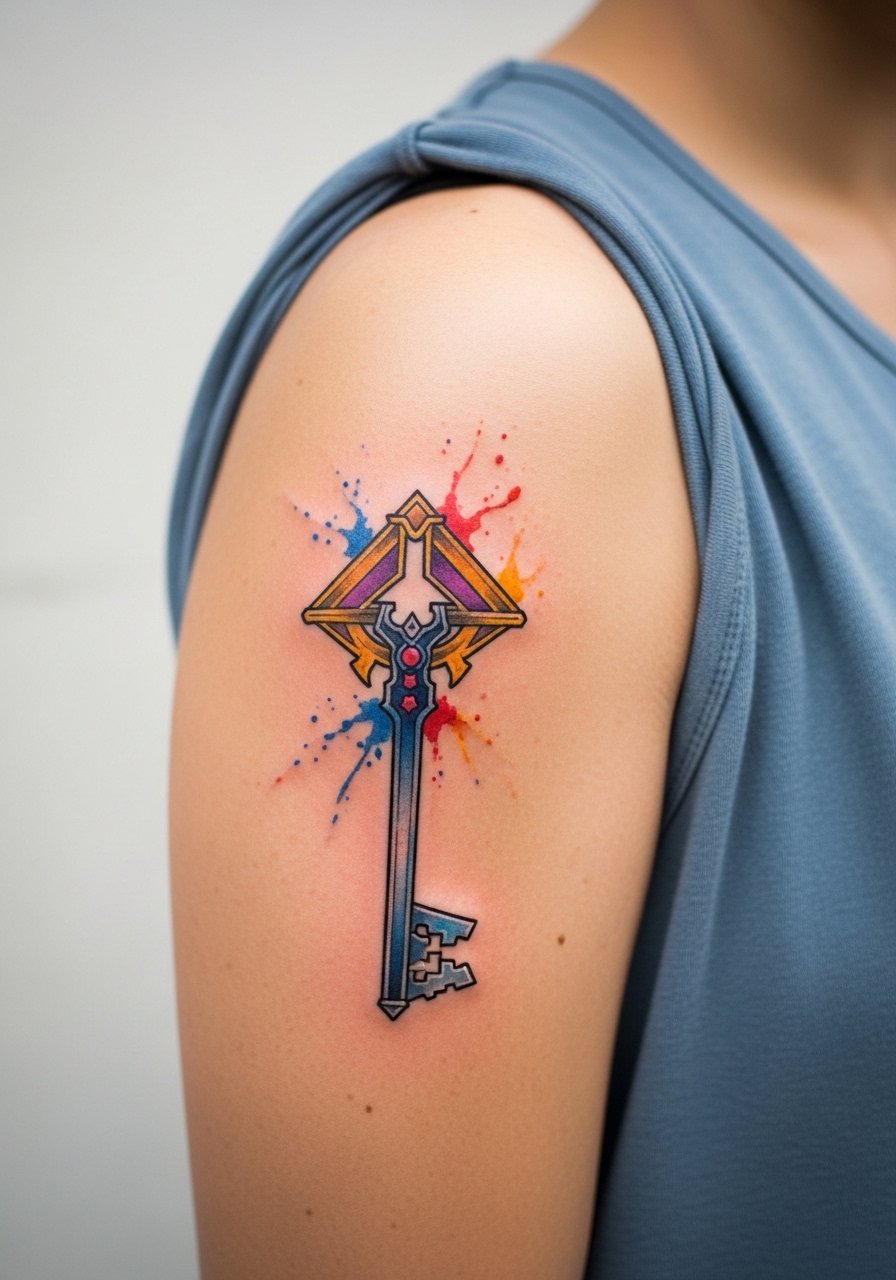
Watercolor washes are popular with illustrated designs, but they need room to breathe. Tell your artist you want a soft color field that does not touch the linework exactly, so the borders age separately. Shoulder sessions are quick and tolerable, and they photograph well with open-neck or tank tops. A common aging problem is color migrating into black lines when the pigment sits too deep. Expect a touch-up at year two or three for saturation refresh if you spend a lot of time in the sun.
3. Heartless Emblem Cluster on Calf

Bold blackwork holds up on the calf because the skin there moves less than on joints. For a cohesive cluster, ask for spacing between symbols to prevent merging over time. Sessions take about one to two hours depending on size. The real mistake is cramming too many tiny emblems together. For showing this off, pair with mid-length shorts and low socks, both keep attention on the calf silhouette without crowding the tattoos.
4. Oathkeeper and Oblivion Crossed on Chest
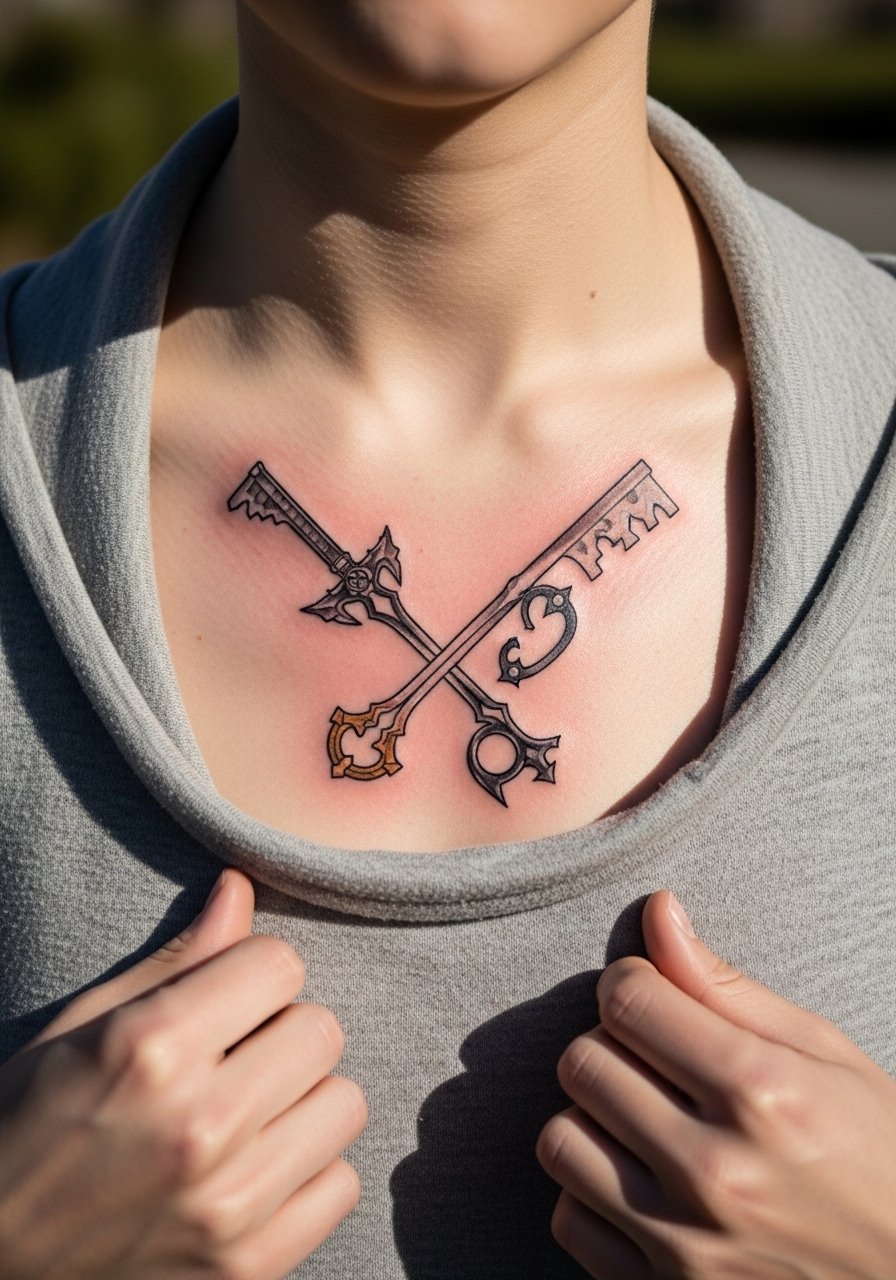
Chest pieces age differently because of sun exposure and fabric friction. Request slightly bolder keys near the center so the negative space forming the cross remains clear at five years. Fair warning, working close to the sternum can sting more, and sessions may be slower. The mistake I see often is tiny teeth detail that fills in. For session day wear, a wide-neck shirt you can pull aside keeps the area accessible and comfortable.
5. Paopu Fruit Duo, Wrist Wrap
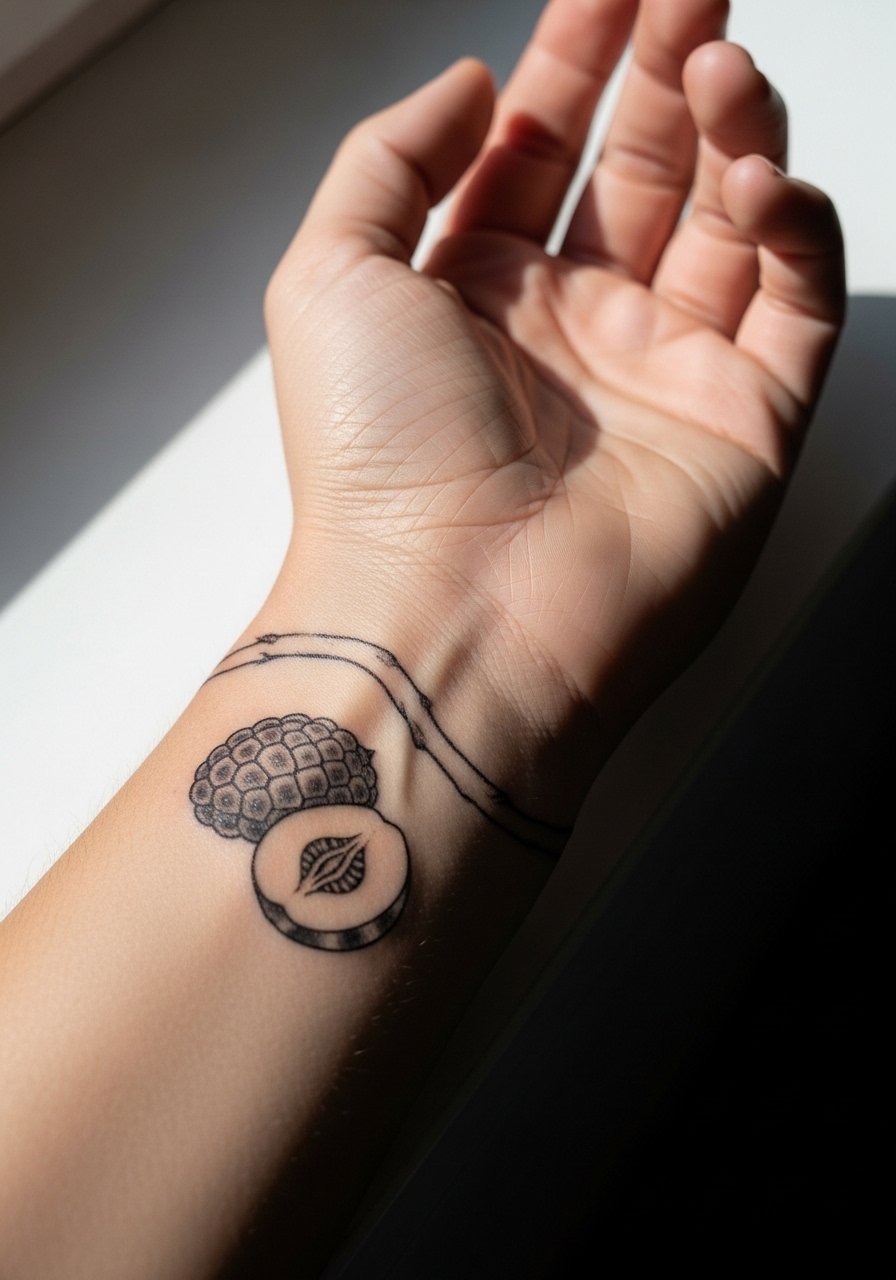
Wrist placement is visible and vulnerable to rubbing from watches and bracelets. Ask for a thin outline with minimal internal shading so the fruit retains shape, and plan for a touch-up sooner than arm work. The biggest practical mistake is placing it too low on the wrist where watchbands sit. During the session wear a loose sleeve button-down you can roll up, so the artist has clean access without causing extra pressure on the area.
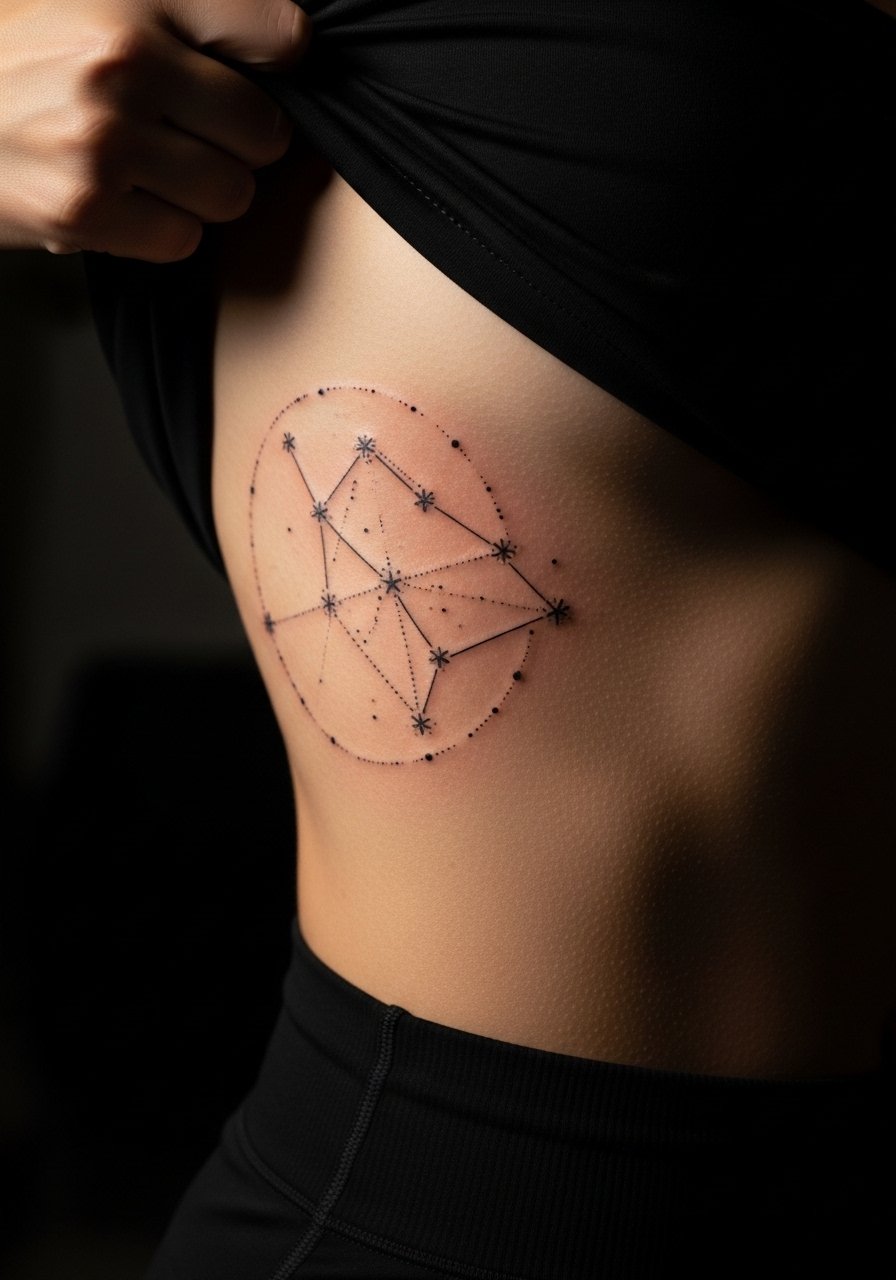
6. Constellation of Stars Forming Kingdom Hearts Crown on Shoulder Blade
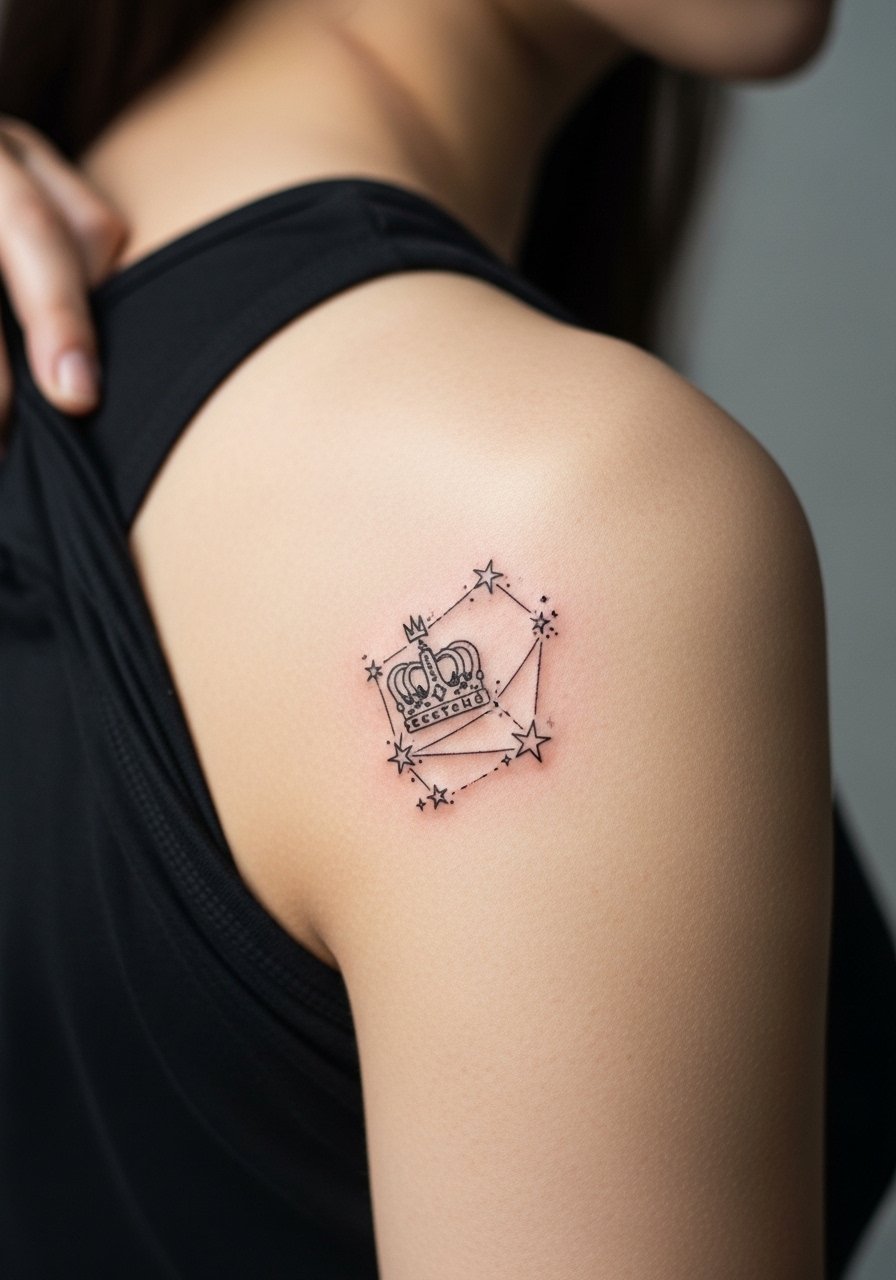
This airy design benefits from negative space so the tiny stars do not merge. Tell your artist you want varied dot sizes and a few stipple-shaded accents. Shoulder blade sessions are comfortable but can require shifting positions for coverage. A common error is using identical dot sizes across the piece which ages into a muddy patch. For evening looks, pair it with an open-back midi dress so the crown reveals itself without extra jewelry.
Studio Day Picks
The forearm, wrist, and shoulder pieces above each have different access needs and friction points, so a small kit for the session and first week smooths the experience.
-
Stencil transfer paper kit. Lets you preview the exact placement and negative space on skin before the needle hits, which is vital for small crown and wrist pieces.
-
Topical numbing cream. Applied as directed before a wrist or sternum session can reduce jumpy movements during sensitive spots.
-
Thin protective film roll. Useful for wrist and hand tattoos that face friction from daily washing and accessories.
-
Fragrance-free gentle body wash. Cleanses healing areas without irritating fine line work on the forearm and chest.
-
Aquaphor healing ointment. Thin layers during the first few days help retain moisture around delicate linework without suffocating the skin.
7. Chibi Sora on Outer Thigh
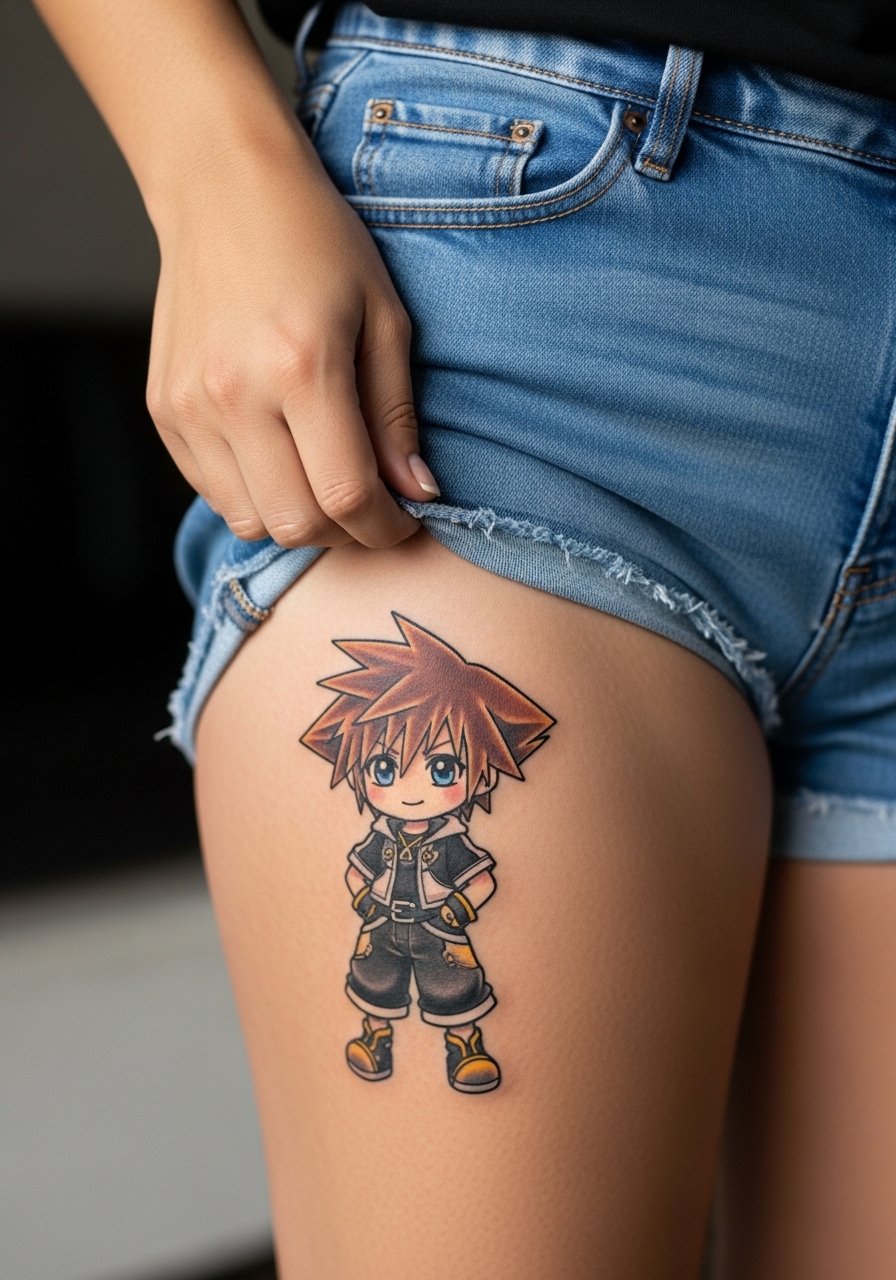
Thigh pieces let you go bigger without risking blowout from constant movement. If you want color, ask for slightly larger pigment fields and clean black outlines to anchor the washes. Sessions here are more comfortable for many people, but expect a longer single appointment. The mistake is packing micro-detail into the chibi face that loses clarity when the pigment migrates. For the appointment wear loose drawstring shorts so the artist can access the outer thigh without the waistband pressing on the area.
8. Small Keyblade Finger Tattoo
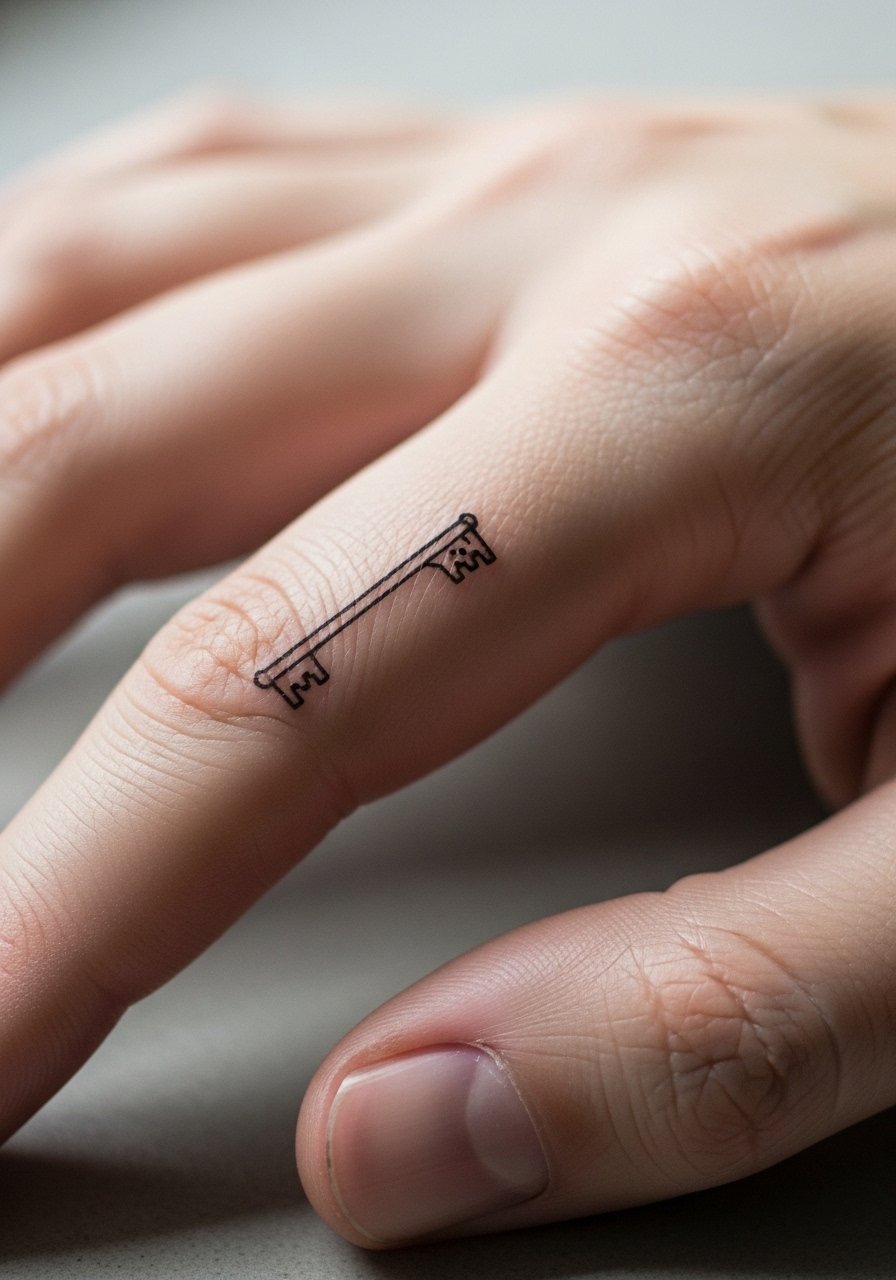
Finger tattoos are trend-forward but polarizing. One camp says fingers are perfect for tiny symbolic pieces since they are always visible. The other camp warns that constant hand use and thin skin make fading and blur almost inevitable within a few years. Tell the artist you accept the likely need for touch-ups and keep the size conservative. Expect quick sessions but faster fade. Consider placement on the side of the finger rather than the pad to reduce abrasion.
9. Kingdom Hearts Crown Behind the Ear
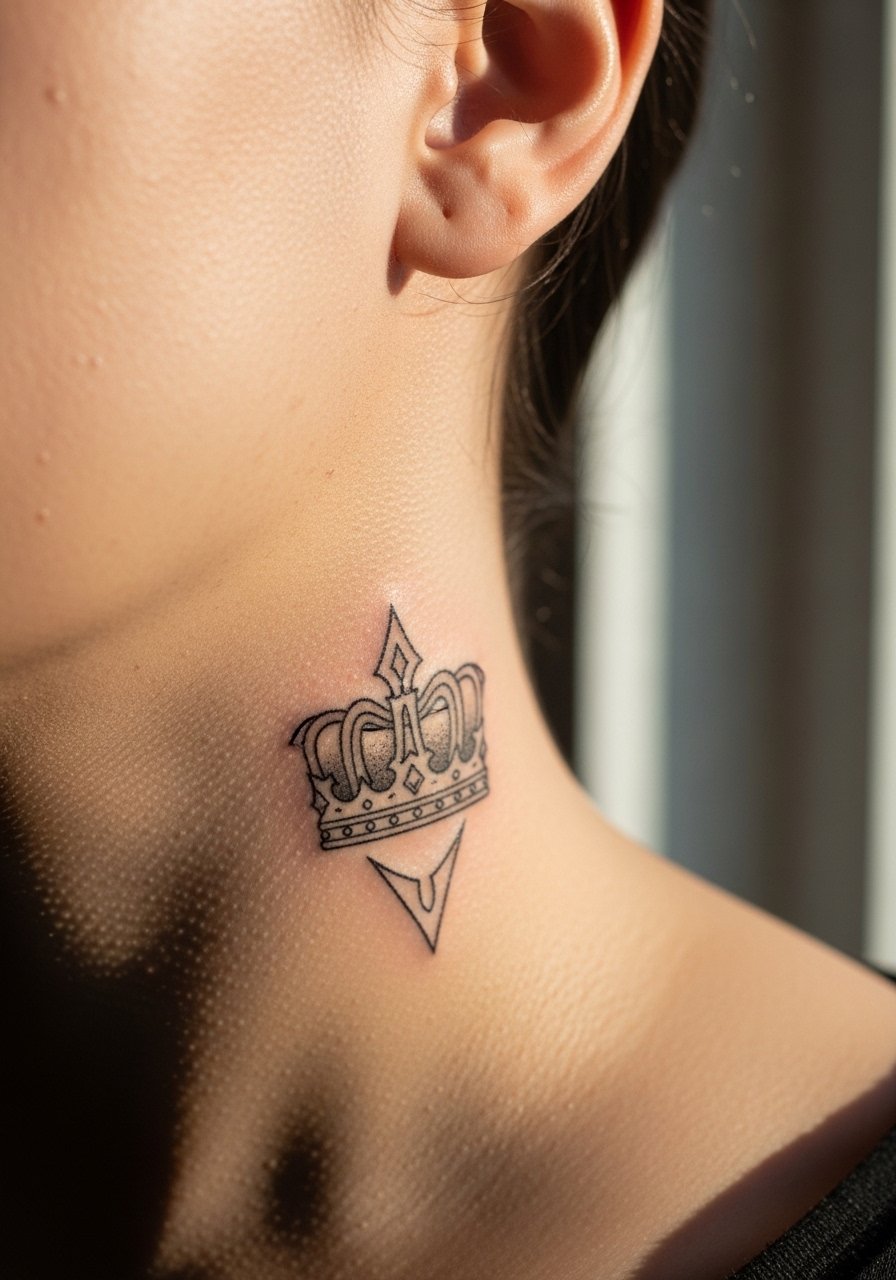
Behind-the-ear tattoos read small and intimate. Ask for reinforced outlines because the area can lose crispness. This placement hides well under hair and is a low-visibility choice for workplace concerns. Sessions are brief but can be ticklish. If you work in an industry that screens visible ink, this is a discreet option to consider. For session comfort wear a shirt with a wide collar so the artist can access the area without tugging at clothing.
10. Paper Star Trail Along Collarbone
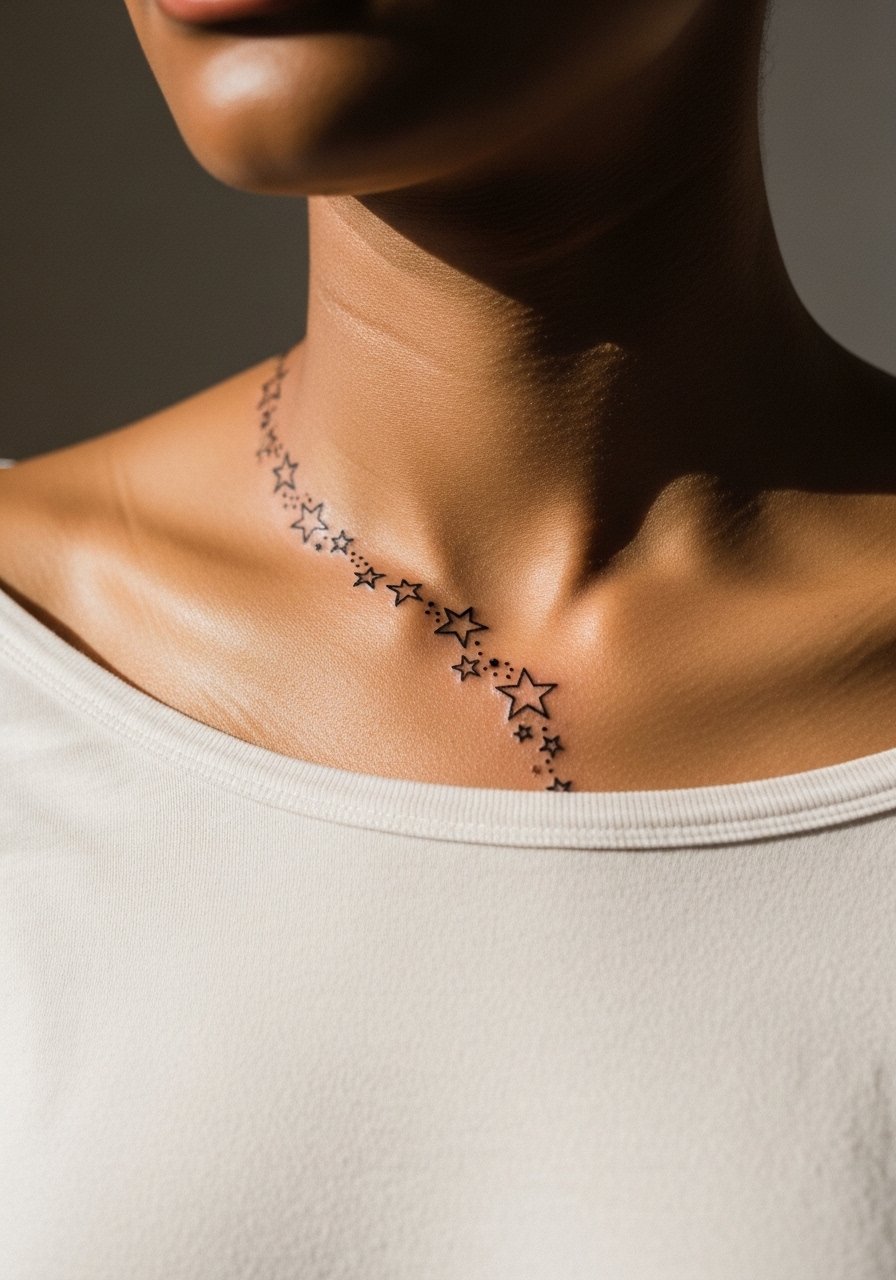
Collarbone pieces photograph well and discover themselves with certain necklines. Ask for slightly staggered spacing between stars so the lines do not merge as the skin moves. Expect moderate sensitivity near the bone and a one-hour session. A mistake is asking for identical tiny stars too close together. For styling, pair with a thin chain pendant necklace that sits above the trail without crowding the artwork.
11. Ominous Heartless Maw on Upper Arm Sleeve Accent
For sleeve accents, heavy black areas anchor the composition and age into a readable silhouette. Tell the artist you want the maw as a focal point with clear margins so it does not bleed into surrounding textures. Upper arm skin handles saturation well and is lower risk for blowout. Avoid asking for tiny internal teeth that will soften. For showing the work, a short-sleeve shirt with rolled sleeves keeps the upper arm visible without forcing constant exposure.
12. Pawprint Wayfinder on Inner Bicep
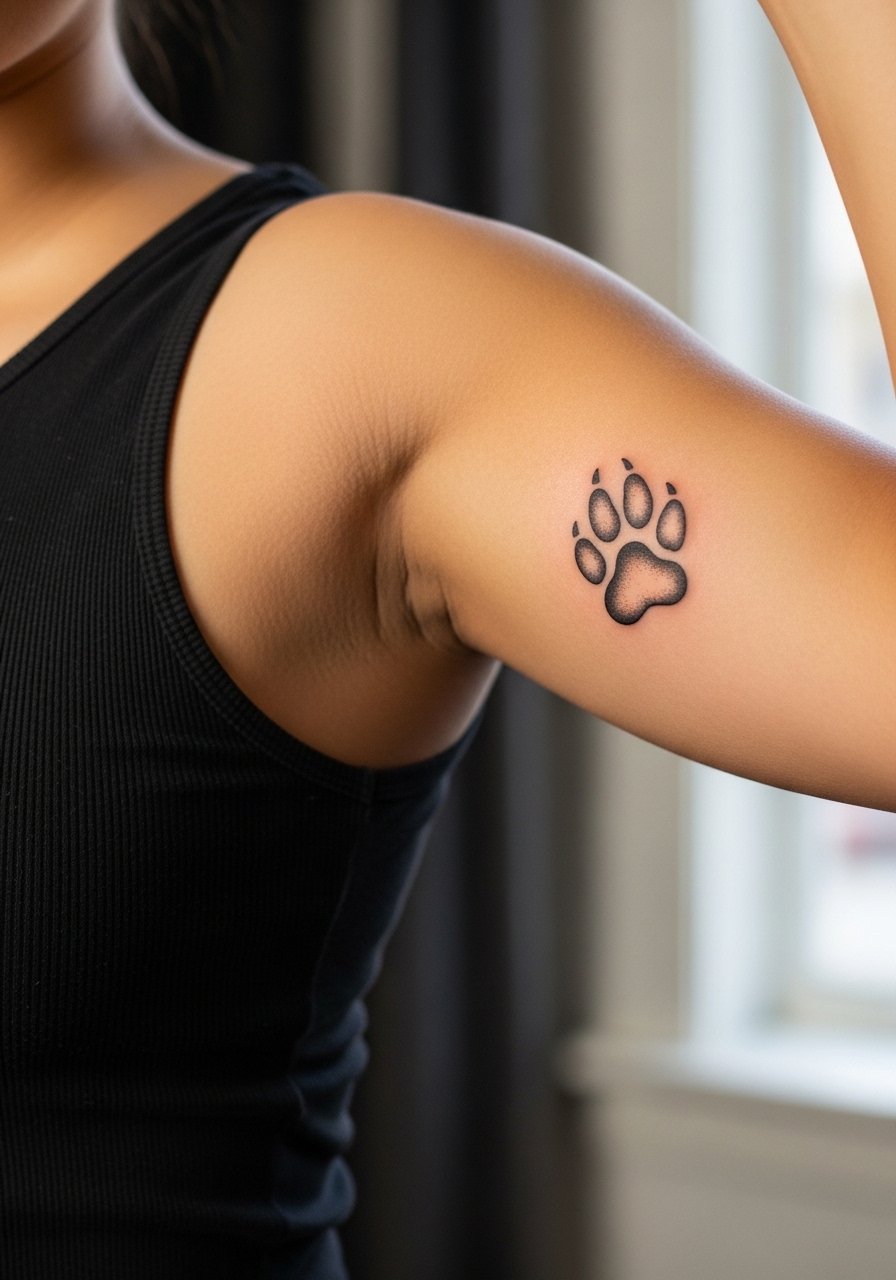
Inner bicep placements are private but can be shown selectively. Expect higher sensitivity and a slightly longer session because the skin is softer. The common mistake is packing a dense design in this area which can lead to early blur. For the session wear a tank top so the artist has clear access and you stay comfortable. This placement looks great peeking out from sleeveless shirts for a low-key reveal.
13. Remember Me Script Along the Ribcage
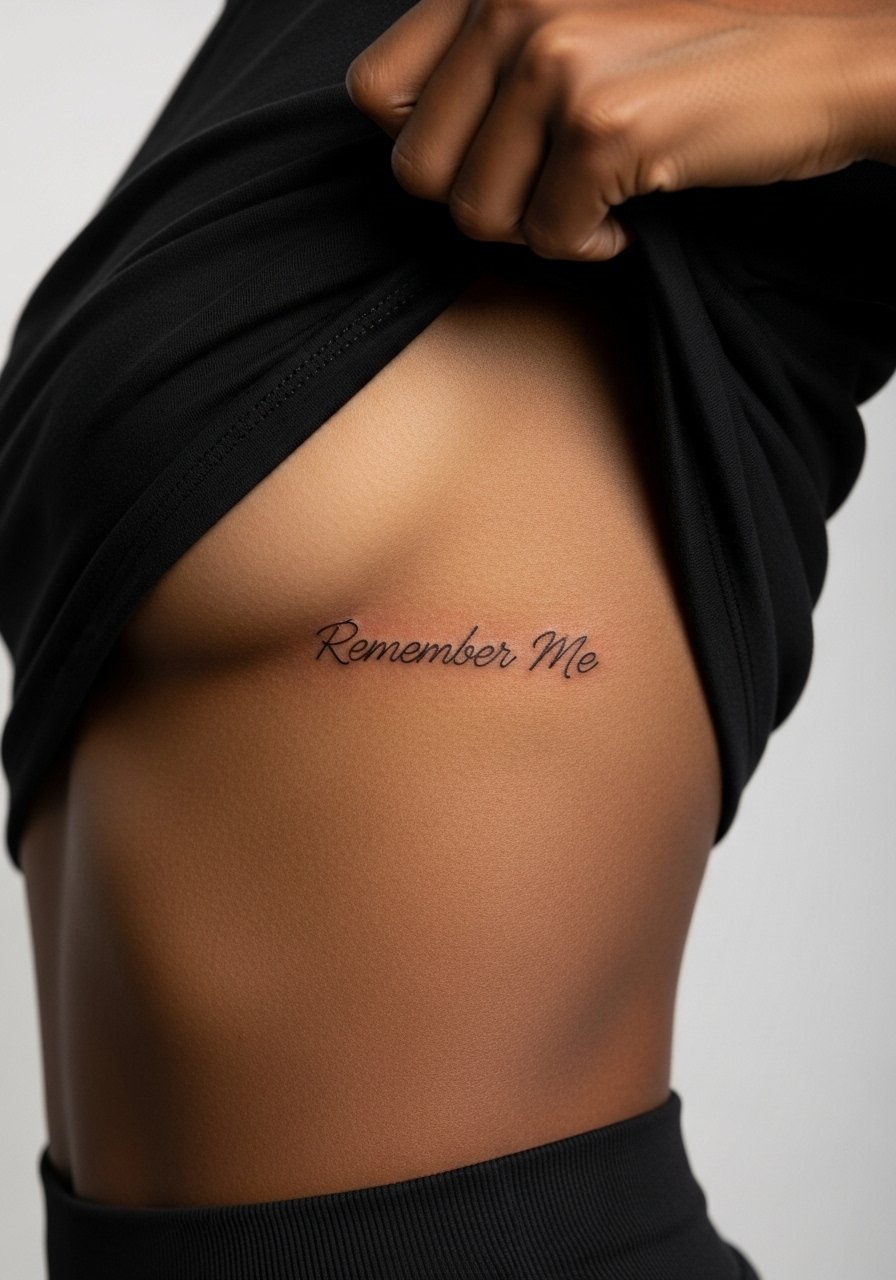
Ribcage scripts split artists into two camps. One group says the skin there stretches and lines blur within two years. The other group argues that with proper needle depth and extra spacing, fine script settles well. Ask your artist which camp they belong to and see healed photos of their rib work. Expect higher pain levels and staggered sessions if the piece is long. Opt for slightly larger lettering and generous letter spacing to help longevity.
14. Paopu Fruit Minimal Pair on Ankle
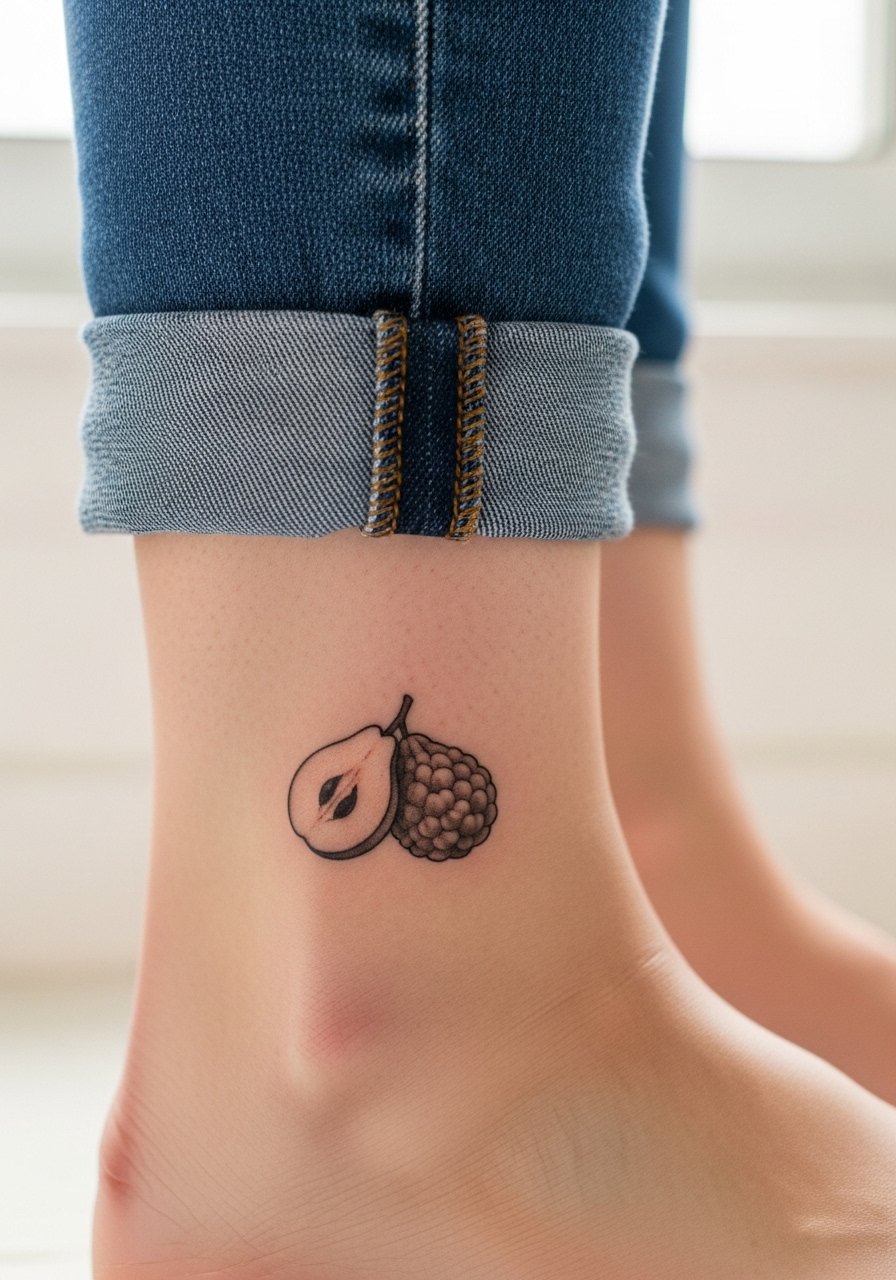
Ankle pieces face constant movement and shoe rubbing, so simplicity helps. Ask for a clean outline and minimal fill to avoid color loss from friction. Sessions are short but healing can be tricky because of swelling from standing and walking. The common mistake is placing it where shoe rubbing occurs. Wear loose footwear and consider pairing with ankle socks or sandals during the first week to reduce abrasion.
15. Hollow Bastion Ruins Back Piece Accent
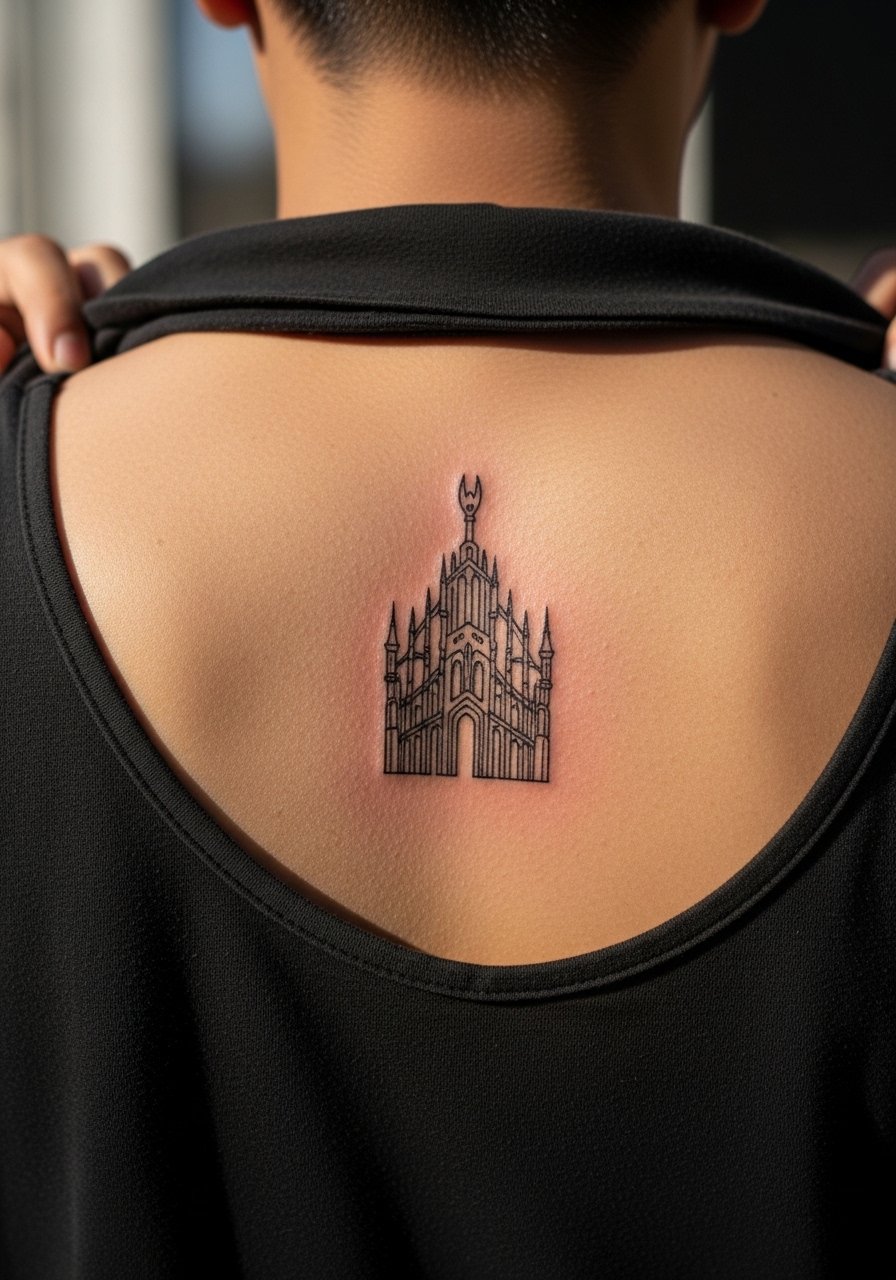
Back accents let you go intricate without daily visibility. Ask your artist to prioritize strong vertical lines so the ruins maintain depth as the skin shifts. Sessions can be long if you expand it into a larger back piece. A frequent mistake is over-detailing small arches that fill in with time. For session comfort bring a loose button-down you can wear open to the back or a tank that avoids pulling on the tattoo zone.
16. King Mickey Tiny Portrait on Calf

Tiny portraits demand bold contrast to stay readable. Tell the artist you prefer simplified features and higher contrast rather than micro-realism at a very small scale. Calf tissue holds shading well and heals nicely. The usual mistake is insisting on tiny facial details that blur. Pair this with cropped pants or a knee-length skirt so the design becomes a subtle focal point when you want to show it.
17. Organization XIII Emblem on Back of Neck
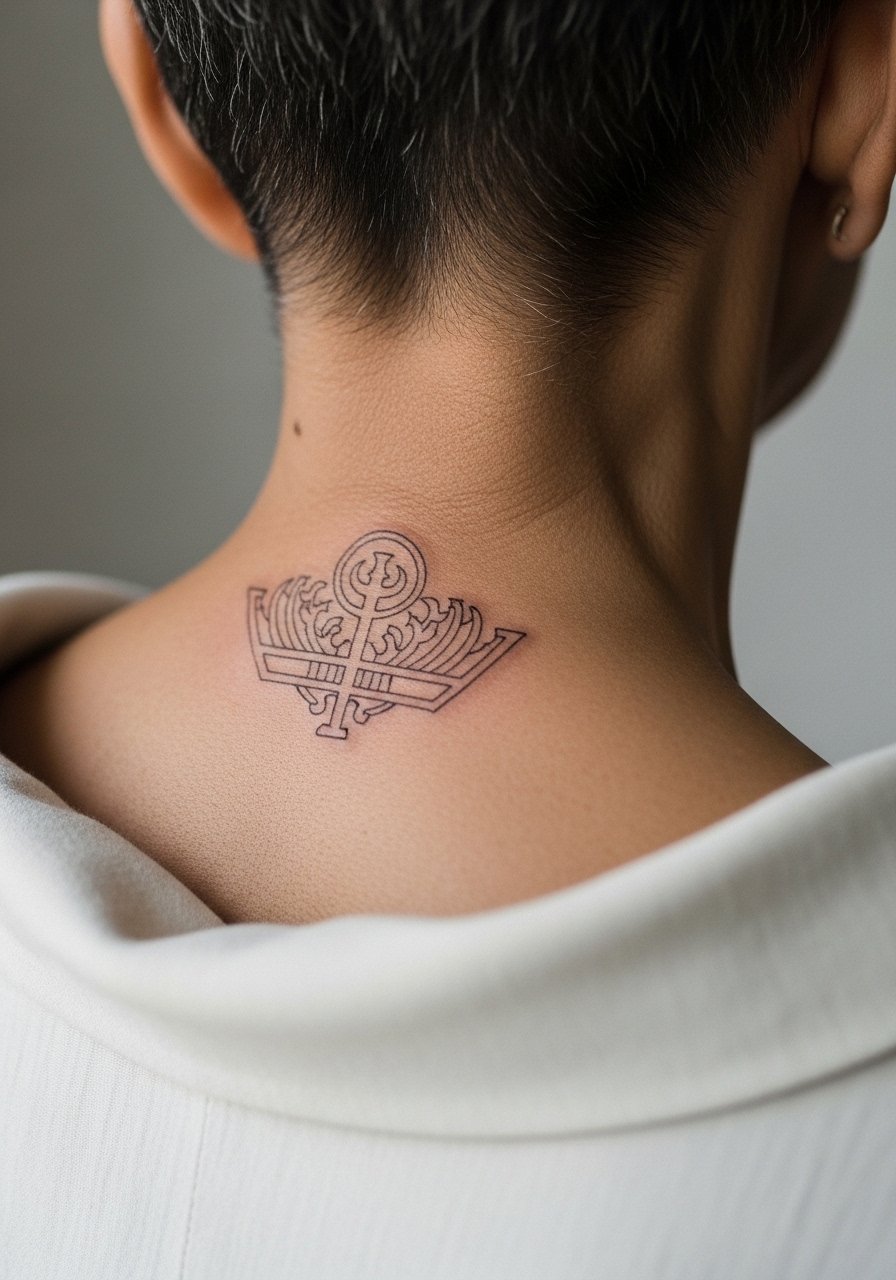
Neck pieces are visible and career-sensitive for some. Ask for placement that sits low so you can hide it with collars when needed. Sessions are brief but can feel intense because of the exposed location. A common error is going too big on the neck where professional boundaries might become an issue. For session day wear a shirt with a collar you can adjust easily.
18. Sea Salt Ice Cream Cone on Hip
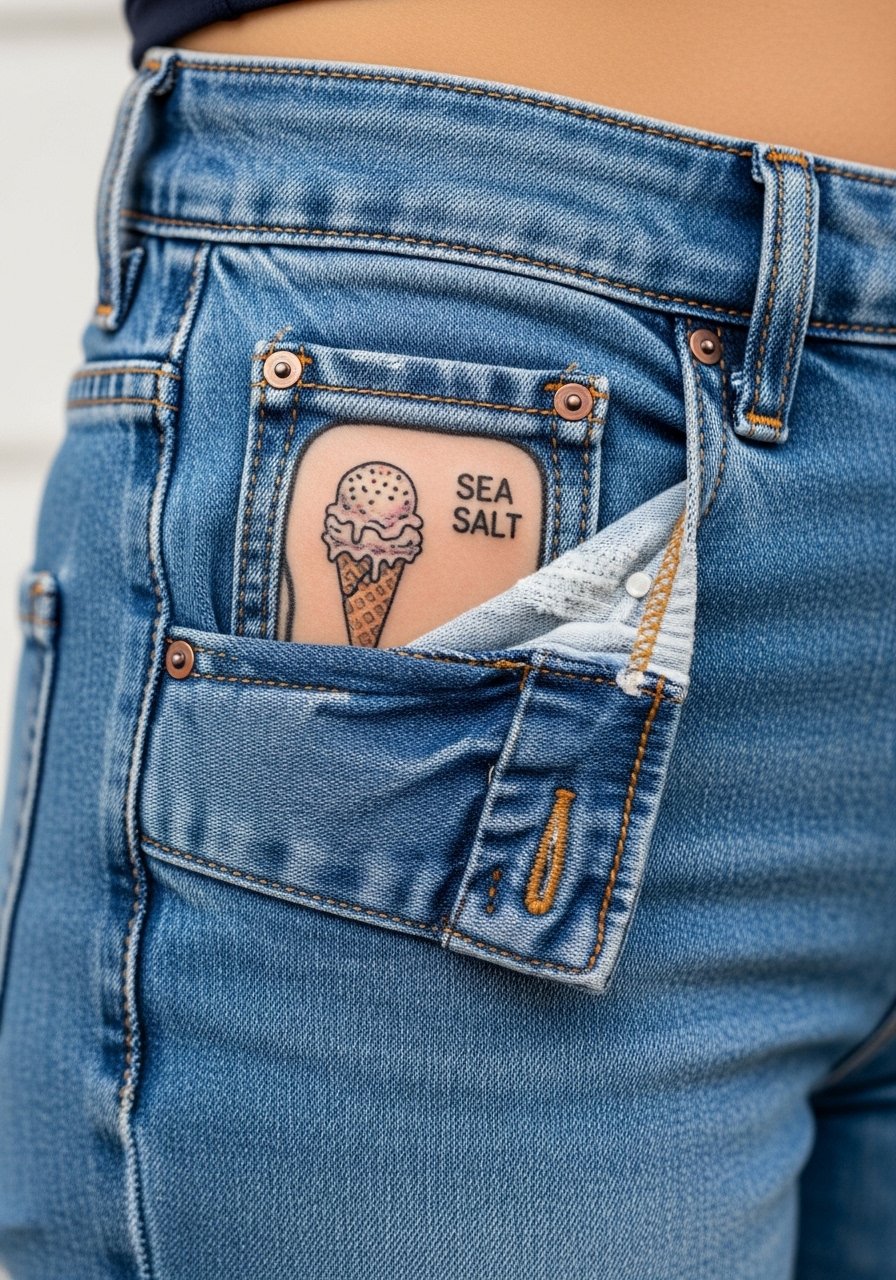
Hip tattoos are intimate and age predictably because they are often covered. Ask for slightly stronger outlines to keep small color fields in place over time. Sessions here are moderate for pain but short. The mistake is using sketchy lines that do not stand up to skin movement. For comfort on session day wear high-waisted bottoms you can lower slightly without exposing more than the tattoo area.
19. Destiny Islands Map Ribbon Around Wrist
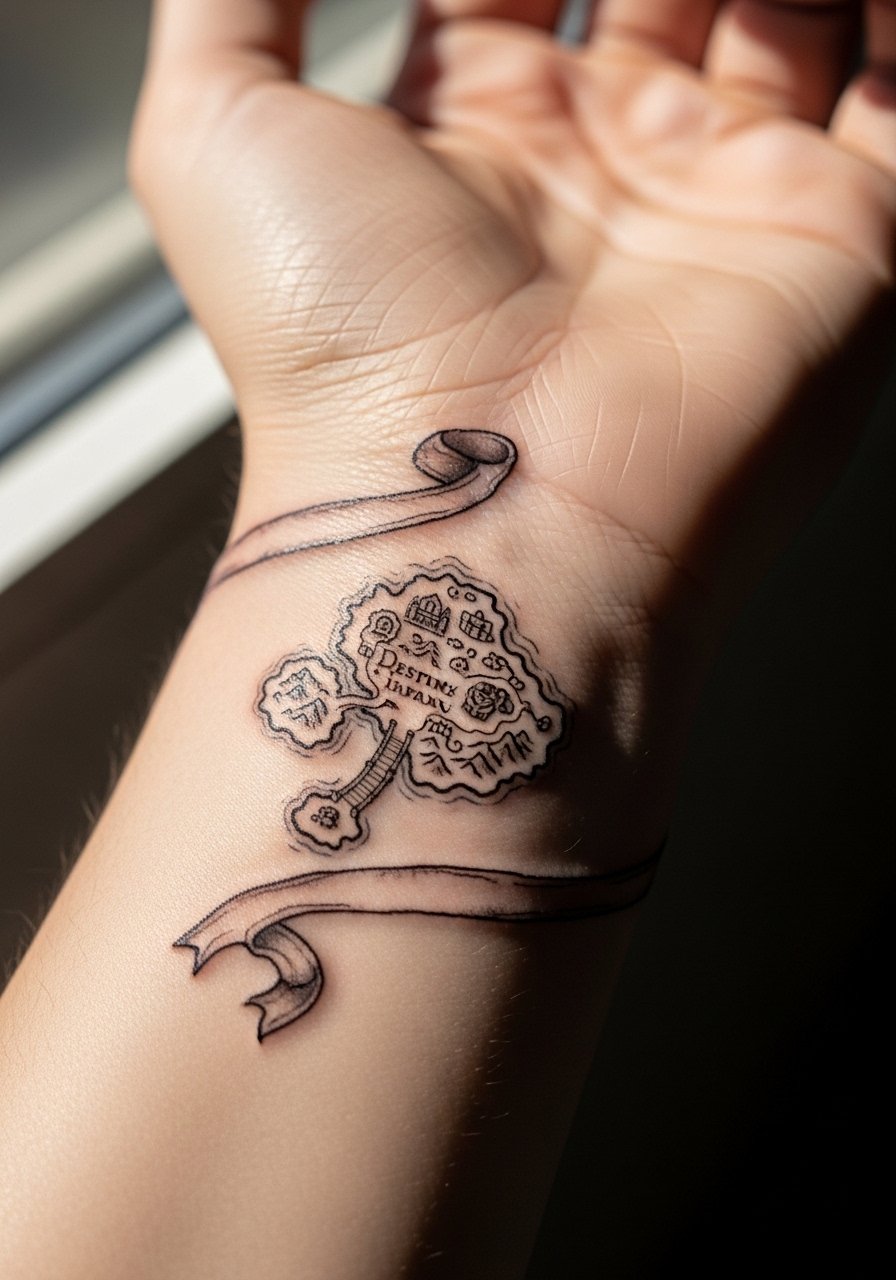
Wrapped map ribbons need negative space to avoid becoming a smudge after a couple years. Ask for breaks in the line and a few tiny landmarks that anchor the composition. Wrist skin is prone to friction, so expect a higher touch-up chance. The usual error is trying to fit a detailed map into a single narrow band. For showing it off, stack with a minimalist watch that does not press on the design.
20. Dream Eater Emblem on Lower Leg Calf
Lower leg placements handle heavier saturation, and emblems with solid black lines age into a strong silhouette. Tell the artist to leave breathing room around dark blocks so they do not bleed into neighboring textures. Sessions are usually one sitting under two hours. A mistake is over-texturing tiny elements that later look muddy. For casual shows pair with low socks and sneakers that keep the calf visible.
21. Constellation Map of Paopu Stars on Ribcage
Ribcage constellations look delicate but are vulnerable to blur. Ask for star spacing and avoid ultra-thin single-needle lines for every star. Expect higher pain and staggered sessions if the piece runs long. The core controversy here mirrors other rib work. One camp says delicate linework will blur quickly. The other camp maintains that careful spacing and slightly heavier key points prevent early merging. Choose an artist whose healed rib photos match the approach you want.
22. Chain of Memories Script Wrapped Around Wrist
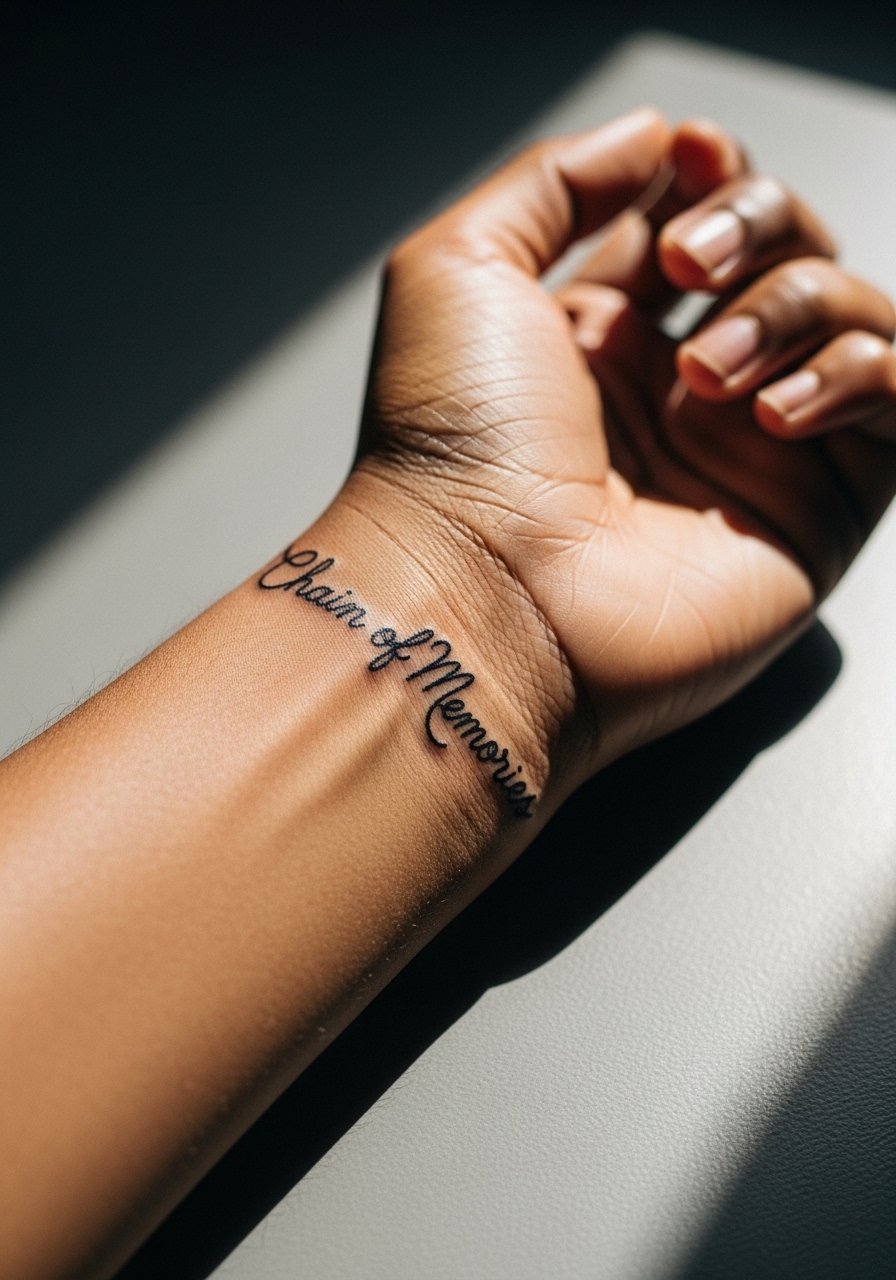
Script wrapping the wrist should prioritize legibility over flourish. Ask for slightly larger letterforms and consistent spacing so each word reads even as the skin moves. The wrist wears faster than the forearm. The mistake many make is choosing a tiny decorative font that fills in within a year. For showing this off, stack with a set of dainty bracelets that sit above the script and avoid rubbing the ink.
23. Twilight Town Skyline on Upper Arm Band
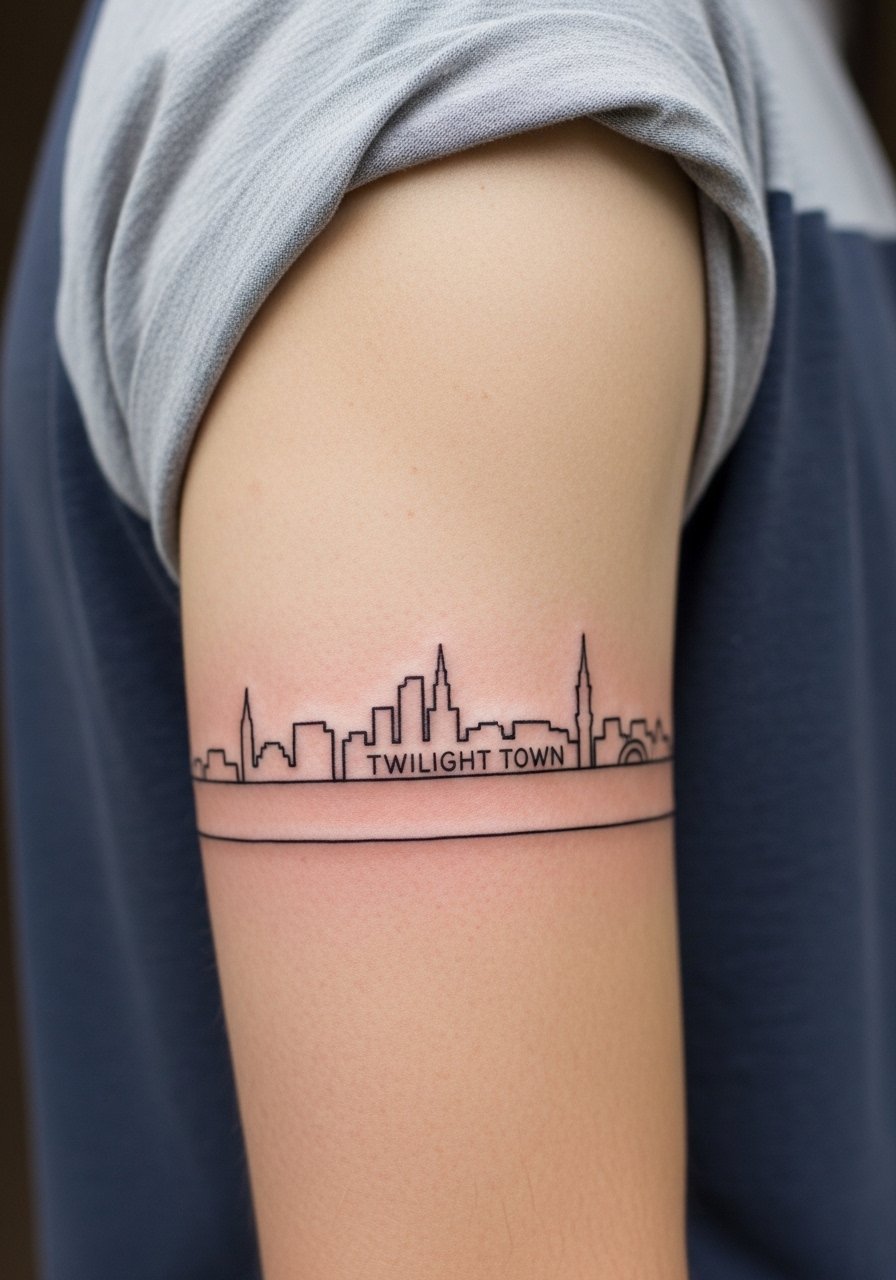
Bands around the upper arm read well because the circumference keeps the composition stable. Tell the artist you want negative spacing between buildings to prevent long-term merging. Sessions are comfortable and often finished in one sitting. A common mistake is adding too much fine shading in narrow spaces. For casual wear, a rolled-sleeve button shirt frames the skyline without hiding it.
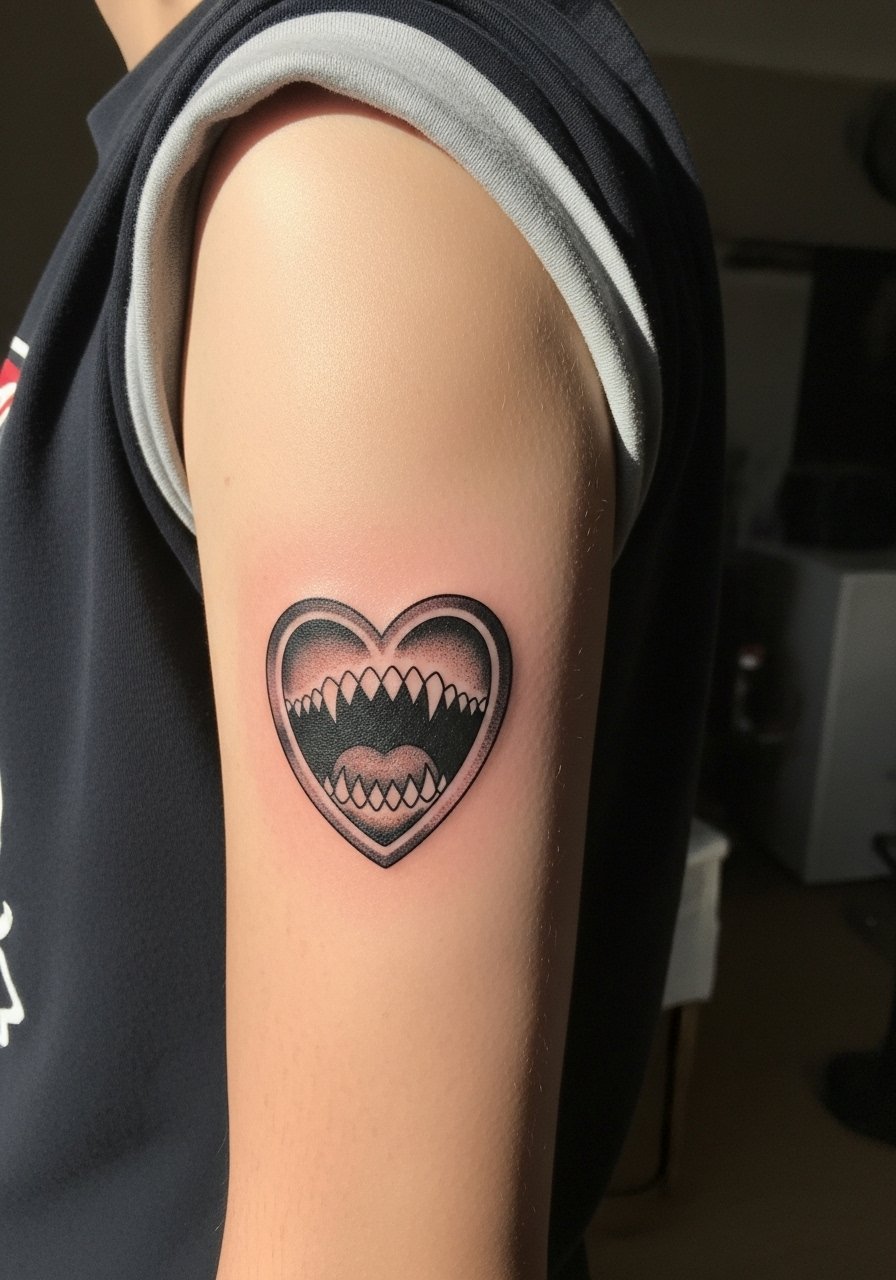
24. Hollowed Heart with Subtle Glow on Sternum
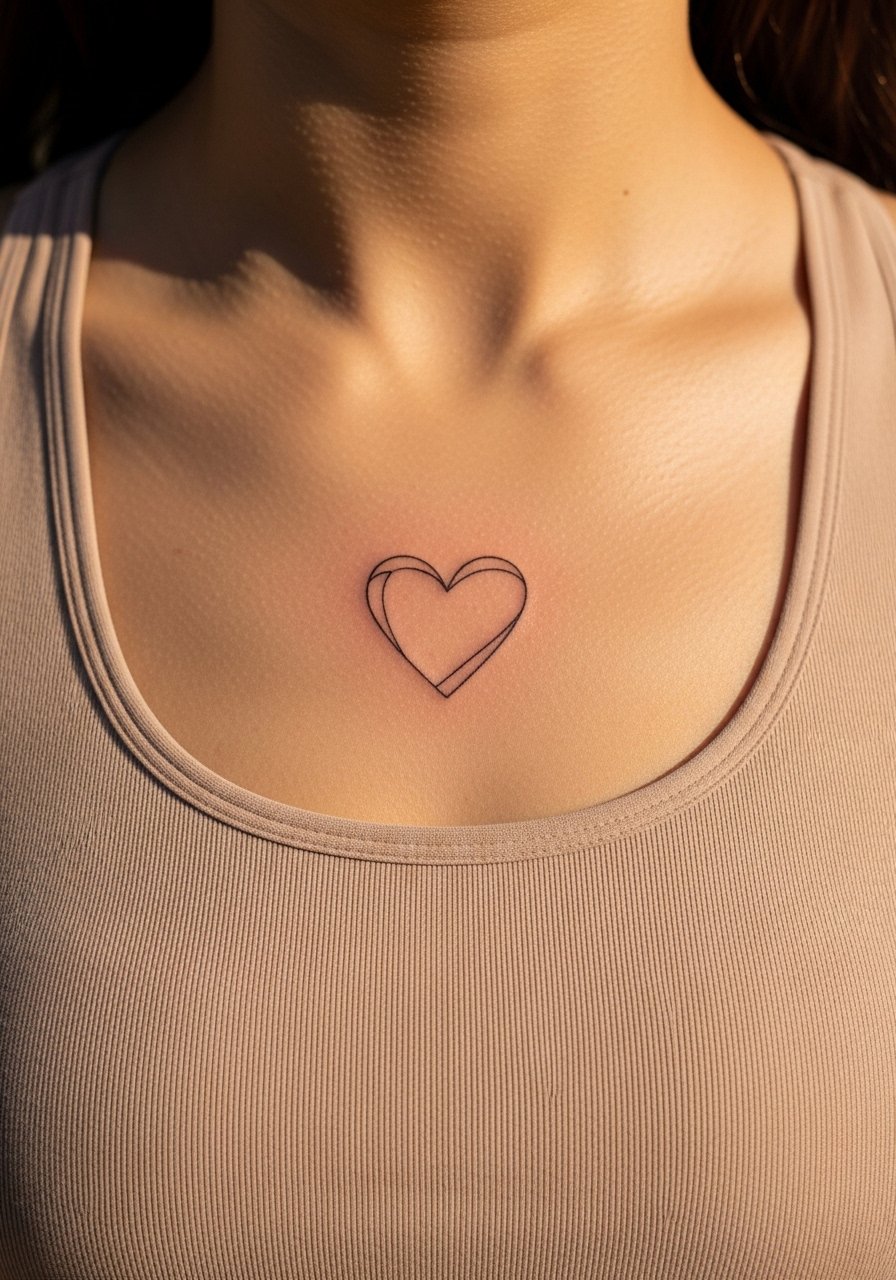
Sternum placements are intimate and require careful needle depth. Ask for centered composition and slightly bolder anchor lines so the hollow center keeps its shape as the skin shifts. Sessions are more painful and often need breaks. The mistake is expecting ultra-fine detail to survive in this zone. For session comfort wear a sports bra you can adjust so the artist has access without exposing more than the area needed.
25. Small Riku Silhouette Behind Shoulder
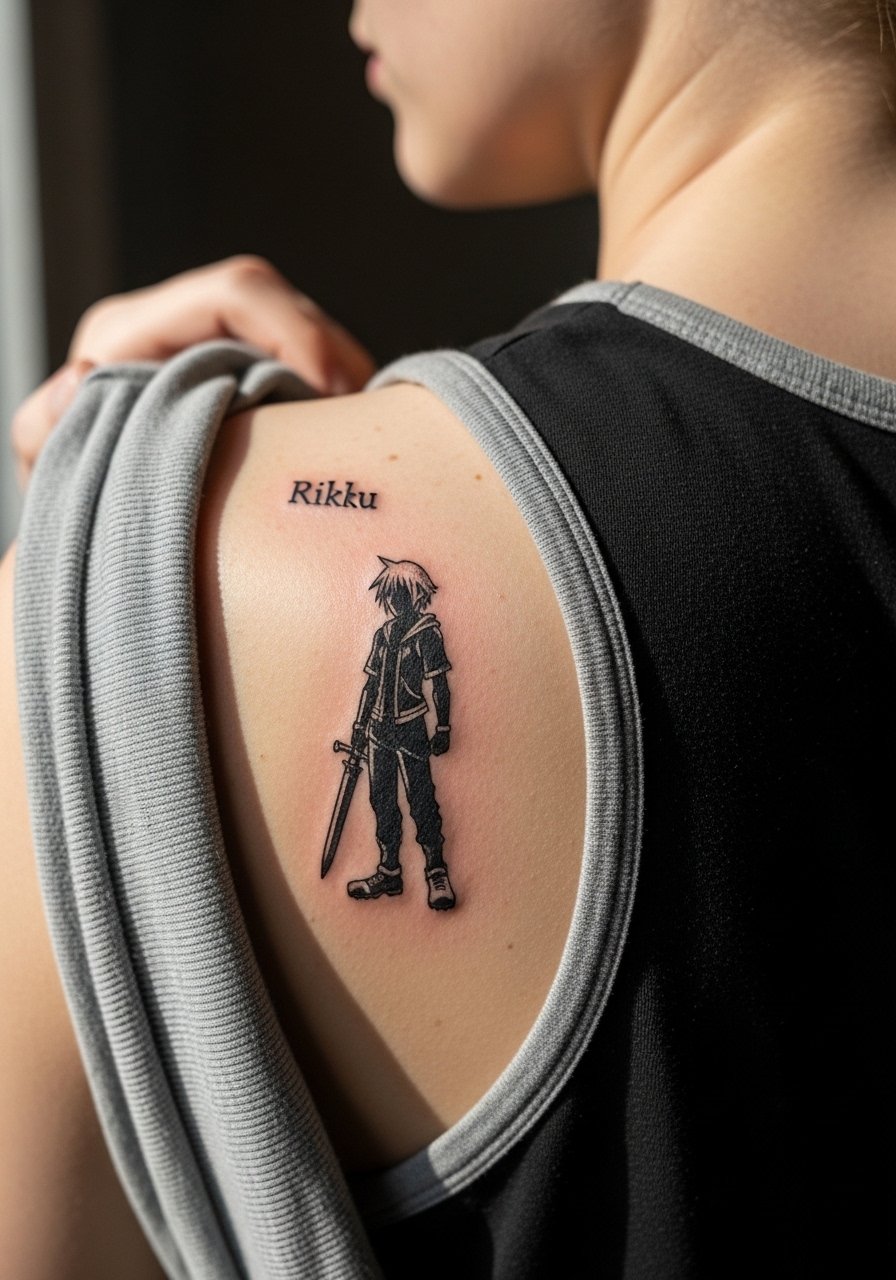
Behind-shoulder silhouettes are low-maintenance and discreet. Ask for strong negative space around the silhouette so it holds definition at longer intervals. The session is easy and quick. Common error is undersizing the silhouette so detail blurs into the background. For styling, a loose button-down shirt worn over a tank allows the silhouette to peek out when you want it to.
26. Wayfinder Charm on Collarbone Edge
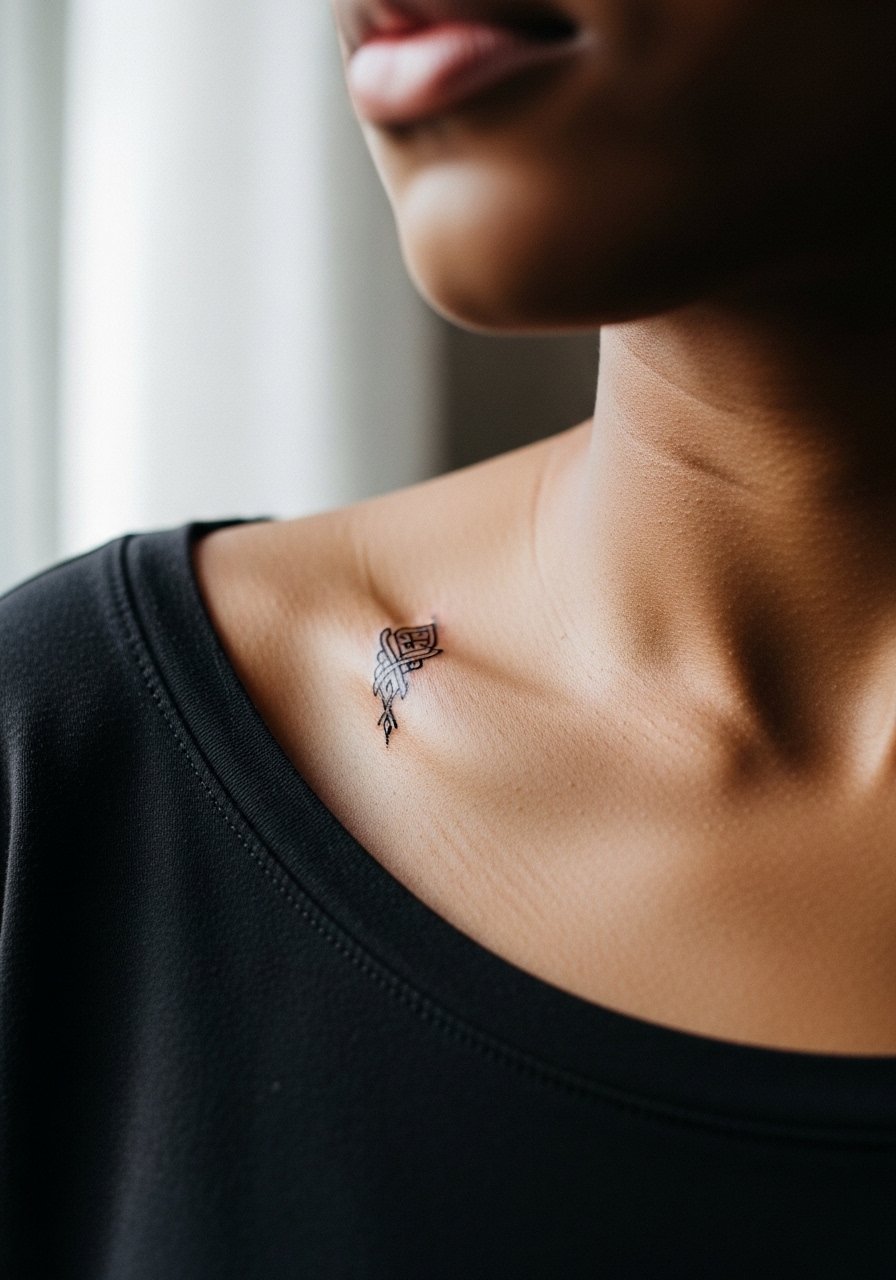
Edge-of-collarbone placements are delicate visually but prone to movement from shoulder use. Request the charm at a slightly smaller size with reinforced outline and minimal interior shading. Sessions are quick and can feel uncomfortable near the bone. The mistake I often see is choosing too much internal dotwork that loses clarity. Pair it with a racerback tank to show the charm without competing neck jewelry.
27. Tiny Sea Salt Ice Cream on Finger Side
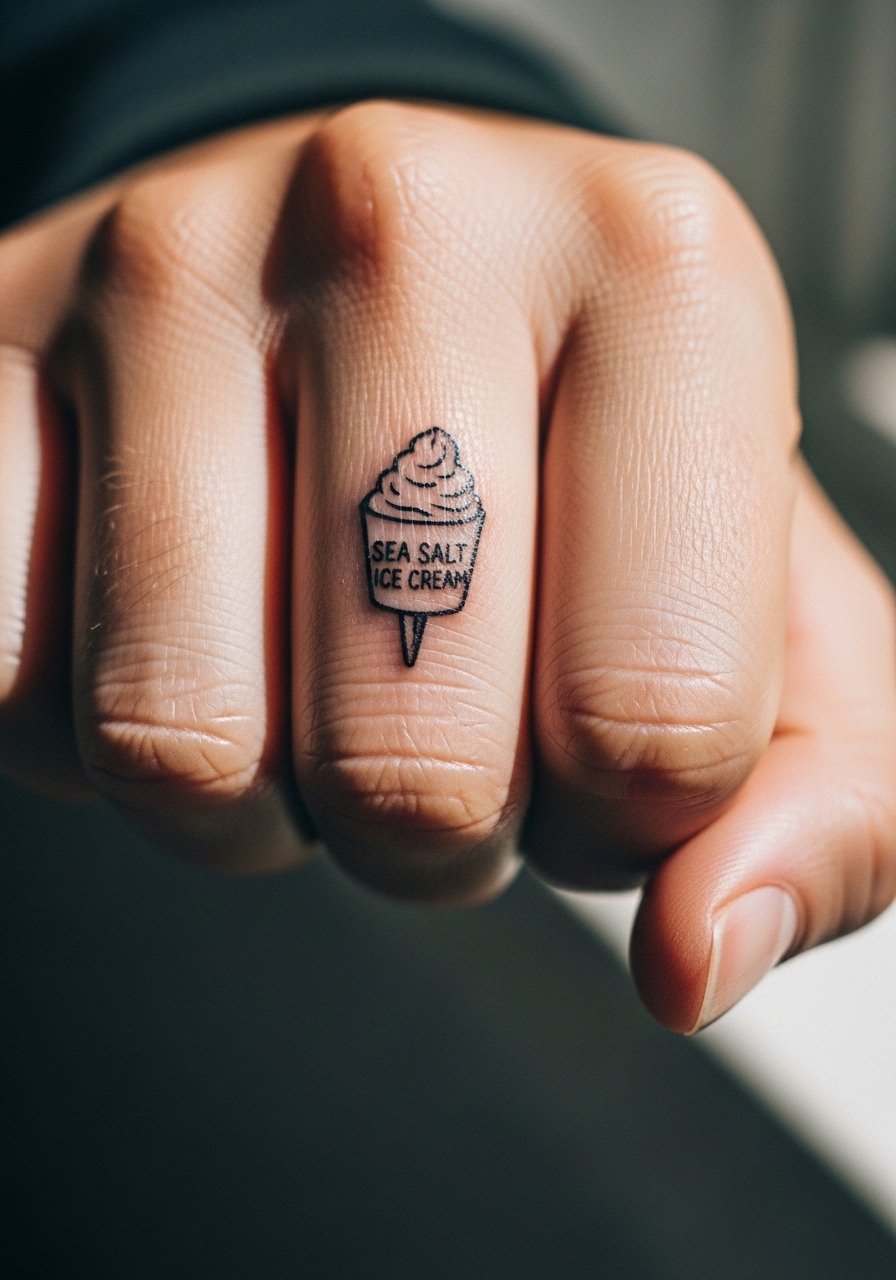
Finger-side micro tattoos have high visibility but high maintenance. Ask for a slightly larger silhouette and accept likely touch-ups at year one or two. Sessions are short but the aftercare window is delicate because hands are used constantly. A common mistake is placing it where soap and scrubbing wear the area. Consider sliding placement a few millimeters away from the knuckle fold to extend legibility.
Frequently Asked Questions
Q: Will fine line Kingdom Hearts pieces blur faster than bold traditional ones, and which placements age best?
A: From what I have seen, fine line pieces generally need more space and careful placement to avoid early blur. Areas with thicker skin and less friction, like the calf or upper arm, age better than high-movement zones such as fingers, wrists, and ribs. Choosing slightly bolder anchor lines for fine line work helps longevity.
Q: How do watercolor fills affect the longevity of Keyblade designs?
A: Watercolor fills look soft but they often need touch-ups sooner than saturated black. The solution is to separate color fields from black outlines so the two settle independently. If you want long-term color, ask the artist to plan for a follow-up saturation session at year two.
Q: Are hand and neck pieces still career risky, and how should I approach that decision?
A: Hand and neck tattoos remain contentious. One camp believes visible pieces are fine with the right design and placement. The other camp warns that some employers still screen for visible ink. Consider your industry and pick a discreet placement or a small design you can hide with clothing when necessary.
Q: What should I wear to a ribcage or sternum session for comfort and access?
A: For ribcage and sternum sessions wear a cropped athletic top or a zip-up hoodie so the artist can expose only the needed area. Loose, adjustable clothing reduces tugging and keeps you comfortable throughout a longer session.
Q: How often should I realistically plan touch-ups for detailed Kingdom Hearts scripts and micro symbols?
A: Expect touch-ups within two to four years for micro symbols and scripts, depending on placement and sun exposure. Areas like fingers and wrists need more frequent refreshes. A short touch-up session can restore crispness without changing the original composition.
