
Fine line center-chest trends look airier on feeds than they do in daily life. Movement from breathing, bra straps, and sun exposure all play a role in how geometric between-breast tattoos age, and spacing matters as much as the motif. These ideas favor negative space, deliberate line weight, and placement tips so the geometry reads delicate at first and stays legible over time.
1. Center Sternum Mandala, Tiny Negative Space
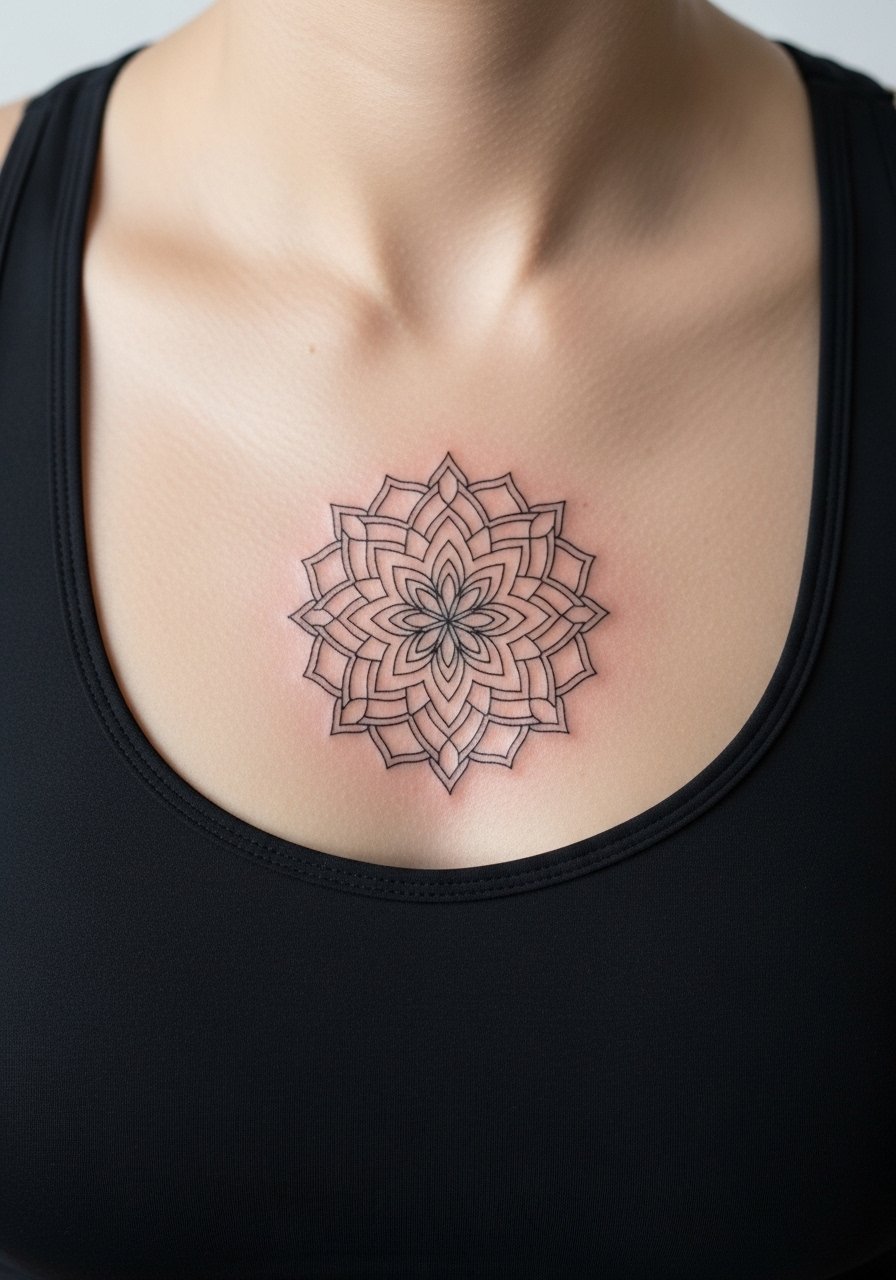
Start with a small mandala centered on the sternum if you want symmetry without heavy saturation. Fair warning, the sternum moves with every breath so I advise slightly larger gaps between spokes than you might pick on an iPhone mockup. Tell your artist to prioritize slightly thicker outer linework and airy interior dot work to keep petals readable at year two and beyond. The common mistake is requesting a too-dense mandala, which crowds the lines and causes merging as the skin heals. Expect a moderate pain level and a touch-up sooner than arm work, often around year two for fine detail. For the session wear, bring a fitted sports bra so the artist can access the sternum cleanly.
2. Minimal Geometric Chevron Underbust
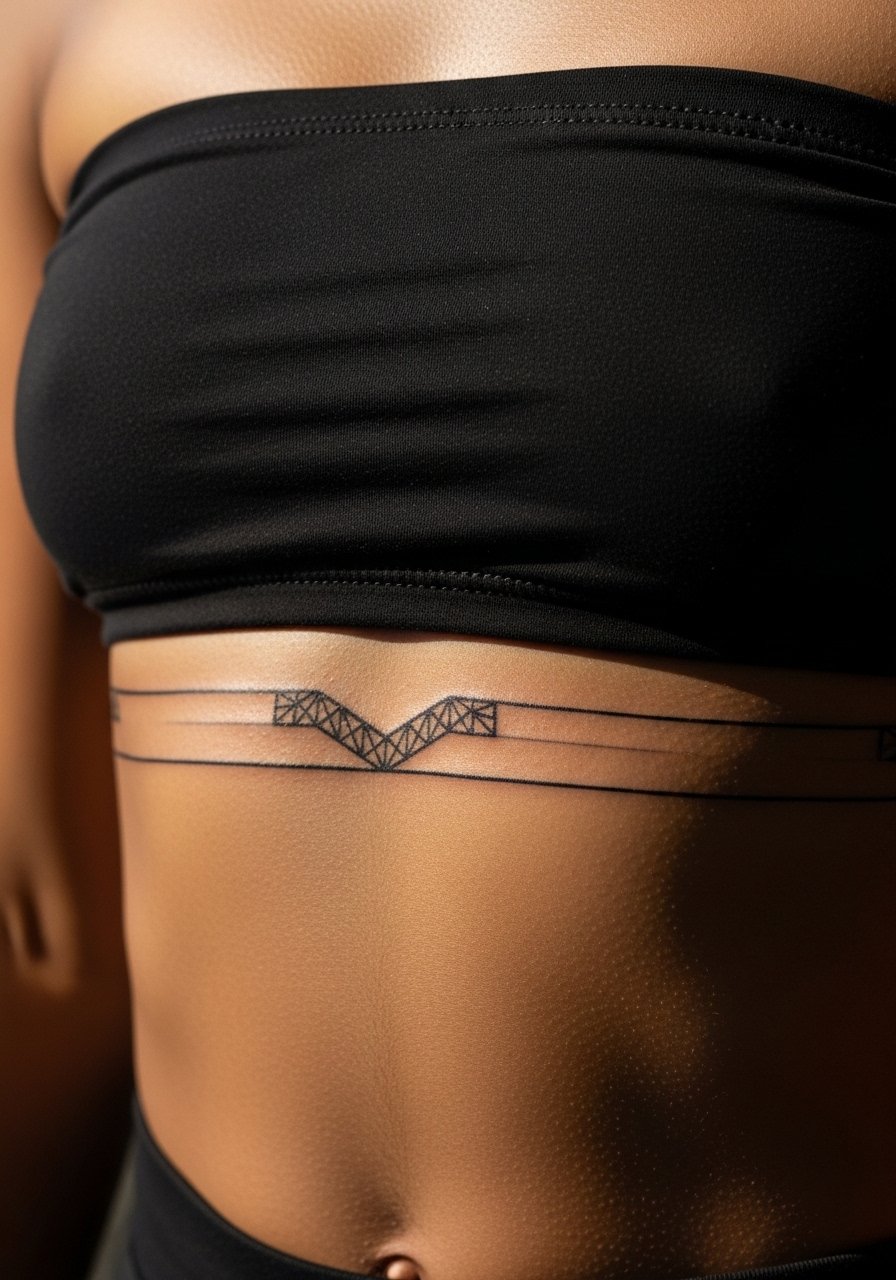
This underbust chevron reads delicate with a single clean V and small negative-space triangles. I've seen it sit well on people who prefer a discreet piece that appears only with certain tops. In consultation, specify how far below the breast fold you want the apex to sit, because placement affects friction from waistbands. The biggest mistake is placing it too low where clothing rubs constantly. Expect a higher pain rating than collarbone work but shorter sessions, usually under an hour. Over five years the shapes soften, so plan for a light touch-up if you want crisp edges later. Pair it with an open-back midi dress for nights out.
3. Micro Grid Between Cleavage, Vertical Alignment
A stacked micro-grid gives symmetry without one dominating focal point. I recommend this if you want something strictly vertical that interacts with the natural trough between the breasts. During the consult, ask for mapped spacing shown directly on skin so you can approve how the grid follows your anatomy. Common mistakes include making the grid too tight or too small which causes dot work to blur together over time. Pain is moderate and sessions are short. Expect the six-month look to be crisp and the two-year look to need a small touch-up on the smallest dots. For showing it off, a wide-neck blouse frames the vertical line without crowding it.
4. Diamond Lattice with Negative Space Petals

There is something about a diamond lattice that reads both delicate and intentional. In practice, I tell people this style benefits from slightly bolder outer diamonds and lighter inner detail so the pattern does not collapse visually. The mistake is requesting a fully packed lattice at a micro scale. That version ages into a muddled block. Expect moderate pain and a session of one to two hours. Over time the inner petals will lose definition first while the lattice frame holds, so plan the design with that aging in mind. Wear a loose button-down shirt to the appointment so the artist can shift fabric without stretching the chest.
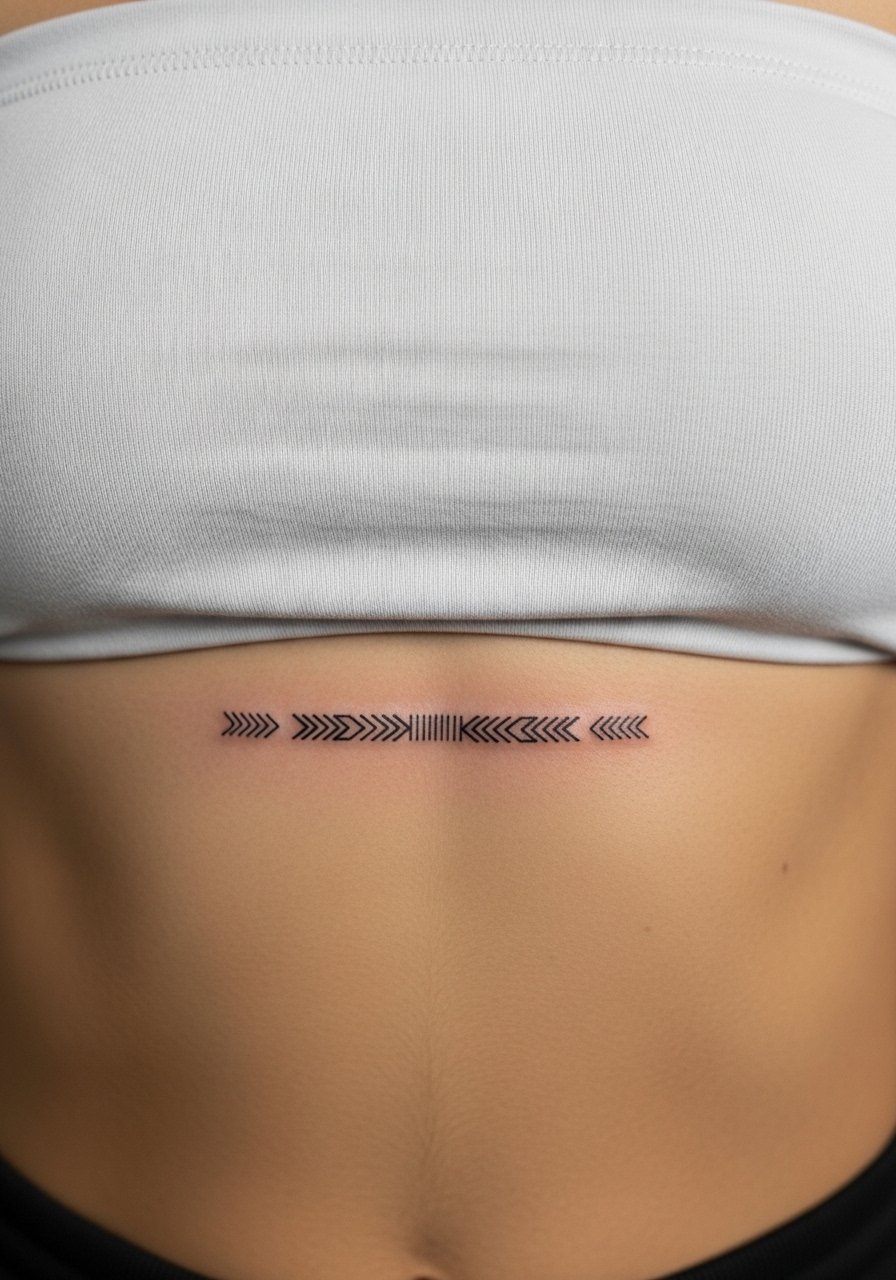
5. Single Geometric Arrow With Dot Trail
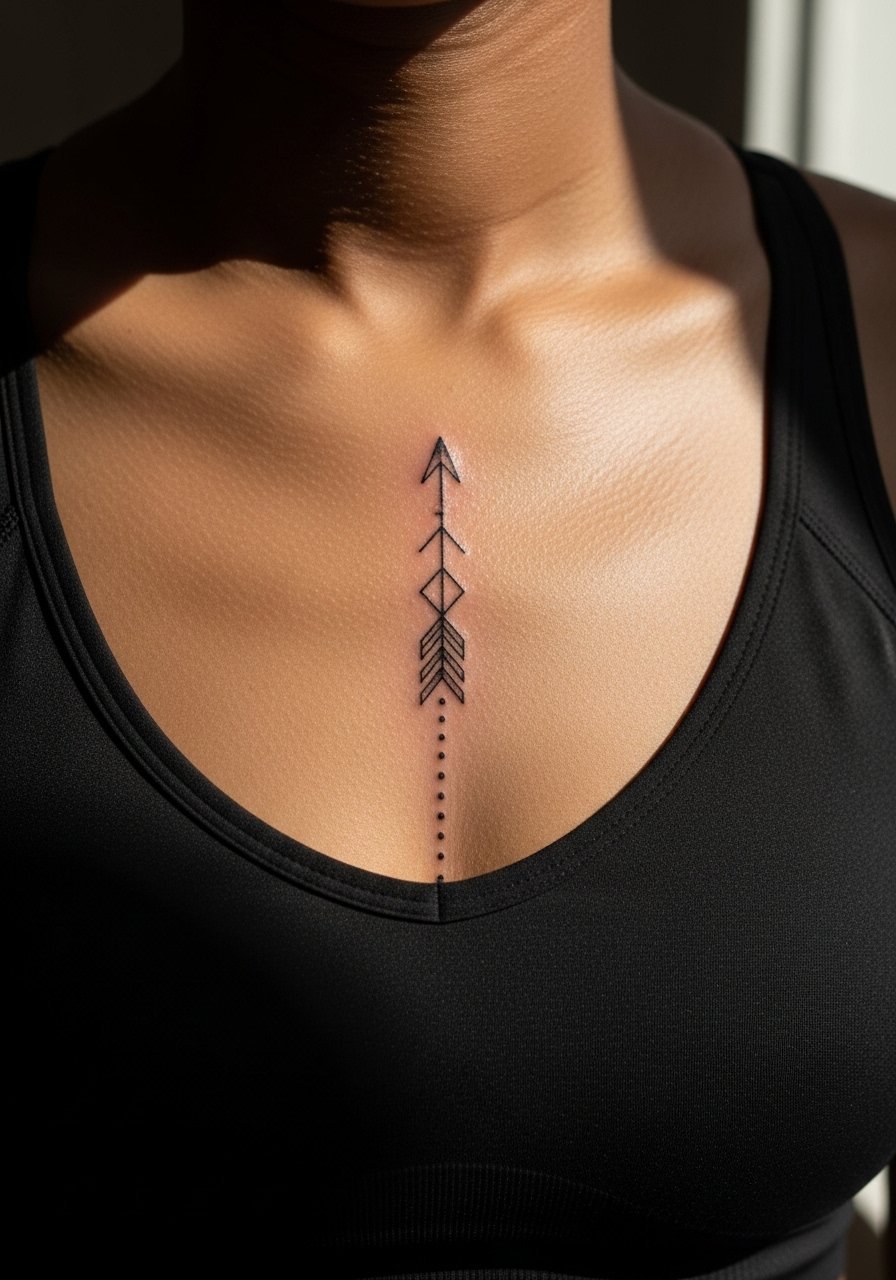
The arrow is a simple anchor that reads intentional between the breasts. Visual impact comes from a clean spine line and evenly spaced dot work trailing below. When you sit with your artist, say how long you want the tail to be relative to the breast fold so the arrow does not disappear under clothing. A common error is making the shaft too thin for this placement which can blur within two to three years. Pain is comparable to other chest work with brief needle runs that feel sharper near bone. This is a good pick for first-timers who want geometric and minimal. For after-session comfort and access, a racerback tank lets the artist work without awkward fabric shifts.
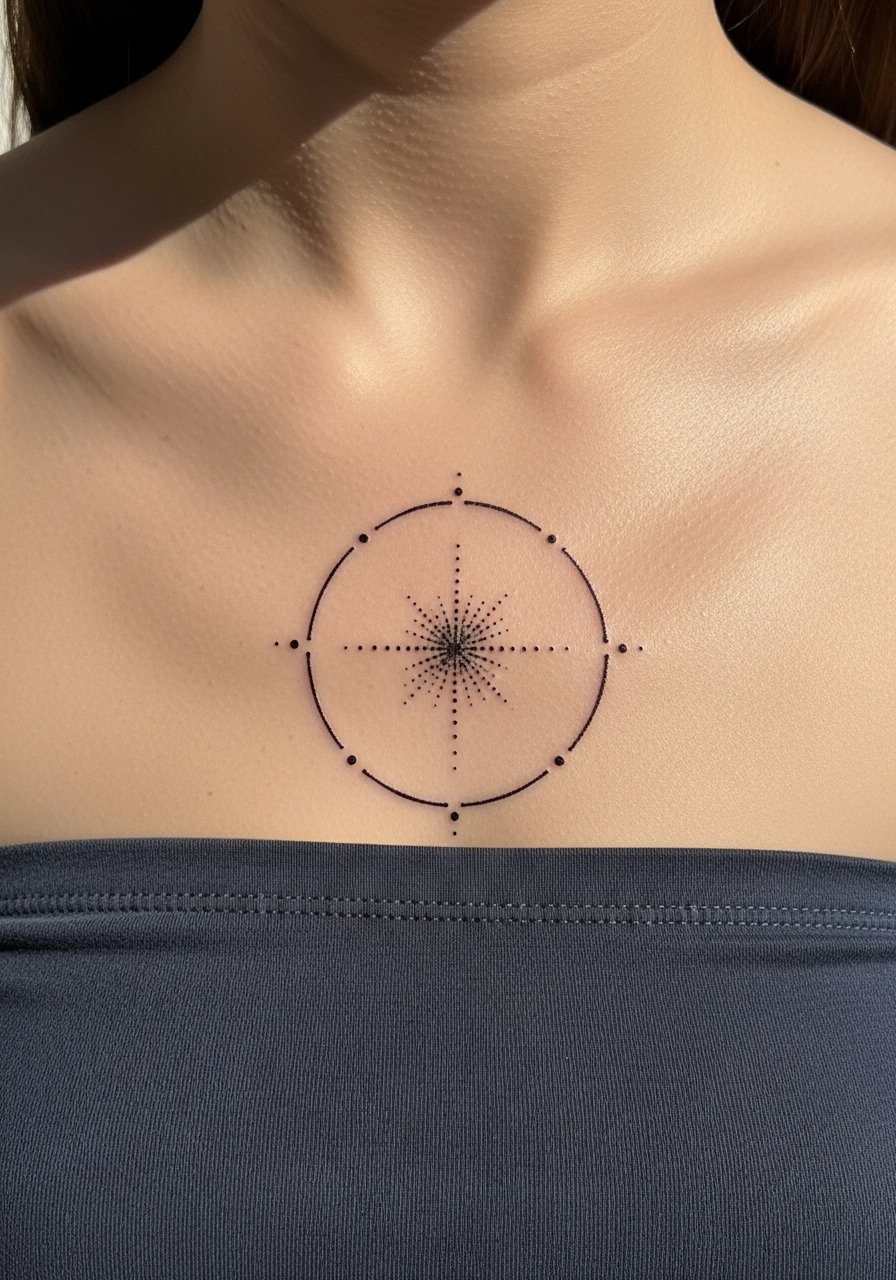
6. Concentric Rings With Open Center
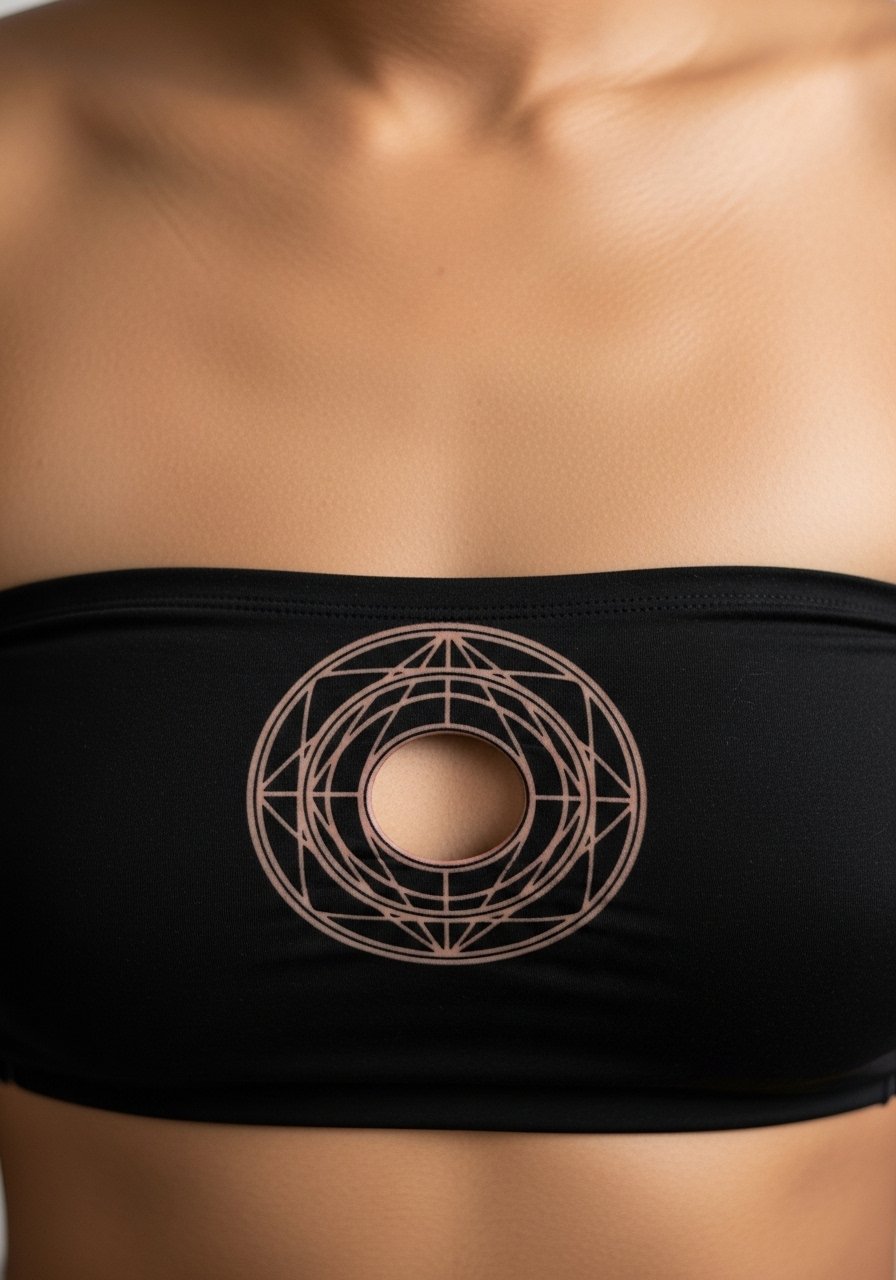
Concentric rings can feel ornate while staying airy if you leave the center open. My rule is to space each ring slightly wider than the previous so the pattern breathes. The mistake I see is squeezing too many thin rings into a small area. That creates a blur zone as the piece heals. Discuss ring spacing and outer border thickness during the consult. Expect moderate pain and a session under two hours. Over five years the innermost rings soften first. Pair this design with a thin chain pendant necklace that sits above the open center and complements the geometry.
Studio Day Picks
The sternum and underbust pieces above need different prep from collarbone work, and a small kit makes studio time smoother.
-
Stencil transfer paper kit. Lets you test vertical alignment and ring spacing on skin so the geometric center sits where you want it.
-
Topical numbing cream. Applied before a longer sternum session reduces jumpiness during thin-line passes while keeping the artist's lines readable.
-
Thin protective film roll. Useful for short-term coverage when the tattoo sits close to bra straps or waistbands that might rub.
-
Fragrance-free body wash. Cleanses healing skin gently without irritating delicate dot work and fine lines.
-
Aquaphor healing ointment. A thin layer for the first days helps keep moisture in and shields tiny geometric channels until the skin forms a scab.
7. Mirrored Triangle Pair Anchored on Midline
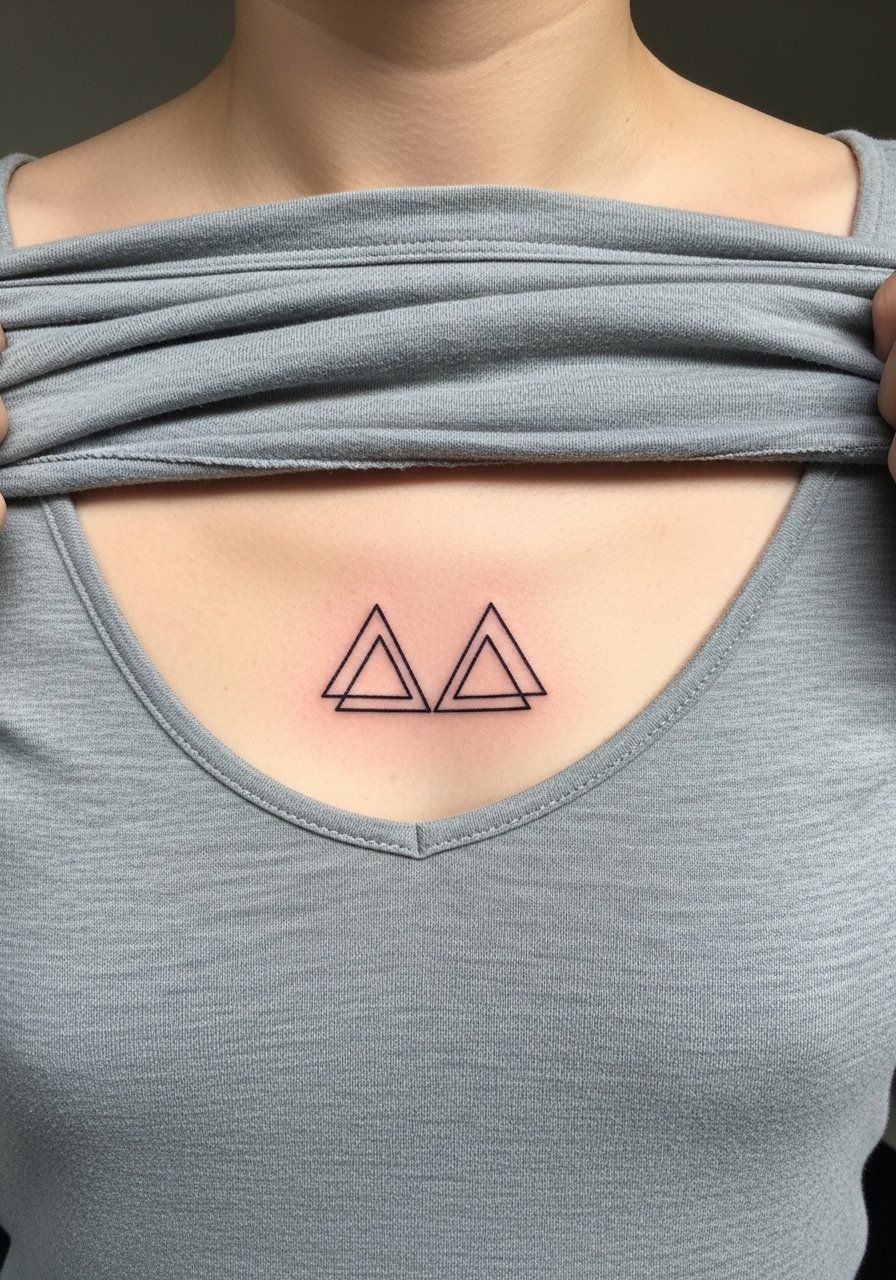
This mirrored pair plays with symmetry and negative space for a crisp, modern look. I usually advise making each triangle a bit larger than the minimal sketch so the interior negative space does not collapse. Ask your artist to test the mirror visually on skin before finalizing the stencil. A typical mistake is asking for extremely fine triangle outlines which can lose definition due to stretch and pressure from bras. Pain is moderate and sessions are brief. The triangles hold well at two years if spaced properly but expect a small touch-up window at three to four years for the thin interior lines. For dressing, an open-back midi dress will frame the mirrored shapes in evening wear.
8. Stipple Shaded Geometric Heart
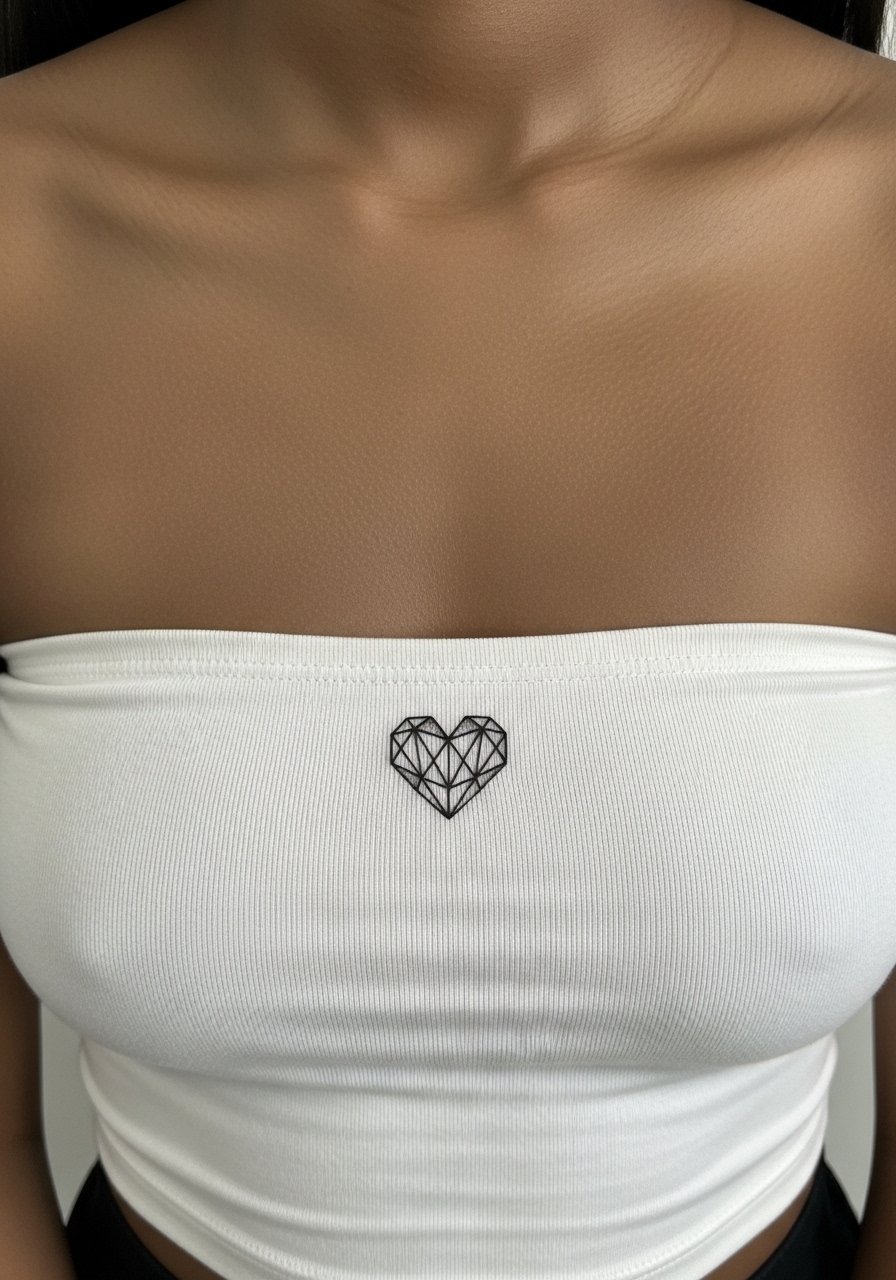
A geometric heart using stipple shading keeps the look soft while preserving edge definition. Stipple ages differently than solid fills because individual dots fade first. The consultation note should include dot size and spacing to maintain a cohesive texture at year two. Some artists argue stipple on sternum is less reliable because the dots can spread. Others say proper needle depth and spacing prevent that. Name both camps when you book and ask where your artist stands. Expect moderate pain and a session under two hours. The most common mistake is over-stippling the center which looks patchy as it settles. If you plan to show it off, a thin chain pendant necklace can sit above without competing.
9. Horizontal Micro-Bar Chain Motif
A horizontal micro-bar chain reads like jewelry and moves with the chest anatomy. When you ask for this, specify the bar thickness and gap width. Too thin and the bars merge after healing. A mistake people make is matching the chain scale to a necklace rather than the skin canvas. Expect moderate pain and brief multiple passes across the area. Over time the bars may soften so plan on a touch-up around year three if you want to retain crisp separation. For session comfort, wear a bandeau top so fabric does not chafe the fresh work.
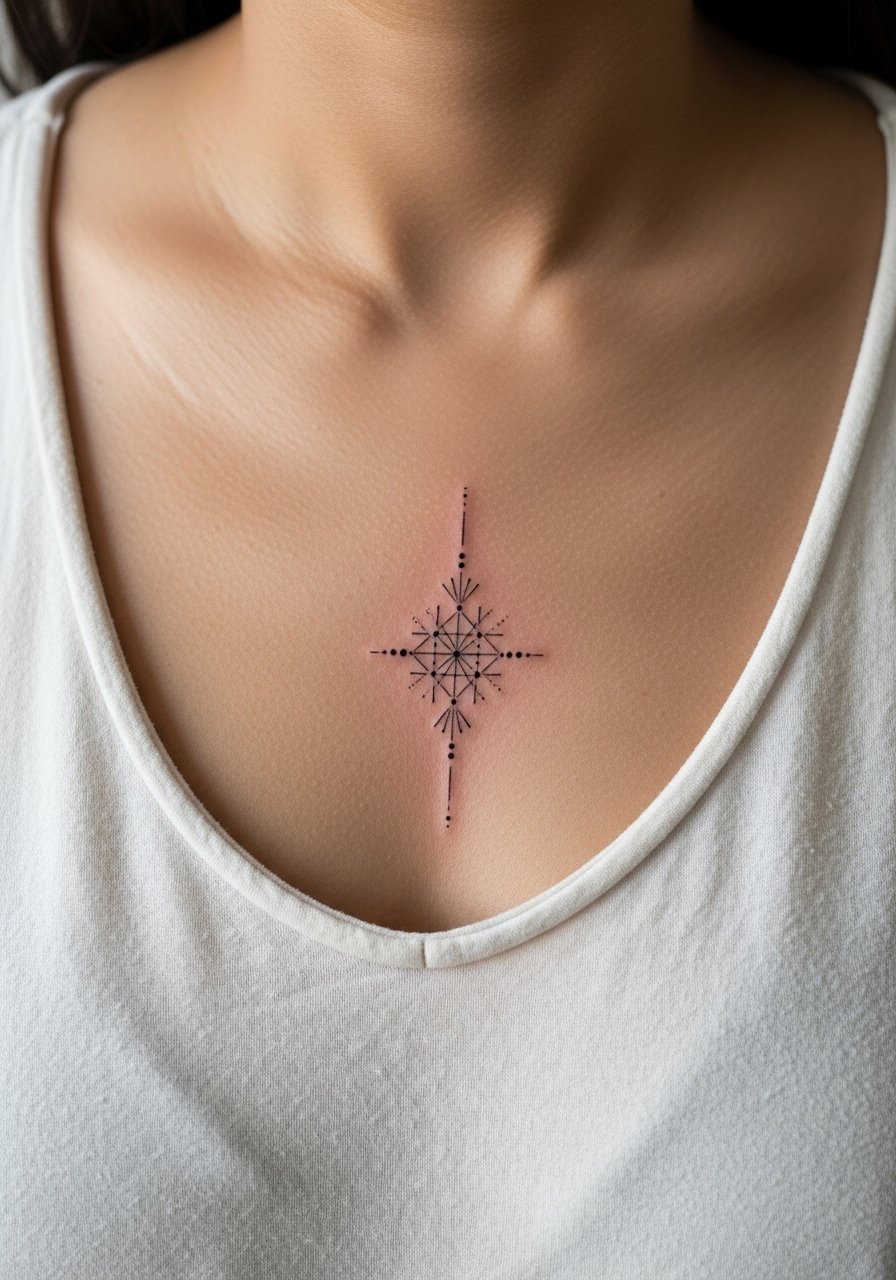
10. Geometric Compass With Subtle North Point
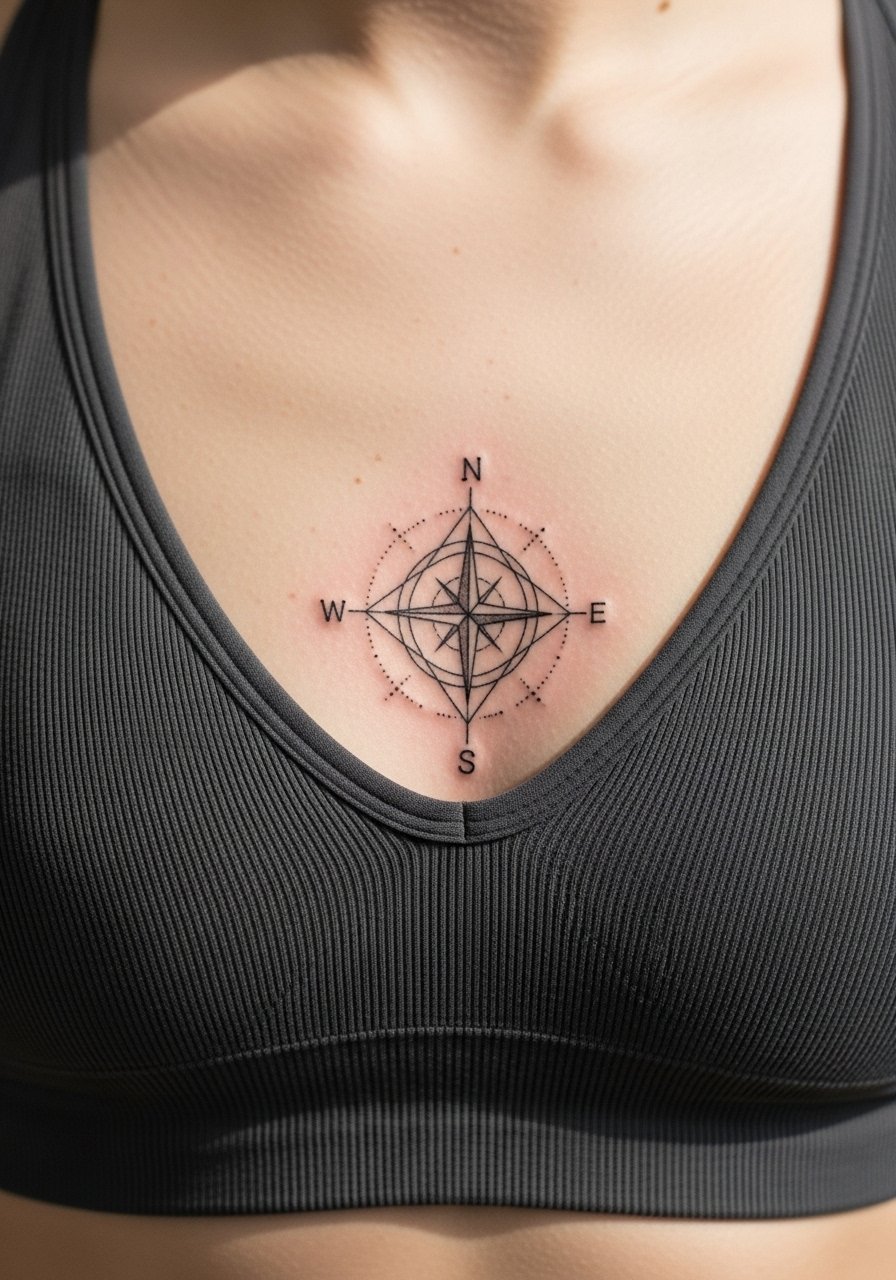
A tiny compass can be a sentimental but geometric option. I tell clients to keep the north point slightly bolder so orientation reads clearly even as the rest softens. The usual error is packing too much directionality into a tiny circle which blurs. Expect a short session and focused needle runs near the sternum that feel sharp. Compass detail often needs a light touch-up in three to five years. If you want it visible in low-cut tops, pair it with a thin chain pendant necklace that sits just above the compass.
11. Lattice Starburst That Follows the Cleavage Curve
This starburst is designed to curve with anatomy rather than sit strictly on the midline. For anatomy-aware work, ask your artist to stencil the design while you stand so the curve reads correct in normal posture. A frequent mistake is applying a flat stencil that looks off when you move. Expect moderate pain and a session that may take up to two hours for mapping. The controversy here is whether curved geometry holds as cleanly as straight grids. One camp says curvature spreads lines faster. The other camp says careful spacing and needle depth prevent that. Ask your artist which approach they use. To show it off, a wide-neck blouse keeps attention on the curve.
12. Dot-Work Crescent, Asymmetric Placement
An offset crescent feels delicate because it breathes on the side of the midline. This works well if you want geometry that avoids direct sternum bone contact. Tell your artist how far to offset and whether the crescent opens upward or downward. The common error is underestimating how offset placement shifts when you sit or bend. Pain is similar to other chest areas and sessions are relatively quick. Dot work fades unevenly if dots are too small, so plan the spacing accordingly. For session wear, a fitted sports bra gives clear access without pulling fabric across the design.
13. Triangle Halo With Fine Dot Center
A halo triangle gives geometry and subtle ornamentation without heavy fills. I recommend slightly bolding the outer triangle and keeping the center dots airy. The frequently seen mistake is asking for too many inner dots which become an indistinct patch. Expect moderate pain and a session under two hours. Over time the outer edges age better than the interior dots so design the halo knowing the center may need a light refresh. Pair it with an open-back midi dress to use the halo as a low-neckline focal point.
14. Micro Hex Cluster, Scattered Negative Space
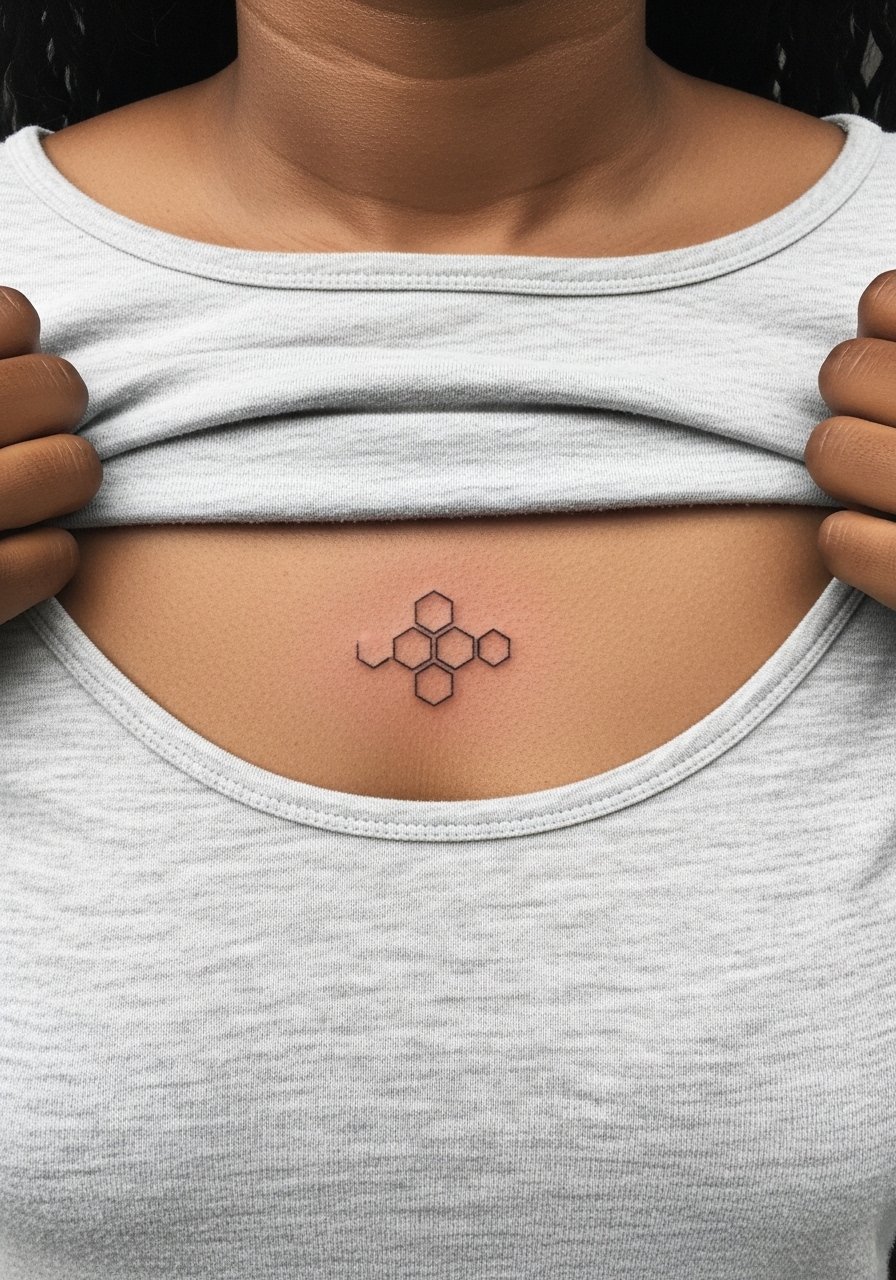
Hex clusters give a honeycomb feel while staying geometric and delicate. My advice is to space the hexes so that the negative space forms part of the pattern rather than being accidental. A common mistake is filling every gap which creates a patch that blends. Pain is moderate and sessions are short. The smallest hexes fade first so choose slightly larger cells for longevity. For outfits, a wide-neck blouse frames a small cluster well.
15. Fine Line Arrowhead Trio Down the Midline

Stacking identical arrowheads creates rhythm without density. I suggest slight spacing increases between each arrowhead so the stack reads across movement. A mistake is compressing the stack too tightly which causes the arrows to blur into each other. Expect moderate pain and short needle passes. Over two to five years the central arrow often needs the earliest touch-up. For session comfort, wear a bandeau top that does not shift during work.
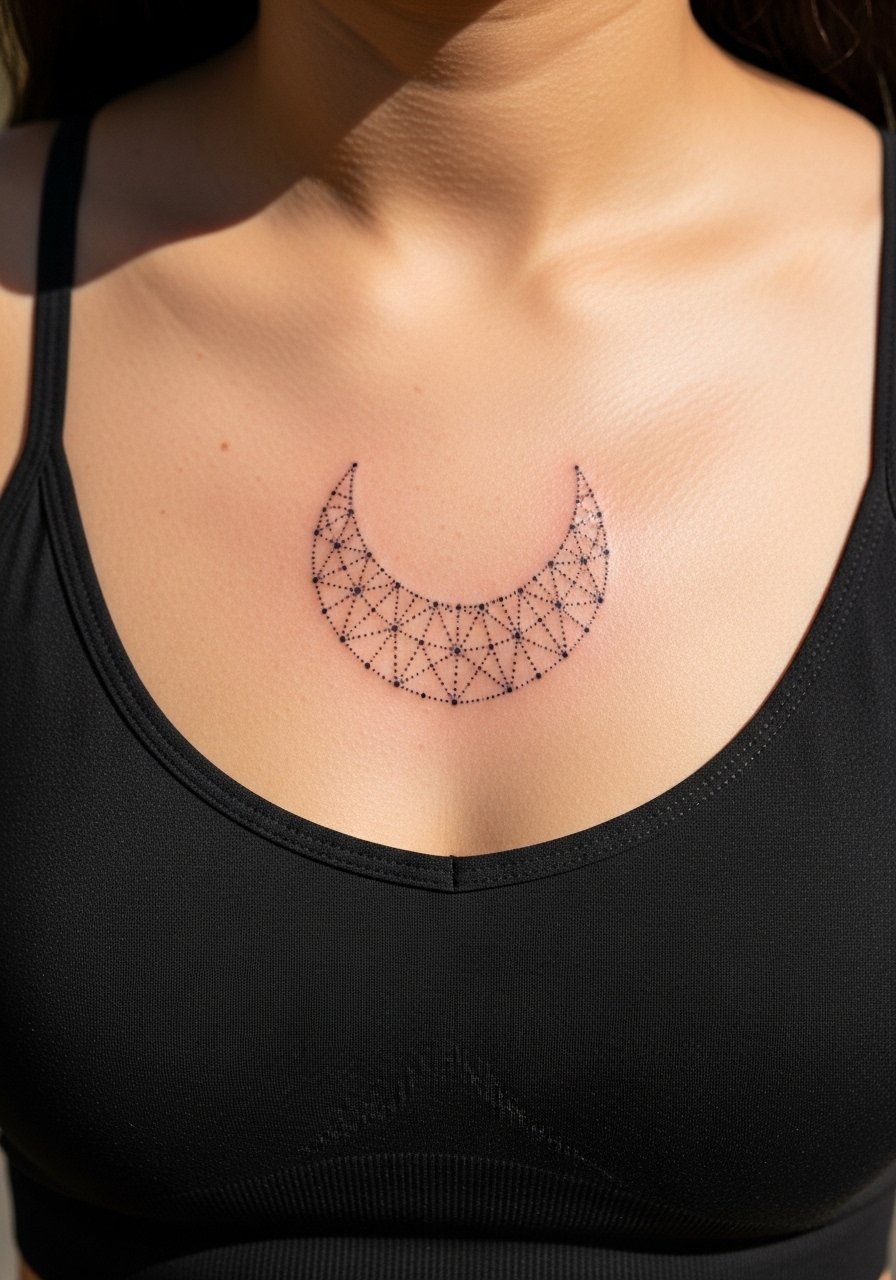
16. Thin Blackwork Crescent and Dot Accent
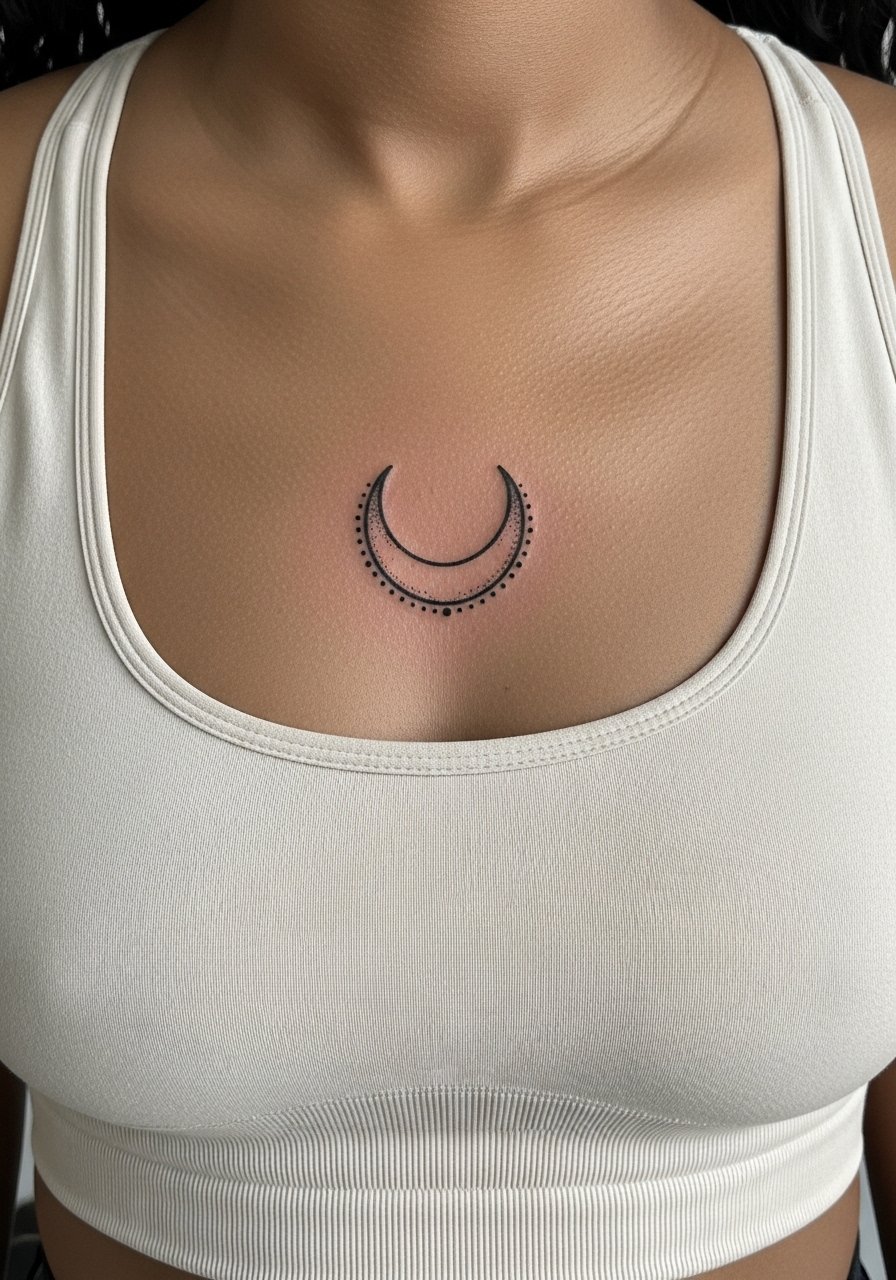
A thin black crescent with dot accents reads like a small ornamental piece. For this placement, I advise a slightly heavier outer curve so the silhouette reads when the dots soften. Artists split on whether thin blackwork at the sternum requires heavier line weight or careful spacing alone. One camp prefers slightly bolder outer edges. The other camp says skilled spacing and subtle dot work suffice. Ask the artist which they practice. Expect a moderate pain level and a session under ninety minutes. Over years the dots soften faster than the curve, so schedule a light touch-up if you want crisp dot contrast. To showcase the crescent, pair with an open-back midi dress.
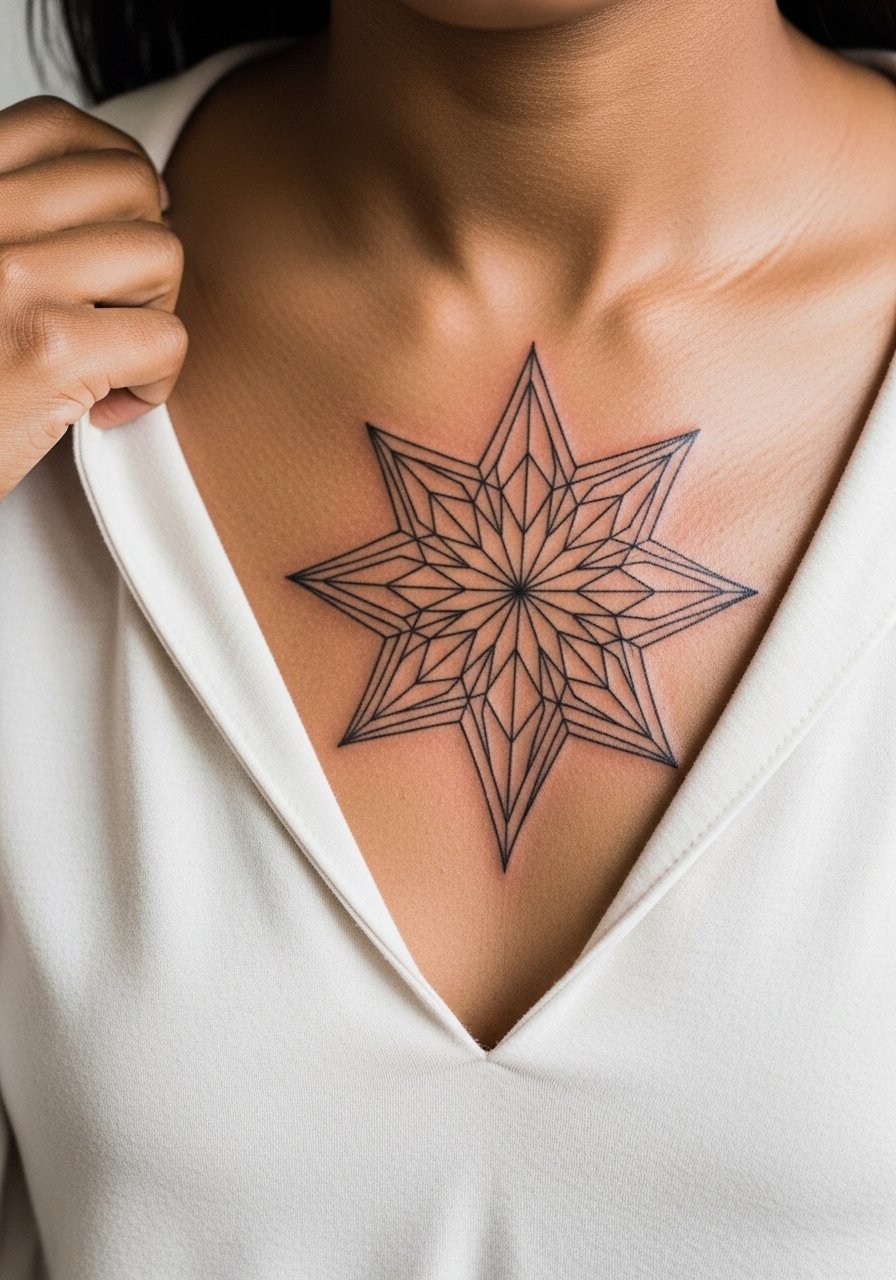
17. Geometric Script Frame With Small Negative Space
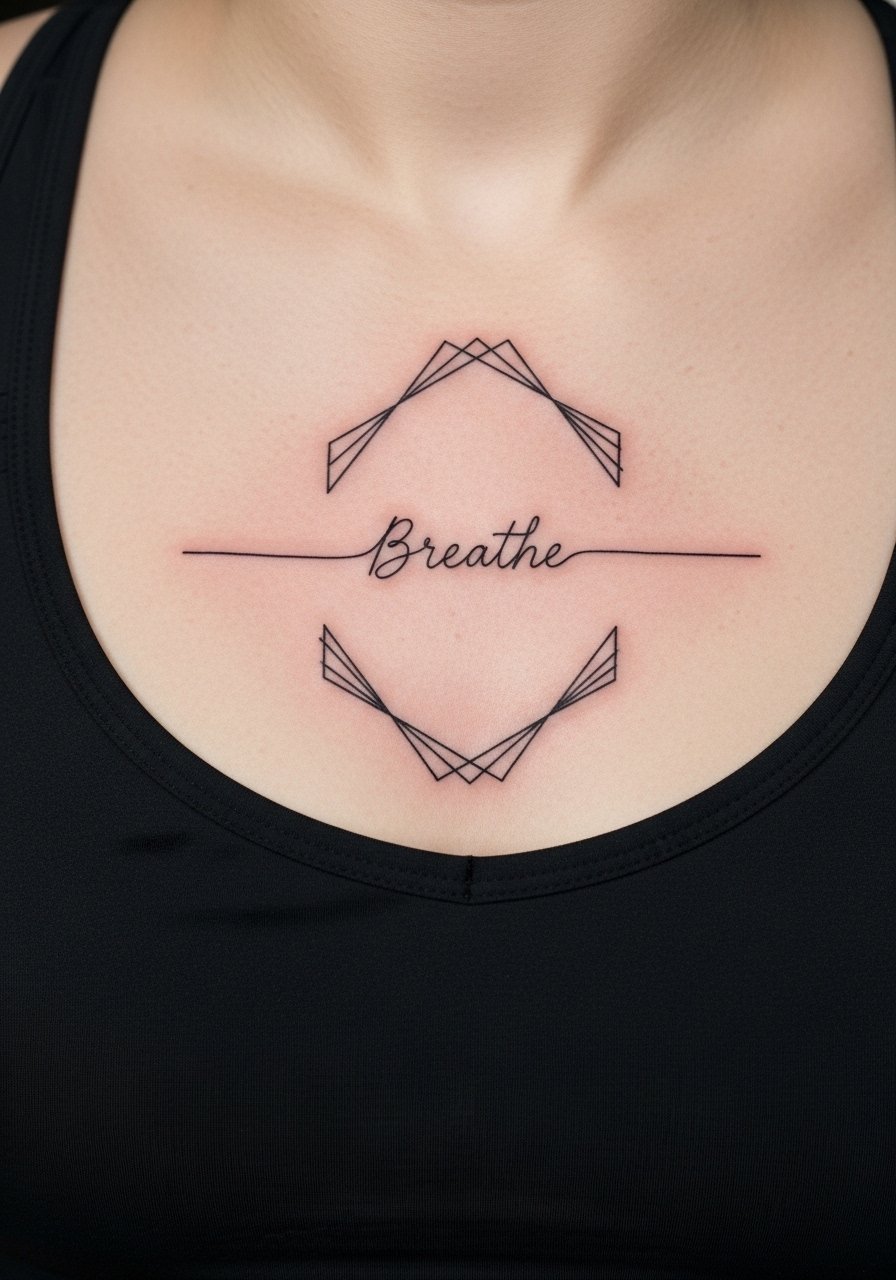
Framing a short script with a geometric border gives a personal statement while keeping motifs restrained. If you include text, specify the exact word and font to avoid gibberish in the stencil. The frame should be slightly thicker than the script to prevent the letters from visually merging with border lines. A common mistake is choosing tiny script inside a tight frame which becomes illegible. Pain is moderate and the session depends on letter complexity. Expect the script to remain readable at two years if spacing is generous. For the session, come in a fitted sports bra so the artist can place the frame accurately on the sternum.
Frequently Asked Questions
Q: Will fine line geometric designs between the breasts need touch-ups sooner than bolder pieces?
A: In my experience fine line and stipple work on the sternum and underbust generally require touch-ups earlier than bold blackwork because micro detail softens with skin movement and sun exposure. Expect a possible light touch-up around year two to four depending on your skin and how much sun and friction the area sees.
Q: How should I choose needle spacing and line weight for a mandala centered on the sternum?
A: Ask the artist to show you spacing options on skin before finalizing the stencil and request slightly larger negative space between spokes than you might think necessary. A heavier outer ring and lighter inner detail often keep the shape readable as it settles.
Q: Are geometric sternum tattoos safe for people with larger breasts or prominent cleavage?
A: It depends on anatomy and placement. For fuller chests I recommend designs that sit just above the breast fold or that curve with the cleavage rather than flattening across it. Ask an artist who documents work on similar body types and request a standing stencil test.
Q: What should I wear to the studio for a between-breast geometric session?
A: Wear something that gives the artist clear access while keeping you comfortable, like a fitted sports bra or a bandeau. Loose tops can shift and cause the artist to reposition stencils multiple times.
Q: Should I be concerned about blowout with delicate dot-work on the sternum?
A: Blowout risk increases with excessively fine dots and overly shallow needle depth. The right artist uses spacing and depth to minimize spread. Ask about their approach to dot size and how they plan to preserve dot edges over time.
