
Sitting in the chair with the stencil aligned over skin is where a sketch-style Grim Reaper either reads as crisp storytelling or becomes a muddled silhouette a few years down the line. Sketch work thrives on intentional looseness, not accidental blur, and placement decides a lot of the longevity. Read the first idea to see how a forearm sketch holds up, then follow the sequence for placement, wardrobe, and consult tips that protect the linework.
1. Hooded Reaper on the Inner Forearm
I've seen this placement become a go-to for people who want a readable sketch piece that still fits under a sleeve. Ask for loosened cross-hatching and varied lineweight so the scythe reads without dense black blocks. Fair warning, the inner forearm gets frequent sun exposure so the thin strokes soften faster. During consultation, request slightly bolder primary contours and lighter stipple for shadows so touch-ups are easier at year three. The session feels moderate on pain and typically runs 90 to 150 minutes for a mid-sized piece. Pair with a loose button-down shirt the day of your appointment so the artist can access the arm without tugging.

2. Tiny Scythe on the Wrist, Sketch Lines
Personal observation: tiny wrist pieces look dramatic fresh but suffer from friction and frequent washing. For a sketch-style Grim Reaper accent, keep the figure small and let negative space define the hood. Tell your artist to avoid packed black fills near the wrist crease because those areas blow out easily. Expect the wrist to need a touch-up by year two if you want crisp negative space. Session time is short but the area is sensitive, so pain is higher than on the forearm. Style it with a thin chain bracelet that sits above the tattoo, not over it, to prevent rubbing while still framing the piece.

3. Half-Sleeve Sketch Reaper Scene on Upper Arm
Visual impact lead: a half-sleeve lets you treat the Grim Reaper as a storytelling figure with sketchy finelines and open negative space that ages more gracefully than packed shading. I recommend layering stipple and whip shading rather than dense black, so the scene breathes over time. In consultation, bring 3-4 reference shots that show your preferred balance of loose strokes to solid shapes. Larger pieces age better because the lines have room to settle, but plan for a two-stage session and possible touch-up work at year three. Wear a sleeveless linen tank to the shop so the artist can work without fabric interference.

4. Whisper Reaper on the Ribcage, Fine Sketch
Pain warning lead: ribs are high on the pain scale but the skin there takes sketch lines in a delicate way when done correctly. Artists split on fine line work on ribs. One camp says the stretch and movement blur fine strokes within two years. The other camp argues that with proper needle depth and spacing the lines can settle well. I advise naming this debate in your consultation and asking which side the artist practices. For longevity, choose slightly thicker main contours with airy stippling for shadows. Expect a long session broken into short stints to manage pain. Bring a cropped top to reveal only the area for the artist and to keep the rest covered.

5. Collarbone Reaper Accent with Script
Styling lead: collarbone pieces show with certain wardrobe choices and hide easily when you need them to. Place a small sketch Reaper above the collarbone with a minimal script date or motto in a thin serif to anchor the image. Tell your artist to place the linework to follow the collarbone angle so it reads in motion. This area can soften by year three if lines are too tiny, so request slightly increased lineweight on the main silhouette. The session is brief but proximity to bone raises sensitivity. Pair the finished piece with a thin chain pendant necklace that sits just above the script to frame it without competing.

6. Ankle Wrap Reaper, Fine Line Chain
Aging/healing lead: ankle tattoos read well in the first year but face constant abrasion from socks and shoes. A sketch wrap Reaper that curves around the ankle benefits from open linework and interrupted negative space to avoid muddying. Ask your artist to keep primary contours clear and to avoid tight cross-hatching where fabric will rub. Sessions are short and the pain is low to moderate, though bone proximity can sting. For the appointment and after, roll pants or wear slip-on sandals so the area is exposed without the risk of a heel strap rubbing immediately after.

Studio Day Picks
The wrist, forearm, and ankle pieces above need different prep than larger torso work, so these picks smooth the session and protect fine line detail in the first week.
-
Stencil transfer paper kit. Lets you preview the line placement on skin before the needle hits, which is useful for small Grim Reaper accents.
-
Topical numbing cream. Applied per instructions about 45 minutes before can take the edge off sensitive ankle and rib sessions.
-
Thin protective film roll. Keeps high-friction areas like the wrist and ankle clean while the first layer of skin reforms.
-
Fragrance-free gentle body wash. Helps cleanse healing lines without stripping the skin, which matters for delicate sketch shading.
-
Aquaphor healing ointment. A thin layer during the initial days locks in moisture around fine linework while letting breathability continue.
7. Back-of-Hand Mini Reaper, Quick Sketch
Mistake lead: the biggest mistake with hand pieces is underestimating how often they will be seen and how quickly they fade. Hand skin is thin and exposed, so sketch strokes need to be bolder in core areas while keeping hairline details minimal. Artists are split on hand placement for careers and wear. One camp says hand tattoos are a modern norm and employers are accepting more. The other camp warns that many industries still react conservatively. Name this debate when you book. Expect a short but sharp session and likely a touch-up within two years. Style the finished piece with a minimalist ring set that complements without rubbing the tattoo.

8. Inner Thigh Reaper Outline, Intimate Sketch
Consultation lead: inner thigh skin is softer and holds stipple shading differently than the outer leg. For a sketch-style Reaper, use airy stipple for shadows and avoid dense black near the groin. The session requires modesty considerations and longer healing due to friction from clothing. Expect moderate pain and plan for two short sessions if you want a detailed hood and scythe. For the appointment, wear shorts you can shift slightly to reveal only the area the artist needs. Note that this placement is intimate and may need a specialist who regularly works on thigh pieces.

9. Micro Reaper at the Collarbone with Script Tag
Personal observation lead: micro pieces near the collarbone are subtle but photograph well with jewelry. Keep the Reaper compact and let script sit below the figure so the two elements do not compete. Ask your artist to map the layout while you stand and move your shoulder so the placement reads in motion. Lines here soften faster than on the forearm if placed too close to bone. Session time is short and sensitivity is medium. Pair with a thin chain pendant that rests above the mark to frame the composition.

10. Calf Grim Reaper with Cloak Motion Lines
Visual impact lead: the calf is forgiving for sketch techniques since it has enough flat canvas to let strokes breathe. A Grim Reaper that uses motion lines in the cloak looks intentional rather than messy when you request varied lineweight and open white space. Tell your artist you prefer stipple over solid fills for shadow so the piece keeps its sketch energy. Sessions are comfortable and can be handled in one sitting for a mid-sized piece. Show it off with mid-calf boots or rolled denim when healed. Wear rolled jeans to the shop so the artist can access the calf easily.

11. Full Back Scene, Loose Sketch Composition
Visual impact lead: a full back gives space to build a scene that reads from a distance while keeping sketch texture up close. Map large negative spaces and anchor areas of denser black where you want long-term contrast. Tell your artist to plan the piece across multiple sessions so the composition can breathe. Expect longer chair time and more healing complexity because of the surface area. Pair the healed piece with open-back tops for evenings out, and a backless dress frames the main figure without covering the details.

12. Nape Reaper Accent, Fine-Line Outline
Pain warning lead: nape and side-neck placements are sensitive, and they read differently when hair moves across them. For a sketch accent behind the nape, ask for slightly increased spacing between hairline strokes so the piece does not blur as hair follicles shift. The session is brief but can sting due to the thin skin. When booking, request a wide-neck shirt you can pull aside for the artist to work without exposing more than the area needed. After healing, style it with a wide-neck shirt that shows the nape without pulling hair over the design.

13. Fingertip Micro Reaper, Single-Line Sketch
Mistake lead: tiny finger tattoos often fail because clients request too much detail in too small a space. For a fingertip Grim Reaper, keep the silhouette and one defining feature, like the scythe or hood, and let the rest be implied. Discuss with your artist the higher chance of fading and the likely need for a yearly touch-up. The session is short but the sensation is sharp. Accessory-wise, a single minimalist ring on an adjacent finger frames the work without covering it.

14. Shoulder Blade Reaper, Sketchy Cloak Flourish
Aging/healing lead: shoulder blade pieces sit on relatively stable skin, so sketch strokes with medium spacing last well. For a cloak-heavy Reaper, ask the artist to use stipple shading on the lower hood and lighter whip shading on the flowing cloak. The session is moderate and you may need a short second pass to even out saturation. Show the piece off with tank tops and scoop-back dresses and consider wearing a scoop-back top when you want the tattoo visible without exposing more skin.
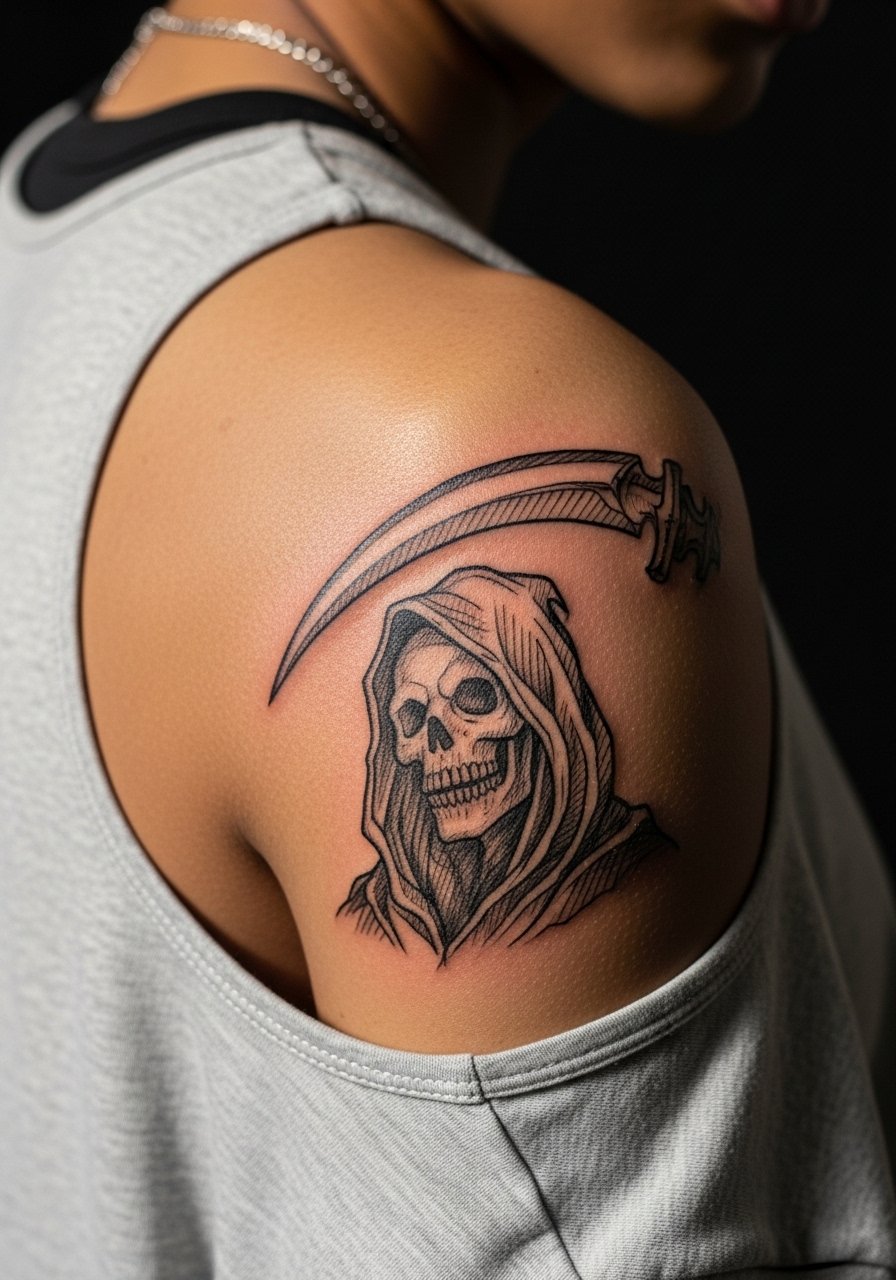
15. Inner Bicep Portrait Reaper, Tender Lines
Personal observation lead: inner bicep skin gives a soft canvas for portrait-style sketching but moves with muscle and activity. A Reaper portrait here should emphasize midweight contours and avoid very thin cross-hatching that can blur as the arm flexes. The area is sensitive during the session and healing requires attention to friction from clothing. Plan on a longer session if you want facial detail, and expect touch-ups earlier than on the outer arm. Wear a loose tank top so the artist can access the inner upper arm comfortably.

16. Behind-the-Ear Accent Reaper, Subtle Mark
Consultation lead: behind-the-ear placements require precise mapping because the area sits just below the hairline on the neck. Ask the artist to place the mark slightly lower than you think so it does not get hidden by hair or caught in collars. The session is short and the pain is mild to moderate. Mention career considerations quietly, since visibility depends on hairstyle. This placement needs an artist comfortable with tight, controlled strokes.

17. Side Neck Reaper, Thin-Line Contour
Controversy lead: side-neck tattoos spark debate between those who see them as bold personal statements and those who warn about workplace repercussions. One group says neck work is expressive and increasingly accepted. The other group points out that many employers still screen for visible tattoos. If this worries you, ask a prospective artist how they advise clients on placement visibility. For the sketch-style Reaper, request a design that can be slightly shifted higher or lower depending on how you want to conceal it with collars. For session wear, bring a high-collar shirt you can pull down slightly so the artist can work without exposing more than needed.

18. Hip and Upper Thigh Reaper Cluster, Flowing Lines
Visual impact lead: the hip and upper thigh offer curves that suit a flowing cloak and scythe composition. Keep heavier shading off the immediate hip crease to reduce friction issues during healing. This area takes well to sketch shading because you can use more negative space. The session is moderate and often done in two shorter sittings. For modesty, plan layered clothing you can adjust and ask the artist for a privacy preference. The tattoo also pairs well with high-cut shorts when you want to show it selectively.

19. Ankle-to-Foot Chain Reaper, Linear Sketch
Mistake lead: extending a sketch piece across the ankle and onto the foot risks rapid wear from shoes. If you want continuity, keep linework bolder where friction is highest and use single-line suggestions across the instep. Expect faster fade on the foot portion and plan touch-ups earlier. Bring shoes you can slip on without rubbing the fresh area in the first week. For styling, pair the healed design with strappy sandals that reveal the instep without a tight heel strap.

20. Sternum Reaper, Central Linework
Aging/healing lead: sternum and underbust placements can be gorgeous for central motifs but they require careful discussions about exposure and garment choices. For a sketch-style Reaper centered on the sternum, ask the artist to avoid tiny hairline strokes near the rib margin and instead use midweight lines with airy stipple so the piece ages evenly. Sessions can be intense given proximity to ribs, so plan breaks. Wear a fitted sports bra to the appointment so the artist can reveal only the small area as needed. This placement needs an artist experienced in sternum work.

21. Elbow-Adjacent Forearm Reaper, Bold Sketch Lines
Mistake lead: putting too much tiny detail near the elbow invites distortion when the joint bends. For an elbow-adjacent Grim Reaper, design the main silhouette on stable forearm skin and let the scythe tip curve away from the joint. Request reinforced primary contours so the image stays legible when you move. The session is similar to other forearm work but expect the artist to check placement in multiple arm positions. For the appointment, wear a loose button-down shirt you can roll up so the artist can work without pressure on the elbow.

Frequently Asked Questions
Q: How fragile are sketch-style lines compared with traditional blackwork for a Grim Reaper on the forearm?
A: Sketch-style lines are more dependent on spacing and initial lineweight. In my experience, a sketch piece with slightly bolder primary contours and airy stipple holds up nearly as well as blackwork, but it will need touch-ups sooner if you spend a lot of time in the sun. Ask your artist to show healed examples of similar skin tones and placements before booking.
Q: Will a ribcage sketch Reaper blur faster than one on the shoulder blade?
A: Yes, ribs typically move and stretch more with breathing, which can cause very fine strokes to merge sooner. Shoulder blade skin is more stable, so the same level of detail usually lasts longer there. If you love the ribs, plan for slightly thicker anchor lines and budget for a touch-up at year two or three.
Q: Are hand and neck Grim Reaper sketches still risky for jobs?
A: This is a split issue. One camp treats visible tattoos as accepted personal expression. The other camp warns that certain employers still screen for neck and hand ink. If career concerns matter, place the design where you can conceal it with clothing or choose a placement with easier concealment. Ask your artist about how they advise clients in similar work situations.
Q: What should I wear to a session for a sternum or ribcage sketch piece?
A: Wear a fitted sports bra or a cropped top you can lift slightly so the artist only exposes the small area they need. This keeps the rest of you covered and lets the artist work without fabric tugging. If you want product ideas for session clothing, a strappy sports bra or a cropped tank with adjustable straps is useful.
Q: How often will I need touch-ups for tiny finger or wrist Grim Reaper sketches?
A: Expect finger and wrist sketch pieces to require maintenance earlier than larger areas. Realistically, plan to revisit the studio within one to three years for touch-ups if you want crisp negative space. Factors like washing frequency, sun exposure, and friction from accessories change that timeline.
Q: Can I find reference images and artist portfolios without contacting specific shops directly?
A: Yes. Use discovery pathways like curated tag searches, community forums, and reputable directories to find portfolios. Try related hashtags and local studio pages, and look for images of healed work in relevant placements so you can see how sketch lines age on comparable skin tones.
