
Fine line blackbird pieces are all over saved boards, and the tricky part is that what looks delicate on a screen can blur on skin if placement or spacing is wrong. Small blackbird tattoos reward careful spacing, proper depth, and realistic expectations about touch-ups. Read these 27 dainty options with notes on how they age, what to ask your artist, and simple wardrobe ideas to show them off.
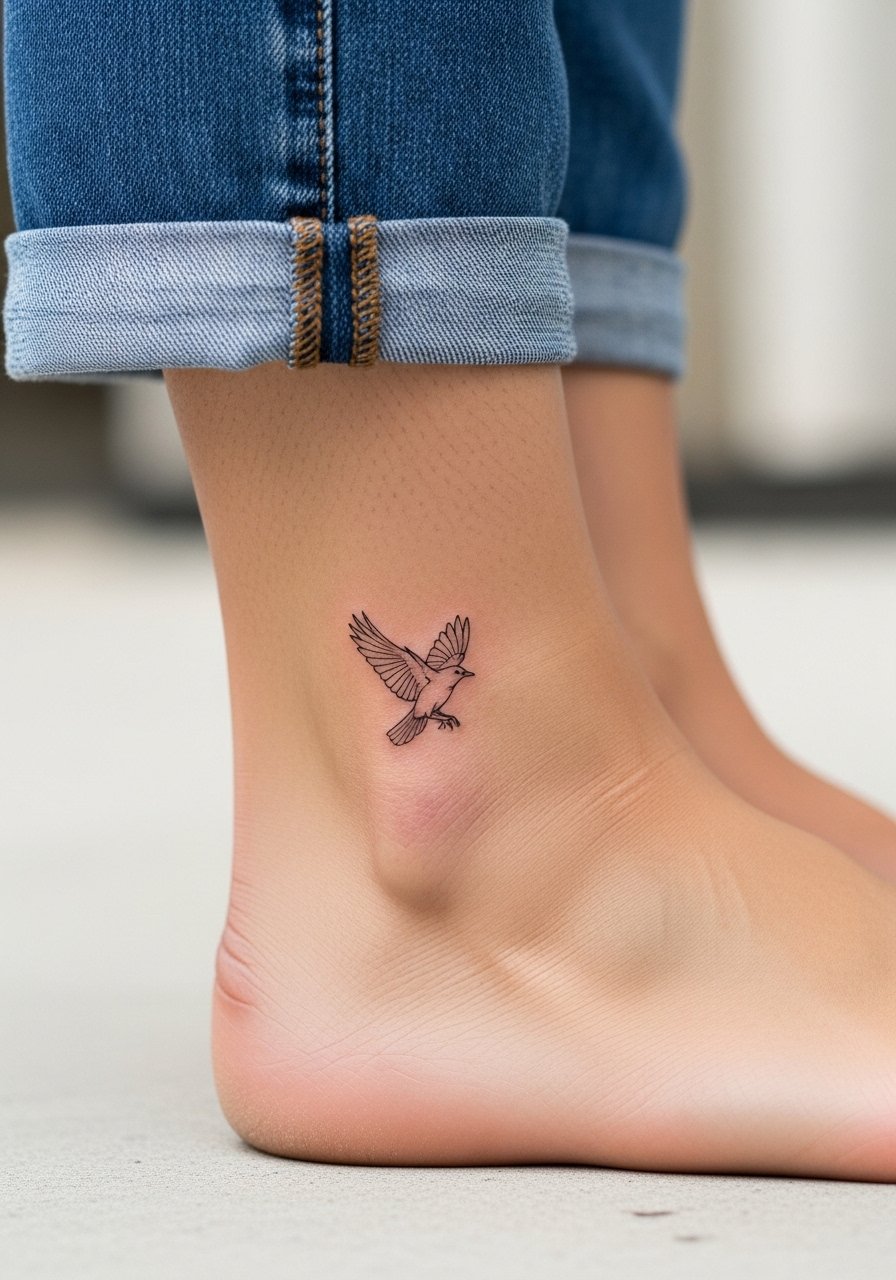
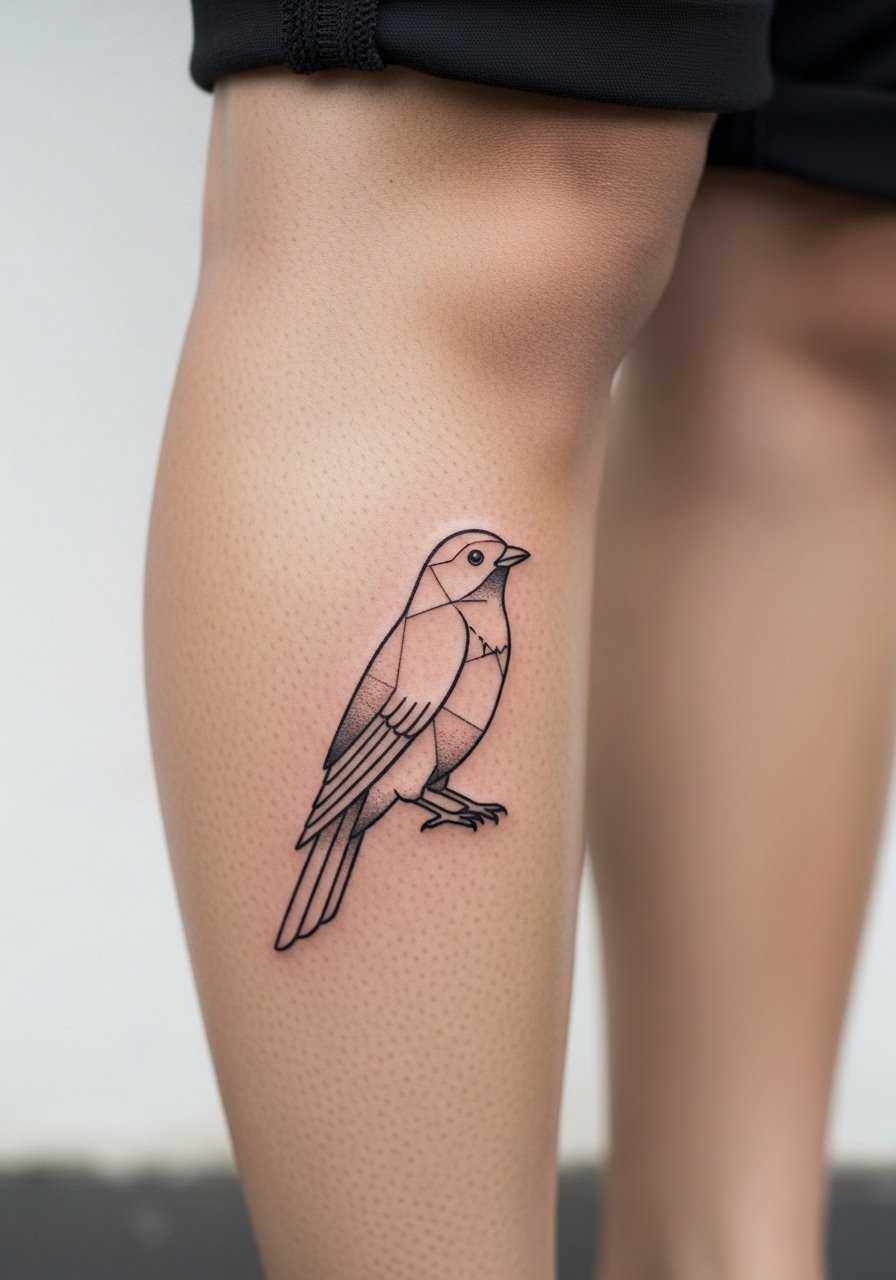
1. Fine Line Blackbird in Flight on the Wrist
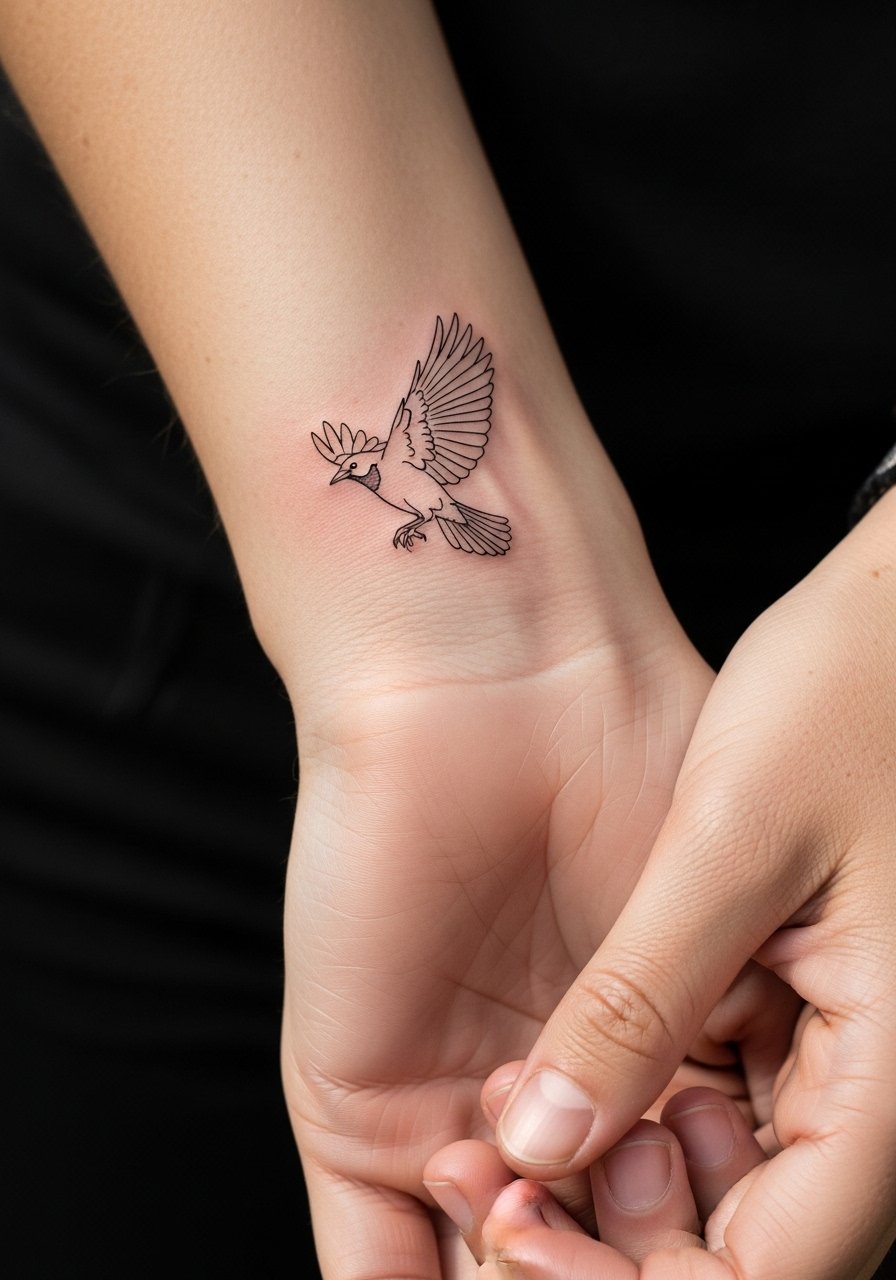
This tiny flight piece reads best when the wings are sketched with one continuous confident stroke. I recommend asking your artist for slightly more space between parallel lines so the design does not merge after a year. Expect a short 30 to 45 minute session and low to moderate wrist sensitivity. A common mistake is packing too many feather details into a one-inch area. For showing it off, pair the wrist piece with a thin chain bracelet on the opposite wrist, and wear a sleeveless top to the session so the artist has clear access.
2. Silhouette Blackbird Perched on a Branch, Forearm
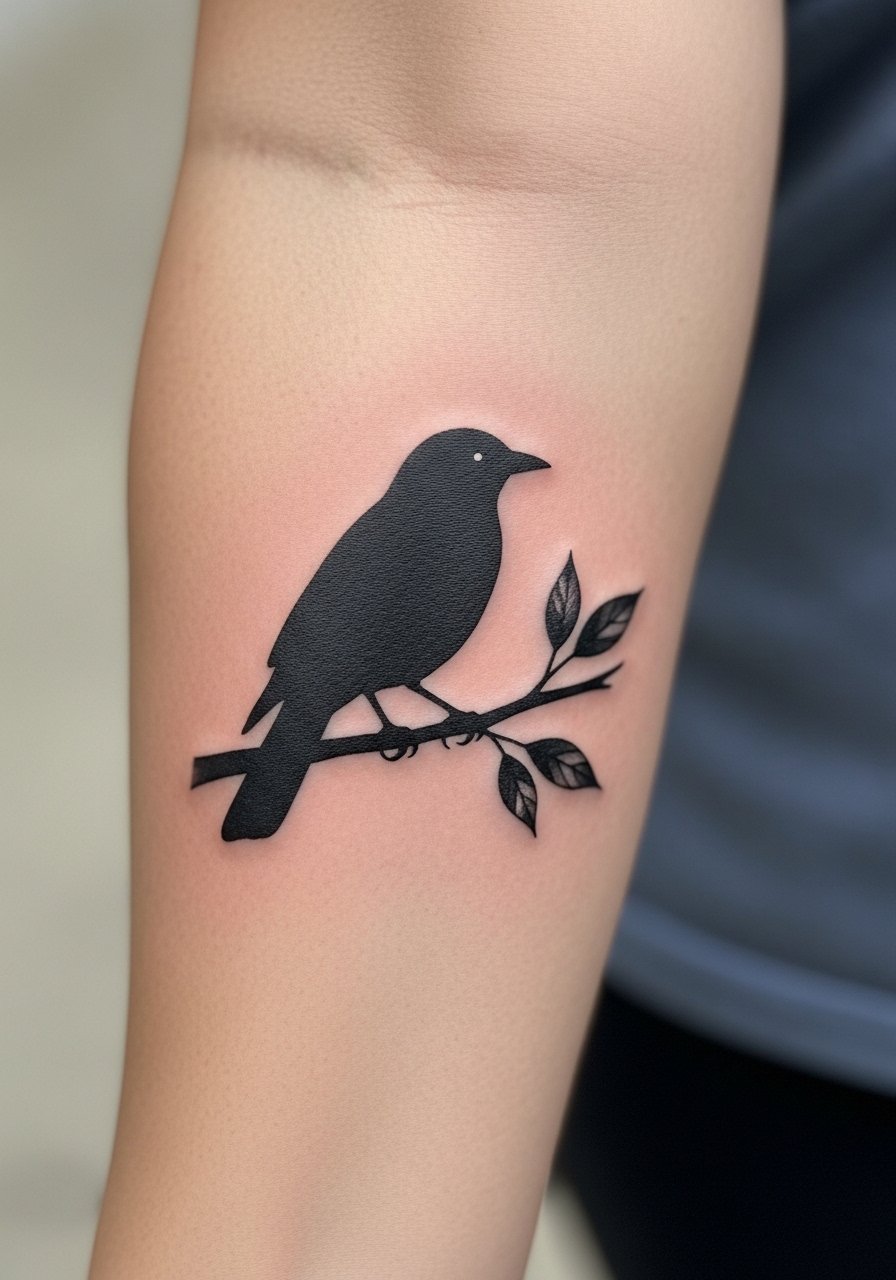
A silhouette on the forearm is forgiving because bold fill ages into a clean shape rather than soft lines. Tell your artist you want solid blackwork with slightly softened edges, not razor-thin outlines that can feather. The session runs about 45 to 75 minutes depending on branch detail and the pain is low to moderate. Avoid asking for tiny leaves packed tightly into the branch. For an everyday look, roll sleeves and wear a linen rolled sleeve shirt when you want to frame the forearm without distracting from the silhouette.
3. Tiny Back-of-Ear Blackbird with Feather Highlights
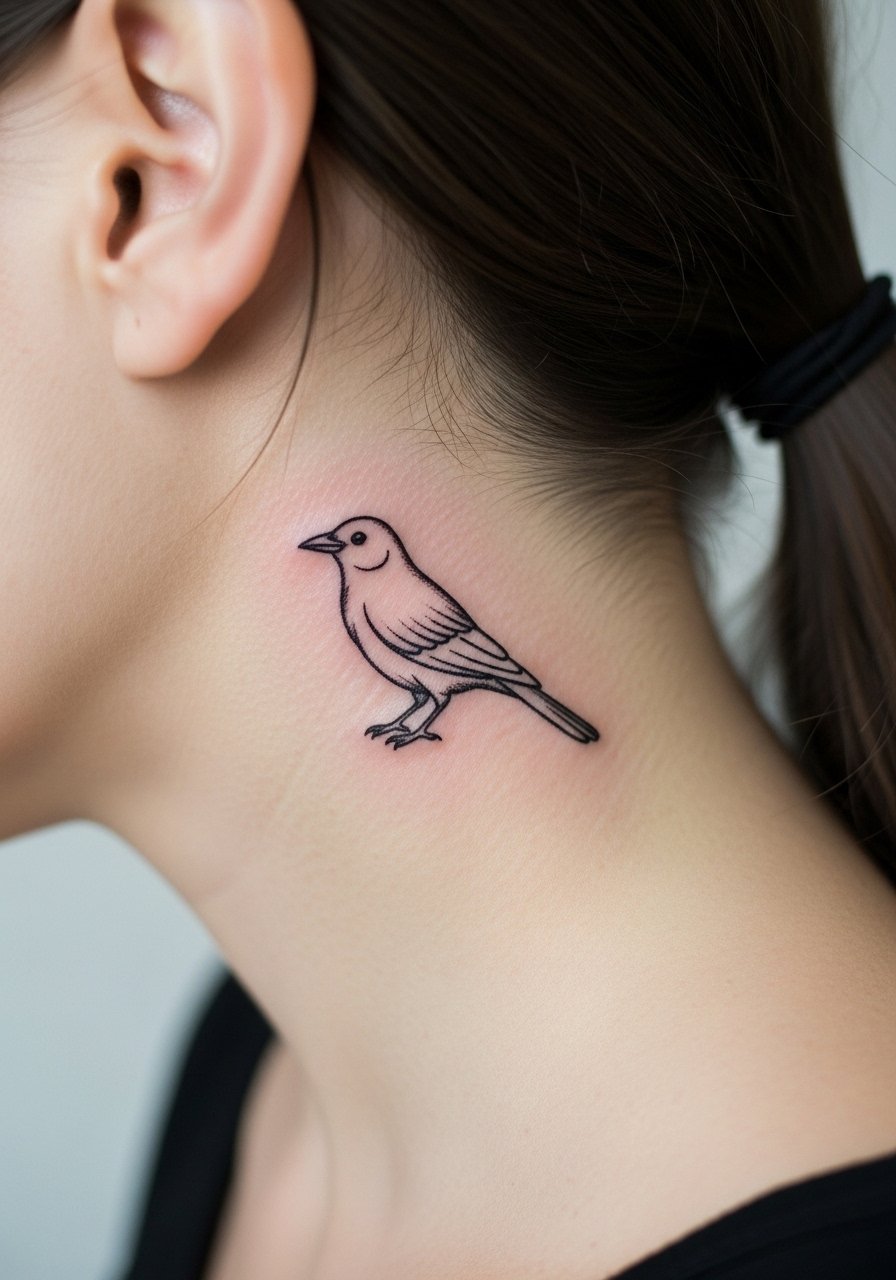
This tucked spot is ideal if you want a discreet, dainty accent under hair. Expect under 30 minutes and low pain, but ask for slightly heavier lineweight than you'd pick for a visible wrist piece so it holds up. A common mistake is requesting ultra-thin lines that disappear once hair rubs them. For showing it off, style hair in an updo or use a hair updo clip on the session day so the artist has clear access and you can see the healed placement later.
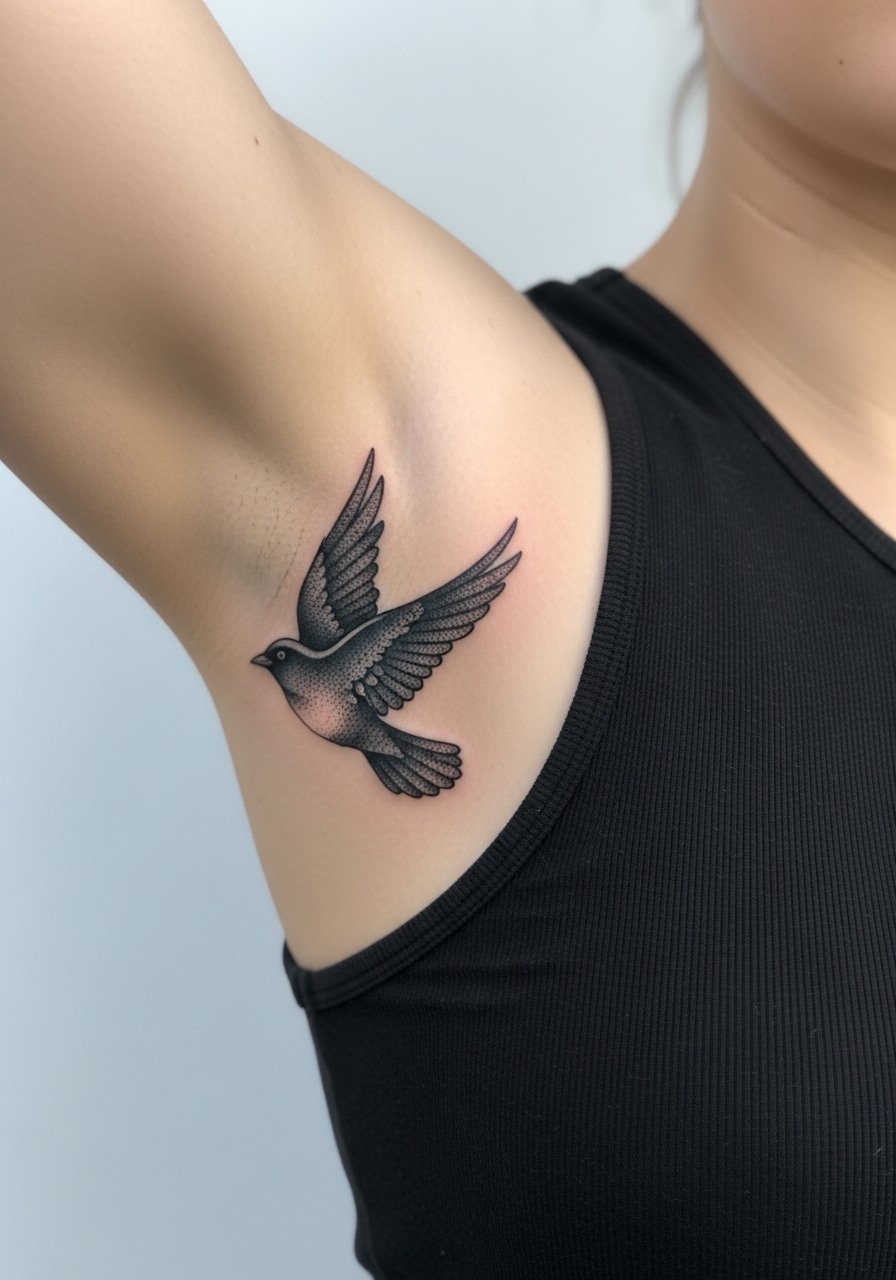
4. Mid-Flight Realistic Blackbird on the Shoulder
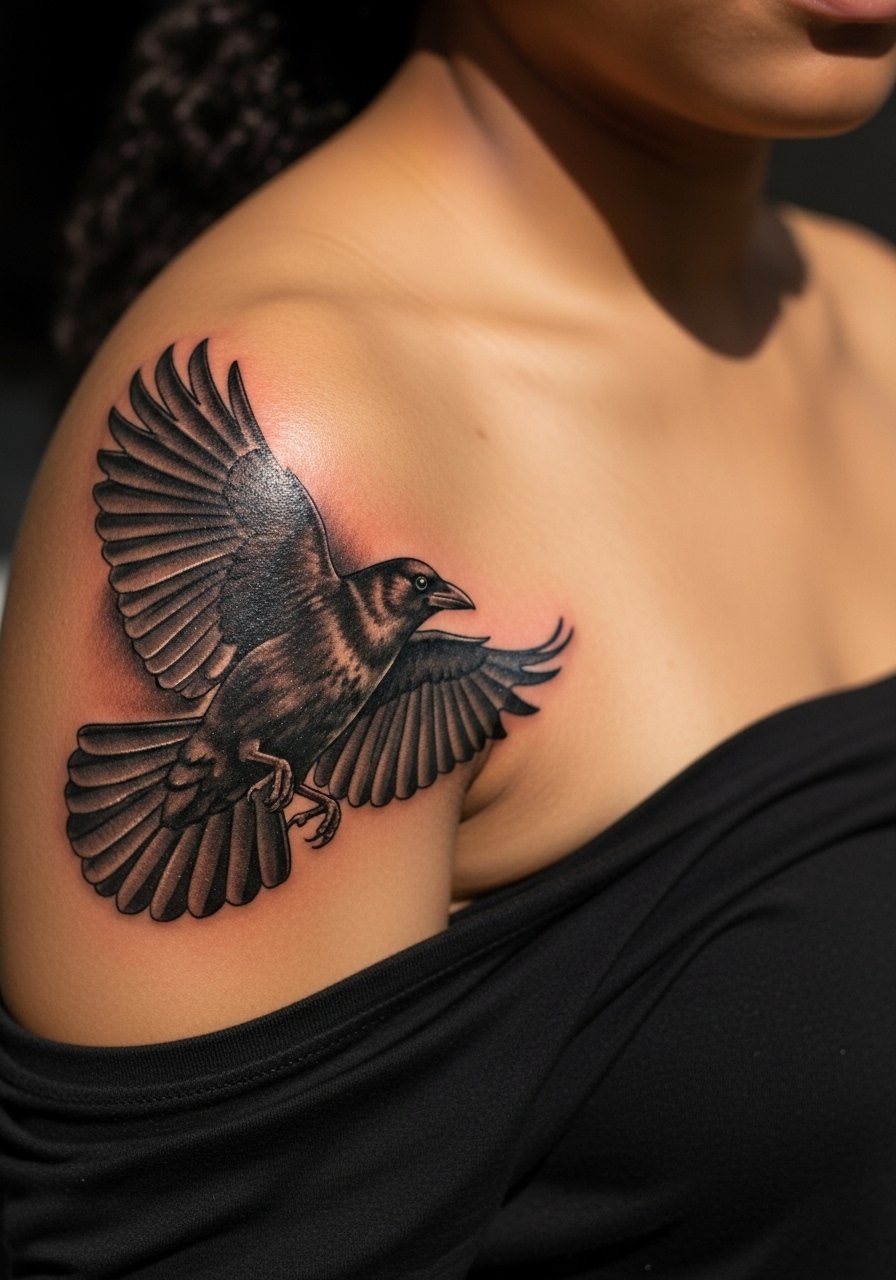
A mid-flight realistic piece works well on the shoulder because the canvas lets wings sit without crowding. Tell your artist you want subtle contrast and a soft beak highlight rather than heavy micro-detail in feathers. This design often takes 1 to 2 sessions and is moderate on pain. The mistake I see is trying to force photo-real detail into a two-inch area. To show it off, wear a sleeveless sundress on cooler days, and bring a loose button-down to the appointment so the shoulder is easy to access.
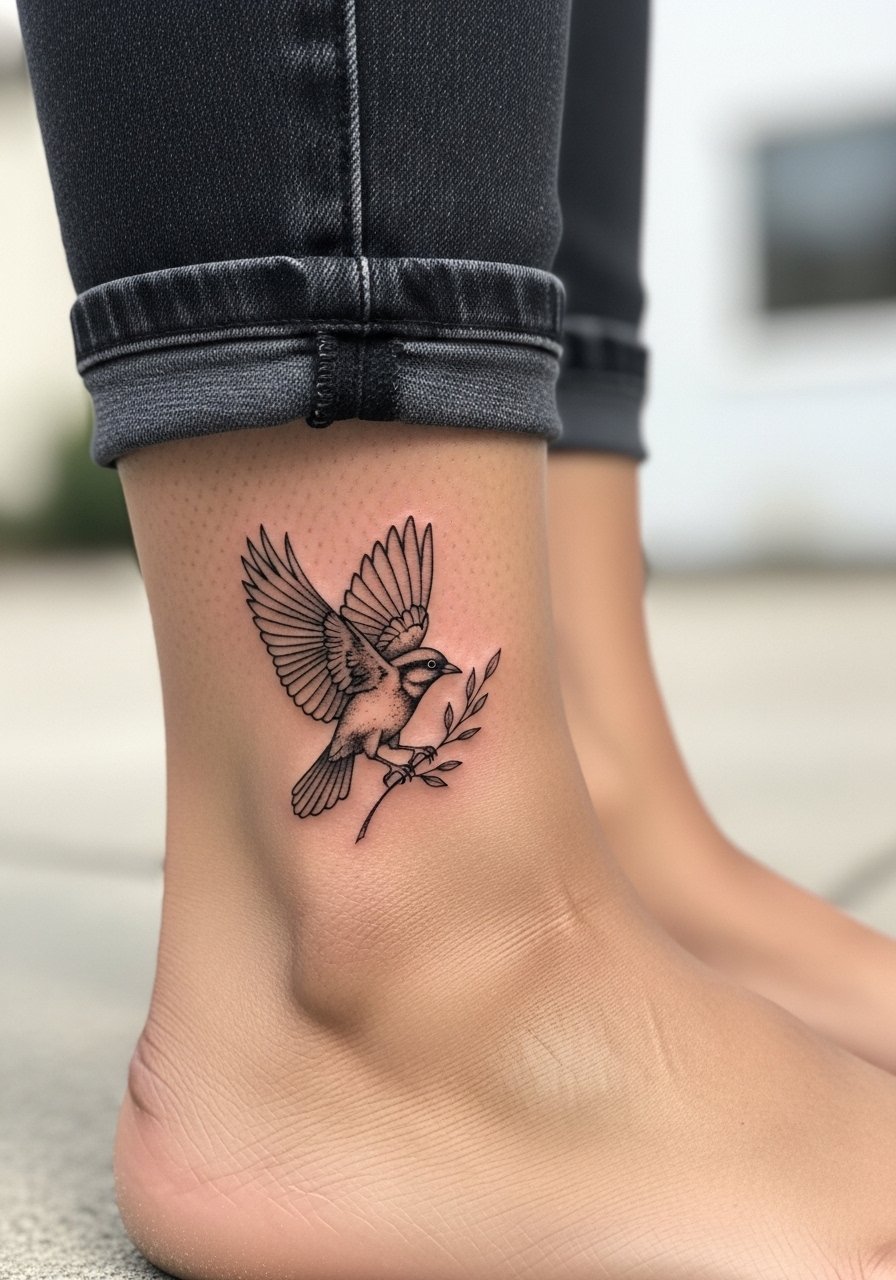
5. Small Red-Winged Blackbird Near the Ankle
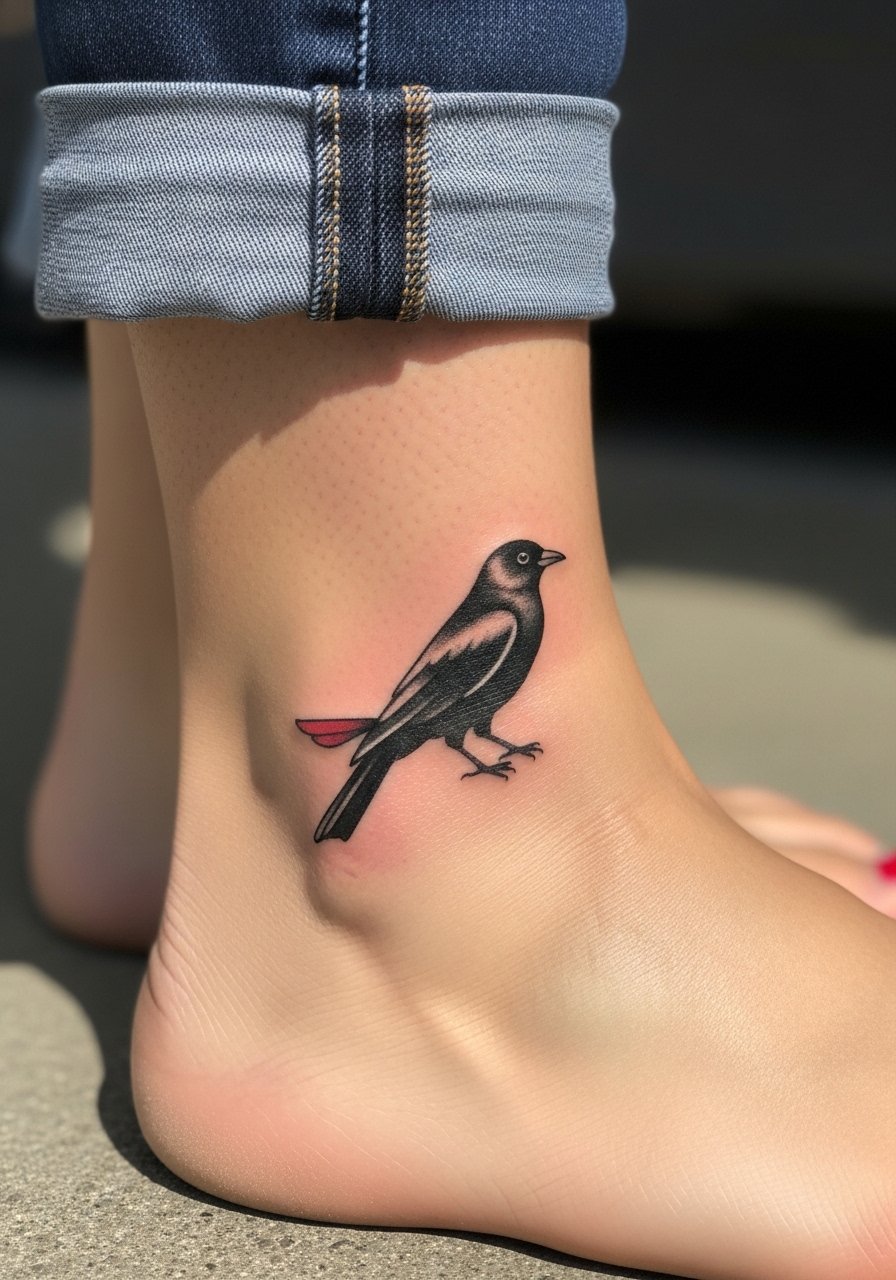
A pop of red gives a dainty blackbird a focal point without committing to full color work. Ask your artist for a small, saturated accent rather than a watercolor wash so it holds color longer. Ankle pieces are quick, usually under an hour, but the location can be sensitive for some. A common mistake is choosing a varnished bright red that migrates into skin tone; ask for a muted red and expect touch-up within a few years. When you want to show it, slip into strappy ankle sandals and cropped pants to frame the design.
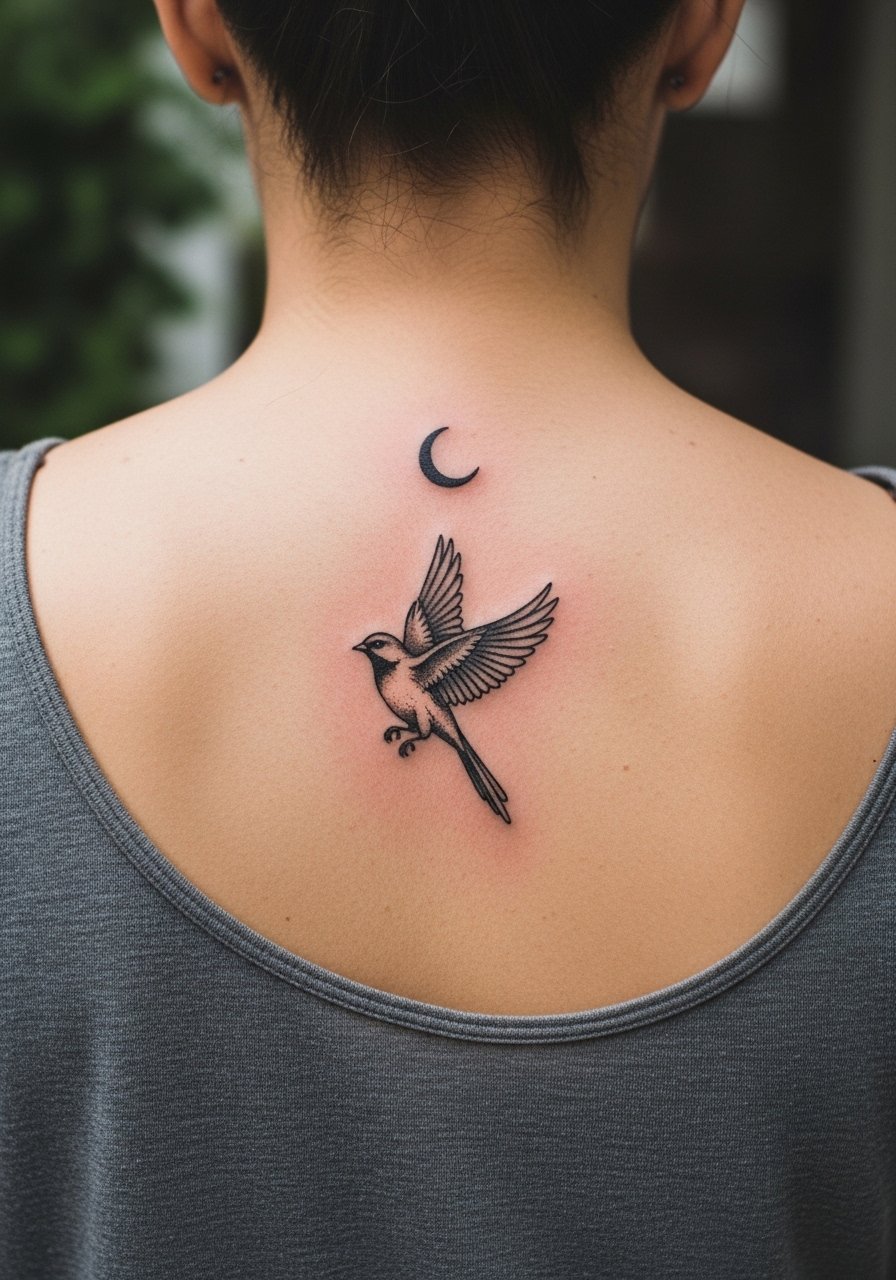
6. Geometric Blackbird with Moon on the Collarbone
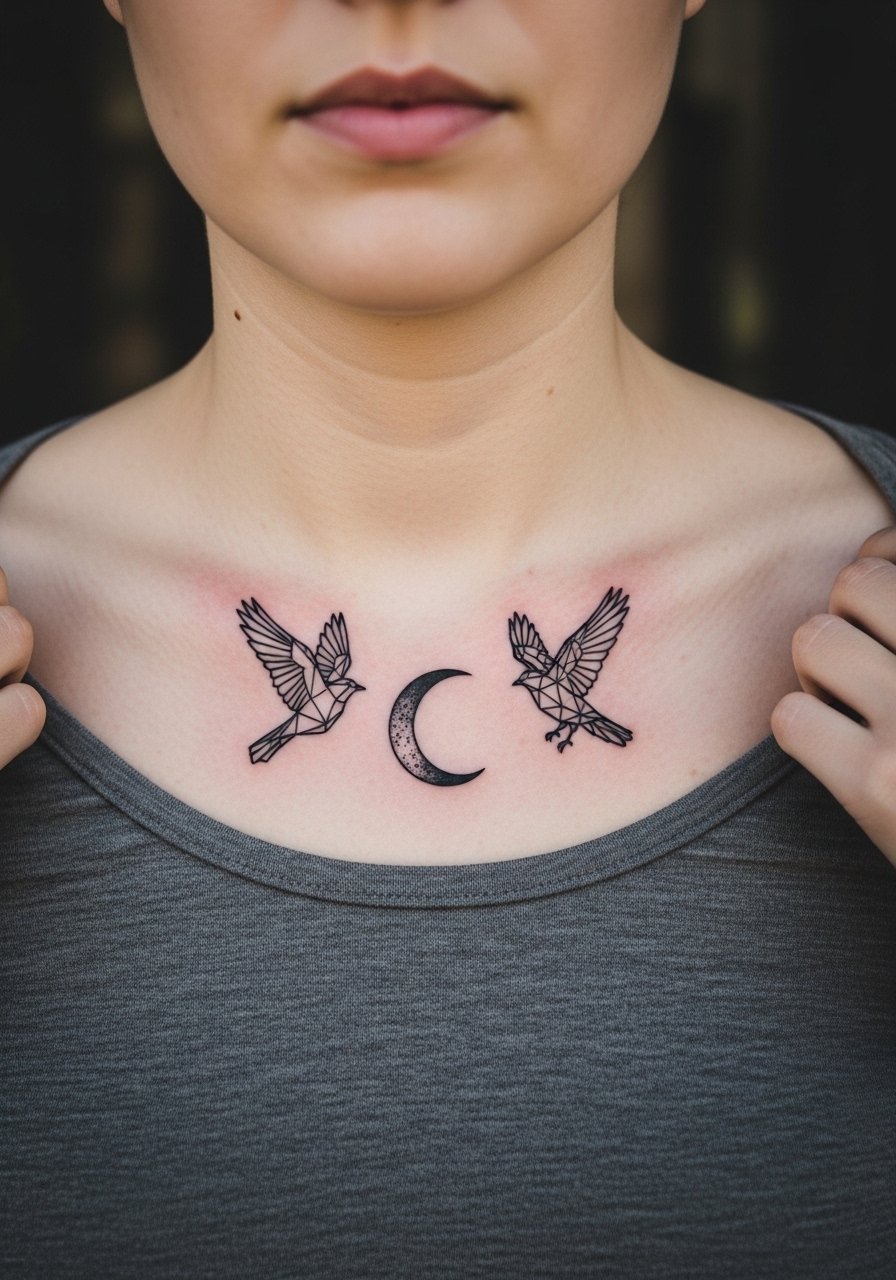
Geometric shapes around the collarbone read as a modern talisman when the negative space is deliberate. Ask for intentional spacing between the bird and moon so the shapes remain distinct as skin settles. Session time is typically 30 to 60 minutes with low to moderate pain. A frequent misstep is going too small on dense geometry which causes lines to blur. For evenings out, an off shoulder top frames the collarbone ink while keeping the look refined.
Studio Day Picks
The first six ideas above include lots of wrist, ankle, and collarbone work, so a few thoughtful items make the appointment and first week easier.
- Stencil transfer paper kit. Lets you preview placement directly on skin so the fine line wrist and collarbone designs sit right before needle touches skin.
- Topical numbing cream. Apply per product instructions to take the edge off ankle and shoulder sensitivity without interfering with the artist's lines.
- Thin protective film roll. Useful for ankle and wrist pieces that rub against socks or sleeves during the first few days.
- Fragrance free gentle body wash. Helps keep delicate blackwork clean without irritating the area after showers.
- Aquaphor healing ointment. Thin application helps lock in moisture for small fine line work during the initial healing window.
7. Watercolor Blackbird with Soft Edges on the Shoulder Blade
Watercolor shading around a blackbird gives motion without heavy linework, and the shoulder blade lets flows breathe. For longevity, request that the artist anchors the watercolor with thin black outlines in key areas so fades look intentional. Sessions are typically one to two hours and range from moderate to low pain. The trap is asking for large soft washes too close together which can look muddy as they fade. For easy styling, pick a strapless top for nights out or a loose tank on appointment day.
8. Geometric Outline Blackbird on the Inner Wrist
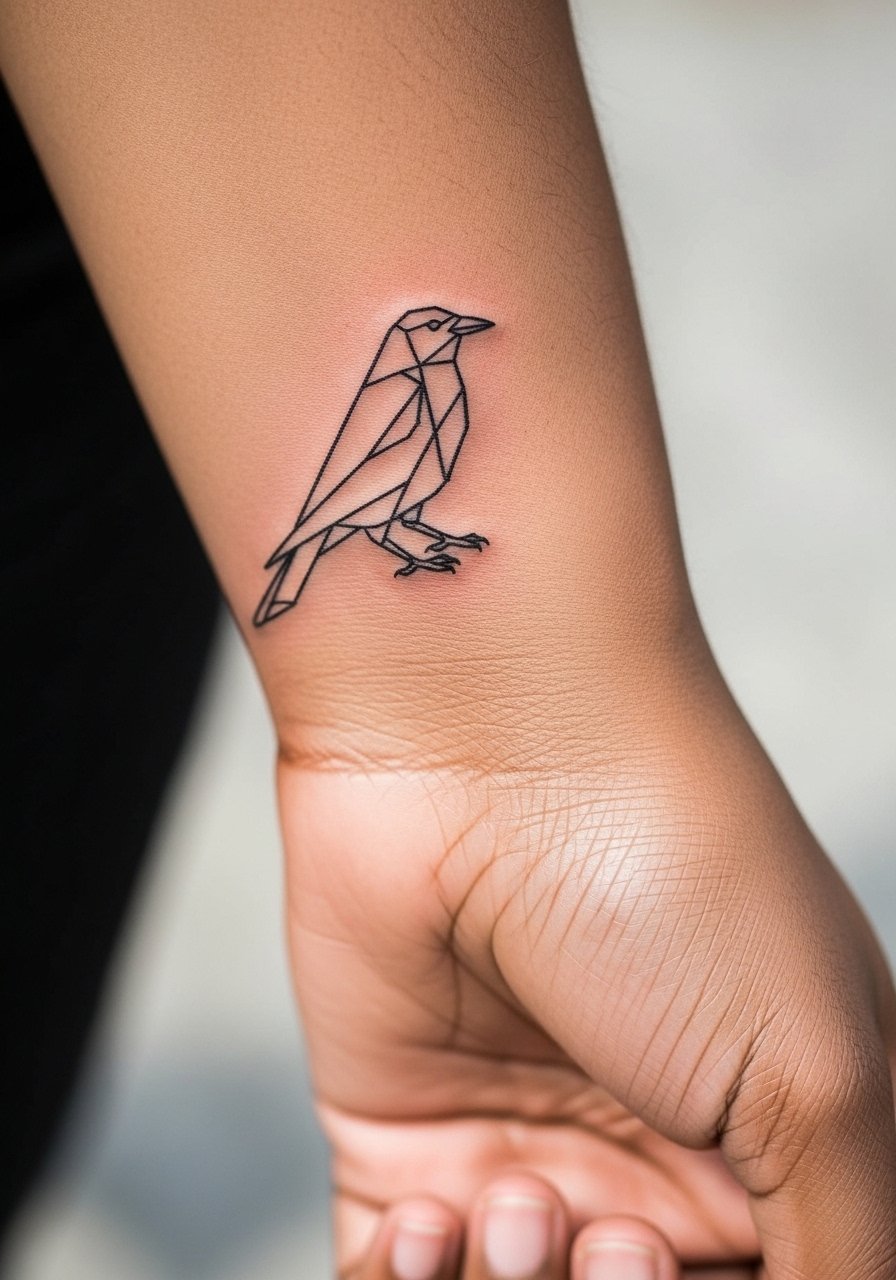
Geometric outlines work when the negative space is planned and the lines are bold enough for long-term clarity. Tell your artist you want slightly heavier lineweight than a typical ultra-fine wrist tattoo. Expect 30 to 60 minutes and low to moderate pain. A common error is asking for tiny, intricate angles under one inch which leads to merging lines. This placement benefits from rolled sleeves and a loose tank top to give the artist room and keep the area exposed during healing.
9. Neo-Traditional Blackbird with Florals on the Inner Arm
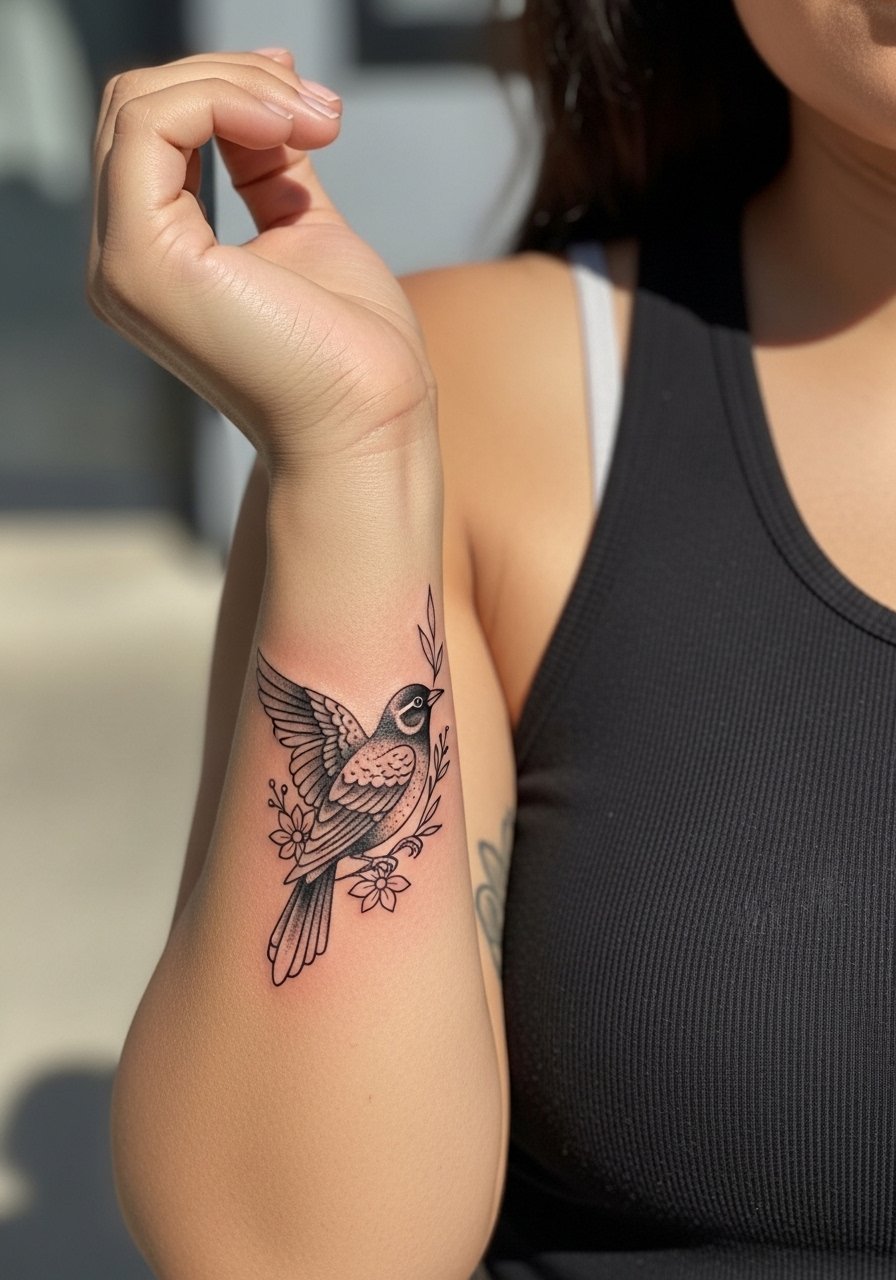
Pairing floral elements with a dainty blackbird layers meaning while keeping the piece compact. Ask your artist to keep petals slightly spaced and avoid dense stipple inside the bird to preserve clarity over time. The inner arm can be moderate on pain and usually takes 45 to 90 minutes. A mistake is requesting excessive detail in a two-inch area. For appointments, wear a loose tank top that allows the artist to raise the arm without bunching fabric against the site.
10. Perched Profile Blackbird on the Collarbone
A quiet profile perched at the collarbone reads like a wearable accent when placed just above the clavicle. Keep the scale to one to two inches and request clean silhouette edges to avoid blowout along the collarbone. Sessions are short and pain is low to moderate. People often make the mistake of dropping the design too low where clothing rub accelerates fading. To frame it, layer a dainty chain necklace that sits above the bird so the tattoo remains the focal point.
11. Script and Blackbird Combo Along the Forearm
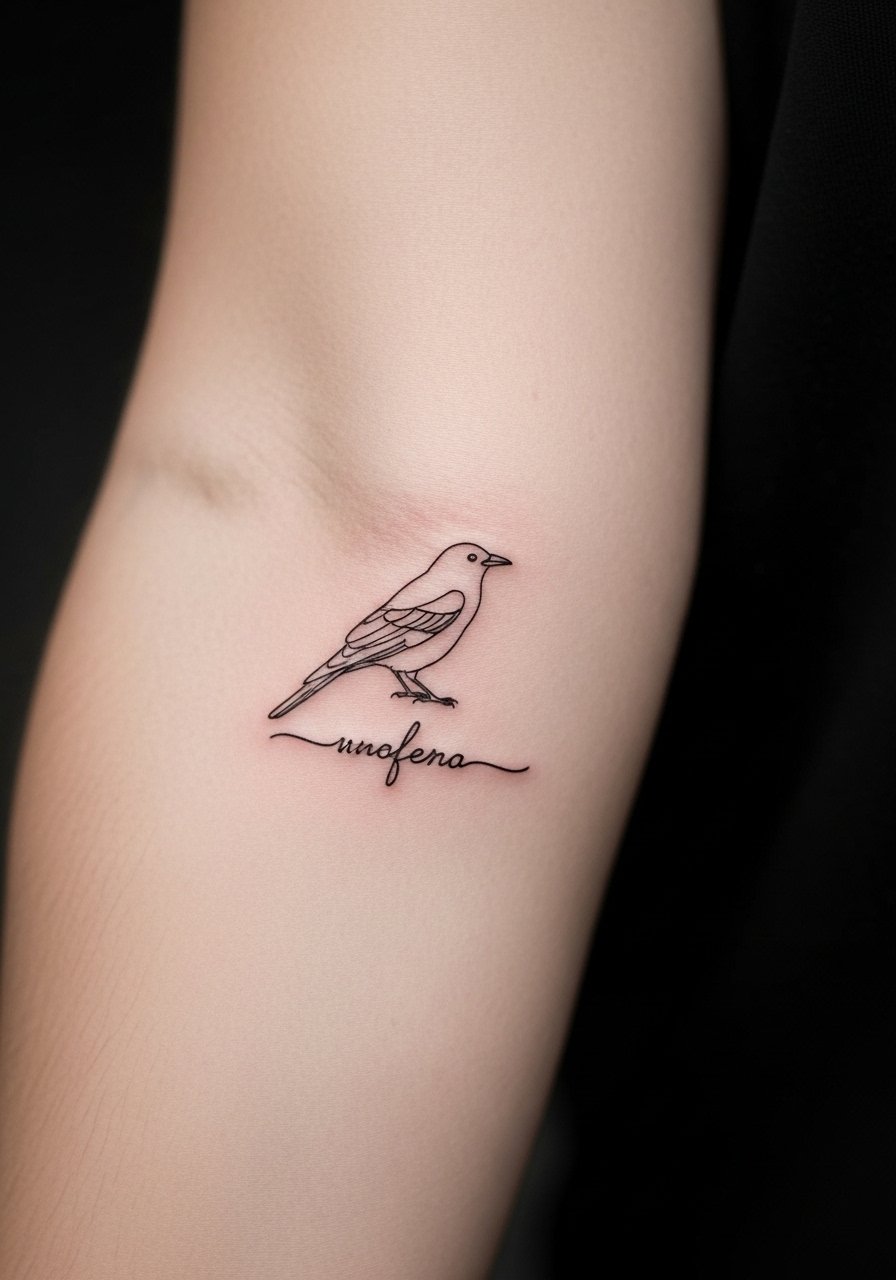
Adding a short phrase beneath a small bird personalizes the piece but requires size discipline so both elements remain legible. Tell your artist exactly which font and request full-size stencil on skin to confirm spacing. The forearm is forgiving and the session usually takes 45 to 75 minutes with low pain. A common misstep is choosing tiny script that blurs into the bird after one or two years. For show-off styling, roll sleeves and wear a linen rolled sleeve shirt that frames the forearm cleanly.
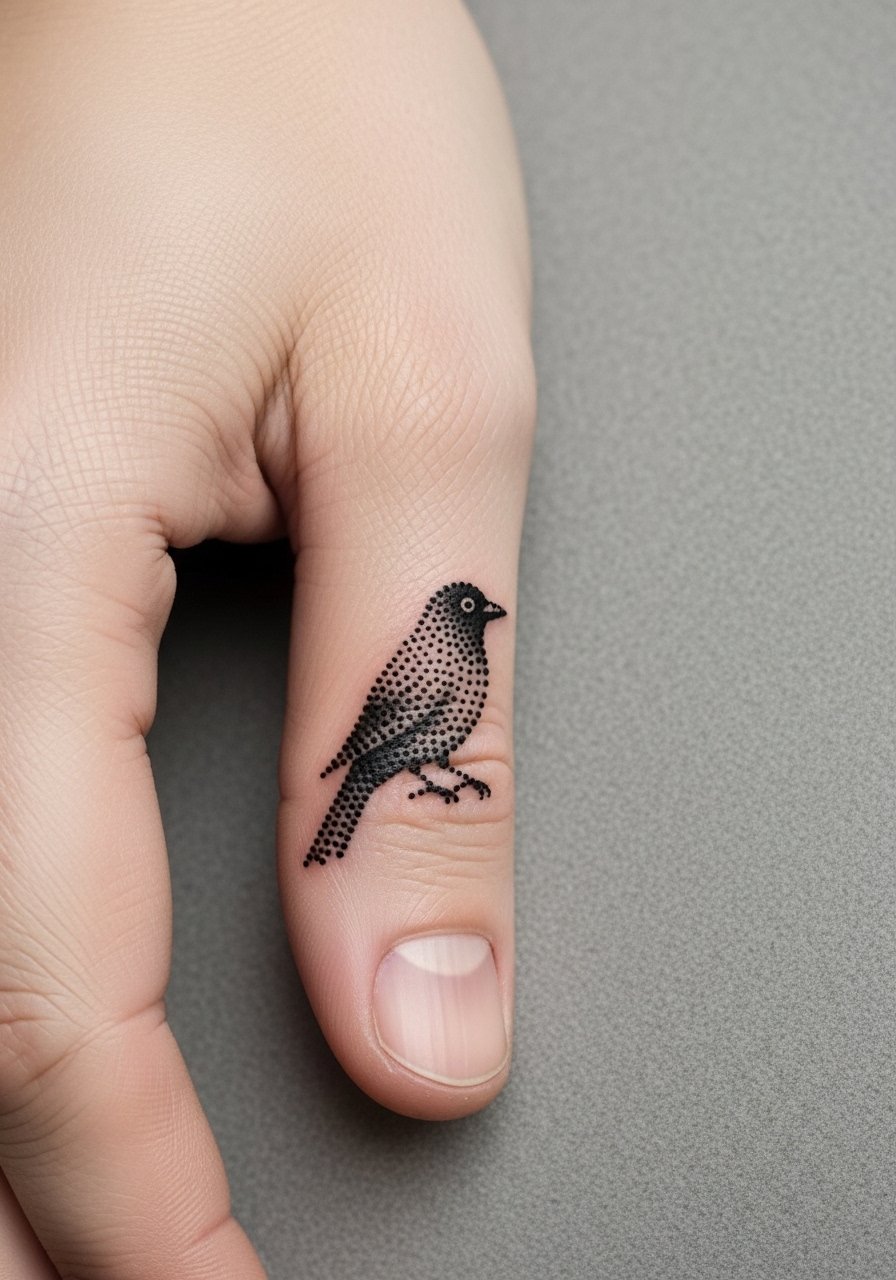
12. Micro-Realism Finger Blackbird
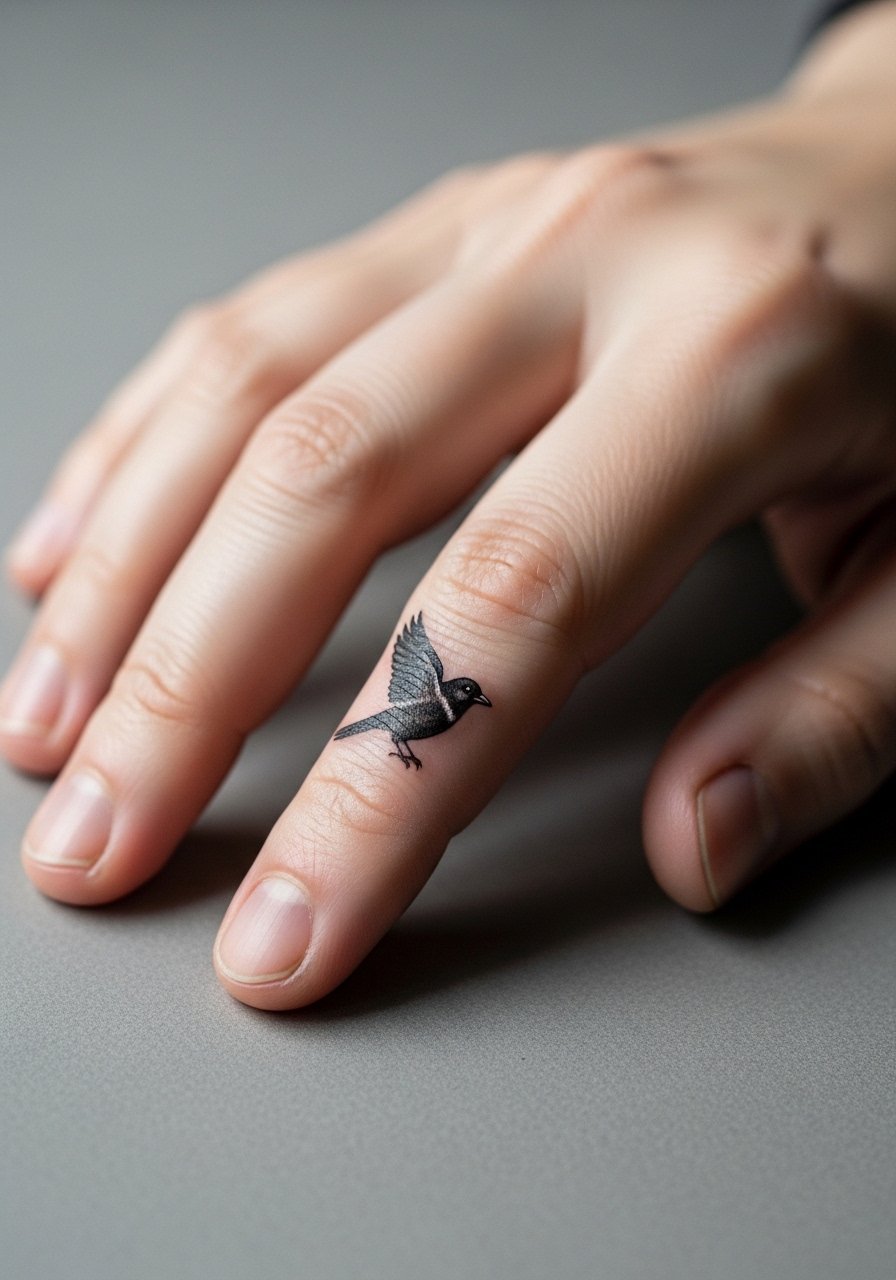
Finger tattoos are intimate and demand realistic expectations about fading and touch-ups. Micro-realism on a finger is great for someone who wants a tiny statement but accepts likely touch-ups at year one to three. The session is brief and pain can be higher due to thin skin. A real mistake is asking for shaded micro-detail across multiple fingers in one sitting. For session wear, keep hands clean and avoid heavy rings the first week while the area heals.
13. Blackbird Flock in Tiny Dots Across the Back of the Shoulder

A tiny flock in dot work gives motion without dense linework, and the shoulder area lets the composition breathe. Ask for spacing between birds so each dot silhouette ages separately. Sessions may be split into short stints and pain is low to moderate. People sometimes pack the flock too tightly which leads to loss of individual shape as dots soften. Wear a loose tank top to the appointment so the artist has clean access and you avoid chafing afterward.
14. Single-Line Continuous Blackbird on the Ribcage

Fine line on ribs sparks debate among artists. One camp argues that rib skin stretches and shifts, making ultra-fine lines blur within a couple of years. The other camp says that with correct needle depth and spacing, a fine single-line can settle cleanly. Ask your artist which approach they use and whether they recommend slightly heavier lineweight for ribs. Sessions can be uncomfortable and may need breaks, and touch-ups at year two or three are common for tiny work in this zone.
15. Negative Space Blackbird with Stipple Shading on the Inner Bicep
Negative space designs use surrounding dot work to shape the bird silhouette, which can age gracefully if spacing is generous. For this spot, tell your artist you want the stipple spacing mapped out so the negative bird remains readable at three years. The inner bicep is moderate in pain and sessions can last 45 minutes to an hour. Avoid cramming stipple density into a small oval. Wear a loose tank top on the day so the artist can raise your arm without fabric restriction.
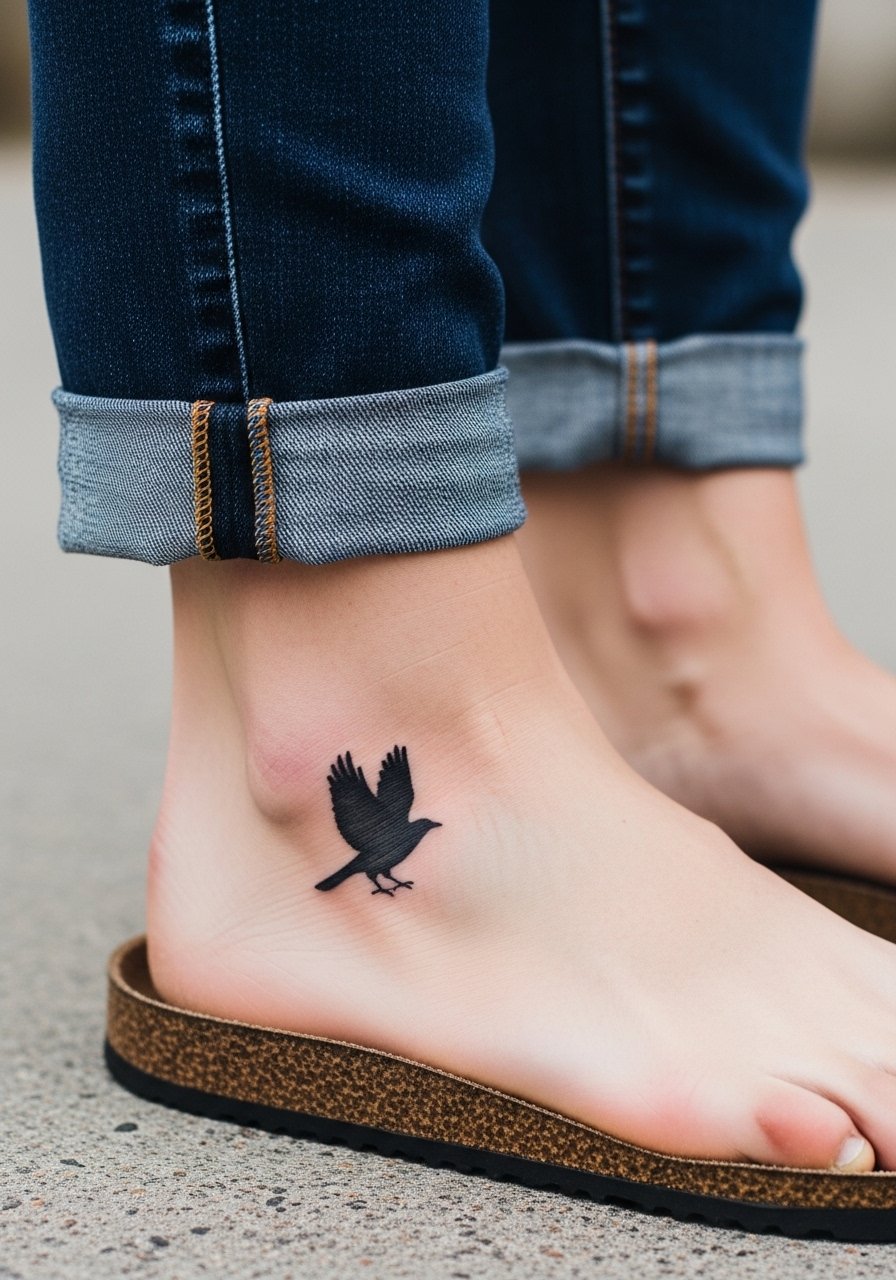
16. Tiny Blackbird Above the Ankle Bone
Ankle placement gives a discreet peek of ink and tolerates small silhouettes well when the linework is bold enough. Tell your artist you want slightly stronger contour lines that won't diffuse under thin ankle skin. Sessions are short and pain varies by individual. A predictable mistake is asking for minute feather detail in under an inch. For footwear-friendly showing off, pair it with cropped ankle pants and low sandals.
17. Blackbird Silhouette with Crescent on the Upper Arm
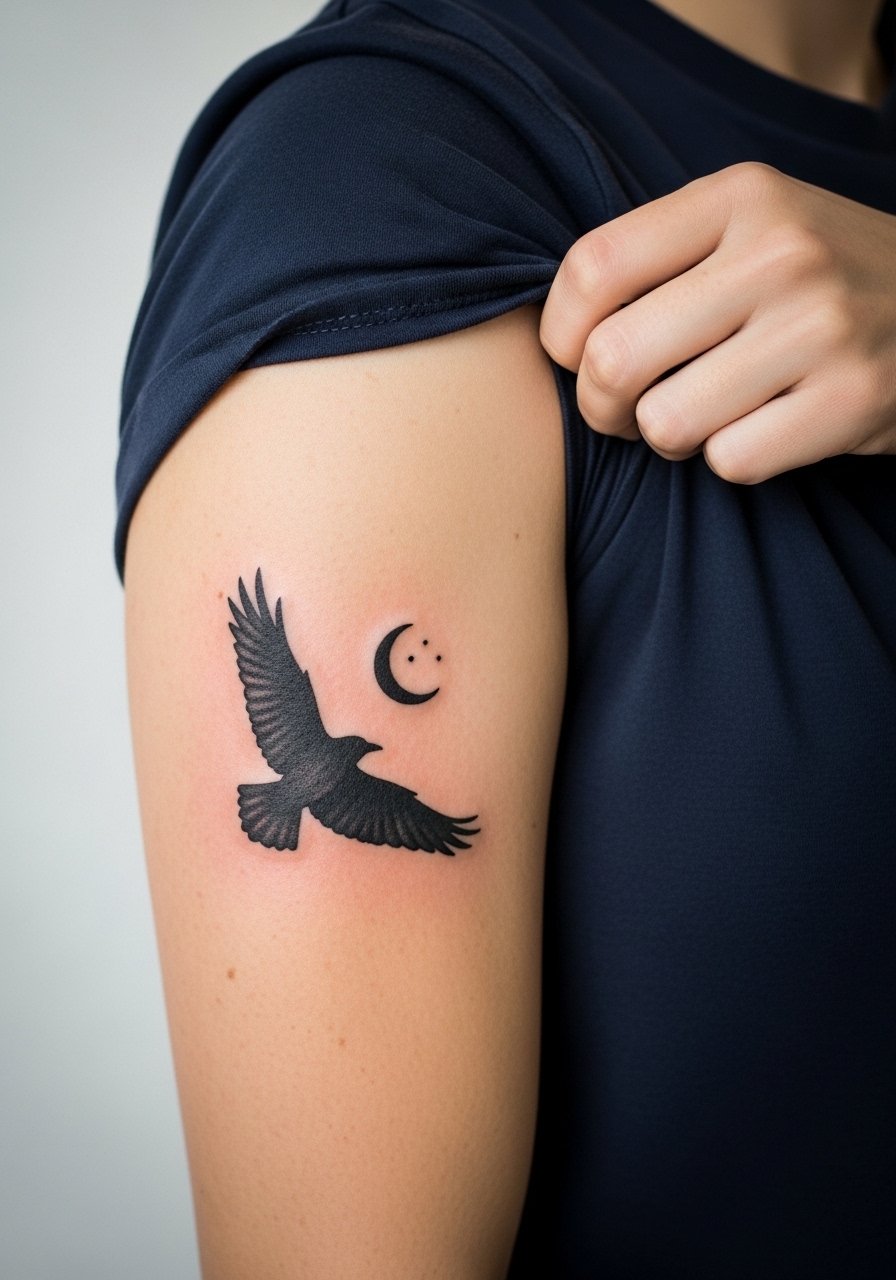
Upper arm placements are forgiving and make silhouette work look graphic for years. Ask your artist to space the moon and bird so both read at small sizes. Expect 45 to 90 minutes and low pain compared with ribs or sternum. A common misstep is requesting extremely tight geometry here which crowds as the skin ages. For sessions, wear a loose button-down shirt you can slide aside for access.
18. Blackbird with Tiny Star Accents Along the Collarbone
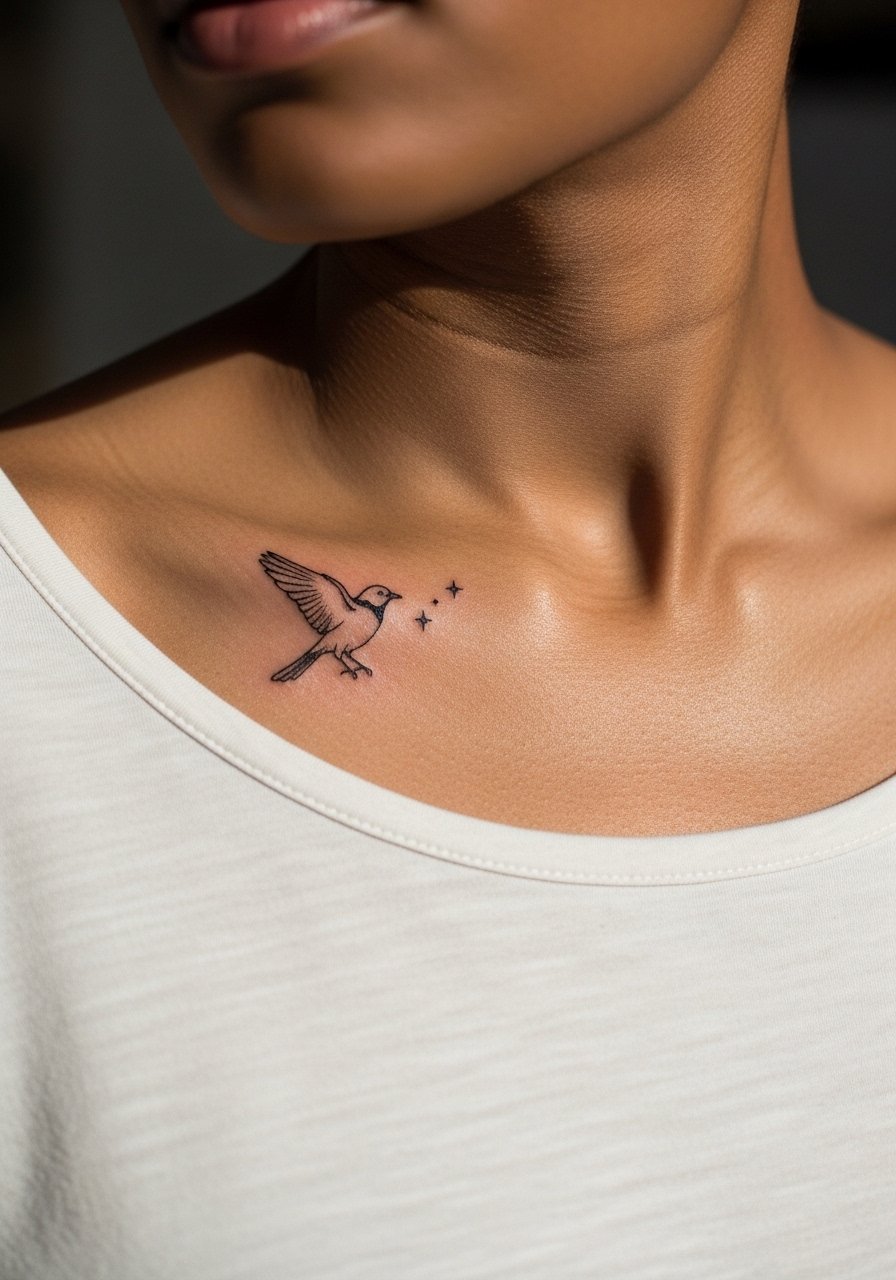
Small star accents add punctuation to a collarbone bird without stealing focus. Ask for a full-size stencil so you can confirm spacing between the bird and stars before tattooing. This piece is quick, low pain, and generally ages well if the dots are spaced at least a few millimeters apart. People sometimes request dot clusters that blur into a single blob. For subtle evenings out, layer a thin chain pendant necklace that sits above the ink.
19. Blackbird Outline with Geometric Fill on the Calf
Calf placement lets you scale slightly larger while keeping a dainty aesthetic. For stability, request the artist use a moderate outline and avoid tiny interior line patterns that can blur. Session time varies but often sits around one hour and pain is low to moderate. A common error is over-detailing interior geometry in a small footprint. On warmer days, wear a sleeveless sundress that keeps the calf visible when you want to show the design.
20. Tiny Double Birds Tucked Behind the Ear Area
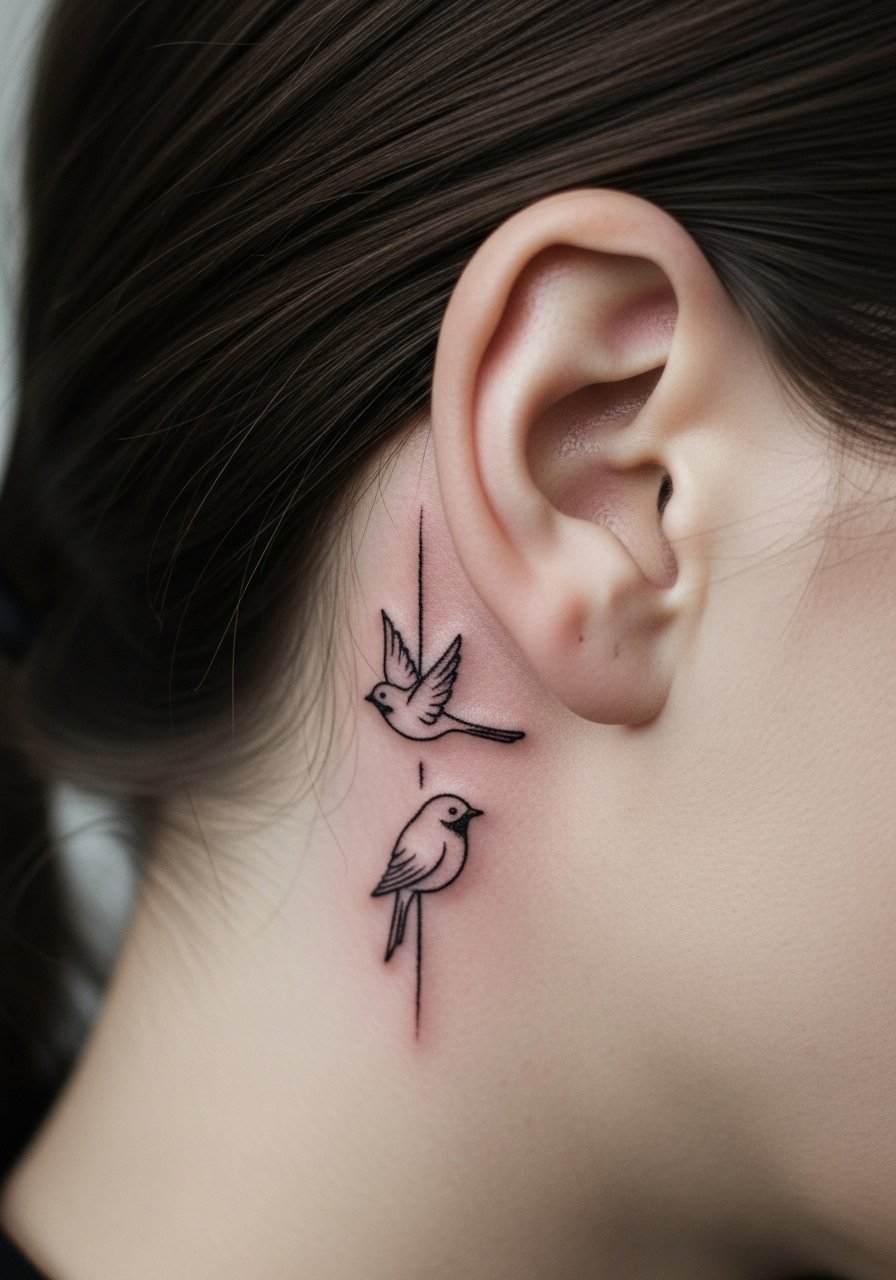
A pair of minis behind the ear makes for a private motif that peeks out with updos. Ask for slightly heavier contour lines than a typical ear-area fine line so the tiny forms read once hair brushes them. Sessions are short with low pain. The wrong move is packing birds too close so they become indistinguishable over time. For easy reveal, bring small stud earrings and wear your hair up for the session.
21. Crescent-Backed Blackbird Near the Spine
Spine-adjacent placements are elegant for vertical motifs that run with posture. Ask your artist for a narrow composition that keeps the bird centered over the spine but offset slightly to one side to avoid mobility lines. Sessions can be longer and sensitivity varies. A typical mistake is trying to cram horizontal detail along a vertical curve. Wear a tank top you can pull down or a button-up you can slip off one shoulder so the artist has clean access.
22. Tiny Blackbird Tattoo on the Top of the Foot
Top-of-foot tattoos are delicate and see rapid wear because of footwear and friction. I suggest keeping the design simple and asking the artist to avoid heavy shading near the toes. Session time is short and pain can be moderate to high depending on your anatomy. A frequent error is choosing dense detail that fades quickly from shoe friction. For summer reveal, wear low heel sandals and avoid tight-fitting shoes during the first two weeks.
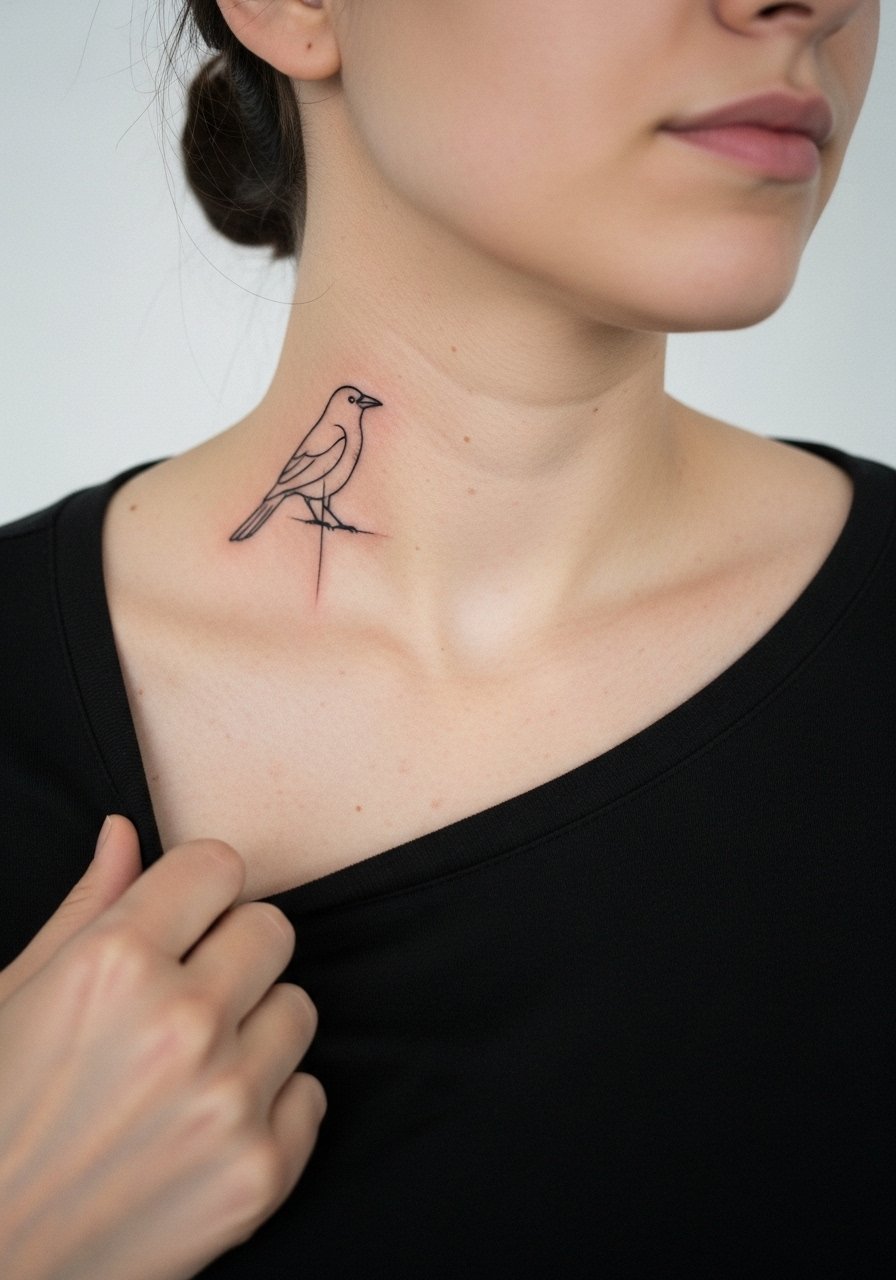
23. Minimalistic Blackbird on the Side of the Neck
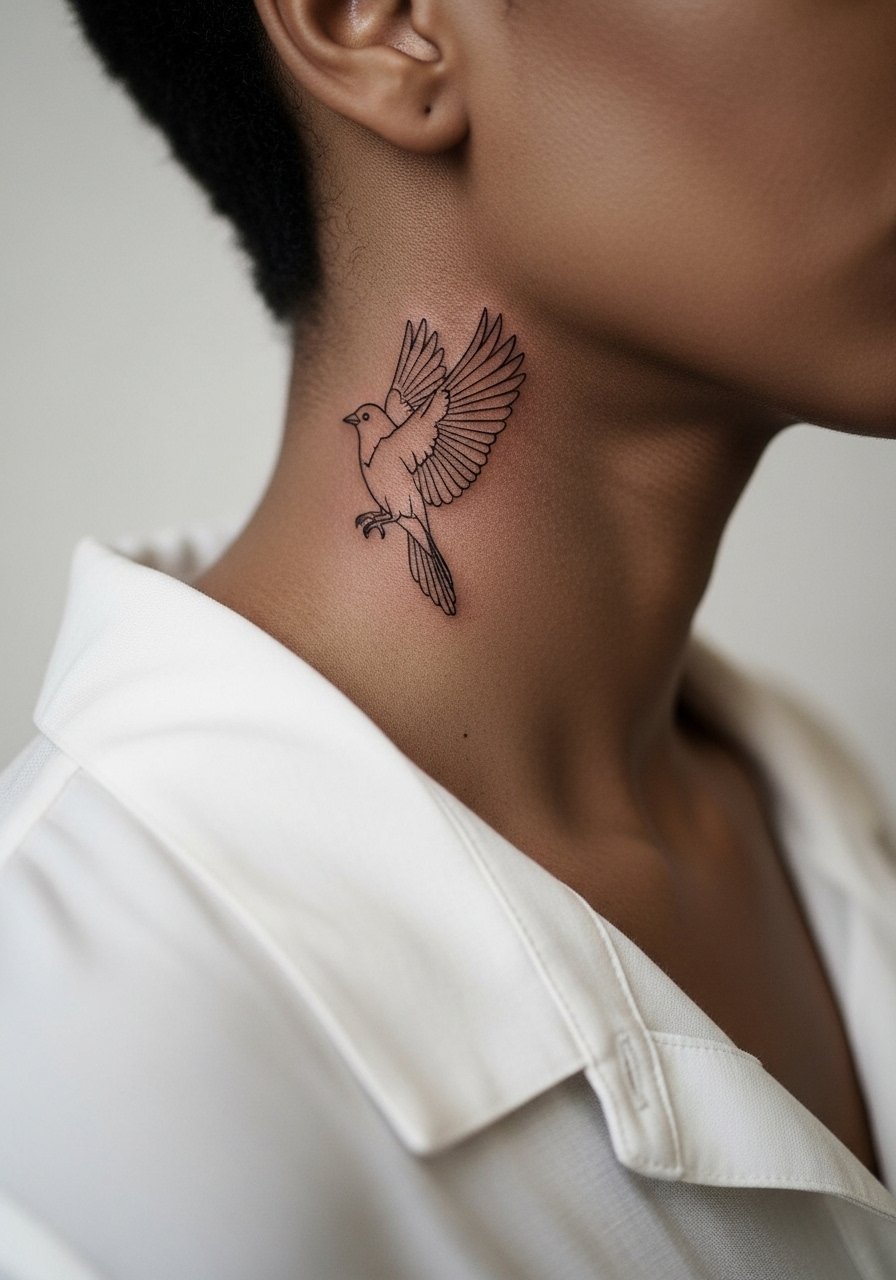
Neck placements are visible and should be treated like a statement. Ask your artist about touch-up timelines up front and whether they recommend slightly robust line weight for neck mobility. The session is often quick but sensitivity varies, and placement affects visibility in professional settings. Some artists say neck lines blur faster, while others say proper spacing and depth avoid merging. Discuss both perspectives with your artist before booking. For session comfort, wear a wide-neck shirt you can pull aside easily.
24. Stipple-Shaded Blackbird Over a Small Leafy Branch, Inner Wrist
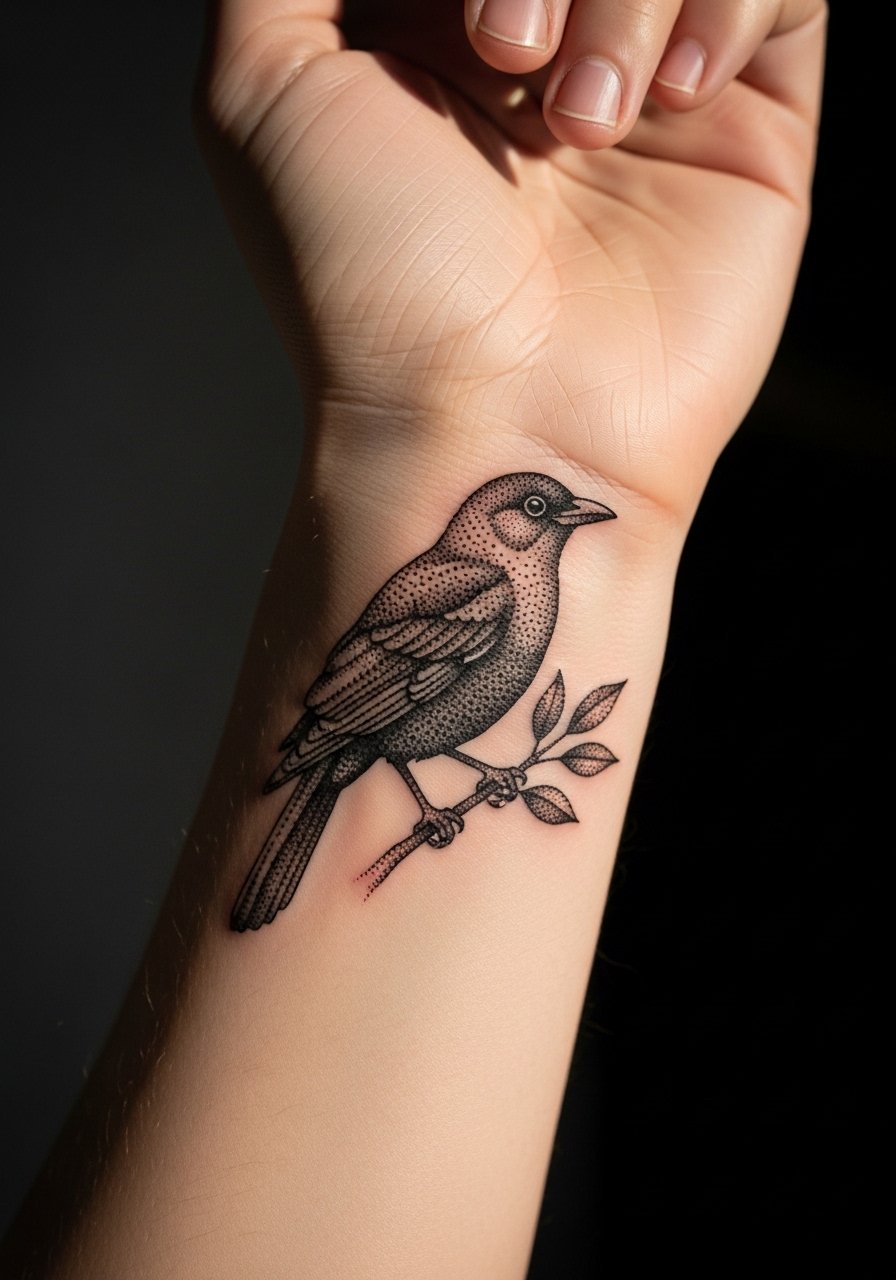
Stipple shading around a branch gives texture while keeping lines minimal. Ask for stipple spacing to be previewed so the bird silhouette remains clear at six months and two years. Expect 45 to 75 minutes and mild wrist sensitivity. The mistake I see is over-dense stippling that merges into the branch. For styling, stack the wrist with a minimalist cuff bracelet on the opposite arm to balance the look.
25. Tiny Blackbird with Script on the Sternum Area
Sternum tattoos require precise placement and a sitter comfortable with chest access. Ask your artist for a mockup while seated so you confirm how the piece sits with breathing and fabric lines. Sessions can be more uncomfortable than arm work and may need 1 to 2 hours with breaks. One camp cautions that chest movement shortens line longevity. The other camp says good depth and space prevent early blur. Name both views, ask how many sternum pieces your artist has healed, and plan for a possible touch-up.
26. Micro Dot-Work Blackbird Near the Thumb Base
Thumb-base placements face heavy friction from daily use, so dot-work needs spacing to age. Tell your artist to keep the design minimal and to expect a higher chance of touch-ups in year one. Sessions are quick but sensitivity is moderate. A common error is choosing dense dot patterns in an area that wears with hand use. For sessions, keep rings off and avoid tight gloves while the area heals.
27. Tiny Blackbird on the Outer Ankle with Branch Accent
A small branch accent grounds the ankle bird and reduces the sense of floating ink. Ask the artist to keep the branch low contrast so the bird silhouette reads cleanly over time. Sessions are short and ankle sensitivity varies. Mistakes to avoid include adding too many small leaf veins that blur with shoe friction. For showing it off, choose strappy ankle sandals and cropped trousers so the detail is visible.
Frequently Asked Questions
Q: Will a fine line dainty blackbird on my wrist need touch-ups sooner than a silhouette?
A: Fine line pieces often need touch-ups sooner because the thin strokes sit closer to the surface and can soften faster. If you want lower maintenance, ask for slightly heavier lineweight or a small silhouette fill. Placement matters too, and wrist skin gets more sun and friction than the upper arm.
Q: Is a red accent on a small blackbird worth the extra risk of color fade on darker skin tones?
A: A muted red accent can work on darker skin tones if the artist packs color carefully and keeps the accent small. Ask the artist for a test patch or a color placement mockup on your skin tone. Touch-ups for colored accents are common, but many people prefer the subtle pop anyway.
Q: How do I find a tattooist who understands fine line work without naming anyone directly?
A: Use discovery pathways like searching #daintyblackbirdtattoo and filtering portfolios on apps like Tattoodo, and check local studios on Google Maps for "fine line bird tattoo studio." Browse saved boards on Pinterest and look for healed photos, not just fresh work, to evaluate how their lines hold up over time.
Q: Will ribcage or sternum placement ruin fine line details faster than forearm placements?
A: Ribcage and sternum placements move more with breathing and have different skin tension than forearms, which can accelerate softening for ultra-fine lines. Some artists accept this and adjust spacing and depth, while others avoid ultra-fine approaches in those zones. Ask the artist their stance and request healed examples from similar placements.
Q: Any quick wardrobe tips for appointment day when getting a collarbone or shoulder bird?
A: Wear garments that give the artist clean access such as an off shoulder top or a loose button-down. Choose clothing you can pull aside without creating pressure on the fresh tattoo and avoid tight straps that might rub the area during healing.
