
Fine line name scripts are everywhere online right now, and the appeal is obvious: small, simple marks that read private and personal. The catch is they age differently across placements and skin types, and a fresh photo does not predict what the piece will look like after two years of sun, sleeves, and life. Read these 21 modern takes on kid tributes, with exact styling tips and things to ask before the stencil goes on.
1. Minimalist Child's Name in Cursive Script on the Wrist
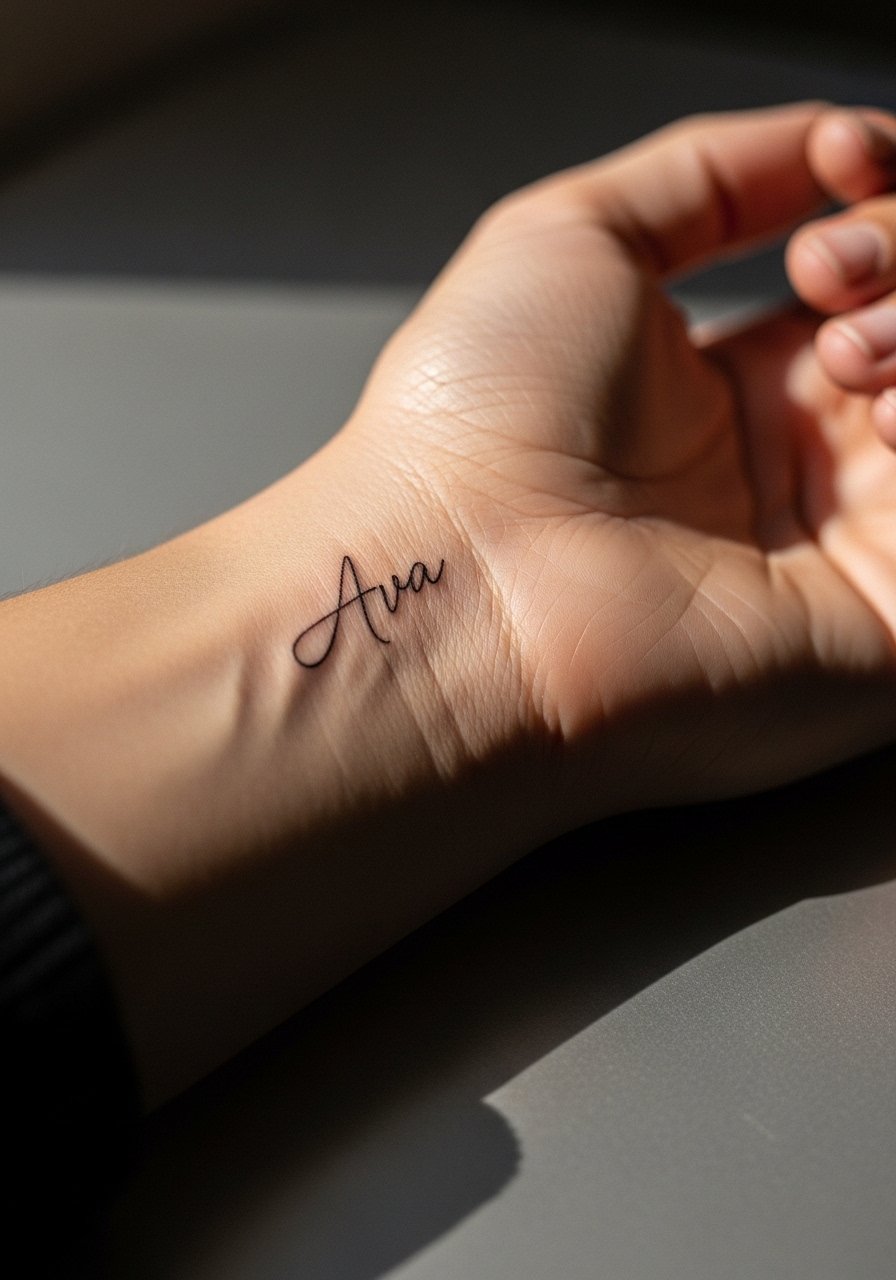
I recommend this when you want a quiet tribute that will be visible during daily moments. Mention to your artist that you want medium line weight and slightly increased letter spacing so the cursive keeps legibility over time. Common mistakes are asking for ultra-fine lines that look perfect fresh but soften into blurs after two years, and placing the name right over the wrist crease where movement shortens lifespan. The wrist is a 4 to 5 on most pain scales and usually takes a single quick session. Pair this with a thin chain bracelet on the opposite wrist when showing it off, and wear a sleeveless top or loose short sleeves to make the appointment easy.
2. Watercolor Baby Name with Pastel Blooms on the Forearm

Forearm space suits watercolor because there is room for soft spreads and touch-ups if colors settle too light. Tell your artist you prefer pastel washes with low saturation and a thin black outline to protect the lettering definition. Many watercolor pieces from years past look like bruises because pigments were placed too shallowly or too saturated for certain skin tones. Expect one to two sessions and a possible touch-up at year two. For casual show-off wear a rolled chambray button down shirt or pull sleeves up to frame the ink during warmer months.
3. Fine Line Feather with Name Along the Shaft on the Inner Arm
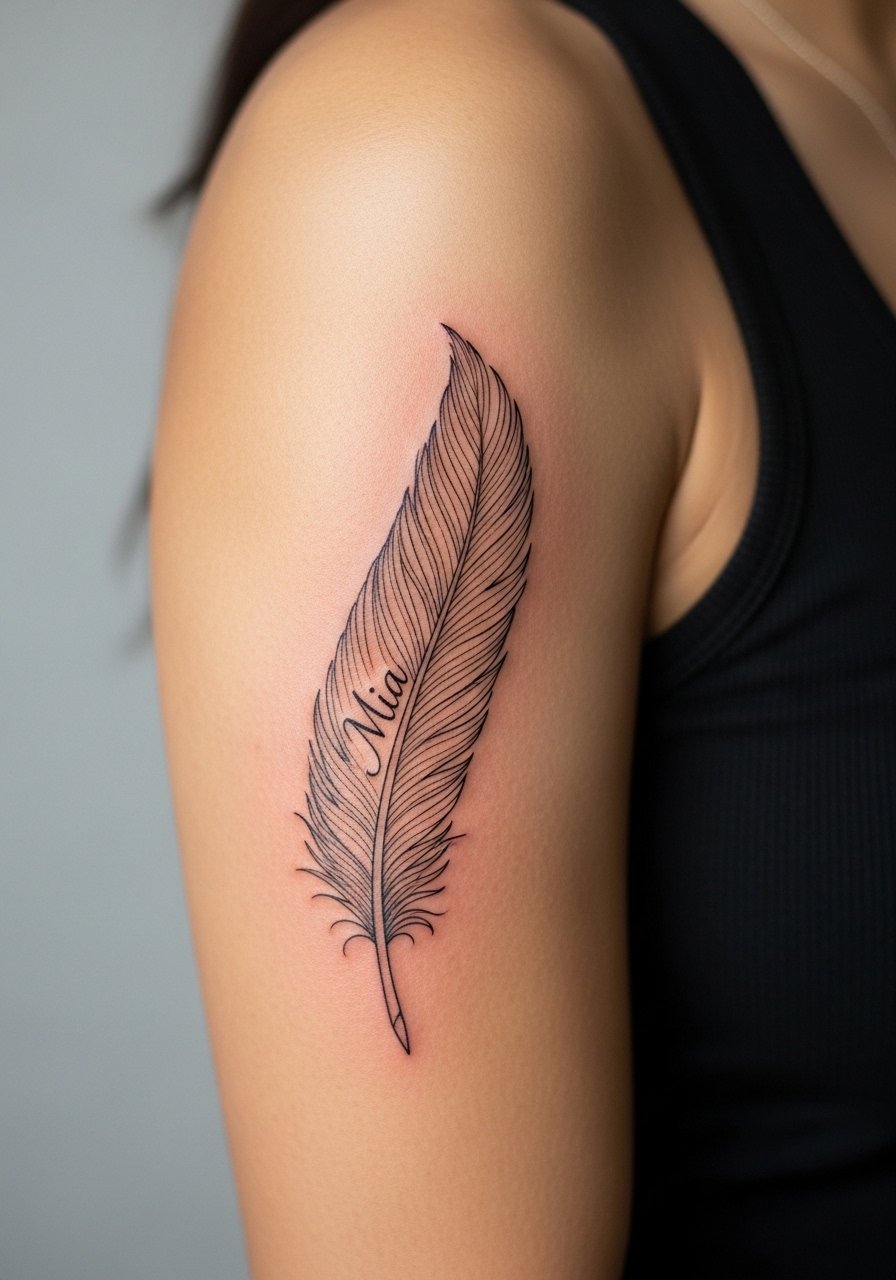
This is a strong choice if you want symbolism that reads as both shape and script. In consultation ask for slightly heavier stem lines and the name spaced so letters are not squeezed into the feather barbs. Artists split on fine line here. One camp warns that the inner arm stretches and blurs fine hairlines. The other camp says proper needle depth and spacing keep the detail stable. Be explicit with the artist about how they set depth and where they expect touch-ups. The inner arm is usually less painful than the ribcage but more tender than the outer arm. Pair with a delicate metal cuff when showing the piece, and for the session wear a loose button-down shirt you can pull slightly aside.
4. Circular Mandala Encircling Child's Initials on the Shoulder
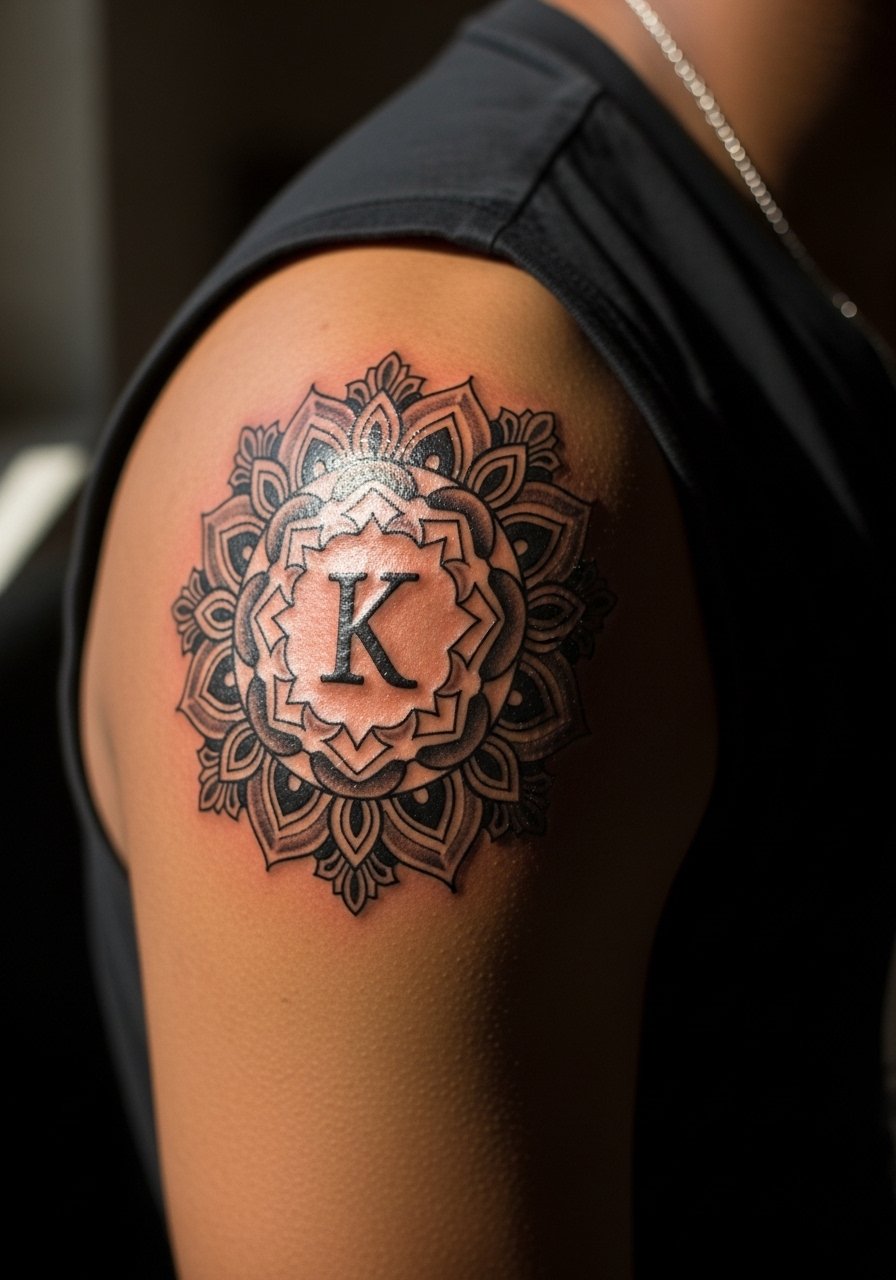
Choose this if you want the initials to feel framed and compact. Tell your artist you want open negative space in the mandala instead of dense linework so the pattern does not merge as it heals. A common ageing issue is drawing mandalas too tight with tiny details that run together after a few years. Shoulder placement is forgiving for touch-ups and usually photos well. Style this with a sleeveless olive tank or a thin-strap top to let the round shape show without competition. For the session, bring a shirt you can shift aside easily.
5. Minimalist Typography Name in Clean Font on the Ankle
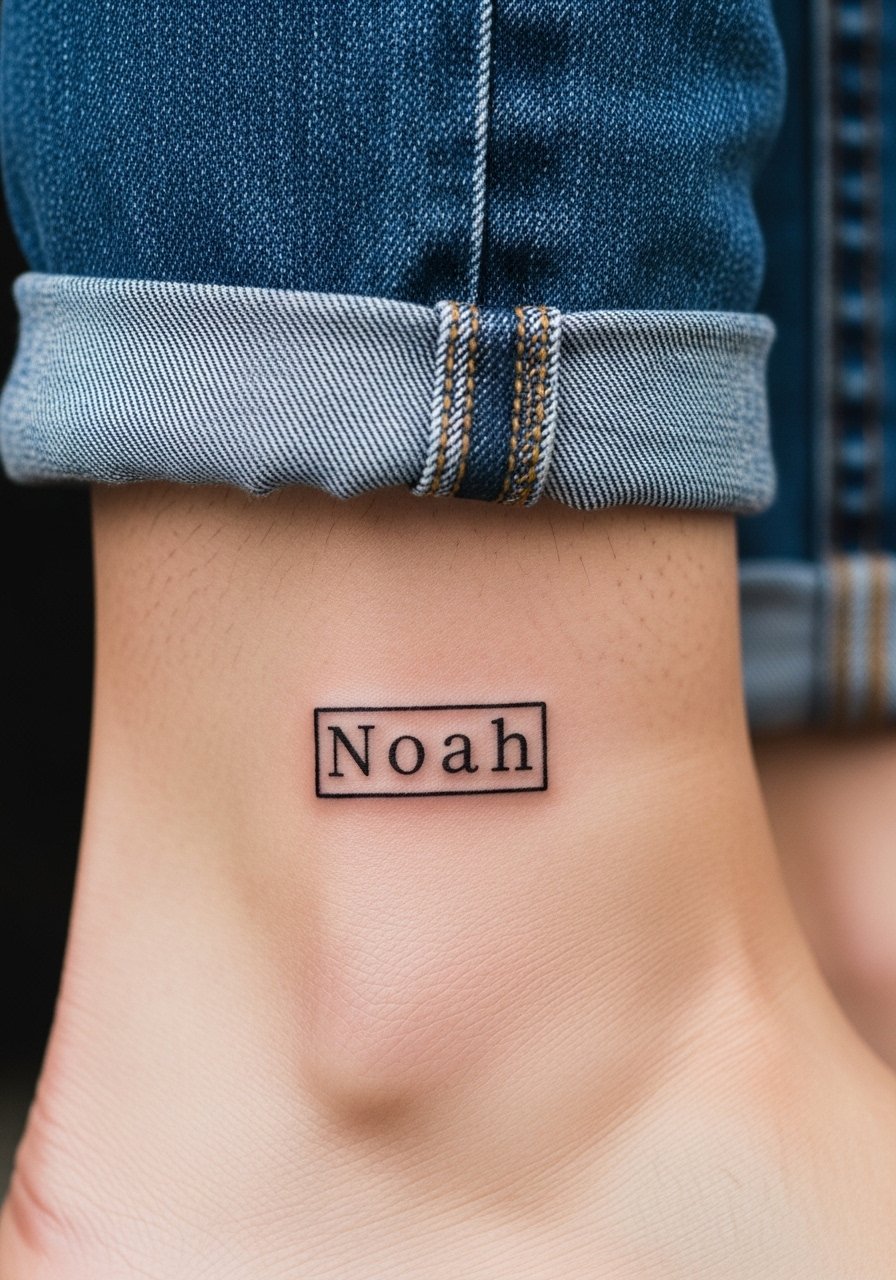
Ankle placements wear differently because of socks, shoes, and friction. Choose bold enough stroke weight so letters do not fade into gaps. People often pick tiny caps and then find letters break up with time. The ankle is a 3 to 4 on pain scales and can usually be done in one short session. For showing the design pair it with cuffed ankle jeans or minimal ankle strap sandals. For the session wear flat shoes you can easily remove and loose pants you can roll up.
6. Petals Forming Child's Name Letters on the Collarbone
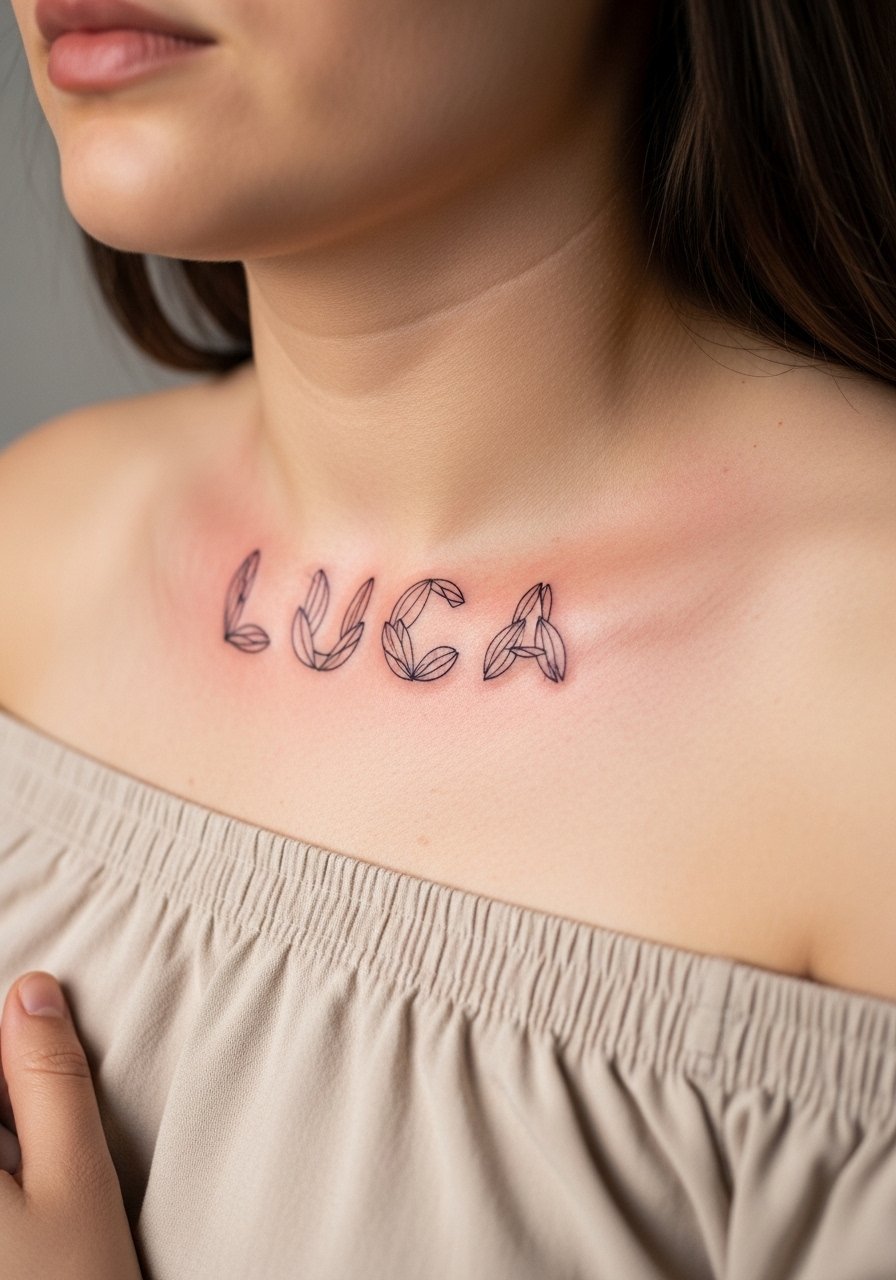
This hidden-letter trick reads playful and personal when placed at the collarbone. During consultation ask for each petal to act as a discrete letter but keep negative space so the whole word does not blur together. The collarbone is sensitive so expect a 5 to 7 pain level depending on depth of shading. A common mistake is overfilling color into tiny petals which then smudge into a blob. You can show this off with an off shoulder blouse or layer a thin chain pendant necklace that sits just above the script. For the session wear a strapless top or an open-neck shirt so the artist has clear access.
Pre-Session Essentials
The small wrist and collarbone pieces above heal differently from larger arm work, so a few specific items smooth the session and the first week.
-
Stencil transfer paper kit. Lets you preview the design placement on skin before the needle starts, which is useful for names and script-heavy designs in ideas above.
-
Topical numbing cream. Applied before the session can reduce discomfort for sensitive spots like the collarbone and inner arm.
-
Thin protective film roll. Helps protect small wrist and ankle tattoos from friction while the first scabs form.
-
Fragrance-free gentle body wash. Cleans without irritating delicate linework in the first week.
-
Aquaphor healing ointment. A thin layer in the very earliest days keeps fine line work from drying into tight flakes that pull ink.
7. Barcode-Style Child's Name on the Inner Forearm
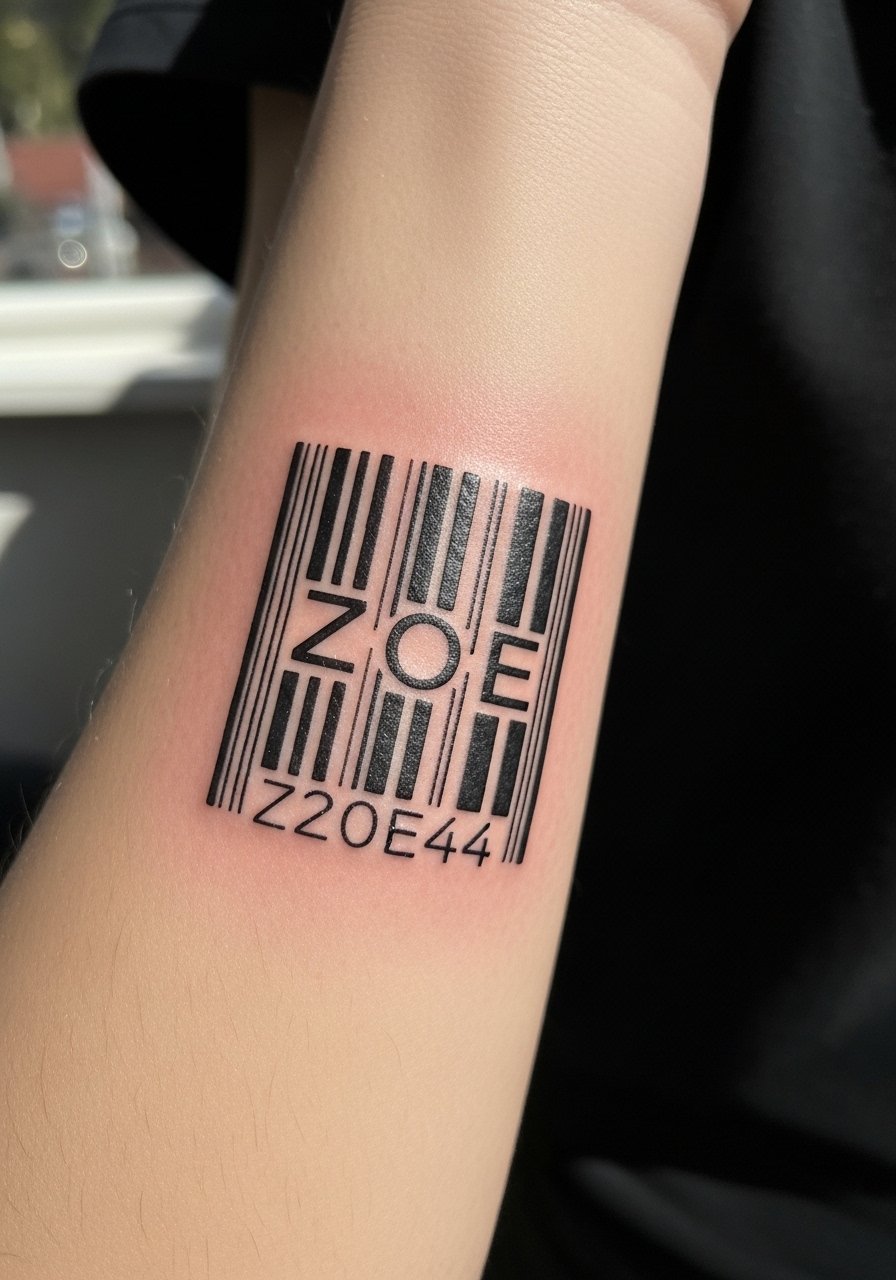
This takes a modern, tech-forward approach and reads bold from a distance. When you bring reference images, show the exact spacing you want so characters remain legible after healing. The biggest mistake is compressing letters into barcode stripes that become an indistinguishable block as ink spreads. The inner forearm is forgiving for touch-ups and usually requires a single session. For casual wear roll your sleeves up or try a chambray button down shirt to frame the linear look. In consultation ask how the artist will separate bars to avoid future merging.
8. Alphabet Blocks Spelling Child's Name on the Upper Arm

This playful approach nods to childhood toys while keeping the tribute literal. Choose slightly larger blocks and solid outlines so letters remain readable after a few years. A typical regret is squishing the blocks too small to keep the charm but losing separation as the skin moves. Upper arm work takes two sessions for medium detail and is a lower-pain area. It shows well with a sleeveless tee or a thin strap top. Ask the artist about saturation and edge sharpness if you want the colors to age steadily.
9. Angel Silhouette with Birthdate on the Upper Back
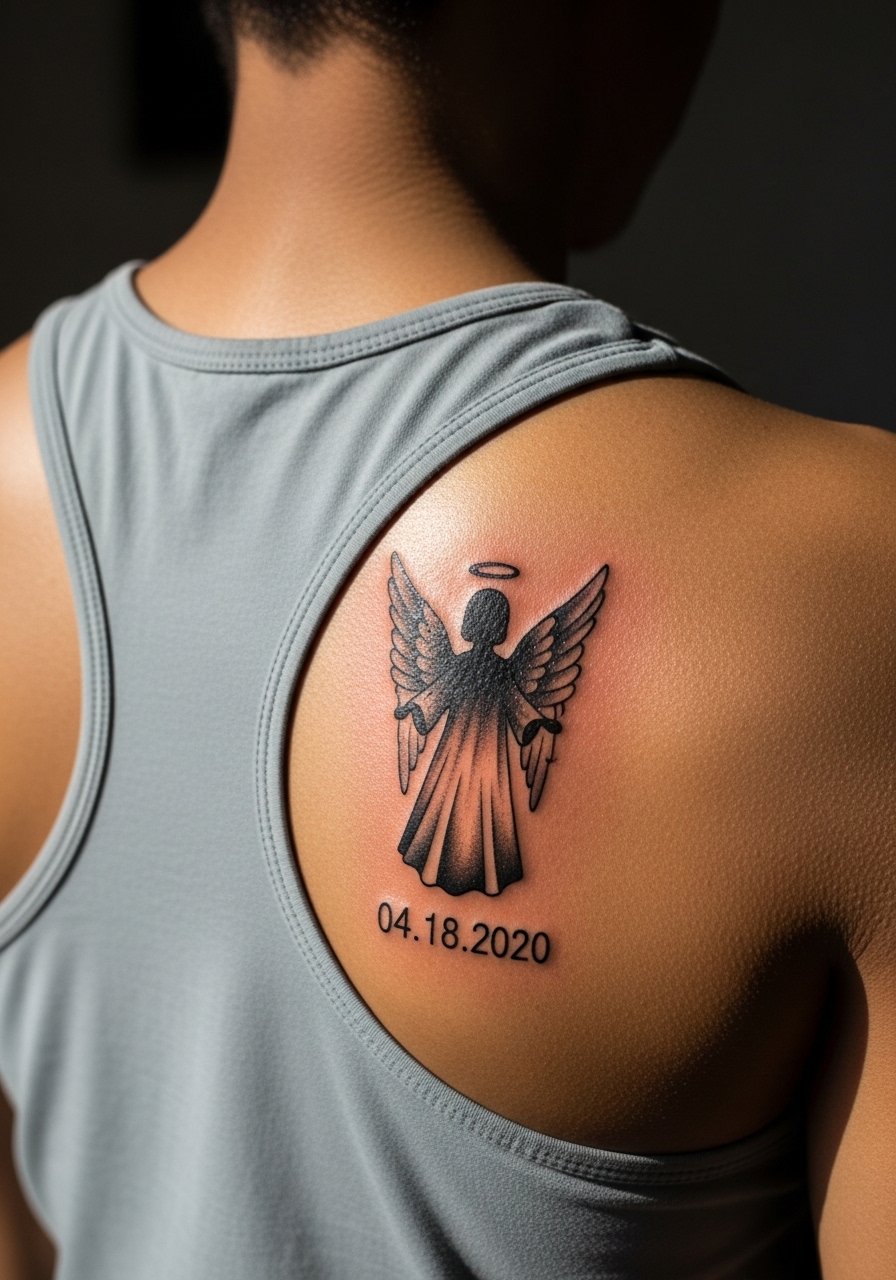
This design often serves as a memorial or a quiet dedication and reads strongly at a medium size. Tell the artist where you want the birthdate placed exactly and request bold silhouette edges to avoid softening into gray fields. The common mistake is tiny dates that become unreadable. Back placement can require multiple sessions and is a 4 to 6 on pain scales for larger pieces. Show it off with a racerback tank top or a low-back dress. For placement decisions, ask how the curve of your shoulder blades will affect the silhouette.
10. Graffiti-Style Child's Name on the Calf
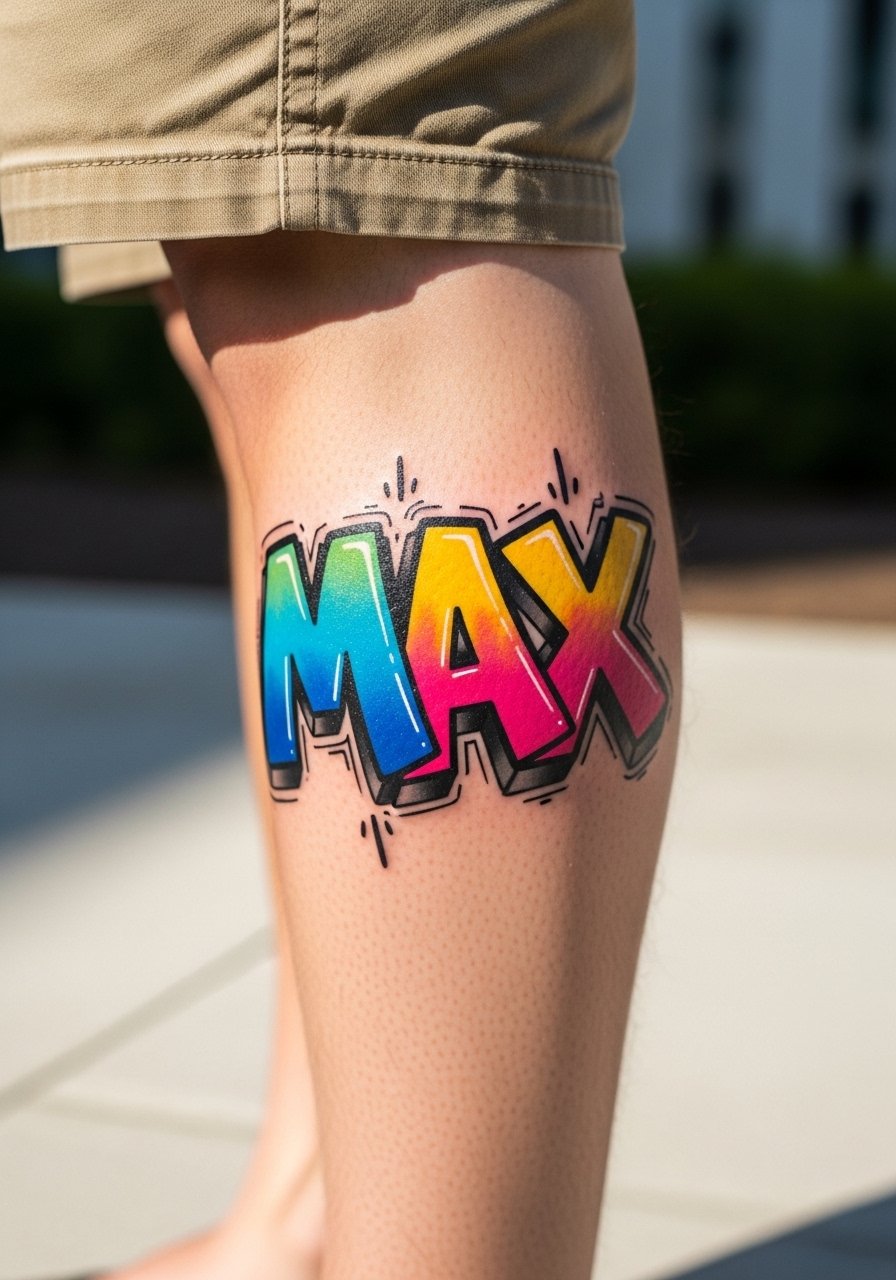
Pick this if you want energy and street-inspired personality. Bring references showing the exact letter distortion you like and confirm the color blocking will rely on solid outlines to protect the fills. The usual regret is chasing micro details in graffiti lettering that do not read on moving skin. Calf tattoos tolerate bold color and are low to moderate pain, usually one session. Pair with cropped pants or shorts for casual display. Ask about how the design will look from a few feet away so scale reads correctly.
11. Tiny Constellation with Child's Initial on the Finger
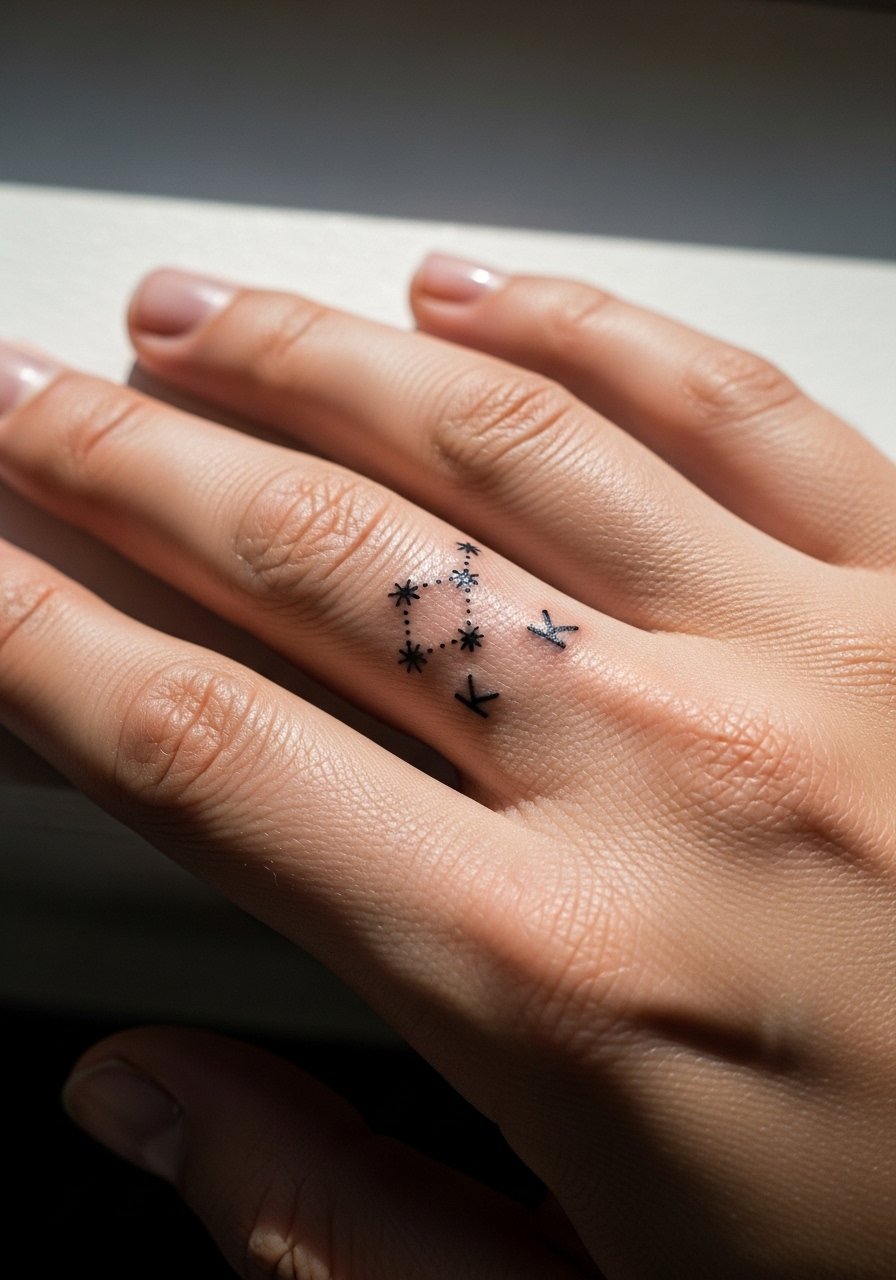
Finger tattoos are intimate but exposed to heavy wear that accelerates fading. If you choose this, request slightly bolder dots and connecting lines than the thinnest option so the constellation survives frequent washing. A common mistake is picking ultra-fine dots which disappear within months. Fingers often need touch-ups yearly and can be a rapid fade zone compared to the forearm. Style advice is minimal because the area is small, but simple rings or thin band bracelets on the opposite hand complement the look. During the session expect short stinging intervals and plan for a follow-up if letters blur.
12. Micro-Realism Animal Silhouette with a Tiny Name on the Thigh

Thigh placements let you keep size and detail that other spots cannot. Ask for a test stencil at scale so the animal reads as an animal and not a shape. The error to avoid is cramming too much micro shading into a very small area which later fades into an unrecognizable smudge. The upper thigh wears well and is lower on the pain scale; it is also easy to hide during work or travel. For session wear pick loose shorts or a skirt so the artist can access the zone cleanly. Expect one session for micro-realism pieces and a potential touch-up after six months.
13. Geometric Heart with Child's Initial on the Sternum
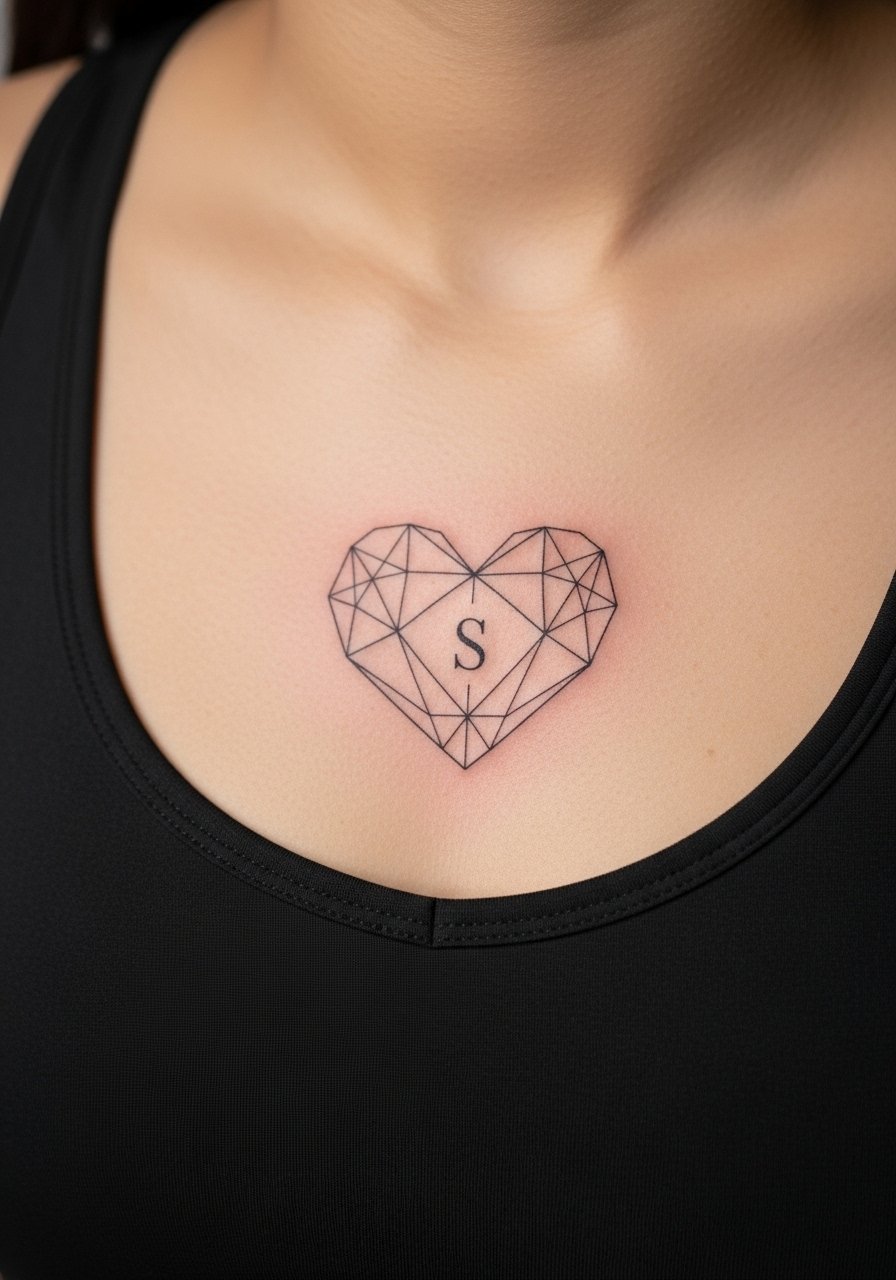
Sternum pieces are high on the sensitivity scale but show beautifully under neckline clothing. If you want lines to remain crisp, ask for slightly increased spacing inside the geometry so shading does not merge. There is an active debate among artists about fine line density on the sternum. One camp warns the area flexes and compresses and will soften lines faster. The other camp says choosing the right spacing and depth keeps the geometry sharp. Be clear in the consultation which side they are on. Expect stronger sensation during the session and plan clothing accordingly. Wear a fitted sports bra to the appointment.
14. Tiny Botanical Sprig Behind the Ear
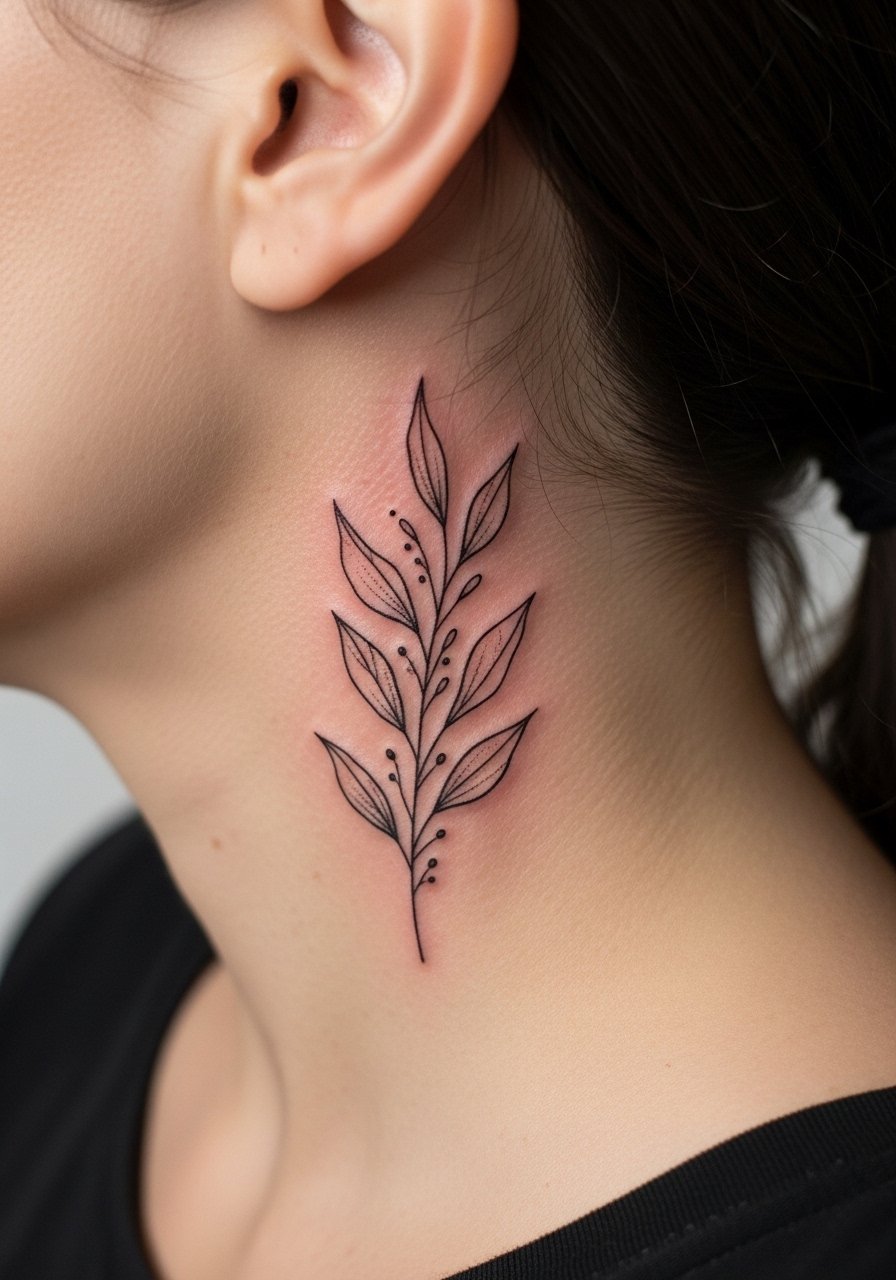
Behind-the-ear placements are discreet and subtle, and they suit tiny motifs like a sprig. Request that the artist place the design slightly lower than the hairline so daily hair movement does not rub the fresh area. The usual mistake is underestimating how often hair oils touch the area which can affect early healing. This spot is low to moderate on pain and prone to faster fading because of frequent handling and hair contact. Keep aftercare careful in the first week and expect a touch-up sooner than for forearm work. Discover this style through tags like #babynametattoo when searching.
15. Stitched Heart Name Tag on the Upper Chest
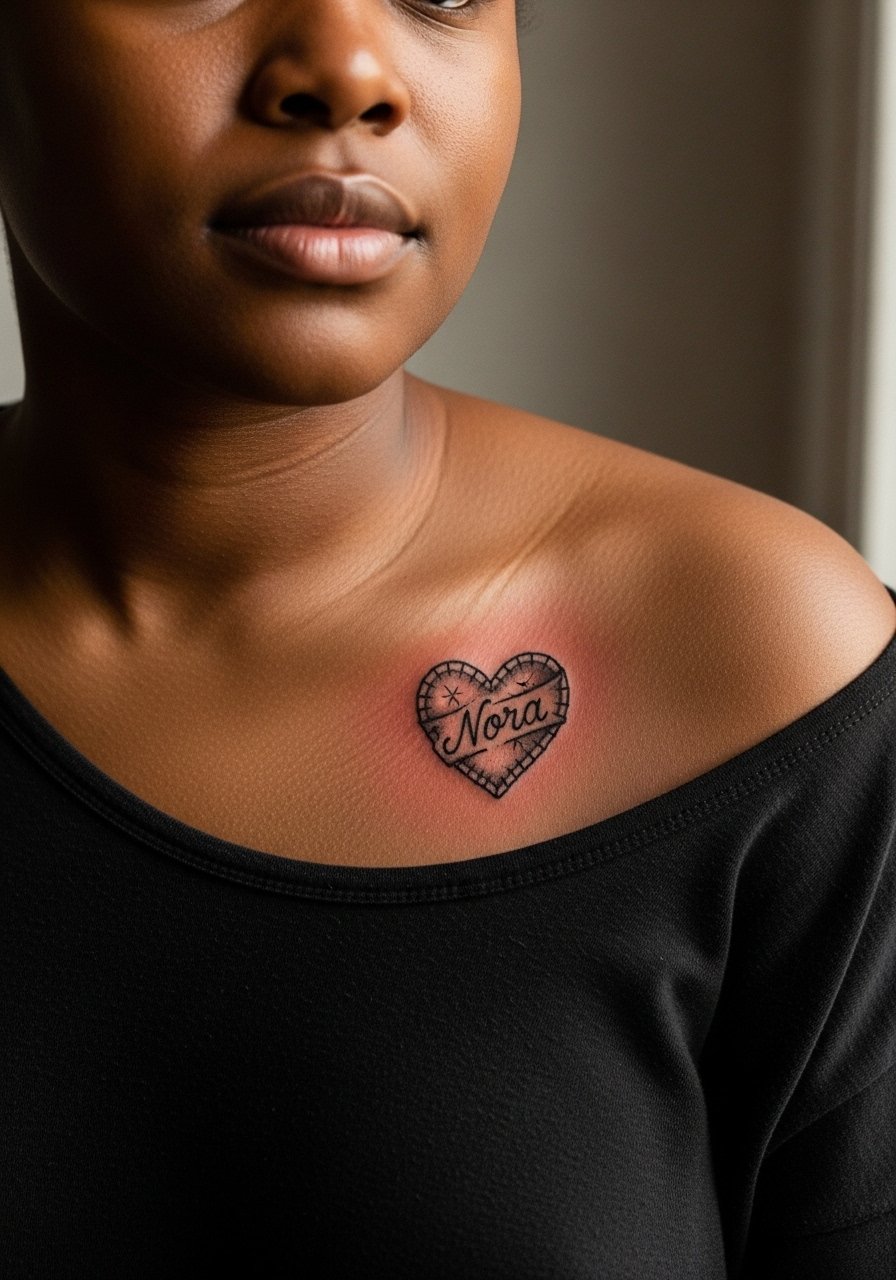
This is a modern, slightly kitschy option that reads like a little patch you might find on kids' clothing. Tell the artist you want visible stitch lines and a modest drop shadow to keep the patch readable as it ages. The most common error is making the shadow too soft which blurs with time. Upper chest placements need careful positioning to avoid the collarbone intercepting the design. The session can be a bit more tender and may need touch-ups depending on sun exposure. For showing the piece, a wide-neck shirt that pulls slightly aside highlights the area without exposing more skin than intended.
16. Minimal Outline Animal Paw with Tiny Initial on the Ankle Bone
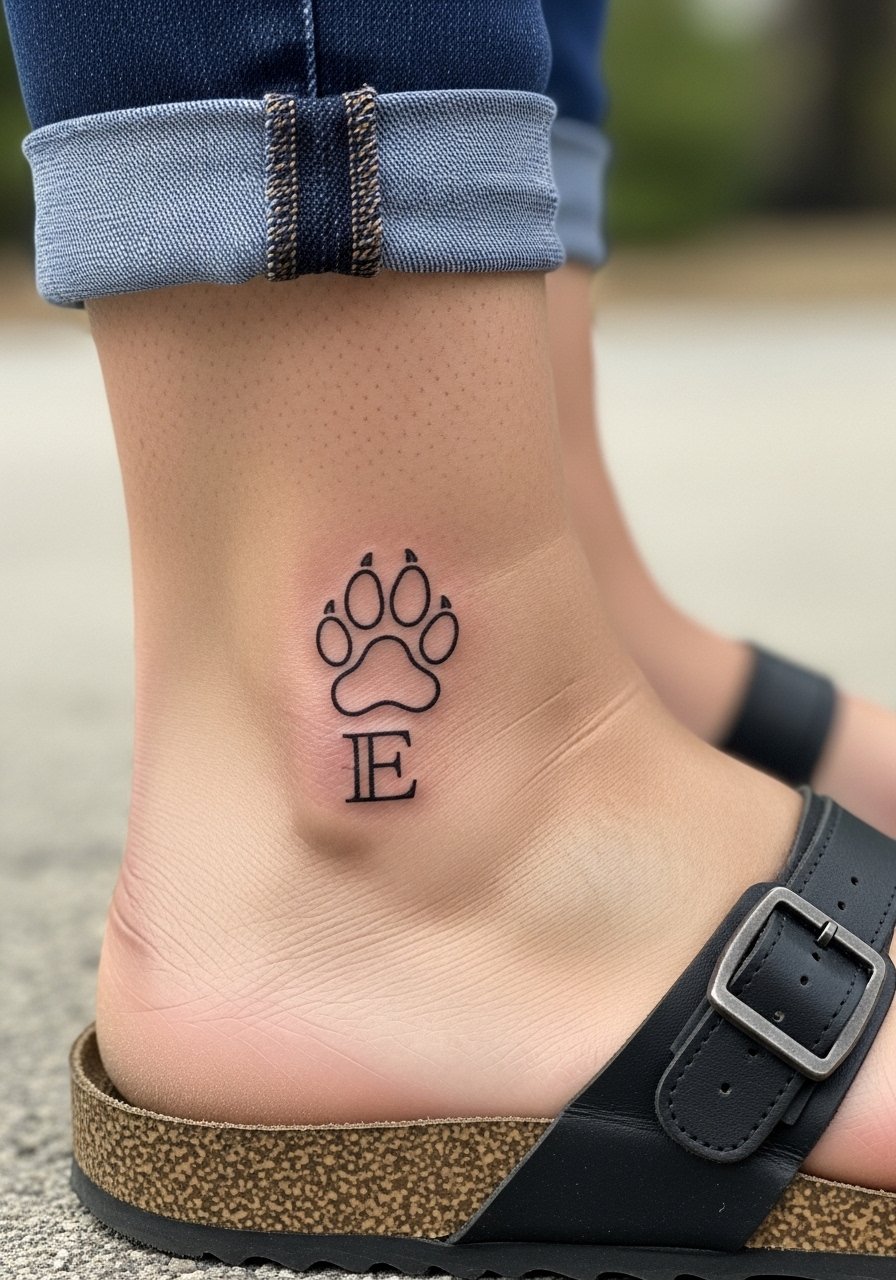
Paw prints are simple and hold sentimental weight without extra wording. Ask for slightly thicker outlines to resist early fading from shoe rubbing and socks. A common mistake is placing the print where shoe collars constantly rub, which speeds smoothing and pigment loss. The ankle bone is low to moderate pain and often requires only a short session. Pair with cuffed pants or linen wide leg pants for casual visibility. Plan for the possibility of a touch-up after repeated wear from footwear.
17. Script Wrapped Around a Small Infinity Symbol on the Finger Side
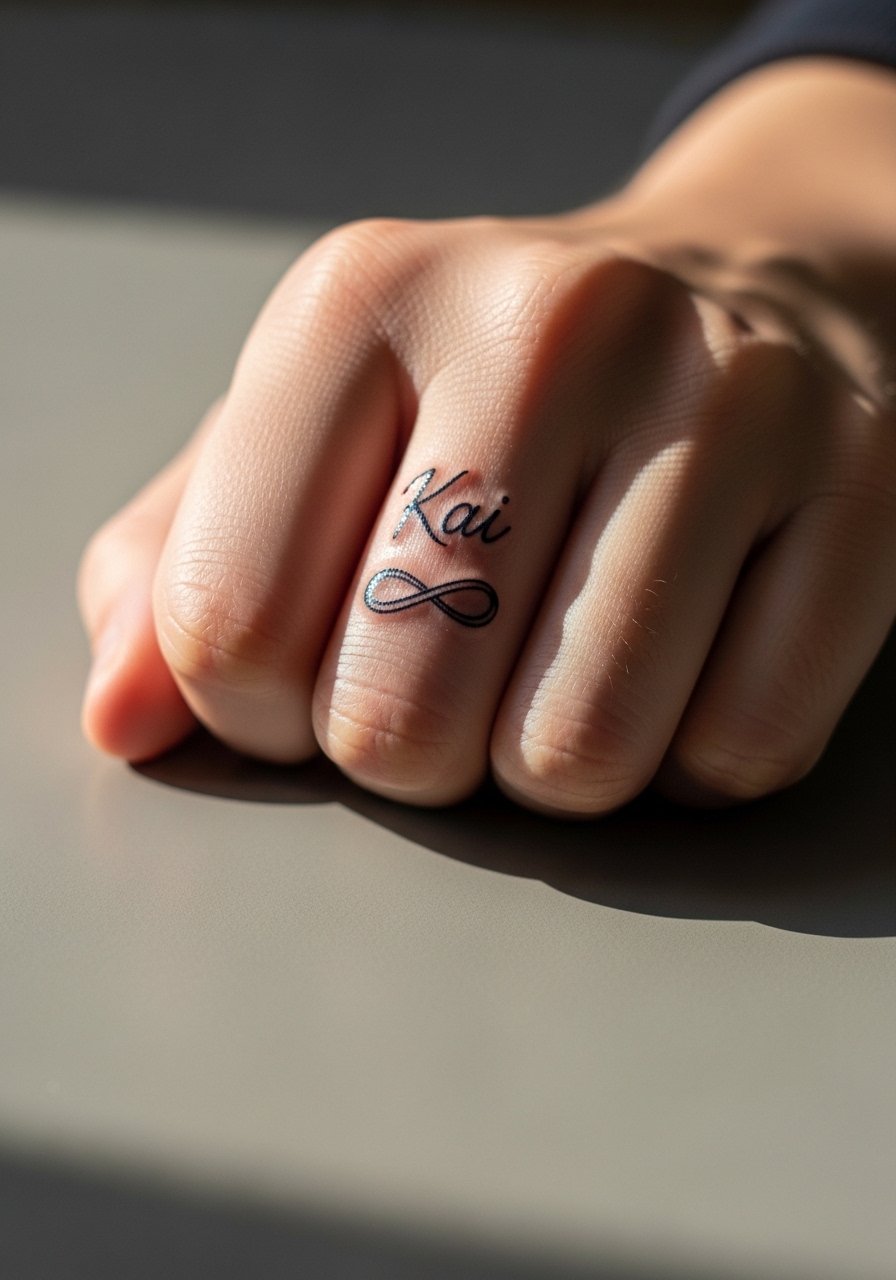
Finger-side scripts are intimate and discreet but face high friction which shortens clarity. Ask for slightly bolded script lines and a simple knot in the infinity so the central point holds up. The major error is requesting hairline script that washes out within months. Fingers usually need touch-ups more often, sometimes yearly. Keep expectations realistic for longevity. Minimal rings on the opposite hand highlight the piece without overwhelm. The session is short but sharp.
18. Small Sailboat with Name on the Outer Calf
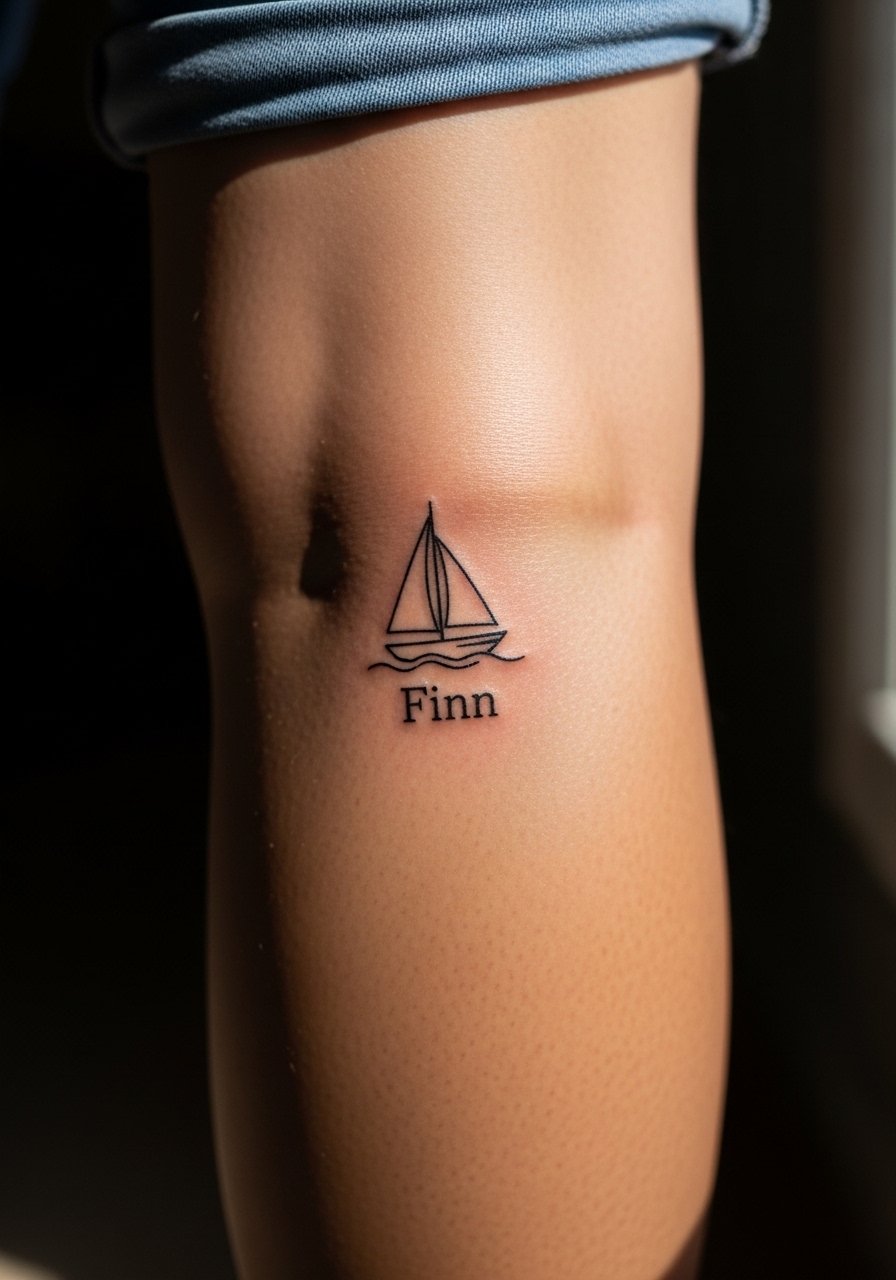
Outer calf work takes movement well and tolerates bold black outlines and modest color fills. For clarity over time ask for solid outlines and avoid micro shading inside the sails. Some people pack too much fine shading into the boat and then find it looks muddy as it settles. Calf sessions are comfortable and usually one sitting. Pair with shorts or cropped trousers when you want to show the piece. This placement is straightforward for future expansion into larger leg work if you decide on a family sleeve later.
19. Tiny Script on the Collar of the Neck
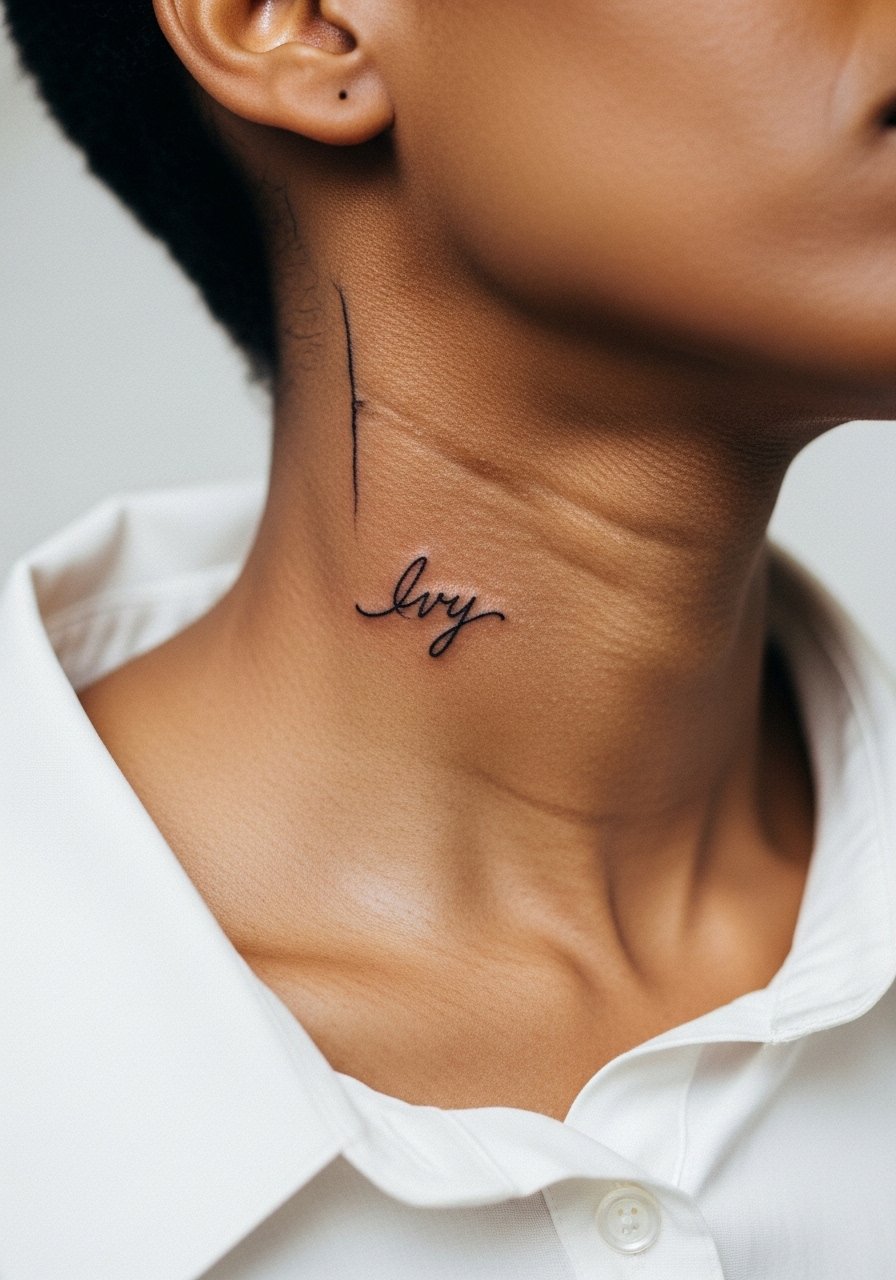
Neck placements are visible and can affect professional considerations, so weigh exposure before booking. If you choose this, request modest scale and ask how the artist spaces letters to account for neck movement. The two camps disagree about neck fine line resilience. One camp says constant movement and sun exposure accelerate blurring. The other maintains that with correct depth and aftercare it can remain crisp for years. Both sides agree to expect earlier touch-ups than forearm work. Wear a wide-neck shirt to show it off or hide it. The session can be more painful than the forearm.
20. Tiny Watercolor Footprint on the Top of the Foot
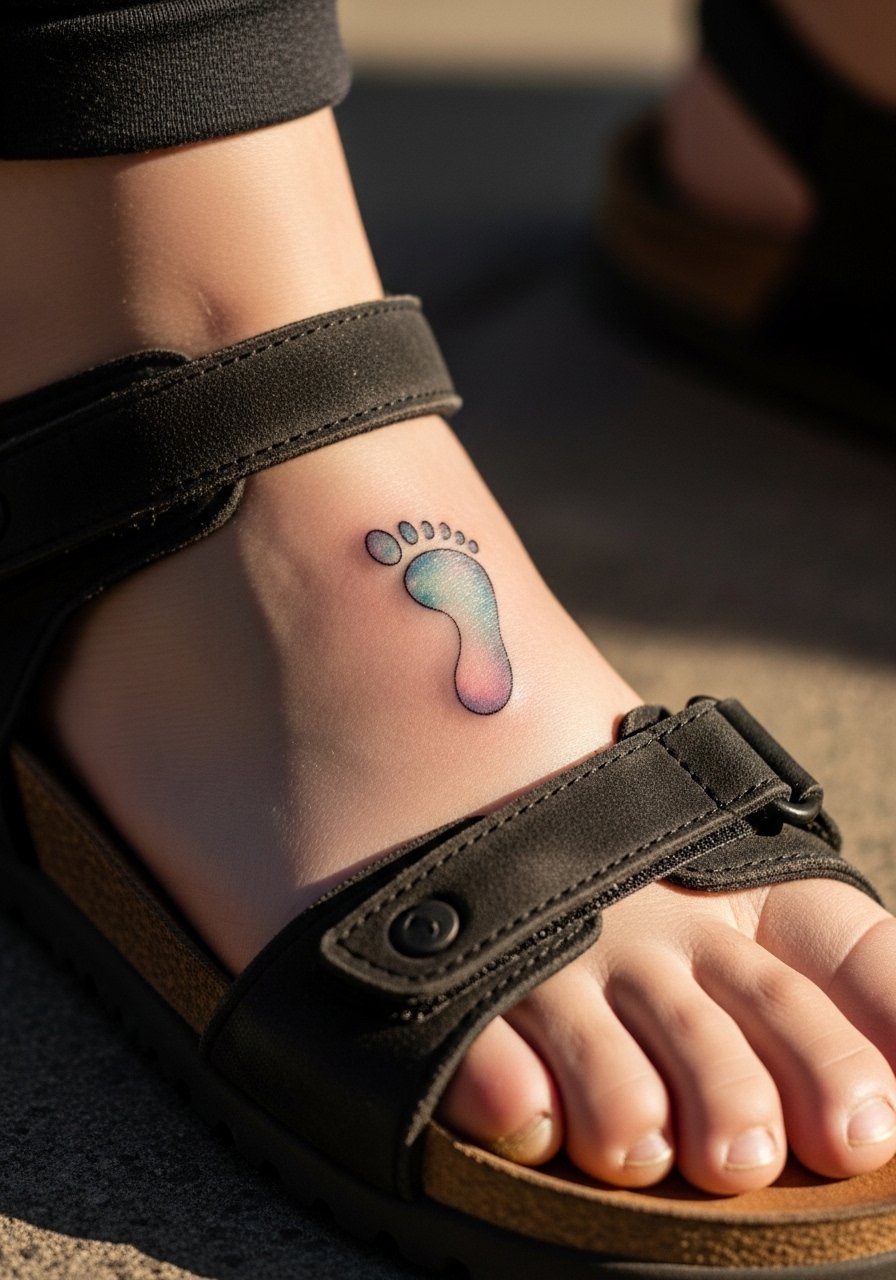
Foot tattoos sit in a tough wear zone because shoes and socks constantly touch them. If you want watercolor here, ask for a protective outline and plan for faster fading. The common mistake is trusting full washes without anchor lines which then blur into a stain-like patch. Foot pieces can be painful and often need touch-ups after the first year. For showing the piece pick sandals or roll pants up during warmer months. During the session keep footwear easy to remove and wear comfortable shoes for the trip home.
21. Full Family Portrait Silhouettes Across the Back
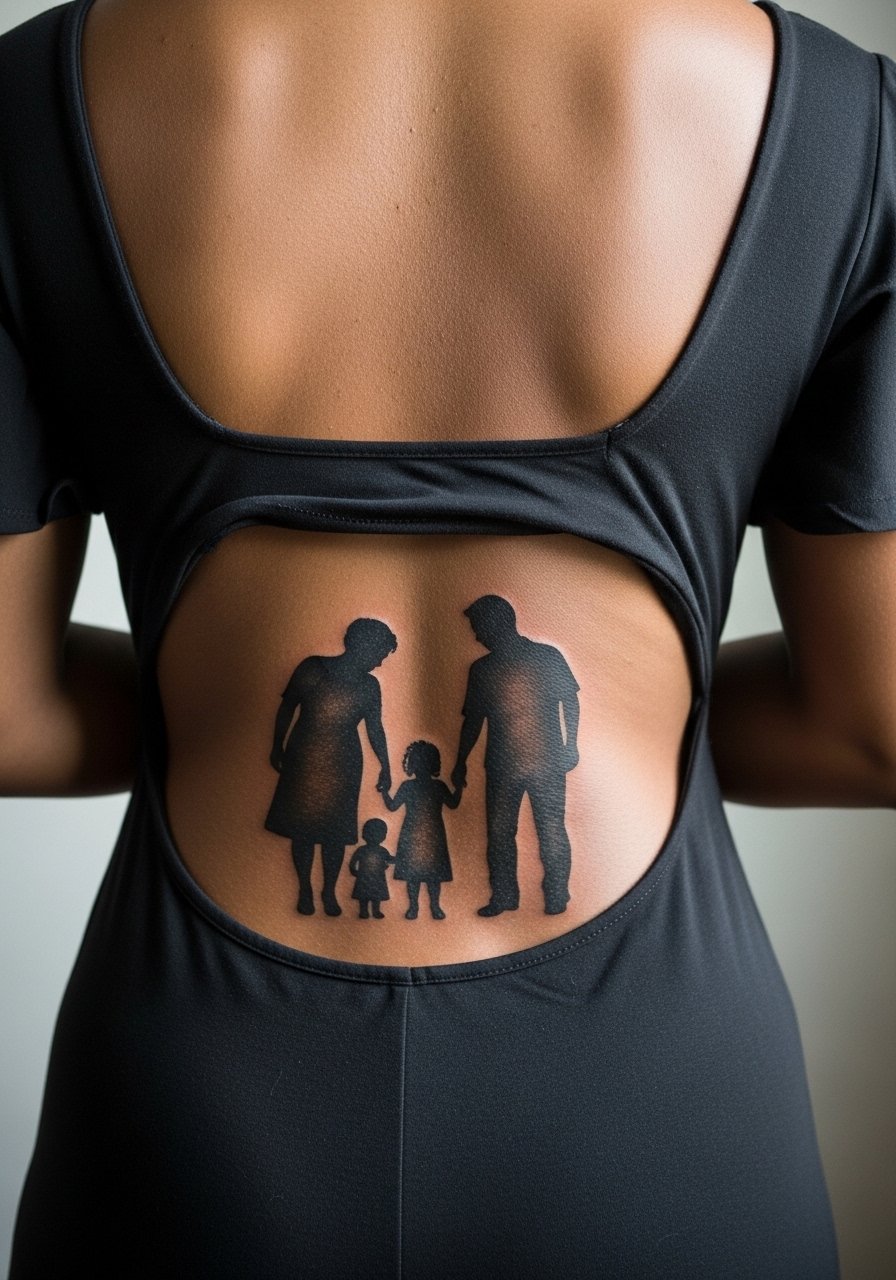
This is the largest commitment on the list and the one best for people wanting a single, cohesive family statement. Ask for a drawn mock-up that positions each silhouette at scale and confirms negative space around each figure to prevent merging. The biggest mistake is compressing many figures into too small an area which loses individual shapes over time. Full back work runs multiple sessions and is higher on pain scales. For showing the piece consider low-back dresses or racerback tops. Plan the timeline with your shop because larger blackwork needs several sittings and staged healing.
Frequently Asked Questions
Q: Will fine line name tattoos blur faster than bold script on the wrist and collarbone?
A: Fine line tends to soften faster on high-motion or high-exposure zones like the wrist. On the collarbone it depends on how dense the lines are and whether the artist leaves breathing room between letters. Expect touch-ups earlier with the finest work, and ask your artist to show healed examples on similar placements.
Q: Do watercolor-style names need different session prep or clothing than black ink pieces?
A: Watercolor often requires slightly longer sessions for layering and settling. For forearm and foot watercolors wear loose clothing that exposes the area cleanly, like a rolled chambray button down shirt for the forearm or sandals for foot work. The main difference is how color sits shallowly and may need a touch-up for saturation.
Q: How should I ask my artist about future touch-ups when booking a child-name tattoo?
A: Say directly that you want a touch-up timeline included in the consultation. Ask how long they expect lines or color to hold in that placement and whether they offer a complimentary or paid touch-up window. Specific questions like that reveal realistic expectations faster than vague statements.
Q: Are there placements I should avoid if I want the name to remain crisp for many years?
A: High-friction areas such as fingers, palms, and some parts of the feet fade fastest. Wrists and ankles also wear quickly if the lines are ultra-fine. If longevity is the top priority pick lower-friction sites like the upper arm or shoulder and ask for slightly heavier linework at the start.
Q: For memorial pieces like angel silhouettes, how do I keep dates or tiny text readable on a back or chest piece?
A: Request modestly sized numerals with clear spacing and ask the artist to avoid tiny serif details. Place dates beneath a silhouette in a spot with flat surface area, and consider a bolder small font rather than micro script. Large black silhouettes with simple date blocks usually age better.
Q: What's the best way to discover artists who specialize in these modern kid-tribute styles without naming specific studios?
A: Use style-specific hashtags such as #babynametattoo or #minimalistnametattoo, search tattoo directories for "family name" filters, and scan Reddit threads for recent consultation stories. Apps that list booking options can also filter by specialty so you can compare healed photos and client notes.
