
Not every small black and red tattoo that looks flawless on a phone screen holds up after a year. Fading, surprise pricing, and red not popping on darker skin are complaints I hear at consultations more than you might think. The list below balances what actually lasts with small-scale designs that still read loud, plus the practical notes to bring to your booking and the wardrobe tricks that help them sing.
1. Black and Red Rose on the Forearm
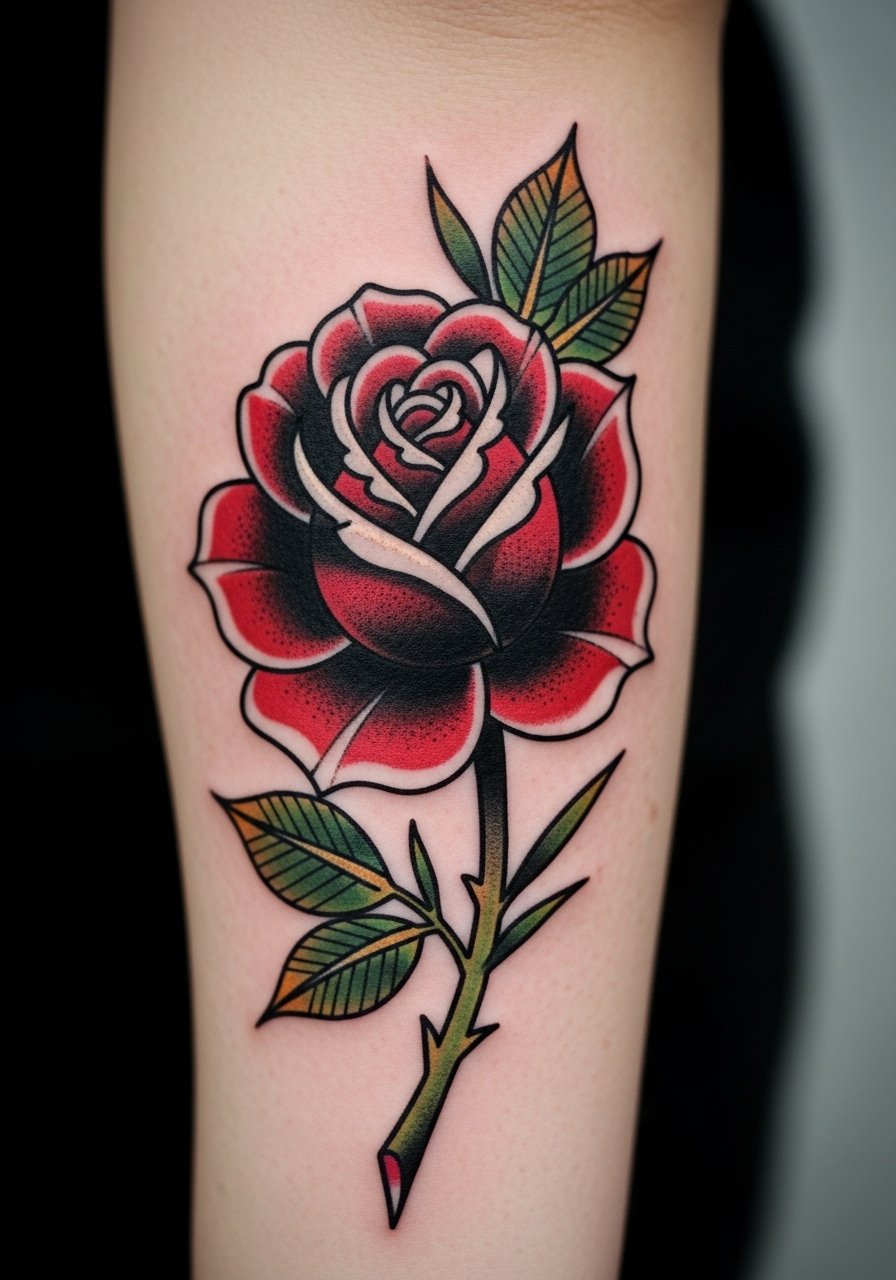
I recommend this if you want something readable across seasons and in photos. Tell your artist you want thick linework around the petals and heavy saturation on the red so the color sits in the dermis rather than feathering out. A common mistake is asking for ultra-fine veins in a 2-inch rose, which tends to fade into fuzz by year three. Expect a one-session piece that feels like a 3 out of 10 on most pain charts for the forearm. For showing it off, roll a sleeve or wear a rolled sleeve denim shirt so the red petals sit against a neutral cuff and read clearly.
2. Minimalist Red Heart Filled Black on the Wrist
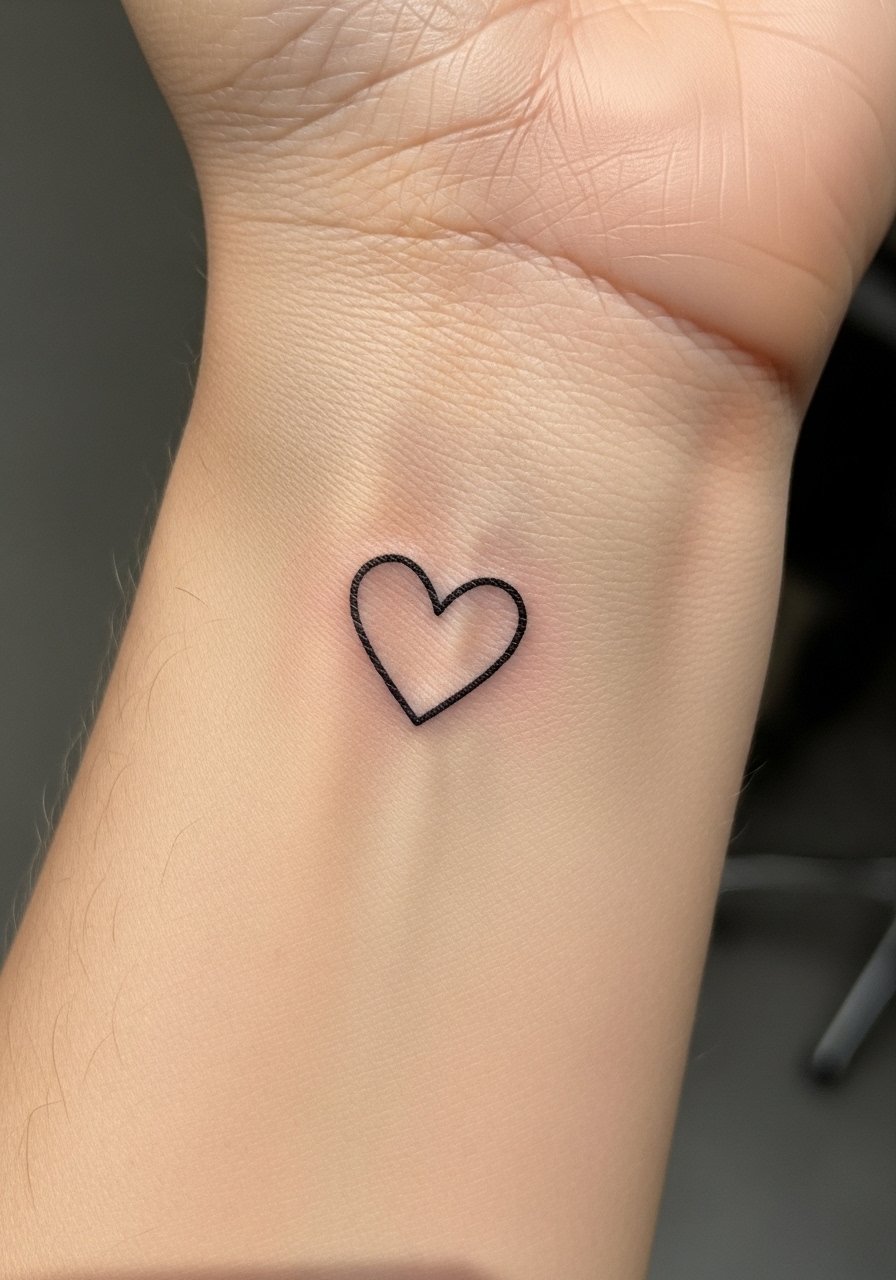
This one is a safe first tattoo for many people because it reads simple and personal. Bring a reference that shows the exact fill density you want and ask for slightly thicker outline weight than the digital file. The wrist sees frequent washing and friction, so expect touch-ups around year one to two for the red fill. The session is quick and the pain is mild to moderate. Pair it with a thin silver cuff that sits opposite the tattoo to frame the look and avoid crowding the ink by removing bracelets during healing. Try a thin silver cuff bracelet when you want to highlight the wrist in public.
3. Geometric Wolf Head with Red Eyes on the Shoulder
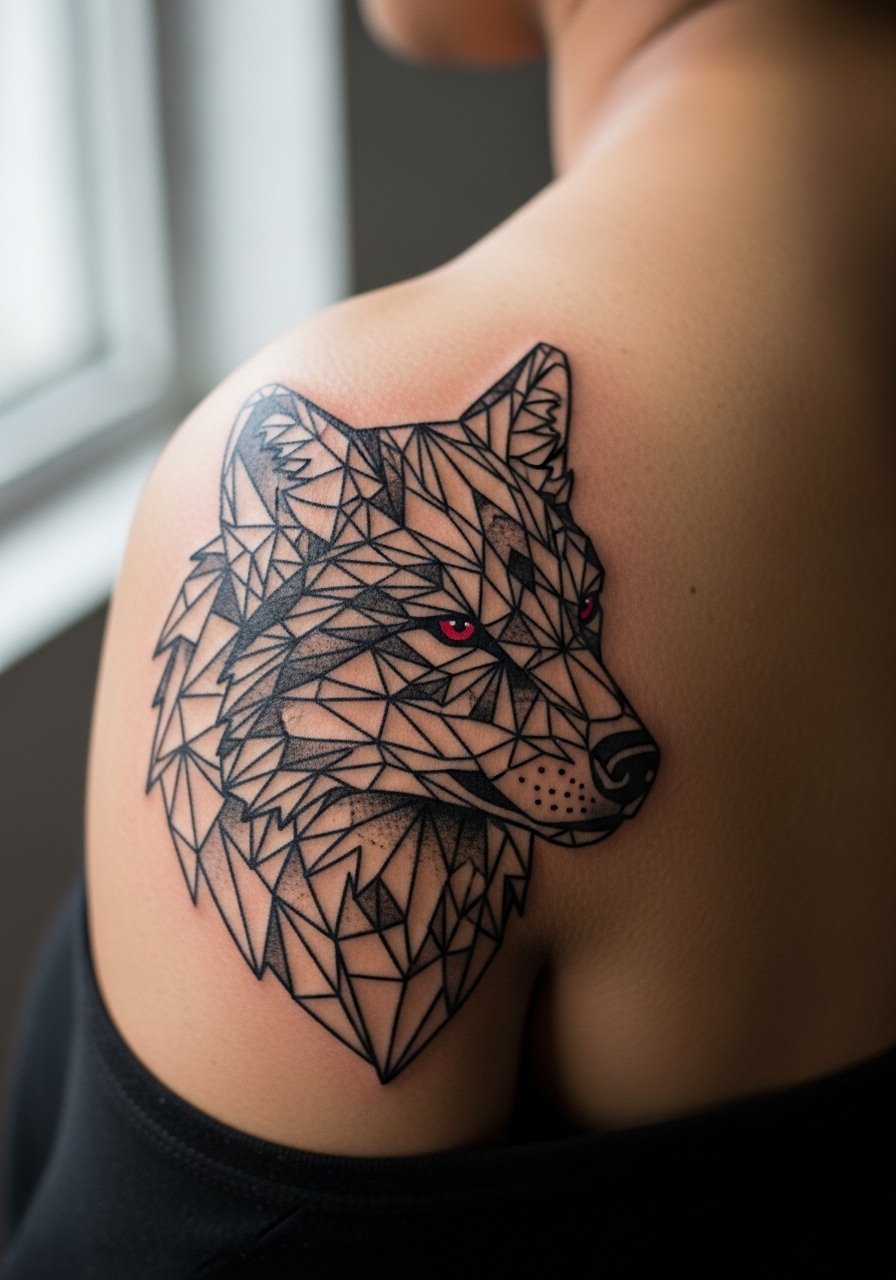
I pick this when someone wants fierceness without a full animal sleeve. Ask for clear negative space in the geometry so dense areas do not merge as they age. The shoulder gives room for 3 inches to breathe, so the linework holds better than on a tighter canvas. Expect the session to feel moderate and last under two hours for a small piece. For showing it off, an off-shoulder top in gray or white creates a clean frame. Slip into an off shoulder top on reveal days and wear a loose button down shirt to the session so the shoulder is easy to access.
4. Watercolor Red Dragon Outline on the Thigh
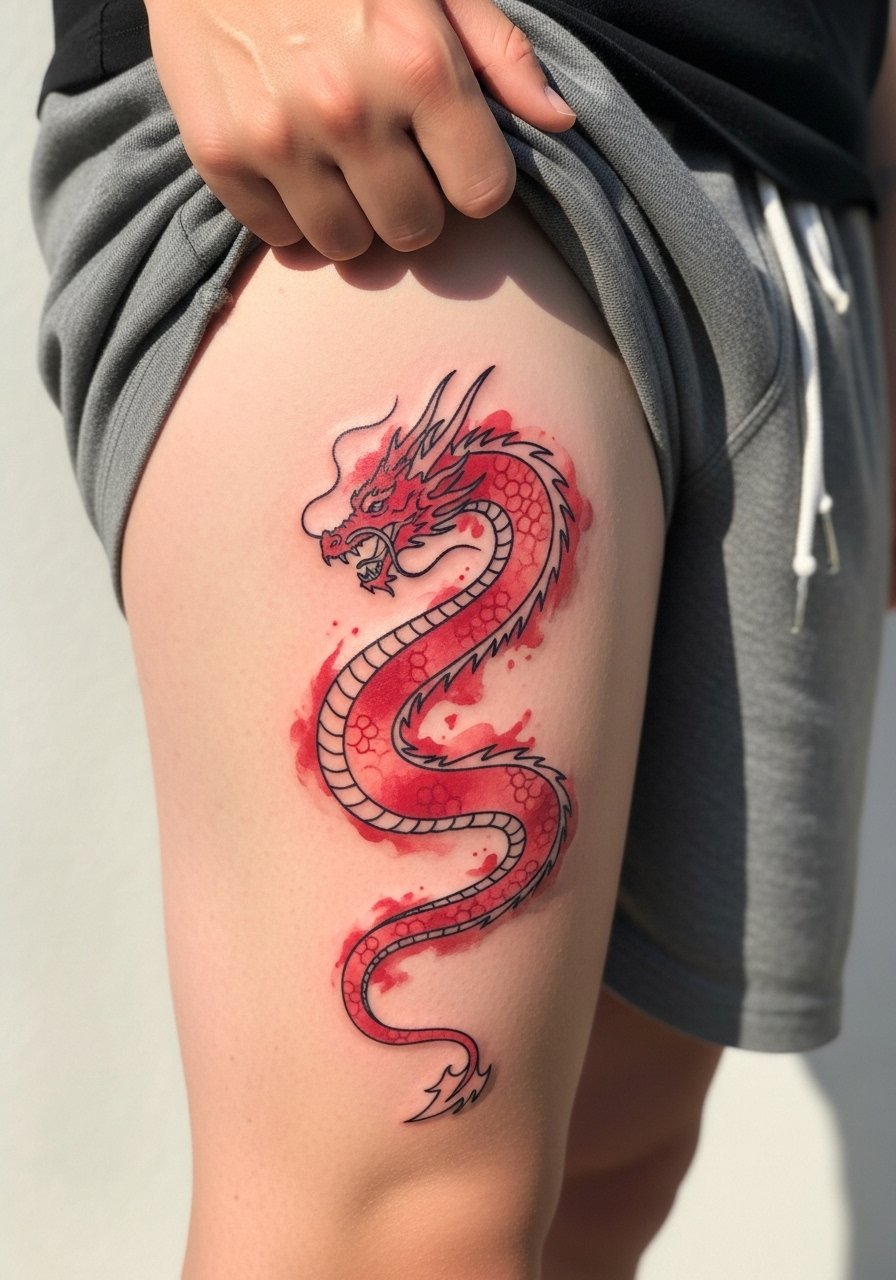
Watercolor techniques look amazing fresh but can fade faster when red is used in soft washes. Artists are split on this point. One camp says watercolor reds will lose vibrancy within a couple of years and need routine touch-ups. The opposing camp argues that careful saturation and layered red fades can hold longer if placed on fleshier areas like the thigh. If you want the look with longer life, ask for a black outline to anchor the red washes and deeper saturation where the shade needs to read bold in photos. Thigh sessions are comfortable and absorb ink well. For sessions, wear loose shorts so the artist can reach the area without pulling at clothing.
5. Traditional Black Anchor with Red Rope on the Ankle
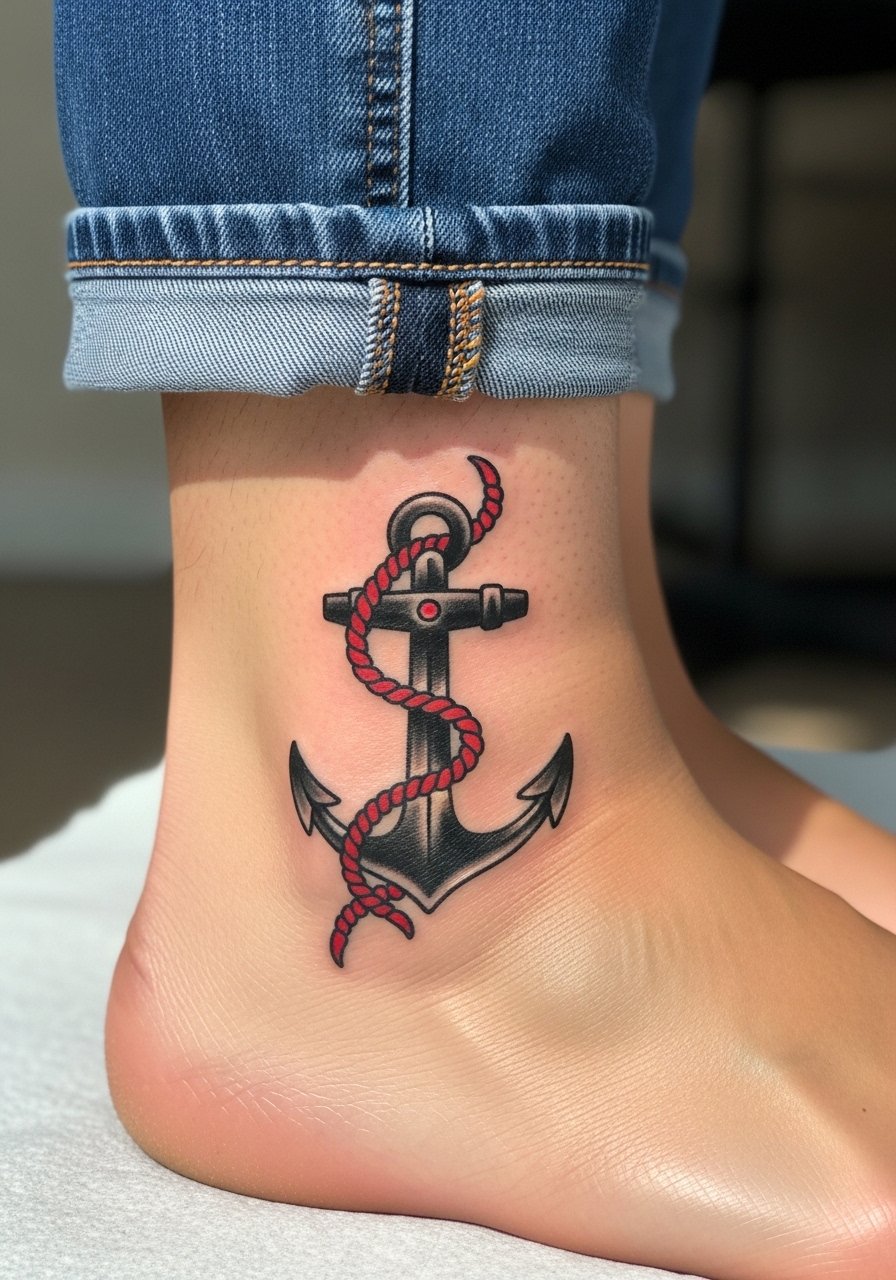
Ankle work is compact and shows clearly in summer footwear. For longevity, ask for slightly bolder linework than the tattoo flash usually suggests. The main mistake is shrinking down a complex anchor to an inch in height, which makes the rope detail blur after healing. Ankle pain varies but many report a 4 to 6 out of 10. This placement pairs well with cuffed chinos or cropped pants that stop just above the ink. Try styling with cuffed chino pants to let the red rope peek during warm months.
6. Fine Line Black Snake with Red Fangs on the Collarbone
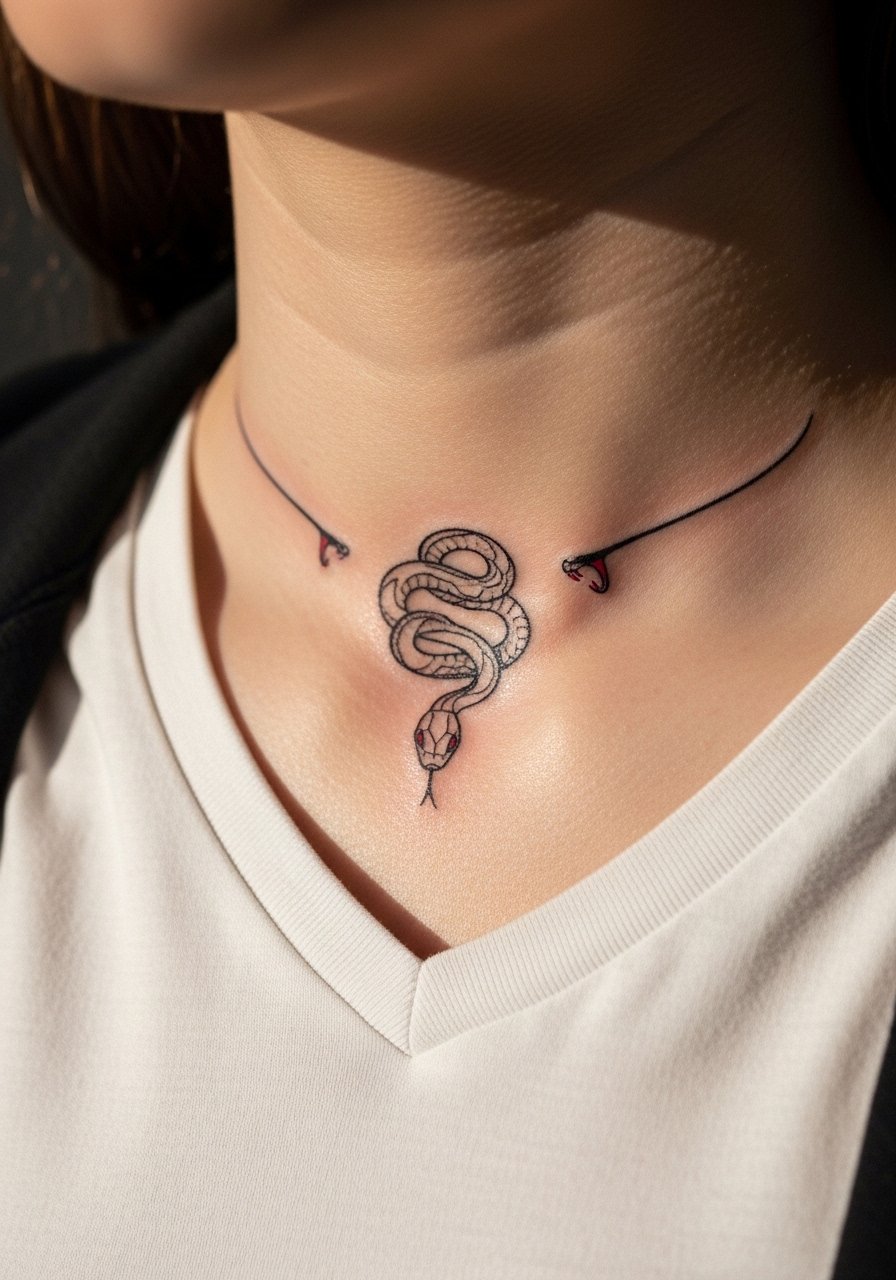
Fair warning: the collarbone lands higher on most pain scales, and the skin there is thin. Fine line advocates say this delicate work creates a whisper of ink that ages gracefully if the spacing is right. The bold-line advocates say any fine detail near bone blurs into a heavier mark as the years go by. Those are the two camps, named plainly. To get the collarbone snake to hold, ask for slightly more space between coils and for the red fangs to be saturated without being blobbed. Session time is short but sharp. For showing it off, a v neck tee or a strapless bralette works well. If you are unsure about the red on darker skin, request a small patch test or plan for a touch-up window at 6 to 12 months.
Studio Day Picks
The forearm, wrist, shoulder, thigh, ankle and collarbone pieces above each demand different prep. These five things smooth the session and cut down on first-week surprises.
-
Red ink stabilizer pack. Helps artists test how a red will sit at the needle depth you want, useful when you care that the color reads against medium and dark skin tones.
-
Green Sheep fragrance-free balm. A low-grease alternative that many people choose when they want a lighter-feeling ointment during the first few days of healing.
-
Quick-dry aftercare spray. Ideal for thigh and ankle work in humid weather because it dries fast and reduces early friction.
-
Fragrance-free gentle body wash. Keeps wrist and forearm pieces clean during showers without stripping pigment or irritating fresh lines.
-
Aquaphor healing ointment. A thin layer in the first 48 hours soothes and protects small fine line spots before you switch to a lighter balm.
7. Ornamental Mandala with a Red Gem Center on the Shoulder Blade
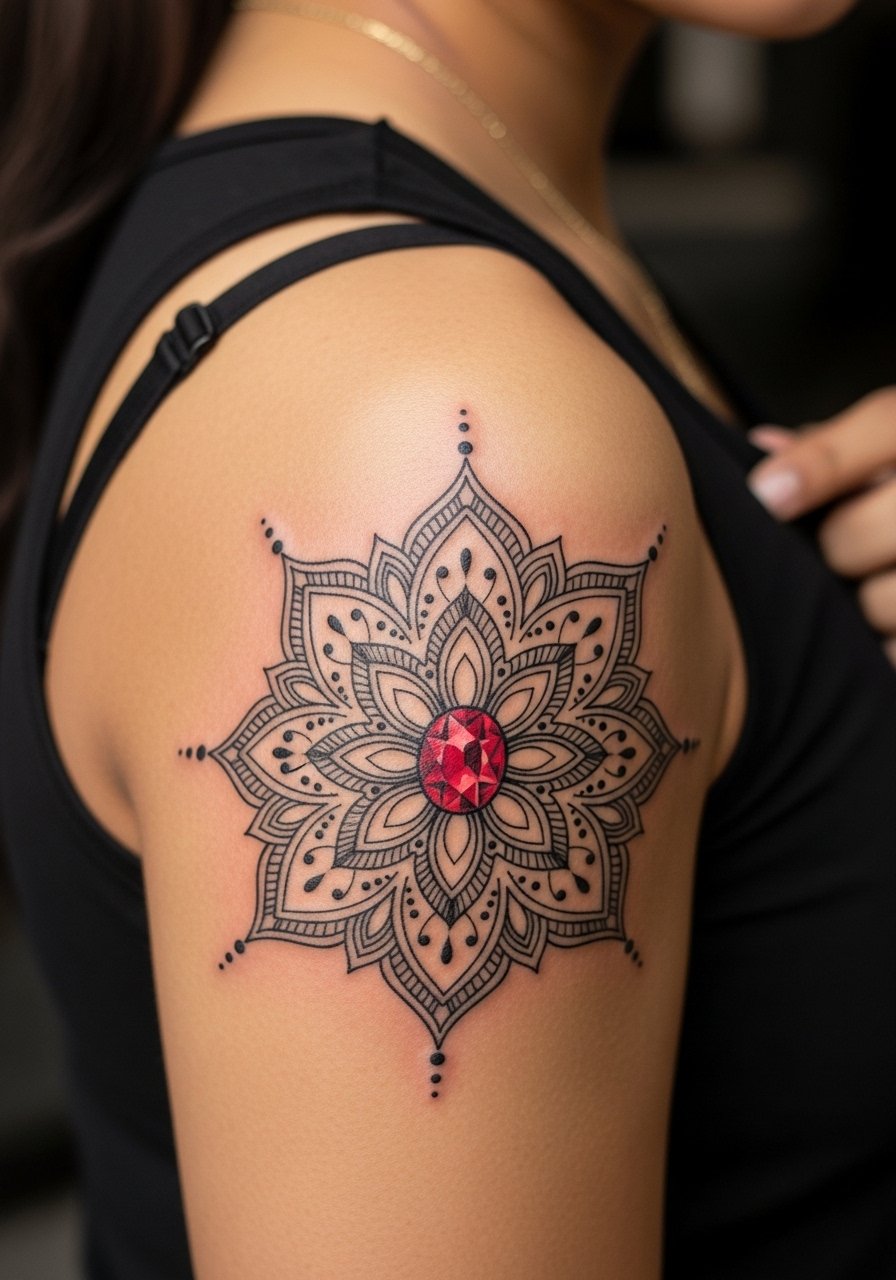
Mandala work thrives on symmetry and spacing. On the shoulder blade you can keep details tight without risking merge. Tell the artist you want a clear central red spot and bold negative space around dense stippling so the pattern breathes as it heals. A common misstep is packing too many tiny stipple dots into a 2-inch area. The shoulder blade tolerates heavier contrast, so the red center will pop if saturated properly. Sessions are moderate and sometimes split into two sittings if the artist wants crisp symmetry. For reveal outfits, an off-shoulder or open-back top frames the design. Try an open-back dress when you want the mandala visible without interference.
8. Micro-Realism Red Rose Bud Emerging from a Black Skull on the Forearm
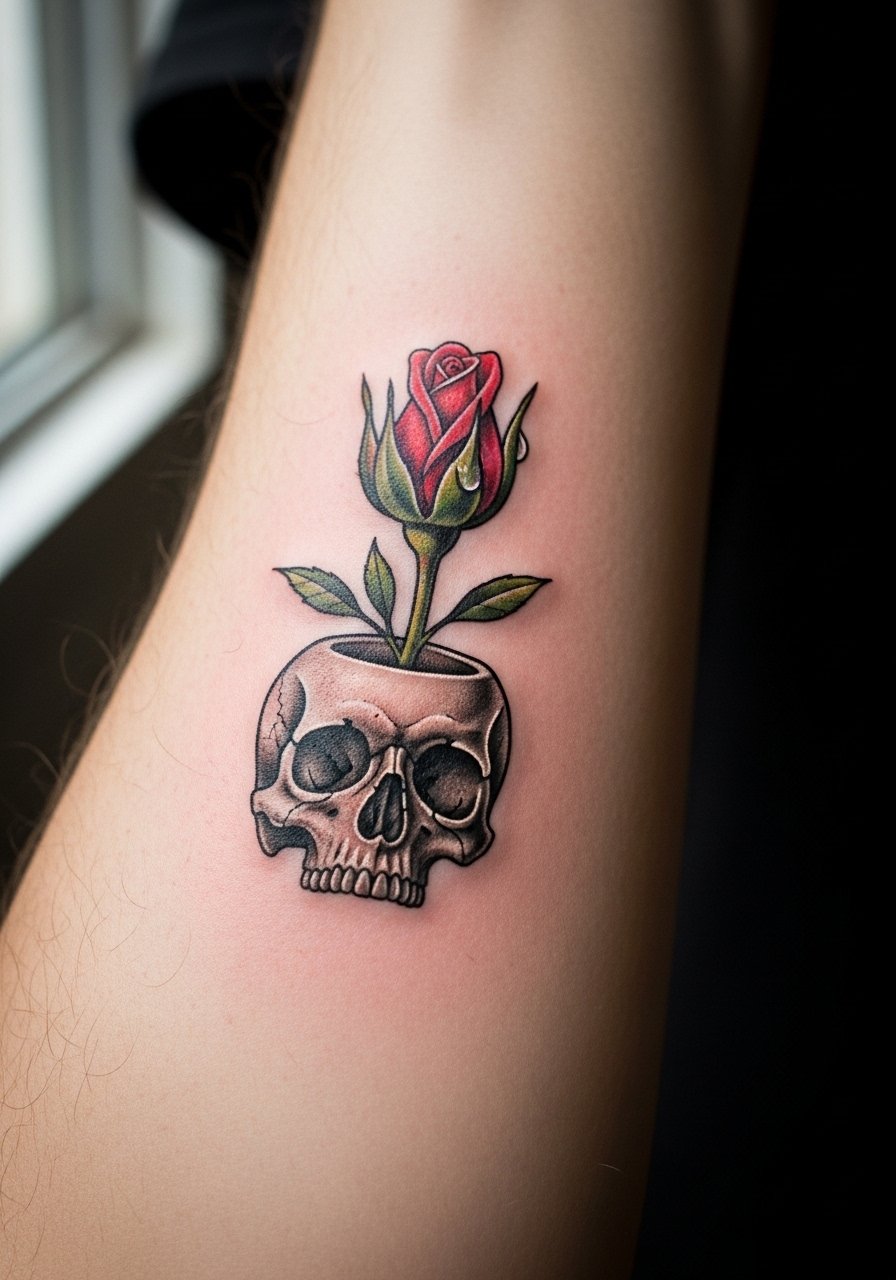
Micro-realism in small sizes needs an artist whose healed photos show true-to-life scale. When this contrast shows well it reads like a tiny scene on the skin. Ask to see healed photos of similar-sized micro-realism before booking. A typical mistake is pushing too much tonal range into a 1.5-inch piece, which softens into blotches. Forearm placement is forgiving for detail and the session feels like a steady two hours for a dense tiny piece. Expect touch-ups around year two if you want the red bud to keep its glow. For a casual reveal, a fitted black tee keeps attention on the forearm narrative.
9. Neo-Traditional Black Crow with a Red Rose in the Beak on the Calf
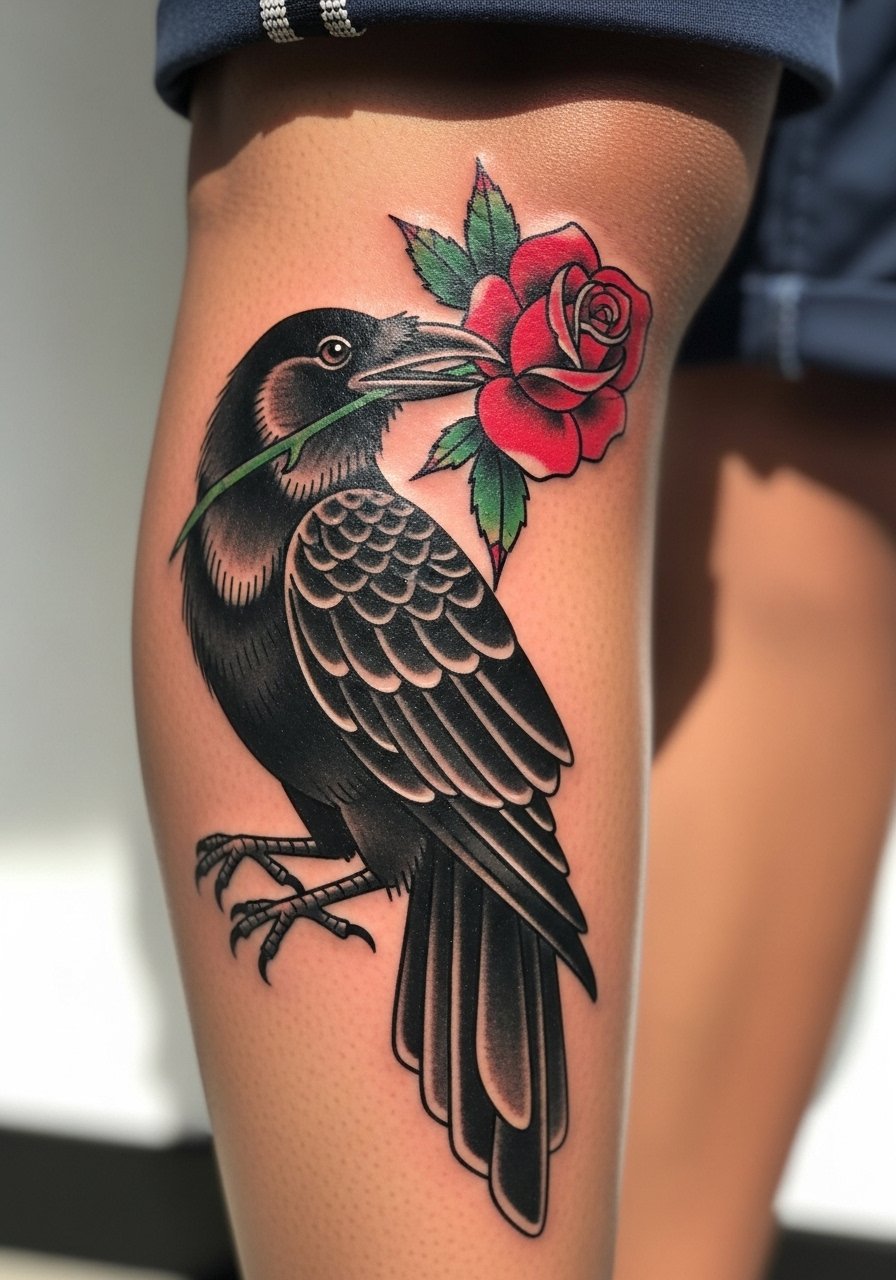
Calf pieces let you work at three inches comfortably, so neo-traditional detail looks lively without crowding. Tell your artist you want thick wing outlines and a saturated red bloom to avoid early fading. The biggest mistake is shrinking a full-feathered crow into a tiny vertical space and losing wing definition. Calf sessions are moderate and friendly for longer appointments. To show it off, rolled jeans or low socks frame the crow without competing colors. Try rolled hem jeans on casual days so the red rose pops when you walk.
10. Ignorant Style Red Dagger Through a Black Heart on the Bicep
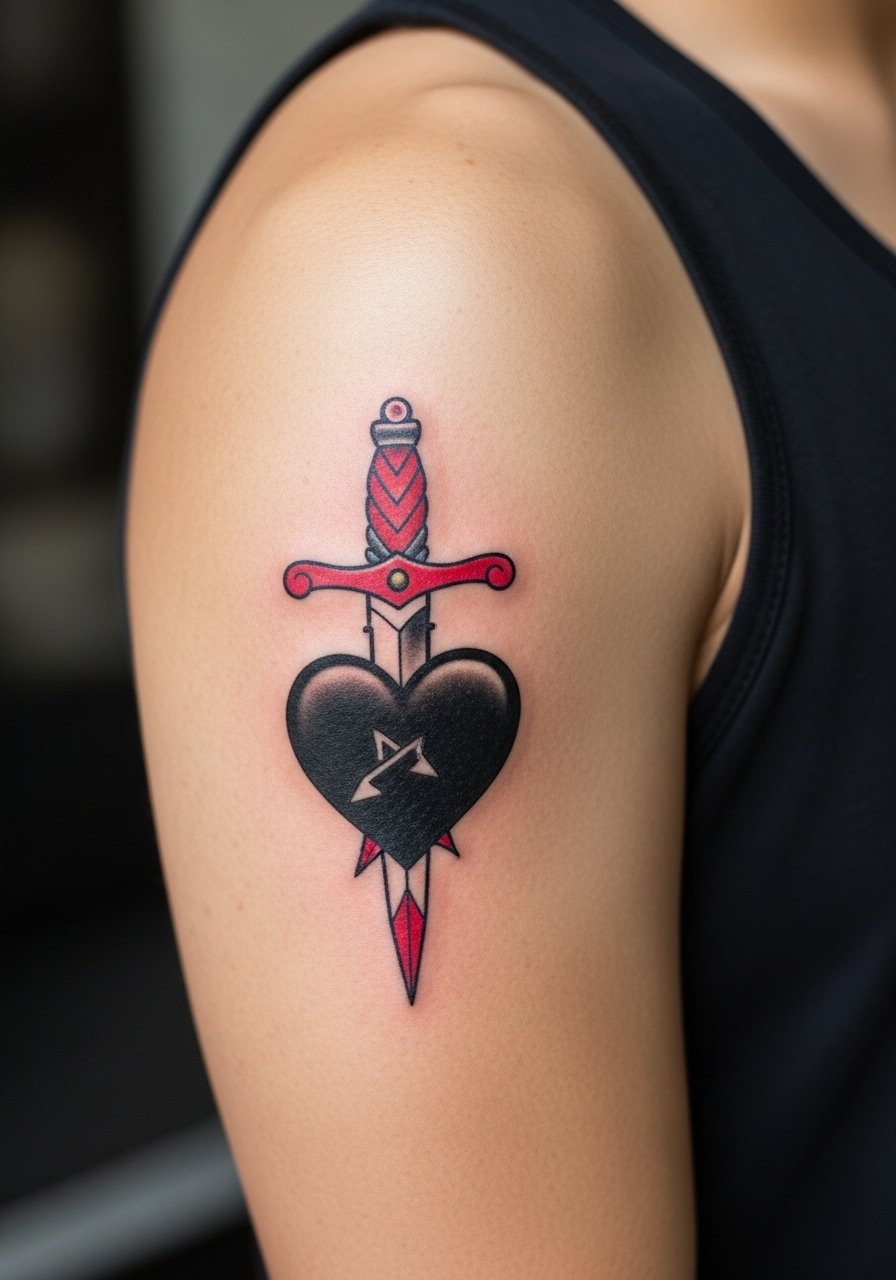
Ignorant style thrives on rough edges and uneven lines. If you want raw energy, ask for intentional wobble in the linework and exaggerated blood drips rather than microscopic precision. The common error is over-cleaning the design at the stencil stage which robs the piece of its character. Bicep sessions are relatively low on pain and can be finished quickly. This design wears well because the strong black heart anchors the red dagger. For the session, wear a sleeveless tank so the artist can access the upper arm easily.
11. Blackwork Floral Sleeve Starter with Red Poppy Accents on the Inner Arm
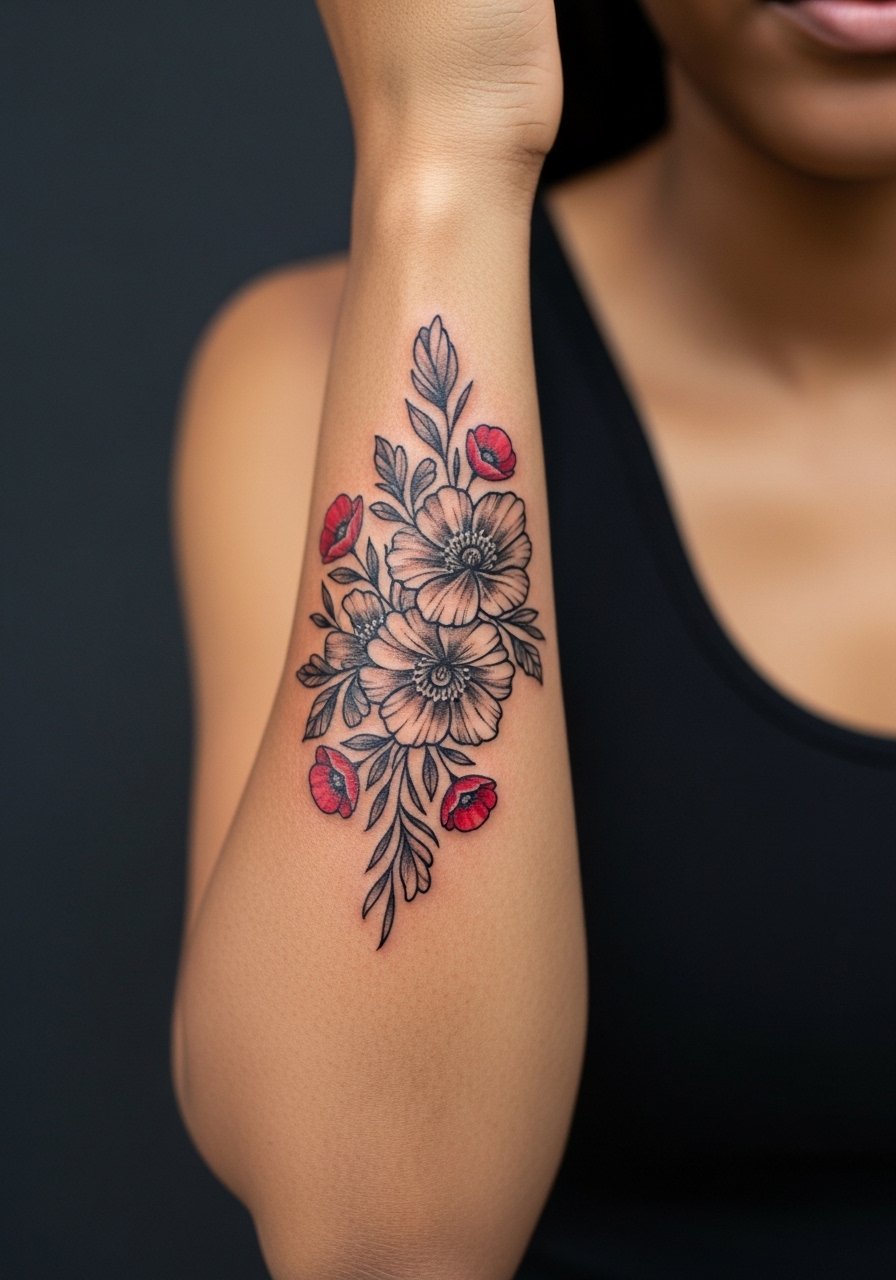
Think of this as a modular piece that can expand into a sleeve. The inner arm is a great place to start because you can build around solid black leaves and add red flowers later. A mistake is trying to cram a finished sleeve into one tight session. Let the artist plan 2 to 3 sittings so the black saturation stays consistent. Expect touch-ups where the arm sees frequent friction. For the appointment, wear a sleeveless tank so the inner arm is accessible and the artist can roll the sleeve without uncomfortable fabric tugging.
12. Minimalist Red Hourglass Framed in Black on the Ankle

This small symbol reads as tidy and personal when you keep the lines simple. Tell the artist you want a slightly thicker black frame than the usual fine line to ensure the hourglass silhouette survives regular washing and sock friction. The ankle can be touchy during healing because of shoe straps. A common issue is underestimating how much rubbing happens in daily life. The session is brief, and the pain is modest. Styling pairs well with cropped pants and sandals. Try cropped ankle pants for sunny days so the hourglass gets visible attention.
13. Alice in Wonderland Black Silhouette with Red Accent on the Hand
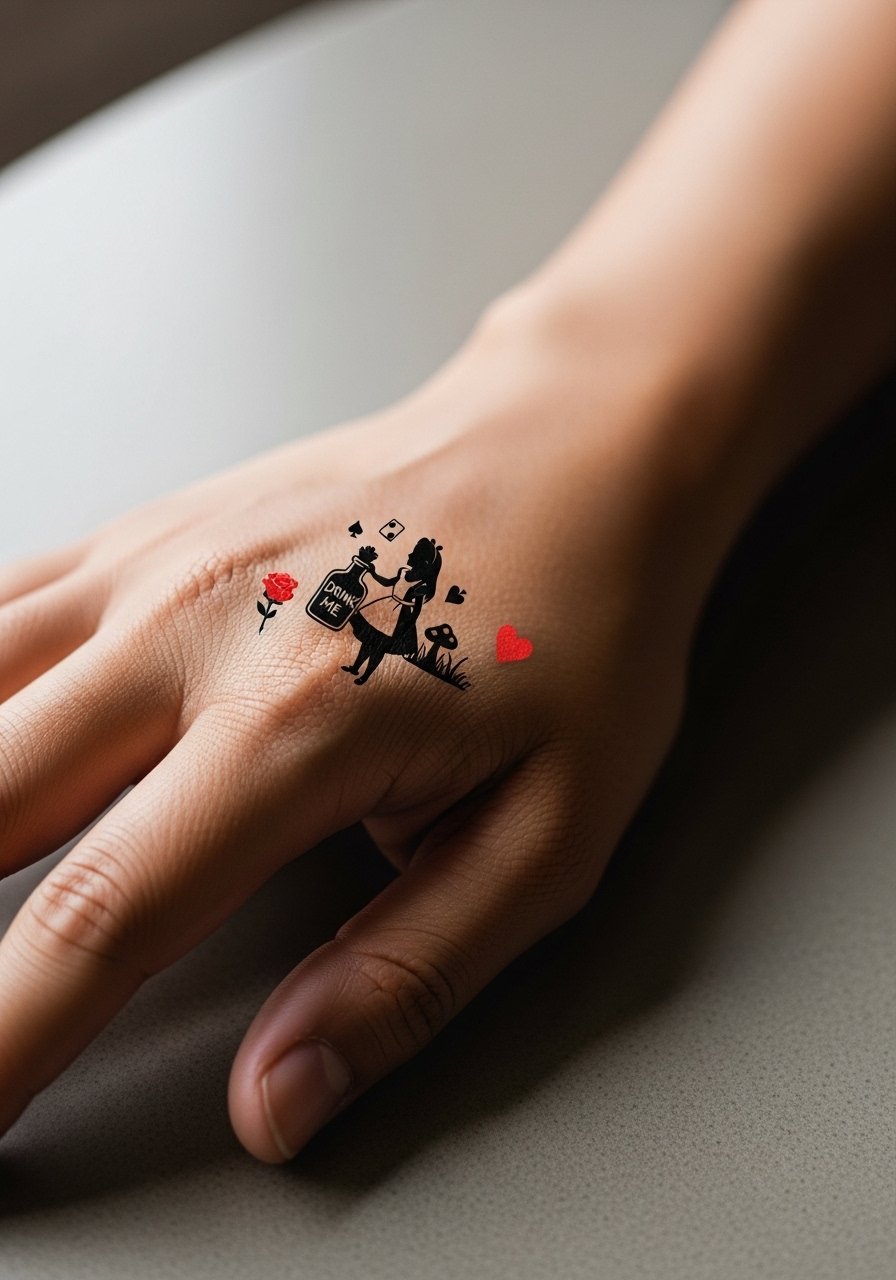
A literary motif like this is uncommon and feels personal without being literal. Hands and fingers see a lot of movement, so keep the silhouette simple and the red accent tiny. The real mistake is asking for intricate shading on a hand-sized flash, which blurs as the skin cycles. Also consider career and hiring contexts since hands are visible during many interactions. Sessions are short but healing can be fussy because of constant washing. For styling, small rings or neutral nail polish help the piece read like deliberate jewelry rather than casual ink.
14. Geometric Micro-Mandala Behind the Ear with a Red Dot
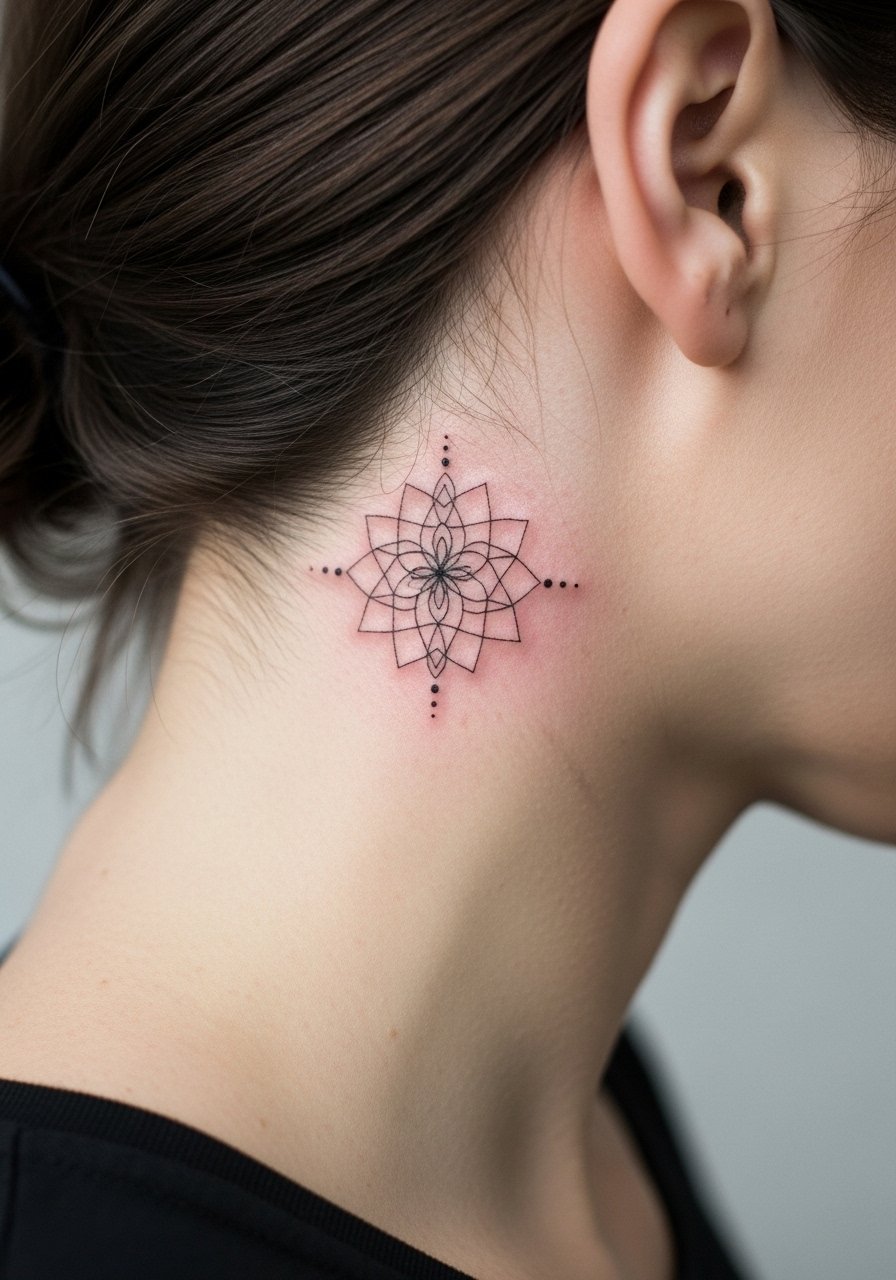
Behind-the-ear spots are discreet and surprising when they catch light. Keep the mandala size small and ask for clear spacing between spokes so the pattern does not merge. The skin there is thin which can make crisp geometry harder to hold. A common misstep is demanding extreme detail in an area that needs breathing room. Sessions are quick and the pain is low to moderate. This placement often looks like an accessory paired with tousled hair. Wear a hairstyle that reveals the area on purpose rather than as an accident.
15. Blackwork Geometric Moon Phases with Red Accent on the Back of the Neck
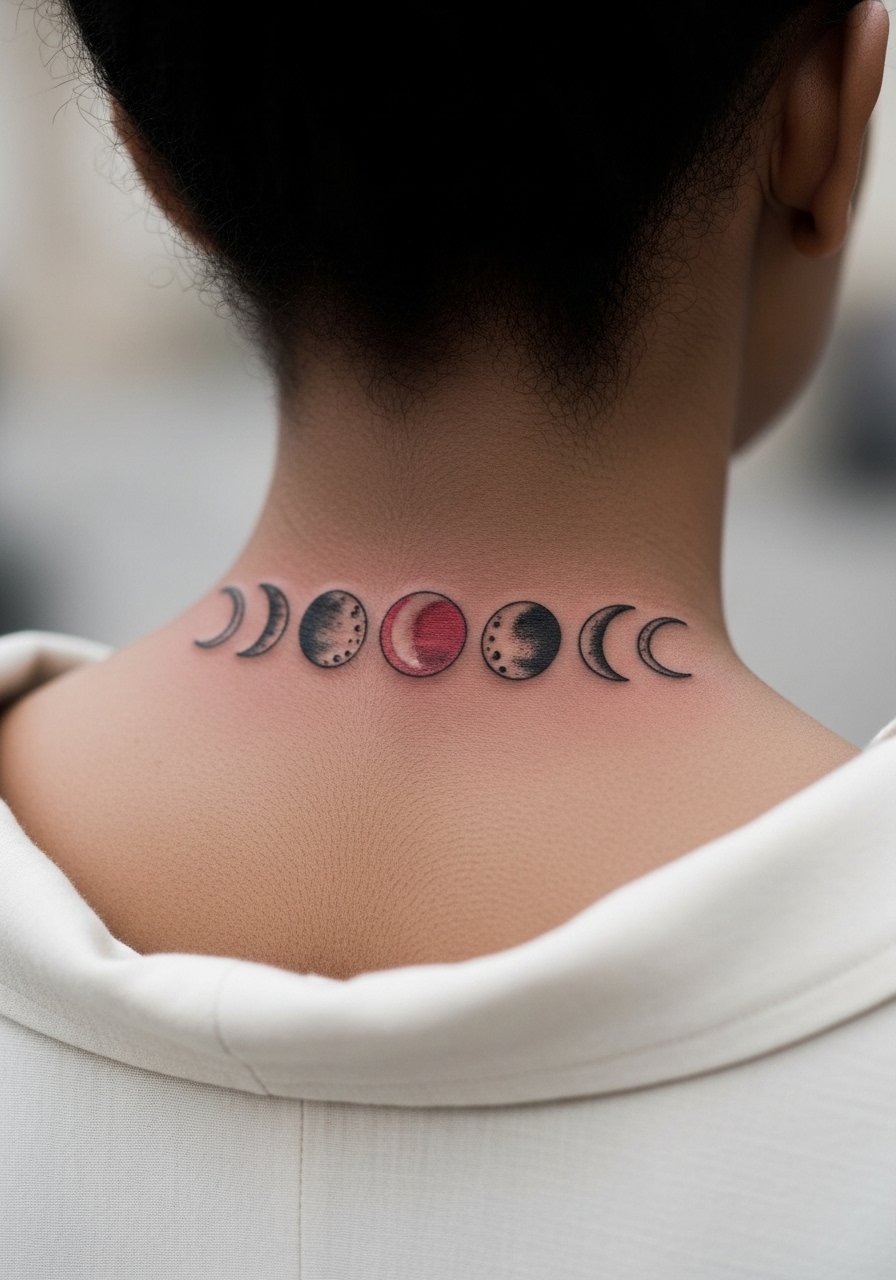
Neck work reads bold even when small because of the placement. For moon phases, keep spacing consistent and let the red accent anchor one of the crescents. The mistake is stacking phases too close together which causes merging over time. Sessions are short but the neck is sensitive for some people. For the session wear, choose a wide-neck shirt you can shift so the artist has clean access and you avoid stretching the inked area post-session.
16. Hip Floral Cluster with Red Berry Accents
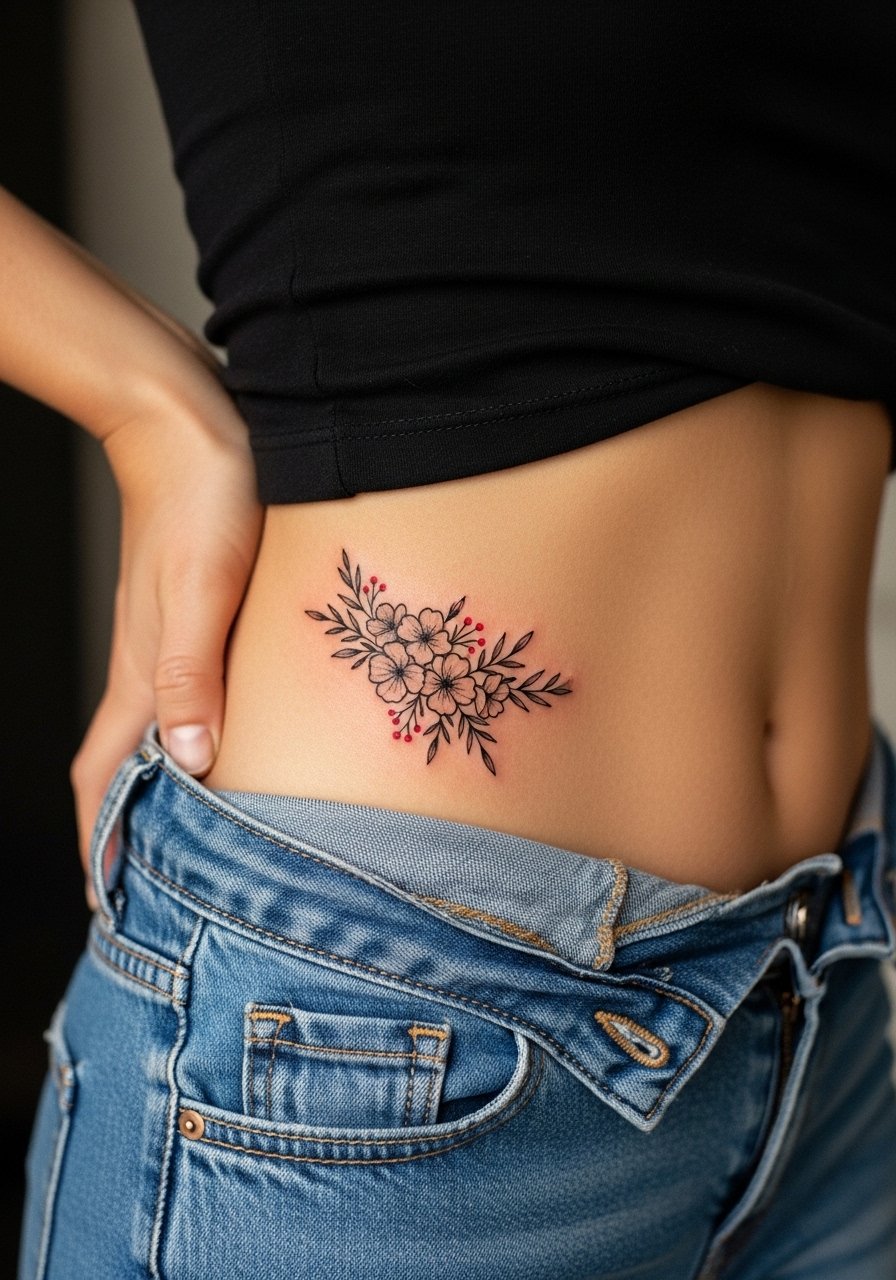
Hip placements give a private spot for something delicate that still reads as an intentional choice. For a small floral cluster, ask for slightly bolder stems and saturated red berry dots so the pop survives regular clothing friction. The typical error is insisting on ultra-fine stems that disappear under waistbands. Sessions are comfortable and often quick. For the session wear, high-waisted bottoms you can shift are ideal. Try high-waisted denim that you can lower slightly for access without exposing more than the targeted area.
17. Micro Geometric Crest with Red Gem Detail on the Thigh
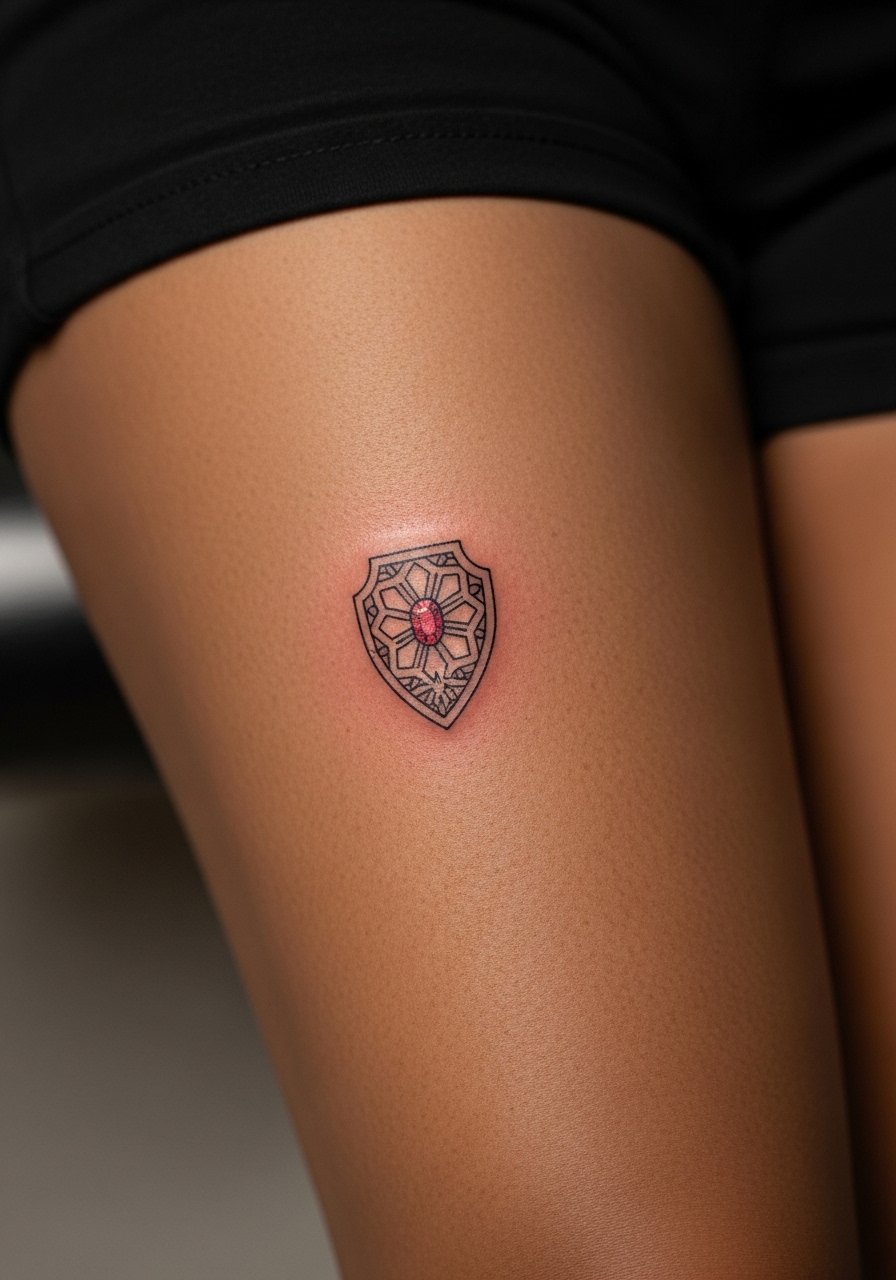
A crest or tiny emblem on the thigh reads like a private token. The thigh holds pigment well which helps the red gem keep its pop longer than on high-friction spots. Ask your artist to anchor the crest with clean negative space so the gem feels intentional rather than tacked on. The common misstep is asking for micro-lettering inside a gem when scale is too small. Sessions are relaxed and you can sit or lie down comfortably. For reveal outfits, slit skirts or high-cut shorts work best. A high cut athletic short will show the piece when you want it seen.
Frequently Asked Questions
Q: Will small red ink fade faster than black, and what should I expect for touch-ups?
A: Red can fade faster than black because of how pigment sits in the skin and how it reacts to sun. Expect touch-ups for red accents around year one to three depending on placement and sun exposure. Places with less friction and more flesh, like the thigh or calf, usually hold pigment longer than wrists or fingers. Plan for a quick touch-up window at 6 to 12 months if you want the color to stay sharp.
Q: Are fine line black and red pieces worth it for ribs or collarbone work given the controversy about longevity?
A: Artists divide into two camps on this. One group says fine line near bone blurs within a couple of years due to skin movement. The other group says with the right spacing and needle technique it holds. The practical approach is to ask your artist to show healed photos of their fine line work in the exact placement you want and to discuss expected touch-up timing before you book.
Q: How should I dress for a session that includes thigh, shoulder, or collarbone placements?
A: For thigh sessions wear loose shorts or a skirt you can shift, for shoulder sessions bring a button-down or a tank that gives full access, and for collarbone wear a V-neck tee or a strapless bralette you can shift aside. A simple in-session outfit avoids awkward fabric tugging and keeps the area clean. If you want a subtle example, try a loose button down shirt for shoulder work.
Q: I have darker skin. Will the red accents still show up?
A: Yes, but technique matters. On medium to dark skin tones the red reads best when artists use slightly deeper saturation and contrast it with solid black anchors. Some people request a small patch test or plan for a deliberate touch-up to ensure the red sits the way they expect. Communicate concerns early so the artist can adapt ink depth and color choice.
Q: Does tip etiquette or healing method impact small black and red tattoos more than larger pieces?
A: Small pieces often demand the same care as larger ones but they can show neglect sooner because any fading or scabbing is concentrated. Tipping remains a local custom and varies by region, and the Saniderm versus dry healing debate has two clear camps. One camp favors protective film for less scabbing, the other prefers dry healing to encourage natural scab formation. Ask your artist which method they use and follow the aftercare they recommend for the specific size and placement.
Q: How do I find artists who specialize in black and red work without naming specific studios?
A: Use discovery pathways like searching the hashtag #blackredtattoo on Instagram, filter TikTok searches with your city, and check gallery sites or forums for healed photos that match the style you want. Ask artists for healed photos of similar placements and sizes before you book so you know you are hiring someone with a track record for small black and red pieces.
