
The tattoos that still read clean after five or ten years are often the pieces that lean into high contrast rather than the ultra-fine trend everyone pins. High-contrast blackwork can solve visibility worries across skin tones, reduce the need for frequent touch-ups, and hide minor blowout better than micro-linework. If you care about longevity and legibility, these 21 ideas focus on technique, placement, and what to tell your artist to keep the design looking its best.
1. Fine Line High-Contrast Botanical on Inner Wrist

I have seen this placement on friends who want delicate form that still reads across a room. The trick is to pair single-needle stems with small solid blacks at the base so the silhouette survives fading. Tell your artist you want the main veins bolder and the leaves with whip shading for softness. Common mistakes include asking for ultra-tiny details that merge at year two and wearing tight bracelets right after healing. Pain is low for most people and a session usually fits in under an hour. For showing it off, push up a slim fit long sleeve shirt and wear minimalist rings on the other hand.
2. Black and Gray Realism Portrait with High-Contrast Shading on Outer Forearm
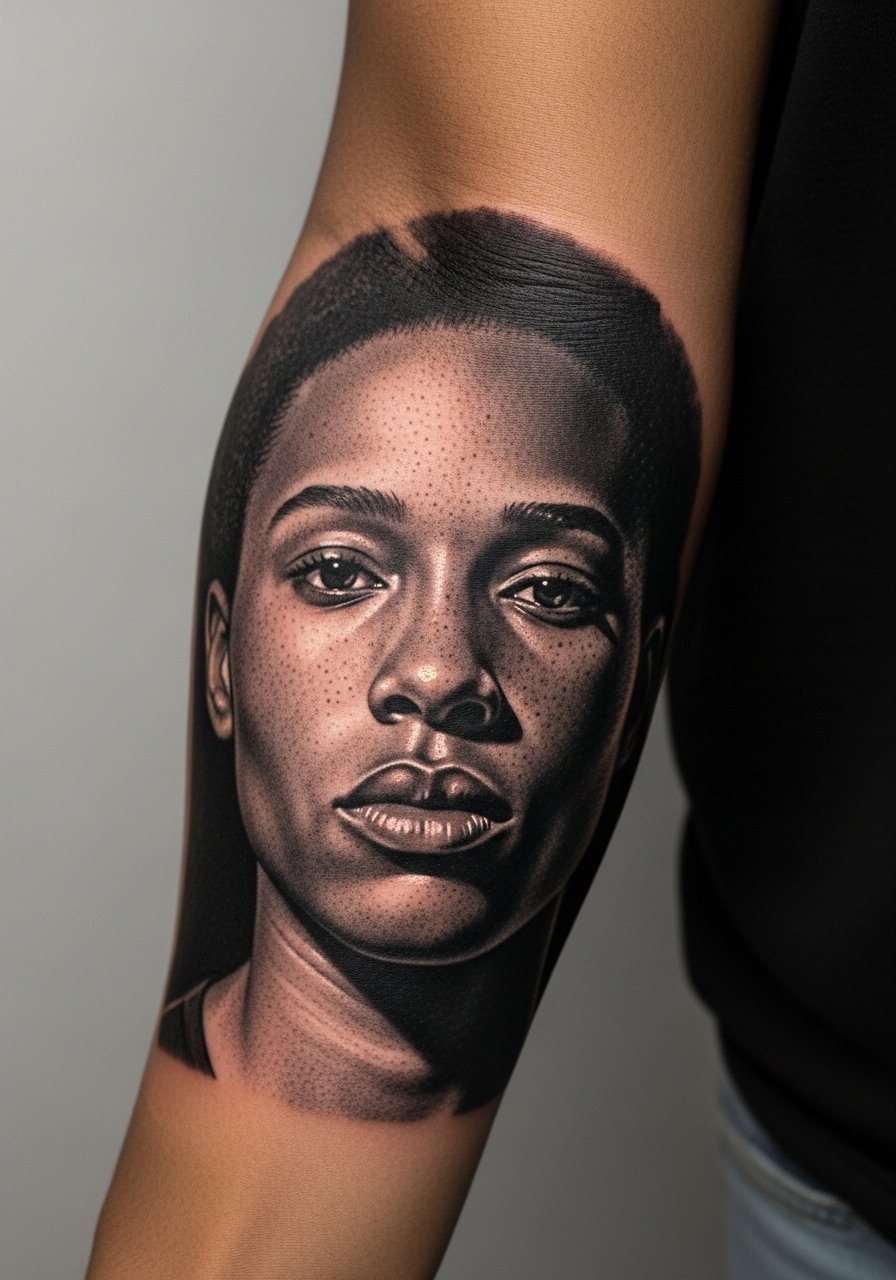
Fair warning, the forearm shows every shading decision. I point clients toward strong midtones and deep blacks around key contours so faces keep their shape as the lighter tones soften. During consultation bring clear reference photos that show the exact lighting direction you want. Common aging pattern is the mid-grays lifting first, leaving the high-contrast areas to define the face over time. Sessions run two to three hours depending on detail and you should expect a touch-up around year three for fine facial textures. For wearing it out, roll up a rolled sleeve button up shirt to frame the piece.
3. Geometric Blackwork Mandala on Shoulder
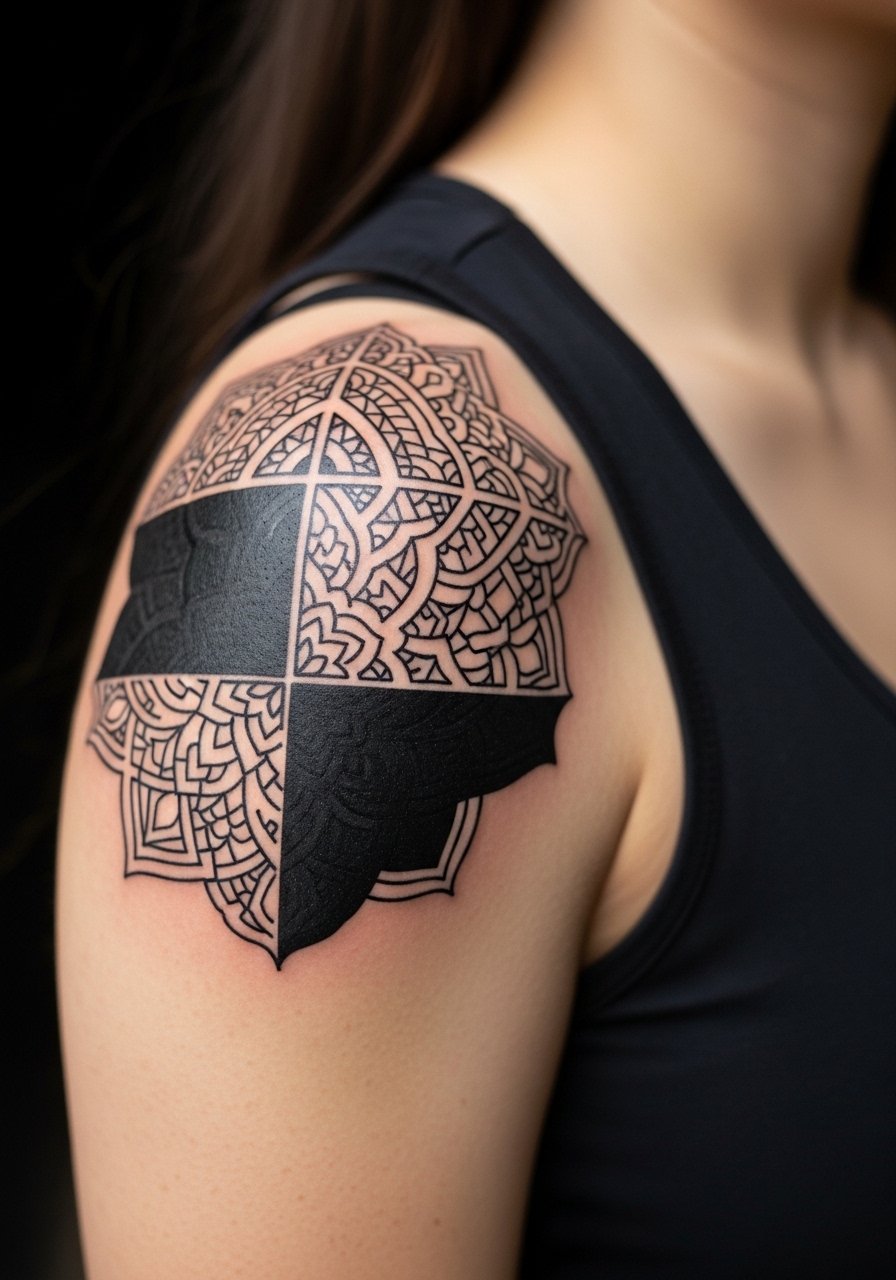
Most mistakes with mandalas come from scaling too small. The shoulder needs spacing between concentric lines so the pattern does not bleed together after healing. Ask for slightly thicker anchor rings and negative-space buffers in the first consultation. Blowout risk on the deltoid is moderate if the linework is too tight. Expect one to three sessions for a detailed mandala and a touch-up window around year two to re-crisp the center rings if needed. Style it with a sleeveless halter tank when you want the geometry visible.
4. Neo-Noir Cityscape Silhouette on Outer Thigh
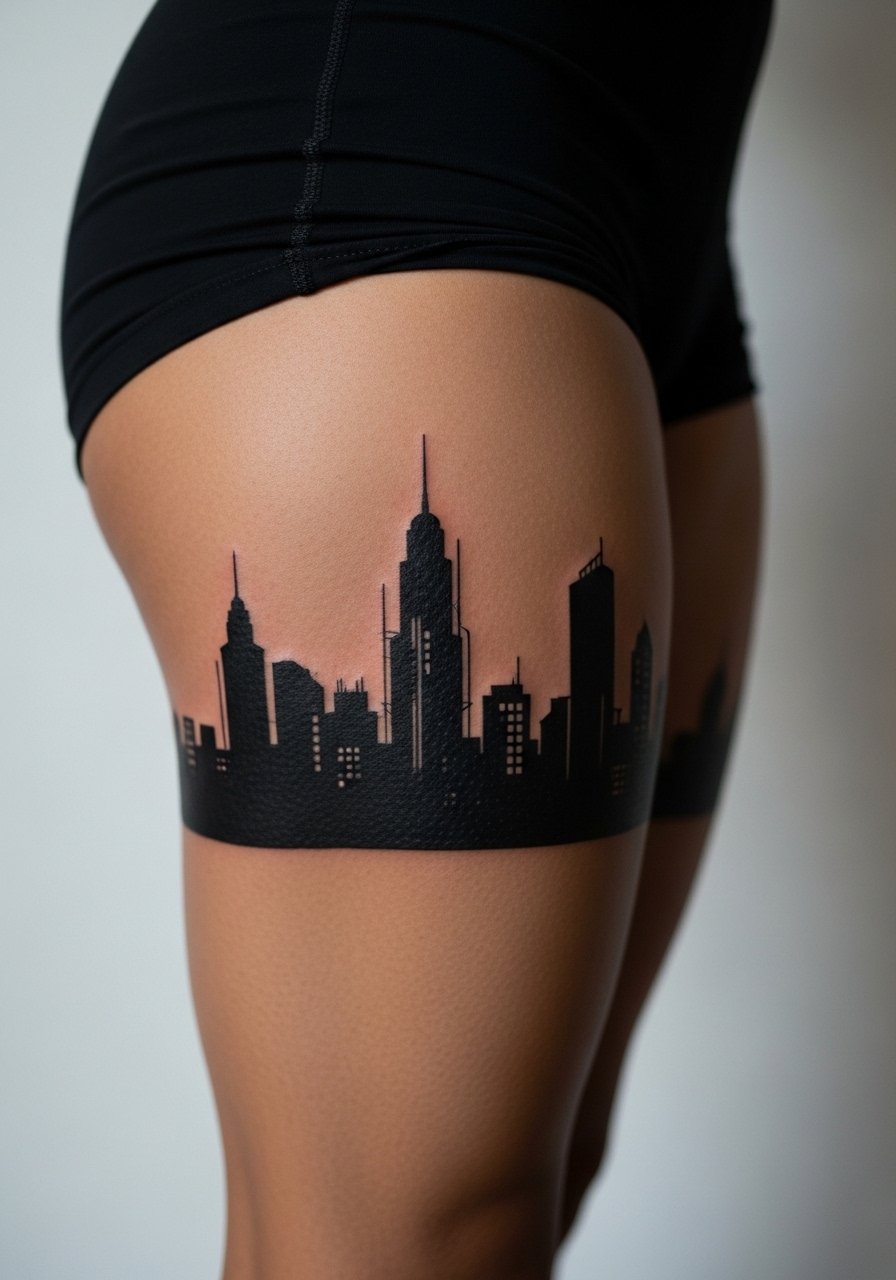
There is a narrative quality to a thigh cityscape that looks cinematic in motion. For longevity, designers use broad black blocks for skyline massing and small negative-space windows for detail rather than micro lines. A common session-day tip is to wear loose shorts or a high waisted denim shorts so the artist can access the area easily. Pain on the outer thigh is manageable for most. Expect multiple sessions if the composition wraps or includes fine architectural work. Over time the silhouette remains readable while the smallest window dots may soften, so ask your artist about planned touch-ups.
5. High-Contrast Noir Skull Portrait Near the Collarbone
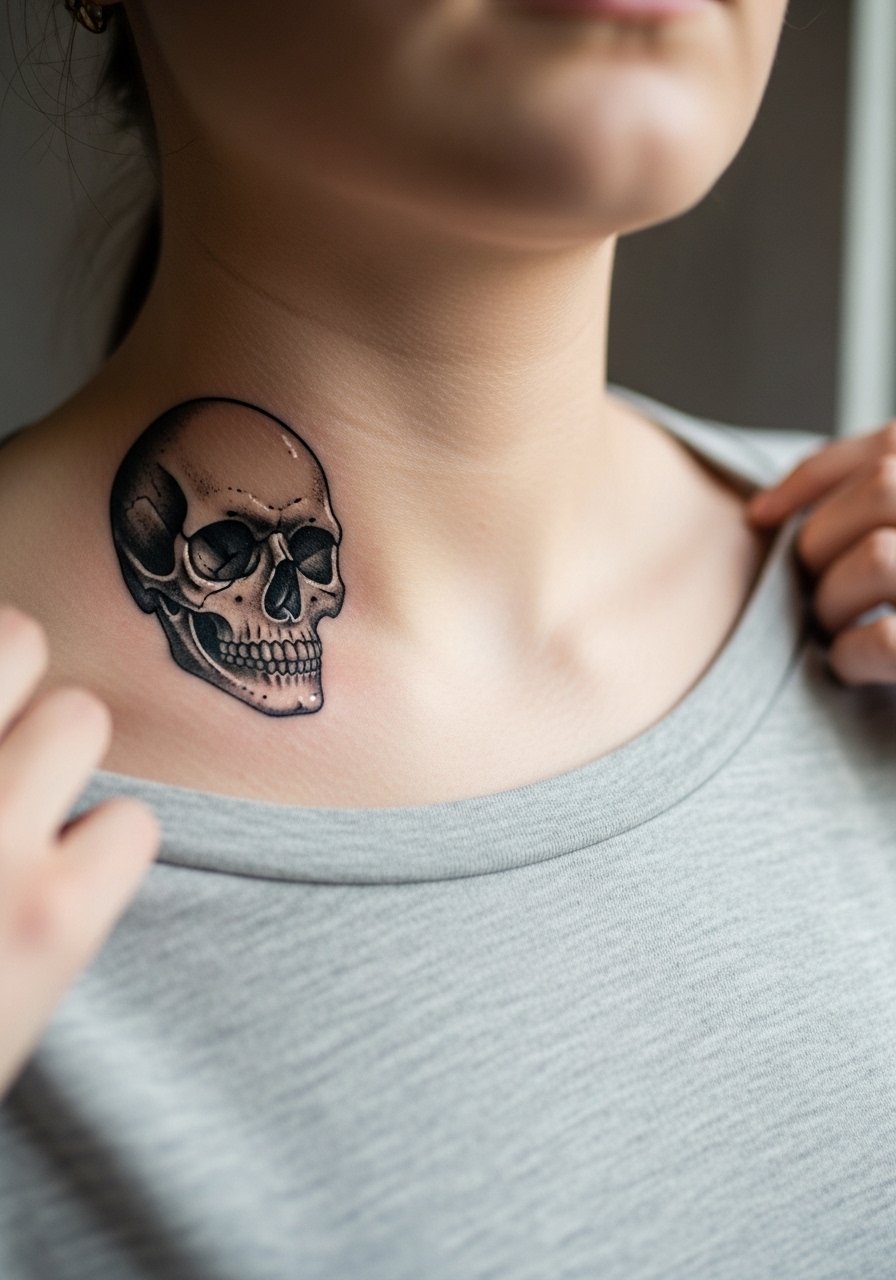
The collarbone is a visually rewarding but sensitive spot. Pain tends to be higher on the bone, and sessions are often split into shorter passes. For a skull portrait, request strong black planes that read from a distance and tiny controlled highlights to suggest form. A frequent mistake is over-detailing the teeth and jaw at small scale, which blurs over time. For showing it off, wear an off shoulder blouse black to frame the area without competing with the ink. Expect two to four sessions and plan a touch-up in a couple of years.
6. High-Contrast Dotwork Abstract Pattern on Calf

When clients want texture over literal imagery, dotwork offers hypnotic contrast that ages into interesting grain rather than mud. Tell your artist you want denser dots for shadow areas and more negative space near the edges so the piece keeps its shape. A common session-day note is to wear cropped jogger pants you can roll up without rubbing the fresh work. Calf sessions are usually two hours and touch-ups may be requested around year three if dot saturation thins. Watch for uneven dot pressure during the session, that is the main cause of patchy fades later.
Studio Day Picks
Those forearm, collarbone, and calf pieces above need different prep than small finger or wrist work, so a short kit that covers stencil checks, comfort, and first-week protection helps the most.
-
Stencil transfer paper kit. Lets you preview and reposition linework on skin before the needle arrives, handy for the botanical wrist piece and geometric mandala.
-
Topical numbing cream. Applied per instructions about 45 minutes before reduces edge pain for collarbone and calf sessions without affecting saturation.
-
Thin protective film roll. Useful for ankle and finger placements that are exposed to friction from shoes or daily washing.
-
Fragrance free gentle body wash. Cleanses healing areas gently, which matters for fine line work on the wrist and forearm.
-
Aquaphor healing ointment. Thin layers in the first few days keep lines moist and reduce scabbing that can pull at single-needle strokes.
7. Whip Shading Portrait Silhouette on Side Neck

Artists are split on neck work, and you should know both camps. One group says the neck moves and stretches too much and fine lines blur within a couple of years. The other group says careful depth and spacing make neck silhouettes hold. When you consult, ask which camp your artist follows. Side neck sessions are concise but can be painful, so plan short breaks. For showing it off, choose an open collar linen shirt that does not rub the area. Expect a two-session workflow and a possible touch-up at year two.
8. High-Contrast Animal Motif, Wolf Head on Shoulder Blade
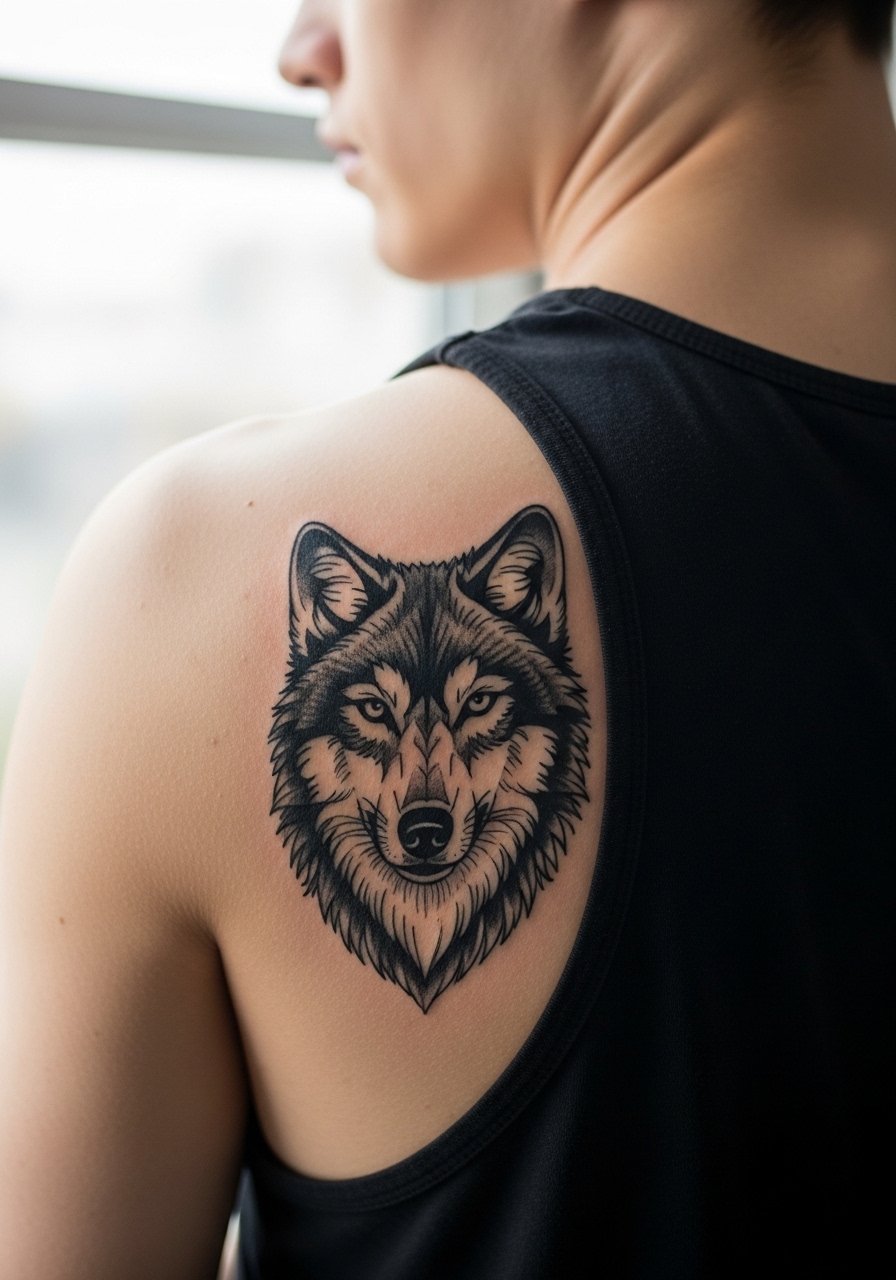
I have seen wolf motifs age well when the jawline and eye sockets are given heavy black anchors. A mistake I often see is relying on tiny fur strokes across the entire face. Those thin strokes blur into texture that no longer reads as fur. Shoulder blade placement reduces friction compared with the ribcage so the bold areas hold up better. For session comfort, wear a loose tank top or loose button down tank you can slide aside. Expect two to three sessions and a touch-up if you want to re-darken the solid fills later.
9. Minimalist High-Contrast Hourglass Symbol on Finger

Finger tattoos carry special care and aging realities. The skin there is thin and exposed to frequent washing and abrasion, so anchor the hourglass with a small solid base to keep the silhouette readable. The common mistake is pushing too many tiny interior lines that disappear in six months. Sessions are short but expect more touch-ups than on the forearm. For appointment day, remove rings and avoid tight gloves. Wearing subtle accessories after healing helps, but avoid continuous friction. A delicate ring on the opposite hand keeps attention on the finger without crowding the design.
10. Noir-Style Rose with Thorns on the Ribcage

Fair warning: the ribcage rates high on most pain charts. That said, the area yields striking negative-space when the petals are composed of heavy black beds and sharp white negatives. One technical controversy here is whether fine thornwork should be attempted on ribs. Some artists avoid tiny thorns because stretching and shifting blur them. Others say with deep enough placement they can hold for years. Ask which approach your artist prefers. Expect two shorter sessions and plan for a year-two touch-up if the thorns soften. Wear a fitted sports bra to the appointment so the artist can work without interruption.
11. Black and White Ornamental Frame on Ankle
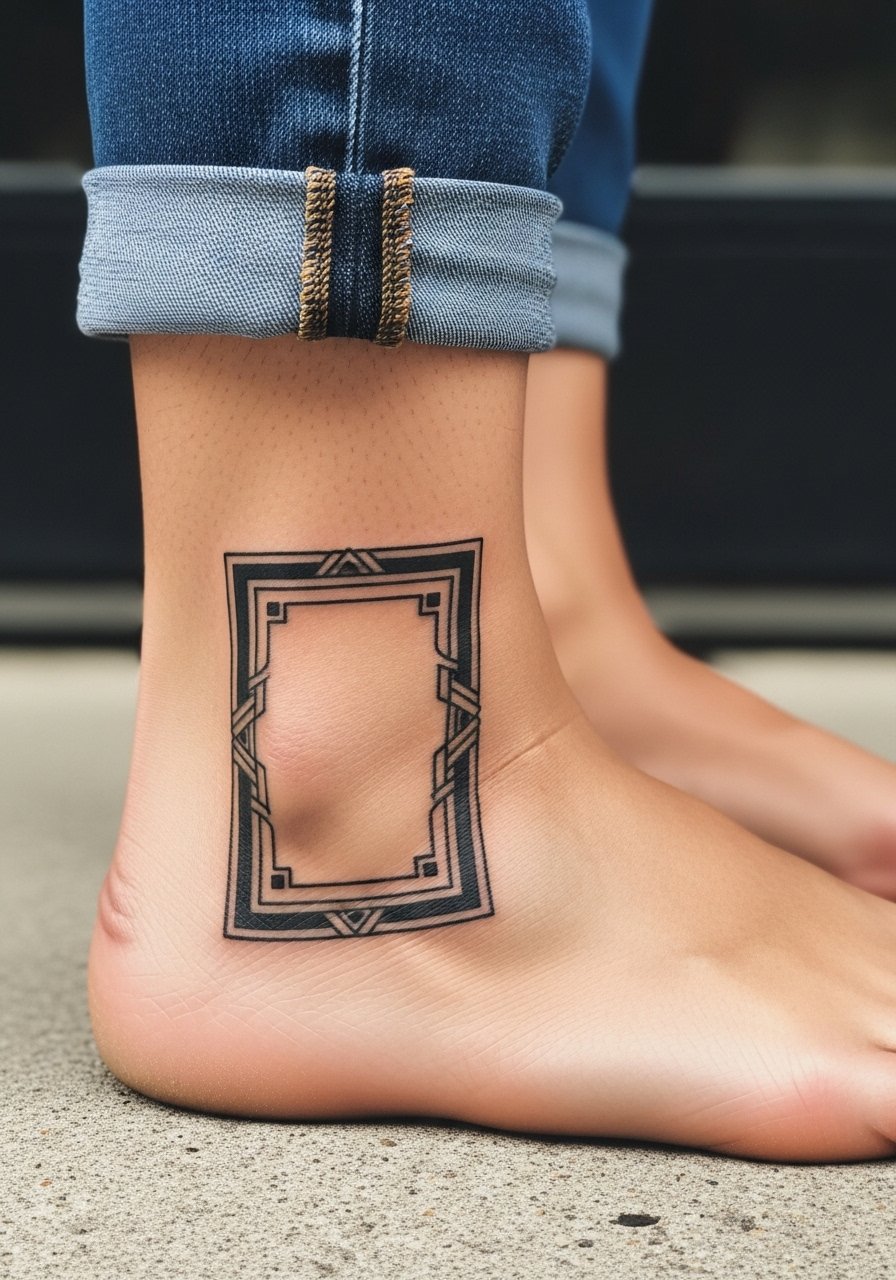
Ankle frames read well when the outer border is bold and interior flourishes stay airy. One common mistake is making the inner ornaments too dense. On the ankle, dense detail meets shoe friction and dirt during healing, which speeds softening. During the appointment wear rolled jeans or jeans rolled up so the artist has full access. Pain is variable near the bone and sessions are often quick. Expect a small touch-up window around year two to re-define thin internal lines that may blur.
12. Blackwork High-Contrast Wave Pattern Across Upper Back

Upper back pieces age gracefully if the design uses large shapes rather than micro texture. I tell clients to prioritize broad saturated fills that form the main motion and allow smaller wave accents to breathe. Avoid packing in stipple shading close to the edges because tension from clothing can smudge those areas during healing. For session wear, bring a loose tank dress or robe so the artist can access the area without rubbing. Big back work often spans multiple sessions and a touch-up after full settling is common. For show, backless tops or low-back dresses reveal the waves elegantly.
13. Fine Line High-Contrast Feather Across Collarbone
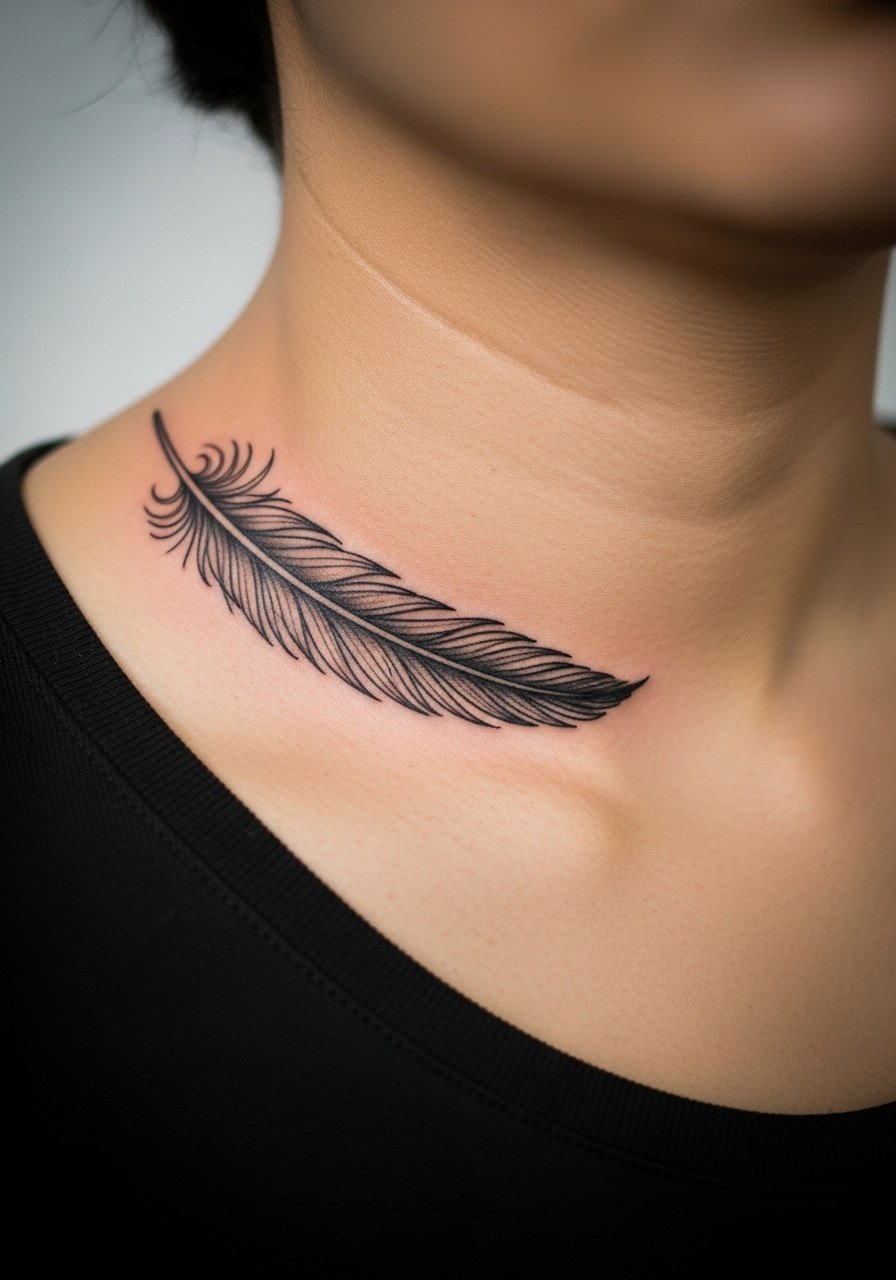
The collarbone gives a feather graceful movement, but fine lines there face both bone proximity and sun exposure. I recommend slightly thicker quill strokes combined with whip shading down the vane so the feather keeps texture after a few years. A common mistake is insisting on hair-fine barbs all the way to the tip. For the session, wear a wide-neck shirt you can pull aside to expose only the area needed. Expect one to two sessions and consider touch-ups in year three if the barbs lose sharpness. Pair with a thin silver choker necklace to balance asymmetry.
14. Blackwork High-Contrast Wave Band on Upper Arm
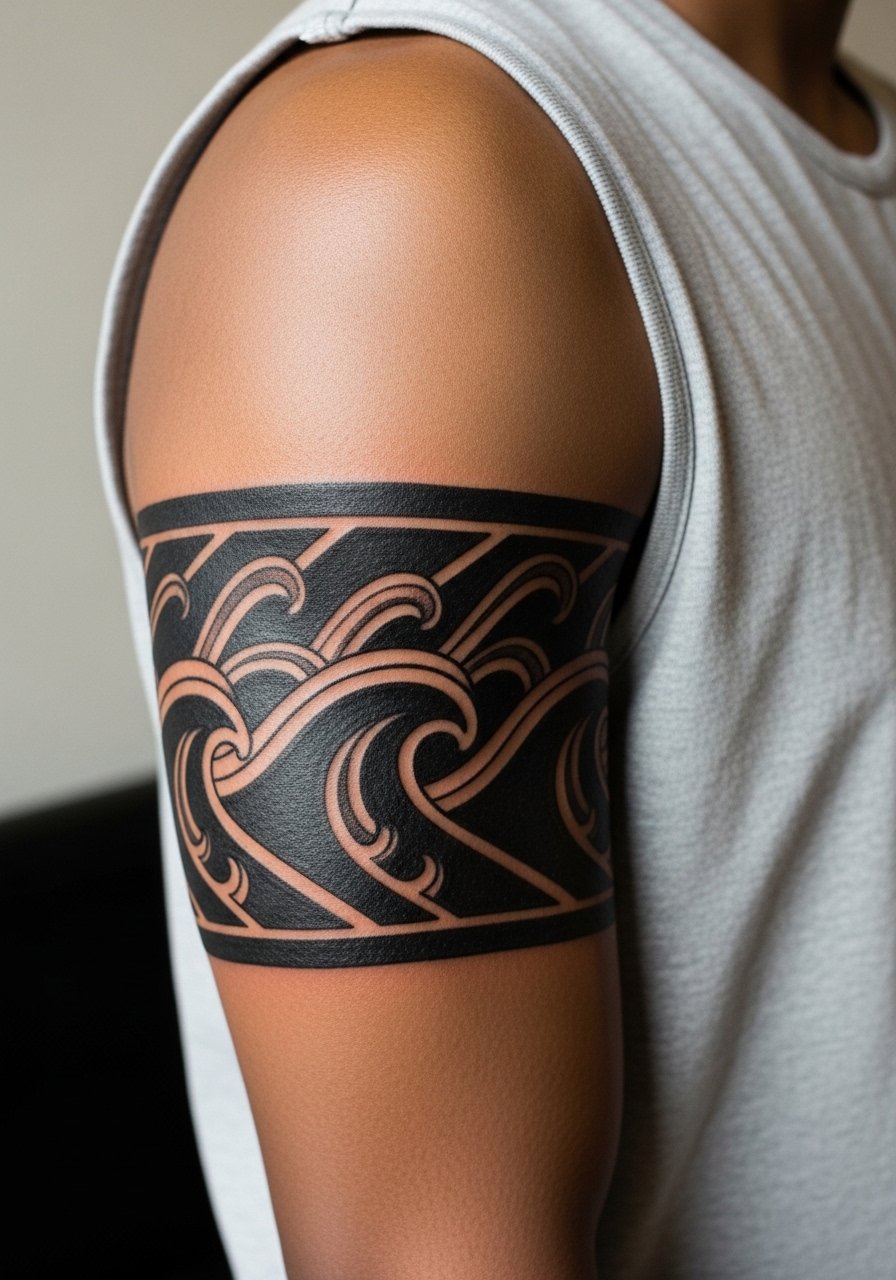
A wrapped wave band benefits from deliberate spacing so the negative shapes read from a distance. The upper arm tolerates bold fills well and blowout risk is low compared with inner-arm placements. Mistakes I see include making the band too tight around the arm which can distort when muscles flex. For the session, pull aside a loose button-down or wear a gray muscle tee. Expect one long session for a single band and a quick touch-up later if the outer edge softens.
15. Whip Shading Portrait Silhouette on Side Neck (Small)

This is compact and intimate, and many artists debate whether neck flesh keeps whip details. One camp claims neck movement blurs soft gradients quickly. The other camp insists that correct spacing and deeper needle placement allow whip shading to settle fine. When you book, ask which approach your artist prefers and request a healed example on similar skin. Sessions are short but can be sensitive. For visibility, wear a v neck black tshirt that frames the profile view. Plan a possible touch-up at year two.
16. High-Contrast Neo-Noir Sleeve Accent: Geometric Meets Realism on Forearm
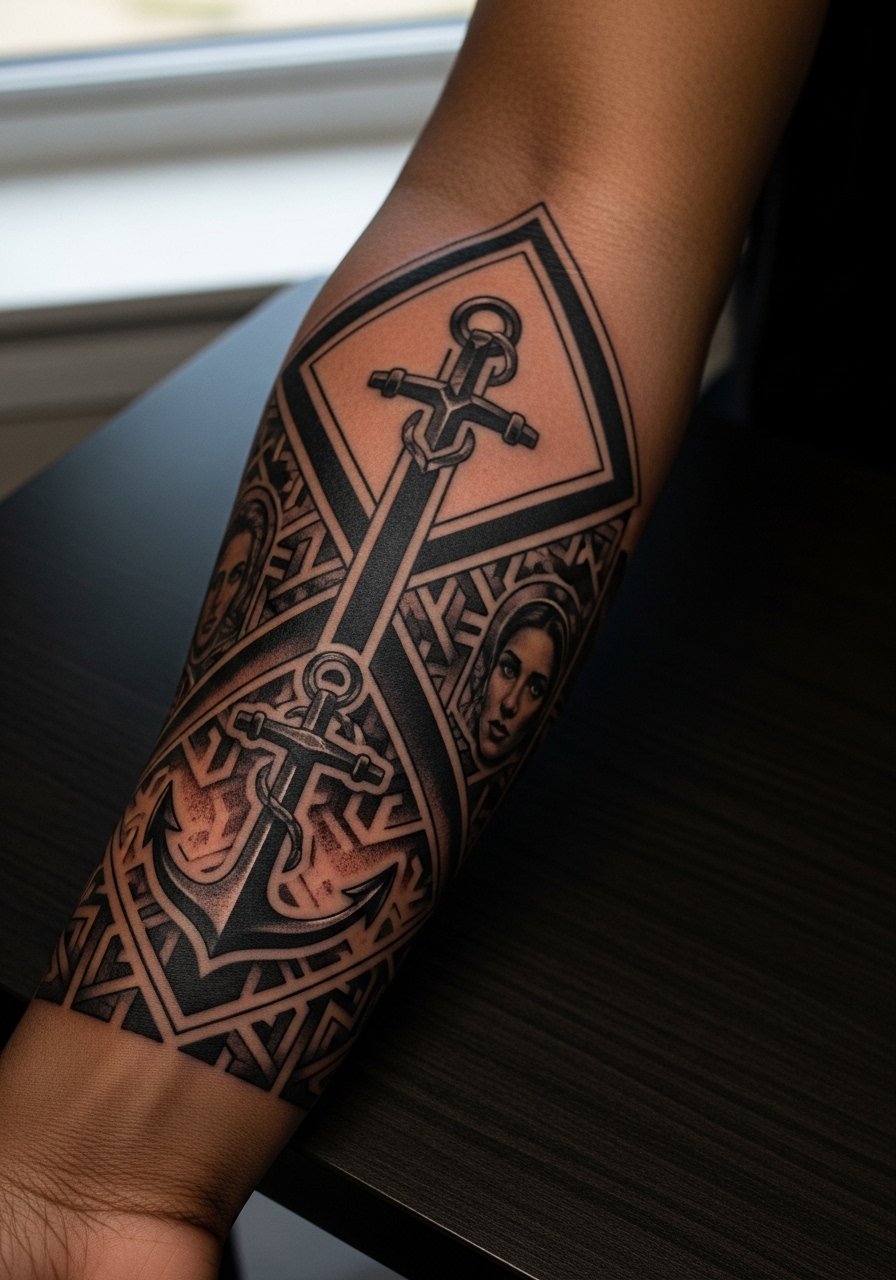
When mixing geometry and realism, the mistake is letting the detailed realism sit too close to dense black fields. I advise a deliberate buffer of negative space so the portrait does not visually sink into the blackwork. Tell your artist you want the portrait elements to have their own halo of mid-gray so they age without merging. Forearm sessions can run long and you may want multiple sittings. For showing it off wear a navy linen shirt with sleeves rolled for contrast.
17. High-Contrast Dotwork Abstract Calf Panel
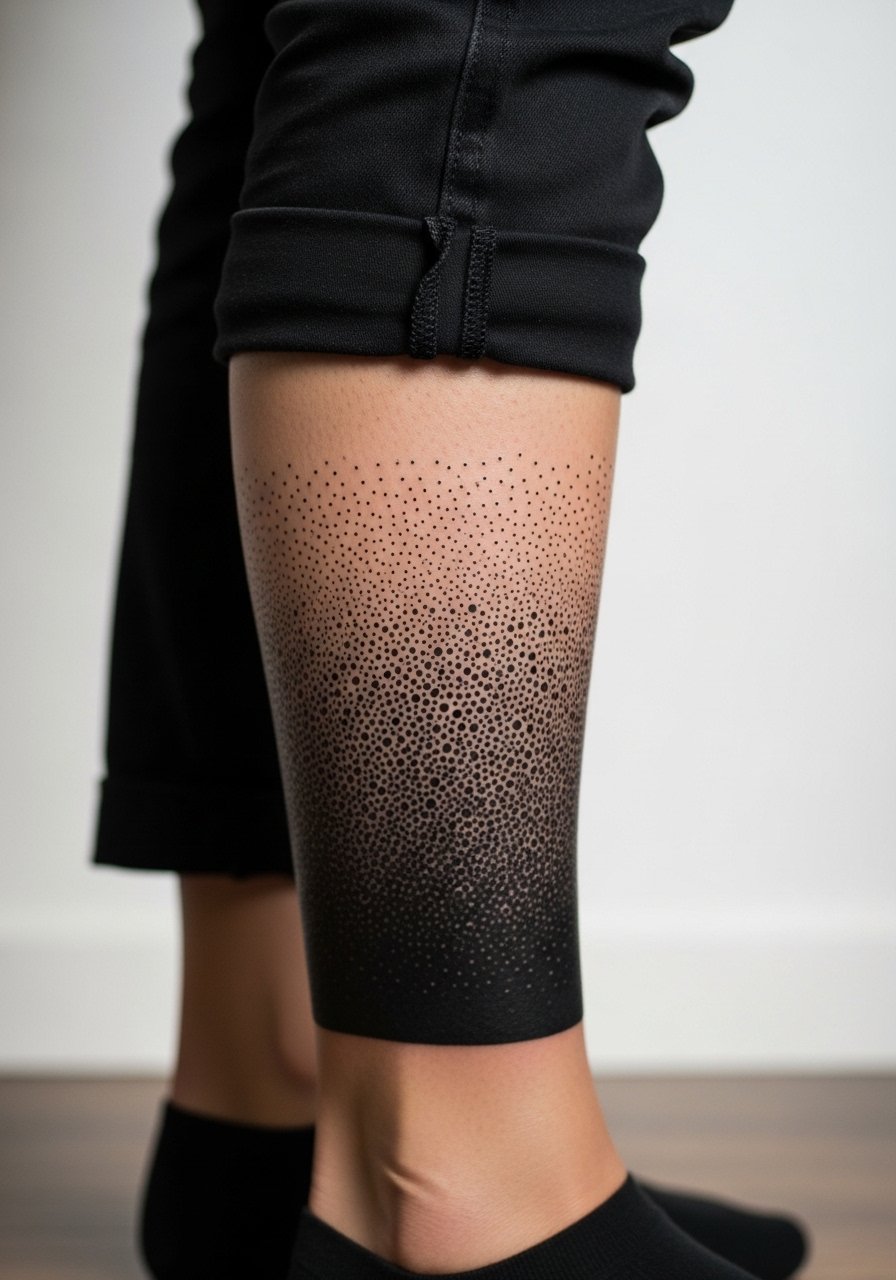
Dotwork on the calf rewards patience. The main mistake is inconsistent dot pressure that leaves patchy density. Talk to your artist about planned dot gradients and how dark you want the deepest areas to be. Sessions are often multiple passes because dotwork takes time. For comfort, bring loose pants you can roll up, such as olive green chinos rolled at the ankle. Expect a touch-up in two to three years if dot density fades unevenly.
18. Black and White Ornamental Frame for Small Footwear-Adjacent Tattoo on Ankle
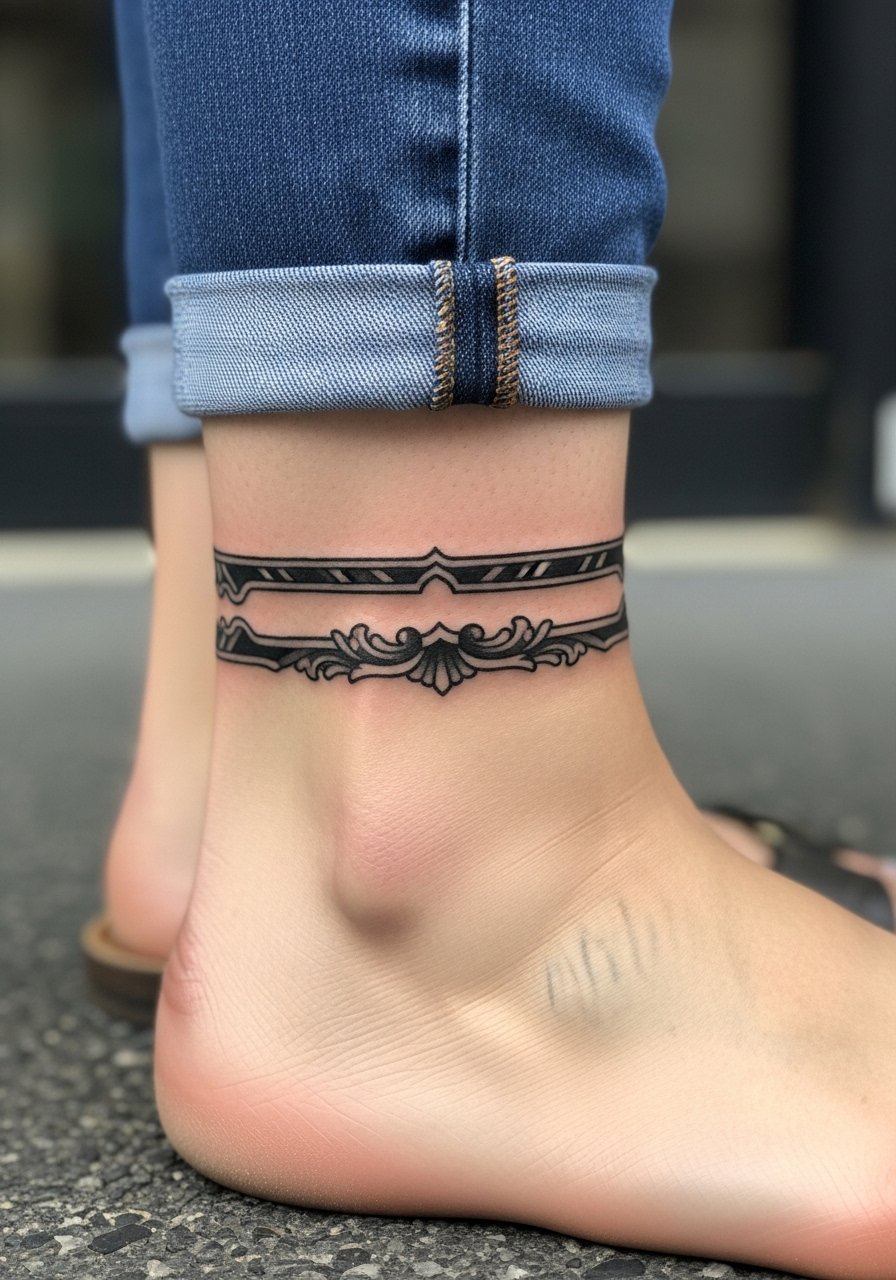
Ankle work must account for shoe pressure during early healing. I advise bolder outer lines and lighter interior detailing so the frame keeps its silhouette despite rubbing. The common mistake is placing too many micro ornaments that melt into the background once shoes start contacting the area. For the session wear sandals and rolled jeans or a rolled ankle chino so the artist can check positioning. Healing time is typical, but expect to protect the area from tight socks or shoes for the first two weeks.
19. Fine Line High-Contrast Feather That Follows the Collarbone Curve
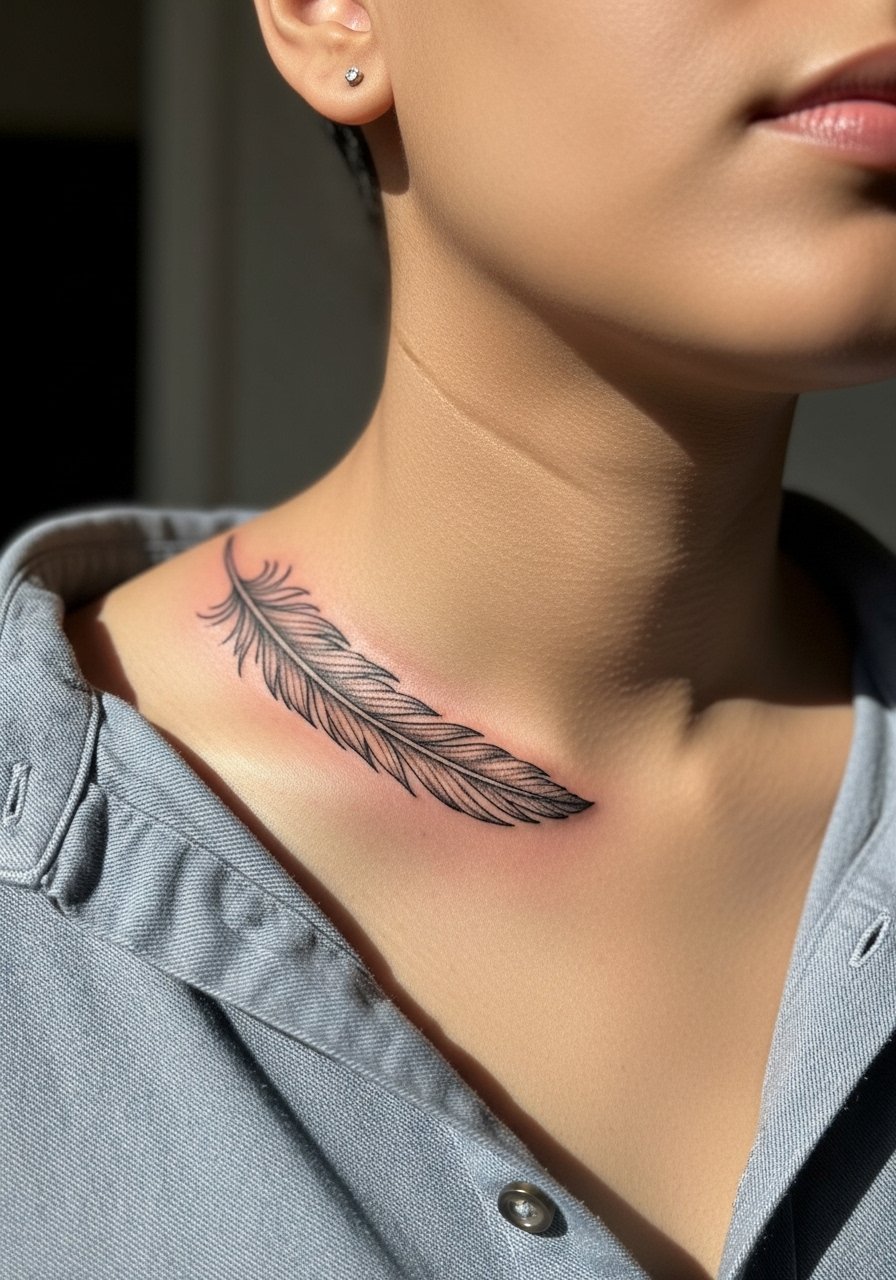
This version emphasizes longevity by thickening the feather's central quill and relying on controlled whip shading along the vane. A frequent error is insisting on hair-fine barbs at the tips which tend to vanish. For appointment comfort wear an open collar linen shirt you can slide aside. Expect shorter sessions and a potential touch-up after a couple of years if those outer barbs soften. The result pairs well with a thin chain pendant necklace that sits just above the ink.
20. Blackwork High-Contrast Wave Back Panel

Large blackwork panels on the back are forgiving because they rely on mass rather than tiny texture. The mistake is overworking small stipple inside big blacks which can create uneven healing. Plan for coverage that uses solid shapes and reserves stipple for accent ribs. Session length is long and usually split. For the day of your appointment wear a loose tank dress or button-down to access the area easily. Touch-ups are common once the whole piece has settled.
21. Neo-Noir Small Script with Bold Shadow on Sternum
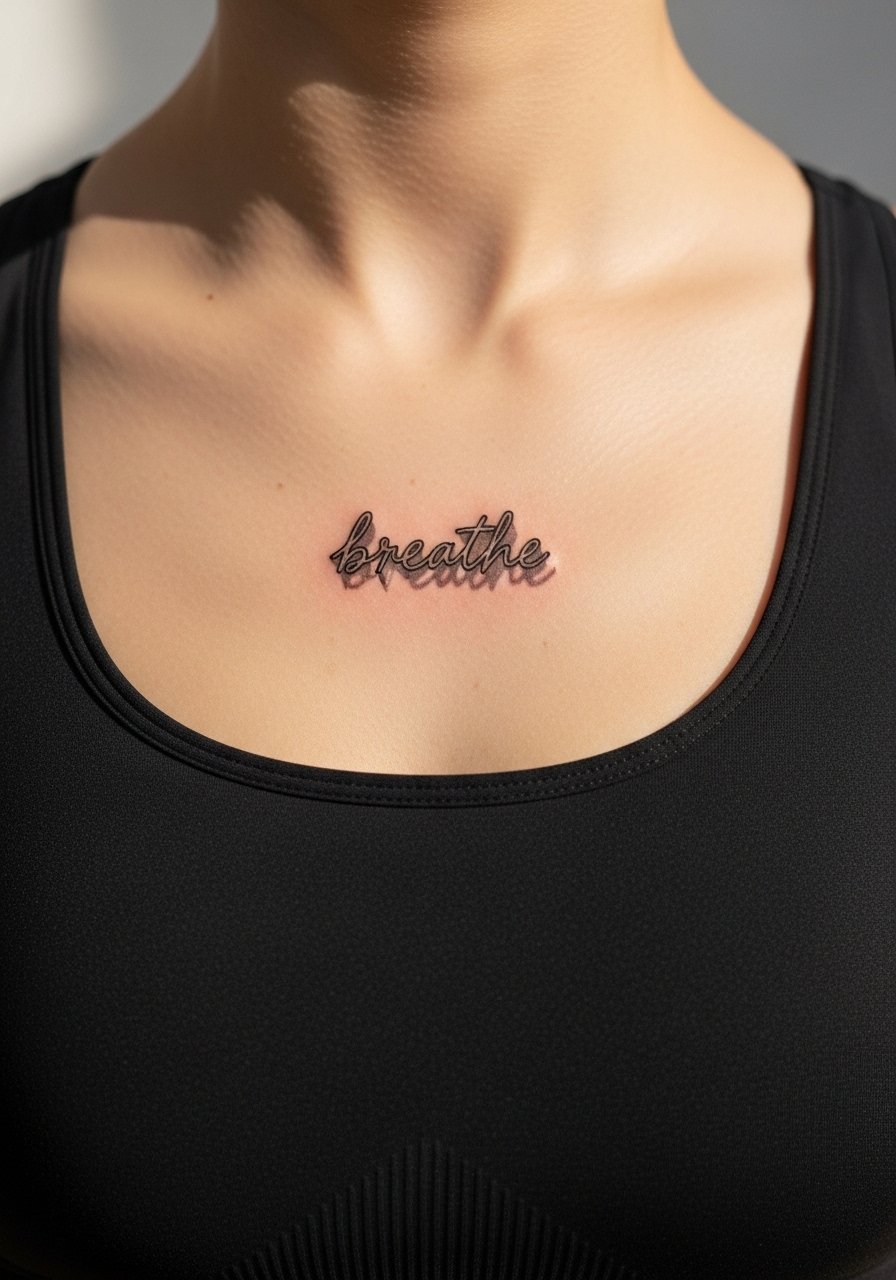
Sternum script is intimate and requires clothing that gives the artist clean access. The typical error is placing tiny script too close to the sternum ridge where the skin moves and distorts. Ask for a slightly larger letterform or bolder shadow so the phrase reads after settling. For the appointment wear a fitted sports bra you can easily pull down to expose only the tattoo zone. Sessions are short but sensitive. Expect a touch-up in the first two years to tweak letter spacing if settling shifts the linework.
Frequently Asked Questions
Q: How does high-contrast blackwork perform on darker skin tones compared with fine line work?
A: From what I have seen, high-contrast black fills and negative space often read better across darker skin tones than ultra-fine single-needle lines. Fine line elements can lose crispness sooner, so ask your artist for bolder anchors and more negative space if you want legibility to last.
Q: If I want a mandala that holds up on a ribcage, what should I ask my artist during consultation?
A: Ask for increased spacing between rings and slightly thicker anchor rings that create breathing room. Bring references that show the level of negative space you prefer. Also ask about expected touch-up timing because ribs move and demand a different approach than a forearm mandala.
Q: Are there wardrobe choices I should make for showing off a new collarbone tattoo without damaging it?
A: Choose open-neck tops like off shoulder blouses or wide-neck shirts that do not rub the area. Avoid tight straps that cross directly over fresh ink for the first few weeks.
Q: Do black and gray portraits need different aftercare than dotwork patterns?
A: The basic aftercare is similar, but portraits rely on subtle midtone retention so protect the area from excessive sun and friction. Dotwork relies on many small penetrations that can scab differently, so gentle cleansing and light moisture are key. Expect different touch-up needs depending on density.
Q: How often should I plan touch-ups for high-contrast pieces versus fine line pieces?
A: High-contrast blackwork often needs less frequent touch-ups because its solids remain readable. Fine line work usually demands touch-ups earlier, sometimes around year two to three. The exact timing depends on placement, sun exposure, and your skin type.
