
Fine line feathers flood saved boards right now, and the gap between the thumbnail and the healed result is wider than most expect. Some of the popular pieces here look fragile at first and then read soft after a couple of years. I wrote this list to show modern options that balance current trends with realistic aging and placement advice so you can pick a design that still reads clean after the first touch-up.
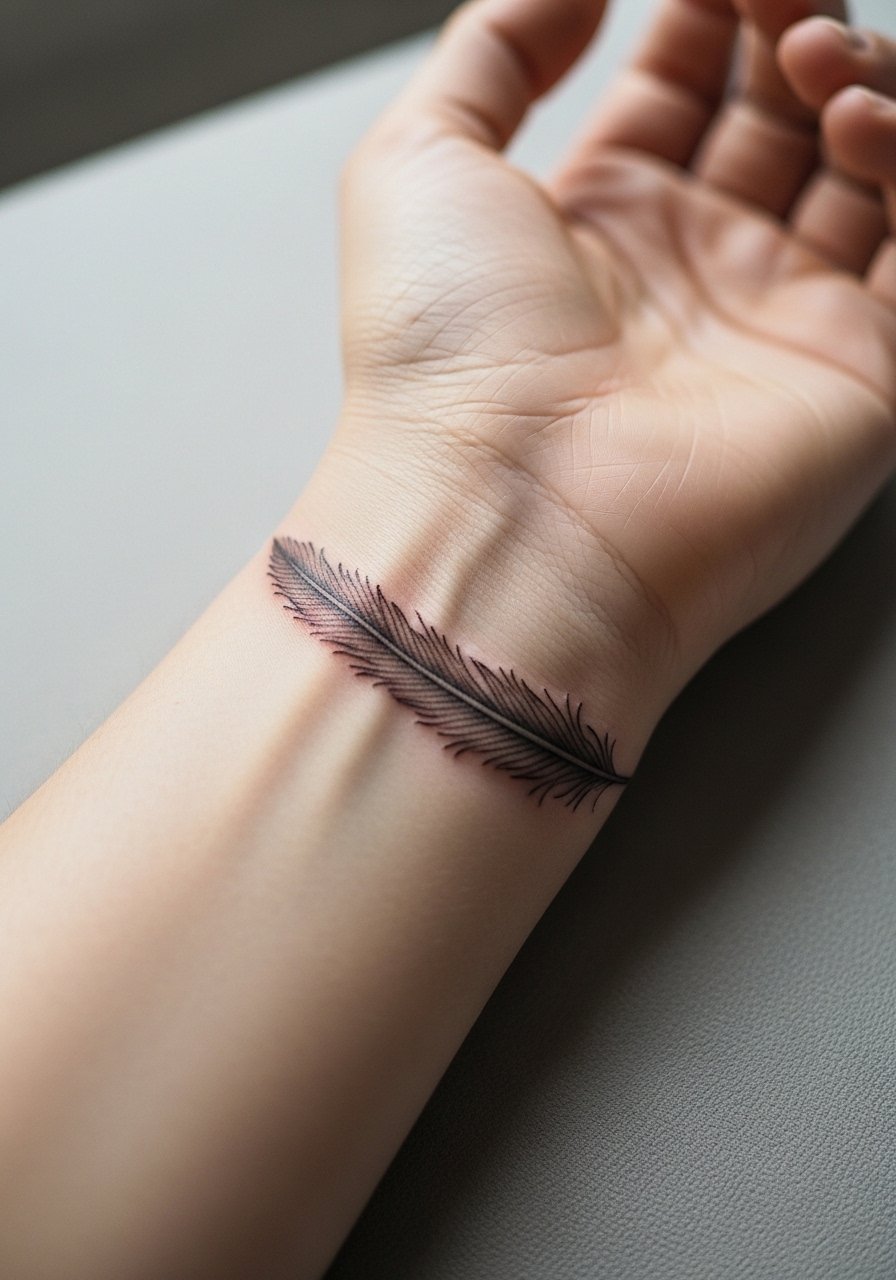
1. Fine Line Single Feather on the Wrist
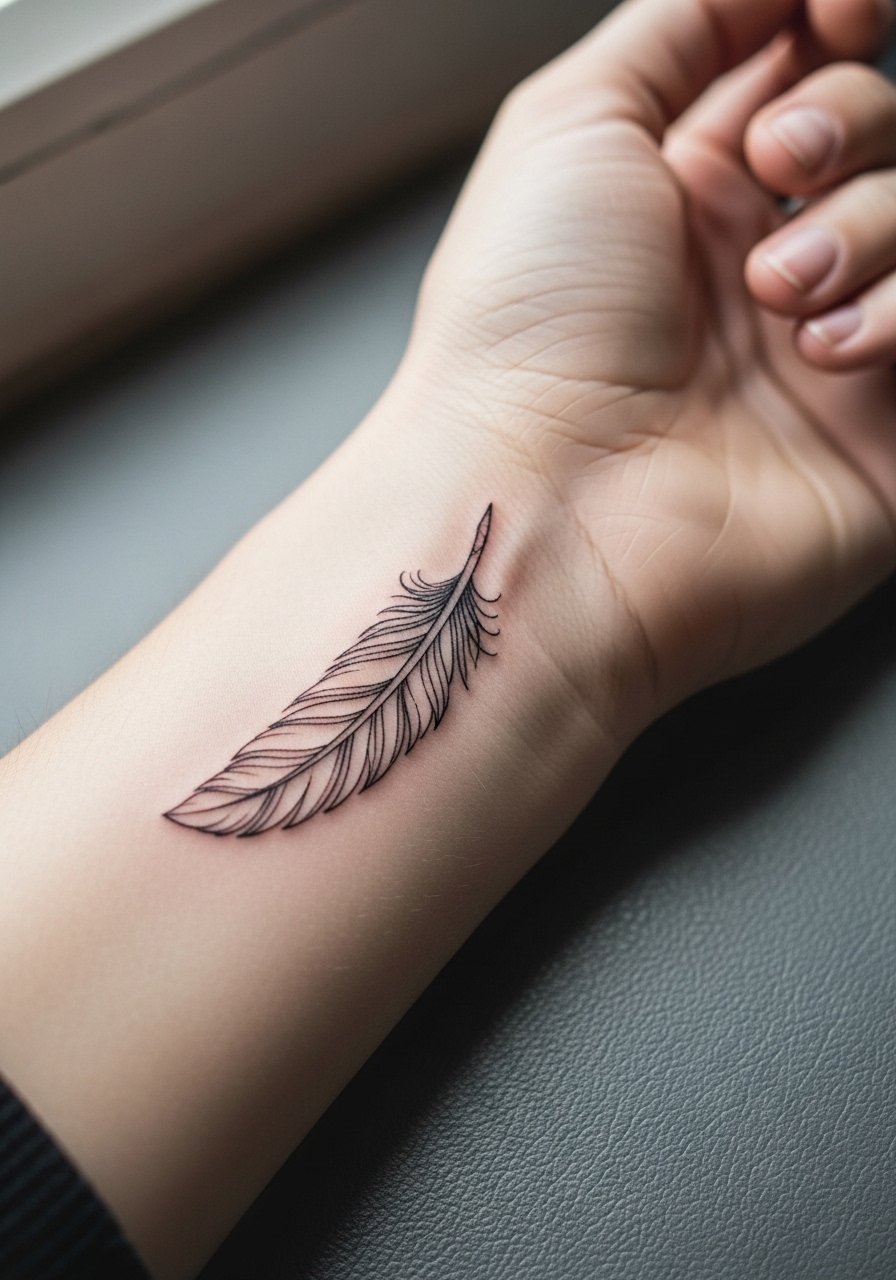
I see this design in appointment books more than almost any other. Ask your artist for single-needle linework and a slightly thicker quill near the base so the taper keeps reading over time. Common mistake is asking for an ultra-tiny feather with tight barbs; the lines merge faster on the wrist because of constant hand movement. Expect a short session and low pain, though knuckle proximity can spike sensitivity. For showing it off, layer a thin chain bracelet on the opposite wrist when you want the tattoo to feel like jewelry during summer.
2. Blackwork Detailed Feather on the Outer Forearm
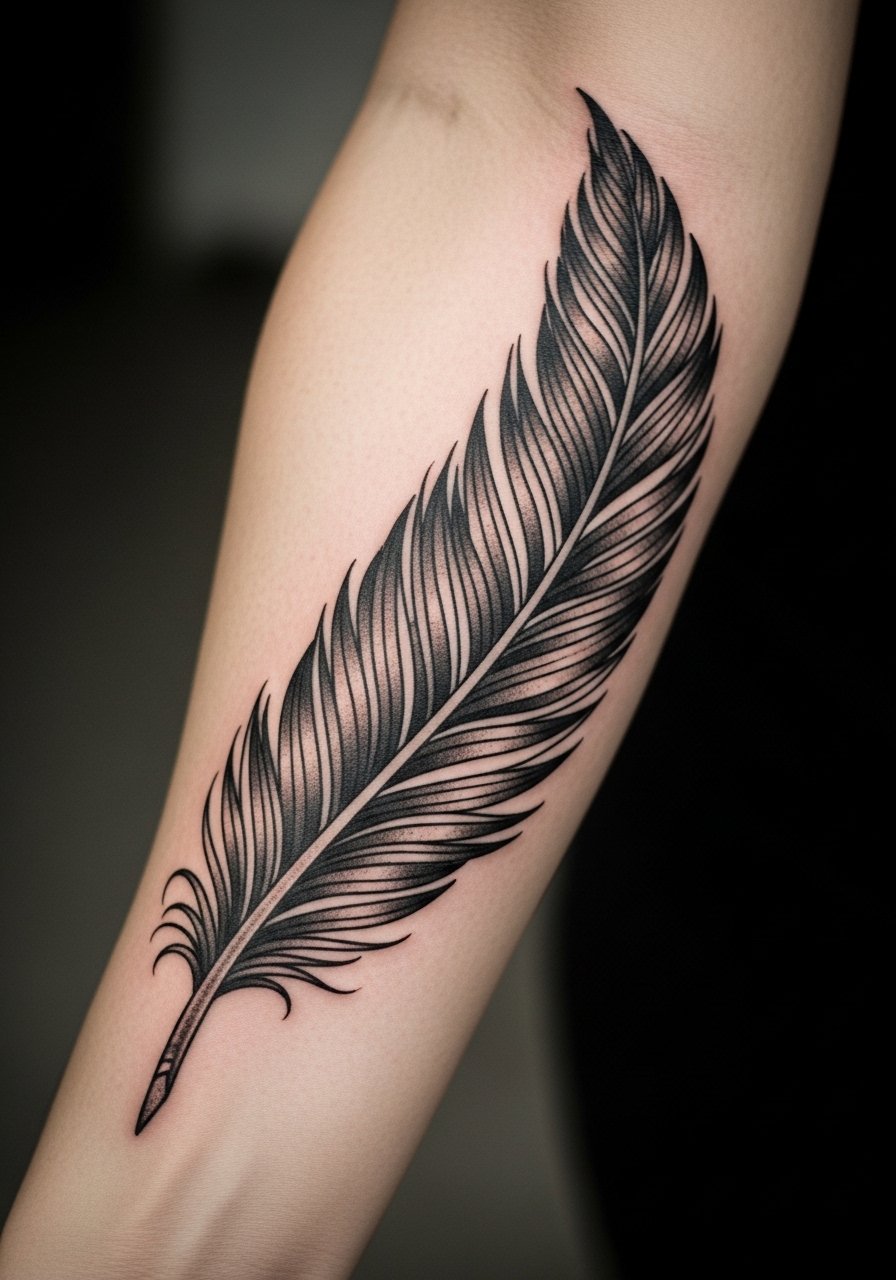
For a piece that reads bold across the room, blackwork gives texture and contrast more reliably than faint lines. Tell your artist to emphasize clean barbs and avoid tiny crosshatching that blurs as saturation softens. The outer forearm tolerates two-session builds, and blowout risk is lower than inner-arm spots. Pair this with a rolled cuff chambray shirt to frame the contrast without competing with the tattoo. Plan for a touch-up after a year if you want the deepest blacks to stay packed.
3. Watercolor Feather Splash on the Ribcage
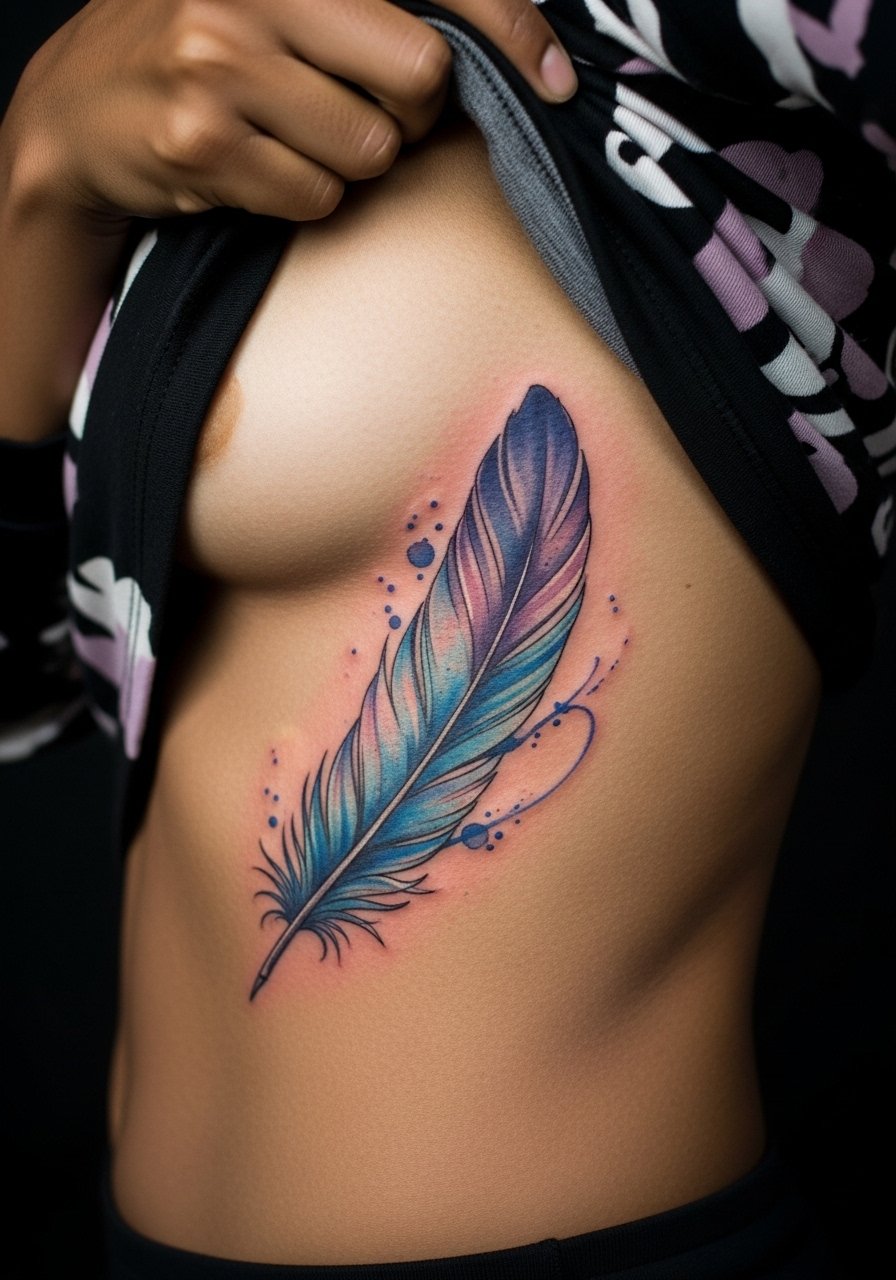
Fair warning: the ribcage is a 7 or 8 on common pain scales, but the rib area gives watercolor room to breathe. The biggest mistake is compressing a wash-style palette into a 2-inch space. Ask for softer edges and more negative space so the pigments fade evenly instead of turning muddy. Artists split on fine line vs fuller depth on ribs. One camp says the skin there stretches and blurs thin lines quickly. The other camp argues that with correct needle depth and spacing the result can last. Bring a loose tank top you can lift for access and a side-slit dress for showing it off later.
4. Geometric Framed Feather on the Ankle
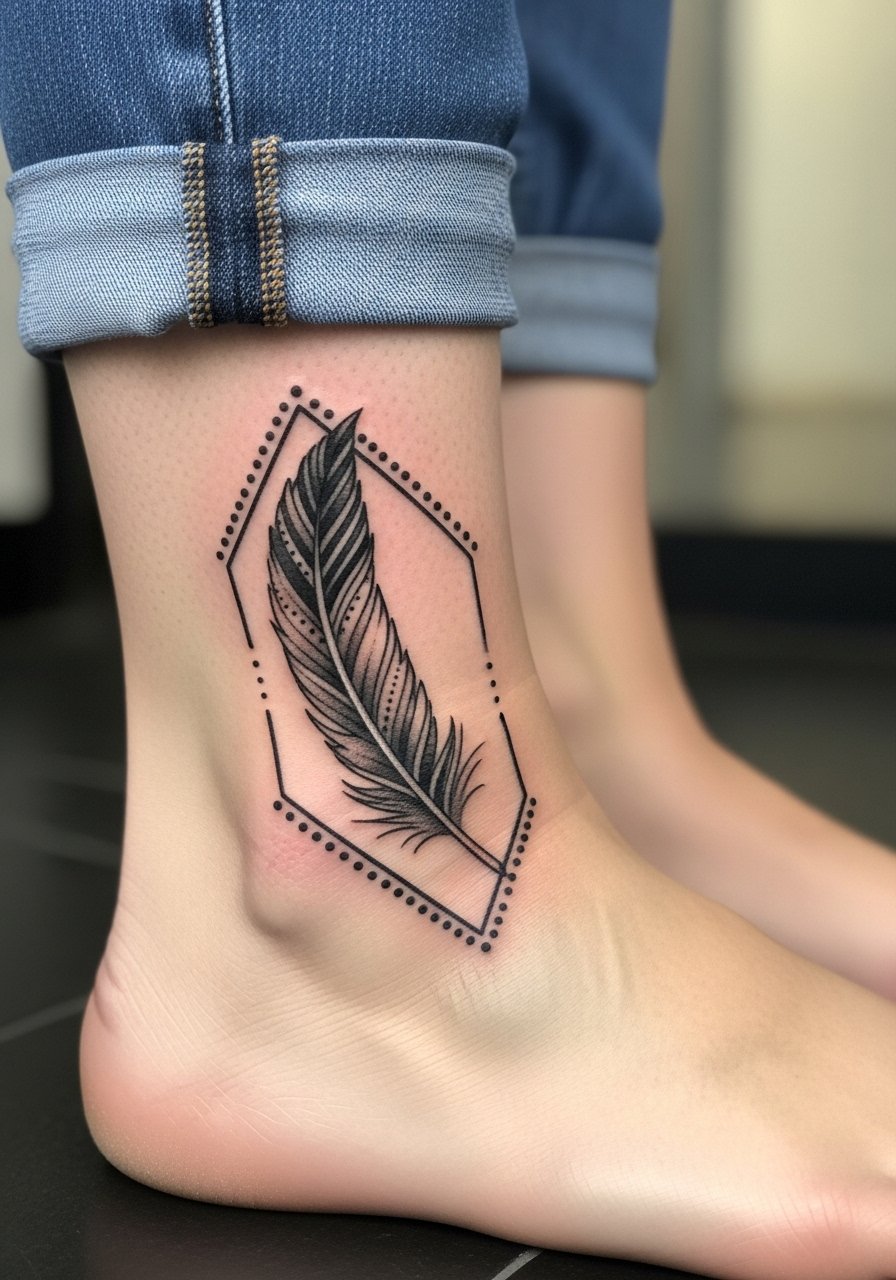
Ankle pieces require thought about footwear and friction. The common error is going too small with parallel lines, which blur under daily rubbing from socks and shoes. Ask for slightly bolder outlines within the geometric frame so the structure survives seasonal wear. Session is short and pain is variable depending on how close to bone the design sits. Pair it with strappy sandals or cropped jeans for summer visibility and less rubbing.
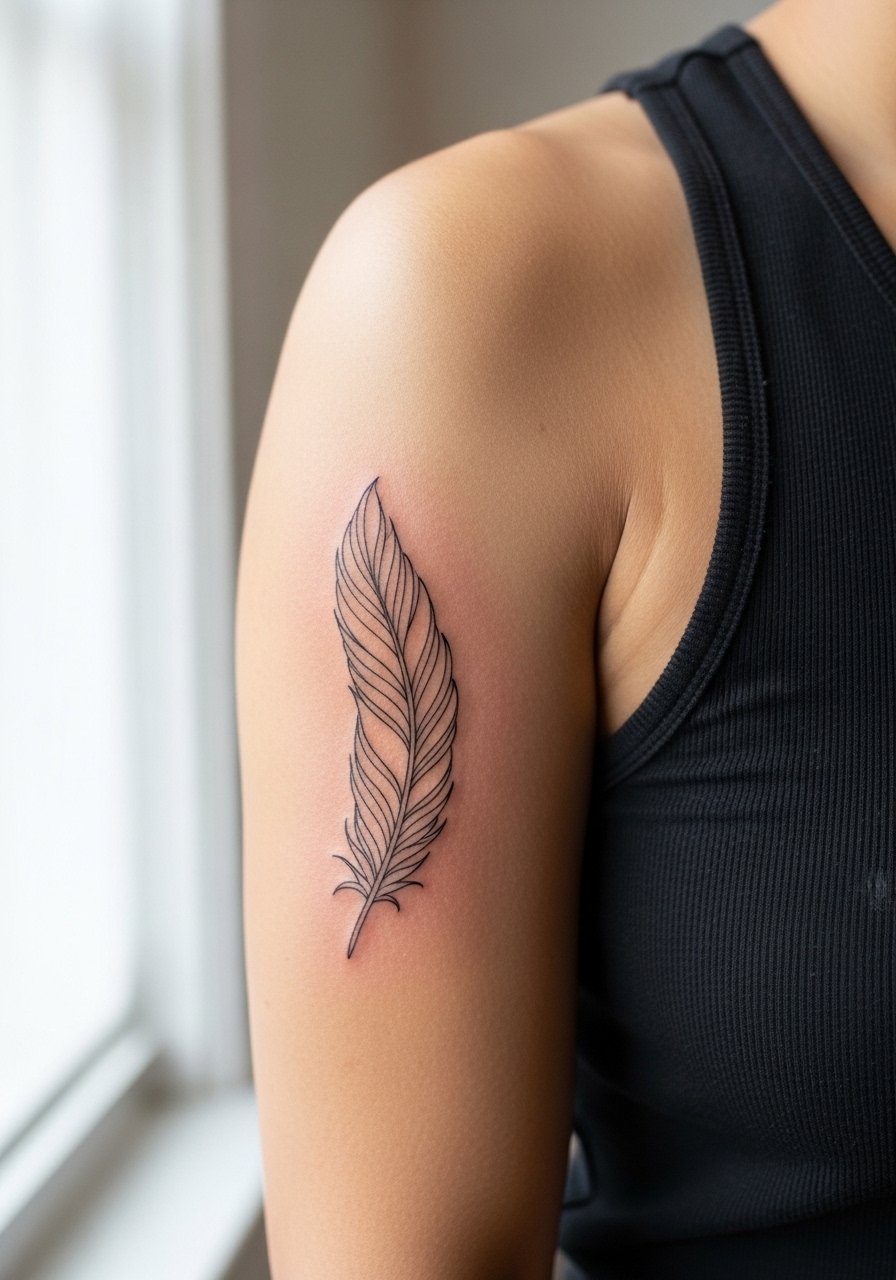
5. Realistic Eagle Feather on the Upper Arm
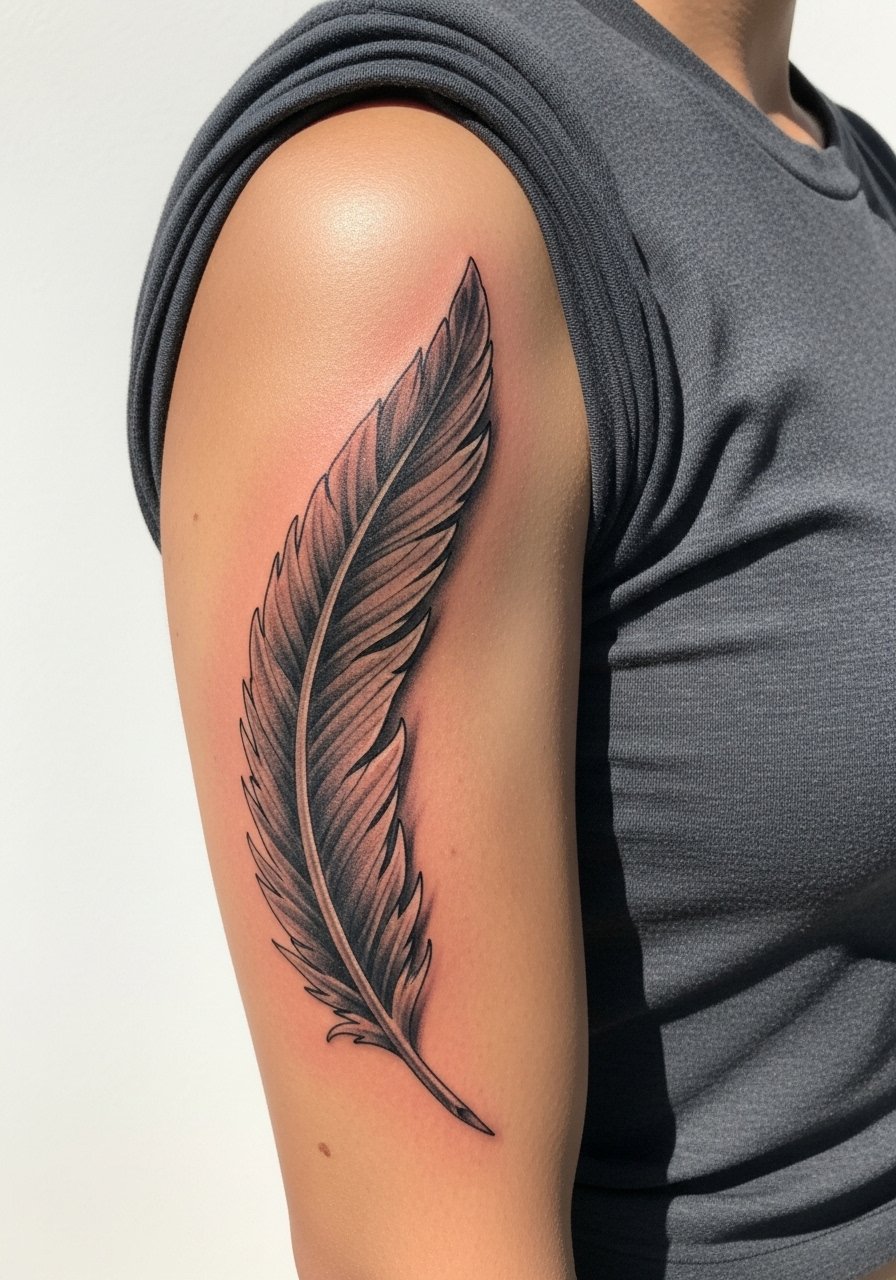
There is evident bravery in choosing a larger realistic feather, and the upper arm is a forgiving canvas for three-session builds. Tell the artist you want strong contrast in the quill and soft stipple shading across barbs for dimensionality. A mistake I see is asking for ultra-fine realism at a size that cannot support it. Expect moderate pain and longer sessions. For outfits that frame this style, a fitted tee in navy or sleeveless vest works well to let the feather read as an emblem.
6. Quill Feather with Inkwell on the Shoulder
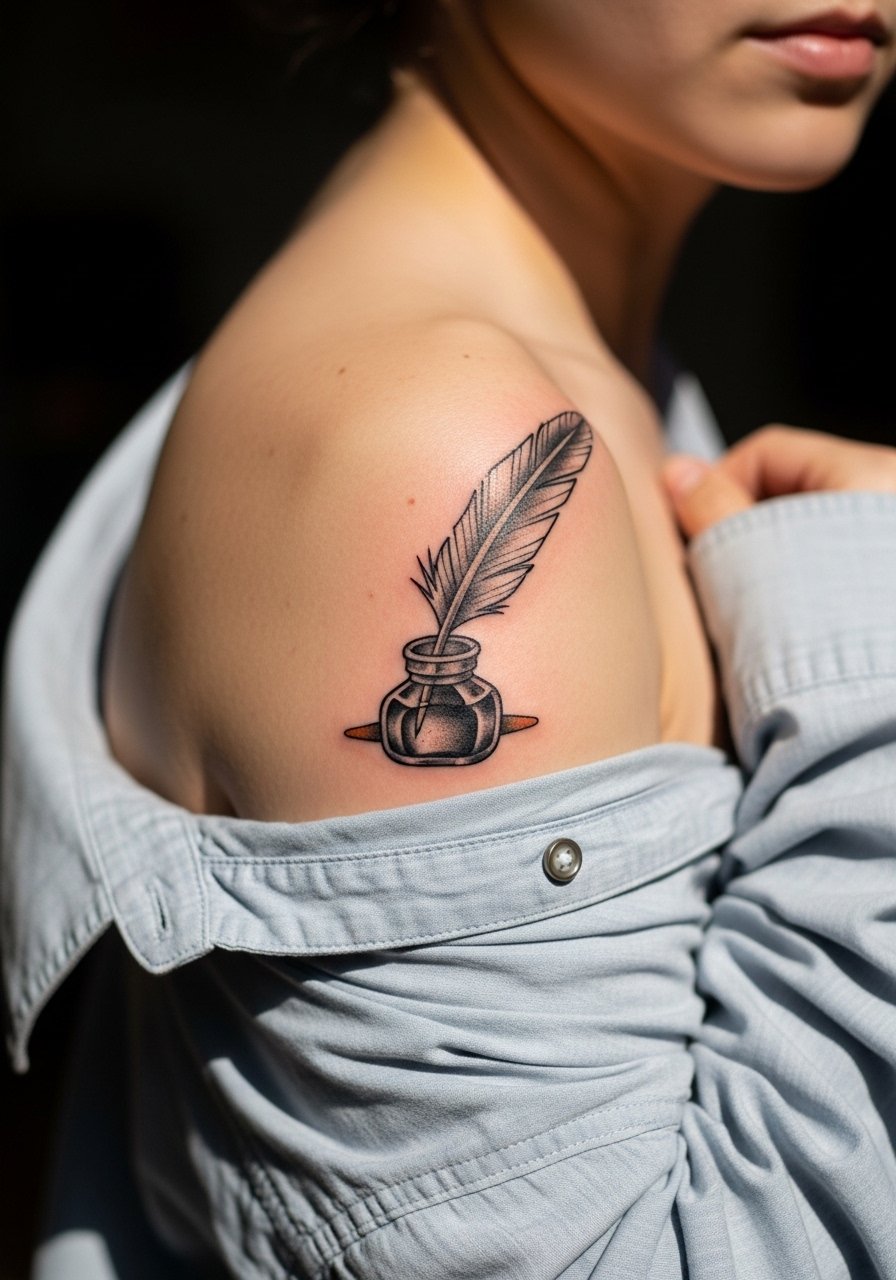
This design reads like a profession emblem for writers and editors, and shoulder placement lets you hide or reveal it easily. In consultation, bring reference images showing line weight for the quill tip and a small, shaded inkwell rather than heavy color fills. Avoid asking for tiny script inside the inkwell because fine text blurs with time. For the session, choose a loose button-down shirt you can pull aside so the artist has clear access. Expect two sessions for crisp black lines and subtle shading.
Pre-Session Essentials
The wrist, forearm, and shoulder pieces above have different prep needs, and a few small items make the first week smoother.
-
Stencil transfer paper kit. Lets you preview the exact placement on skin before the needle touches it, which is invaluable for wrist and collarbone designs.
-
Topical numbing cream. Applied about 45 minutes before takes the edge off ribcage or ankle sensitivity without altering the artist's linework.
-
Thin protective film roll. Keeps tiny wrist and finger pieces clean during the first week of friction from daily washing and typing.
-
Fragrance-free gentle body wash. Gentle cleansers reduce irritation around fresh linework, especially for detailed forearm or shoulder tattoos.
-
Aquaphor healing ointment. A thin layer during the initial days locks in moisture for fine line work without clogging needle channels.
7. Minimalist Dove Feather on the Collarbone
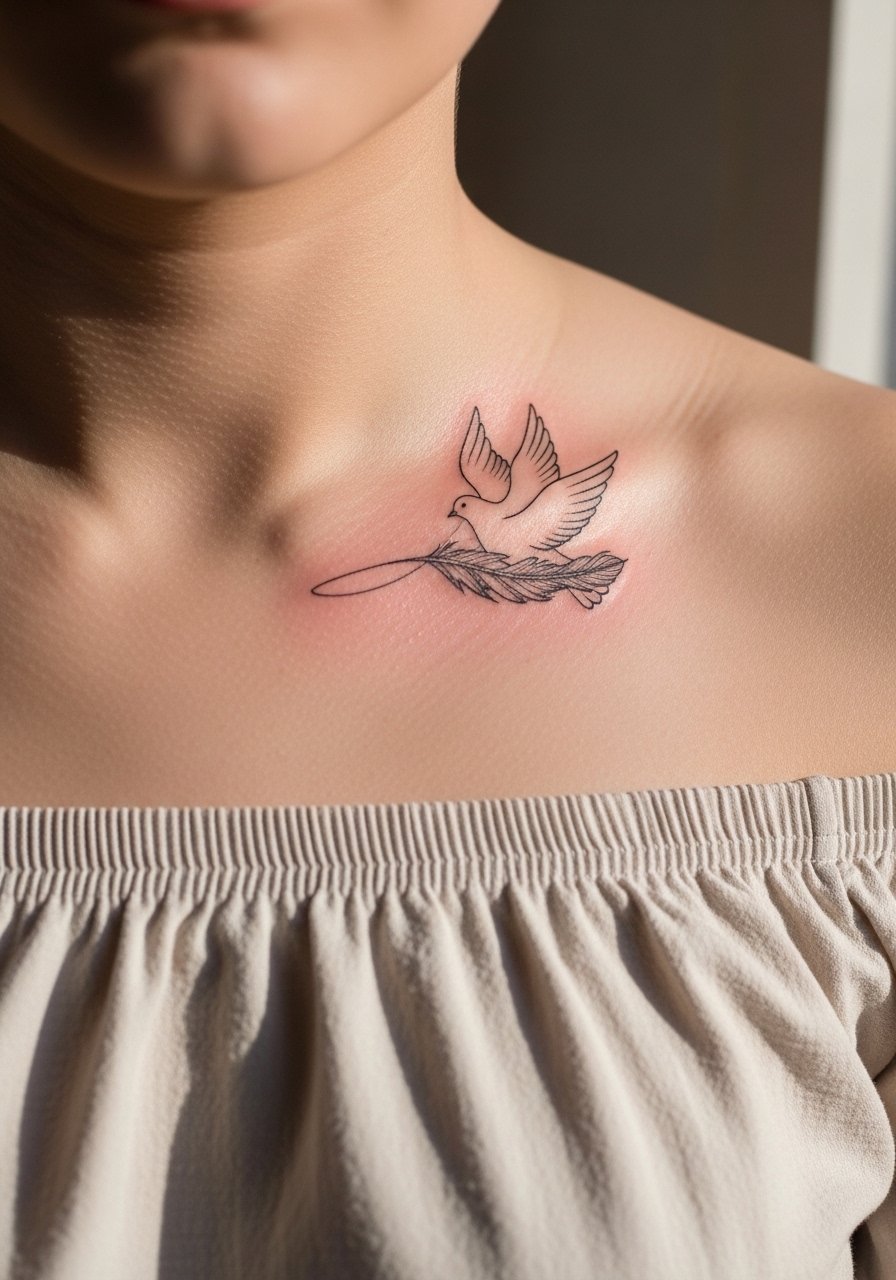
Collarbone pieces age well when spaced correctly, but the area is thin and moves with breathing. The most common mistake is cramming dense barbs into a 2-inch span. Ask for single-needle lineweight and a slightly longer feather to sit along the clavicle. Pain is mild to moderate depending on how close to bone the needle lands. For showing it off, an off-shoulder blouse in cream frames the tattoo without necklaces crowding the space.
8. Peacock Feather Pattern on the Outer Thigh
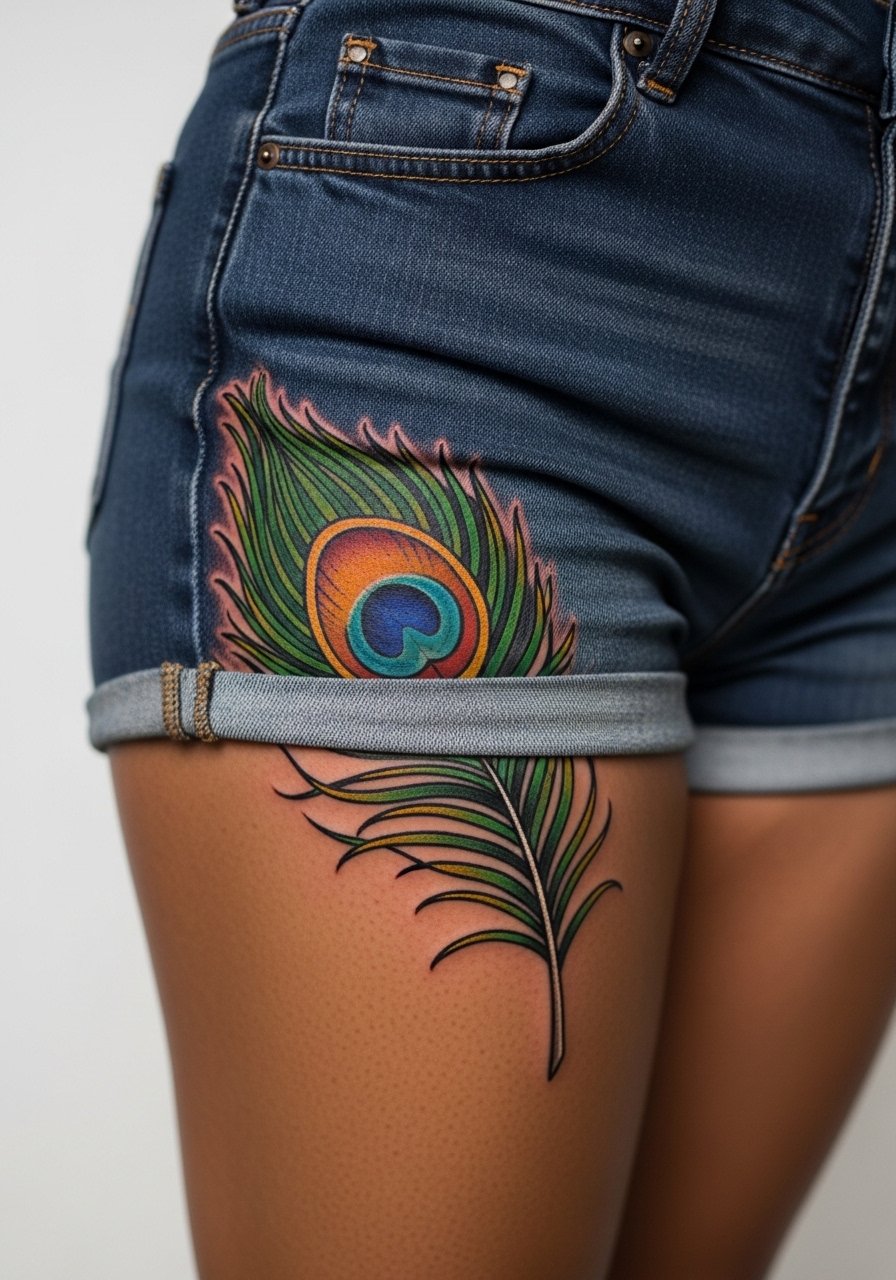
Neo-traditional peacock feather favors the outer thigh because the leg tolerates larger, colorful pieces and hides them easily. Ask for bold outlines and a color palette that complements your skin tone rather than competing with it. Common mistake is asking for tiny ornamental details that the thigh will compress during movement and washing. Expect multiple sessions for full saturation. Pair with high-waisted shorts for warm-weather reveals and less friction during healing.
9. Dotwork Feather Curving Down the Spine
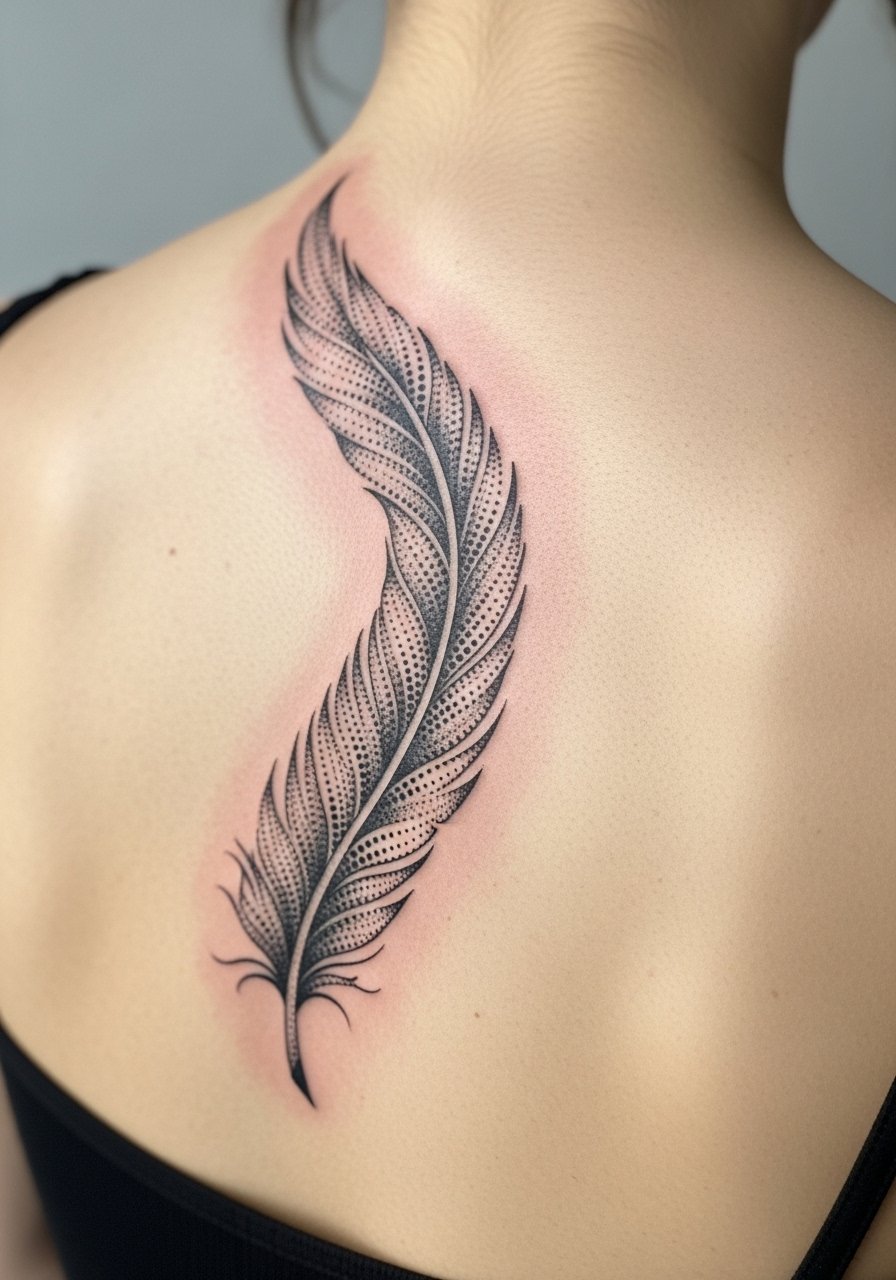
This long, meditative piece plays well down the spine, but the area needs spacing for dotwork to read. The mistake is crowding dots too close together, which creates mud over time. Expect 2 to 3 sessions and moderate discomfort from positioning. If you plan to show it with clothing, a backless top highlights the spine curve while keeping the rest covered. Discuss touch-up timelines with your artist because dotwork often needs a revisit at year two for crispness.
10. Fine Line Owl Feather on the Inner Bicep
The inner bicep is tender because the skin is thin, but the surface lets fine details show off when healed. In consultation, specify slightly heavier quill contrast so the feather does not blend into the armpit crease as it ages. A common error is asking for too much tiny stippling right up against the crease. Expect moderate pain and a quick single session for a 3-inch piece. For the appointment, wear a [tank top] (search for one that is easy to lift) so the artist can access the area without you feeling exposed.
11. Cardinal Feather Cluster on the Calf
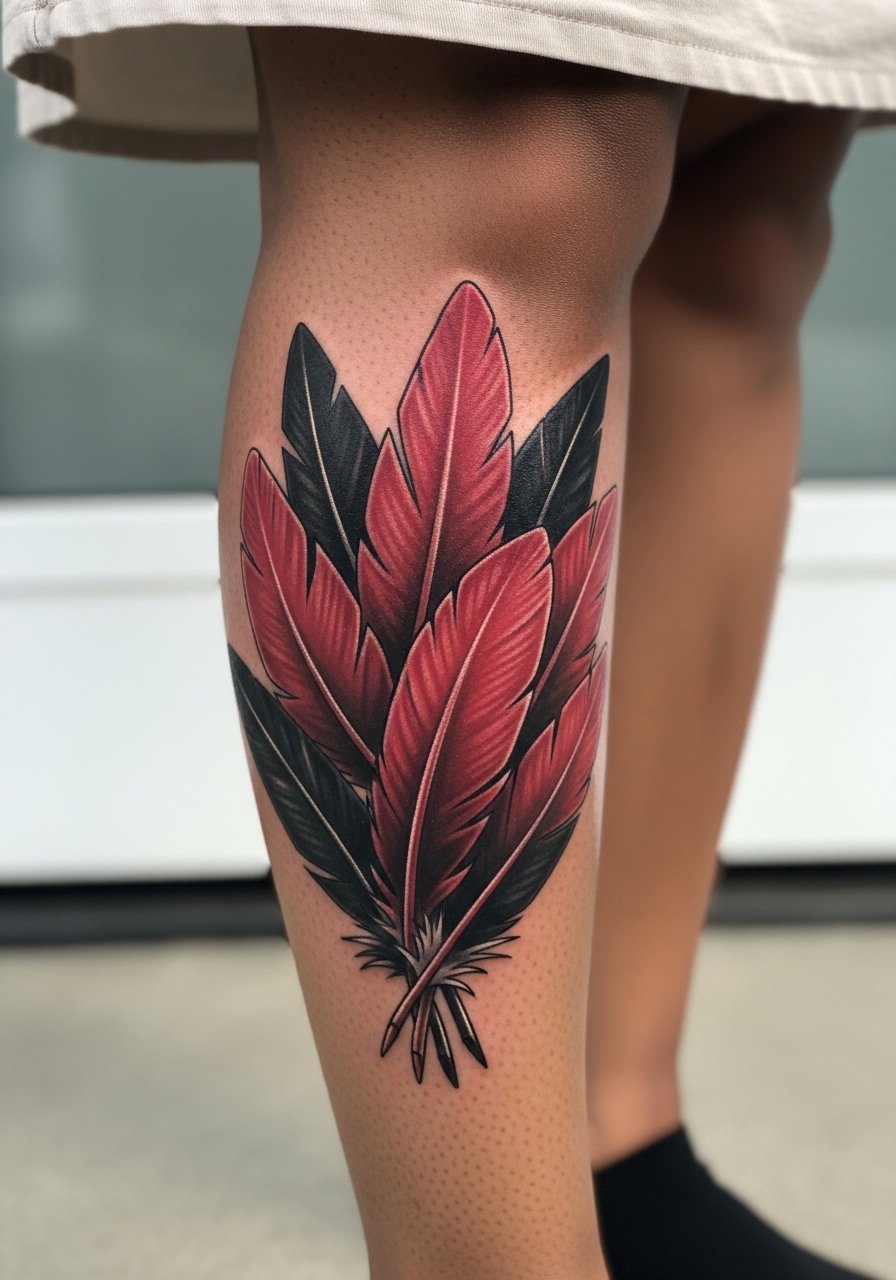
Calf tattoos are forgiving and show color vibrantly if the artist spaces saturation well. The usual mistake is placing heavy reds in tiny pockets where the color can migrate and dull. Ask for gradual color packing and for the artist to map where your muscle will sit when standing so the cluster avoids creases. Sessions are comfortable and well tolerated. For daytime reveals, high-waisted shorts or patterned skirts highlight the feather cluster while avoiding constant friction from tight jeans.
12. Abstract Feather with Cosmic Elements on the Upper Back

Upper back space allows larger, ornamental abstractions that mix feathers and stars without crowding. The mistake here is trying to fit too many symbolic elements into a small patch. Ask your artist to prioritize one clear motif per few inches and to leave negative space. Sessions can be longer and may span multiple appointments. If your stylistic lean includes mystical elements, bring Pinterest boards and use directory searches like style-specific hashtags or local studio tags to find someone who does ornamental abstract well.
13. Micro Feather Wrist Wrap
A wrapped micro feather around the wrist reads like a bracelet but needs breathing room to avoid line merging. Common mistake is asking for the wrap to be too tight or for repeated identical barbs that blur. Request slightly varied barbs and a clear quill to keep rhythm in the design. The session is short and the pain mild, though sensitivity varies. For showing it off, pair the design with a dainty bracelet stack on the opposite wrist to complement the wrap without covering it.
14. Feather and Tiny Bird Flock on the Shoulder Blade
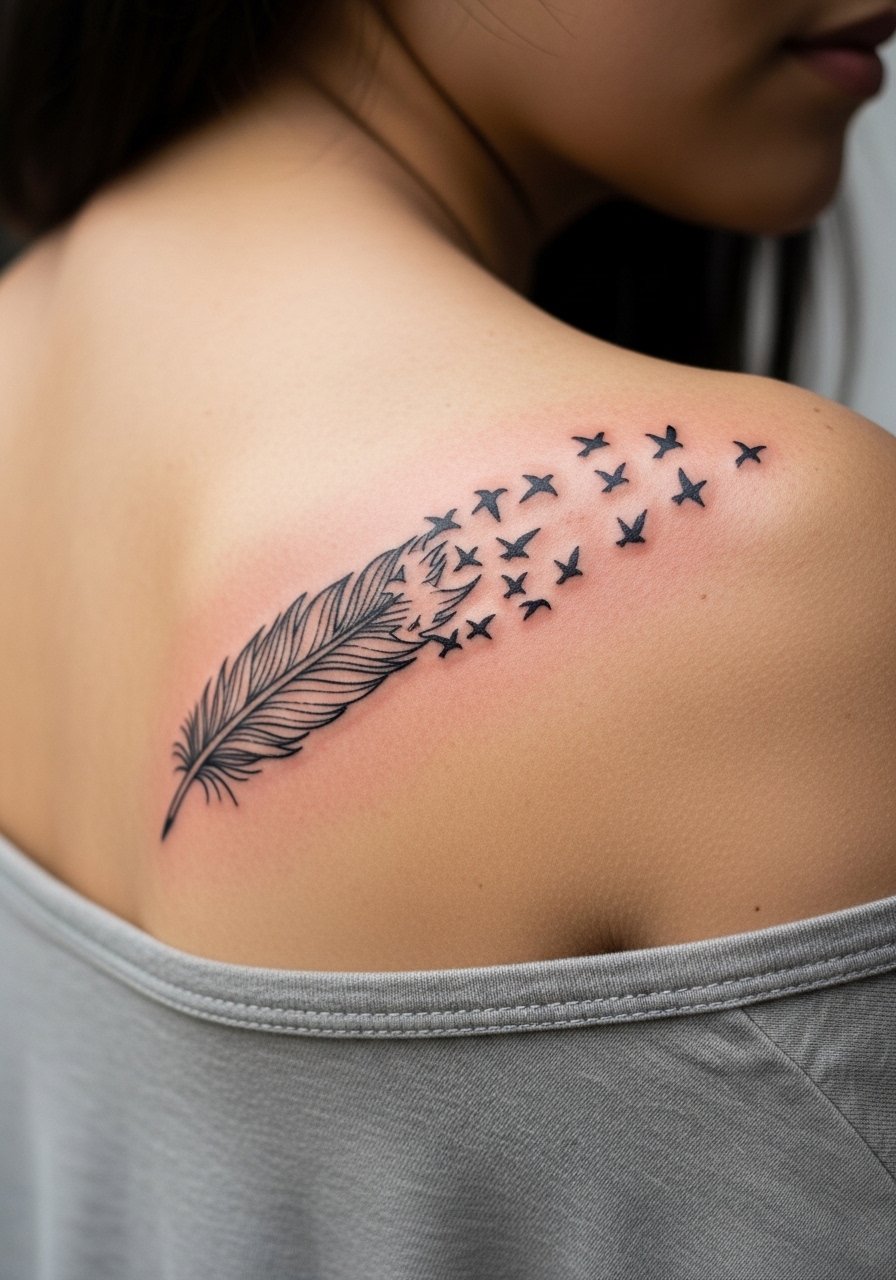
This transition motif looks dynamic on the shoulder blade where movement enhances the narrative. A mistake I often see is requesting tiny birds with filled wings that become indistinct after healing. Ask for simplified silhouettes and clear spacing between the flock. Expect light to moderate pain and a single longer session for a 4- to 6-inch composition. The shoulder blade hides easily under tees and shows up nicely with open-shoulder tops.
15. Black and Gray Feather Sleeve Accent on the Forearm
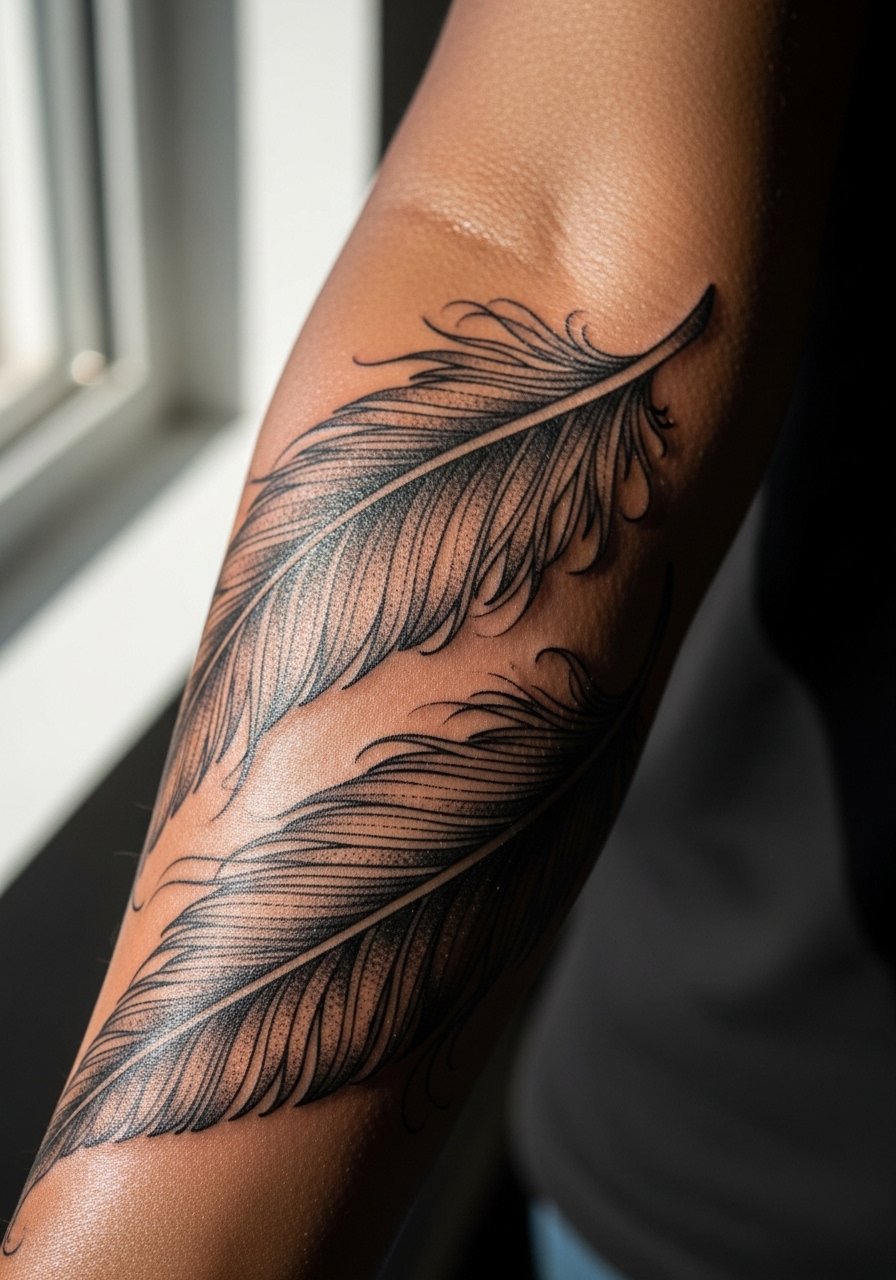
Forearm sleeves require a plan for how each feather interacts with existing work. The common error is treating a sleeve as isolated flashes. During consultation, map where texture and saturation will sit and ask about stipple shading to prevent heavy blocks that age into mush. Sessions will be multiple and dense work requires touch-ups. For daily wear, rolled sleeves and button-ups frame the piece and let points of the sleeve show without exposing the whole arm. A rolled cuff chambray shirt complements a textured blackwork forearm.
16. Minimal Script Quill Along the Rib Edge
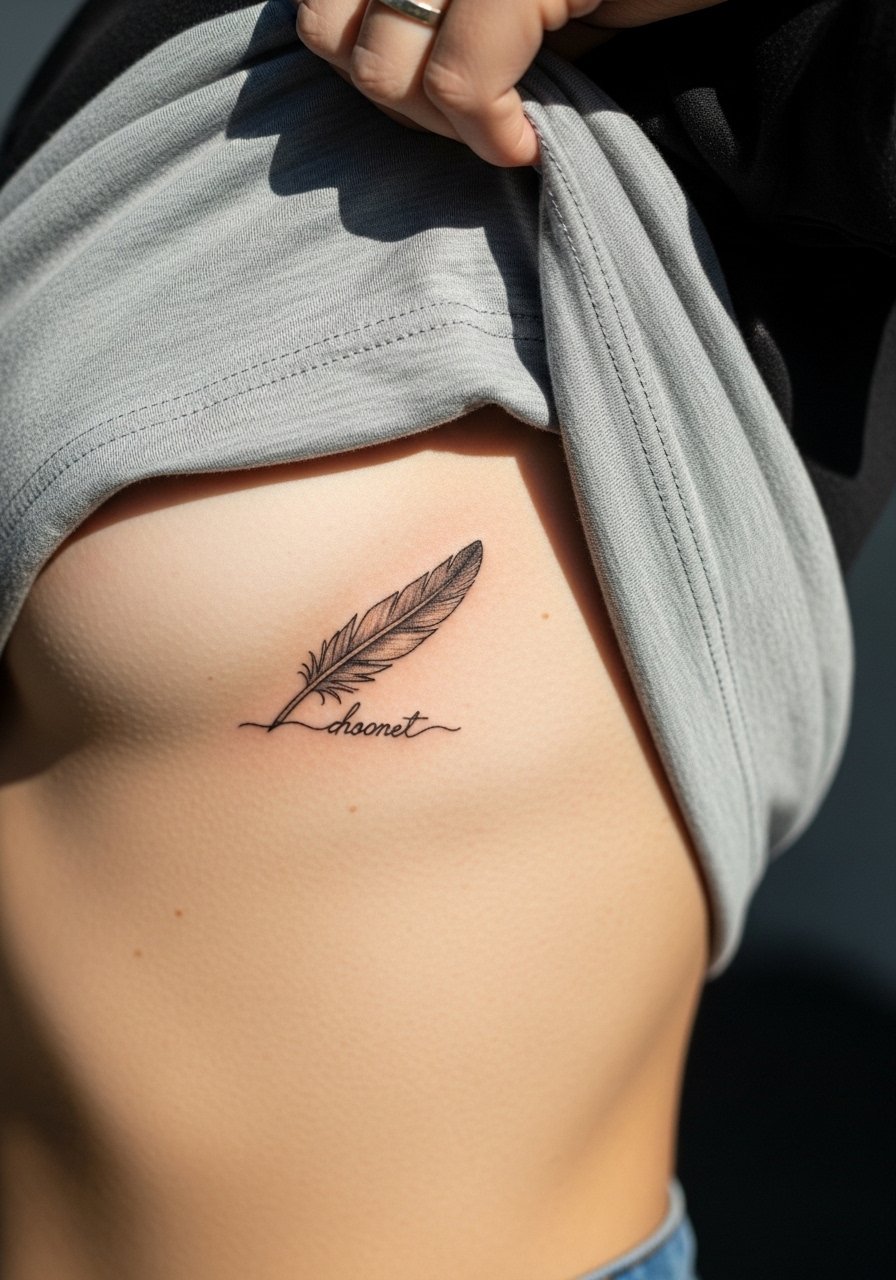
Combining script with a quill along the ribs is elegant but risky because tiny letters blur faster on the stretchable skin. The biggest mistake is requesting dense lettering with thin serifs. Ask for a slightly larger size or a simple sans script to hold. Pain is significant on the ribs, and healing demands careful movement limitation for a week. If you want to show the area sometimes, think about crop tops that lift easily for styling and appointments.
17. Stylized Phoenix Feather on the Upper Arm Wrap
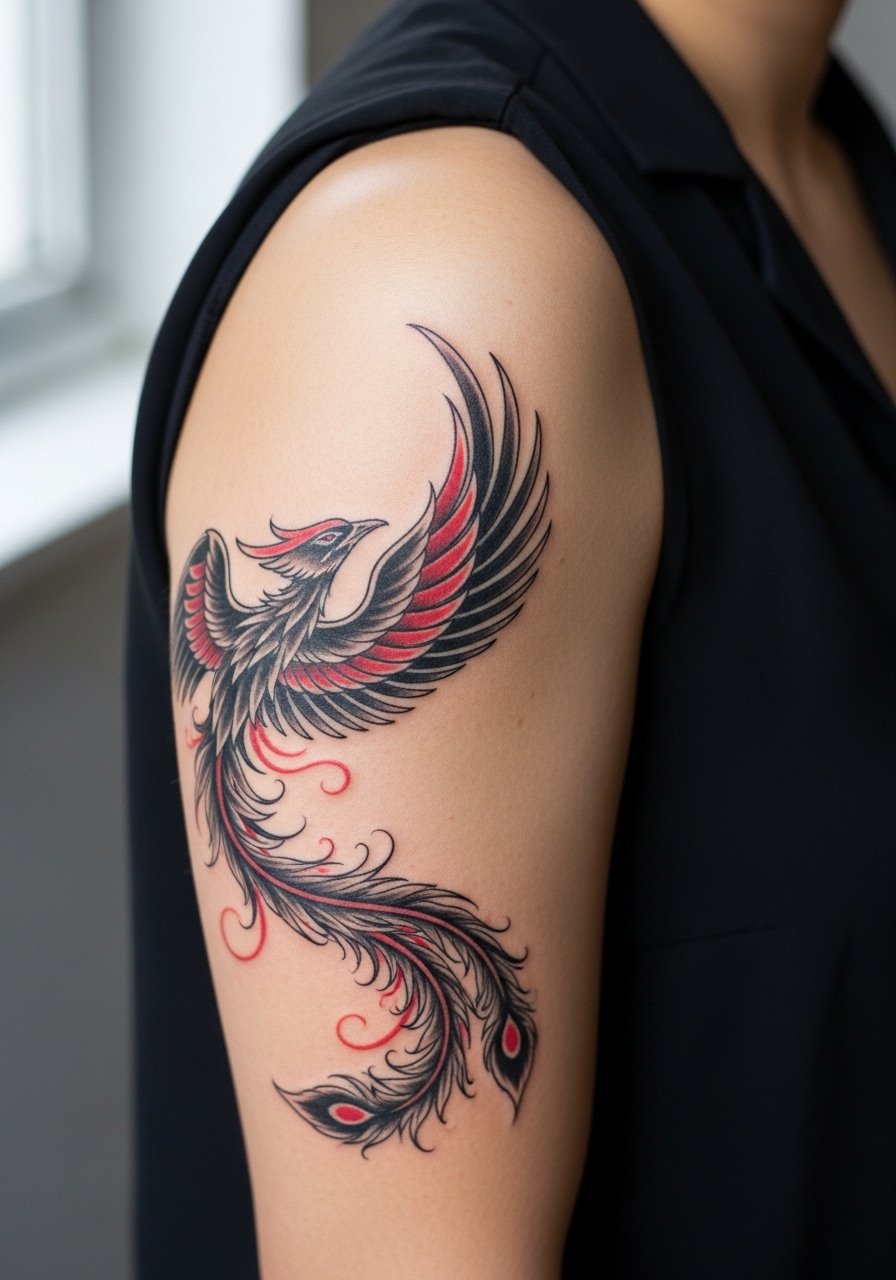
A phoenix motif benefits from movement along the upper arm and strong quill contrast that survives fading. A common request that ages poorly is a feather with too many hairline barbs. Ask for bolder anchors and selective micro-details so the major shapes hold. Sessions are moderate and may need layering for color. For showing it off, a sleeveless vest or fitted tee frames the feather as part of the arm silhouette.
18. Constellation Feather with Tiny Stars on the Back
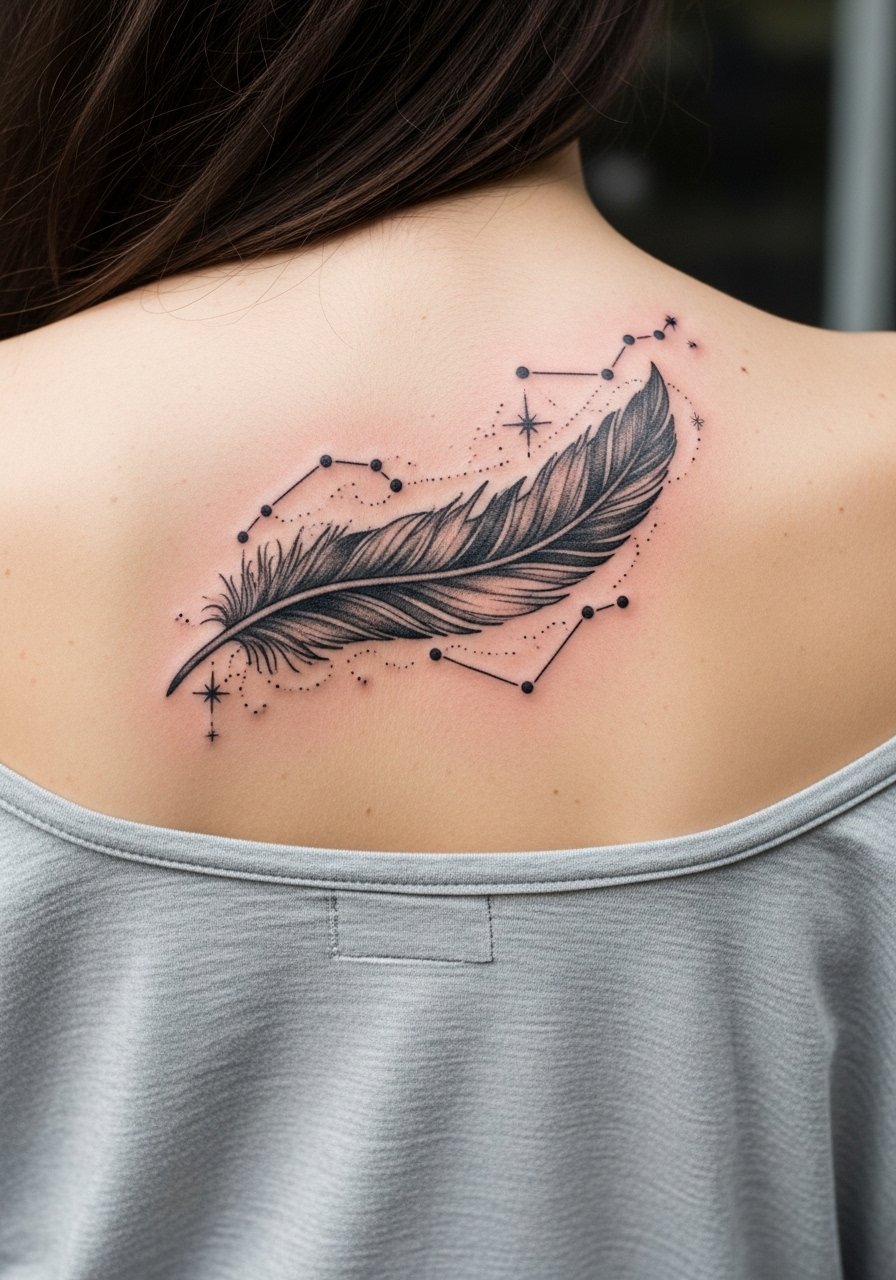
Mixing feathers and small celestial dots creates a modern ornamental piece for the back. The error here is placing tiny, dense stars near fine lines; over time the dots can coalesce. Ask for slightly larger dots and thoughtful spacing so the constellation reads at distance and up close. Back pieces allow larger layouts and multiple sessions. This design benefits from a gentle reveal like an off-shoulder or open-back shirt.
19. Peacock Eye Detail on the Thigh
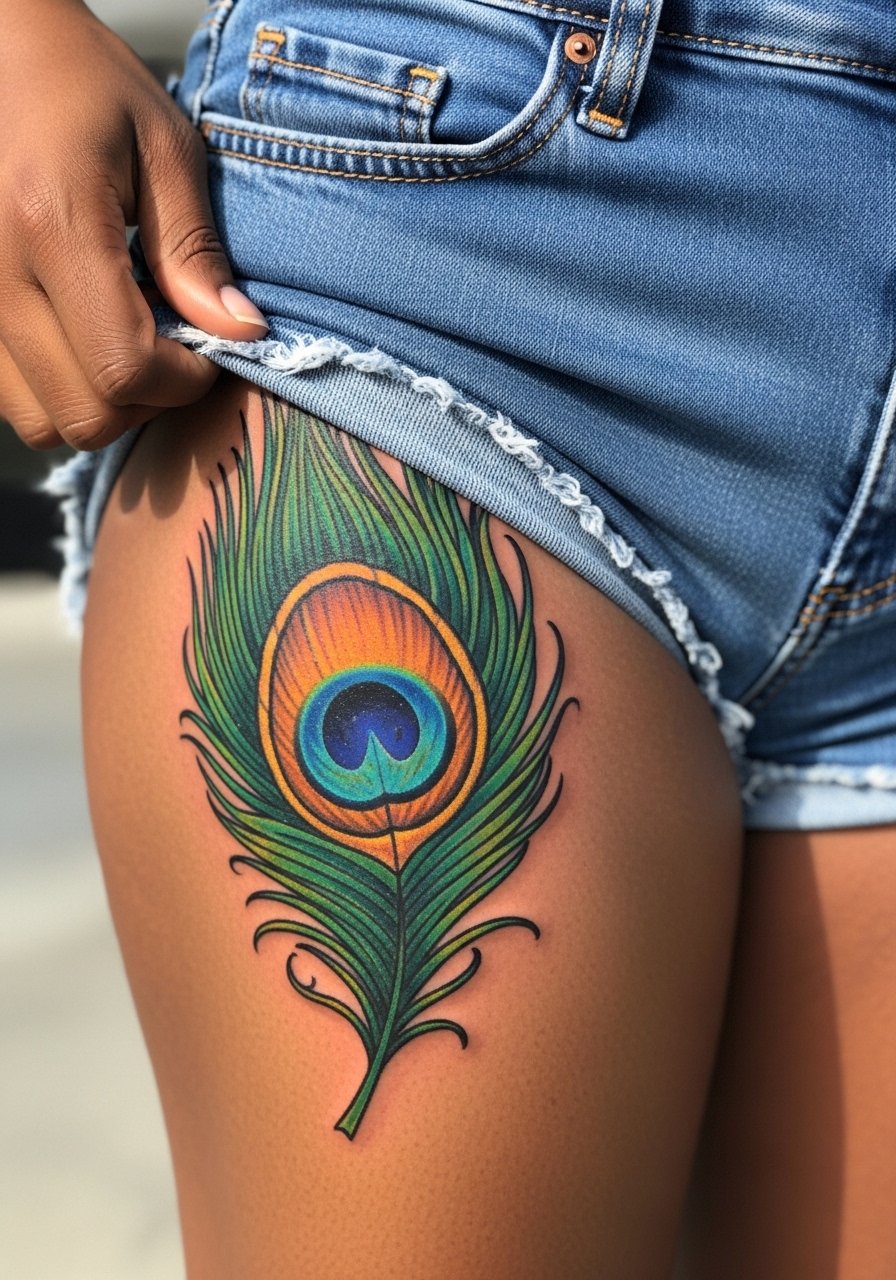
The peacock eye is where color and size matter most. The most frequent mistake is squeezing too much color into a tiny eye. Ask for a 5- to 7-inch scale so the iris gradations have room. Thigh sessions are comfortable and the area tolerates bold color well. Pair this piece with patterned skirts or high-waisted shorts for seasonal reveals that keep the tattoo protected during daily activities.
20. Feather with Compass Accent on the Ankle Wrap
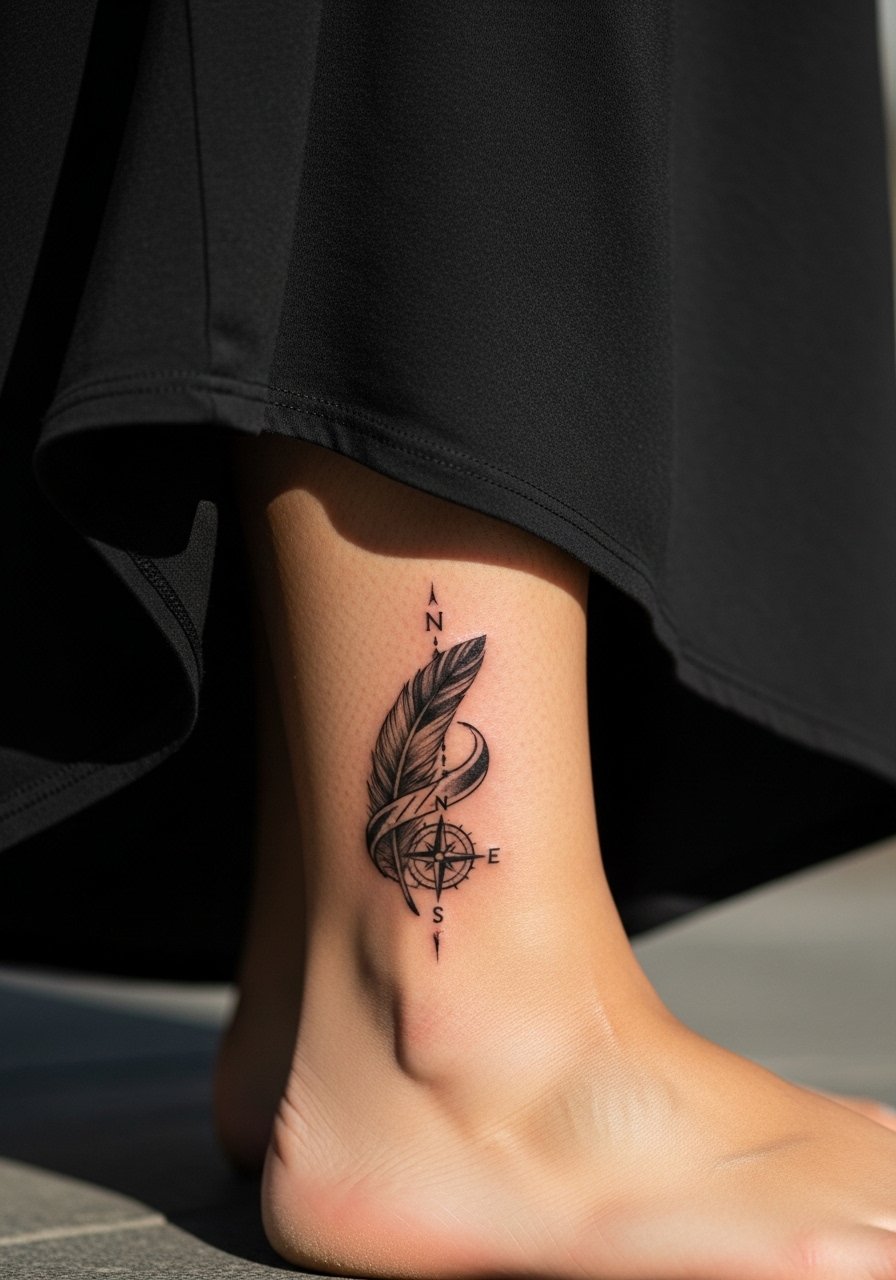
Mixing navigation motifs with a feather around the ankle gives a travel-ready aesthetic but requires spacing so the compass lines do not blur. The error is overcomplicating the compass face at a tiny scale. For durability, ask for a simpler compass with thicker cardinal points and a clear quill. Pain is mild and sessions short. Show it with cropped trousers or sandals to avoid constant sock abrasion.
21. Broken Feather Cluster with Negative Space on the Calf
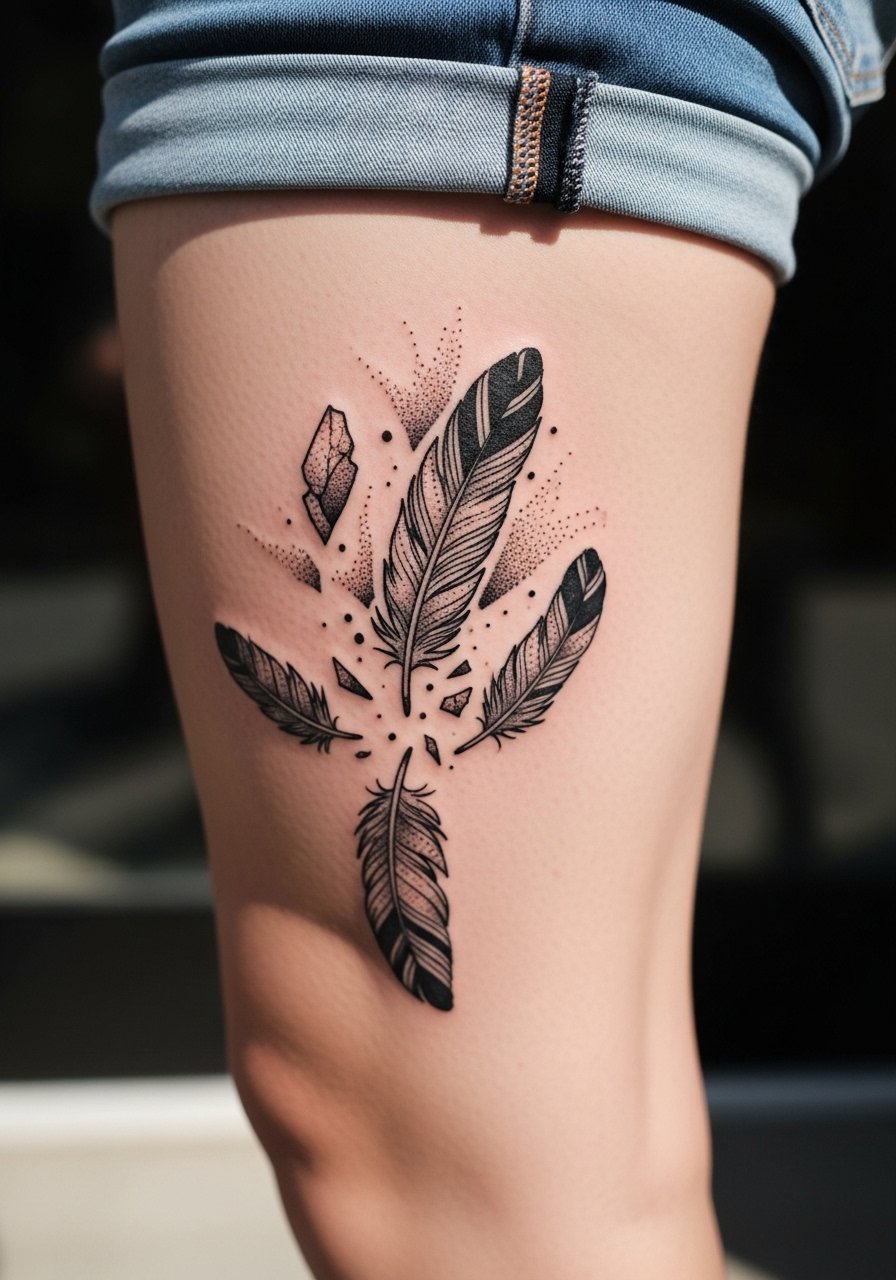
This fragmentary aesthetic reads modern and architectural when the negative space is deliberate. The mistake is adding too many small fragments that blur into a patch. Ask your artist to plan 30 to 50 percent negative space so shapes remain distinct. Sessions are comfortable and touch-ups can sharpen fragments if lines soften. For summer outfits, a mid-length skirt keeps the design visible without exposing it to daily rubbing.
Frequently Asked Questions
Q: Will fine line feather tattoos on the wrist need touch-ups sooner than bolder styles?
A: In my experience, yes. Fine line on high-movement spots like the wrist tends to soften faster than packed blackwork, so expect to discuss a light touch-up around year two to three depending on sun exposure and how thick the original quill was.
Q: Do watercolor ribcage feathers fade faster than black and gray designs?
A: Watercolor pigments generally lose saturation quicker than black and gray, especially on areas with friction or frequent sun. Plan for occasional color refreshes and protect the area with sunscreen once healed to slow fading.
Q: Is getting a dotwork feather down the spine more painful than a forearm piece?
A: Mostly yes. Spine placements are often more uncomfortable because of thin tissue over bone and the positioning for long sessions. Forearm work is usually milder and heals with less stiffness. Bring a soft pillow and plan breaks for longer spine sessions.
Q: How should I dress for a shoulder or upper back tattoo session?
A: Wear something easy to shift like a loose button-down shirt you can pull aside. That keeps you covered while giving the artist clear access and keeps the rest of your clothing clean.
Q: Are thigh peacock feathers more sun-safe than ankle designs?
A: Yes. The thigh is easier to keep covered and out of direct sun during daily life, which helps color last. Ankle tattoos face constant sock and shoe friction plus more sun exposure if you wear sandals, so they often need touch-ups sooner.
